


Running COSBench Performance Test on PowerScale
Tue, 09 Jan 2024 14:21:02 -0000
|Read Time: 0 minutes
Starting with OneFS version 9.0, PowerScale enables data access through the Amazon Simple Storage Service (Amazon S3) application programing interface (API) natively. PowerScale implements the S3 API as a first-class protocol along with other NAS protocols on top of its distributed OneFS file system.
COSBench is a popular benchmarking tool to measure the performance of Cloud Object Storage services and supports the S3 protocol. In the following blog, we will walk through how to set up COSBench to test the S3 performance of an PowerScale cluster.
Step 1:Choose v0.4.2.c4 version
I suggest choosing the v0.4.2 release candidate 4 instead of the latest v0.4.2 release, especially if you receive an error message like the following and your COSBench service cannot be started:
# cat driver-boot.log
Listening on port 0.0.0.0/0.0.0.0:18089 ...
!SESSION 2020-06-03 10:12:59.683 -----------------------------------------------
eclipse.buildId=unknown
java.version=1.7.0_261
java.vendor=Oracle Corporation
BootLoader constants: OS=linux, ARCH=x86_64, WS=gtk, NL=en_US
Command-line arguments:  -console 18089
!ENTRY org.eclipse.osgi 4 0 2020-06-03 10:13:00.367
!MESSAGE Bundle plugins/cosbench-castor not found.
!ENTRY org.eclipse.osgi 4 0 2020-06-03 10:13:00.368
!MESSAGE Bundle plugins/cosbench-log4j not found.
!ENTRY org.eclipse.osgi 4 0 2020-06-03 10:13:00.368
!MESSAGE Bundle plugins/cosbench-log@6:start not found.
!ENTRY org.eclipse.osgi 4 0 2020-06-03 10:13:00.369
!MESSAGE Bundle plugins/cosbench-config@6:start not found.
Step 2: Install Java
Both Java 1.7 and 1.8 work well with COSBench.
Step 3: Config ncat
Ncat is necessary for COSBench to work. Without it, you will receive the following error message:
[root]hopisdtmelabs14# bash ./start-driver.sh
Launching osgi framwork ...
Successfully launched osgi framework!
Booting cosbench driver ...
which: no nc in (/usr/local/bin:/usr/local/sbin:/usr/local/bin:/usr/sbin:/usr/bin:/root/bin:/usr/local/tme/bin:/usr/local/tme/tme_portal/perf_web/bin)
No appropriate tool found to detect cosbench driver status.
Use the following commands to install Ncat (example here is CentOS 7) and config it for COSBench:
yum -y install wget
wget [https://nmap.org/dist/ncat-7.80-1.x86_64.rpm](https://nmap.org/dist/ncat-7.80-1.x86_64.rpm)
yum localinstall ncat-7.80-1.x86_64.rpm
cd /usr/bin
ln -s ncat nc
Step 4: Unzip the COSBench files
After you download the 0.4.2.c4.zip, you can unzip it to a directory:
unzip 0.4.2.c4.zip
Grant all the bash script permission to be executed:
chmod +x /tmp/cosbench/0.4.2.c4/*.sh
Step 5: Start drivers and controller
On drivers and controller, find the cosbench-start.sh. Locate the java launching line, then add the following two options:
-Dcom.amazonaws.services.s3.disableGetObjectMD5Validation=true
-Dcom.amazonaws.services.s3.disablePutObjectMD5Validation=true
The COSBench tool has two roles: controller and driver. You can use the following command to start the driver:
bash ./cosbench/start-driver.sh
Before we start the controller, we need to change the configuration to let the controller knows how many drivers it has and their addresses. This is done by filling in information in the controller's main configuration file. The configuration file is under ./conf, and the name of the file is controller.conf. Following is an example of the controller.conf:
[controller]
drivers = 4
log_level = INFO
log_file = log/system.log
archive_dir = archive

[driver1]
name = driver1
url = [http://10.245.109.115:18088/driver](http://10.245.109.115:18088/driver)

[driver2]
name = driver2
url = [http://10.245.109.116:18088/driver](http://10.245.109.116:18088/driver)

[driver3]
name = driver3
url = [http://10.245.109.117:18088/driver](http://10.245.109.117:18088/driver)

[driver4]
name = driver4
url = [http://10.245.109.118:18088/driver](http://10.245.109.118:18088/driver)
Run the start-controller.sh to start the controller role:
bash ./start-controller.sh
Step 6: Prepare PowerScale
First, you need to prepare your PowerScale cluster for the S3 test. Make sure to record the secret key of the newly created user, s3. Run the following commands to prepare PowerScale for the S3 performance test:
isi services s3 enable
isi s3 settings global modify --https-only=false
isi auth users create s3 --enabled=true
isi s3 keys create s3
mkdir -p -m 777 /ifs/s3/bkt1
chmod 777 /ifs/s3
isi s3 buckets create --owner=s3 --name=bkt1  --path=/ifs/s3/bkt1
Compose the workload XML file, and use it to specify the details of the test you want to run. Here is an example:
<?xml version="1.0" encoding="UTF-8"?>
<workload name="S3-F600-Test1" description="Isilon F600 with original configuration">
        <storage type="s3" config="accesskey=1_s3_accid;secretkey=wEUqWNWkQGmgMos70NInqW26WpGf;endpoint=http://f600-2:9020/bkt1;path_style_access=true"/>
        <workflow>
               <workstage name="init-for-write-1k">
                       <work type="init" workers="1" config="cprefix=write-bucket-1k; containers=r(1,6)"/>
               </workstage>
               <workstage name="init-for-read-1k">
                       <work type="init" workers="1" config="cprefix=read-bucket-1k; containers=r(1,6)"/>
               </workstage>
               <workstage name="prepare-1k">
                       <work type="prepare" workers="1" config="cprefix=read-bucket-1k;containers=r(1,6);oprefix=1kb_;objects=r(1,1000);sizes=c(1)KB"/>
               </workstage>
               <workstage name="write-1kb">
                       <work name="main" type="normal" interval="5" division="container" chunked="false" rampup="0" rampdown="0" workers="6" totalOps="6000">
                               <operation type="write" config="cprefix=write-bucket-1k; containers=r(1,6); oprefix=1kb_; objects=r(1,1000); sizes=c(1)KB"/>
                       </work>
               </workstage>
               <workstage name="read-1kb">
                       <work name="main" type="normal" interval="5" division="container" chunked="false" rampup="0" rampdown="0" workers="6" totalOps="6000">
                               <operation type="read" config="cprefix=read-bucket-1k; containers=r(1,6); oprefix=1kb_; objects=r(1,1000)"/>
                       </work>
               </workstage>
        </workflow>
</workload>
Step 7: Run the test
You can directly submit the XML in the COSBench WebUI, or you can use the following command line in the controller console to start the test:
bash ./cli.sh submit ./conf/my-s3-test.xml
You will see the test successfully finished, as shown in the following figure.
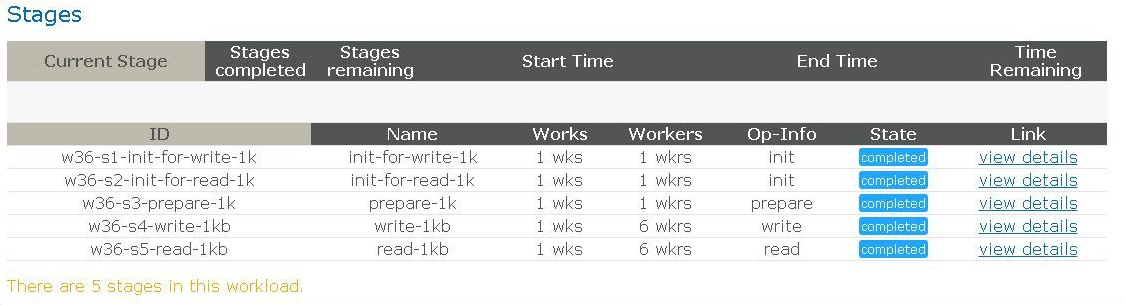
Figure 1. Completion screen after testing
Have fun testing!
Author: Yunlong Zhang