


Getting Started with the PowerMax REST API: Time for a REST

So, a few years down the line and over 15,000 views later, I’ve decided to refresh my infamous “Time for a REST” post and put it in a new, permanent location on Info Hub. The original site has been retired, so I’ve rewritten and updated the post here.
This blog post will not teach you Python, and it assumes basic programming skills. I recommend Learn Python the Hard Way—It’s totally free. If you want to dig deeper, the $60 course at RealPython.com is a worthwhile investment in yourself.
This blog post covers some basics on REST. If you want to explore it further, there’s a mountain of information available. You could even ask ChatGPT, which is all the rage at the moment.
I will, however, give a brief overview here. If you already know about REST and just want to know about the PowerMax REST API, you can just skip the next section.
What is REST API?
REST, which stands for Representational State Transfer, is an architectural style of shaping web services. It is not a standard but, rather, a style describing the act of transferring a state of something by its representation. An API s a set of routines, protocols, and tools for building software applications. An API specifies how software components should interact and are used when programming UI components. Basically, REST API gives you a way of interacting with an application without having to know every detail about how the underlying application is implemented.
Why REST? I can think of more than a few reasons, but here are some of my top reasons for using REST:
- Simplicity—REST is based on HTTP protocols. If you know how to use a web browser by entering an address to get information from a website, you already know a little about REST.
- Industry Standard—REST is widely used everywhere. Look at any web application out there —for example, Service Now, Amazon, maps.com, weatherchannel.com, to name but a few —and you’ll probably find that it has a REST API. REST is very lightweight and easy to get started with. Pretty much every enterprise application provides a REST interface and a way to connect and get information to other REST APIs.
- Choice—You’re not stuck with one toolset; you can use any programming language you’re already familiar with to work with REST. This means that you don’t have to retool if you don’t want to; however, there are great tools out there that might persuade you to choose one language over another. Modern languages, like Python for example, are easy to learn and have a ton of resources and packages already written to help.
- Versatility—Providing a REST interface into our products makes it very easy for people to plug in and build on the work that’s already engineered into the system. It also enables other vendors and customers to build tools that interface with the PowerMax REST API and increase options for customers.
This YouTube video gives a great explanation of other REST APIs and some ideas about how to use them: REST API concepts and examples.
REST is really what makes automation possible. The PowerMax REST API enables storage configurations to be dynamic and automated through Infrastructure as Code (IaC) tools such as Ansible, Terraform, Puppet, and so on.
REST is also very useful for reporting and data mining; we have many customers pulling information from the system into tools such as Splunk and Grafana.
Types of REST calls
REST is all about state—getting the states of objects, creating new objects by providing their representative state, and changing the state of an existing object or deleting the object.
Unisphere for PowerMax REST API supports the following types of REST calls:
- GET—Get state information on objects.
- POST—Call to create an object.
- PUT—Make an edit to an object’s state. Typically, you have to do a GET to ensure that you have all the information before you can do a PUT.
- DELETE—Remove object.
For more general information about REST, check out Getting Started with REST API.
Securing your REST API access
Security is always a concern, and working with REST APIs you will need to authenticate. The method might be different, depending on the API, Some APIs will work with tokens, while others will work with username and password (Basic Authentication).
For the PowerMax REST API, each call is verified with Basic Authentication over HTTPS by username and password. With this authentication method, users can have granular roles, and their REST calls can be limited to specific arrays/storage groups and functions. For example, a user could be set up so that the user can only create snapshots for a specific set of storage groups. For more information about role-based access, see the Unisphere for PowerMax API documentation.
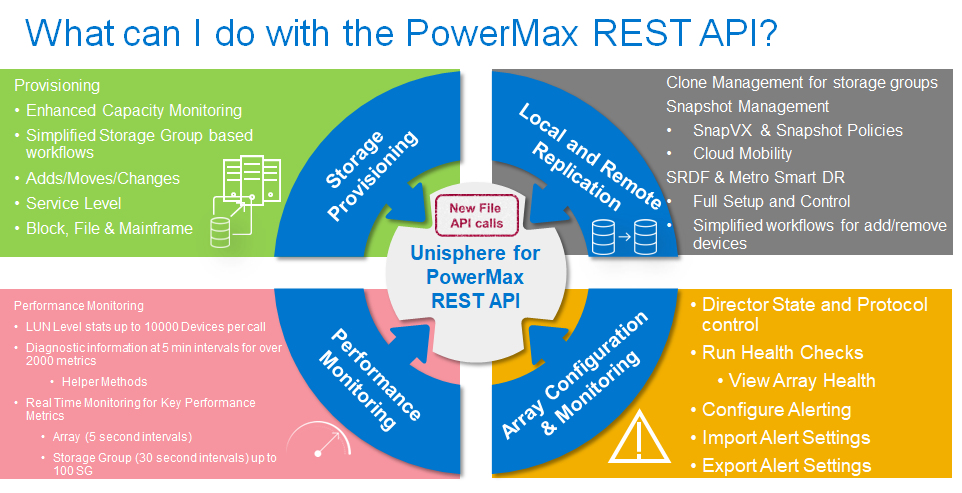
What can I do with the PowerMax REST API?
Before we get into making an API call, it’s worth looking at what can be done with the PowerMax REST API. The following figure gives a high-level overview of the main tasks that you can perform. In addition to the components shown, there is a migration API, Workload Planner API, and vVOL API.
Storage group based control with PowerMax REST API
Unisphere for PowerMax is designed around the concept of the storage group for management of applications. A storage group is a container for a set of devices that are related in some way, usually representative of an application or a tenant with data on the PowerMax array.
Most operations using REST API are built to take advantage of the storage group as a control entity—for example, SnapVX and SRDF. Using a storage group for management reduces the number of objects that storage administrators need to manage. A storage group must exist for masking devices to a host for access through the SAN so that REST can take advantage of this construct.
Some legacy processes might need to be re-worked so that they fit into the storage group operation workflows. Historically, operating systems reacted badly to volumes being removed and re-added; however, modern operating systems are no longer sensitive to these types of changes.
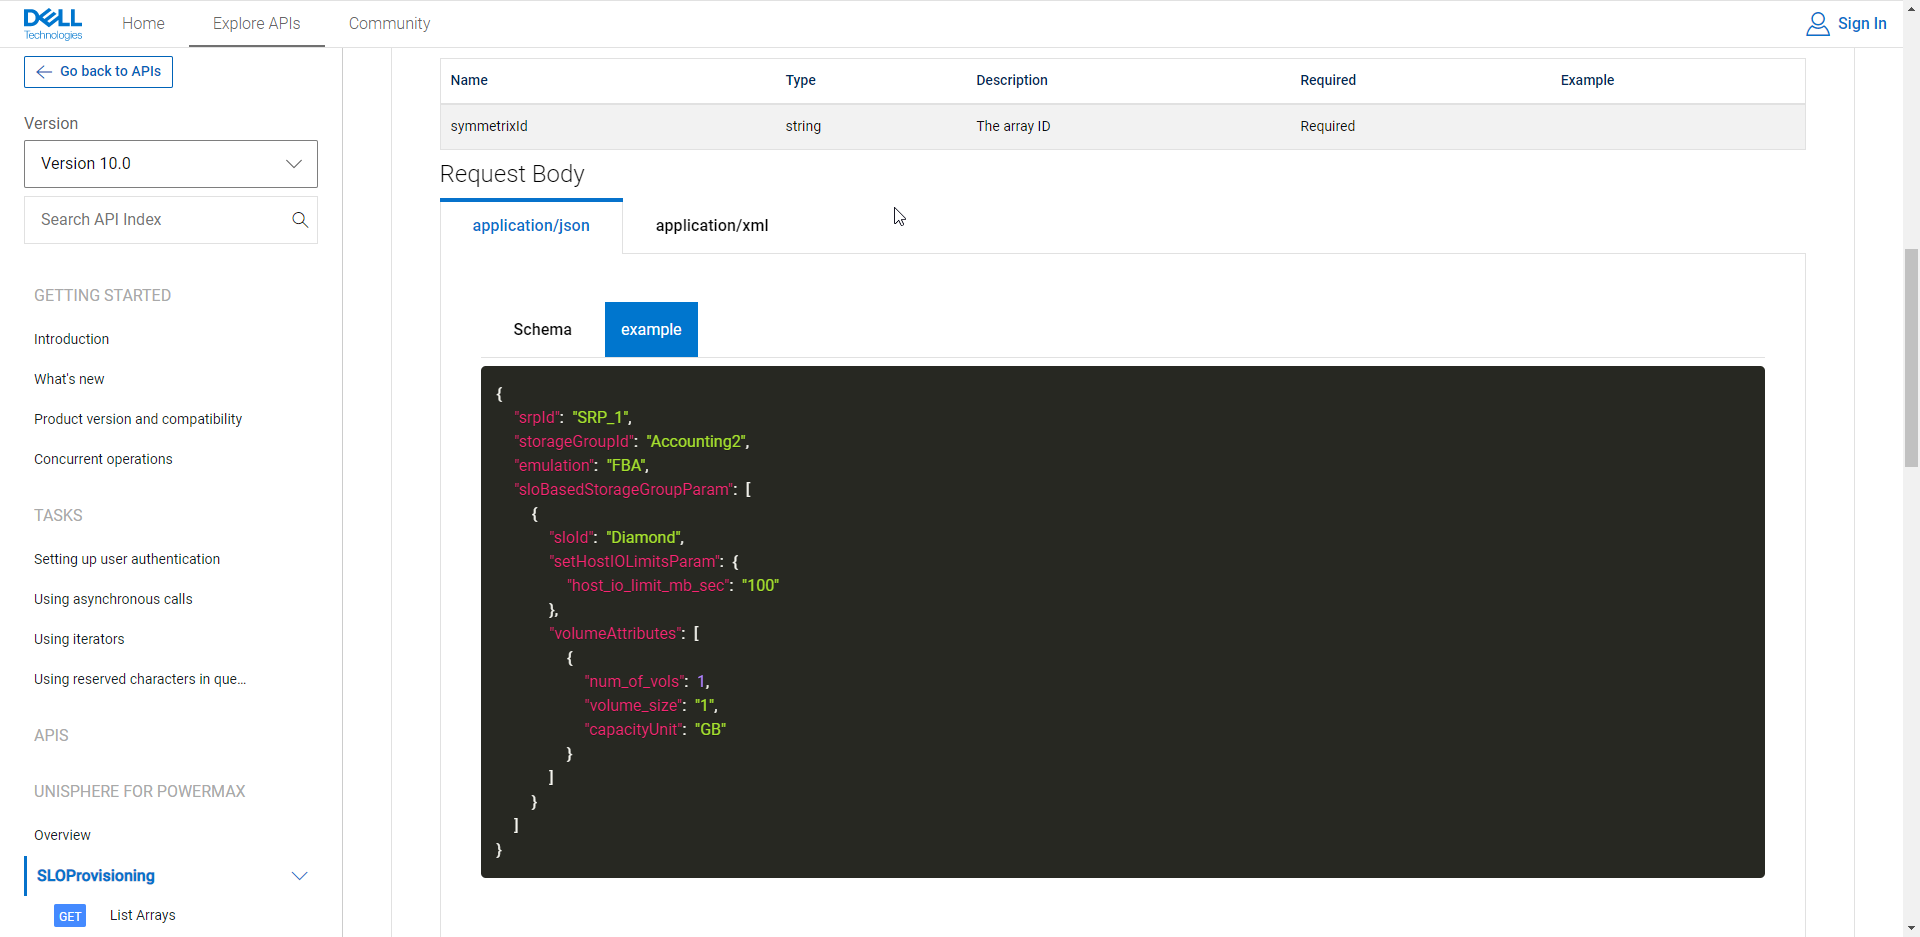
Accessing the PowerMax API documentation and schema
Now that we’ve covered the bare bones of REST and some of what’s possible with the PowerMax REST API, we can look at making an actual REST API call. To make a REST call, you will need to know the structure of the API schema.
All REST API schemas for Dell products are published on https://developer.dell.com. This site provides for unrestricted access to assist developers who might not have access to Dell support materials. From the overview section, the documentation, which includes sample payloads and responses, can be downloaded in an OpenAPI.json file, or you can browse the documentation on the site.
The PowerMax API is organized by functional resource. Each API call is prepended with https://{{ipaddress|hostname}}/univmax/restapi, where ipaddress|hostname is the Unisphere for PowerMax server address managing the array that you want to control or gather information about. This section of the URI is known as the Base URI.
Depending on what you want to do next, you will need to look at the documentation and follow the resource tree. Any active management API call to the PowerMax array will have a version that is specified after the URI, for example: https://{{ipaddress|hostname}}/univmax/restapi/{{API_version}}/sloprovisioning/symmetrix
This API call will find information about what arrays are managed by the Unisphere server.
Making a REST call
A simple GET call using the Client for URL tool cURL looks something like this:
curl --url https://UnipshereIPaddress:8443/univmax/restapi/version --insecure -u username:verysecretpassword
States are transmitted and received in JSON. JSON stands for JavaScript Object Notation. JSON is easily readable, consisting of key value pairs. The key is on the left, and the value is on the right, with : separating key and value.
The response to the GET version API call above is a JSON payload containing the version of Unisphere, the current API version, and a list of supported API versions. Here’s an example:
{
  "version": "T10.0.1.448",
  "api_version": "100",
  "supported_api_versions": [
    "100",
    "92",
    "91"
  ]
}
Making a POST or PUT call either creates or updates an object on the PowerMax array. Unlike a GET call, which is much simpler, you need to send a payload describing the object you want to create or the changes you want to make.
curl -X PUT \
  -H "Content-Type: application/json" \
  -H "Authorization: Basic <base64 encoded username:password>" \
  -d ' {
   "executionOption": "SYNCHRONOUS",
   "storageGroupId": "API_Created_SG",
  "srpId": "SRP_1",
   "sloBasedStorageGroupParam": [
    {
       "volumeAttributes": [
        {
           "capacityUnit": "TB",
           "volume_size": "1",
          "num_of_vols": 2,
           "volumeIdentifier": {
             "volumeIdentifierChoice": "identifier_name",
             "identifier_name": "API_Created_1TB_Volume"
          }
        },
        {
           "capacityUnit": "GB",
           "volume_size": "1",
          "num_of_vols": 2,
           "volumeIdentifier": {
             "volumeIdentifierChoice": "identifier_name",
             "identifier_name": "API_Created_1GB_Volume"
          }
        }
      ]
    }
  ]
}' \
  "https://{{ipaddress|hostname}}/univmax/restapi/100/sloprovisioning/symmetrix/000120200287”
Here's a breakdown of the different parts of the cURL command:'
-X PUT: Specifies that we are using the PUT HTTP method to update a resource.
-H "Content-Type: application/json": Specifies the content type of the request body as JSON.
-H "Authorization: Basic <base64 encoded username:password>": Specifies the authorization header with a base64-encoded string of your PowerMax username and password. Note that this is just an example; you should never expose your username and password in plain text.
-d 'payload': Specifies the JSON payload. In this example, it will create a storage group on array serial 000120200287 with four volumes, two of 1 TB and two of 1 GB.
"https://{{ipaddress|hostname}}/univmax/restapi/100/sloprovisioning/symmetrix/000120200287": Specifies the URL of the resource to create the object.
Building the payload for your POST and PUT calls is generally the toughest part of creating a REST call. The API documentation includes examples that can be copied and pasted with the minimum required keys. Note there are additional keys that can be added to take advantage of more advanced features should your workflows require them.
Beyond the basics
At this point, we’ve discussed the structure of API calls and how to create some cURL command, but that’s not really automation, is it?
To truly take advantage of the API, you will want to write some reusable scripts. And that is where we are here to help. The next section introduces you to our Python SDK, which is pre-loaded with pre-written and documented functions covering all the major API functionality, taking your API usage to the next level.
Jump-starting your REST development with PyU4V
If you’re just getting started with the PowerMax REST API, the good news is that there are tools out there to help you. A small team within Dell Engineering has produced a Python SDK library with hundreds of useful functions that can be consumed in Python scripts. The library is fully documented at https://pyu4v.readthedocs.io, and source code is available at https://github.com/dell/PyU4V. There have been many releases at this stage, and download statistics show that it’s heavily utilized.
PyU4V can be installed on a system with Python. Simply enter pip install PyU4V to install the latest.
The version of PyU4V will match the version of Unisphere. You can use older versions of PyU4V to access older versions of endpoints. They will continue to operate and return the same information regardless of the Unisphere version; however, for the latest functionality, you should aim to be on the latest version.
With the PyU4V function library installed, you should be good to start writing your scripts.
PyU4V pre-written functions are organized into function modules. Complete details are on the documentation website:
https://pyu4v.readthedocs.io/en/latest/quick_start.html#pyu4v-unisphere-rest-coverage
You might want to install a good IDE to help you write the code (IDE is integrated Development Environment. It helps with keeping track of variables and autocomplete on method names and variable calls, and so on). I really like pycharm; I’m sure there are others, but this one has served me well.
As with any programming task, we usually start with Hello World!. In this case I’m going to connect you to your Unisphere instance and list the arrays attached.
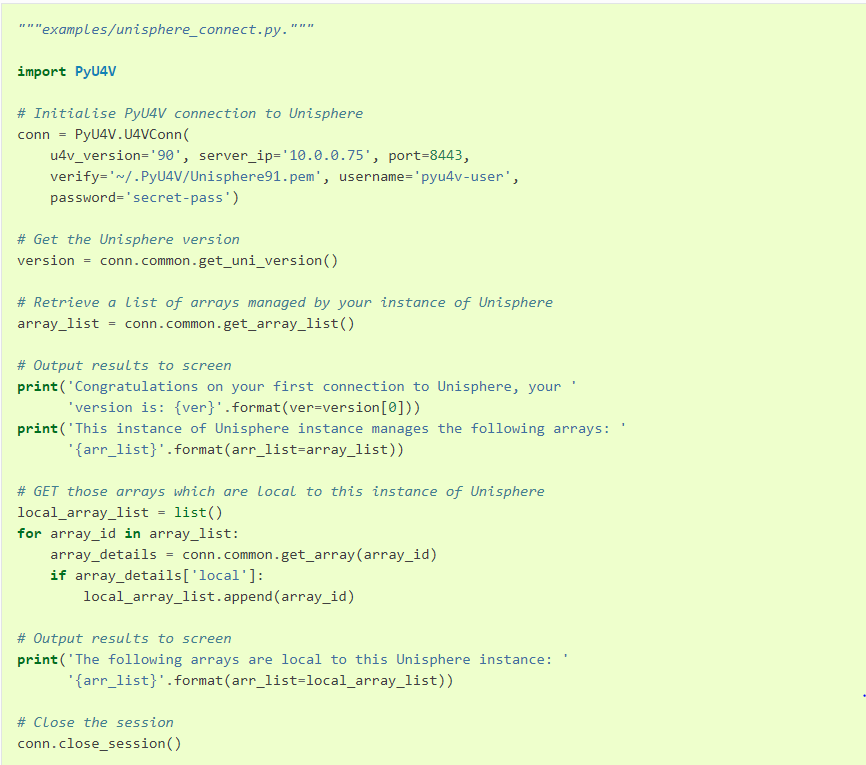
Running the script is as follows:

Other examples are in the programmers’ guide section of the PyU4V documentation; take some time to review them. For any call that is not covered in PyU4V, you can always use the custom methods. I’ll write some more about this in a follow-up post.
This post has been shortened from its original length, hopefully making it easier to consume.
I’ll be posting additional sections on gathering performance stats and working with snapshots in future blogs.