
VLAN and IP allocation information
All ESXi hosts, whether running on the MX compute sleds or in the rack server, are all in the same ESXi_MGMT VLAN. In this example, MGMT VLAN 1611 is deployed. vMotion, vSAN, and ESXi Host VMs are also deployed on VLANs 1612 through 1616.
Configure and set up VMware vCenter
For the scenarios in this guide, the VMware vCenter Server Appliance (VCSA) is deployed on the same server as the DNS and jump-box which serves as a centralized multipurpose work-station, as shown in the figure below.
To configure the Dell EMC PowerEdge R730xd server with the required services and install the VMware vCenter server appliance, perform the following steps:
- Upgrade the server with the latest BIOS and NIC driver.
- Using the same subnet IP, configure both NIC ports on the server. This configuration is used for DNS.
- From the Server Manager in Microsoft Windows, perform the following actions:
- Create a DNS server
- Create the forward and reverse lookup zones
- Assign host records as shown in the figure below
- Note: For detailed information, see the User Guide specific for your DNS server.
Figure 15. Example DNS settings 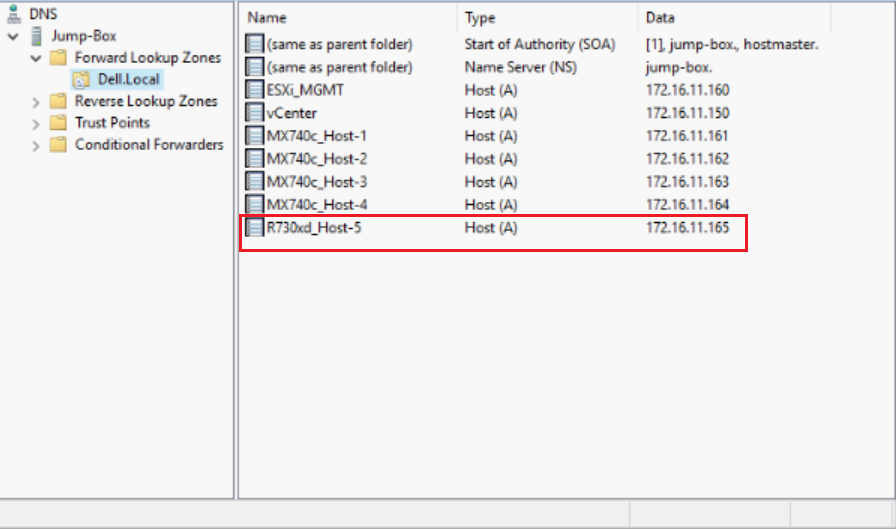
- Install and configure VMware vCenter Server Appliance 7.0 or the latest version. For more information, see Appendix D.
Create and configure ESXi hosts
After the VMware vCenter server appliance is installed and host information has been successfully added to the DNS server, perform the following steps to create and configure the ESXi host using VMware vCenter.
- From the Hosts and Clusters tab, right-click the vSphere client listing and select Create New Datacenter.
- Right-click Datacenter and then select Add host.
- Enter the IP address or hostname as configured in the DNS server, then enter the username and password of the ESXi host.
- Follow the prompts to verify the host summary and other information.
- From the Ready to Complete screen, click Finish.
Figure 16. Listing of ESXi hosts created  Note: Repeat the steps provided in this section to create additional ESXi hosts that are specific for your environment.
Create and configure VMs
To create and configure the ESXI host virtual machine (VM), perform the following steps:
- Right-click ESXi host and select New Virtual Machine.
- Select New Virtual Machine and click Next.
- Provide an appropriate name to VM, select the desired Datacenter, and click Next.
- Select ESXi Host, where the VM must be created, and click Next.
- Select the appropriate Datastore for the VM and click Next.
- Select the compatible ESXi version and click Next.
- Select the Operating System family and wanted version.
- Click to select the network port-groupand designate the wanted hard-disk and memory size.Note: Browse for vDS during step 8, when selecting Network Port-Group for Compute host VM. Select MGMT-vDS as a Network Port-Group for MGMT host VM.
- Verify the selections and if there are no changes to make, click Finish.
- Click to select the newly created VM then select Launch Remote Consoleto install and configure the operating system.Note: This example uses a vDS. For details on the creation and configuration of a vDS, see Appendix B.
Figure 17. Listing of VMs created 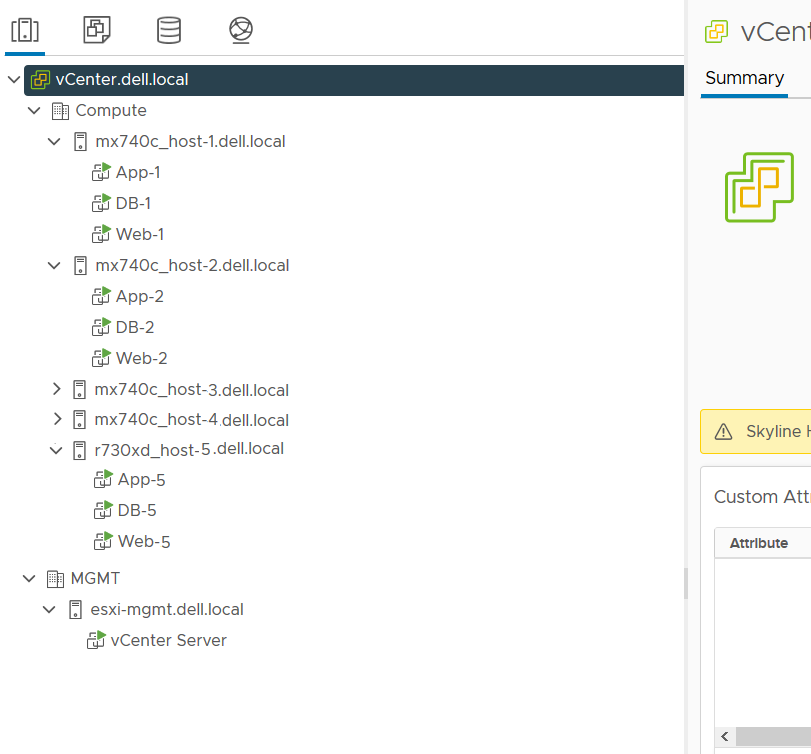 Note: Repeat the steps provided in this section to create and configure additional VMs for the same host or for other ESXi hosts.Note: To configure PowerEdge MX through OME-M, see the Dell EMC PowerEdge MX Networking Guide Deployment Guide.