Testing recovery plans using TimeFinder/SnapVX
Testing recovery plans using TimeFinder/SnapVX
-
TimeFinder/SnapVX provides space-efficient snaps, while offering efficient usage of metadata and flash memory and simplified pool management. It is the preferred technology for use with the SRDF SRA.
TimeFinder/SnapVX overview
SnapVX creates snapshots by storing changed tracks (deltas) directly in the Storage Resource Pool (SRP) of the source device. With SnapVX, you do not need to specify a target device and source/target pairs when you create a snapshot. These snapshots are “targetless”. To access a point-in time-copy, however, one must create a link from the snapshot data to a host mapped target device. The links may be created in Copy mode for a permanent copy on the target device, or in NoCopy mode for temporary use. Copy mode links create
full-volume, full-copy clones of the data by copying it to the target device’s Storage Resource Pool. NoCopy mode links are space-saving snapshots that only consume space for the changed data that is stored in the source device’s Storage Resource Pool. NoCopy is the default mode when using SnapVX with the SRA and is recommended.
If there is ever a need for the application to use the point-in-time data, you can create links from the snapshot to one or more target devices. If there are multiple snapshots and the application needs to find a particular point-in-time copy for host access, you can link and relink until the correct snapshot is located. Snapshots can be set to expire or manually terminated.
SnapVX operations are performed using the symsnapvx command to create point-in-time copies (snapshots) of critical data. SnapVX supports up to 256 snapshots per source device (including any emulation mode snapshots) and 1024 linked targets. For a more detailed overview of TimeFinder SnapVX functionality including I/O flow, refer to the array product guides.
Configuring TimeFinder/SnapVX for test failover without AutoTargetDevice
The process for using TimeFinder/SnapVX replicas of R2 devices is explained in this section using the EmcSrdfTestFailoverConfig.xml file. This example uses synchronous SRDF, but asynchronous would follow a similar process. This process is only used when the option AutoTargetDevice in the global options file is set to NO. The following steps should be adhered to when testing recovery plans with TimeFinder/SnapVX technology:
- Create a device or composite group at each site, protection and recovery, and place the R1s in the protection group, and the R2/R21s in the recovery group. In most configurations, these groups should be consistency groups. The groups should NOT contain the target devices (step 2) to be used in testing.
- In order to use SnapVX with SRM, a target will be required for linking with each device. Ensure the target of the SnapVX operation is created and presented (masked) to the appropriate VMware ESXi hosts at the recovery site or TestReplicaMaskingControl is enabled and the device(s) are configured in the masking control XML file.
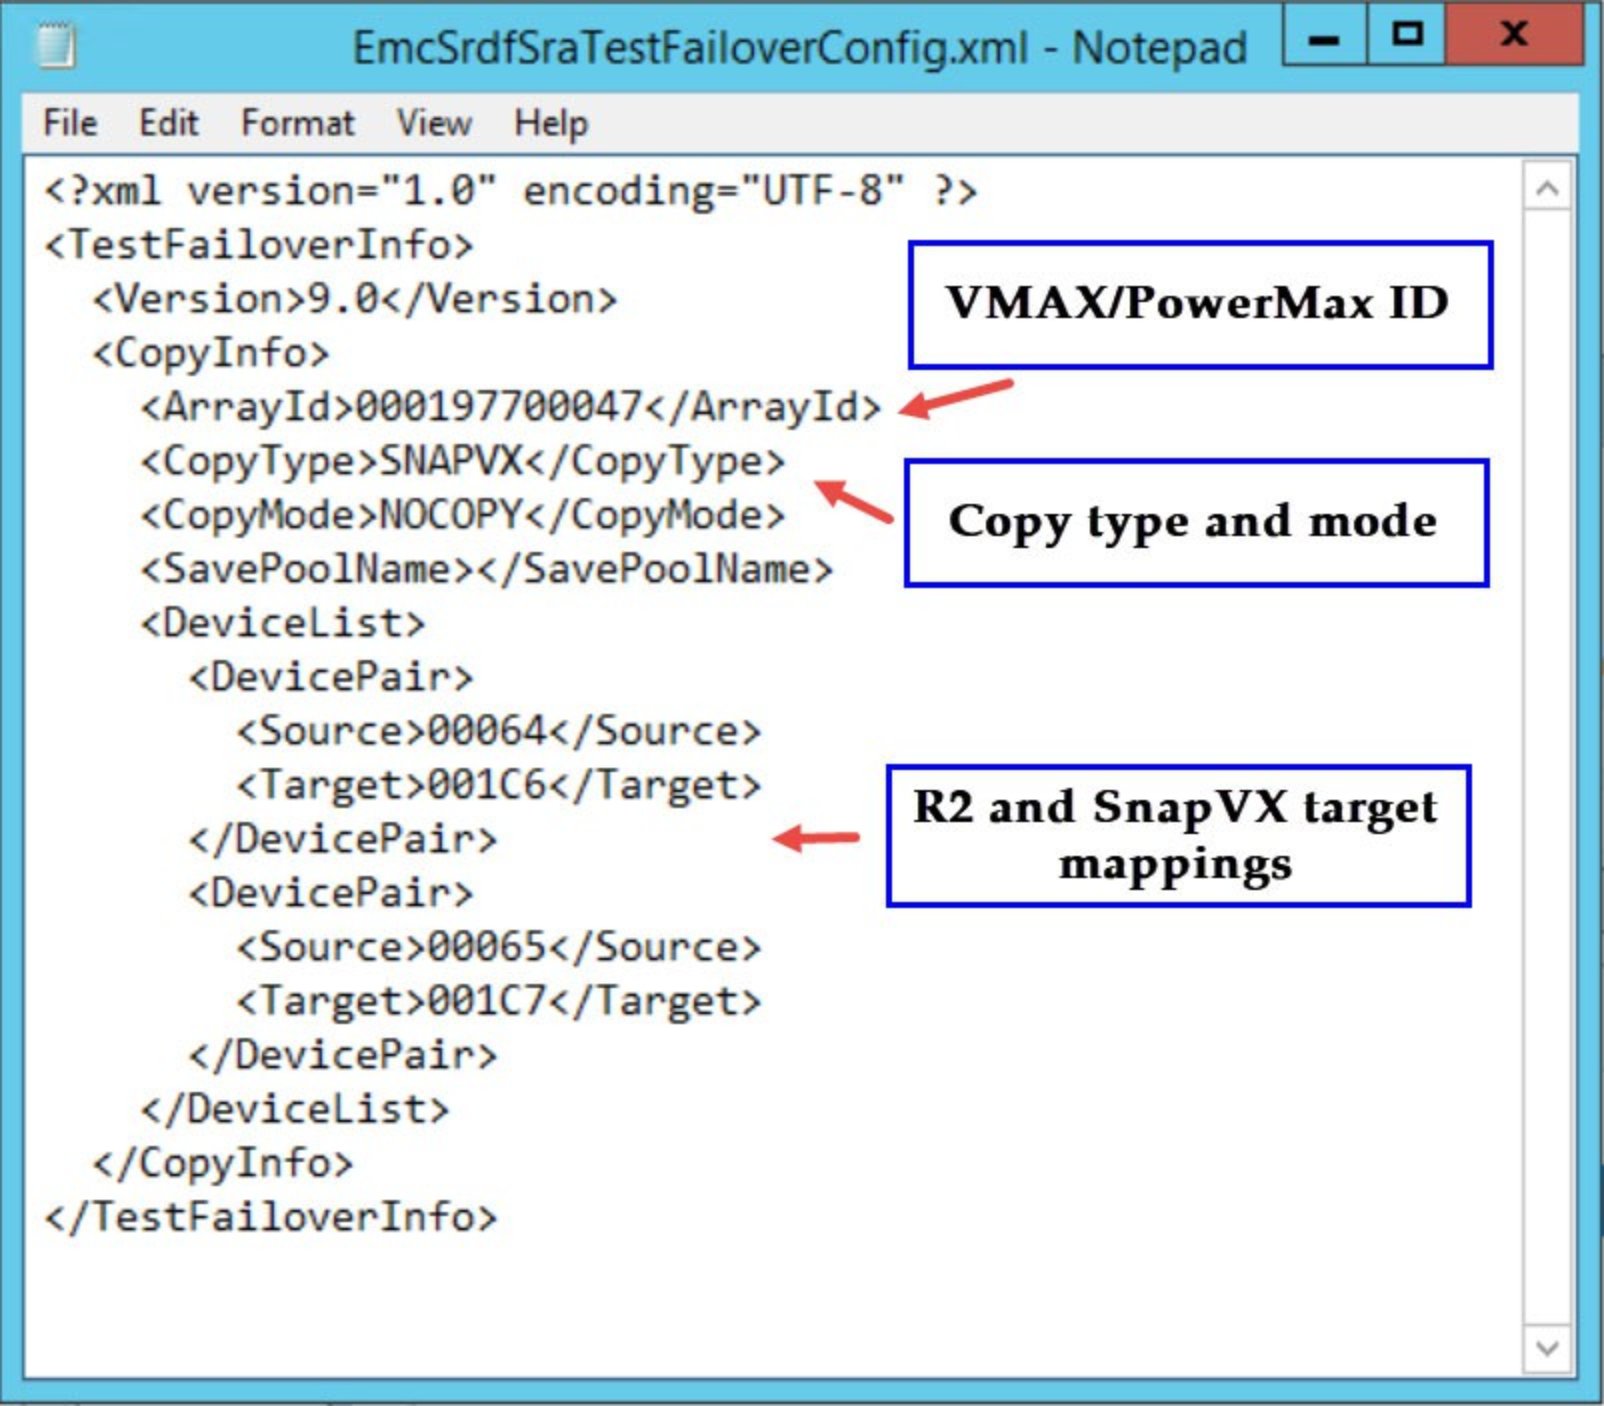
- Using an XML text editor, modify the EmcSrdfSraTestFailoverConfig.xml file on the recovery site associating the source R2 devices with their SnapVX targets.
- Save the EmcSrdfSraTestFailoverConfig.xml file on the recovery site. The device pairs will define the relationship between the SRDF device at the recovery site (R2) and the SnapVX target. The adapter uses the pairings defined in the options file to determine the devices to use when a recovery plan is tested.
In addition to selecting the device pair, the user should select whether to use COPY or NOCOPY (default) mode. For most SRM tests, NOCOPY is the most appropriate mode as the intent is not for the replicas to be of a permanent or long-lasting nature.
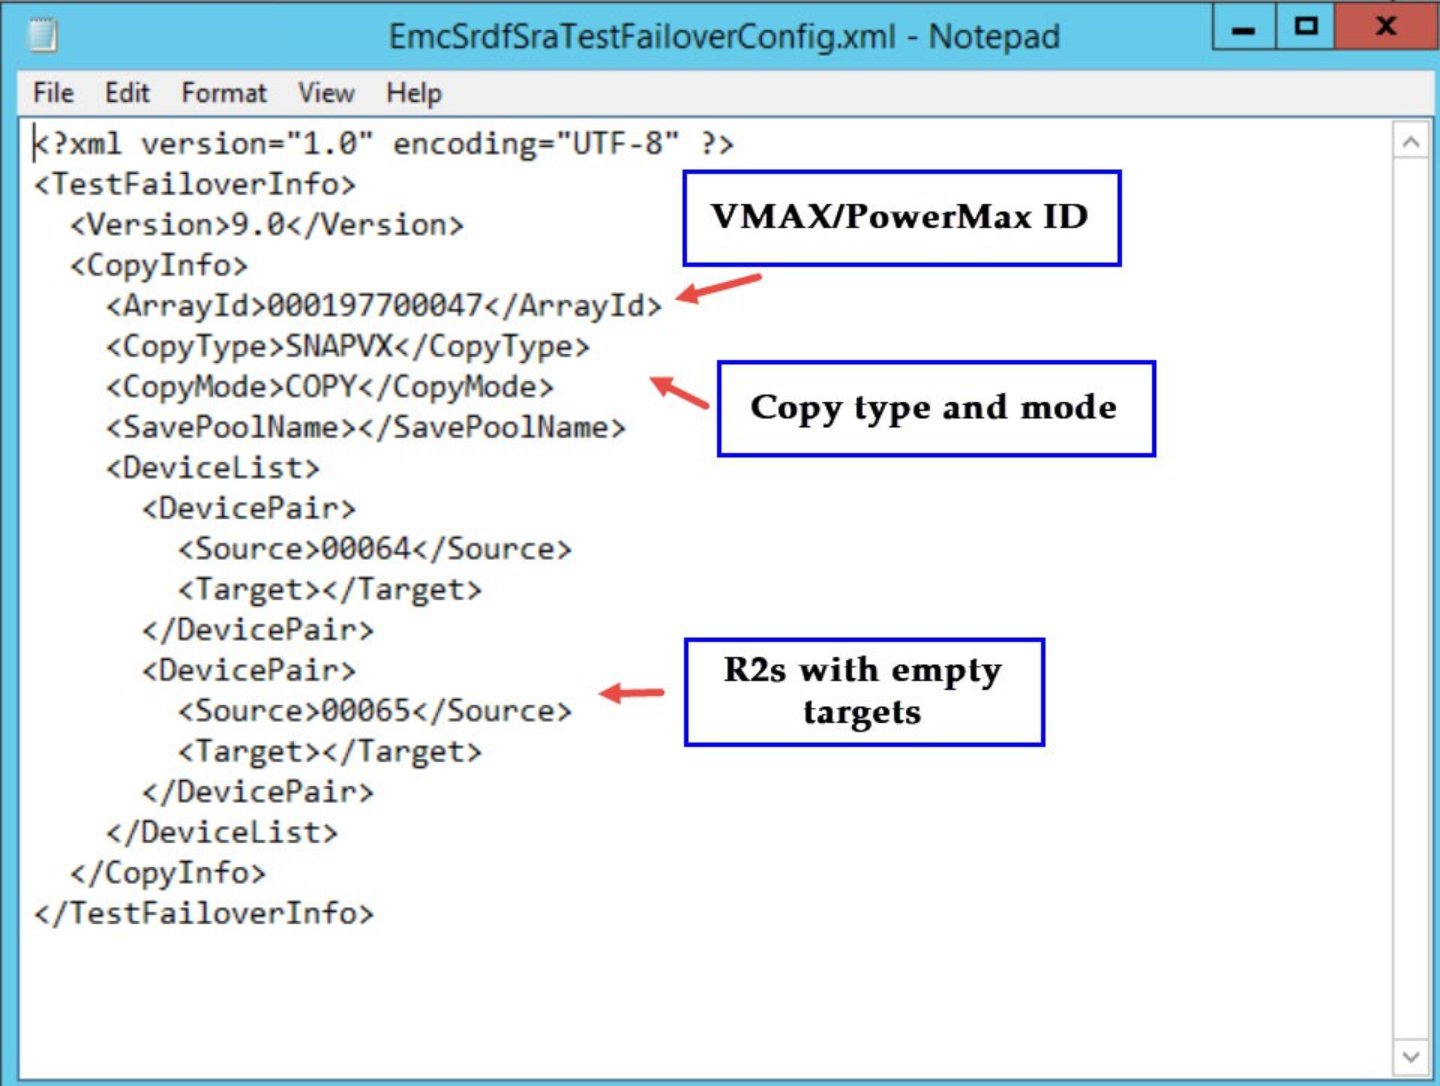
Figure 63 shows the options file containing the pairings required to test a recovery plan. The figure demonstrates the organization of the options file and the tag, ArrayID, which enables the adapter to support multiple storage arrays in a single recovery plan. Thus, when a recovery plan involves multiple VMAX/PowerMax arrays at the target, a CopyInfo stanza with appropriate TimeFinder technology, VMAX/PowerMax serial number, and device pair definitions should be created for each VMAX/PowerMax array.
Figure 63. Defining device pairs for TimeFinder/SnapVX when testing recovery plans
- Click the Test link after selecting the recovery plan that is to be tested. The SRDF SRA uses the information provided in the options file and performs appropriate TimeFinder/SnapVX operations.
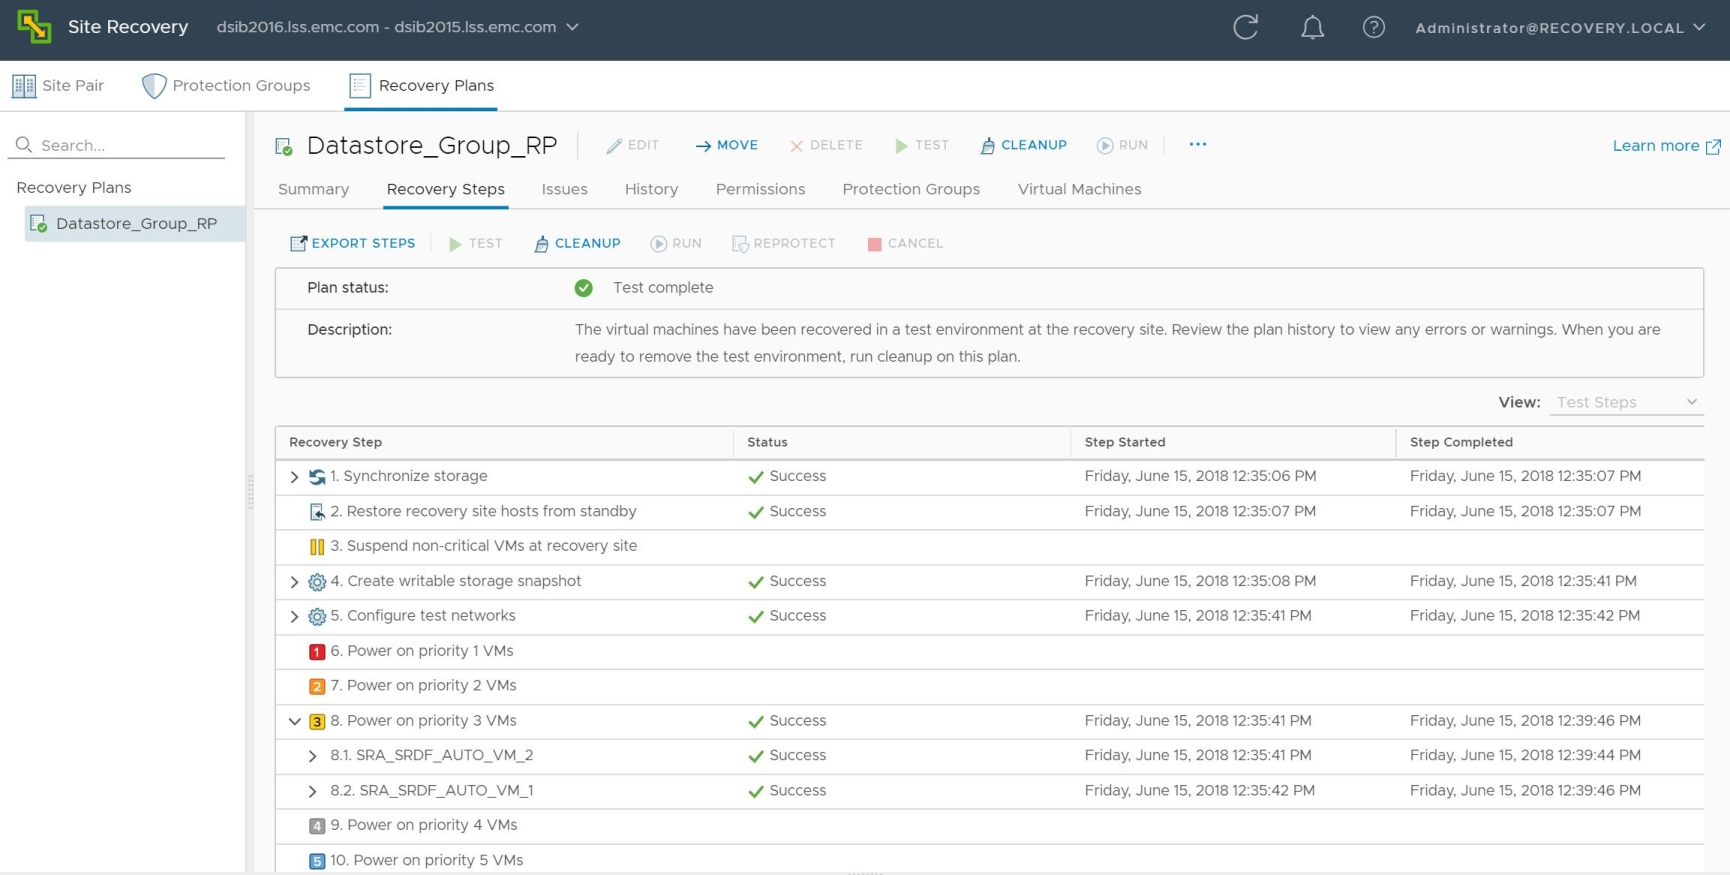
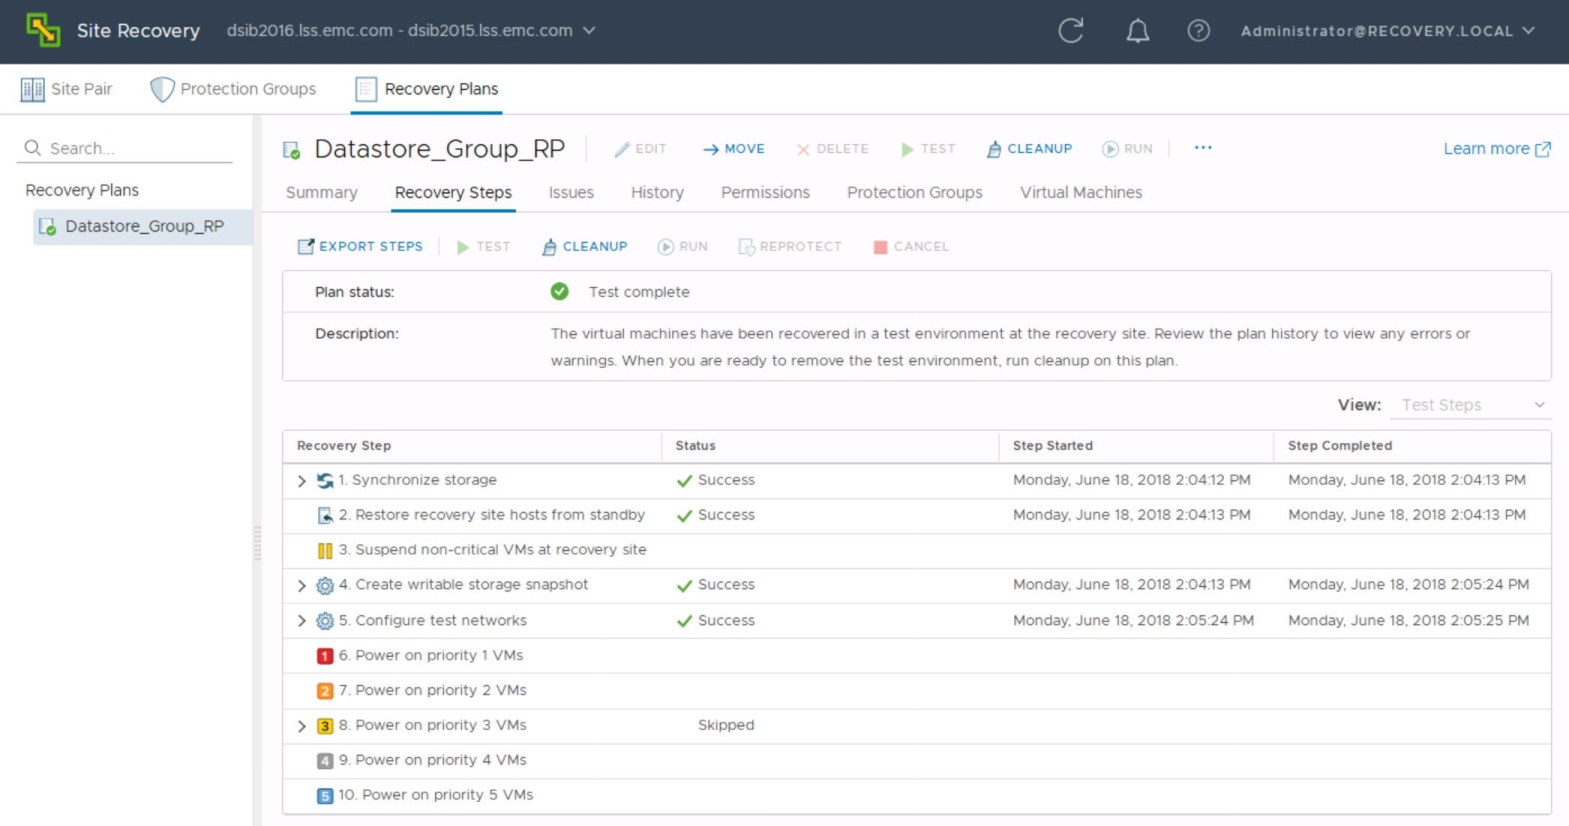
- The testing of a recovery plan is shown in Figure 64. It can be seen from the figure that the SRA has successfully created a local copy of the devices defined in its protection group using TimeFinder/SnapVX technology. SRM has also successfully used the copy of the datastore on the VMware ESXi servers at the recovery site to power on the replica virtual machines hosted on those devices.
Figure 64. Running a test of a recovery plan using TimeFinder/SnapVX technology
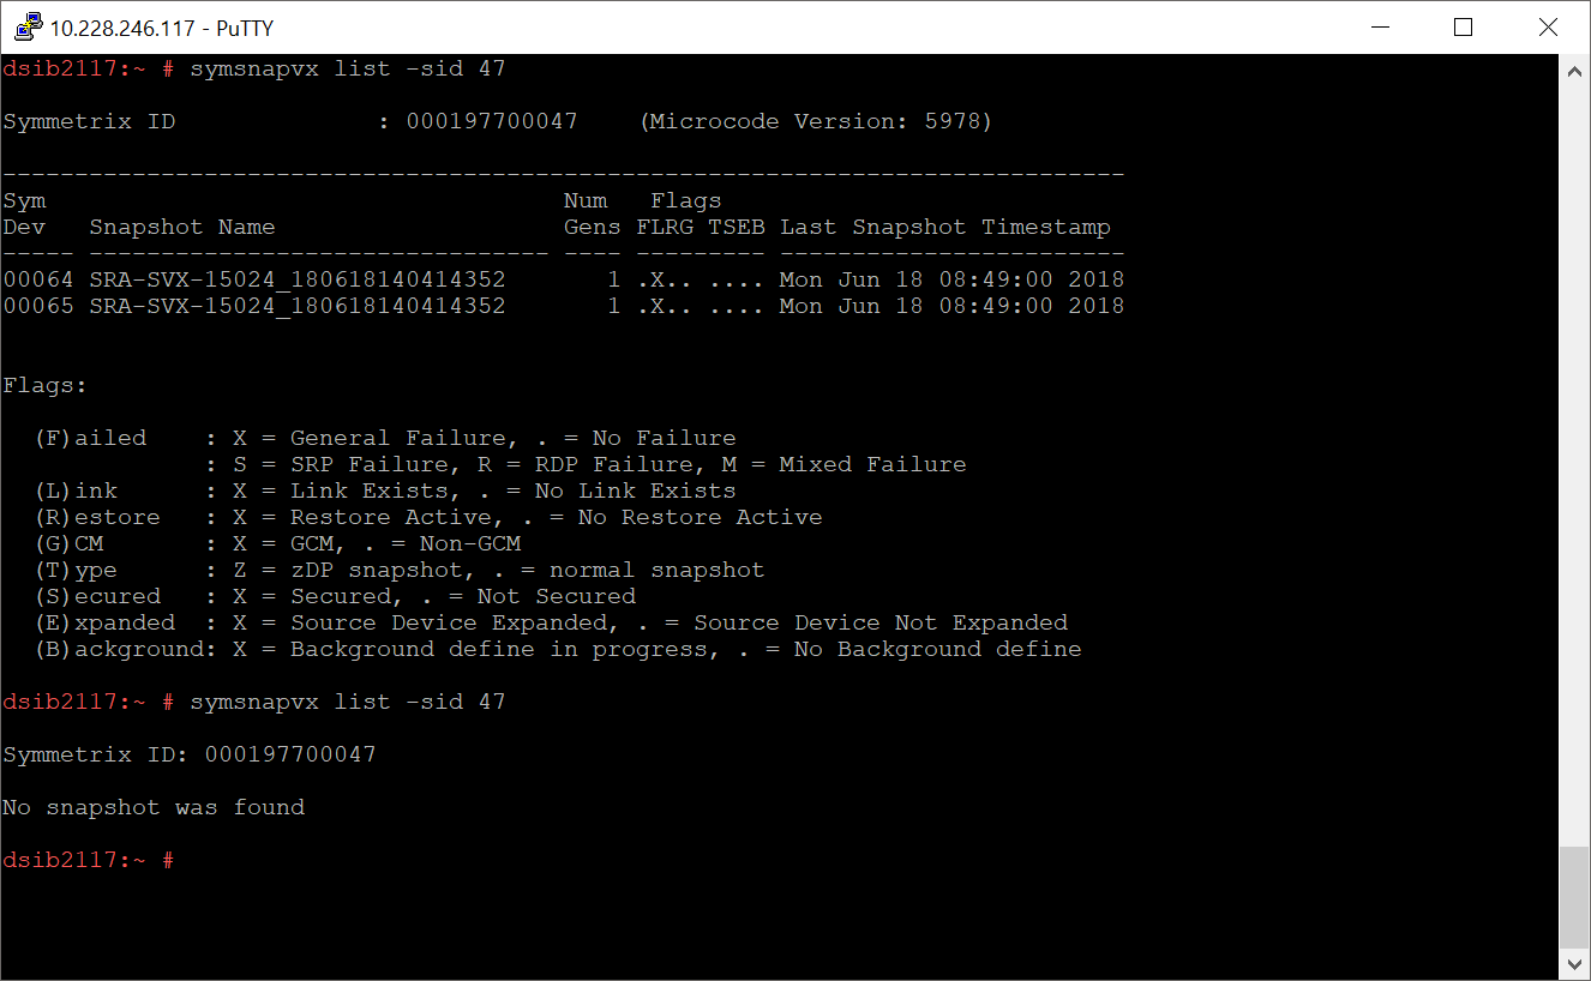
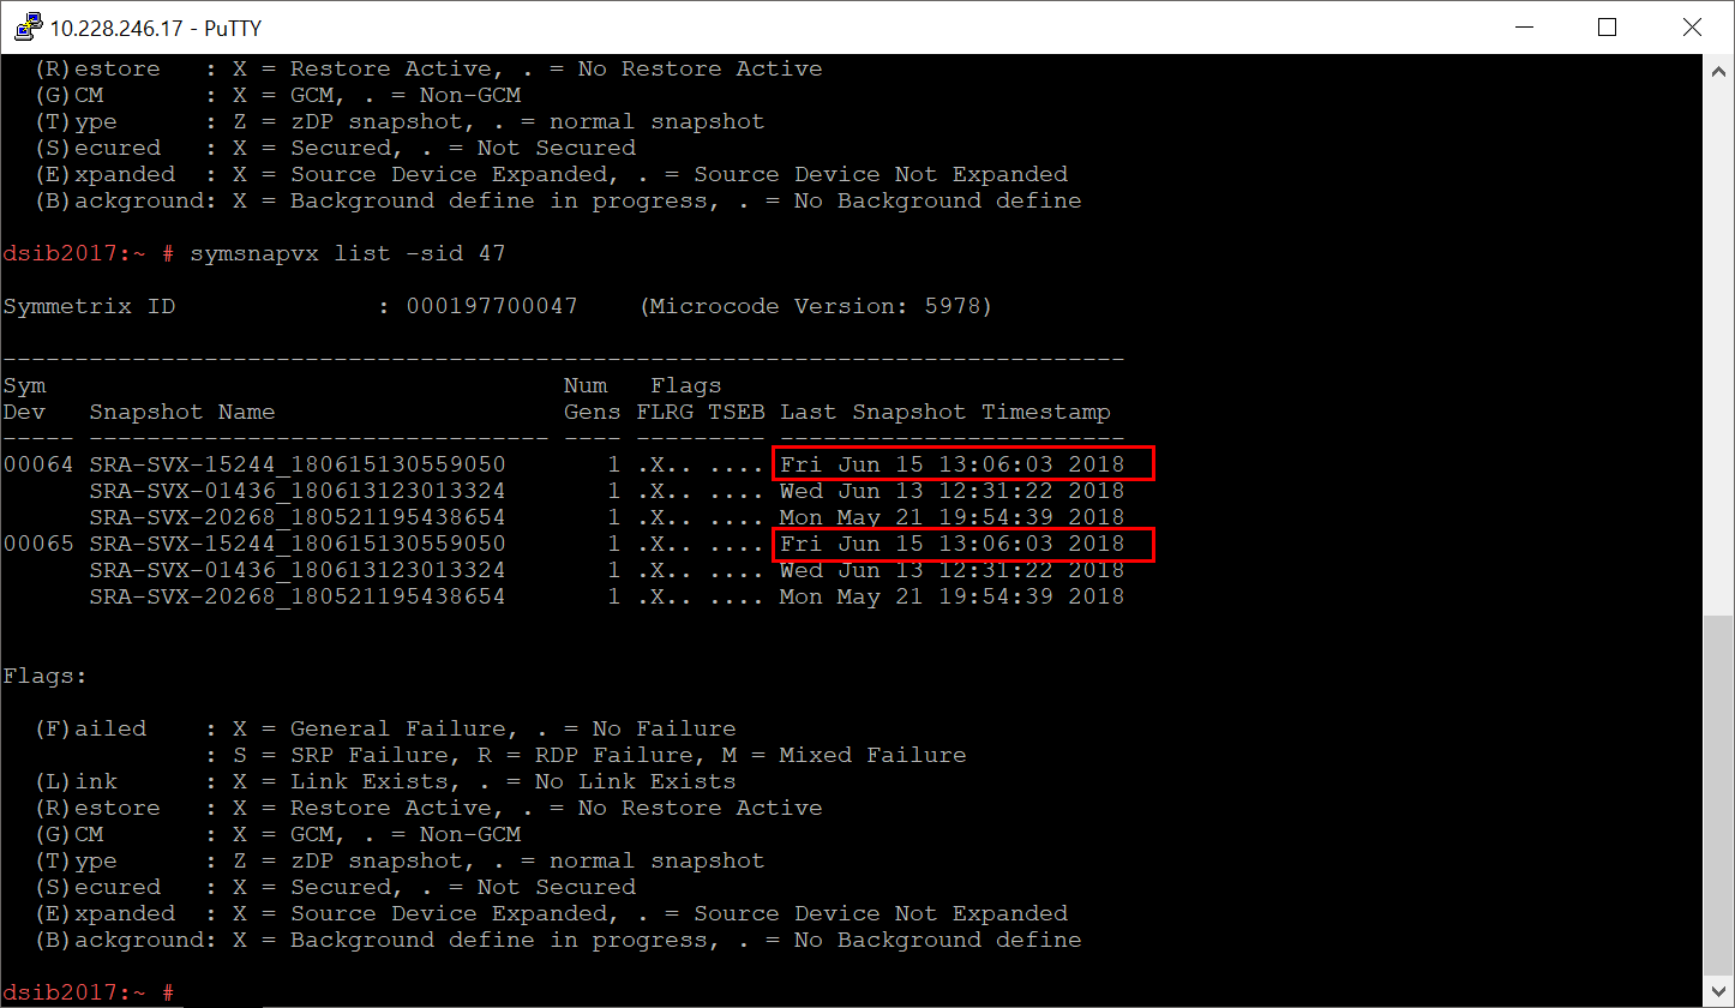
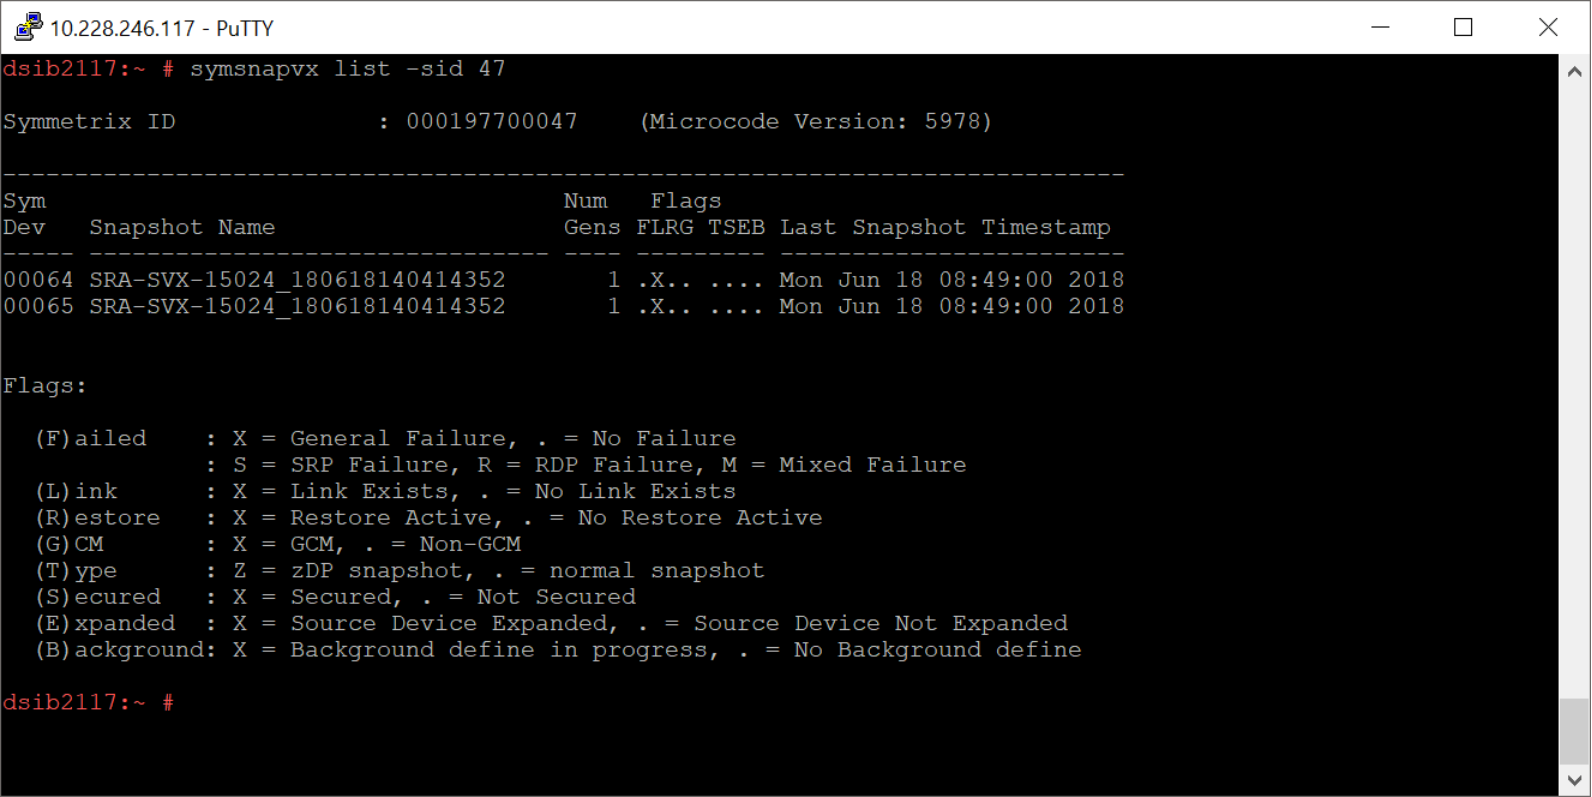
The state of the SnapVX pairs when the test environment is running can be verified by utilizing the Solutions Enabler command, symsnapvx. An example screenshot is shown in Figure 65.
Figure 65. SnapVX showing linked state of pair during the testing of a recovery plan
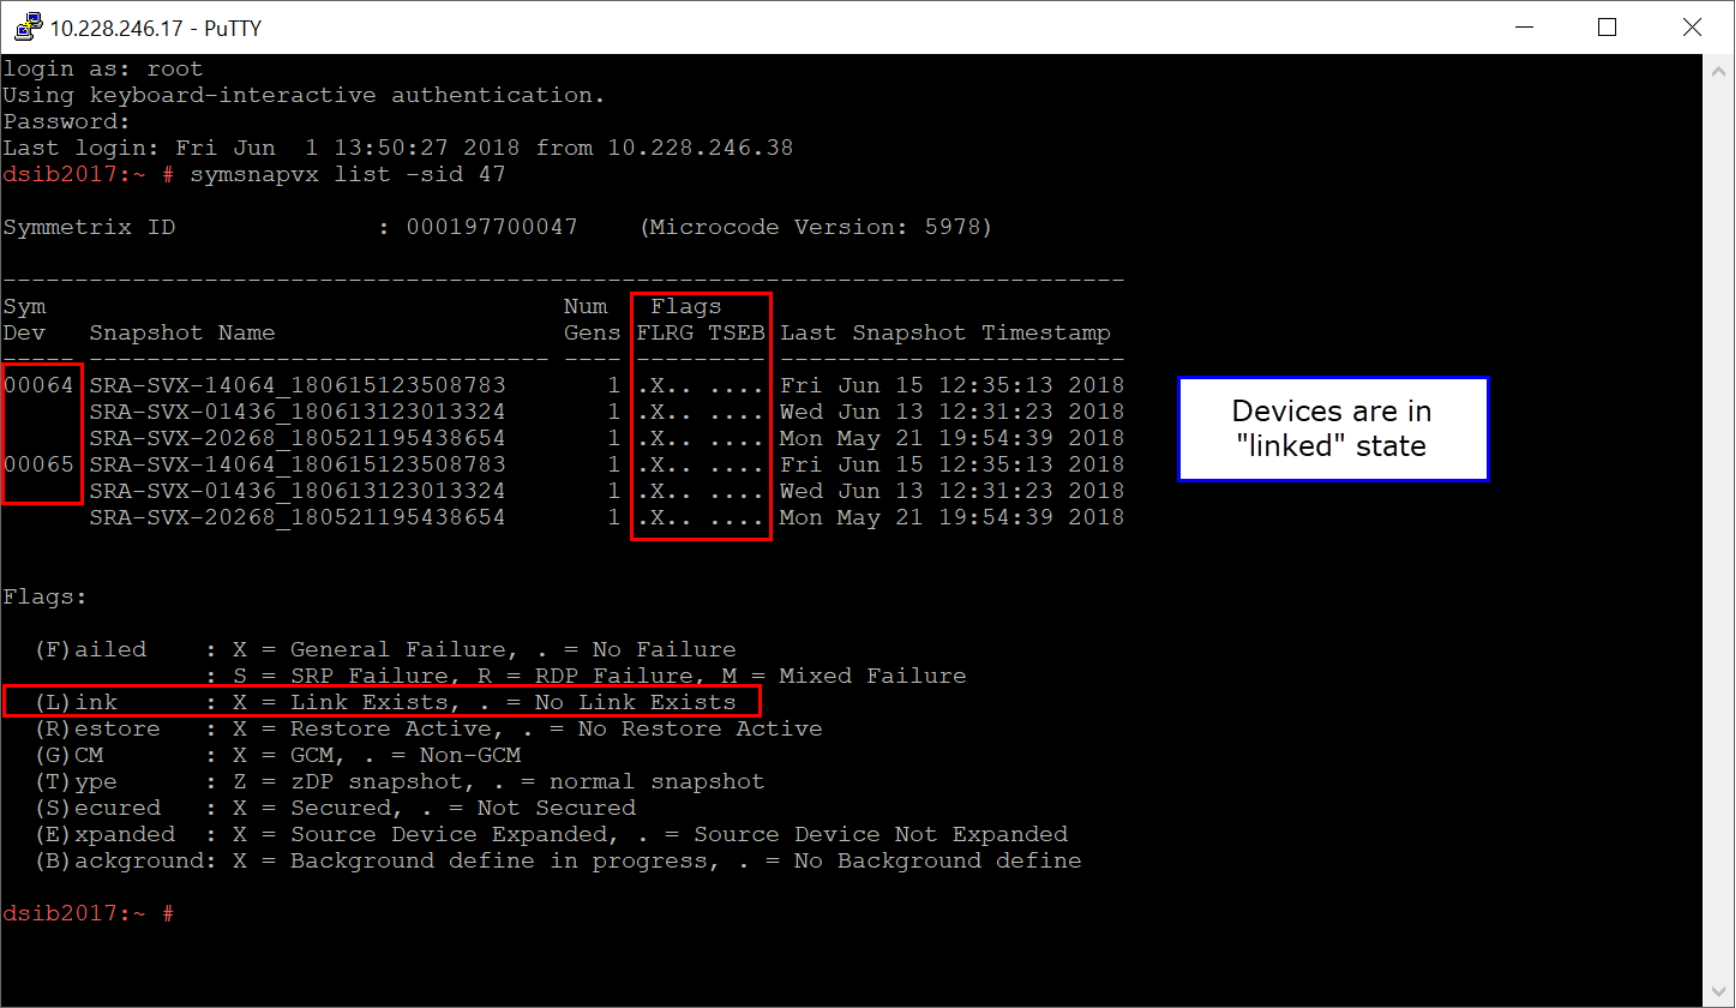
The termination of the recovery plan test is accomplished by clicking the Cleanup link as discussed previously in this chapter. The SRA automatically re-creates the TimeFinder/SnapVX link during the next failover test as seen in Figure 66. Note the change in the “Last Snapshot Timestamp”. If the user prefers, the SRA can terminate all sessions (unlink and terminate) by setting the global option, TerminateCopySessions to YES.
Figure 66. Relinking TimeFinder/SnapVX devices at the end of the test of a recovery plan
Configuring TimeFinder/SnapVX for test failover with AutoTargetDevice
The process for using TimeFinder/SnapVX replicas of R2 devices is explained in this section using the global option AutoTargetDevice. This example uses synchronous SRDF, but asynchronous would follow a similar process. This process is only followed when the option AutoTargetDevice in the global options file is enabled. Note that AutoTargetDevice is only available with TimeFinder/SnapVX technology. TimeFinder/Clone will always require manual creation of the target devices. The following steps should be adhered to when testing recovery plans:
- Create a device or composite group at each site, protection and recovery, and place the R1s in the protection group, and the R2/R21s in the recovery group. In most configurations, these groups should be consistency groups.
- In order to use SnapVX with SRM, a target will be required for linking with each device. When AutoTargetDevice is set, the SRA will automatically create device targets for each R2 in the recovery plan and during the test will place those devices in the R2 storage group. If a different storage group other than the R2 is desired, it will be necessary to use the option TestReplicaMaskingControl. Be sure this feature is enabled and the R2 device(s) are configured in the masking control XML file. See Masking requirements with Masking Control Enabled.
- Using an XML text editor, be sure the EmcSrdfSraTestFailoverConfig.xml file exists, but does not contain any pairs. The default configuration is acceptable. If the file has been modified previously, when the pairs are removed be certain the XML syntax is accurate or the test will fail indicating the device pairs in the file are invalid (though there are none). During a test recovery, if the option AutoTargetDeviceReuse is enabled (default), the SRA will automatically update the EmcSrdfSraTestFailoverConfig.xml with the newly created devices.
In addition, by default the NOCOPY option is used for SnapVX. If the user desires COPY, the <CopyMode> should be adjusted in the EmcSrdfSraTestFailoverConfig.xml file along with the <ArrayId> and the <Source> devices. For most SRM tests, NOCOPY is the most appropriate mode as the intent is not for the replicas to be of a permanent or long-lasting nature.
Figure 67 shows the options file containing no actual pairings because AutoTargetDevice is in use; however notice that the R2 devices are present, the targets are empty, and that the <CopyMode> is set to COPY indicating that SnapVX will copy all the data from the sources to the targets. Note that doing so will mean that if the devices are not reused with AutoTargetDeviceReuse, the cleanup operation will take longer since the devices may require more time to drain.
Figure 67. TimeFinder/SnapVX definition when testing recovery plans with AutoTargetDevice
- Click the Test link after selecting the recovery plan that is to be tested. The SRDF SRA uses the information provided in the global options file and EmcSrdfSraTestFailoverConfig.xml.
- The testing of a recovery plan is shown in Figure 68. It can be seen from the figure that the SRA has successfully created a local copy of the devices defined in its protection group using TimeFinder/SnapVX technology. SRM has also successfully used the copy of the datastore on the VMware ESXi servers at the recovery site to power on the replica virtual machines hosted on those devices.
Figure 68. Running a test of a recovery plan using AutoTargetDevice with TimeFinder/SnapVX technology
As the EmcSrdfSraTestFailoverConfig was modified to copy the data from the target, the log file will show this Figure 69.
Figure 69. SRA log file when using AutoTargetDevice and COPY mode
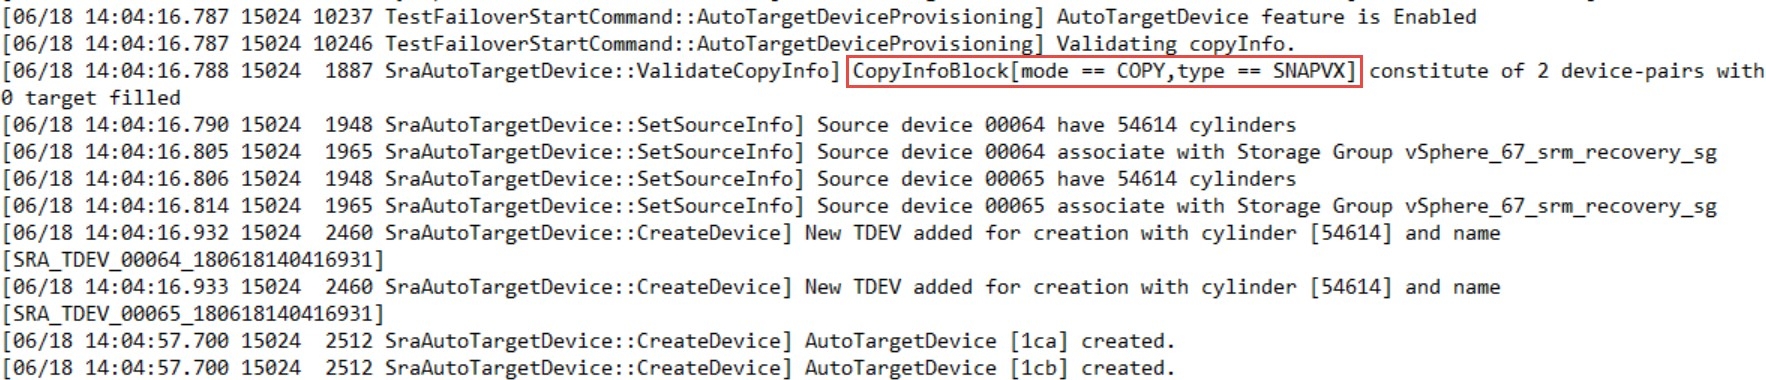
Figure 70 shows the final state with the linked targets.
Figure 70. SnapVX showing linked state of pair during the testing of a recovery plan
The termination of the recovery plan test is accomplished by clicking the Cleanup link as discussed previously in this chapter. In this example, AutoTargetDeviceReuse is disabled which means that TerminateCopySessions must be enabled in the global options file.
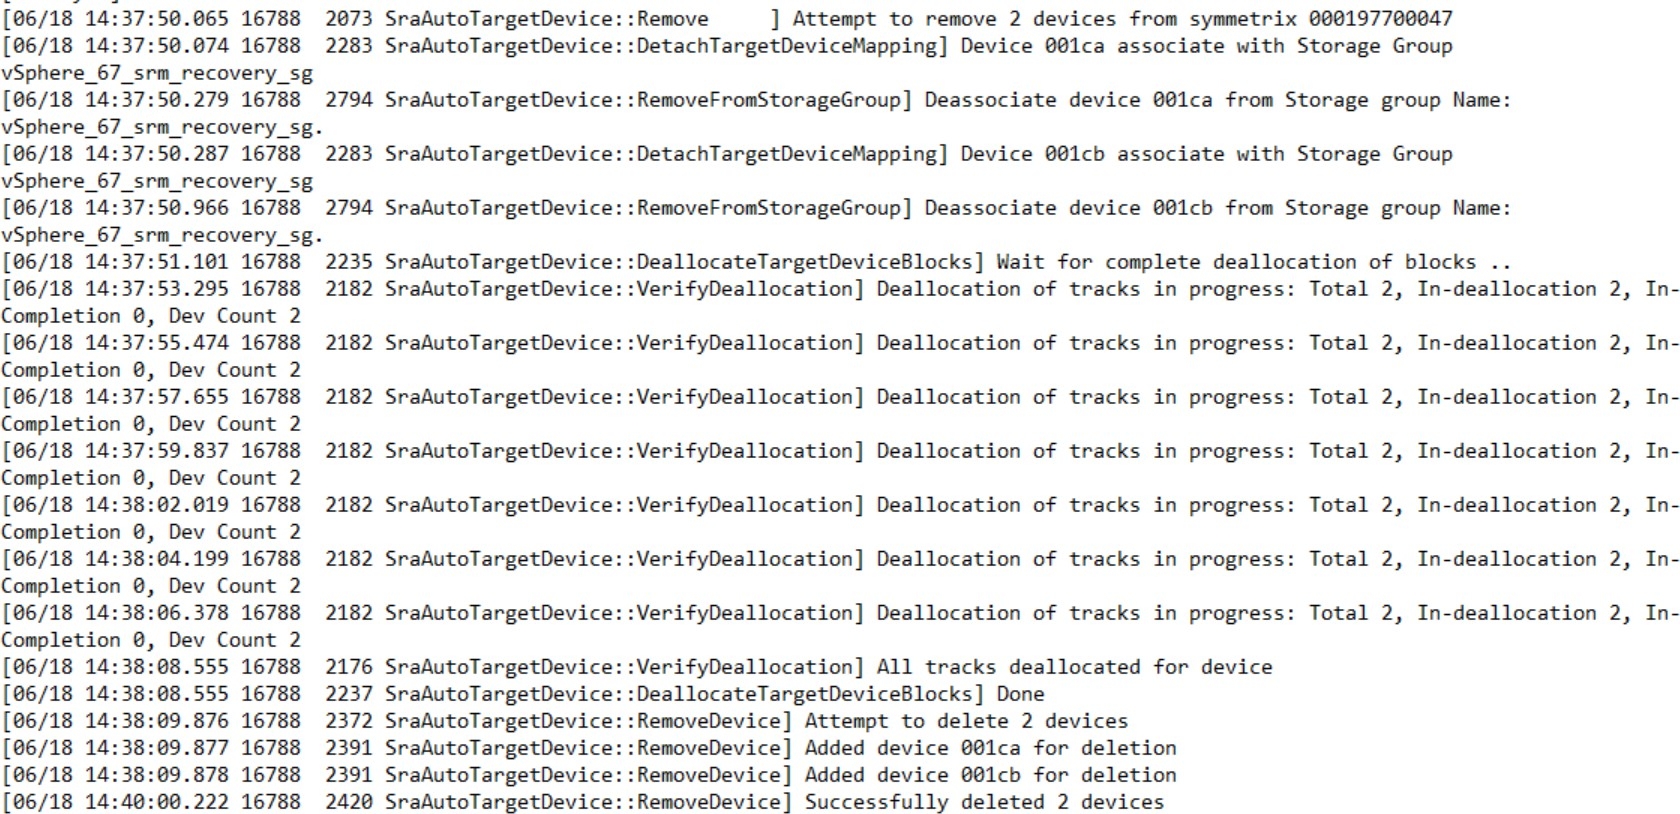
The snapshot therefore will be unlinked and terminated and the devices deleted as seen in Figure 71 and Figure 72.
Figure 72. Deallocation and deletion of TimeFinder/SnapVX devices at the end of the test of a recovery plan
Failure to unlink a SnapVX target in Cleanup
A known issue can arise when running the Cleanup after utilizing TimeFinder SnapVX in test failover. The following paragraph explains how to address it.
When a SnapVX target is first linked, all of the tracks are known as “undefined”. At this point the target does not know where in the SRP the track is located, and host access to the target must be derived from the SnapVX metadata. A background process is run to define the tracks and updates the thin device to point directly to the track location in the source device's SRP. This process is completed fairly quickly, however the larger the device, the longer the process. There can arise situations where the SRM Cleanup operation is run before the define is complete. In such cases, the SRA cannot unlink the target as that would cause the target to become undefined. An error message will appear in the SRA logs similar to the following:
[11/29 18:12:56 15592 13653 SraSnapVxDg::DoSraAction] Performing SymSnapvxControl() for the SNAPVX action [UNLINK] on Snapshot [SRA-SVX-30088_161129175135402] for
[1] devices
[11/29 18:12:58 15592 3716 SraSnapVxDg::DoSraAction] [ERROR]: Failed to perform SNAPVX operation [UNLINK] on DG [VEGRP12], Symm [000197000115].
[ERROR]: [SYMAPI_C_SNAP_UNLINK_WOSF: The unlink cannot be completed in this state unless the Symmetrix force flag is used]
[11/29 18:12:58 15592 14334
SraSnapVxGroup::DeactivateSnapshot] [ERROR]: Could not perform SNAPVX [UNLINK] on device pairs within the DG [VEGRP12].
[11/29 18:12:58 15592 10516
TestFailoverStopCommand::RunOnGroup] [ERROR]: Failed to restore deactivate snapshots for the group [VEGRP12].
Exiting with failure
If this error is received, the state of the SnapVX target can be checked with the following command and demonstrated in Figure 73.
snapvx list -sid xxx -dev xxx-linked
Figure 73. SnapVX target define status
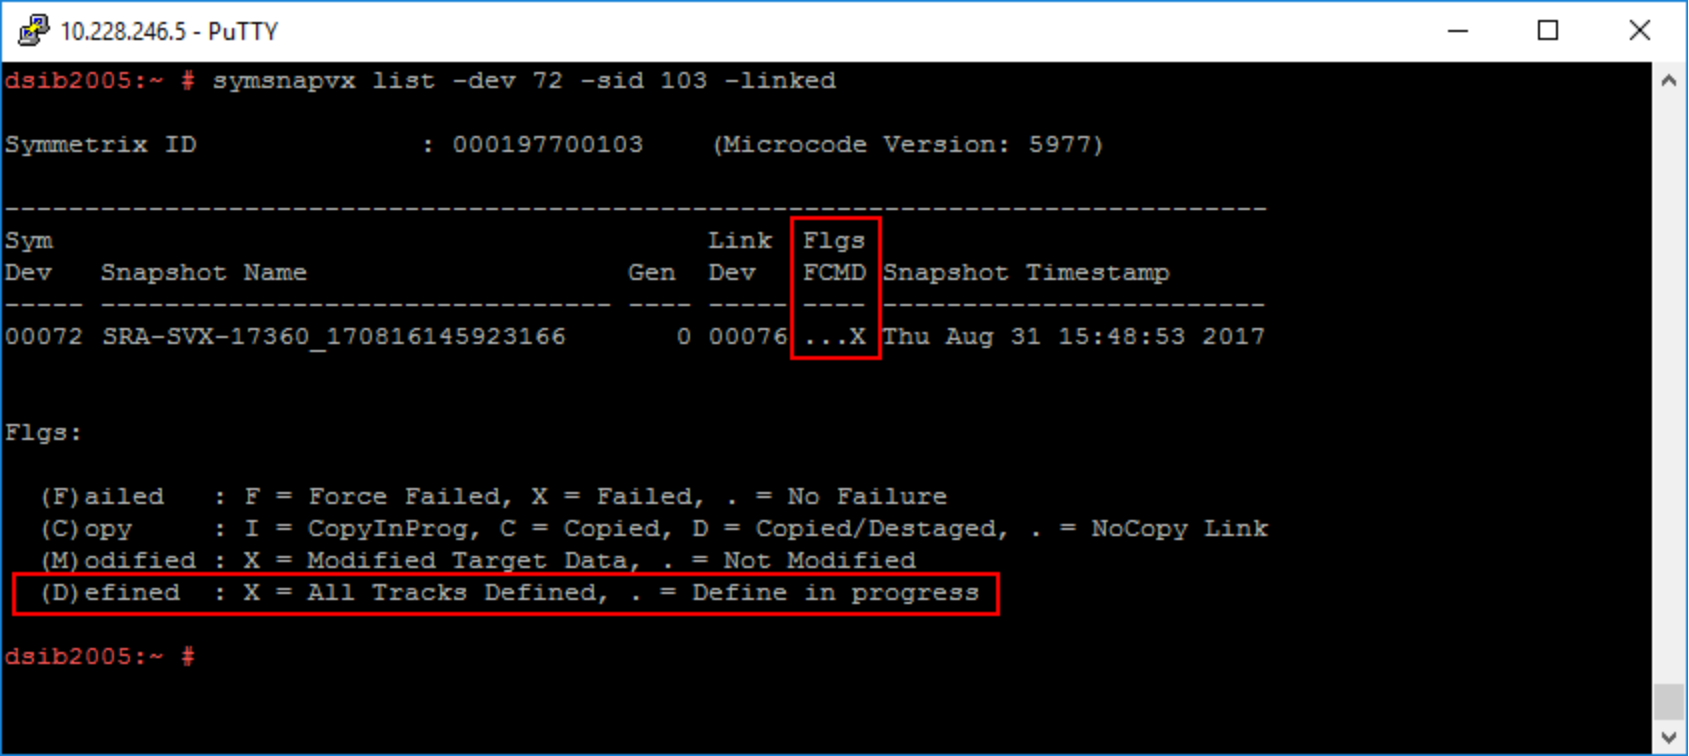
While the Defined state is in progress, a Cleanup will fail. Once the ‘X’ bit is set, it will be safe to re-run the Cleanup operation.