Assets

Cyber Intrusion Detection for z Systems (zCID)
Tue, 12 Dec 2023 18:42:09 -0000
|Read Time: 0 minutes
Any cyber security event can have a devastating impact on a company’s financials. Stolen credit cards, identity theft, hacked emails, and so on hurt both the customer and the company’s brand, even going so far as to potentially ruin that company. Data Recovery takes time, but rebuilding customer trust may take even longer.
Dell Technologies has made major investments in a series of continuous security product enhancements to help protect companies and their end users from data loss and/or compromise in the event of an attack. Whether it’s an attack on open systems data or mainframe data, the result of any attack is the same: loss of productivity and concern over theft and exposure of sensitive information.
Ideally, technologies like storage should be able to detect a cyber threat, protect data from the threat, and, in the event of a loss or corruption of data, recover to a known good point. Eight years ago, Dell Technologies developed the first snapshot-based recovery capability for mainframe and open systems data and, as of the latest release of PowerMax in October 2023, has moved into the “intrusion detection” realm of cyber resiliency.
This blog is about a new enhancement to our Mainframe Enabler Software for PowerMax that is designed to provide advanced threat detection for PowerMax mainframe environments.
Mainframe Enabler for intrusion detection
Mainframe Enabler Software (MFE) runs on a z/OS LPAR and is designed to manage PowerMax 2500/8500 and 8000. During discussions about the most recent customer requirements for this release of MFE, it became apparent that customers urgently needed a way to determine whether a cyber event was imminent or occurring. The ask was to send the equivalent of a ‘flare in the sky’ to single-out any atypical behavior in mainframe data access. Upon learning of zCID’s capability within the larger Dell cyber solution, a large mainframe service provider commented “Dell’s innovation around detection of cyber events within PowerMax and CloudIQ is ahead of any other storage provider we talked to”.
Dell Mainframe Solutions development, Product Management, and other organizations within Dell designed a way to enhance MFE to provide awareness of atypical data access behavior. The result of that work was delivered as an enhancement in MFE 10.1.0, released 17 October 2023. This enhancement is known as ‘Cyber Intrusion Detection for z Systems’ or zCID for short.
We will jump into the technical details of zCID; but first, let’s cover the What, Why, and How of this valuable new feature.
What: zCID is a utility that detects atypical data access patterns in mainframe workloads.
Why: To warn PowerMax mainframe customers that atypical access is occurring, and which should be investigated if a cyber intrusion is suspected.
How: zCID monitors the number of unique tracks accessed for mainframe CKD devices and SMS groups within a customer specified time interval. First a baseline of “normal/typical” access is confirmed by the storage administrator. The next step is to create a set of rules for warning statements that will be generated if an anomaly was detected when data was accessed. Next, zCID is started and runs continually in the background. Finally, if an intrusion is suspected, zCID raw data can be converted to a CSV format for detailed analysis.
Technical and install requirements for zCID
The minimum technical requirements for zCID are:
- MFE 10.1.0 with available SCF address space
- PowerMax 8000, 2500, or 8500
- A list of CKD volumes or SMS groups to monitor
Customers must APF-authorize the MFE 10.1.0 LINKLIB dataset and add a STEPLIB DD statement in their zCID batch jobs. (zCID can also run as a started task.)
zCID is delivered in two programs:
- ECTRAARD is the zCID utility program
- ECTREXTR is a zCID program that converts the raw zCID data to a CSV file. This CSV file is intended to be imported into Microsoft Excel for additional analysis and reporting as determined by a storage analyst.
zCID modes of operation and high-level implementation strategy
ECTRAARD can run in “Live Run mode” or “Batch Run mode”. It is important to understand these two modes before deploying zCID:
- Live Run mode: processes data in real time and collects data from the resources you tell zCID to monitor.
- Batch Run mode: takes the output produced in Live Run mode and creates reports about the historical information.
To maximize the benefits of zCID, follow these five-steps:
- Live Run mode will vary from customer to customer. Typically, you would run zCID in Live Run mode to capture access rates for the z/OS resources you are monitoring. Typically, I would start Live Run mode for one week (seven days), then capture a month end batch processing cycle, and ideally, a quarterly and year end closing cycle. With that information, you can calibrate your WARN statements for your highest accessed rate z/OS workloads that zCID is monitoring.
- Run zCID in Live Run mode over a “long” period. View this period of time as an opportunity to collect access rate information for the z/OS resources that zCID is monitoring. In the future, you can use this information to test your warning statements for atypical access rates on monitored z/OS resources.
- Stop Live Run mode at the end of the “long period" so that the datasets zCID was building can be closed.
- Run zCID Batch Mode to create reports, then analyze the results.
- Create warning statements for the atypical access rates for which you want to be notified. To calibrate the warning statements, take the datasets created in Step 2 and run zCID in Batch Run mode. Are zCID warning messages being issued from the warning statements you created?
Calibrate the WARN statements ensures that z/OS SYSLOG, z/OS master console, and z/OS zCID started tasks are not spammed with zCID warning messages. - Restart zCID in Live Run mode with the calibrated warning control statements.
zCID will now actively monitor the z/OS resources you provided and generate an alert every time an atypical access rate occurs!
Summary
Cyber Intrusion Detection for z Systems (zCID) makes Dell PowerMax the industry’s first intrusion detection mechanism for on-array mainframe storage [1]. zCID is a layer of intelligence that detects atypical data access patterns for specified workloads by providing for first-time PowerMax customers insight into their z/OS workloads’ access rates. Customers can then automate the monitoring of those workloads with the goal of detecting cyber events within their mainframe storage infrastructure.
Check out https://infohub.delltechnologies.com/ for more information about zCID and Dell’s PowerMax mainframe solutions.
Author: Justin Bastin, Senior Principal Engineer
[1] Based on Dell's internal analysis comparing PowerMax 2500/8500 cyber detection for mainframe storage to mainstream mainframe competitors. August 2023.

Kubernetes on Z with PowerMax: Modern Software Running on Mainframe
Mon, 02 Oct 2023 13:21:45 -0000
|Read Time: 0 minutes
Benefits of Kubernetes on System Z and LinuxOne
When I was a customer, I consistently evaluated how to grow the technical influence of the mainframe platform. If I were talking about the financials of the platform, I would evaluate the total cost of ownership (TCO) alongside various IT solutions and the value deduced thereof. If discussing existing technical pain points, I would evaluate technical solutions that may alleviate the issue.
For example, when challenged with finding a solution for a client organization aiming to refresh various x86 servers, I searched online presentations, YouTube videos, and technical websites for a spark. The client organization had already identified the pain point. The hard part was how.
Over time, I found the ability to run Linux on a mainframe (called Linux on Z), using an Integrated Facility for Linux (IFL) engine. Once the idea was formed, I started baking the cake. I created a proof-of-concept environment installing Linux and a couple of applications and began testing.
The light-bulb moment came not in resolving the original pain point, but in discovering new opportunities I had not originally thought of. More specifically:
- Physical server consolidation – I’ll create a plethora of virtual servers when needed
- License Consolidation – Certain applications with x86 were licensed on a per engine basis. A quad core x86 server may need four application licenses to function. I needed one license for my Linux on Z environment (at the time of testing)
- Scalability – I could scale horizontally by adding more virtual machines and vertically by increasing the network ports accessible to the server and adding more memory/storage
- Reliability – Mainframe technology has been known to be reliable, utilizing fault tolerant mechanisms within the software and hardware to continue business operations
With the 2023 addition of Kubernetes on LinuxOne (mainframe that only runs Linux), you can scale, reduce TCO, and build that hybrid cloud your IT management requires. With Kubernetes providing container orchestration irrelevant of the underlying hardware and architecture, you can leverage the benefits of LinuxOne to deploy your applications in a structured fashion.
Benefits when deploying Kubernetes to Linux on Z may include:
- Enablement of DevOps processes
- Container Scalability – using one LinuxOne box with hundreds (if not thousands) of containers
- Hybrid Cloud Strategy – where LinuxOne is servicing various internal business organizations with their compute and storage needs
With Dell providing storage to mainframe environments with PowerMax 8500/2500, a Container Storage Interface (CSI) was created to simplify your experience with allocating storage to Kubernetes environments when using Linux on Z with Kubernetes.
The remaining content will focus on the CSI for PowerMax. Continue reading to explore what’s possible.
Deploy Kubernetes
Linux on IBM Z runs on s390x architecture. This means that all the software we use needs to be compiled with that architecture in mind.
Luckily, Kubernetes, CSI sidecars, and Dell CSI drivers are built in Golang. Since the early days of Go, the portability and support of different OS and architectures has been one of the goals of the project. You can get the list of compatible OS and architecture with your go version using the command:
go tool dist listThe easiest and most straightforward way of trying Kubernetes on LinuxOne is by using the k3s distro. It installs with the following one-liner:
curl -sfL https://get.k3s.io | sh -
Build Dell CSI driver
The Dell CSI Driver for PowerMax is composed of a container to run all actions against Unisphere and mount a LUN to a pod, with a set of official CSI sidecars to interact with Kubernetes calls.
The Kubernetes official sidecars are published for multiple architectures including s390x while Dell publishes only images for x86_64.
To build the driver, we will first build the binary and then the image.
Binary
First, let’s clone the driver from https://github.com/dell/csi-powermax in your GOPATH. To build the driver, go in the directory and just execute:
CGO_ENABLED=0 GOOS=linux GOARCH=s390x GO111MODULE=on go buildAt the end of the build, you must have a single binary with static libs compiled for the s390x:
file csi-powermax
csi-powermax: ELF 64-bit MSB executable, IBM S/390, version 1 (SYSV), statically linked, Go BuildID=…, with debug_info, not stripped
Container
The distributed driver uses minimal Red Hat Universal Base Image. There is no s390x compatible UBI image. Therefore, we need to rebuild the container image from a Fedora base-image.
The following is the Dockerfile:
# Dockerfile to build PowerMax CSI Driver
FROM docker.io/fedora:37

# dependencies, following by cleaning the cache
RUN yum install -y \
     util-linux \
     e2fsprogs \
     which \
     xfsprogs \
     device-mapper-multipath \
     && \
     yum clean all \
     && \
     rm -rf /var/cache/run

# validate some cli utilities are found
RUN which mkfs.ext4
RUN which mkfs.xfs

COPY "csi-powermax" .
COPY "csi-powermax.sh" .
ENTRYPOINT ["/csi-powermax.sh"]
We can now build our container image with the help of docker buildx, which makes building cross-architecture a breeze:
docker buildx build -o type=registry -t coulof/csi-powermax:v2.8.0 --platform=linux/s390x -f Dockerfile.s390x .The last step is to change the image in the helm chart to point to the new one: https://github.com/dell/helm-charts/blob/main/charts/csi-powermax/values.yaml
Et voilà! Everything else is the same as with a regular CSI driver.
Wrap-up, limitations, and disclaimer
Thanks to the open-source model of Kubernetes and Dell CSM, it’s easy to build and utilize them for many different architectures.
The CSI driver for PowerMax supports FBA devices via Fiber Channel and iSCSI. There is no support for CKD devices which require code changes.
The CSI driver for PowerMax allows CSI-compliant calls.
Note: Dell officially supports (through Github tickets, Service Requests, and Slack) the image and binary, but not the custom build.
Useful links
Stay informed of the latest updates of the Dell CSM eco-system by subscribing to:
Authors: Justin Bastin & Florian Coulombel

Unreducible Capacity Alerting for PowerMax for Possibly Indicating a Ransomware Attack
Thu, 31 Aug 2023 21:00:21 -0000
|Read Time: 0 minutes
Unreducible Capacity Alerting for PowerMax for Possibly Indicating a Ransomware Attack
With the release of PowerMaxOS 6079.175.0042 and Unisphere 10.0.1 (March 2023), you can now get anomaly detection for your PowerMax storage environment. This blog explores the various ways you can set up capacity anomaly detection for your PowerMax storage environments that could possibly indicate a ransomware attack occurring on your PowerMax.
Unisphere 10.0.1 provides a new performance metric called Unreducible Capacity, which reports on the unreducible capacity in the storage array. With data reduction capabilities enabled by default, this metric monitors your unreducible capacity for a system and Storage Group. To chart the unreducible capacity within a PowerMax environment:
- Log in to Unisphere 10.0.1.
- Select the PowerMax for which you would like to chart unreducible capacity (this assumes that the PowerMax is leveraging DRR capabilities).
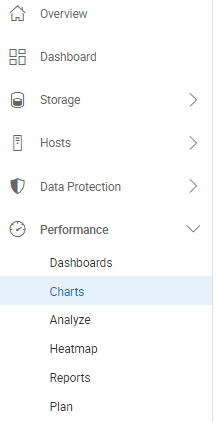
- On the left-hand side of Unisphere, expand the Performance section and select Charts (example shown here).
- Locate the Time Frame section and select a time frame. Please note, the ‘Unreducible Capacity’ metric is selectable with all ‘Diagnostic’ and ‘Historical’ time frames, however the metric is not selectable with the Realtime time frame.
- Under Category, Unreducible Capacity is eligible for System and Storage Group (which is under the System & Hosts category). There are benefits to charting unreducible capacity for system and Storage Groups. The benefits are:
- For System – Gives customers an idea if a massive ransomware attack is occurring across the whole system.
- For Storage Groups – Gives customers a more surgical approach because Storage Groups are typically created on an application-by-application basis. Therefore, customers can chart the unreducible capacity per Storage Group and give an indication if a ransomware attack may be occurring on the application.
- Change Data Format from the default setting of Avg (for average) to Max.
- If charting the System, check under Instances for the PowerMax array serial number you want to chart.
- Under Metric, select All for all the available metrics.
- In the All Metrics field, enter unreducible and Unreducible Capacity appears. Select Unreducible Capacity, and click Create at the bottom of the screen.
Here is how the screen now appears:
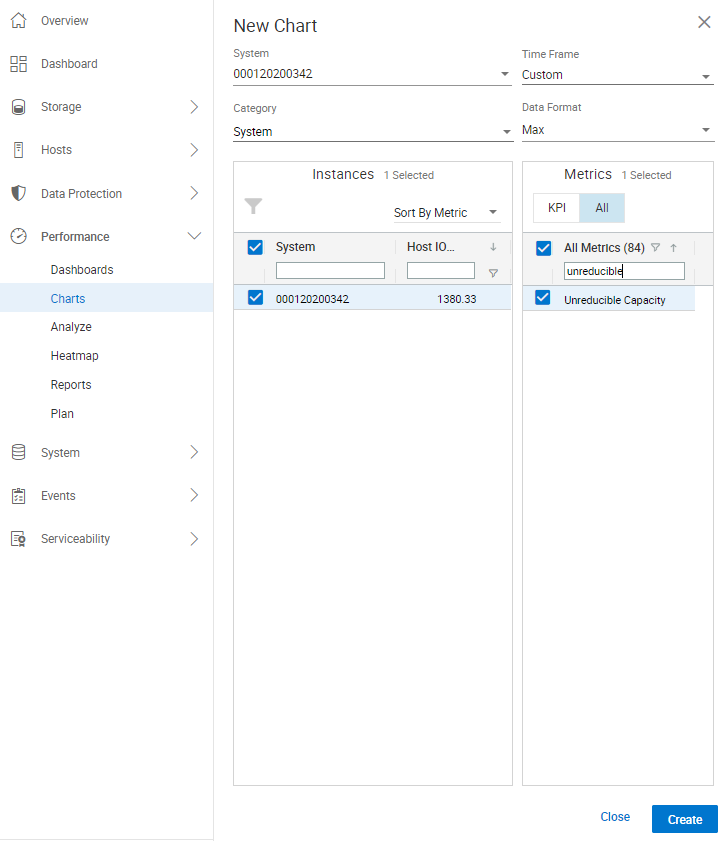
This figure shows how customers can chart the Unreducible Capacity metric in Unisphere. Customers can also set a Performance Threshold and Alert within the Settings section of Unisphere. Doing this enables customers (after monitoring the System and Storage Group for the appropriate thresholds) to set an alert within Unisphere. Unisphere will generate an alert within Unisphere and could email and/or have SNMP send the alert to stakeholders if the thresholds set for Unreducible Capacity are exceeded. To set an alert for Unreducible Capacity:
- Log in to Unisphere.
- Navigate to and select the gear icon in the top right-hand corner of Unisphere. The gear icon is the Settings section for Unisphere for this PowerMax instance.
- On the left-hand side, navigate to the Alerts section and expand it.
- Select the Performance Thresholds and Alerts section. This opens a panel to configure performance thresholds and alerts within Unisphere.
- By default, the category System is selected. To create a threshold for Unreducible Capacity for System:
- Select the Create button.
- On the top right-hand side, select the All setting to view all the Performance Metrics available within Unisphere for the category System.
- The metrics are listed in alphabetical order, so scroll down to the Unreducible Capacity metric and select it.
- Enter a number for First Threshold and a higher number for Second Threshold.
- On the bottom right-hand side, click OK to create a Performance Threshold alert for unreducible capacity being measured against the PowerMax system.
Here is how the information appears with these steps completed:
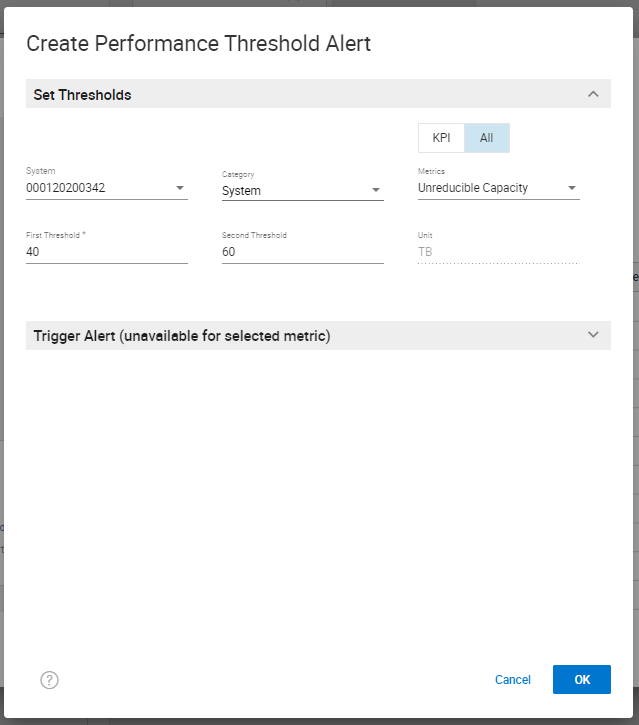
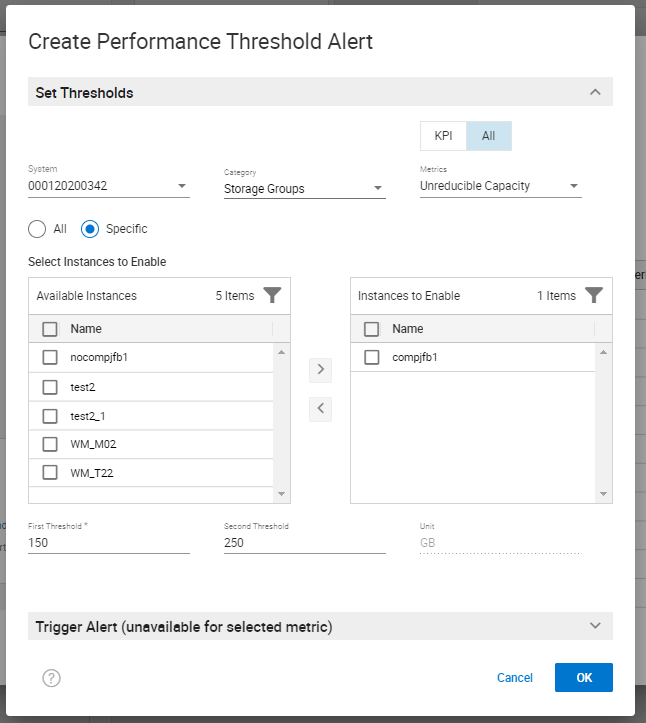
You can change the Category shown in this screenshot from System to Storage Groups to set a performance threshold alert for an individual storage group. Here is a screenshot of creating a performance threshold and alert for Storage Groups (Note: I selected the radio button Specific to pick specific Storage Groups that I want to monitor and alert on).
If you have SRS enabled on your PowerMax array, you can onboard CloudIQ through Unisphere. CloudIQ is a monitoring and reporting tool for all supported Dell assets that feed data into CloudIQ. With PowerMaxOS 6079.175.0042, you can use CloudIQ for Capacity Anomaly Detection on a PowerMax storage array.
For more information about the technologies mentioned in this blog, see the following resources:
- For Unisphere information, review the Dell Technologies Support page
- PowerMaxOS Release Notes
Authors: Justin Bastin (Senior Principal Engineer) and Richard Pace (Principal Engineering Technologist)

Querying Your PowerMax Devices in z/VM
Tue, 21 Mar 2023 14:26:50 -0000
|Read Time: 0 minutes
If you are running the IBM z/VM hypervisor, you can install, and run, and manage various operating systems on it. When managing PowerMax devices on z/VM (called minidisks), you use a Unit Control Block (UCB) as a virtual device identifier. This is important to know when assigning and working with the devices in z/VM and the guest operating systems.
With PowerMax and VMAX, there are Symmetrix IDs associated with a device. My customers ask how to translate a given UCB on the z/VM hypervisor that deduces the Symmetrix ID. Dell Technologies created a ‘freeware’ program called SYMMQRY that enables you to:
- Run a command on z/VM with the UCB as input
- Use the SYMMQRY command, which provides z/VM with the Symmetrix ID for users of that device
The use case is that a customer who is using Solutions Enabler to execute commands against their PowerMax or VMAX needs the Symmetrix ID to complete the execution. Leveraging the SYMMQRY command on z/VM provides the information needed to get the Symmetrix ID to execute the needed Solutions Enabler command(s). I’ve outlined a process below that explains:
- Notes and hints about the SYMMQRY program
- A summary of the SYMMQRY program
- How to get the command
- Installing the command
- Using the command
Notes and hints about the SYMMQRY program
- This program is considered ‘freeware’ as described in this KB article.
- Although the source indicates that there is an ‘ALL’ option, it currently only works on a single device.
- Because the program is freeware, you have access to the source. If you have someone proficient with assembler, then they can modify it to meet their needs.
Summary
Dell Technologies provides the freeware program SYMMQRY to translate between a UCB and a SYMMID. When unpacking SYMMQRY, you get two files: the source and module files. For more information, see the KB article.
Getting the SYMMQRY program
- Read the KB article.
- In the Attachments section of the article, download the SYMMQRY.VMARC file.
Installing the SYMMQRY program
- If you don’t have VMARC (the IBM utility to unpack VMARC), download VMARC and install it.
- Upload the SYMMQRY.VMARC file to z/VM
- During the FTP process, ensure that the transmission to z/VM is done in BINARY.
- To ensure that you are uploading the SYMMQRY.VMARC file in FIXED format, open a CMS window and use the FTP quote subcommand.
- On the z/VM user where SYMMQRY VMARC is, unpack the file (assuming the file is on my ‘A’ Fm)
- I used ‘VMARC UNPK SYMMQRY VMARC A’
- After unpacking the SYMMQRY VMARC file, you should see the following output:
SYMMQRY ASSEMBLE A1... <bytes in and out information>
SYMMQRY MODULE A1… <bytes in and out information>
The source code file is called SYMMQRY ASSEMBLE. The module file is called SYMMQRY MODULE.
Using the SYMMQRY program
- While in CMS, attach a UCB to the z/VM userid that you want to query.
- Execute the SYMMQRY command against that device.
a. USERID JBASTIN, Device - 7700
q 7700
DASD 7700 CK7700
b. Ready;
att 7700 *
DASD 7700 ATTACHED TO JBASTIN 7700 WITH DEVCTL
c. Ready;
q 7700
DASD 7700 ATTACHED TO JBASTIN 7700 R/W CK7700
d. Ready;
symmqry 7700
DASD RDEV SYMMQRY :CAP(CYL/MB) UCODE SYMM-SER/ALPHA
7700 7700 032E 10017/8514 5978 0001976-00191/AWCTY
Output format
UCB = 7700
RDEV = 7700
SYMMQRY = 032E (this is the SYMMID you requested)
:CAP(CYL/MB) – Capacity information
UCODE: PowerMax Operating System level
SYMM – Symmetrix Serial Number
Alpha – If you look in Unisphere this is the SPLIT ‘Alpha Serial #’. This is just another way to identify the split. Here is a screen shot of what mine is in Unisphere:

In conclusion, the SYMMQRY is a freeware program that offers z/VM you additional insight into your PowerMax/VMAX investment. Customers who are knowledgeable about Assembly language can modify SYMMQRY and customize it for their needs.
Author: Justin Bastin

Important Updates in Dell’s Geographically Dispersed Disaster Restart (GDDR)
Tue, 30 Aug 2022 20:53:25 -0000
|Read Time: 0 minutes
Dell Technologies created Geographically Dispersed Disaster Restart (GDDR) to provide mainframe customers a comprehensive business continuity automation product for their Dell PowerMax Storage and Disk Library for mainframe virtual tape environments. GDDR achieves this by reacting to events within your IT environment.
The three functions of automate, react, and monitor (ARM) combine to enable continuous operations across both planned and unplanned outages. GDDR is designed to perform planned data-center site-switch operations and to restart operations following disasters. These incidents can range from the loss of compute capacity or disk-array access, to the total loss of a single data center, or a regional disaster resulting in the loss of dual data centers. GDDR also provides automation to protect data from cyberattack in a separate physical vault array. For more information about GDDR, see the document GDDR (Geographically Dispersed Disaster Restart) for PowerMax 8000 and VMAX ALL FLASH 950F.
Dell’s GDDR 5.3 enhancements
GDDR introduced an exciting new feature in GDDR 5.3 called Cyber Protection Automation (zCPA) which populates a separate physical cyber vault for your mainframe environment. zCPA automates cyber protection copy creation and preservation by using Dell’s Data Protector for z Systems (zDP). zCPA automates the creation and transmission of PowerMax snapshots to a physically separate cyber vault PowerMax array. This provides a protected copy of data that can be used for testing purposes, recovery from a cyber event, or an analytical process to better understand the extent of damage caused by a cyberattack.
The transmission of data to the cyber vault leverages SRDF/Adaptative Copy. To take advantage of zCPA, customers need GDDR 5.3 with the zCPA PTF, Mainframe Enabler 8.5, and a PowerMax at 5978.711.711 or higher.
Unique benefits of GDDR zCPA types
zCPA supports air gapped and non-air gapped physical cyber vaults. Any site in a GDDR topology can be an attached cyber vault array managed by zCPA. To provide customers choice, there are three types of methods for creating zCPA vault arrays. The three zCPA types are defined by the different configuration and operational attributes that dictate how zCPA will function.
zCPA Type 1
- Type 1 is defined as an environment that has no airgap in connectivity between a data center and the cyber vault. The data copied to the cyber vault is initiated when a newly created zDP Snapset is detected. The cyber vault in Type 1 does not have to be a dedicated physical vault and could be another storage array within the production data center. This type is the default for zCPA.
zCPA Type 2
- Type 2 is an air-gapped environment between two storage environments. The data copied to the cyber vault is triggered by SRDF link online operation. GDDR monitors the SRDF Link Operation process to know when SRDF connectivity to the vault has been established and closed it when it has populated the vault.
zCPA Type 3
- Type 3 is an environment that does not provide an airgap solution. The data copied to the cyber vault is triggered by the SCHEDULE or INTERVAL parameter in GDDR.
The airgap support between the production and vault site is optional.
For more information about GDDR’s zCPA with respect to cyber, see the white paper Dell PowerMax: Cyber Security for Mainframe Storage or contact us at mainframe@dell.com.
Resources
- Mainframe Enablers TimeFinder SnapVX and zDP 8.5 Product Guide
- Data Protector for z Systems (zDP) Essentials White Paper
- Dell PowerMax: Cyber Security for Mainframe Storage
- GDDR (Geographically Dispersed Disaster Restart) for PowerMax 8000 and VMAX ALL FLASH 950F
Author: Justin F. Bastin

PowerMax and PowerStore Cyber Security
Tue, 15 Mar 2022 19:24:40 -0000
|Read Time: 0 minutes
Dell Technologies takes a comprehensive approach to cyber resiliency and is committed to helping customers achieve their security objectives and requirements. Storage Engineering Technologists Richard Pace, Justin Bastin, and Derek Barboza worked together, cross platform, to deliver three independent cyber security white papers for PowerMax, Mainframe, and PowerStore:
- Dell PowerMax: Cyber Security
- Dell PowerMax: Cyber Security for Mainframe Storage
- Dell PowerStore: Cyber Security
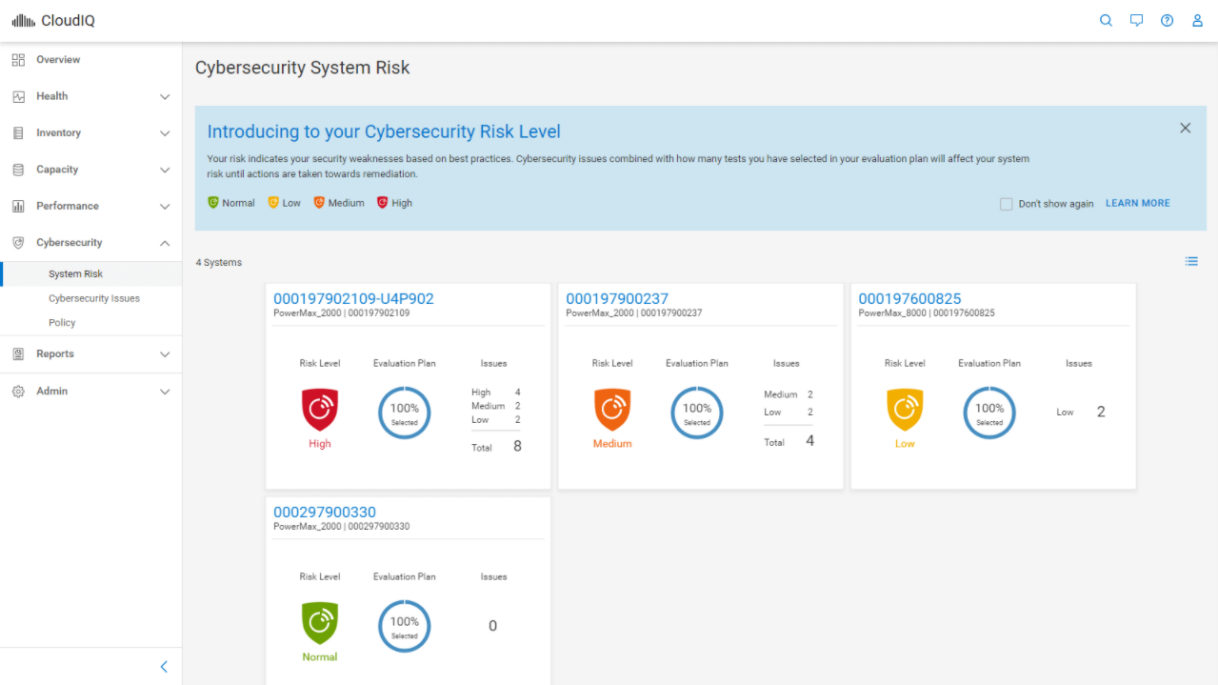
Each paper acts as a single point where customers can gain an understanding of the respective robust features and data services available to safeguard sensitive and mission critical data in the event of a cyber crime. All three papers leverage CloudIQ and the CyberSecurity feature to provide customers insight in anomaly detection.
The following figure shows a CloudIQ anomaly that indicates unusual behavior in a customer’s environment:

Backed by CyberSecurity in CloudIQ, we can see how quickly CloudIQ detects the issue and provides the details for manual remediation.
Dell has an ingrained culture of security. We follow a 'shift-left' approach that ensures that security is baked into every process in the development life cycle. The Dell Secure Development Lifecycle (SDL) defines security controls based on industry standards that Dell product teams adopt while developing new features and functionality. Dell’s SDL defines security controls that our product teams adopt while developing new features and functionality. Our SDL includes both analysis activities and prescriptive proactive controls around key risk areas.
Dell strives to help our customers minimize risk associated with security vulnerabilities in our products. Our goal is to provide customers with timely information, guidance, and mitigation options to address vulnerabilities. The Dell Product Security Incident Response Team (Dell PSIRT) is chartered and responsible for coordinating the response and disclosure for all product vulnerabilities that are reported to Dell. Dell employs a rigorous process to continually evaluate and improve our vulnerability response practices, and regularly benchmarks these against the rest of the industry.
Resources
- Dell PowerMax: Cyber Security
- Dell PowerMax: Cyber Security for Mainframe Storage
- Dell PowerStore: Cyber Security
Authors: Richard Pace, Justin F. Bastin


