


Using the VMware SD-WAN Orchestrator API to build custom reporting tools
Mon, 12 Apr 2021 14:46:08 -0000
|Read Time: 0 minutes
What are APIs?
In this blog post, I will lay out the fundamentals of why and how to use a RESTful API. This is a relatively new journey for me, and I want to share with you my eureka moments and hopefully inspire you in the way that you handle network device management. I believe there is nothing better than a working example, so I’ve included a working API application that shows the peak bandwidth used by all active edges in your enterprise.
Before we get into Postman and leveraging existing SD-WAN APIs, let us break down what an API is, what REST means, and how the two come together.
An API, or Application Programming Interface, is simply an intermediary software layer which allows two applications to communicate with each other. The Internet is largely built on this principle, and the VMware SD-WAN Orchestrator is no exception. For example, when you go to Monitor > Edges, a list of your edges appears.
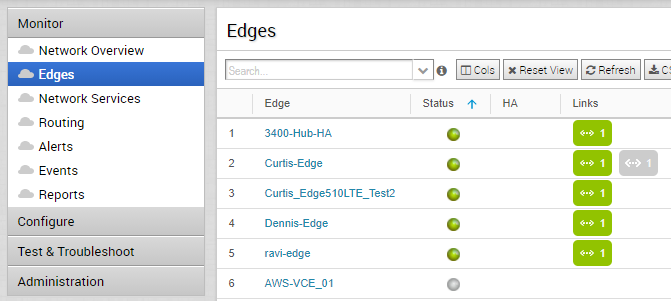
This list of Edges appears because the UI is making an API request for you and the Orchestrator web server is responding back accordingly. An API call or request consists of an HTTP method, headers, and a request body. The request body contains a method. In the request above, the HTTP method is GET, one of the headers specifies the body type, and another specifies the authentication method.
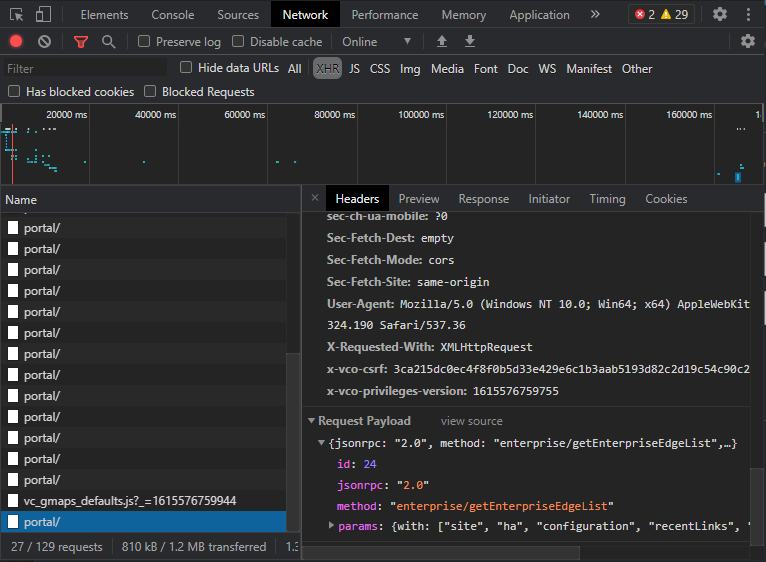
You can see this process in action by using Chrome and the developer tool set. Press Ctrl+Shift+I to open the developer tools. Go to the Network tab and filter by XHR. Navigating the various portals and objects listed, you see multiple API methods being made as you navigate the screens. In this case, when you click Edges, the Orchestrator application is sending a well-known method named /enterprise/getEnterpriseEdgeList to the Orchestrator API host, and the web server is responding back with the appropriate data associated with that method.
Click the Preview tab and you will see all the data associated with the request, from creation date, edge name, serial numbers, and software revision.
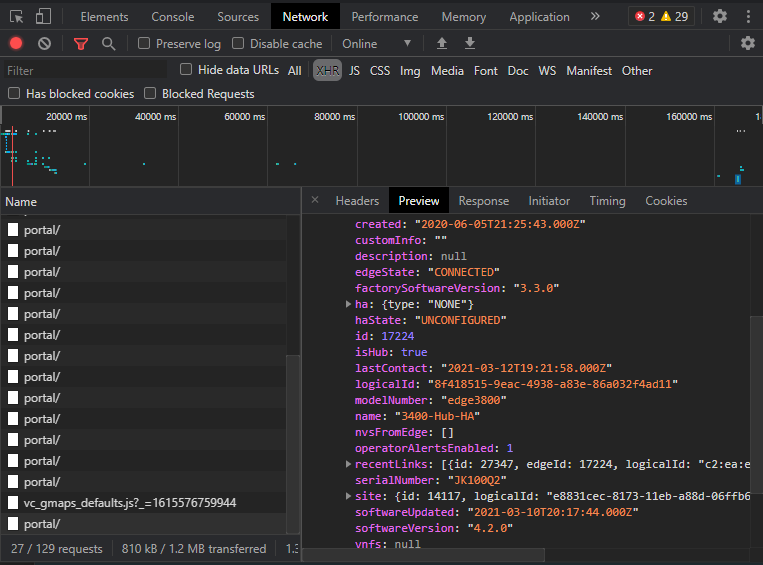
Knowing this, you can browse the Orchestrator UI with the developer tools open and see exactly how information is sent and obtained. This is the cornerstone of building an application in Postman, or any modern programming language, to extract additional value from the Orchestrator API.
The terms API, REST, and RESTful are new to networking engineering, but as you have seen, you have been using RESTful systems daily as you browse the Internet. So, what is REST then? REST stands for REpresentation State Transfer, and it is the most common approach to designing and developing network applications. To be RESTful is to adhere to the REST design guidelines. This approach relies on a stateless client/server model, in which the client tracks the session and the server holds no client state or context. And best yet, HTTP is the most commonly used underlying transport protocol.
REST was originally designed as a paradigm for the HTTP protocol. As a result, most RESTful APIs are implemented over HTTP methods and use common verbs such as GET, PUT, and DELETE. A RESTful client connects to the interface, sends formatted data—for example, a configuration or show command—and the device responds with an HTTP code and optionally formatted data. The returned HTTP code is a standard response; for example, 200 = OK, 401 = unauthorized, and so on, informs the client if the command was successful. As shown below, to poll a single Edge interface, three requests must be made:
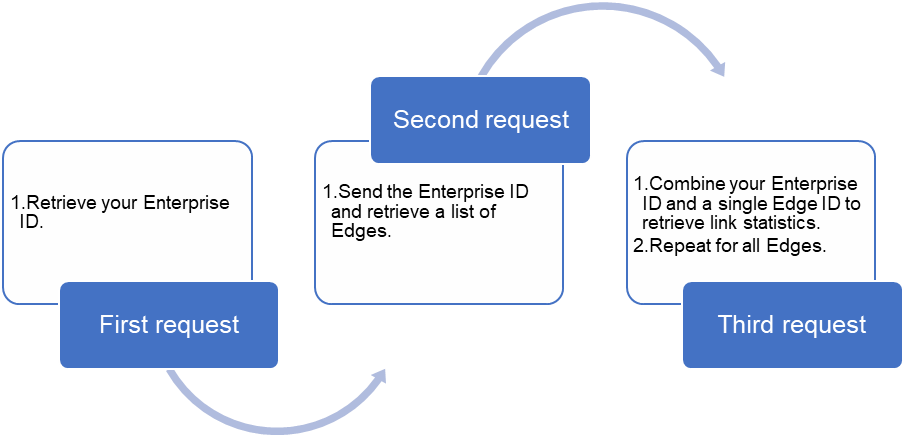
These requests can be written in any programming language that supports API requests. Later in this post, we will use Postman to make it easier to present, but you can use cURL or Client URL. cURL is part of the libcurl library and is part of any common Linux distribution. It provides a way to interact with URLs from the command-line interface. For example, using cURL, the second request above would look like this:
curl --location --request POST 'https://vco109-usca1.velocloud.net/portal/rest/enterprise/getEnterpriseEdges' \
--header 'Content-Type: application/json' \
--header 'Authorization: Token eyJhbGciOiJIUzI1NiIsInR5cCI6IkpXVCJ9.eyJ0b2tlblV1aWQiOiI3ZWVjMTlkNC0zNzY0LTQ2MDctYWY1Mi00YjI0MWQ0Y2RiYjciLCJleHAiOjE2NDQ2MzE0NDgwMDAsInV1aWQiOiIyNWM0Y2M5MC0xNTNlLTExZTgtYTk0NC0wNjMyMzA4NzIwZjIiLCJpYXQiOjE2MTMwOTU0NTF9.oJeVnr1iuAqabf5XmcDOE2prieOp8rJriyrHfGLAKes' \
--data-raw '{
"enterpriseId": 778,
"with": [],
"fieldsNeeded": [
"id",
"siteId",
"modelNumber",
"name"
]
}'
The method passes three key elements:
- The URL of the VCO and API method using HTTP POST
- A header specifying the authentication method used in a token
- A method body specifying the needed data to return (in this case, the Edge ID and SiteID information)
The returned response is structured data using JSON. For the previous example, the method would return a response body like this:
Status: 200 OK
Time: 73 ms
Size: 1.2 KB
Response Body:
[
{
"id": 17224,
"siteId": 14117,
"modelNumber": "edge3800",
"name": "3400-Hub-HA",
"isHub": true
}
]
It is now up to your application to store the information in the response body to use in the next API request. The data is structured and enables extracting specific values in any language.
VMware SD-WAN Orchestrator API documentation
At the time of this post, two APIs exist for VMware SD-WAN, Orchestrator V1 and V2. V2 is scheduled for release in mid-2022 and will be feature-compatible with V1. This blog post uses V1 and will be compatible with V2 with only minor changes. The following are links to both API versions:
- Orchestrator API V1 documentation - https://code.vmware.com/apis/1115/velocloud-sdwan-vco-api
- Orchestrator API V2 documentation - https://developer.vmware.com/docs/vmware-sdwan-rest/latest/
Orchestrator API V1 responds to an API method using the VCO Portal. The VCO Portal allows network administrators to manage network and device configuration and to query current or historical network and device state. API clients may interact with the Portal through a REST interface using HTTP POST requests. The interface is accessible through the /portal/rest/ base path. This means that all API methods listed in the document are appended to this path. For example, using cURL again, the method /event/getEnterpriseEvents would look like this:
curl --header 'Content-Type: application/json' --data
'{"enterpriseId":1}' --cookie cookies.txt -X POST
https://vco.velocloud.net/portal/rest/event/getEnterpriseEvents
For this example, I use three methods. See the V1 documentation for explanations and more detail.
- enterprise/getEnterprise – Gets data for the specified enterprise for your organization.
- enterprise/getEnterpriseEdges – Gets all edges associated with the Enterprise ID.
- metrics/getEdgeLinkSeries – Gets link metric time series data for an edge.
The first method, enterprise/getEnterprise, obtains the UID associated with the Orchestrator Enterprise account. The second fetches a list of edges and their associated details. The final method retrieves link metrics from the specific edges.
Before using any of these methods, let us discuss authentication. VMware SD-WAN Orchestrator API V1 supports both cookies and token authentication. Token-based authentication has gained prevalence over the last few years due to the rise of single-page applications, web APIs, and IoT. Another advantage of token-based authentication is that it is stateless. This means that the server does not keep a record, like cookies, of which users are logged in. Instead, a token is sent with every request and is specified in the header of the request.
I strongly recommend using token-based authentication and avoiding cookie-based authentication. Use of tokens is RESTful, and it is the only authentication method that Orchestrator V2 supports. Later in this post, I will show you how to obtain an API token from the Orchestrator UI and how to use the token for each method.
Using Postman for API testing
Postman is an API testing tool that simplifies API workflows and provides an ideal platform for getting started with building API requests. Recall that RESTful APIs are stateless, each request is a single method, and the burden is on you as the application builder to stitch multiple requests together to create a useful application.
Postman provides the framework you need to create an API test. Some of the benefits of Postman are:
- Accessibility – All you need to create end-to-end API requests is the Postman application. There is no need to build a testing environment.
- Collections – A collection is a grouping of individual API requests. Each request can be manipulated to store values and pass them to the next API request in any order needed.
- Collaboration – Collections and environments can be imported and exported, making it simple to share files.
- Environments – An environment is a group of variables. You can use global or specific environment variables. For example, SD-WAN collections for the same SD-WAN environment can be used to decrease human error.
- Testing – checkpoints can help verify HTTP response status or in validating the response body of a request.
Before moving forward, download Postman from www.postman.com. You can create a free account to get started. Check out Installing and updating from learning.postman.com for additional assistance. After installation is complete, spend some time learning the basics of navigating Postman. Finally, check out Navigating Postman and focus on the following topics:
- Creating a collection
- Creating a workspace
- Running collections
- Importing and exporting data
Postman setup
Now that we have covered the basics of APIs, REST, VMware SD-WAN Orchestrator APIs, and Postman, let’s build something. For this example, I created a basic bandwidth measurement script that polls the highest utilized link by edge over the last hour. Output is directed to the Postman console. This collection can be used to monitor bandwidth usage and build an enterprise-wide report on bandwidth utilization. This data can be used to increase or decrease bandwidth at locations accordingly.
After building the application yourself, you may see console output like this:
Edge Name: 3400-Hub-HA
Edge Model: edge3800
Edge ID: 17224
Top usage throughput for the last 60 minutes is 0.057 Mbps
To help speed up deployment for you, I have included two files. The postman collection file defining the collection that contains the API requests, pre-request script, and testing. The postman environment file contains the environment variables needed to support to the collection. Go ahead and download both files.
Being JSON formatted, these files are in plain text format. You can open both files in a text editor such as Nano, TextEdit, or Notepad to become more familiar with how Postman structures data using JSON. Importing a collection into Postman is a simple task, as shown below.
- Click the File tab, then select Import.
- Choose the downloaded collection file and click Open.
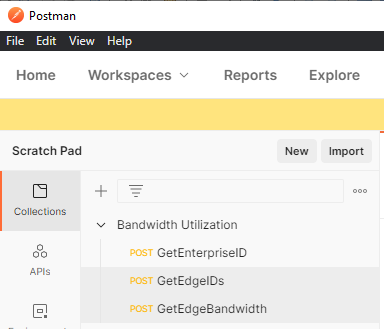
- Postman will open the collection, and it will appear under the Collections section:
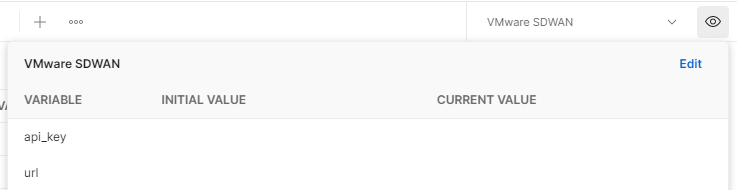
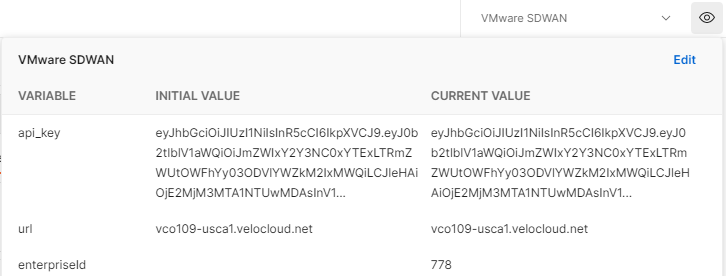
To import environment variables, repeat this same process. After the import is complete, ensure that the environment is set to VMware SDWAN and confirm that there are two blank variables, api_key and url. Supply your Orchestrator’s URL, but do not include the protocol. For example, my URL is vco109-usca1.velocloud.net. Type your URL in the INITIAL VALUE and CURRENT VALUE fields. Next, you need to fetch your API token.
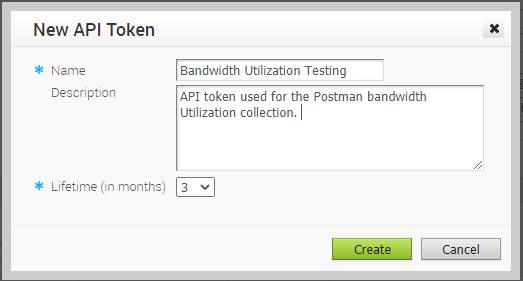
You can access the Orchestrator APIs using token-based authentication, irrespective of the authentication mode. Using the Orchestrator UI, go to Administration > Administrators and click your login ID. In the API section, click Actions and choose New API Token. In the pop-up window, complete the fields and click Create.
Select the API token in the field and choose Actions > Download API Token. A Download API Token window displays, and you can copy the token and save it a secure location.
NOTE: Be sure to copy the token immediately, as this is the only opportunity to view the token.

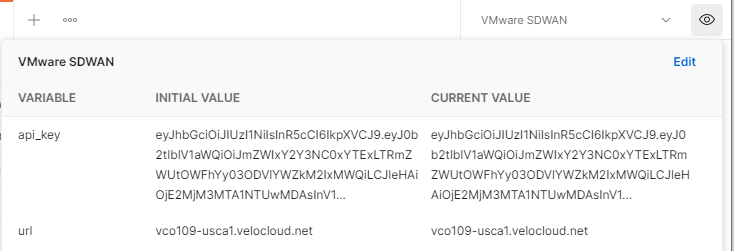
Go back to Postman and edit the environment variables. Copy and paste the API token to both the INITIAL VALUE and CURRENT VALUE columns.
That’s it for the setup.
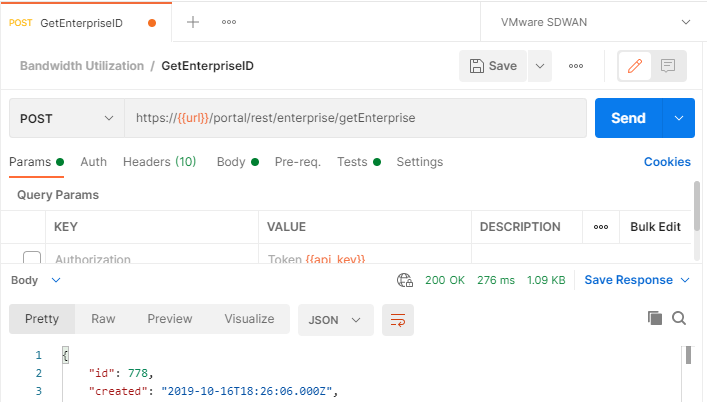
Before running the entire collection, let’s ensure that your environment variables and authentication is working. In Postman, under Collections, select the API request GetEnterpriseID, then click the blue Send button. If everything worked correctly, you will see a body response. The field we are most interested in is the id value. My Enterprise ID is 778.
Now click the Tests tab. There is a small bit of code that extracts the Enterprise ID and stores it as an environment variable. The following shows the Postman code to read the body response and set an environment variable:
let responseData = pm.response.json();
pm.environment.set("enterpriseId",responseData.id);
Open the environment variables pop-up screen to show the new variable named enterpriseID with the current value set to your Enterprise ID.
This task exemplifies the core of any API application developed in Postman. Each request runs pre-request tests and post-request tests. Each child request in the collection does this. Explore both the pre-request and test sections for each request to see exactly what is happening.
Running a Postman collection
After you have verified that both the collection and environment variables are working, execute the entire collection. Select the collection item Bandwidth Utilization from the left side and click Run on the right side of the screen.

From the Runner tab, click the blue Run Bandwidth Utilization button. As the collection runs, all output is directed to the Postman console. Open the console by clicking the Console button at the bottom of the Postman window.
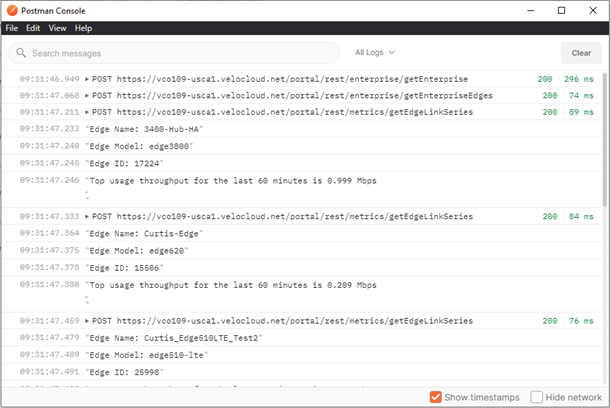
The collection runs the first two API requests to obtain the Enterprise ID and a list of Edge IDs. The collection then loops the /metrics/getEdgeLinkSeries method for each Edge ID, calculating the peak throughput for the Edge over the last 60 minutes.
Conclusion
The most interesting code for this collection is attached to the GetEdgeBandwidth request. The collection includes both pre-request code and test code. From here, you can add and change the code to suit your needs. For instance, you could aggregate highest usage over multiple WAN links, or you could address error handling when an edge is in a partial active state. Change the output to write to a plain text file, formatted in either JSON or CSV. Consider automating all of this and have the script transformed into Python so that you can pull the data directly into your organization’s existing monitoring platform.
Remember that an API is just a mechanism that is used for computer software on one device to talk to computer software on another device. APIs are used nearly everywhere on the Internet today, and they are finally getting the focus they deserve from networking vendors like VMware and Dell Technologies. We will soon see APIs become the primary means of managing all network devices.
For more examples of VMware SD-WAN Orchestrator API V1 and V2, go to code.vmware.com/samples.
Thanks for reading,
-Curtis Bunch
curtis.bunch@dell.com
https://www.linkedin.com/in/curtisbunch/
Related Blog Posts

RecoverPoint for VMs Automation – Advanced VM Protection
Wed, 21 Feb 2024 21:39:22 -0000
|Read Time: 0 minutes
In the spirit of automating everything, this blog will discuss a new automation solution in the RecoverPoint for VMs (RP4VMs) collection of automation solutions.
We have a variety of automation solutions for RP4VMs, including per-tag and per-cluster VM protection and use-case driven tasks, as well as a complete deployment automation solution. Now, I would like to present a new automation solution – Advanced VM Protection.
Let’s take a closer look at this exciting new solution.
What does the solution do?
The RecoverPoint for VMs advanced VM protection solution automates VM protection in RP4VMs with a wide variety of options:
- Automates VM protection based on pre-defined parameters in a JSON configuration file:
- VM name
- RP4VMs cluster name
- Plugin server IP or FQDN
- vCenter user/password or path to credentials file
- Production journal capacity (GB)
- Replica journal capacity (GB)
- Required RPO (sec)
- Failover networks per vNIC
- Performs and monitors mass VM protection
- Protects VMs for a specific RP4VMs cluster (optional)
- Performs VM protection operations on a specific plugin server (optional)
- Includes an option to skip the monitoring of VM protection preparation tasks
- Configures failover networks on a per network adapter basis as a post-protection operation
What is the solution?
It is a Python-based script that exclusively leverages the RP4VMs REST API.
Here is the list of prerequisites:
- Python 3.x (The script supports every platform Python is supported on)
- Python requests module, which can be installed using pip with the command:
pip install requests or python -m pip install requests
- RP4VMs 5.3.x and later
- Connectivity from the host running the script to the RP4VMs plugin server(s), specifically on tcp port 443
How do I use the script?
The script accepts the following parameters:
- One mandatory parameter, file, for a full path to the JSON configuration file.
- The optional parameters, rpvmcluster and server, limit script execution only for VM protection on a specified RP4VMs cluster and/or plugin server accordingly.
- The no-monitor parameter skips monitors of VM protection preparation task.
Here is the full script syntax:
# python advprotectvm.py -h
usage: advprotectvm.py [-h] -file CONFIG_FILE [-cl RPVM_CLUSTER] [-s SERVER] [-nmonitor]

Scripts advanced VM Protection in RecoverPoint for VMs

options:
  -h, --help            show this help message and exit
  -file CONFIG_FILE, --vm-config-file CONFIG_FILE
                        Path to VM config file
  -cl RPVM_CLUSTER, --rpvmcluster RPVM_CLUSTER
                        Optionally specify the RP4VMs cluster
  -s SERVER, --server SERVER
                        Optionally specify RP4VMs Plugin Server DNS/IP
  -nmonitor, --no-monitor
                        Optionally prevents protection monitoring
Use Cases and Examples
Let’s look at some common use cases for RP4VMs automated advanced VM protection:
- RP4VMs mass VM protection for onboarding of a new application:
# python advprotectvm.py -file idan-vms.json
- Batch VM protection only for a specific RP4VMs cluster:
# python advprotectvm.py -file idan-vms.json -cl Tel-Aviv
- Mass VM protection for a specific vCenter/ plugin or onboarding of a new datacenter:
# python advprotectvm.py -file vms.json -s pluginserver.idan.dell.com
Script output
# python advprotectvm.py -file vms.json
-> Protecting VM prodwebsrv1
---> Protection of VM prodwebsrv1 initiated
-> Protecting VM prodappsrv1
---> Protection of VM prodappsrv1 initiated
-> Protecting VM proddbsrv1
---> Protection of VM proddbsrv1 initiated
-> VM protection initiated, monitoring
---> Protection of VM: prodwebsrv1, Transaction: d6783e2d-55be-47db-a082-de1d251c2375, Status: RUNNING
---> Protection of VM: prodappsrv1, Transaction: 808ab022-e79a-4ad1-a633-cc86e17644f2, Status: RUNNING
---> Protection of VM: proddbsrv1, Transaction: c7895dce-f3e6-4e70-872e-9d0b104d6273, Status: RUNNING

---> Protection of VM: prodwebsrv1, Transaction: d6783e2d-55be-47db-a082-de1d251c2375, Status: COMPLETED
---> Protection of VM: prodappsrv1, Transaction: 808ab022-e79a-4ad1-a633-cc86e17644f2, Status: COMPLETED
---> Protection of VM: proddbsrv1, Transaction: c7895dce-f3e6-4e70-872e-9d0b104d6273, Status: COMPLETED

-> Configuring failover networks
---> Skipping failover network config for VM: prodwebsrv1
---> Failover networks config is not required for VM: prodappsrv1
---> Failover network config is successful for VM: proddbsrv1
Where can I find it?
The script and the config file can be found on GitHub: https://github.com/IdanKen/Dell-EMC-RecoverPoint4VMs.
Resources
- The Dell developer site provides comprehensive online API documentation, including full API references, tutorials, and use cases for the RP4VMs REST API.
- The RP4VMs REST API offers self-documentation – Swagger UI running on the plugin server itself – https://{plugin-server}/ui
- RecoverPoint for VMs GitHub repository
- RecoverPoint for VMs 5.3 – New RESTful API Demo
How can I get help?
For additional support, you are more than welcome to raise an issue in GitHub or reach out to me by email: Idan.kentor@dell.com
Thanks for reading!
Idan
Author: Idan Kentor

VxRail’s Latest Hardware Evolution
Thu, 04 Jan 2024 17:22:21 -0000
|Read Time: 0 minutes
December is a time of celebration and anticipation, a month in which we may reflect on the events of the year and look ahead to what is yet to come. Charles Dickens’ “A Christmas Carol” – and its many stage and movie remakes – is one of those literary classics that helps showcase this season’s magic at its finest. It is even said that there is a special kind of magic—one full of excitement, innovation, and productivity—that finds a way to (hyper)converge the past, present, and future for data center administrators all around the world who have been good all year!
No, your wondering eyes do not deceive you. Appearing today are VxRail’s next generation platforms—the VE-660 and VP-760—in all-new, all-NVMe configurations! While Santa’s elves have spent the year building their backlog of toys and planning supply-chain delivery logistics that rival SLA standards of the world’s largest e-tailers, the VxRail team has been hard at work innovating our VxRail family portfolio to ensure that your workloads can run faster than ever before. So, let’s grab a glass of eggnog and invite the holiday spirits along for a tour of VxRail past, present, and future to better understand our latest portfolio addition.
 Figure 1. VxRail VE-660
 Figure 2. VxRail VP-760
Spirit of VxRail Past
 Figure 3. Santa still runs 3-tier architecture. He needs VxRail and the speed of NVMe!When VxRail first launched almost 8 years ago in early 2016, we introduced the concept of hyperconverged infrastructure to the masses with one easily-managed platform that combined best-of-breed Dell PowerEdge servers with VMware technology. This new age of data center management brought better performance, extended capabilities, and time-saving advantages to data center admins everywhere. Over the years, we’ve sought to improve the offering by taking advantage of the latest hardware standards and technologies.
This was especially true earlier this summer when we launched the VE-660 and VP-760 VxRail platforms based on 16th Generation Dell PowerEdge servers. These next-gen successors to the VxRail E-Series and P-Series platforms not only contained the latest hardware innovations, but also represented a systemic change in the overall VxRail offering.
First, the mainline E- and P-series platforms were respectively re-christened as the VE-660 and VP-760. This was done primarily to invite easier comparison points to the underlying PowerEdge servers on which they’re based – the R660 and R760. Second, we tracked how the use of accelerators in the data center had evolved over the years and made the strategic decision to fold the capabilities of the V-Series platform into the P-Series by way of specific riser configurations. Now, customers have the ability to glean all the benefits of a high-performant 2U system with the choice of either storage-optimized (up to 28 total drive bays) or accelerator-optimized (up to 2x double wide or 6x single wide GPUs) chassis configurations—whichever best aligns to the specifics of their workload needs. And third, VxRail platforms dropped the storage type suffix from the model name. Hybrid and all-flash (and as of today, all-NVME–more on this later) storage variants are now offered as part of the riser configuration selection options of these baseline platforms, where applicable.
These changes are representative of how the breadth and depth of customer needs have grown tremendously over the years. By taking these steps to streamline the VxRail portfolio, we charted an evolutionary path forward that continues our commitment to offer greater customer choice and flexibility.
Spirit of VxRail Present
These themes of greater choice and flexibility are amplified by the architectural improvements underpinning these new VxRail platforms. Primary among them is the introduction of Intel® 4th Generation Xeon® Scalable processors. Intel’s latest generation of processors do more than bump VxRail core density per socket to 56 (112 max per node). They also come with built-in AMX accelerators (Advanced Matrix Extensions) that support AI and HPC workloads without the need for any additional drivers or hardware. For a deeper dive into the Intel® AMX capability set, the Spirit of VxRail Present invites you to read this blog: VxRail and Intel® AMX, Bringing AI Everywhere, authored by Una O’Herlihy.
Intel’s latest processors also usher in support for DDR5 memory and PCIe Gen 5, two other architectural pillars that underpin significant jumps in performance. The following table offers a high-level overview and comparison of these pillars and a useful at-a-glance primer for those considering a technology refresh from earlier generation VxRail:
Table 1. VxRail 14th Generation to 16th Generation comparison
VxRail VE-660 & VP-760 | VxRail E560, P570 & V570 | |
Intel Chipset | 4th Generation Xeon | 2nd Generation Xeon |
Cores | 8 - 56 | 4 - 28 |
TDP | 125W – 350W | 85W – 205W |
Max DRAM Memory | 4TB per socket | 1.5TB per socket |
Memory Channels | 8 (DDR5) | 6 (DDR4) |
Memory Bandwidth | Up to 4800 MT/s | Up to 2933 MT/s |
PCIe Generation | PCIe Gen 5 | PCIe Gen 3 |
PCIe Lanes | 80 | 48 |
PCIe Throughput | 32 GT/s | 8 GT/s |
As the operational needs of a business change day-by-day, finding the right balance between workload density and load balance can often feel like an infinite war for resources. The adoption of DDR5 memory across the latest generation of VxRail platforms offers additional flexibility in the way system resources can be divvied up by virtue of two key benefits: greater memory density and faster bandwidth. The VE-660 and VP-760 wield eight memory channels per processor, with the ability to slot up to two 4800MT/s DIMMs per channel for a maximum memory capacity of 8TB per node. Compared to a VxRail P570, the density and speed improvements are staggering: 33% more memory channels per processor, 2.6x increase in per system total memory, and up to a 64% increase in memory speed! With faster and greater density compute and memory available for workloads, each node in a VxRail cluster can handle more VMs, and if there is ever a case of task bottlenecking, there are plenty of resources still available for optimal load balancing.
When we consider the presence of PCIe Gen 5, we see an even greater increase in the overall performance envelope. PowerEdge’s Next-Generation Tech Note does a great job of contextualizing the capabilities of PCIe Gen 5. The main takeaway for VxRail, however, is that it increases the maximum bandwidth achievable from various peripheral components by roughly 25% when compared to PCIe Gen 4 and roughly 66% when compared to PCIe Gen 3. In particular, the jump in available PCIe lanes (48 lanes to a luxurious 80 lanes) and associated throughput (8 GT/s to 32 GT/s per lane) from Gen 3 to Gen 5 significantly reduces performance bottlenecks, resulting in faster storage transfer rates and more bandwidth for accelerators to process AI and ML workloads.
PCIe Gen 5 is also backwards compatible with previous generation peripherals, enabling a certain degree of flexibility with respect to VxRail’s component extensibility and longevity in the data center. Yesterday’s technologies can still be used, but the VE-660 and VP-760 can adapt to growing workload demands by taking full advantage of the latest peripherals as they are released. They are even equipped with an additional PCIe slot over their E- & P-Series predecessors, providing extra dimensions of configuration. These boons in flexibility ensure any investment into this generation of VxRail enjoys longer relevance as your infrastructure backbone.
Spirit of VxRail Future
Even with all these architectural improvements defining the VP-760 and VE-660, we knew we could find ways of improving the capability set. So, we made our list of desired features (and checked it twice!) and determined that the best way to augment these next-generation hardware enhancements would be with the introduction of all-NVMe storage options.
The Spirit of VxRail Past wishes to remind us that VxRail with all-NVMe storage is not new—NVMe first made its way to the VxRail lineup with the P580N and E560N almost four years ago and has been a mainstay facet of the VxRail with vSAN architecture ever since. However, what is most compelling about all-NVMe versions of the VE-660 and VP-760—what the Spirit of VxRail Future wishes to strongly communicate—is that NVMe opens the door to two very compelling benefits: additional flexibility of choice with respect to vSAN architecture and an associated increase in overall storage capacity with the addition of read intensive NVMe drives in sizes of up to 15.36TB.
The following figure outlines all of the generational advantages customers can benefit from when transitioning from existing 14th Generation VxRail environments to VP-760 all-NVMe platforms.
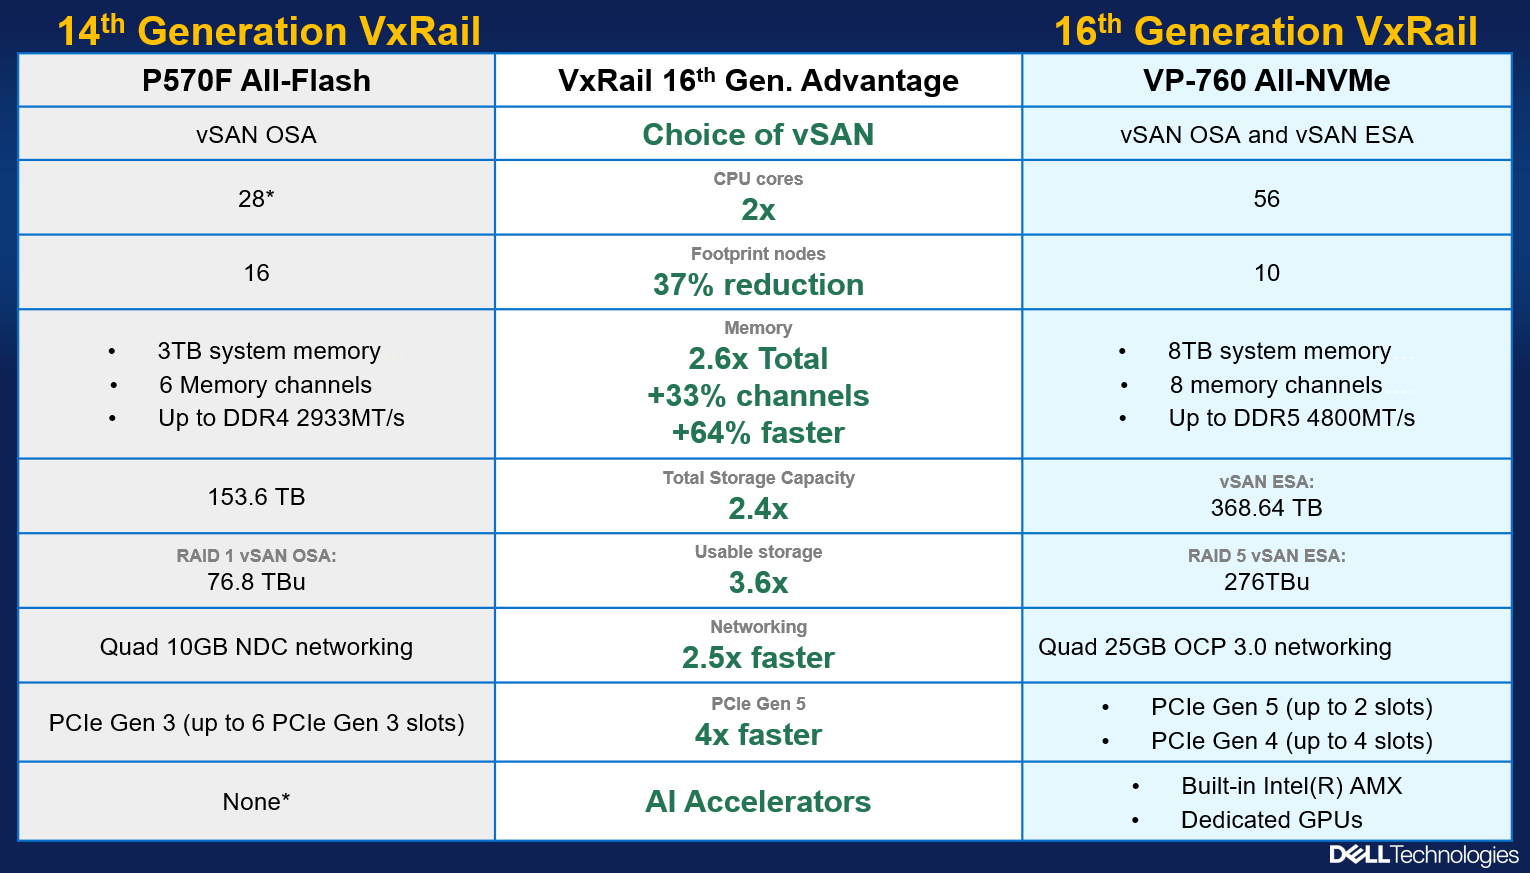 Figure 4. The VxRail 16th Generation all-NVMe advantage
In addition, VxRail on 16th Generation hardware can now support deployments with either vSAN Original Storage Architecture (OSA) or vSAN Express Storage Architecture (ESA). David Glynn provided a great summary of the core value vSAN ESA brings to the table for VxRail in his blog written nearly a year ago. With today’s launch, the VP-760 and VE-660 can now take advantage of vSAN ESA’s single-tier storage architecture that enables RAID-5 resiliency and capacity with RAID-1 performance. Customers who choose to deploy with vSAN OSA can also see the benefit of these new read intensive NVMe drives, with a total storage per node of up to 122.88TB in the VE-660 and 322.56TB in the VP-760. For those who deploy with vSAN ESA, maximum achievable storage is 153.6TB on the VE-660 and up to 368.64TB on the VP-760.
The Spirit of VxRail Future has seen the value of all-NVMe and is content knowing that VxRail will continue to underpin VMware mission-critical workloads for years to come.
Resources
Author: Mike Athanasiou, Sr. Engineering Technologist