


Using Snapshot Policies to Mitigate Ransomware Attacks

Cyber security remains a priority for organizations. A cyber or ransomware attack occurs every 11 seconds1, causing organizations to continually implement security requirements in order to safeguard mission critical and sensitive data. There is an important need not only to protect this data but have the ability to recover and restore data in the event of a ransomware attack. PowerMax SnapVX Snapshots are a powerful tool to help protect, recover, and restore in the event of a cyber-attack.
SnapVX provides space saving and efficient local replication in PowerMax arrays. SnapVX snapshots are a pointer-based structure that preserves a point-in-time view of a source volume. Snapshots provide the ability to manage consistent point-in-time copies for storage groups. Host accessible target volumes can be linked if a point-in-time snapshot needs to be accessed without affecting the point-in-time of the source.
SnapVX snapshots can be set as secure snaps. Secure snaps are snapshots that cannot be deleted, either accidentally or intentionally. They are retained in resource-limited situations in which conventional snapshots are placed in a failed state to release resources.
SnapVX snapshot users can take advantage of automated scheduling using Snapshot Policies. Snapshot Policies are customizable with rules that specify when to take snapshots, how many to take, how long to keep them, and whether they are standard or secure snaps.
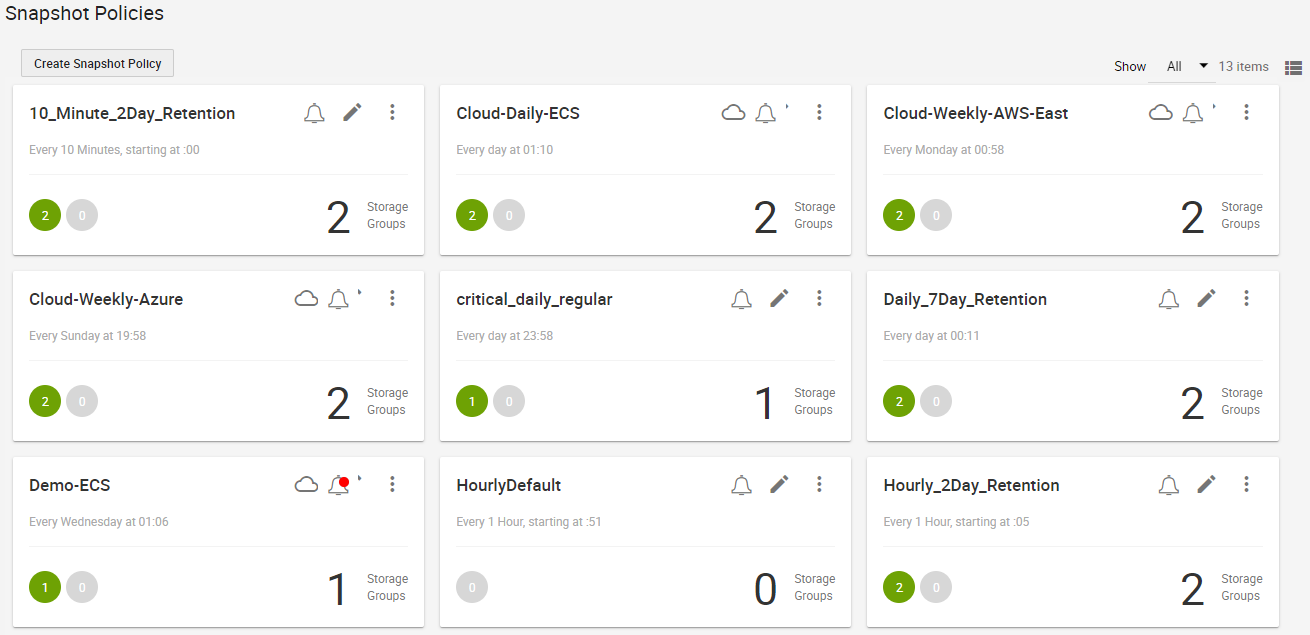
The following is an example snapshot policy dashboard:
SnapVX snapshots with Snapshot Policies allows for 1024 snapshots per source device and 65 million per PowerMax array. Users can take advantage of the frequency and large snapshot scale in policy-driven snapshots to provide enhanced data resiliency.
Because secure snaps cannot be maliciously or accidentally deleted prior to any planned expiration date, they can be leveraged for organizations to preserve multiple point in time copies that can be recovered from, in the event of a malware or ransomware attack. Snapshot policies can be automated to take secure snaps with a high frequency and a short retention duration for fine granularity, with a lower frequency and longer retention for added security, or a mixture of both. If an attack occurs, the user can review the secure snaps to determine which point in time has the most relevant and up to date copy of data without malware impact. When the precise point in time is identified, restoring critical data can be done almost instantaneously by bringing application data back to the original state prior to any attack.
Secure snaps also provide an additional layer of security in the case of multiple attacks and can be used for forensic work to help determine what happened during the attack and when it originally occurred. With the lower frequency and longer retention period, secure snaps can be used to validate data and data change rate to help identify any suspicious activity.
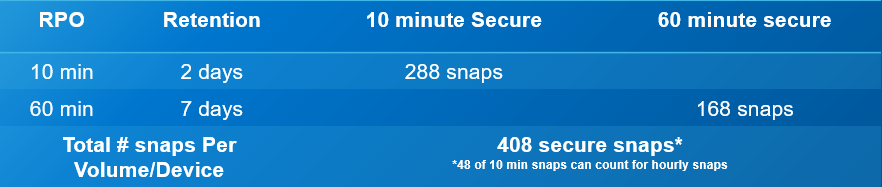
The following figure provides an example of creating secure snaps with snapshot policies:

Traditional snapshots can be set with a policy to take snapshots at a frequency and retention that works best for the organization. These snapshots can be used for daily business continuity, such as development, operations, and data analytics. They can also assist in any forensic analysis and can be compared against secure snaps to help determine what changed and when it started to change. Unlike secure snaps, traditional snapshots can be deleted or fail in array resource constraint situations. However, the data on an existing snapshot cannot be changed and could be used for additional recovery options.
Both secure and traditional snaps are a power tool for organizations to leverage to help protect and restore data rapidly, to minimize any impact of a malware or ransomware attack. The large scalability of snapshots can be easily managed using Snapshot policies for scheduling frequency and retention time duration to fit any size organization.
The following is an operational example of the frequency, retention, and scale out of the value of SnapVX secure snaps. The numbers are based on an average of 5000 production volumes in a PowerMax array.
- Secure snaps every 10 minutes with a 48-hour retention
- 288 per volume point-in-time copies
- Fine grain protection and recovery
- Secure snaps every 60 minutes with a 7-day retention
- 168 per volume point-in-time copies
- Extended protection and data validation
Total of 2,040,000 secure point-in-time copies
The flexible and scalable features for PowerMax SnapVX traditional and secure snapshots are powerful tools for protecting against ransomware attacks.
Resources
- Dell PowerMax: Cyber Security
- Dell PowerMax: Cyber Security for Mainframe Storage
- Dell PowerMax and VMAX All Flash: TimeFinder SnapVX Local Replication
- Dell PowerMax and VMAX All Flash: Snapshot Policies
1 "Cybercrime To Cost The World $10.5 Trillion Annually By 2025," by Cybercrime Magazine, November 2020.
Author: Richard Pace, PowerMax Engineering Technologist
Twitter: @pace_rich
Related Blog Posts

Important Updates in Dell’s Geographically Dispersed Disaster Restart (GDDR)

Tue, 30 Aug 2022 20:53:25 -0000
|Read Time: 0 minutes
Dell Technologies created Geographically Dispersed Disaster Restart (GDDR) to provide mainframe customers a comprehensive business continuity automation product for their Dell PowerMax Storage and Disk Library for mainframe virtual tape environments. GDDR achieves this by reacting to events within your IT environment.
The three functions of automate, react, and monitor (ARM) combine to enable continuous operations across both planned and unplanned outages. GDDR is designed to perform planned data-center site-switch operations and to restart operations following disasters. These incidents can range from the loss of compute capacity or disk-array access, to the total loss of a single data center, or a regional disaster resulting in the loss of dual data centers. GDDR also provides automation to protect data from cyberattack in a separate physical vault array. For more information about GDDR, see the document GDDR (Geographically Dispersed Disaster Restart) for PowerMax 8000 and VMAX ALL FLASH 950F.
Dell’s GDDR 5.3 enhancements
GDDR introduced an exciting new feature in GDDR 5.3 called Cyber Protection Automation (zCPA) which populates a separate physical cyber vault for your mainframe environment. zCPA automates cyber protection copy creation and preservation by using Dell’s Data Protector for z Systems (zDP). zCPA automates the creation and transmission of PowerMax snapshots to a physically separate cyber vault PowerMax array. This provides a protected copy of data that can be used for testing purposes, recovery from a cyber event, or an analytical process to better understand the extent of damage caused by a cyberattack.
The transmission of data to the cyber vault leverages SRDF/Adaptative Copy. To take advantage of zCPA, customers need GDDR 5.3 with the zCPA PTF, Mainframe Enabler 8.5, and a PowerMax at 5978.711.711 or higher.
Unique benefits of GDDR zCPA types
zCPA supports air gapped and non-air gapped physical cyber vaults. Any site in a GDDR topology can be an attached cyber vault array managed by zCPA. To provide customers choice, there are three types of methods for creating zCPA vault arrays. The three zCPA types are defined by the different configuration and operational attributes that dictate how zCPA will function.
zCPA Type 1
- Type 1 is defined as an environment that has no airgap in connectivity between a data center and the cyber vault. The data copied to the cyber vault is initiated when a newly created zDP Snapset is detected. The cyber vault in Type 1 does not have to be a dedicated physical vault and could be another storage array within the production data center. This type is the default for zCPA.
zCPA Type 2
- Type 2 is an air-gapped environment between two storage environments. The data copied to the cyber vault is triggered by SRDF link online operation. GDDR monitors the SRDF Link Operation process to know when SRDF connectivity to the vault has been established and closed it when it has populated the vault.
zCPA Type 3
- Type 3 is an environment that does not provide an airgap solution. The data copied to the cyber vault is triggered by the SCHEDULE or INTERVAL parameter in GDDR.
The airgap support between the production and vault site is optional.
For more information about GDDR’s zCPA with respect to cyber, see the white paper Dell PowerMax: Cyber Security for Mainframe Storage or contact us at mainframe@dell.com.
Resources
- Mainframe Enablers TimeFinder SnapVX and zDP 8.5 Product Guide
- Data Protector for z Systems (zDP) Essentials White Paper
- Dell PowerMax: Cyber Security for Mainframe Storage
- GDDR (Geographically Dispersed Disaster Restart) for PowerMax 8000 and VMAX ALL FLASH 950F
Author: Justin F. Bastin

Local Replication with the PowerMax REST API, Working with SnapVX Snapshots

Tue, 13 Jun 2023 16:02:04 -0000
|Read Time: 0 minutes
PowerMax arrays provide feature rich local replication options in SnapVX and clone technologies. The PowerMax REST API supports all of these features, and Dell Technologies provides pre-written Python functions as part of PyU4V -- a Python package for managing the PowerMax REST API as well as Ansible modules that support SnapVX. In this blog I provide examples in native REST calls and in a Python example.
If you are not familiar with REST, you’ll enjoy reading one or both of these blogs:
- https://infohub.delltechnologies.com/p/getting-started-with-rest-api-1
- https://infohub.delltechnologies.com/p/getting-started-with-the-powermax-rest-api-time-for-a-rest
Full API documentation is available on the developer hub here. All REST endpoints for the SnapVX and clone operations are under the replication resource of the API. This means that URI addresses are prefixed with the base URL https://{{base_url}}/{{api_version}}/replication. In addition to SnapVX and clone functionality, it’s also possible to assign snapshot policies to storage groups at the time of creation or when modifying using sloprovisioning resources. Examples appear further ahead in this blog.
Managing SnapVX snapshots with the REST API
SnapVX provides PowerMax administrators with the ability to take point in time snapshots across a collection of devices to create a consistent point in time image of the data in a very space efficient manner. The user can manipulate the snapshots for restore purposes or link them to volumes and present them to hosts using masking views to provide a copy of the snapshot image.
For details about SnapVX functionality, see the white paper Dell PowerMax and VMAX All Flash: TimeFinder SnapVX Local Replication. The PowerMax REST API provides all the functionality of Unisphere for PowerMax with snapshot management, and just like the UI management is orchestrated with the storage group. If you need to manipulate a snapshot for a single volume, you can use the CLI tools or add the volume to its own storage group.
Some points to remember with SnapVX snapshots:
- A SnapVX snapshot is never altered by host access and therefore is always available to the administrator for restore purposes until it is terminated by user action or it expires based on the time to live value (if set).
- Snapshots will only automatically expire when they are unlinked from all target storage groups.
- Snapshots can be set secure at or after creation time. Once set secure, the user cannot terminate the snapshot until the time to live has passed or modify the security of that snapshot except to extend secure time to live.
- When linking snapshots with the API or UI, if the target storage group doesn’t already exist the API will automatically create the storage group with the correct number of devices and size, matching the source device configurations.
- If you add devices to a source storage group, you must add devices to target storage groups. This is not automatic and needs to be planned for. Naming conventions can help simplify this process.
- Although SnapVX snapshots present with both a generation number and snapId, if automating, snapid is preferred because this number is a static reference id.
Creating and identifying SnapVX SnapShots with the REST API
Creating a snapshot is a simple process. A REST API POST call is sent to the management software, directed at the storage group to be snapped, specifying a name for the snapshot along with any optional parameters to be set (for example, you can set the snapshot to be secure or set time to live).
The following is an example POST call and payload for creating a snapshot of a storage group, with a snapshot named REST_SG_snapshot, setting a time to live of 10 days. (Values to be supplied are enclosed in {} signaling substitution required for actual values or variables.)
https://unisphereIP:8443/univmax/restapi/{{api_version}}/replication/symmetrix/{symmetrixId}/storagegroup/{storageGroupId}/snapshot (POST)
Payload
{
"snapshotName": "REST_SG_snapshot",
"timeToLive": 10
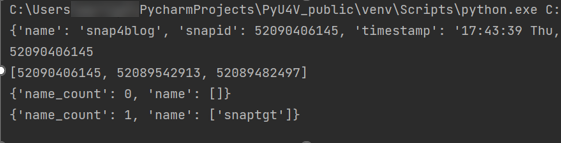
}PyU4V has functions for complete control of SnapVX, making the API easier to consume. The following is a simple script to create a snapshot and print the return from the API.
import PyU4V

 conn = PyU4V.U4VConn(username='smc', password='smc',
                       server_ip='unisphereip', port='8443', array_id=None,
                      verify=False)

#create a snapshot and assign returned information to variable snap_details
snap_details = (conn.replication.create_storage_group_snapshot(
     storage_group_id='snapsrc', snap_name='snap4blog', ttl=1, secure=False,
     hours=True))
#Get SnapIds for all snapshots for storage group with name snap4blog
 all_sg_snaps = (conn.replication.get_storage_group_snapshot_snap_id_list(
     storage_group_id='snapsrc', snap_name='snap4blog'))
 #print details of snapshot created above
 print(snap_details)
#Print only snapid from snap_details
 print(snap_details.get('snapid'))
#Print all SnapIds associated with snap4blog snapshot on snapsrc storage group
 print(all_sg_snaps)
The output is shown below.
- The first print statement shows the detailed information for the snapshot just created with details such as timestamp, snapid, and so on.
- The second line prints only the snapid extracted from the JSON using the key ‘snapid’.
- The third line prints the variable ‘all_sg_snaps’ showing all snapshot ids with the name snap4blog associated with the snapsrc storage group.

To make the snapshot data available to a host, you can add some additional REST calls to link to a storage group.
The following script performs these tasks:
- Lists any storage group that has a snapshot linked to it on my test array. There are none to begin with.
- Creates a link to an existing snapshot using the snapid
- Runs the listing again. This time there is data to display showing the linked storage group.
#list any storage group that is being used as a linked target for snapvx
#snapshot
print(conn.common.get_request(
      target_uri=f'/100/replication/symmetrix/'
                 f'000120200287/storagegroup?is_link_target=True',
     resource_type=None))
 #Link a snapshot from ‘snapsrc’ storage group to ‘snaptgt’ storage group,   #this will create snaptgt storage group as it doesn’t exist
#with the name ‘snap4blog’ and snapid matching value in variable set earlier.
conn.replication.modify_storage_group_snapshot_by_snap_id(
      src_storage_grp_id='snapsrc',tgt_storage_grp_id='snaptgt',
     snap_name='snap4blog', snap_id=snap_details.get('snapid'),
     link=True)
 #Print updated list of storage groups used as snap target
print(conn.common.get_request(
     target_uri=f'/100/replication/symmetrix/'
                 f'000120200287/storagegroup?is_link_target=True',0
     resource_type=None))
The following is the output of the functions showing the snaptgt group in the list after the link has been issued.
SnapVX lends a lot of flexibility when refreshing test and development environments. The ability to relink the same snapshot (essentially wiping any changes to the target copy while preserving the point in time image) greatly simplifies iterative testing. You can also quickly relink to a different snapshot or unlink to reuse the target volumes for another purpose. To relink a snapshot with PyU4V, simply change the parameter in the modify_storage_group call instead of “link=True” we set “relink=True”.
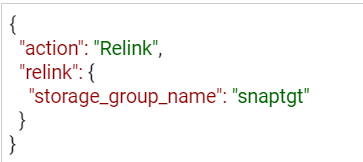
If you are relinking directly from the API, modify the payload for the PUT call to reflect that the action is relink, as shown here:
https://UnisphereIP:8443/univmax/restapi/100/replication/symmetrix/{symmetrixId}/storagegroup/{storageGroupId}/snapshot/{snapshotId}/snapid/{snapId} (PUT)
When you no longer require your snapshots, don’t forget to terminate or unlink any linked targets to allow for automatic expiration if you’ve set a time to live. All actions use the same URI link, however the REST method will be PUT (with modified payload) or DELETE.
It’s generally a good practice to adopt a friendly naming convention for storage groups that are being used as snapvx targets to make them easy to identify in the UI and API output. Simply adding _TGT to the sg name may be enough, but your naming convention can be whatever works best for your organization.
Snapshot policies
In addition to regular snapshots, SnapVX provides a mechanism for users to assign snapshot policies to storage groups. (More details about snapshot policies are described in the white paper Dell PowerMax and VMAX All Flash: TimeFinder SnapVX Local Replication.) Assigning a snapshot policy means that you will have an automated rotation and preservation of a defined number of snapshots for your storage groups with a clearly defined recovery time objective. Users don’t need to manage the scheduling -- the policy automates all of that and can be assigned when storage groups are created, or at a later time.
Associating snapshot policies to storage groups is available through the POST and PUT calls for creating storage groups. A separate set of API calls is available for managing directly from the Snapshot Policy section of the API documentation.
For Py4V in Python, the code only requires an extra variable on the create and modify functions. The following example will create a snapshot policy (example_policy) that will take a snapshot every 12 minutes, retaining a maximum of 24 snapshots. The second part creates a storage group associated with this policy. Note that there are default policies already created on all arrays that users can use without having to create anything new.
import PyU4V

api = PyU4V.U4VConn(username='smc',password='smc',
                                server_ip='unisphereip', verify=None,
                                array_id='000297600841')
api.snapshot_policy.create_snapshot_policy(
    snapshot_policy_name='example_policy', interval="12 Minutes",
    local_snapshot_policy_snapshot_count=24)

api.provisioning.create_non_empty_storage_group(
    srp_id="SRP_1", storage_group_id="blog_example_sg", num_vols=1,
    vol_size=1, cap_unit="GB",snapshot_policy_ids=["example_policy"],
    service_level="Diamond", workload=None)
Hopefully this blog has given you the basics to working with SnapVX snapshots using REST and Python!
For more information and a list of all functions for SnapVX, see the documentation for PyU4V on readthedocs.io and the REST API documentation on the Dell developer portal here.
In upcoming blogs, I will also be looking at using clone technology with the REST API, and when this is a good alternative to SnapVX depending on your needs. Have fun automating and if you have questions, you can always start a discussion on the PyU4V GitHub -- we are always willing to help!
Author: Paul Martin