


SQL Server 2022 Backup Using T-SQL and Dell PowerFlex Storage Snapshots
Fri, 04 Nov 2022 04:56:21 -0000
|Read Time: 0 minutes
Introduction
Challenges with conventional database backups
Conventional SQL Server database backups read the data from the host to write it to the backup target location. Similarly, during the restore operation, the data is read back to the host and written to the database datafiles. Although this method allows both incremental and full backups, it poses significant challenges to mission-critical databases:
- Conventional backup and restore operations use host resources, such as CPU, memory, and I/O, which may end up impacting database performance.
- As database capacity grows, backing up the larger dataset takes longer time that can range from minutes to hours. This issue gets worse during restore operations when the business is waiting for the restore to finish and for the database to become online again.
Why Storage snapshots?
Many companies are using storage snapshots to overcome the above challenges. Dell PowerFlex software-defined storage snapshots provide the following advantages for SQL Server backup:
- You can create and restore storage snapshots in seconds regardless of the database size.
- Since snapshot creation or restore operation is so fast, the database host resources are not impacted.
- PowerFlex storage snapshots are consistent and writable, allowing the snapshot to serve as a point-in-time copy (for purposes such as mounting test, development, or reporting database copies).
- PowerFlex snapshots are thin and keep only the data changes that happened since the snapshot was created hence providing space efficiency better than incremental backups.
- Final and most important advantage is that together with Microsoft APIs, you can use PowerFlex snapshots for SQL Server backup and restore operations.
SQL Server storage backup APIs
It is not new for the SQL Server backup process to take advantage of storage snapshots. This has been done for many years using Virtual Device Interface (VDI) or Volume Shadow Copy Service (VSS) APIs. By using these APIs and backup software, together with PowerFlex, provides all the storage snapshot advantages that are mentioned above, and allows the snapshots to be valid backups of the database.
The new Transact-SQL snapshot backup feature
With SQL Server 2022, Microsoft introduced a new way of creating database backups using storage snapshots: Transact-SQL (T-SQL) snapshot backup. This method does not require the use of either VDI or VSS APIs and can work for both Windows and Linux.
The new T-SQL snapshot backup workflow is as follows:
- A T-SQL backup command is issued, that stops write operations to the database by acquiring a lock. The command can include one, multiple, or all databases.
- The backup administrator takes a storage-level snapshot of the database (or databases).
- A second T-SQL backup command is issued, resuming databases operations and saving the backup’s metadata to a file. This metadata file is required if the storage snapshot is used for database recovery.
Here's an example of using a T-SQL snapshot:
The following example shows how to perform backup and recovery operations on a database that is called tpcc, using the new T-SQL snapshot backup feature with PowerFlex snapshots.
Backup operation
Backup step 1: Suspend database
Suspend the database using the following T-SQL command:
ALTER DATABASE tpcc SET SUSPEND_FOR_SNAPSHOT_BACKUP = ON;
In this command, a single-user database is suspended, blocking any further operations. The following output shows successful suspension:
Database 'tpcc' acquired suspend locks in session 54.
I/O is frozen on database tpcc. No user action is required. However, if I/O is not resumed promptly, you could cancel the backup.
Database 'tpcc' successfully suspended for snapshot backup in session 54.
Note: For more information about how to suspend multiple or all user databases, see Microsoft documentation.
Backup step 2: Take a PowerFlex snapshot of database volumes
Once the database is suspended, a snapshot of the database volumes is created using PowerFlex Manager UI, REST APIs, or PowerFlex Command Line Interface (CLI).
In this example, the snapshot includes both the datafiles and transaction log volumes. This allows the snapshot to serve multiple purposes:
- To create stand-alone database instances for purposes such as reporting, testing, and development (as it contains a consistent image of both the data and log).
- To restore both the data and log if both were corrupted. In that case, both the data and log volumes are restored, and the database is recovered to the last transaction log backup.
- If the active transaction log survived the disaster, only the data volumes are restored, and the database can perform a full recovery of all committed transactions.
The following figure is an example of creating a snapshot using PowerFlex Manager UI:
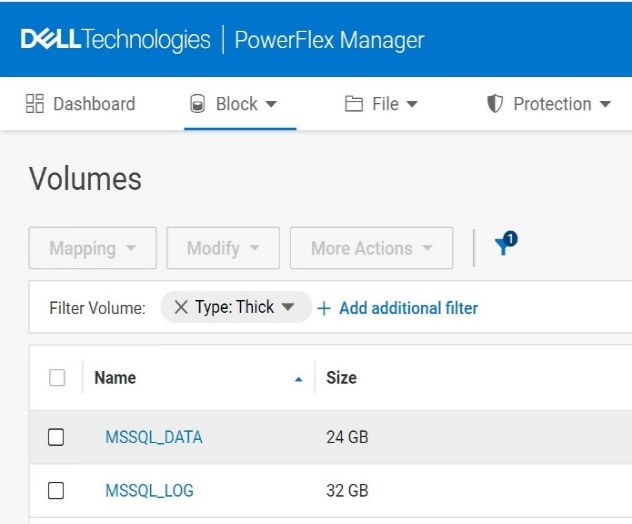

Figure1. Creating a snapshot using PowerFlex CLI
Run the following command to create a snapshot using PowerFlex CLI:
scli --snapshot_volume --volume_name MSSQL_DATA, MSSQL_LOG --snapshot_name MSSQL_DATA-snap-1,MSSQL_LOG-snap-1 --read_only
Sample output:
Snapshots on 2 volumes created successfully
Consistency group ID: b10f52c800000002
Source volume MSSQL_DATA => 20f0895f00000004 MSSQL_DATA-snap-1
Source volume MSSQL_LOG => 20f0896000000005 MSSQL_LOG-snap-1
Backup step 3: Take T-SQL metadata backup of the database
When the snapshot is created, use the following command to create the metadata file and resume database write operations:
BACKUP DATABASE tpcc TO DISK = 'C:\mssql_metadata_backup\tpcc_metadata.bkm' WITH METADATA_ONLY,MEDIANAME='PowerFlex-MSSQL_DATA-Snapshot-backup';
In this step, the metadata file of the database tpcc is stored in the specified path. This command also releases the database lock and allows the database operations to resume.
Sample output:
I/O was resumed on database tpcc. No user action is required.
Database 'tpcc' released suspend locks in session 54.
Database 'tpcc' originally suspended for snapshot backup in session 54 successfully resumed in session 54.
Processed 0 pages for database 'tpcc', file 'tpcc' on file 5.
BACKUP DATABASE successfully processed 0 pages in 0.003 seconds (0.000 MB/sec.
Simulating a database corruption
There could be different reasons for a database to require recovery, such as due to datafiles deletion, disks being formatted or overwritten, physical block corruptions, and so on. In this example, we will drop a large table and recover the database to a point in time before the drop.
To show the database recovery that includes data that is added after the snapshot creation, we create a new table after the snapshot is taken and insert a record to that table. That record is a part of the next transaction log backup. Finally, we drop the customer table and validate the database recovery.
Step 1: Create a new table after the snapshot was taken, and insert a known record to the table
Run the following command to create a table and insert a known record into the table:
create table returns ( returnID int, returnName varchar(255));
insert into returns values (1,'sampleValue');
returnID | returnName |
1 | sampleValue |
Step 2: Take a transaction log backup
The following command creates a log backup which includes the returns table data. The database recovery uses this log backup.
BACKUP LOG tpcc TO DISK = 'C:\mssql_tail_log_backup\tpcc_tail_log_before_disaster.bkm';
Note: It is a best practice to create periodic transaction log backups, as demonstrated above.
Step 3: Simulate a database corruption
For demonstration purposes, we simulate database corruption by dropping the customer table by running the following command:
drop table tpcc.dbo.customer;
Recovery operations
Database recovery happens in two steps:
- First, we restore the database data using the storage snapshot.
- Next, we recover the database using the transaction log backup.
Recovery step 1: Bring the database offline
Before we restore the database, if it is still up (depends on the type of corruption), set the database offline by running the following command:
alter database tpcc set offline;
Recovery step 2: Bring the database disks offline
Before restoring the storage snapshot of the database disks, set the disks offline to avoid any leftover locks. You can use either disk management or PowerShell commands.
Set-Disk -Number 1 -isOffline $True
Note: In this example only the data disk is set to offline, as the active transaction log remained intact and there is no reason to overwrite it with the log snapshot.
Recovery step 3: Restore the database data volume snapshot
Restore the PowerFlex database data volumes using the snapshot. This can be done from the PowerFlex UI, REST APIs, or PowerFlex CLI.
Following is an example of restoring the snapshot using PowerFlex CLI:
scli --overwrite_volume_content --source_vol_name MSSQL_DATA-snap-1 --destination_vol_name 'MSSQL_DATA'
Sample output:
Overwrite volume content can remove data and should not be called during I/O operations or on mounted volumes. Press 'y' and then Enter to confirm: y
Overwrite volume content was completed successfully
Recovery step 4: Bring the database disks online
Bring the database volumes back online either using Disk management or PowerShell commands.
Set-Disk -Number 1 -isOffline $False
Recovery step 5: Bring the database online
Bring the database tpcc back online by using following command:
alter database tpcc set online;
Recovery step 6: Restore the snapshot backup metadata
Use the metadata file captured during the snapshot backup to make the SQL Server aware of the restored snapshot.
Note: Before this can be done, SQL Server requires to perform a backup of active transaction log content. Do this first, followed by the database restore command.
Take a T-SQL backup of the active transaction log by running the following command:
BACKUP LOG tpcc TO DISK = 'C:\mssql_tail_log_backup\tpcc_tail_log_after_disaster.bkm' WITH NORECOVERY;
Restore the snapshot backup metadata by running the following command:
RESTORE DATABASE tpcc FROM DISK = 'C:\mssql_metadata_backup\tpcc_metadata.bkm' WITH METADATA_ONLY, NORECOVERY;
Note: Since the command specifies METADATA_ONLY, SQL Server knows that the database data was restored from a storage snapshot. If NORECOVERY is used, the database goes to a restoring state, as it is waiting to apply transaction log backups to make it consistent.
Recovery step 7: Apply transaction log backups
Restore the appropriate transaction log backup or backups. In the following example, we restore the log backup taken after the returns table was created, and before the customer table is dropped.
RESTORE LOG tpcc FROM DISK = C:\mssql_tail_log_backup\tpcc_tail_log_before_disaster.bkm' WITH RECOVERY;
Note: If there are multiple transaction logs to restore, use the WITH NORECOVERY option with all but the last one. The last RESTORE LOG command uses WITH RECOVERY, signifying that no more recovery is needed.
When this operation is complete, the database is operational and contains all the restored transactions (including the newly created returns table).
Conclusion
With the new SQL Server 2022 T-SQL Snapshot backup feature, it is possible to perform database backups based on the PowerFlex storage snapshots, without relying on additional backup tools. This process can be automated to achieve faster and reliable backup solutions for mission-critical SQL Server databases, for both Windows and Linux operating systems.
Also, for related information about Dell PowerStore see the blog post: SQL Server 2022 – Time to Rethink your Backup and Recovery Strategy.
Related Blog Posts

Q1 2024 Update for Ansible Integrations with Dell Infrastructure

Tue, 02 Apr 2024 14:45:56 -0000
|Read Time: 0 minutes
In this blog post, I am going to cover the new Ansible functionality for the Dell infrastructure portfolio that we released over the past two quarters. Ansible collections are now on a monthly release cadence, and you can bookmark the changelog pages from their respective GitHub pages to get updates as soon as they are available!
PowerScale Ansible collections 2.3 & 2.4
SyncIQ replication workflow support
SyncIQ is the native remote replication engine of PowerScale. Before seeing what is new in the Ansible tasks for SyncIQ, let’s take a look at the existing modules:
- SyncIQPolicy: Used to query, create, and modify replication policies, as well as to start a replication job.
- SyncIQJobs: Used to query, pause, resume, or cancel a replication job. Note that new synciq jobs are started using the synciqpolicy module.
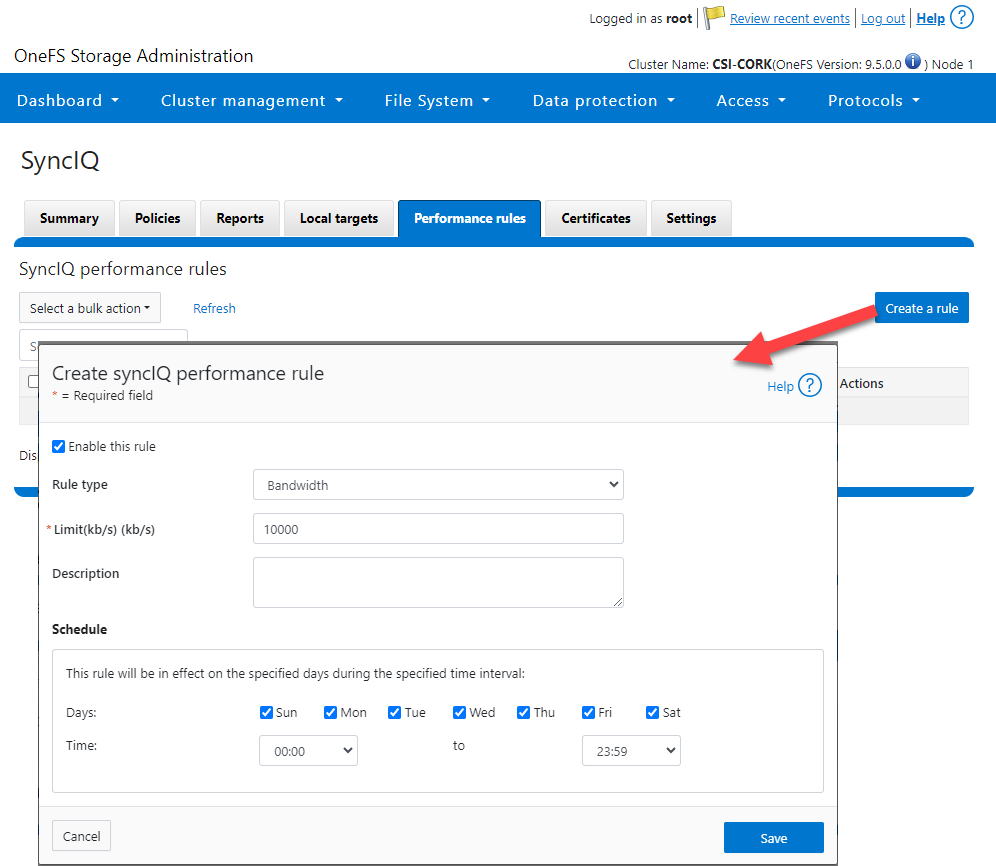
- SyncIQRules: Used to manage the replication performance rules that can be accessed as follows on the OneFS UI:
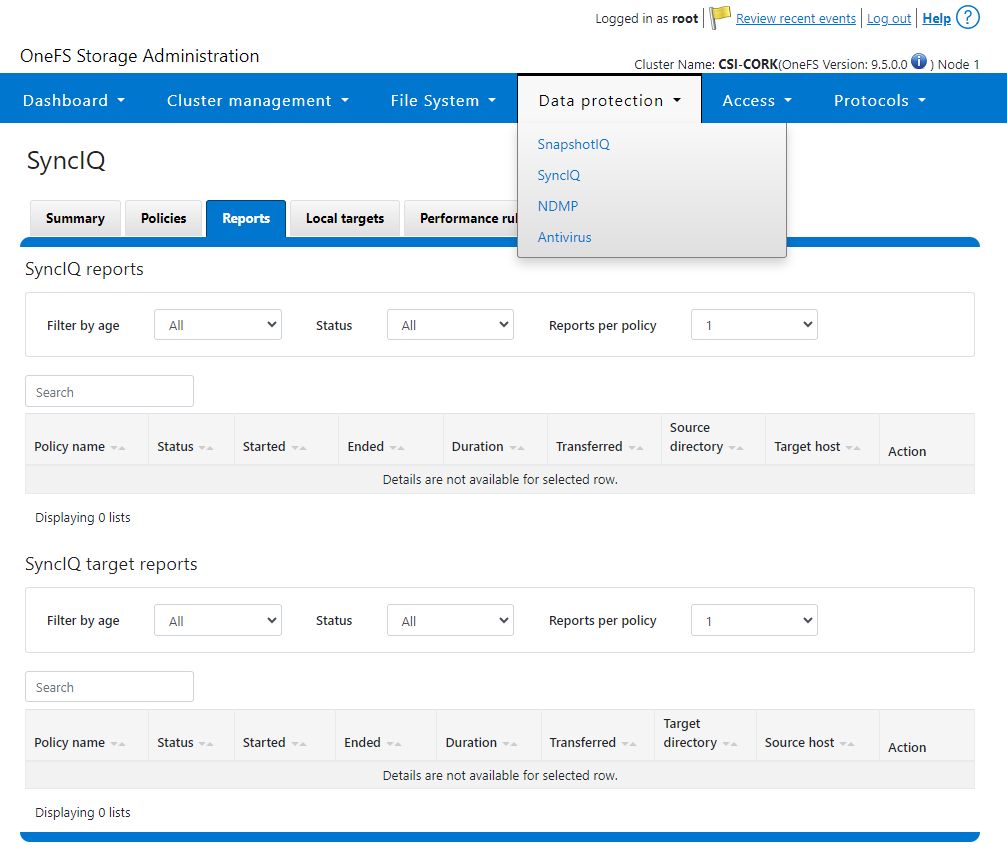
- SyncIQReports and SyncIQTargetReports: Used to manage SyncIQ reports. Following is the corresponding management UI screen where it is done manually:
Following are the new modules introduced to enhance the Ansible automation of SyncIQ workflows:
- SyncIQCertificate (v2.3): Used to manage SyncIQ target cluster certificates on PowerScale. Functionality includes getting, importing, modifying, and deleting target cluster certificates. Here is the OneFS UI for these settings:

- SyncIQ_global_settings (v2.3): Used to configure SyncIQ global settings that are part of the include the following:
Table 1. SyncIQ settings
SyncIQ Setting (datatype) | Description |
bandwidth_reservation_reserve_absolute (int) | The absolute bandwidth reservation for SyncIQ |
bandwidth_reservation_reserve_percentage (int) | The percentage-based bandwidth reservation for SyncIQ |
cluster_certificate_id (str) | The ID of the cluster certificate used for SyncIQ |
encryption_cipher_list (str) | The list of encryption ciphers used for SyncIQ |
encryption_required (bool) | Whether encryption is required or not for SyncIQ |
force_interface (bool) | Whether the force interface is enabled or not for SyncIQ |
max_concurrent_jobs (int) | The maximum number of concurrent jobs for SyncIQ |
ocsp_address (str) | The address of the OCSP server used for SyncIQ certificate validation |
ocsp_issuer_certificate_id (str) | The ID of the issuer certificate used for OCSP validation in SyncIQ |
preferred_rpo_alert (bool) | Whether the preferred RPO alert is enabled or not for SyncIQ |
renegotiation_period (int) | The renegotiation period in seconds for SyncIQ |
report_email (str) | The email address to which SyncIQ reports are sent |
report_max_age (int) | The maximum age in days of reports that are retained by SyncIQ |
report_max_count (int) | The maximum number of reports that are retained by SyncIQ |
restrict_target_network (bool) | Whether to restrict the target network in SyncIQ |
rpo_alerts (bool) | Whether RPO alerts are enabled or not in SyncIQ |
service (str) | Specifies whether the SyncIQ service is currently on, off, or paused |
service_history_max_age (int) | The maximum age in days of service history that is retained by SyncIQ |
service_history_max_count (int) | The maximum number of service history records that are retained by SyncIQ |
source_network (str) | The source network used by SyncIQ |
tw_chkpt_interval (int) | The interval between checkpoints in seconds in SyncIQ |
use_workers_per_node (bool) | Whether to use workers per node in SyncIQ or not |
Additions to Info module
The following information fields have been added to the Info module:
- S3 buckets
- SMB global settings
- Detailed network interfaces
- NTP servers
- Email settings
- Cluster identity (also available in the Settings module)
- Cluster owner (also available in the Settings module)
- SNMP settings
- SynciqGlobalSettings
PowerStore Ansible collections 3.1: More NAS configuration
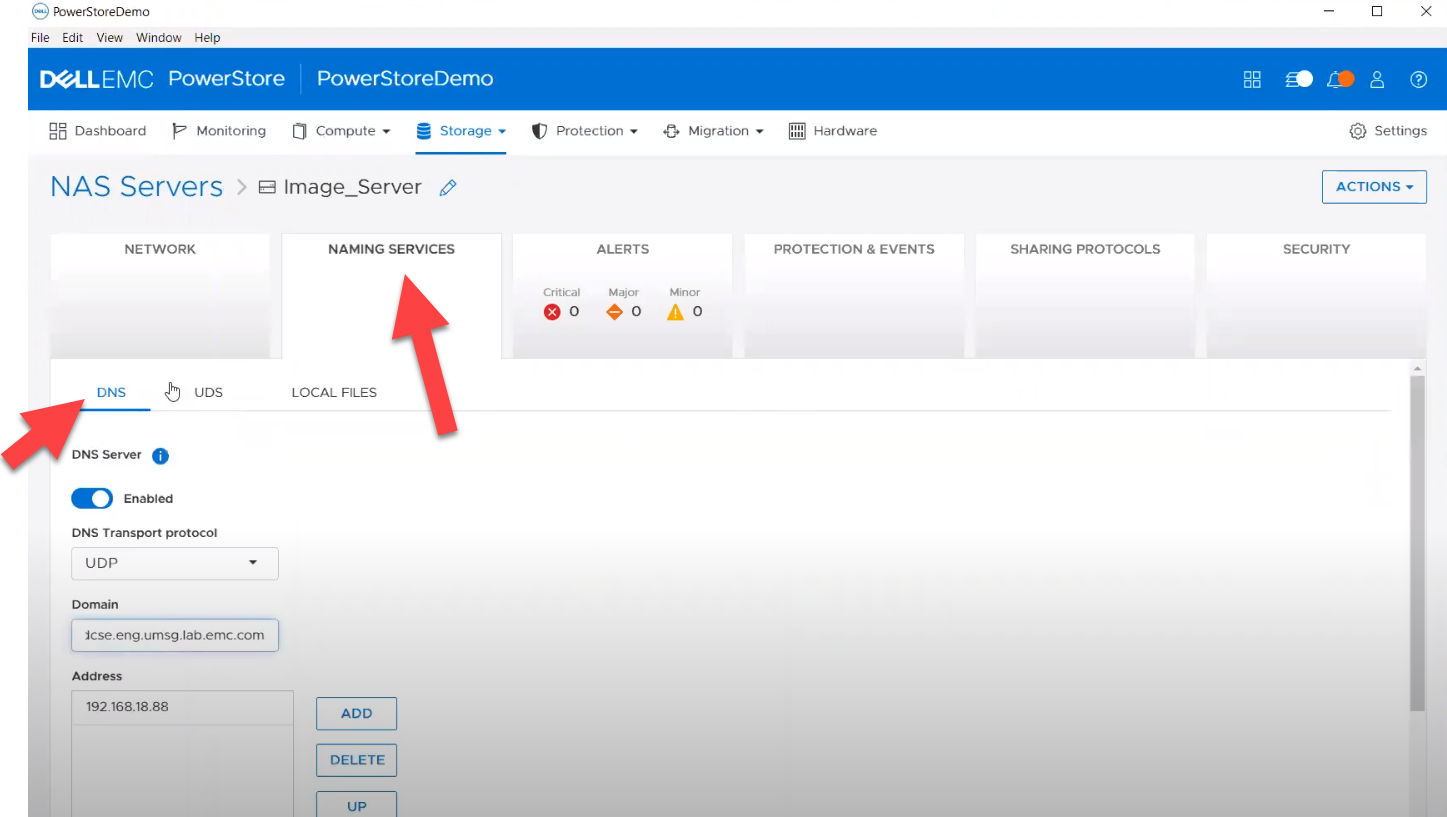
In this release of Ansible collections for PowerStore, new modules have been added to manage the NAS Server protocols like NFS and SMB, as well as to configure a DNS or NIS service running on PowerStore NAS.
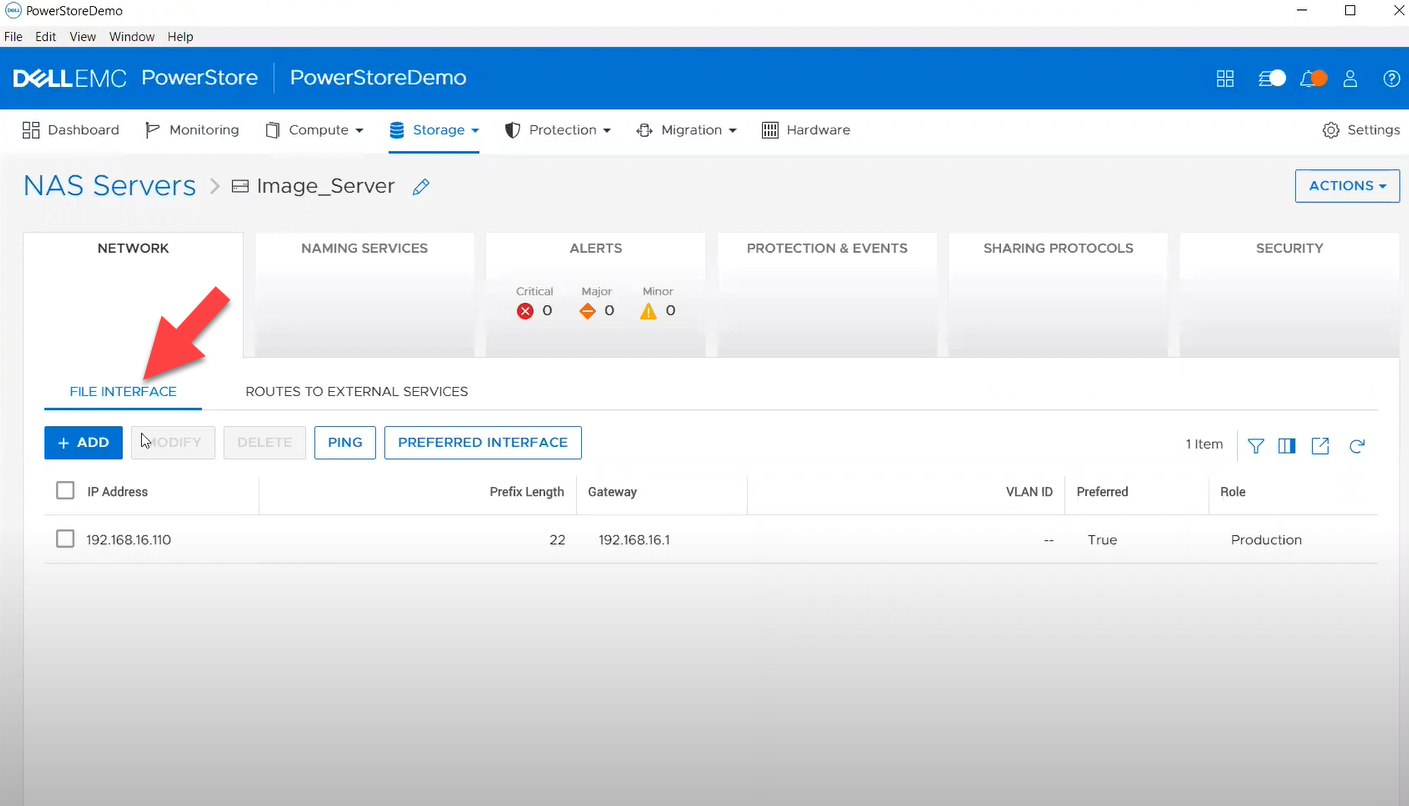
Managing NAS Server interfaces on PowerStore
- file_interface - to enable, query, and modify PowerStore NAS interfaces. Some examples can be found here.
- smb_server - to enable, query, and modify SMB Shares on PowerStore NAS. Some examples can be found here.
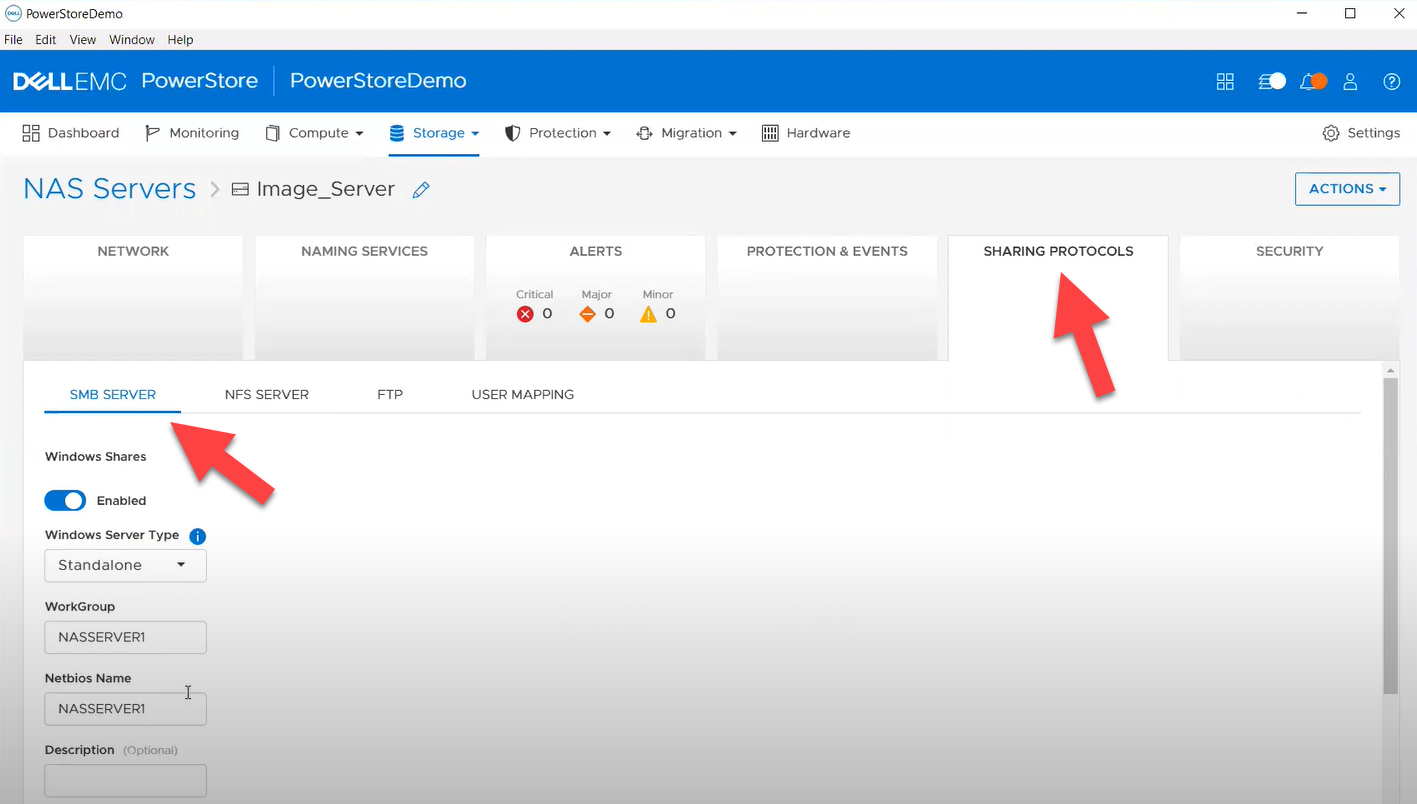
- nfs_server - to enable, query, and modify NFS Server on PowerStore NAS. Some examples can be found here.
Naming services on PowerStore NAS
- file_dns – to enable, query, and modify File DNS on PowerStore NAS. Some examples can be found here.
- file_nis - to enable, query, and modify NIS on PowerStore NAS. Some examples can be found here.
- service_config - manage service config for PowerStore
The Info module is enhanced to list file interfaces, DNS Server, NIS Server, SMB Shares, and NFS exports. Also in this release, support has been added for creating multiple NFS exports with same name but different NAS servers.
PowerFlex Ansible collections 2.0.1 and 2.1: More roles
In releases 1.8 and 1.9 of the PowerFlex collections, new roles have been introduced to install and uninstall various software components of PowerFlex to enable day-1 deployment of a PowerFlex cluster. In the latest 2.0.1 and 2.1 releases, more updates have been made to roles, such as:
- Updated config role to support creation and deletion of protection domains, storage pools, and fault sets
- New role to support installation and uninstallation of Active MQ
- Enhanced SDC role to support installation on ESXi, Rocky Linux, and Windows OS
OpenManage Ansible collections: More power to iDRAC
At the risk of repetition, OpenManage Ansible collections have modules and roles for both OpenManage Enterprise as well as iDRAC/Redfish node interfaces. In the last five months, a plethora of a new functionalities (new modules and roles) have become available, especially for the iDRAC modules in the areas of security and user and license management. Following is a summary of the new features:
V9.1
- redfish_storage_volume now supports iDRAC8.
- dellemc_idrac_storage_module is deprecated and replaced with idrac_storage_volume.
v9.0
- Module idrac_diagnostics is added to run and export diagnostics on iDRAC.
- Role idrac_user is added to manage local users of iDRAC.
v8.7
- New module idrac_license to manage iDRAC licenses. With this module you can import, export, and delete licenses on iDRAC.
- idrac_gather_facts role enhanced to add storage controller details in the role output and provide support for secure boot.
v8.6
- Added support for the environment variables, `OME_USERNAME` and `OME_PASSWORD`, as fallback for credentials for all modules of iDRAC, OME, and Redfish.
- Enhanced both idrac_certificates module and role to support the import and export of `CUSTOMCERTIFICATE`, Added support for import operation of `HTTPS` certificate with the SSL key.
v8.5
- redfish_storage_volume module is enhanced to support reboot options and job tracking operation.
v8.4
- New module idrac_network_attributes to configure the port and partition network attributes on the network interface cards.
Conclusion
Ansible is the most extensively used automation platform for IT Operations, and Dell Technologies provides an exhaustive set of modules and roles to easily deploy and manage server and storage infrastructure on-prem as well as on Cloud. With the monthly release cadence for both storage and server modules, you can get access to our latest feature additions even faster. Enjoy coding your Dell infrastructure!
Author: Parasar Kodati, Engineering Technologist, Dell ISG

A Simple Poster at NVIDIA GTC – Running NVIDIA Riva on Red Hat OpenShift with Dell PowerFlex


Fri, 15 Mar 2024 21:45:09 -0000
|Read Time: 0 minutes
A few months back, Dell and NVIDIA released a validated design for running NVIDIA Riva on Red Hat OpenShift with Dell PowerFlex. A simple poster—nothing more, nothing less—yet it can unlock much more for your organization. This design shows the power of NVIDIA Riva and Dell PowerFlex to handle audio processing workloads.
What’s more, it will be showcased as part of the poster gallery at NVIDIA GTC this week in San Jose California. If you are at GTC, we strongly encourage you to join us during the Poster Reception from 4:00 to 6:00 PM. If you are unable to join us, you can view the poster online from the GTC website.
For those familiar with ASR, TTS, and NMT applications, you might be curious as to how we can synthesize these concepts into a simple poster. Read on to learn more.
NVIDIA Riva
For those not familiar with NVIDIA Riva, let’s start there.
NVIDIA Riva is an AI software development kit (SDK) for building conversational AI pipelines, enabling organizations to program AI into their speech and audio systems. It can be used as a smart assistant or even a note taker at your next meeting. Super cool, right?
Taking that up a notch, NVIDIA Riva lets you build fully customizable, real-time conversational AI pipelines, which is a fancy way of saying it allows you to process speech in a bunch of different ways including automatic speech recognition (ASR), text-to-speech (TTS), and neural machine translation (NMT) applications:
- Automatic speech recognition (ASR) – this is essentially dictation. Provide AI with a recording and get a transcript—a near perfect note keeper for your next meeting.
- Text-to-speech (TTS) – a computer reads what you type. In the past, this was often in a monotone voice. It’s been around for more than a couple of decades and has evolved rapidly with more fluid voices and emotion.
- Neural machine translation (NMT) – this is the translation of spoken language in near real-time to a different language. It is a fantastic tool for improving communication, which can go a long way in helping organizations extend business.
Each application is powerful in its own right, so think about what’s possible when we bring ASR, TTS, and NMT together, especially with an AI-backed system. Imagine having a technical support system that could triage support calls, sounded like you were talking to an actual support engineer, and could provide that support in multiple languages. In a word: ground-breaking.
NVIDIA Riva allows organizations to become more efficient in handling speech-based communications. When organizations become more efficient in one area, they can improve in other areas. This is why NVIDIA Riva is part of the NVIDIA AI Enterprise software platform, focusing on streamlining the development and deployment of production AI.
I make it all sound simple, however those creating large language models (LLMs) around multilingual speech and translation software know it’s not so. That’s why NVIDIA developed the Riva SDK.
The operating platform also plays a massive role in what can be done with workloads. Red Hat OpenShift enables AI speech recognition and inference with its robust container orchestration, microservices architecture, and strong security features. This allows workloads to scale to meet the needs of an organization. As the success of a project grows, so too must the project.
Why is Storage Important
You might be wondering how storage fits into all of this. That’s a great question. You’ll need high performance storage for NVIDIA Riva. After all, it’s designed to process and/or generate audio files and being able to do that in near real-time requires a highly performant, enterprise-grade storage system like Dell PowerFlex.
Additionally, AI workloads are becoming mainstream applications in the data center and should be able to run side by side with other mission critical workloads utilizing the same storage. I wrote about this in my Dell PowerFlex – For Business-Critical Workloads and AI blog.
At this point you might be curious how well NVIDIA Riva runs on Dell PowerFlex. That is what a majority of the poster is about.
ASR and TTS Performance
The Dell PowerFlex Solutions Engineering team did extensive testing using the LibriSpeech dev-clean dataset available from Open SLR. With this data set, they performed automatic speech recognition (ASR) testing using NVIDIA Riva. For each test, the stream was increased from 1 to 64, 128, 256, 384, and finally 512, as shown in the following graph.
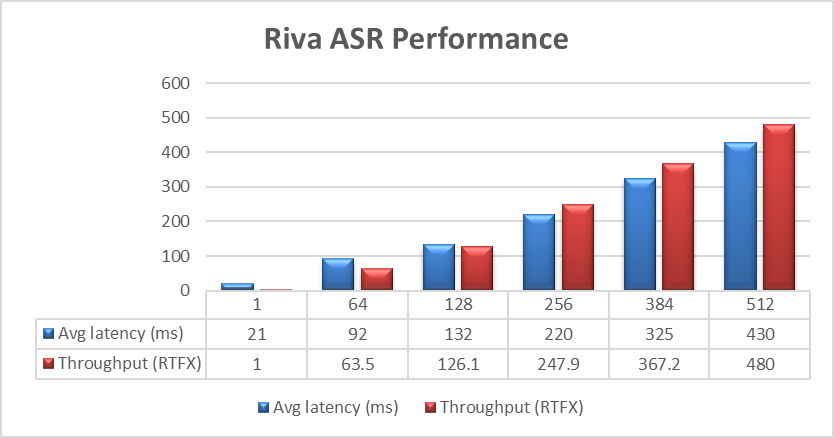 Figure 1. NVIDIA Riva ASR Performance
The objective of these tests is to have the lowest latency with the highest throughput. Throughput is measured in RTFX, or the duration of audio transcribed divided by computation time. During these tests, the GPU utilization was approximately 48% without any PowerFlex storage bottlenecks. These results are comparable to NVIDIA’s own findings in in the NVIDIA Riva User Guide.
The Dell PowerFlex Solutions Engineering team went beyond just looking at how fast NVIDIA Riva could transcribe text, also exploring the speed at which it could convert text to speech (TTS). They validated this as well. Starting with a single stream, for each run the stream is changed to 4, 6, 8, and 10, as shown in the following graph.
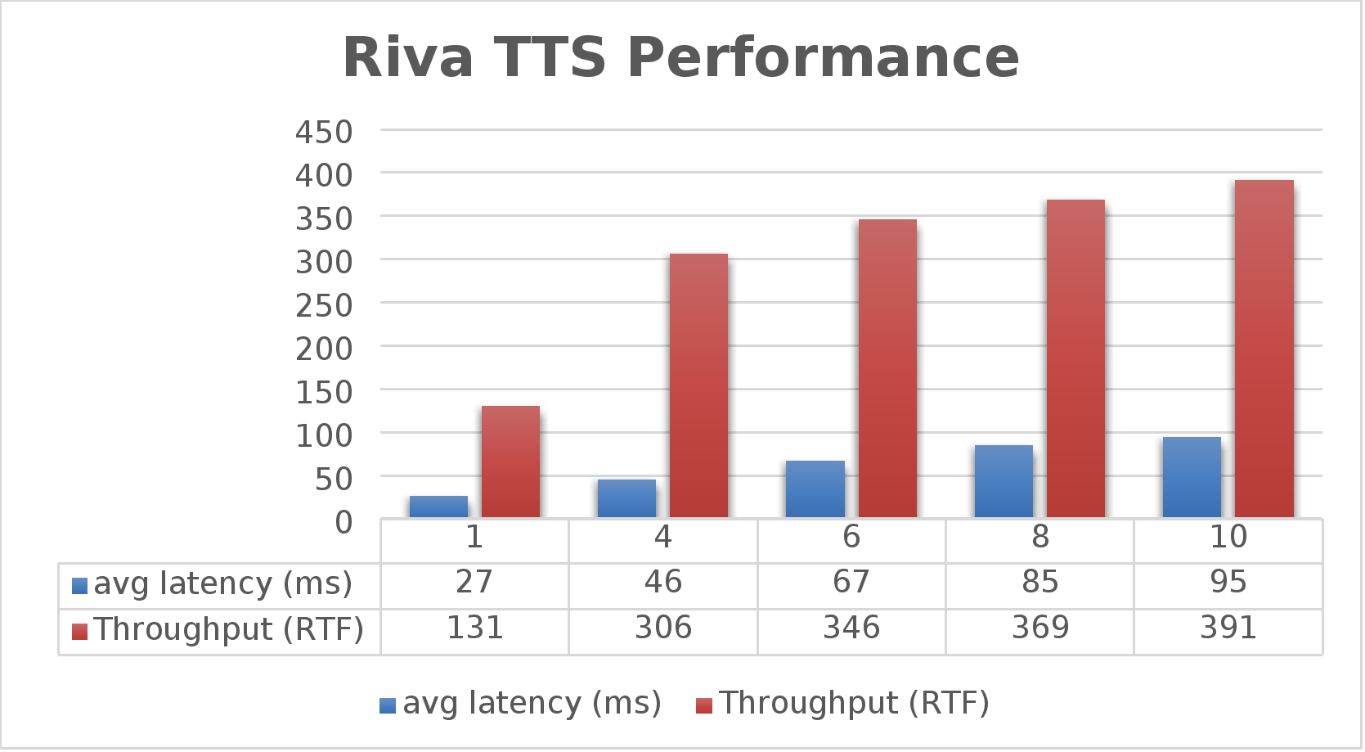 Figure 2. NVIDIA Riva TTS Performance
Again, the goal is to have a low average latency with a high throughput. The throughput (RTFX) in this case is the duration of audio generated divided by computation time. As we can see, this results in a RTFX throughput of 391 with a latency of 91ms with ten streams. It is also worth noting that during testing, GPU utilization was approximately 82% with no storage bottlenecks.
This is a lot of data to pack into one poster. Luckily, the Dell PowerFlex Solutions Engineering team created a validated architecture that details how all of these results were achieved and how an organization could replicate them if needed.
Now, to put all this into perspective, with PowerFlex you can achieve great results on both spoken language coming into your organization and converting text to speech. Pair this capability with some other generative AI (genAI) tools, like NVIDIA NeMo, and you can create some ingenious systems for your organization.
For example, if an ASR model is paired with a large language model (LLM) for a help desk, users could ask it questions verbally, and—once it found the answers—it could use TTS to provide them with support. Think of what that could mean for organizations.
It's amazing how a simple poster can hold so much information and so many possibilities. If you’re interested in learning more about the research Dell PowerFlex has done with NVIDIA Riva, visit the Poster Reception at NVIDIA GTC on Monday, March 18th from 4:00 to 6:00 PM. If you are unable to join us at the poster reception, the poster will be on display throughout NVIDIA GTC. If you are unable to attend GTC, check out the white paper, and reach out to your Dell representative for more information.
Authors: Tony Foster | Twitter: @wonder_nerd | LinkedIn
Praphul Krottapalli
Kailas Goliwadekar