


SmartFabric Services for VxRail
HCI networking made easy (again!). Now even more powerful with multi-rack support.
The Challenge
Network infrastructure is a critical component of HCI. In contrast to legacy 3-tier architectures, which typically have a dedicated storage and storage network, HCI architecture is more integrated and simplified. Its design allows you to share the same network infrastructure used for workload-related traffic and inter-cluster communication with the software-defined storage. Reliability and the proper setup of this network infrastructure not only determines the accessibility of the running workloads (from the external network), it also determines the performance and availability of the storage, and as a result, the whole HCI system.
Unfortunately, in most cases, setting up this critical component properly is complex and error-prone. Why? Because of the disconnect between the responsible teams. Typically configuring a physical network requires expert network knowledge which is quite rare among HCI admins. The reverse is also true: network admins typically have a limited knowledge of HCI systems, because this is not their area of expertise and responsibility.
The situation gets even more challenging when you think about increasingly complex deployments, when you go beyond just a pair of ToR switches and beyond a single-rack system. This scenario is becoming more common, as HCI is becoming a mainstream architecture within the data center, thanks to its maturity, simplicity, and being recognized as a perfect infrastructure foundation for the digital transformation and VDI/End User Computing (EUC) initiatives. You need much more computing power and storage capacity to handle increased workload requirements.
At the same time, with the broader adoption of HCI, customers are looking for ways to connect their existing infrastructure to the same fabric, in order to simplify the migration process to the new architecture or to leverage dedicated external NAS systems, such as Isilon, to store files and application or user data.
A brief history of SmartFabric Services for VxRail
Here at Dell Technologies we recognize these challenges. That’s why we introduced SmartFabric Services (SFS) for VxRail. SFS for VxRail is built into Dell EMC Networking SmartFabric OS10 Enterprise Edition software that is built into the Dell EMC PowerSwitch networking switches portfolio. We announced the first version of SFS for VxRail at VMworld 2018. With this functionality, customers can quickly and easily deploy and automate data center fabrics for VxRail, while at the same time reduce risk of misconfiguration.
Since that time, Dell has expanded the capabilities of SFS for VxRail. The initial release of SFS for VxRail allowed VxRail to fully configure the switch fabric to support the VxRail cluster (as part of the VxRail 4.7.0 release back in Dec 2018). The following release included automated discovery of nodes added to a VxRail cluster (as part of VxRail 4.7.100 in Jan 2019).
The new solution
This week we are excited to introduce a major new release of SFS for VxRail as a part of Dell EMC SmartFabric OS 10.5.0.5 and VxRail 4.7.410.
So, what are the main enhancements?
- Automation at scale
Customers can easily scale their VxRail deployments, starting with a single rack with two ToR leaf switches, and expand to multi-rack, multi-cluster VxRail deployments with up to 20 switches in a leaf-spine network architecture at a single site. SFS now automates over 99% (!) of the network configuration steps* for leaf and spine fabrics across multiple racks, significantly simplifying complex multi-rack deployments. - Improved usability
An updated version of the OpenManage Network Integration (OMNI) plugin provides a single pane for “day 2” fabric management and operations through vCenter (the main management interface used by VxRail and vSphere admins), and a new embedded SFS UI simplifying “day 1” setup of the fabric. - Greater expandability
Customers can now connect non-VxRail devices, such as additional PowerEdge servers or NAS systems, to the same fabric. The onboarding can be performed as a “day 2” operation from the OMNI plugin. In this way, customers can reduce the cost of additional switching infrastructure when building more sophisticated solutions with VxRail.
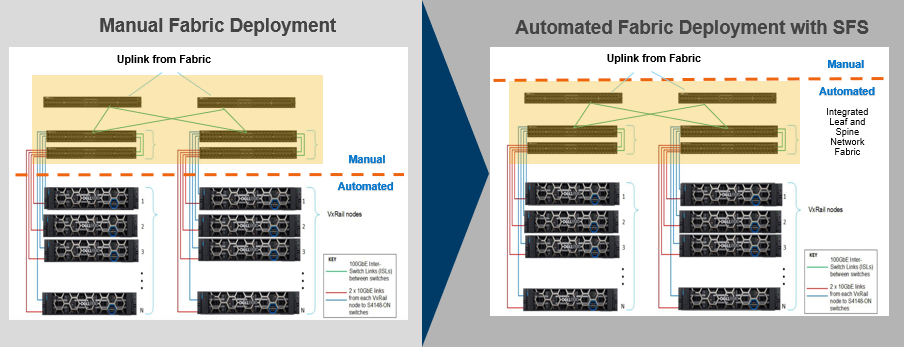
Figure 1. Comparison of a multi-rack VxRail deployment, without and with SFS
Solution components
In order to take advantage of this solution, you need the following components:
- At a minimum a pair of supported Dell EMC PowerSwitch Data Center Switches. For an up-to-date list of supported hardware and software components, please consult the latest VxRail Support Matrix. At the time of writing this post, the following models are supported: S4100 (10GbE) and S5200 (25GbE) series for the leaf and Z9200 series or S5232 for the spine layer. To learn more about the Dell EMC PowerSwitch product portfolio, please visit the PowerSwitch website.
- Dell EMC Networking SmartFabric OS10 Enterprise Edition (version 10.5.0.5 or later). This operating system is available for the Dell EMC PowerSwitch Data Center Switches, and implements SFS functionality. To learn more, please visit the OS10 website.
- A VxRail cluster consisting of 10GbE or 25GbE nodes, with software version 4.7.410 or later.
- OpenManage Network Integration (OMNI) for VMware vCenter version 1.2.30 or later.
How does the multi-rack feature work?
The multi-rack feature is done through the use of the Hardware VTEP functionality in Dell EMC PowerSwitches and the automated creation of a VxLAN tunnel network across the switch fabric in multiple racks.
VxLAN (Virtual Extensible Local Area Network) is an overlay technology that allows you to extend a Layer 2 “overlay” network over a Layer 3 (L3) “underlay” network by adding a VxLAN header to the original Ethernet frame and encapsulating it. This encapsulation occurs by adding a VxLAN header to the original Layer 2 (L2) Ethernet frame, and placing it into an IP/UDP packet to be transported across the L3 underlay network.
By default, all VxRail networks are configured as L2. With the configuration of this VxLAN tunnel, the L2 network is “stretched” across multiple racks with VxRail nodes. This allows for the scalability of L3 networks with the VM mobility benefits of an L2 network. For example, the nodes in a VxRail cluster can reside on any rack within the SmartFabric network, and VMs can be migrated within the same VxRail cluster to any other node without manual network configuration.
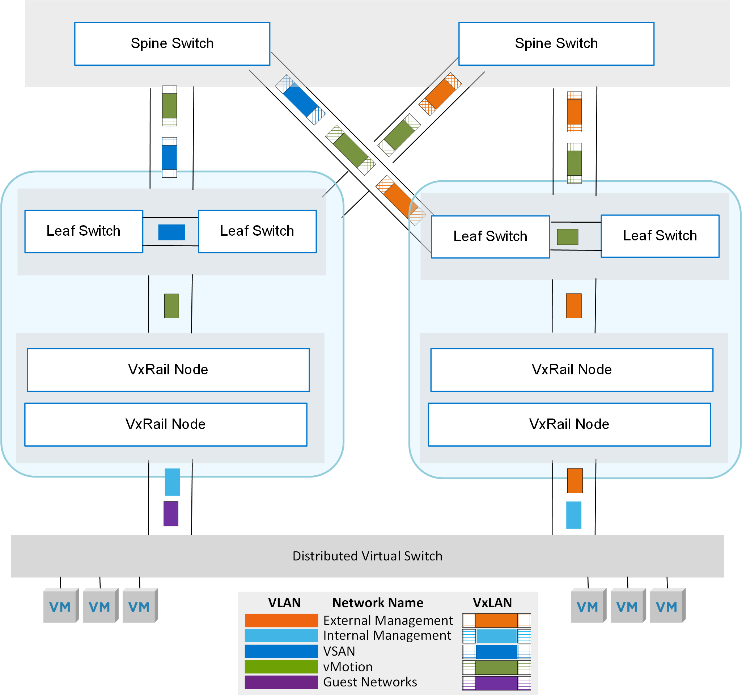
Figure 2. Overview of the VLAN and VxLAN VxRail traffic with SFS for multi-rack VxRail
This new functionality is enabled by the new L3 Fabric personality, available as of OS 10.5.0.5, that automates configuration of a leaf-spine fabric in a single-rack or multi-rack fabric and supports both L2 and L3 upstream connectivity. What is this fabric personality? SFS personality is a setting that enables the functionality and supported configuration of the switch fabric.
To see how simple it is to configure the fabric and to deploy a VxRail multi-rack cluster with SFS, please see the following demo: Dell EMC Networking SFS Deployment with VxRail - L3 Uplinks.
Single pane for management and “day 2” operations
SFS not only automates the initial deployment (“day 1” fabric setup), but greatly simplifies the ongoing management and operations on the fabric. This is done in a familiar interface for VxRail / vSphere admins – vCenter, through the OMNI plugin, distributed as a virtual appliance.
It’s powerful! From this “VMware admin-friendly” interface you can:
- Add a SmartFabric instance to be managed (OMNI supports multiple fabrics to be managed from the same vCenter / OMNI plugin).
- Get visibility into the configured fabric – domain, fabric nodes, rack, switches, and so on.
- Visualize the fabric and the configured connections between the fabric elements with a “live” diagram that allows “drill-down” to get more specific information (Figure 3).
- Manage breakout ports and jump ports, as well as on-board additional servers or non-VxRail devices.
- Configure L2 or L3 fabric uplinks, allowing more flexibility and support of multiple fabric topologies.
- Create, edit, and delete VxLAN and VLAN-based networks, to customize the network setup for specific business needs.
- Create a host-centric network inventory that provides a clear mapping between configured virtual and physical components (interfaces, switches, networks, and VMs). For instance, you can inspect virtual and physical network configuration from the same host monitoring view in vCenter (Figure 4). This is extremely useful for troubleshooting potential network connectivity issues.
- Upgrade SmartFabric OS on the physical switches in the fabric and replace a switch that simplifies the lifecycle management of the fabric.
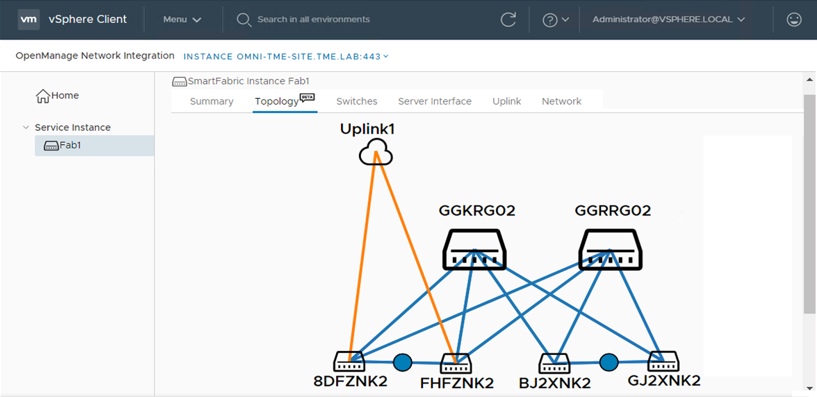
Figure 3. Sample view from the OMNI vCenter plugin showing a fabric topology
To see how simple it is to deploy the OMNI plugin and to get familiar with some of the options available from its interface, please see the following demo: Dell EMC OpenManage Network Integration for VMware vCenter.
OMNI also monitors the VMware virtual networks for changes (such as to portgroups in vSS and vDS VMware virtual switches) and as necessary, reconfigures the underlying physical fabric.
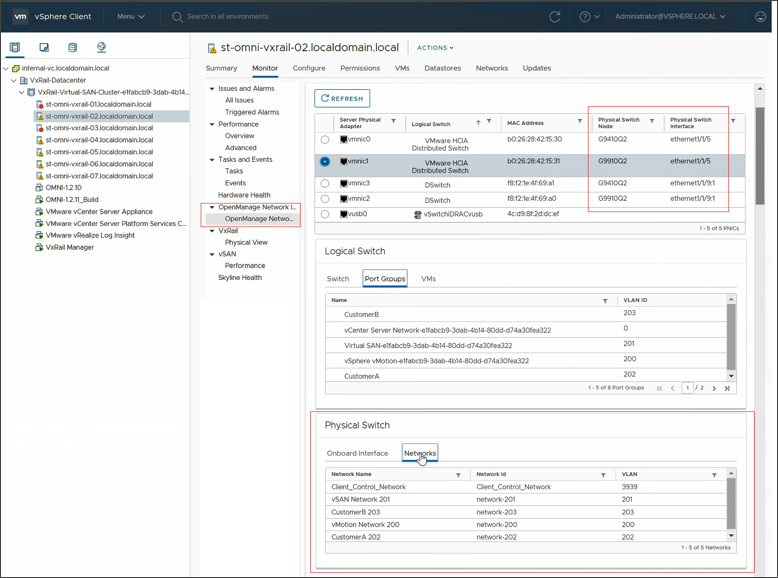
Figure 4. OMNI – monitor virtual and physical network configuration from a single view
Thanks to OMNI, managing the physical network for VxRail becomes much simpler, less error-prone, and can be done by the VxRail admin directly from a familiar management interface, without having to log into the console of the physical switches that are part of the fabric.
Supported topologies
This new SFS release is very flexible and supports multiple fabric topologies. Due to the limited size of this post, I will only list them by name:
- Single-Rack – just a pair of leaf switches in a single rack, supports both L2 and L3 upstream connectivity / uplinks – the equivalent of the previous SFS functionality
- (New) Single-Rack to Multi-Rack – starts with a pair of switches, expands to multi-rack by adding spine switches and additional racks with leaf switches
- (New) Multi-Rack with Leaf Border – adds upstream connectivity via the pair of leaf switches; this supports both L2 or L3 uplinks
- (New) Multi-Rack with Spine Border - adds upstream connectivity via the pair of leaf spine; this supports L3 uplinks
- (New) Multi-Rack with Dedicated Leaf Border - adds upstream connectivity via the dedicated pair of border switches above the spine layer; this supports L3 uplinks
For detailed information on these topologies, please consult Dell EMC VxRail with SmartFabric Network Services Planning and Preparation Guide.
Note, that SFS for VxRail does not currently support NSX-T and VCF on VxRail.
Final thoughts
This latest version of SmartFabric Services for VxRail takes HCI network automation to the next level and solves now much bigger network complexity problem in a multi-rack environment, compared to much simpler, single-rack, dual switch configuration. With SFS, customers can:
- Reduce the CAPEX and OPEX related to HCI network infrastructure, thanks to automation (reducing over 99% of required configuration steps* when setting up a multi-rack fabric), and a reduced infrastructure footprint
- Accelerate the deployment of essential IT infrastructure for their business initiatives
- Reduce the risk related to the error-prone configuration of complex multi-rack, multi-cluster HCI deployments
- Increase the availability and performance of hosted applications
- Use a familiar management console (vSphere Client / vCenter) to drive additional automation of day 2 operations
- Rapidly perform any necessary changes to the physical network, in an automated way, without requiring highly-skilled network personnel
Additional resources:
Dell EMC VxRail with SmartFabric Network Services Planning and Preparation Guide
Dell EMC Networking SmartFabric Services Deployment with VxRail
SmartFabric Services for OpenManage Network Integration User Guide Release 1.2
Demo: Dell EMC OpenManage Network Integration for VMware vCenter
Demo: Expand SmartFabric and VxRail to Multi-Rack
Demo: Dell EMC Networking SFS Deployment with VxRail - L2 Uplinks
Demo: Dell EMC Networking SFS Deployment with VxRail - L3 Uplinks
Author: Karol Boguniewicz, Senior Principal Engineer, VxRail Technical Marketing
Twitter: @cl0udguide

*Disclaimer: Based on internal analysis comparing SmartFabric to manual network configuration, Oct 2019. Actual results will vary.
Related Blog Posts

Exploring the customer experience with lifecycle management for vSAN Ready Nodes and VxRail clusters
Thu, 24 Sep 2020 19:41:49 -0000
|Read Time: 0 minutes
The difference between VMware vSphere LCM (vLCM) and Dell EMC VxRail LCM is still a trending topic that most HCI customers and prospects want more information about. While we compared the two methods at a high level in our previous blog post, let’s dive into the more technical aspects of the LCM operations of VMware vLCM and VxRail LCM. The detailed explanation in this blog post should give you a more complete understanding of your role as an administrator for cluster lifecycle management with vLCM versus VxRail LCM.
Even though vLCM has introduced a vast improvement in automating cluster updates, lifecycle management is more than executing cluster updates. With vLCM, lifecycle management is still very much a customer-driven endeavor. By contrast, VxRail’s overarching goal for LCM is operational simplicity, by leveraging Continuously Validated States to drive cluster LCM for the customer. This is a large part of why VxRail has over 8,600 customers since it was launched in early 2016.
In this blog post, I’ll explain the four major areas of LCM:
- Defining the initial baseline configuration
- Planning for a cluster update
- Executing the cluster update
- Sustaining cluster integrity over the long term
Defining the initial baseline configuration
The baseline configuration is a vital part of establishing a steady state for the life of your cluster. The baseline configuration is the current known good state of your HCI stack. In this configuration, all the component software and firmware versions are compatible with one another. Interoperability testing has validated full stack integrity for application performance and availability while also meeting security standards in place. This is the ‘happy’ state for you and your cluster. Any changes to the configuration use this baseline to know what needs to be rectified to return to the ‘happy’ state.
How is it done with vLCM?
vLCM depends on the hardware vendor to provide a Hardware Management Services virtual machine. Dell provides this support for its Dell EMC PowerEdge servers, including vSAN ReadyNodes. I’ll use this implementation to explain the overall process. Dell EMC vSAN ReadyNodes use the OpenManage Integration for VMware vCenter (OMIVV) plugin to connect to and register with the vCenter Server.
Once the VM is deployed and registered, you need to create a credential-based profile. This profile captures two accounts: one for the out-of-band hardware interface, the iDRAC, and the other for the root credentials for the ESXi host. Future changes to the passwords require updating the profile accordingly.
With the VM connection and profile in place, a Catalog XML file is used by vLCM to define the initial baseline configuration. To create the Catalog XML file, you need to install and configure the Dell Repository Manager (DRM) to build the hardware profile. Once a profile is defined to your specification, it must then be exported and stored on an NFS or CIFS share. The profile is then used to populate the Repository Profile data in the OMIVVV UI. If you are unsure of your configuration, refer to the vSAN Hardware Compatibility List (HCL) for the specific supported firmware versions. Once the hardware profile is created, you can then associate it with the cluster profile. With the cluster profile defined, you can enable drift detection. Any future change to the Catalog XML file is done within the DRM.
It’s important to note that vLCM was introduced in vSphere 7.0. To use vLCM, you must first update or deploy your clusters to run vSphere 7.x.
How is it done with VxRail LCM?
With VxRail, when the cluster arrives at the customer data center, it’s already running in a ‘happy’ state. For VxRail, the ‘happy’ state is called Continuously Validated States. The term is pluralized because VxRail defines all the ‘happy’ states that your cluster will update to over time. This means that your cluster is always running in a ‘happy’ state without you needing to research, define, and test to arrive at Continuously Validated States throughout the life of your cluster. VxRail – well, specifically the VxRail engineering team - does it for you. This has been a central tenet of VxRail since the product first launched with vSphere 6.0. Since then it has helped customers transition to vSphere 6.5, 6.7, and now 7.0.
Once the VxRail cluster initialization is completed, use your Dell EMC Support credentials to configure the VxRail repository setting within vCenter. VxRail Manager plugin to vCenter will automatically connect to the VxRail repository at Dell EMC and pull down the next available update package.
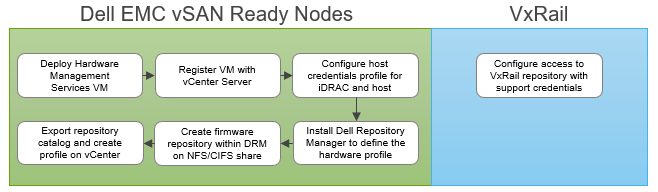
Figure 1 Defining the initial baseline configuration
Planning for a cluster update
Updates are a constant in IT, and VMware is constantly adding new capabilities or product/security fixes that require updating to newer versions of software. Take for example the vSphere 7.0 Update 1 release that VMware and Dell Technologies just announced. Those eye-opening features are available to you when you update to that release. You can check out just how often VMware has historically updated vSphere here: https://kb.vmware.com/s/article/2143832.
As you know, planning for a cluster update is an iterative process with inherent risk associated with it. Failing to plan diligently can cause adverse effects on your cluster, ranging from network outages and node failure to data unavailability or data loss. That said, it’s important to mitigate the risk where you can.
How is it done with vLCM?
With vLCM, the responsibility of planning for a cluster update rests on the customers’ shoulders, including the risk. Understanding the Bill of Materials that makes up your server’s hardware profile is paramount to success. Once all the components are known, and a target version of vSphere ESXi is specified, the supported driver and firmware version needs to be investigated and documented. You must consult the VMware Compatibility Guide to find out which drivers/firmware are supported for each ESXi release.
It is important to note that although vLCM gives you the toolset to apply firmware and driver updates, it does not validate compatibility or support for each combination for you, except for the HBA Driver. This task is firmly in the customer’s domain. It is advisable to validate and test the combination in a separate test environment to ensure that no performance regression or issues are introduced into the production environment. Interoperability testing can be an extensive and expensive undertaking. Customers should create and define robust testing processes to ensure that full interoperability and compatibility is met for all components managed and upgraded by vLCM.
With Dell EMC vSAN Ready Nodes, customers can rest assured that the HCL certification and compatibility validation steps have been performed. However, the customer is still responsible for interoperability testing.
How is it done with VxRail LCM?
VxRail engineering has taken a unique approach to LCM. Rather than leaving the time-consuming LCM planning to already overburdened IT departments, they have drastically reduced the risk by investing over $60 million, more than 25,000 hours of testing for major releases, and more than 100 team members into a comprehensive regression test plan. This plan is completed prior to every VxRail code release. (This is in addition to the testing and validation performed by PowerEdge, on which VxRail nodes are built.)
Dell EMC VxRail engineering performs this testing within 30 days of any new VMware release (even quicker for express patches), so that customers can continually benefit from the latest VMware software innovations and confidently address security vulnerabilities. You may have heard this called “synchronous release”.
The outcome of this effort is a single update bundle that is used to update the entire HCI stack, including the operating system, the hardware’s drivers and firmware, and management components such as VxRail Manager and vCenter. This allows VxRail to define the declarative configuration we mentioned previously (“Continuously Validated States”), allowing us to move easily from one validated state to the next with each update.
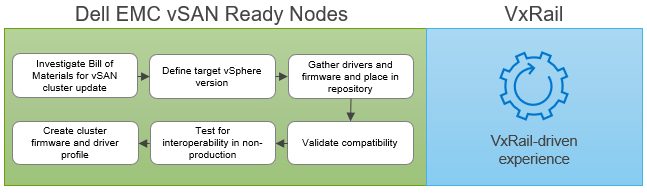
Figure 2 Planning for a cluster update
Executing the cluster update
The biggest improvement with vLCM is its ability to orchestrate and automate a full stack HCI cluster update. This simplifies the update operation and brings enormous time savings. This process is showcased in a recent study performed by Principled Technologies with PowerEdge Servers with vSphere (not including vSAN).
How is it done with vLCM?
The first step is to import the ESXi ISO via the vLCM tab in the vCenter Server UI. Once uploaded, select the relevant cluster, ensure that the cluster profile (created in the initial baseline configuration phase) is associated with the cluster being updated. Now, you can apply the target configuration by editing the ESXi image and, from the OMIVV UI, choose the correct firmware and driver to apply to the hardware profile. Once a compliance scan is complete, you will have the option to remediate all hosts.
If there are multiple homogenous clusters you need to update, it can be as easy as using the same cluster profile to execute the cluster update against. However, if the next cluster has a different hardware configuration, then you would have to perform the above steps over again. Customers with varying hardware and software requirements for their clusters will have to repeat many of these steps, including the planning tasks, to ensure stack integrity.
How it is done with VxRail LCM?
With VxRail and Continuously Validated States, updating from one configuration to another is even simpler. You can access the VxRail Manager directly within the vCenter Server UI to initiate the update. The LCM operation automatically retrieves the update bundle from the VxRail repository, runs a full stack pre-update health check, and performs the cluster update.
With VxRail, performing multi-cluster updates is as simple as performing a single-cluster update. The same LCM cluster update workflow is followed. While different hardware configurations on separate clusters will add more labor for IT staff for vSAN Ready Nodes, this doesn’t apply to VxRail. In fact, in the latest release of our SaaS multi-cluster management capability set, customers can now easily perform cluster updates at scale from our cloud-based management platform, MyVxRail.
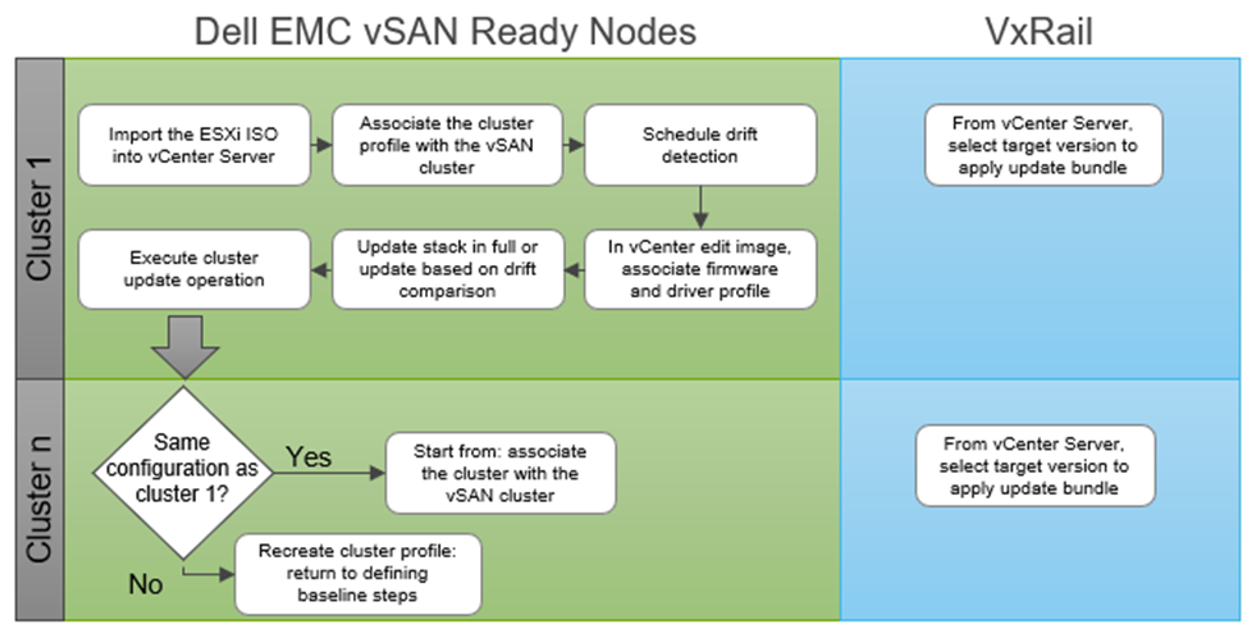
Figure 3 Executing a cluster update
Sustaining cluster integrity over the long term
The long-term integrity of a cluster outlasts the software and hardware in it. As mentioned earlier, because new releases are made available frequently, software has a very short life span. While hardware has more staying power, it won’t outlast some of the applications running on them. New hardware platforms will emerge. New hardware devices will enter the market that will launch new workloads, such as machine learning, graphics rendering, and visualization workflows. You will need the cluster to evolve non-disruptively to deliver the application performance, availability, and diversity your end-users require.
How is it done with vLCM?
In its current form, vLCM will struggle in long-term cluster lifecycle management. In particular, its inability to support heterogeneous nodes (nodes with different hardware configurations) in the same cluster will limit its application diversification and its ability to take advantage of new hardware platforms without impacting end-users.
How it is done with VxRail LCM?
VxRail LCM touts its ability to allow customers to grow non-disruptively and to scale their clusters over time. That includes adding non-identical nodes into the clusters for new applications, adding new hardware devices for new applications or more capacity, or retiring old hardware from the cluster.
Conclusion
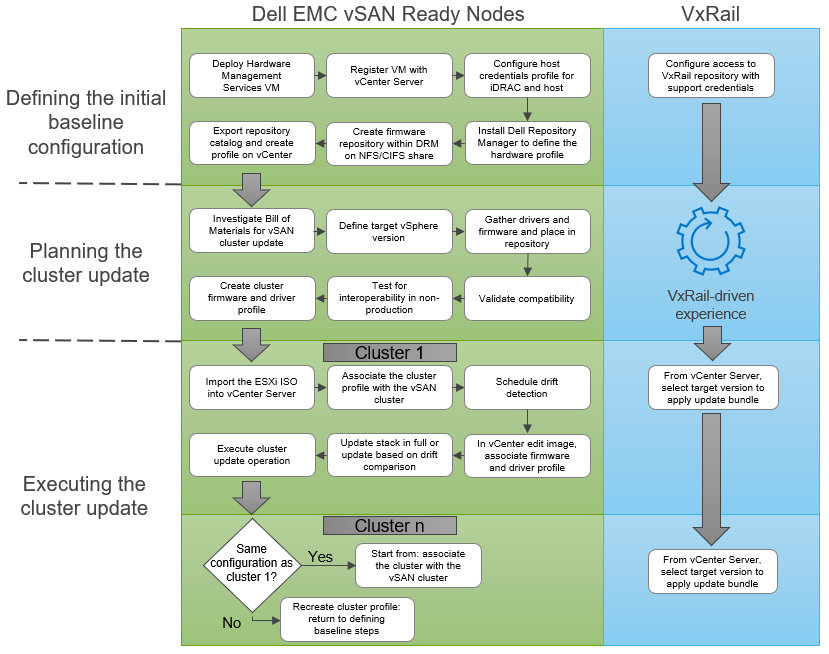
Figure 4 Comparing vSphere LCM and VxRail LCM cluster update operations driven by the customer
The VMware vLCM approach empowers customers who are looking for more configuration flexibility and control. They have the option to select their own hardware components and firmware to build the cluster profile. With this freedom comes the responsibility to define the HCI stack and make investments in equipment and personnel to ensure stack integrity. vLCM supports this customer-driven approach with improvements in cluster update execution for faster outcomes.
Dell EMC VxRail LCM continues to take a more comprehensive approach to optimize operational efficiency from the point of the view of the customer. VxRail customers value its LCM capabilities because it reduces operational time and effort which can be diverted into other areas of need in IT. VxRail takes on the responsibility to drive stack integrity for the lifecycle management of the cluster with Continuously Validated States. And VxRail sustains stack integrity throughout the life of the cluster, allowing you to simply and predictably evolve with technology trends.
Cliff Cahill
VxRail Engineering Technologist
Twitter @cliffcahill
LinkedIn http://linkedin.com/in/cliffcahill

VxRail Edge Automation Unleashed - Simplifying Satellite Node Management with Ansible
Thu, 30 Nov 2023 17:43:03 -0000
|Read Time: 0 minutes
VxRail Edge Automation Unleashed
Simplifying Satellite Node Management with Ansible
In the previous blog, Infrastructure as Code with VxRail made easier with Ansible Modules for Dell VxRail, I introduced the modules which enable the automation of VxRail operations through code-driven processes using Ansible and VxRail API. This approach not only streamlines IT infrastructure management but also aligns with Infrastructure as Code (IaC) principles, benefiting both technical experts and business leaders.
The corresponding demo is available on YouTube:
The previous blog laid the foundation for the continued journey where we explore more advanced Ansible automation techniques, with a focus on satellite node management in the VxRail ecosystem. I highly recommend checking out that blog before diving deeper into the topics discussed here - as the concepts discussed in this demo will be much easier to absorb
What are the VxRail satellite nodes?
VxRail satellite nodes are individual nodes designed specifically for deployment in edge environments and are managed through a centralized primary VxRail cluster. Satellite nodes do not leverage vSAN to provide storage resources and are an ideal solution for those workloads where the SLA and compute demands do not justify even the smallest of VxRail 2-node vSAN clusters.
Satellite nodes enable customers to achieve uniform and centralized operations within the data center and at the edge, ensuring VxRail management throughout. This includes comprehensive, automated lifecycle management for VxRail satellite nodes, while encompassing hardware and software and significantly reducing the need for manual intervention.
To learn more about satellite nodes, please check the following blogs from my colleagues:
- David’s introduction: Satellite nodes: Because sometimes even a 2-node cluster is too much
- Stephen’s update on enhancements: Enhancing Satellite Node Management at Scale
Automating VxRail satellite node operations using Ansible
You can leverage the Ansible Modules for Dell VxRail to automate various VxRail operations, including more advanced use cases, like satellite node management. It’s possible today by using the provided samples available in the official repository on GitHub.
Have a look at the following demo, which leverages the latest available version of these modules at the time of recording – 2.2.0. In the demo, I discuss and demonstrate how you can perform the following operations from Ansible:
- Collecting information about the number of satellite nodes added to the primary VxRail cluster
- Adding a new satellite node to the primary VxRail cluster
- Performing lifecycle management operations – staging the upgrade bundle and executing the upgrade on managed satellite nodes
- Removing a satellite node from the primary cluster
The examples used in the demo are slightly modified versions of the following samples from the modules' documentation on GitHub. If you’d like to replicate these in your environment, here are the links to the corresponding samples for your reference, which need slight modification:
- Retrieving system information: systeminfo.yml
- Adding a new satellite node: add_satellite_node.yml
- Performing LCM operations: upgrade_host_folder.yml (both staging and upgrading as explained in the demo)
- Removing a satellite node: remove_satellite_node.yml.
In the demo, you can also observe one of the interesting features of the Ansible Modules for Dell VxRail that is shown in action but not explained explicitly. You might be aware that some of the VxRail API functions are available in multiple versions – typically, a new version is made available when some new features are available in the VxRail HCI System Software, while the previous versions are stored to provide backward compatibility. The example is “GET /vX/system”, which is used to retrieve the number of the satellite nodes – this property was introduced in version 4. If you avoid specifying the version, the modules will automatically select the latest supported version, simplifying the end-user experience.
How can you get more hands-on experience with automating VxRail operations programmatically?
The above demo, discussing the satellite nodes management using Ansible, was configured in the VxRail API hands-on lab which is available in the Dell Technologies Demo Center. With the help of the Demo Center team, we built this lab as the self-education tool for learning VxRail API and how it can be used for automating VxRail operations using various methods – through exploring the built-in, interactive, web-based documentation, VxRail API PowerShell Modules, Ansible Modules for Dell VxRail and Postman.
The hands-on lab provides a safe VxRail API sandbox, where you can easily start experimenting by following the exercises from the lab guide or trying some other use cases on your own without any concerns about making configuration changes to the VxRail system.
The lab was refreshed for the Dell Technologies World 2023 conference to leverage VxRail HCI System Software 8.0.x and the latest version of the Ansible Modules. If you’re a Dell partner, you should have access directly, and if you’re a customer who’d like to get access – please contact your Account SE from Dell or Dell Partner. The lab is available in the catalog as: “HOL-0310-01 - Scalable Virtualization, Compute, and Storage with the VxRail REST API”.
Conclusion
In the fast-evolving landscape of IT infrastructure, the ability to automate operations efficiently is not just a convenience but a necessity. With the power of Ansible Modules for Dell VxRail, we've explored how this necessity can be met, looking at the examples of satellite nodes use case. We encourage you to embrace the full potential of VxRail automation using VxRail API and Ansible or other tools. If it is something new, you can get the experience by experimenting with the hands-on lab available in the Demo Center catalog.
Resources
- Previous blog: Infrastructure as Code with VxRail Made Easier with Ansible Modules for Dell VxRail
- The “master” blog containing a curated list of publicly-available educational resources about the VxRail API: VxRail API - Updated List of Useful Public Resources
- Ansible Modules for Dell VxRail on GitHub, which is the central code repository for the modules. It also contains complete product documentation and examples.
- Dell Technologies Demo Center, which includes VxRail API hands-on lab.
Author: Karol Boguniewicz, Senior Principal Engineering Technologist, VxRail Technical Marketing
Twitter/X: @cl0udguide
LinkedIn: https://www.linkedin.com/in/boguniewicz/