


Provision PowerStore Metro Volumes with Dell Virtual Storage Integrator (VSI)

Since PowerStoreOS 3.0, native metro volumes have been supported for PowerStore in vSphere Metro Storage Cluster configurations. With the new Virtual Storage Integrator (VSI) 10.0 plug-in for vSphere, you can configure PowerStore metro volumes from vCenter without a single click in PowerStore Manager.
This blog provides a quick overview of how to deploy Dell VSI and how to configure a metro volume with the VSI plug-in in vCenter.
Components of VSI
VSI consists of two components—a VM and a plug-in for vCenter that is deployed when VSI is registered for the vCenter. The VSI 10.0 OVA template is available on Dell Support and is supported with vSphere 6.7 U2 (and later) through 7.0.x for deployments with an embedded PSC.
Deployment
A deployed VSI VM requires 3.7 GB (thin) or 16 GB (thick) space on a datastore and is deployed with 4 vCPUs and 16 GB RAM. The VSI VM must be deployed on a network with access to the vCenter server and PowerStore clusters. During OVA deployment, the import wizard requests information about the network and an IP address for the VM.
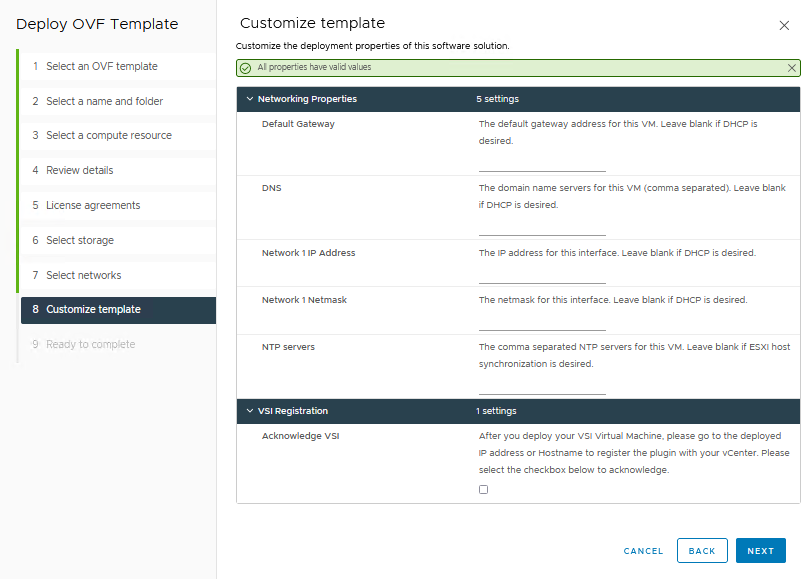
When the VM is deployed and started, you can access the plug-in management with https://<VSI-IP>.
Register VSI plug-in in vCenter
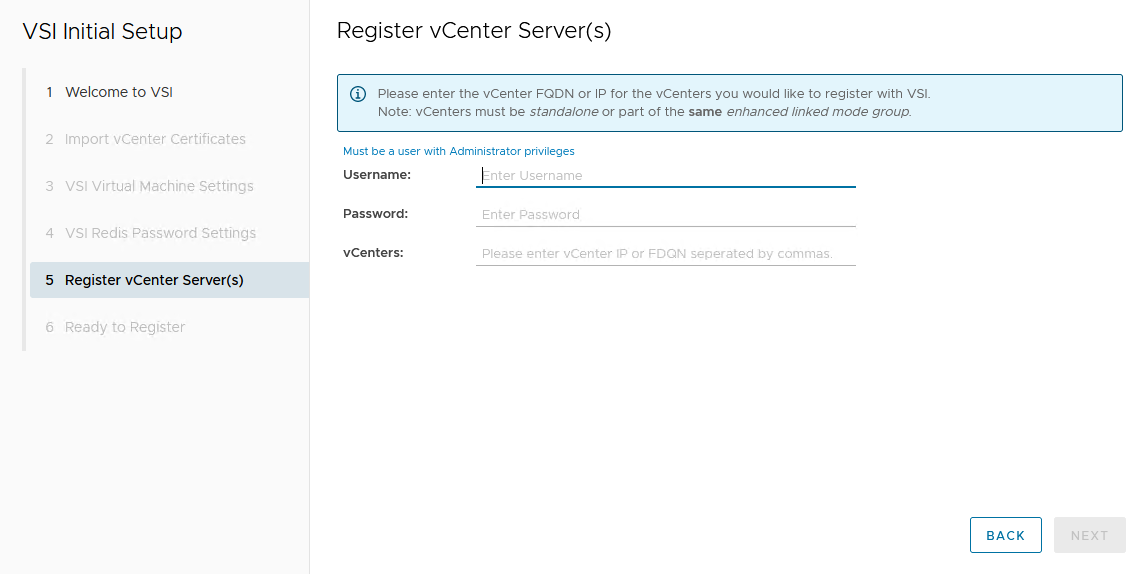
A wizard helps you register the plug-in in a vCenter. Registration only requires that you set the VSI Redis Password for the internal database and username/password.
After the VSI VM is configured, it takes some time for the plug-in to appear in vCenter. You might be required to perform a fresh login to the vSphere Client before the Dell VSI entry appears in the navigation pane.
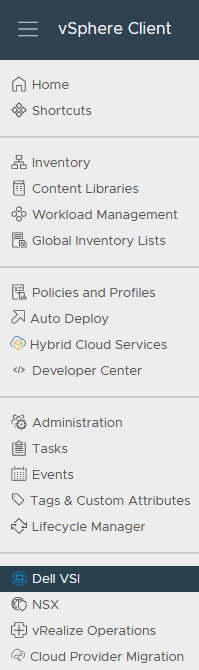
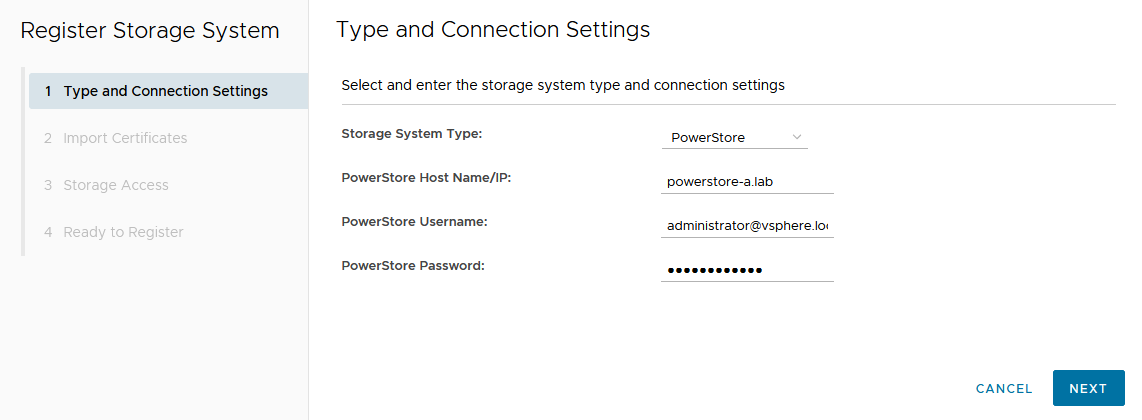
From the Dell VSI dashboard, use the + sign to add both PowerStore clusters used for metro volumes.
Configure a metro volume with the VSI plug-in
As with PowerStore Manager, creating a metro volume with the VSI plug-in requires three steps:
- Create and map a standard volume.
- Configure metro for the newly created volume.
- Map the second metro volume to the hosts.
The following example adds a new metro volume to cluster Non-Uniform, which already has existing metro volumes provisioned in a Non-Uniform host configuration. Esx-a.lab is local to PowerStore-A, and esx-b.lab is local to PowerStore-B.
- Create and map a standard volume in vSphere.
Use the Actions menu either for a single host, a cluster, or even the whole data center in vSphere. In this example, we chose Dell VSI > Create Datastore for the existing cluster Non-Uniform. - Configure metro for the newly created volume.
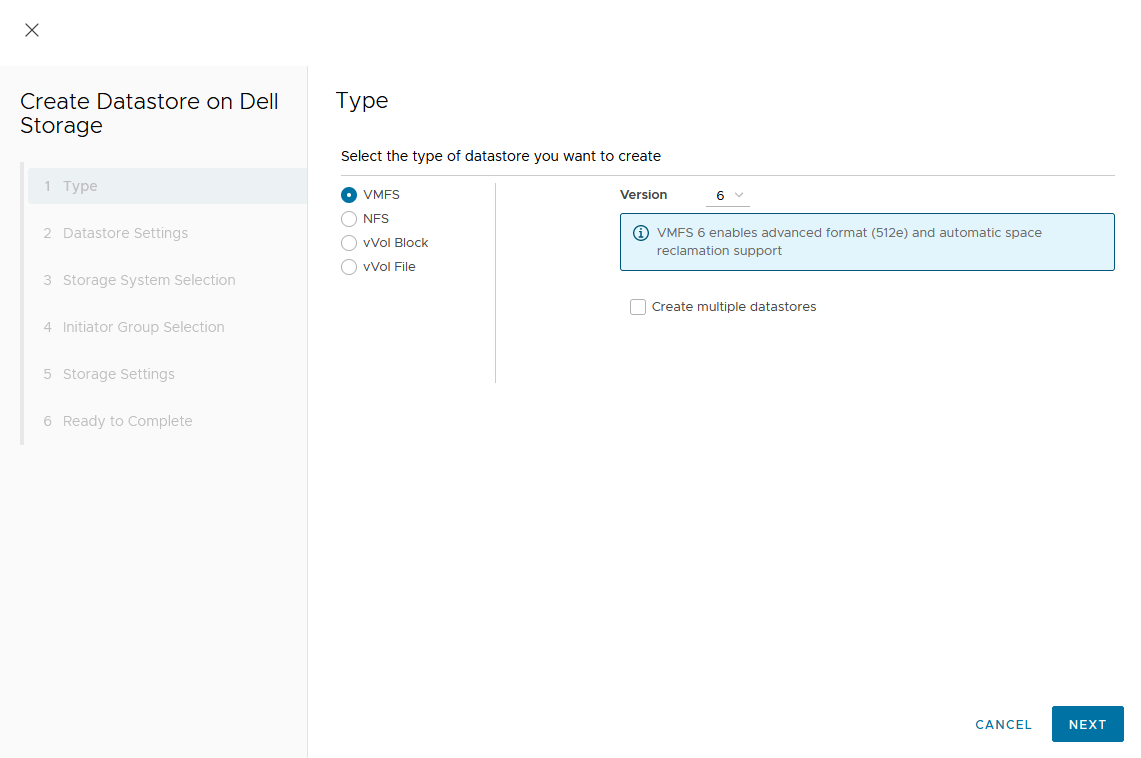
The VSI Create Datastore wizard leads us through the configuration.- For a metro volume, select the volume type VMFS.
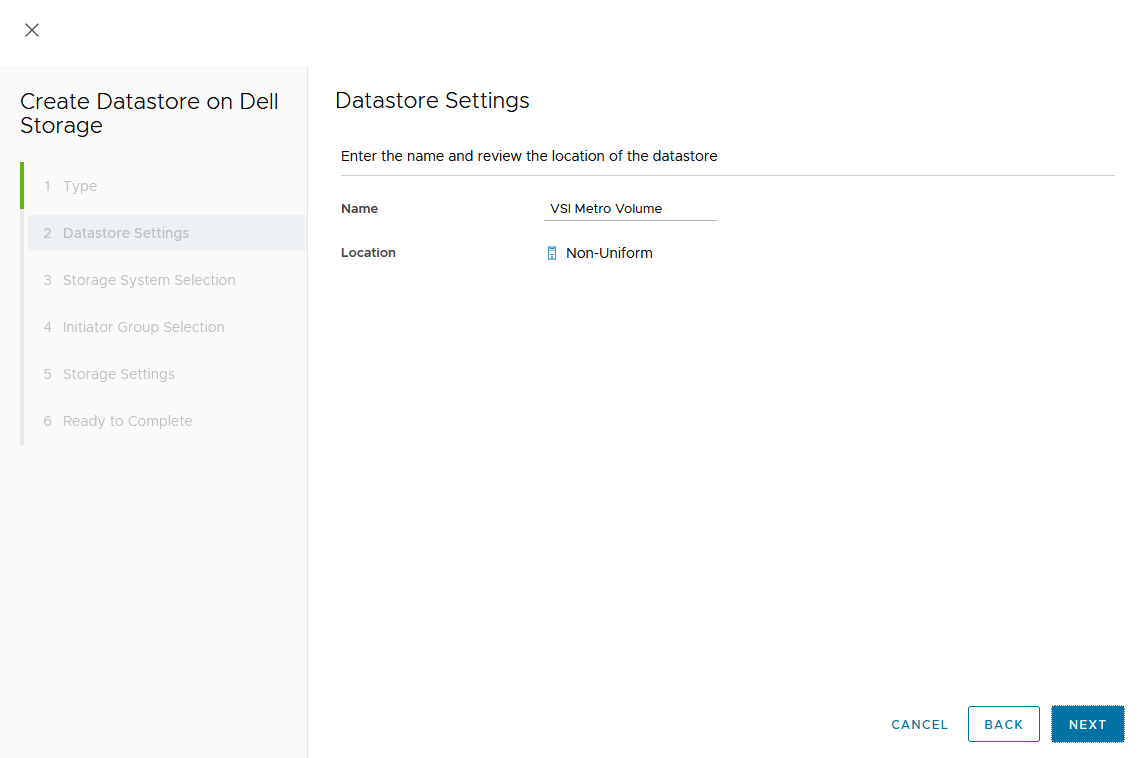
- Provide a name for the new volume.
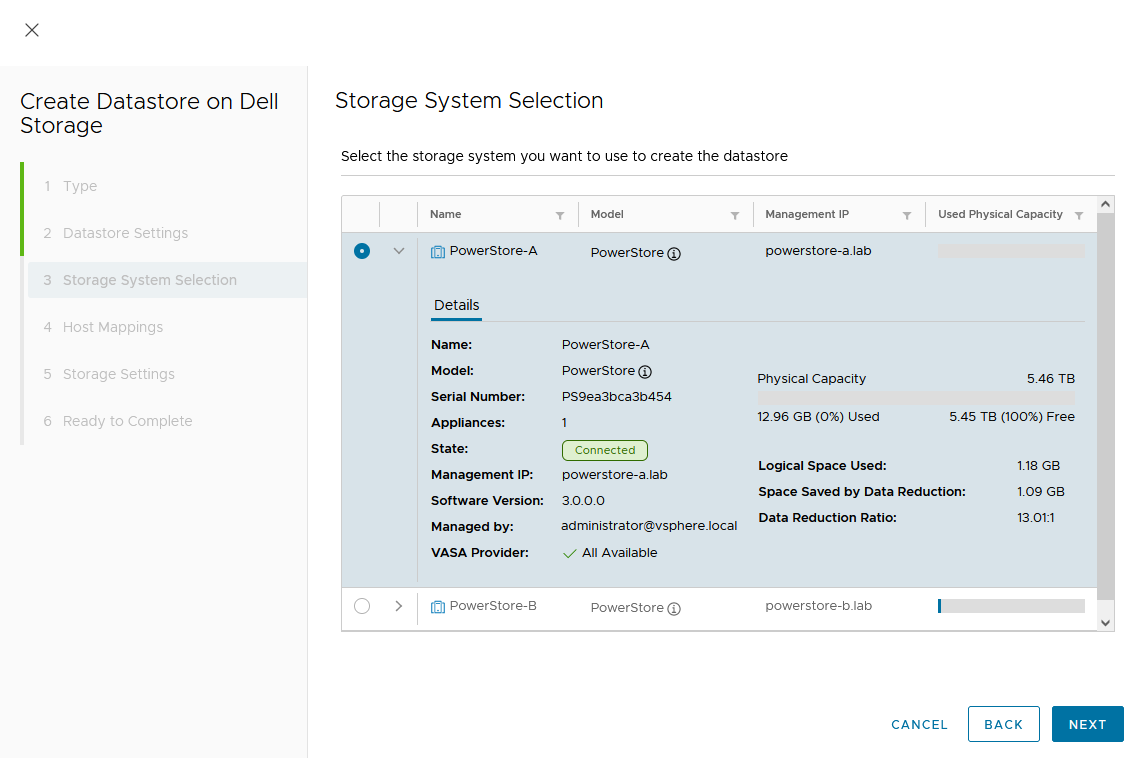
- Select the storage system.
- For a metro volume, select the volume type VMFS.
In the dialog box, you can expand the individual storage system for more information. We start with PowerStore-A for esx-a.lab.
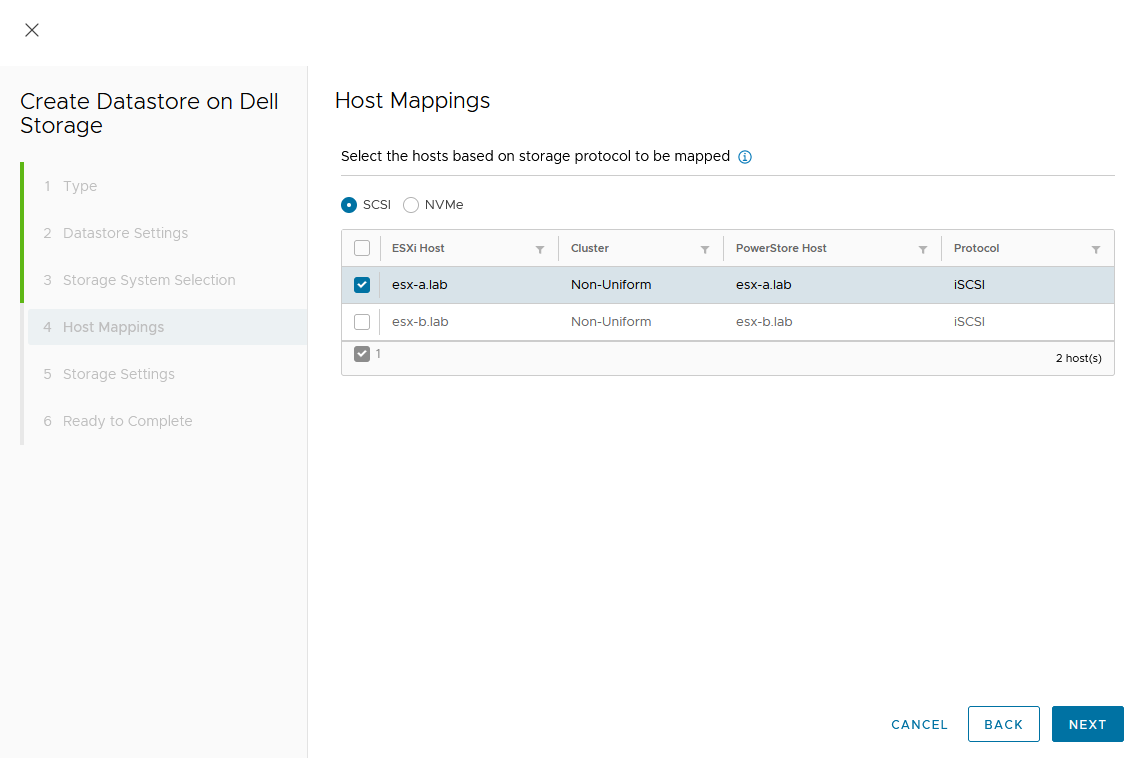
d. Map the host.
As this is a Non-Uniform cluster configuration, only esx-a.lab is local to PowerStore-A and should be mapped to the new volume on PowerStore-A.
e. Set a Capacity and select other volume settings such as Performance Policy or Protection Policy.
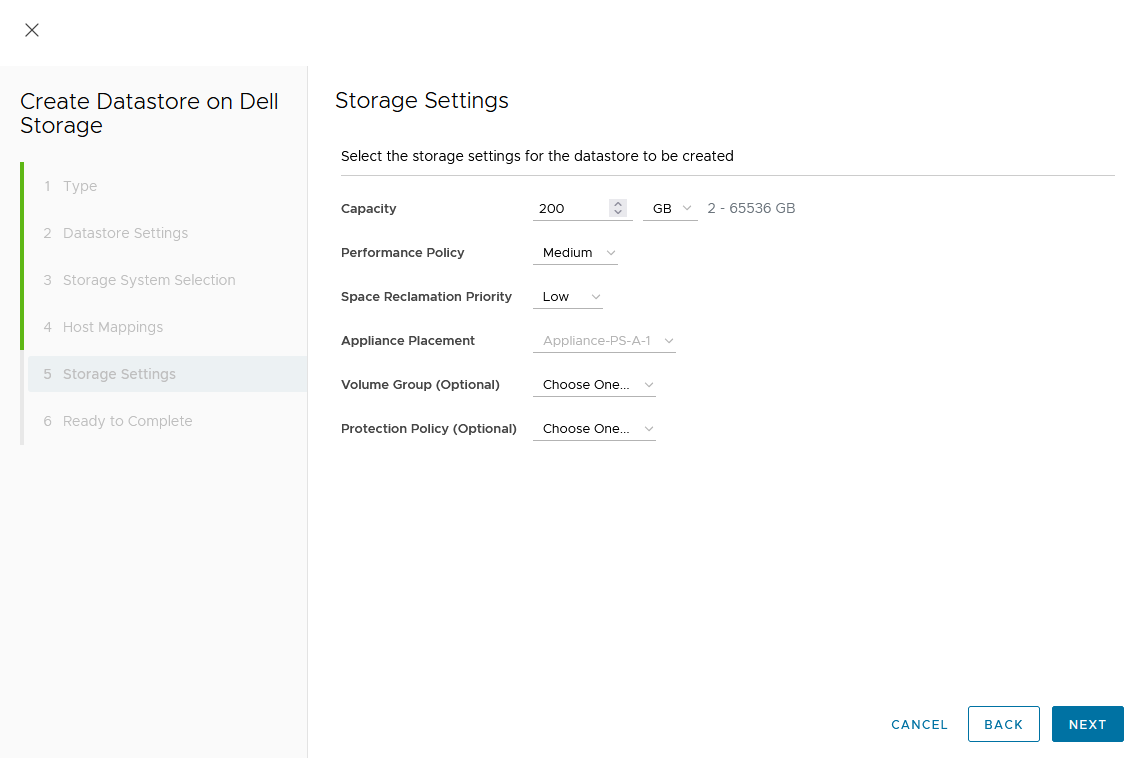
Wizard summary page:
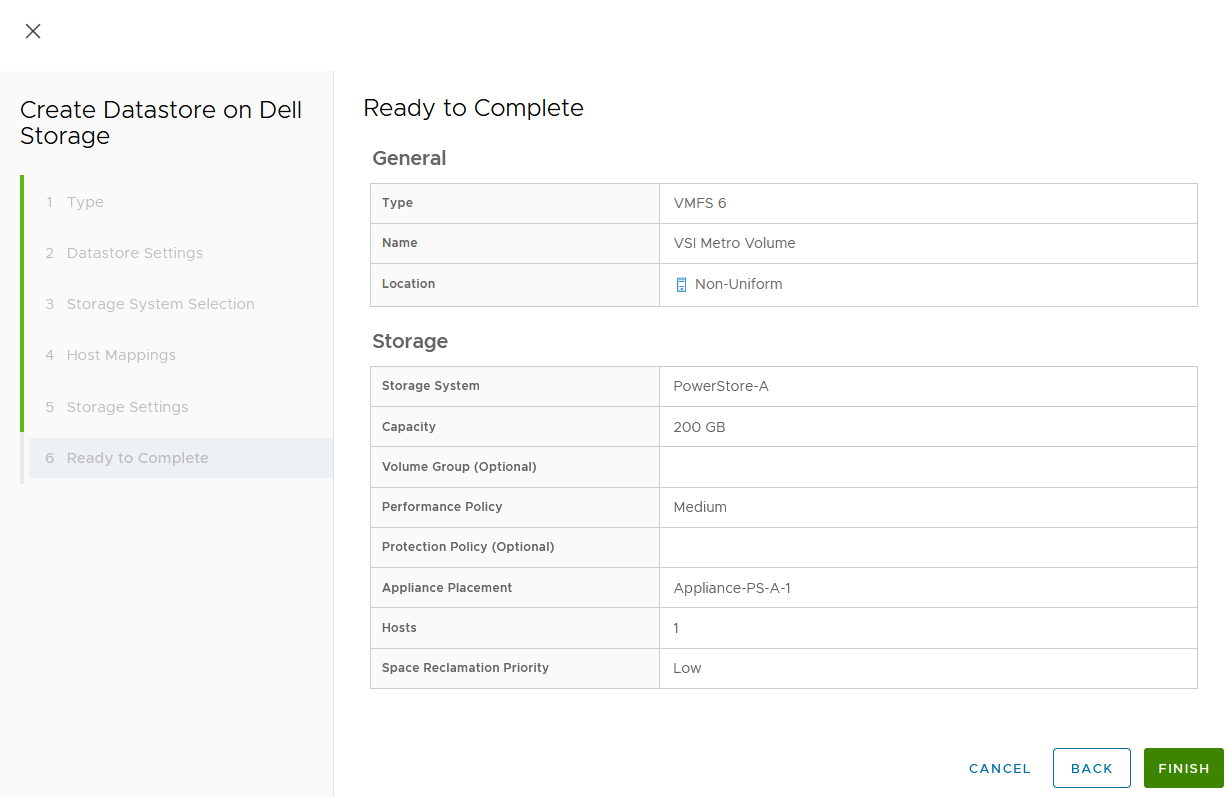
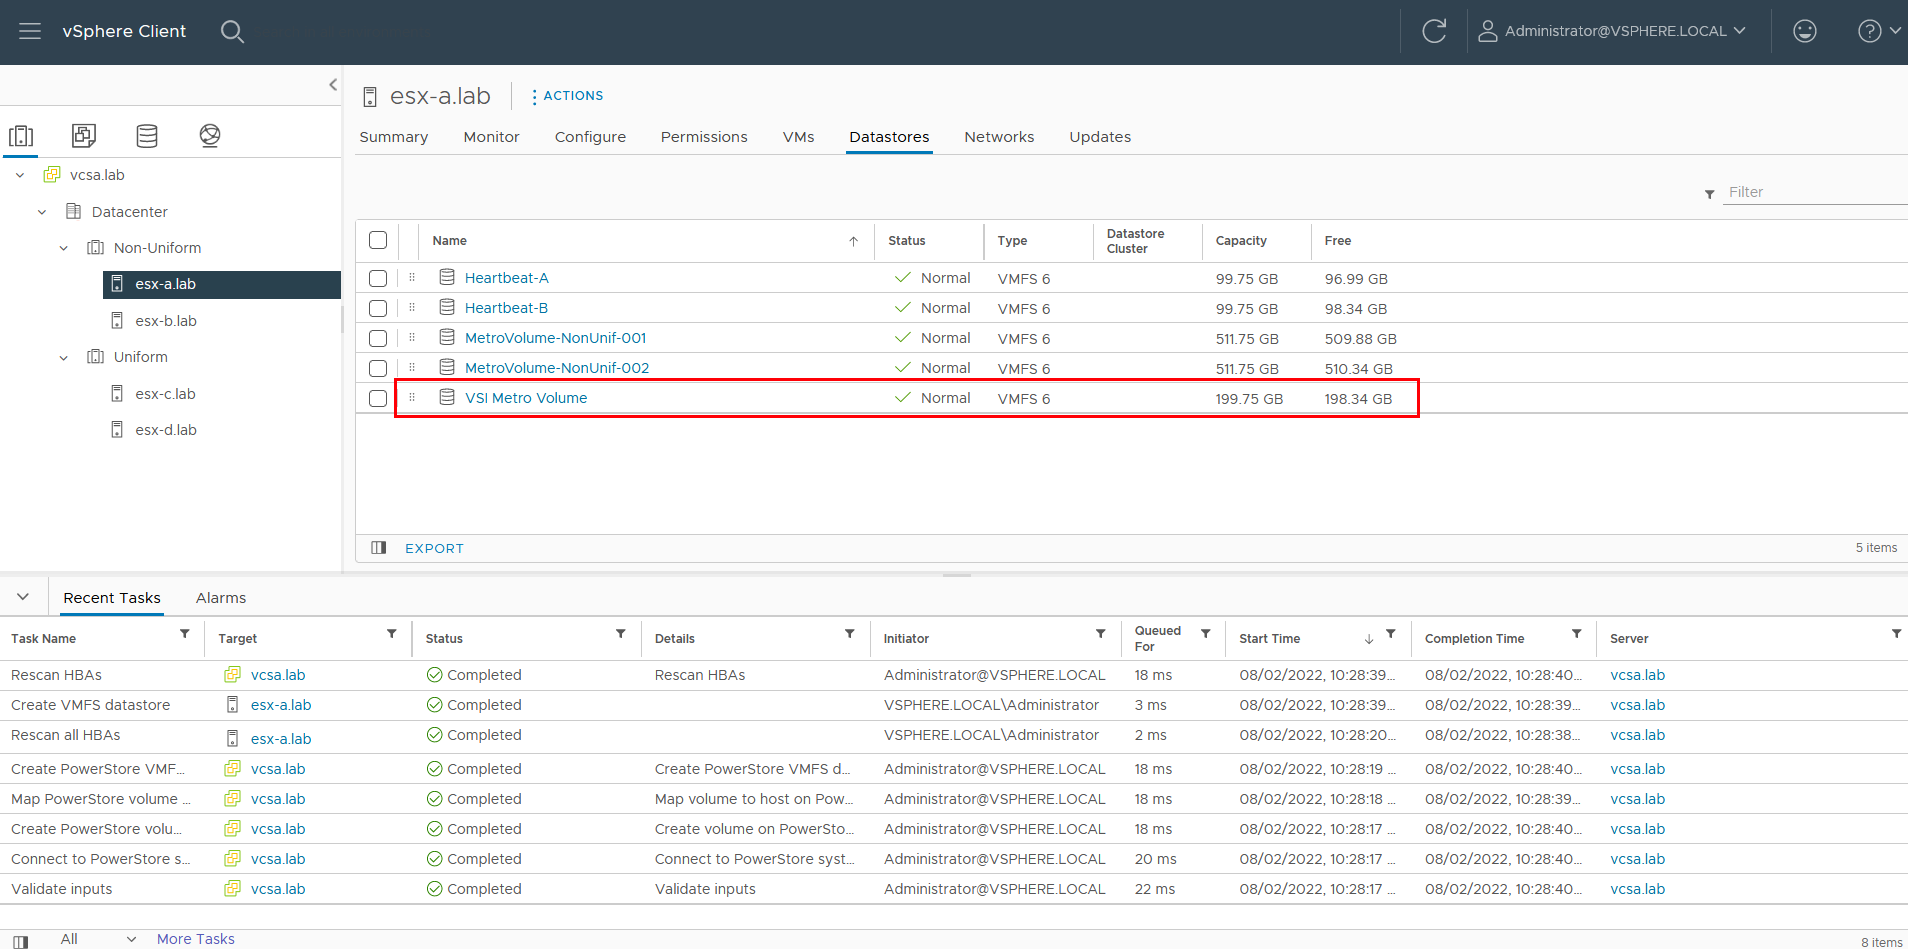
Upon completion, the volume is configured and mapped to the host. The following screenshot shows the new volume, VSI Metro Volume, and the tasks that ran to create and map the volume in vSphere.
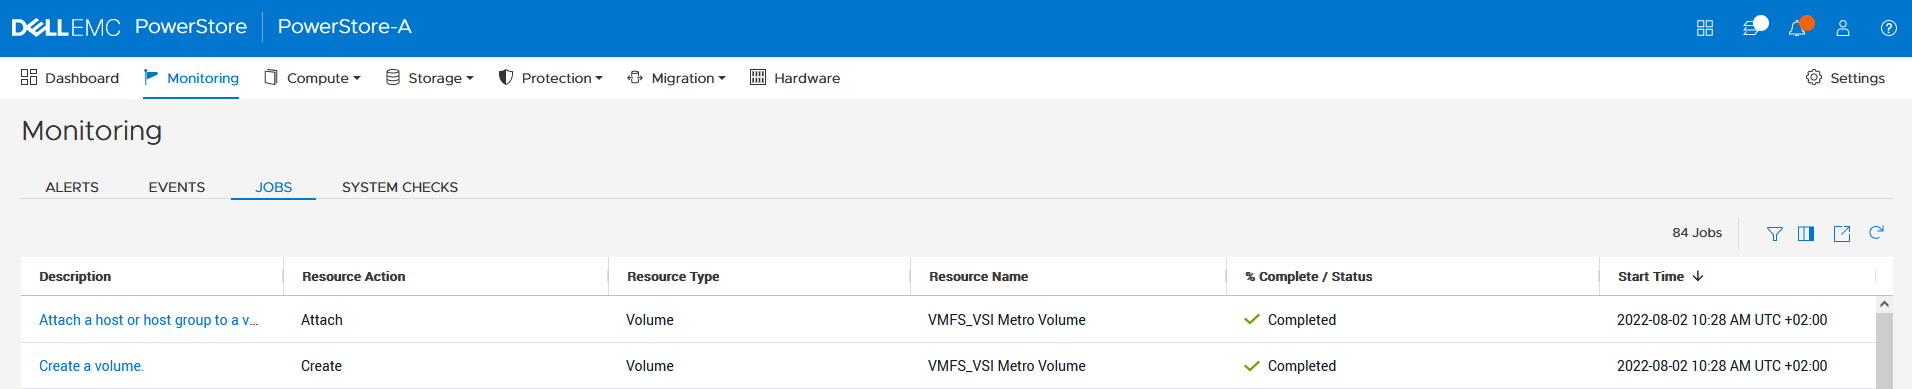
For reference, the related jobs in PowerStore Manager for PowerStore-A are also available at Monitoring > Jobs:
f. Select the VSI Metro Volume datastore, and then select Configure > Dell VSI > Storage to see the details for the backing device.
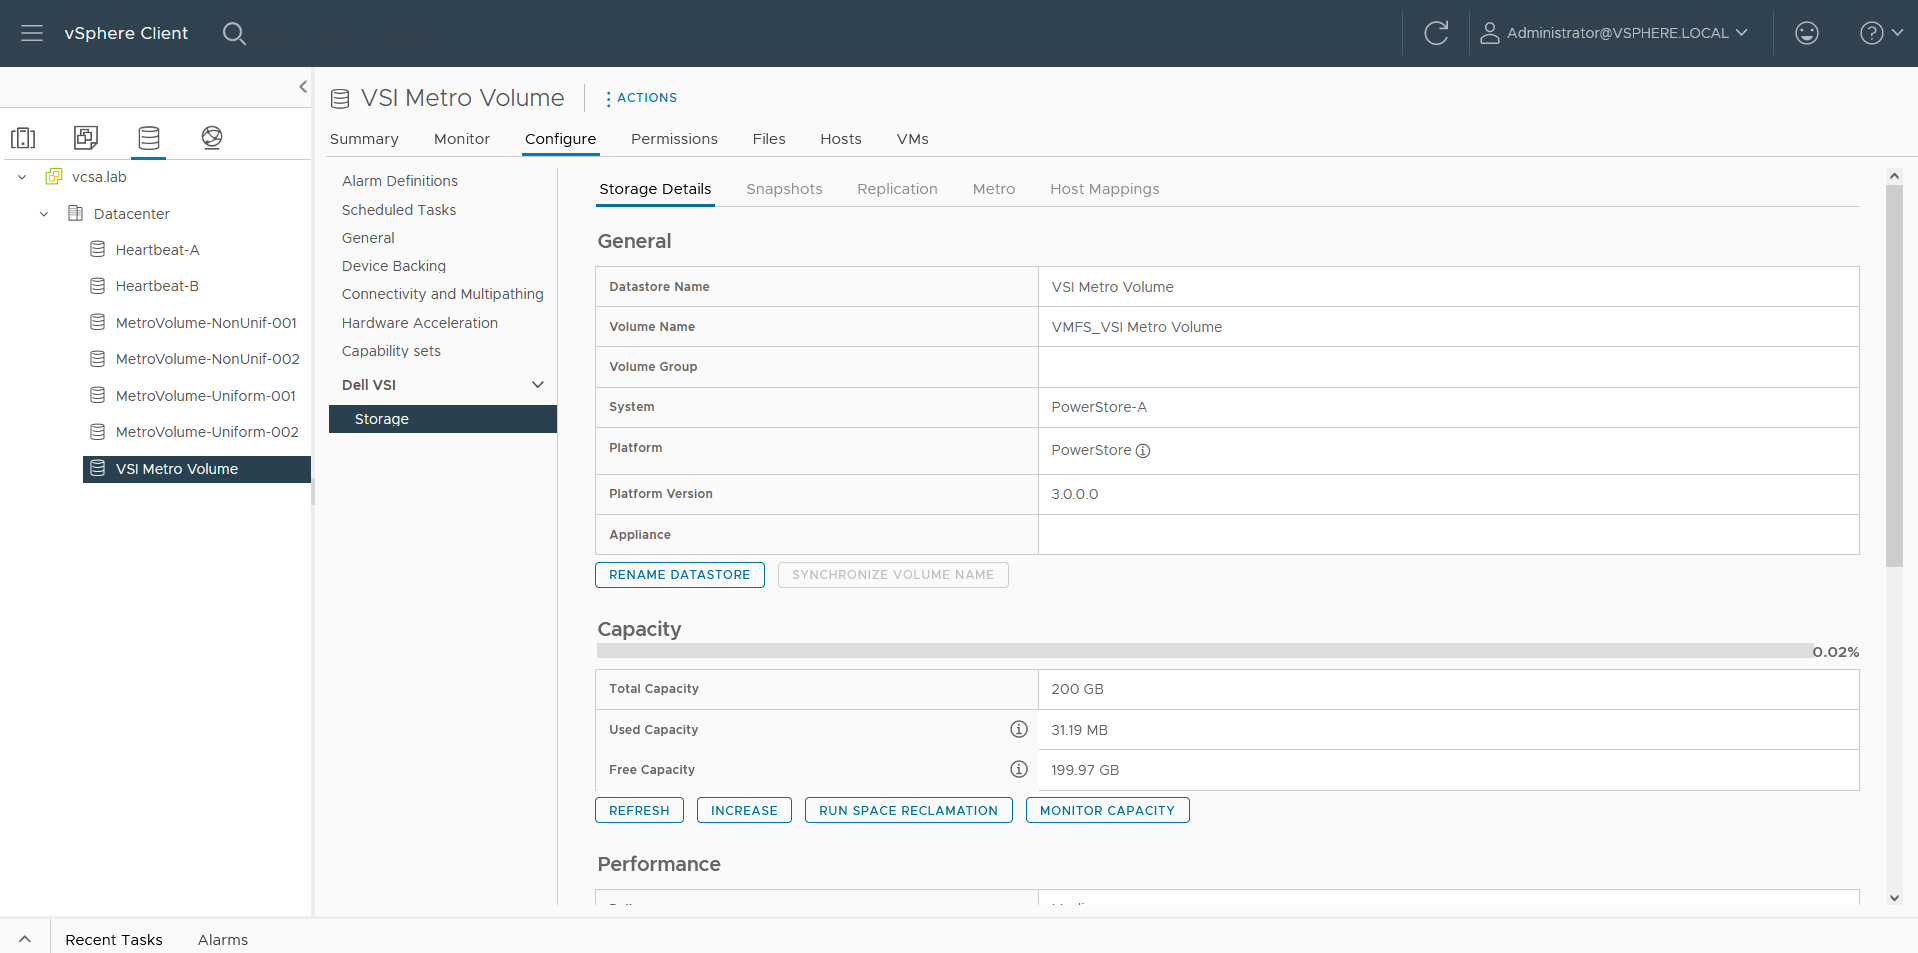
g. On the Storage Details tab under Protection, click Configure Metro.

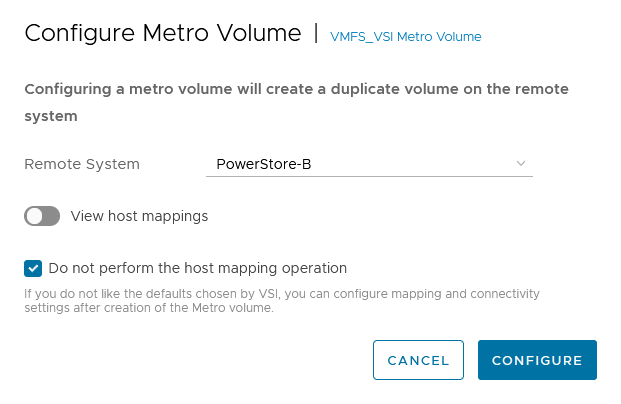
h. In the Configure Metro Volume dialog box, specify the Remote System and whether host mapping should be performed.
Depending on host registrations on PowerStore, automatic mapping may be unwanted and can be skipped. In this example, PowerStore-B has also the esx-a.lab host registered to provide access to one of the heartbeat volumes required for vSphere HA. The host mapping operation in the Create Datastore wizard creates an unwanted mapping of the volume from PowerStore-B to esx-a.lab. To configure manual mapping after the metro volume is created, select Do not perform the host mapping operation.
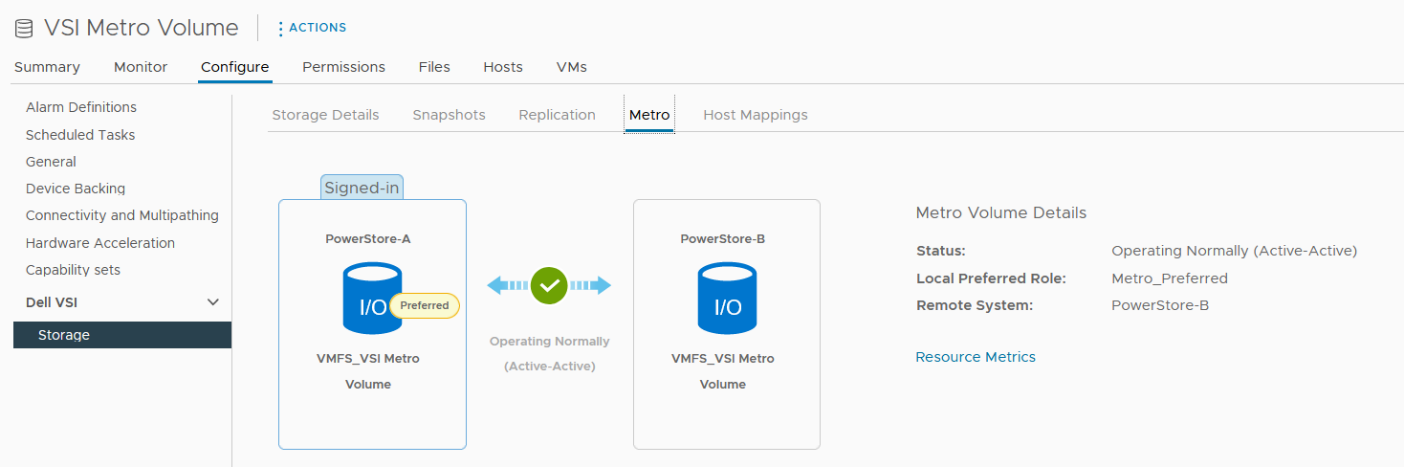
The metro volume is immediately configured on PowerStore and the Metro tab in Dell VSI > Storage view shows the status for the metro configuration.
3. Map the second metro volume to the host.
Because we skipped host mapping when we created the metro volume, we must map the esx-b.lab host to the metro volume on PowerStore-B on the Host Mappings tab. Currently, the volume is only mapped from PowerStore-A to esx-a.lab.
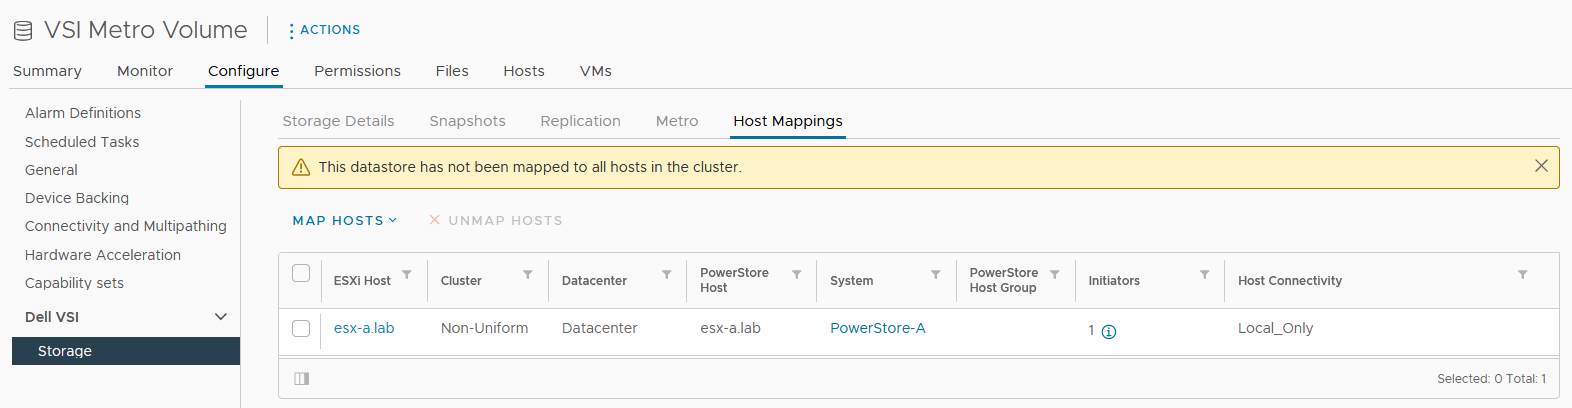
a. Select Map Hosts > PowerStore-B to open the Map Hosts dialog box.
b. Map the volume on PowerStore-B for esx-b.lab.
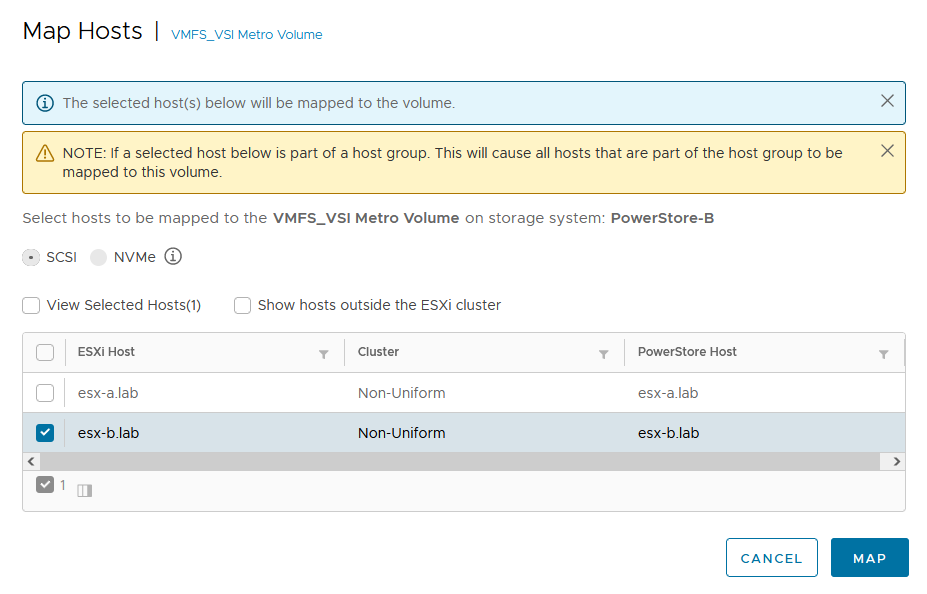
The host mapping overview shows the result and concludes the metro volume configuration with Virtual Storage Integrator (VSI) plugin.

Resources
- Dell Virtual Storage Integrator (VSI) for VMware vSphere Client Version 10.0 Product Guide
- Dell PowerStore Protecting Your Data—Metro Protection
- Dell PowerStore: Metro Volume
Author: Robert Weilhammer, Principal Engineering Technologist
https://www.xing.com/profile/Robert_Weilhammer
Related Blog Posts

Exploring Amazon EKS Anywhere on PowerStore X – Part I

Wed, 19 Jan 2022 15:17:00 -0000
|Read Time: 0 minutes
A number of years ago, I began hearing about containers and containerized applications. Kiosks started popping up at VMworld showcasing fun and interesting uses cases, as well as practical uses of containerized applications. A short time later, my perception was that focus had shifted from containers to container orchestration and management or simply put, Kubernetes. I got my first real hands on experience with Kubernetes about 18 months ago when I got heavily involved with VMware’s Project Pacific and vSphere with Tanzu. The learning experience was great and it ultimately lead to authoring a technical white paper titled Dell EMC PowerStore and VMware vSphere with Tanzu and TKG Clusters.
Just recently, a Product Manager made me aware of a newly released Kubernetes distribution worth checking out: Amazon Elastic Kubernetes Service Anywhere (Amazon EKS). Amazon EKS Anywhere was preannounced at AWS re:Invent 2020 and announced as generally available in September 2021.
Amazon EKS Anywhere is a deployment option for Amazon EKS that enables customers to stand up Kubernetes clusters on-premises using VMware vSphere 7+ as the platform (bare metal platform support is planned for later this year). Aside from a vSphere integrated control plane and running vSphere native pods, the Amazon EKS Anywhere approach felt similar to the work I performed with vSphere with Tanzu. Control plane nodes and worker nodes are deployed to vSphere infrastructure and consume native storage made available by a vSphere administrator. Storage can be block, file, vVol, vSAN, or any combination of these. Just like vSphere with Tanzu, storage consumption, including persistent volumes and persistent volume claims, is made easy by leveraging the Cloud Native Storage (CNS) feature in vCenter Server (released in vSphere 6.7 Update 3). No CSI driver installation necessary.
Amazon EKS users will immediately gravitate towards the consistent AWS management experience in Amazon EKS Anywhere. vSphere administrators will enjoy the ease of deployment and integration with vSphere infrastructure that they already have on-premises. To add to that, Amazon EKS Anywhere is Open Source. It can be downloaded and fully deployed without software or license purchase. You don’t even need an AWS account.
I found PowerStore was a good fit for vSphere with Tanzu, especially the PowerStore X model, which has a built in vSphere hypervisor, allowing customers to run applications directly on the same appliance through a feature known as AppsON.
The question that quickly surfaces is: What about Amazon EKS Anywhere on PowerStore X on-premises or as an Edge use case? It’s a definite possibility. Amazon EKS Anywhere has already been validated on VxRail. The AppsON deployment option in PowerStore 2.1 offers vSphere 7 Update 3 compute nodes connected by a vSphere Distributed Switch out of the box, plus support for both vVol and block storage. CNS will enable DevOps teams to consume vVol storage on a storage policy basis for their containerized applications, which is great for PowerStore because it boasts one of the most efficient vVol implementations on the market today. The native PowerStore CSI driver is also available as a deployment option. What about sizing and scale? Amazon EKS Anywhere deploys on a single PowerStore X appliance consisting of two nodes but can be scaled across four clustered PowerStore X appliances for a total of eight nodes.
As is often the case, I went to the lab and set up a proof of concept environment consisting of Amazon EKS Anywhere running on PowerStore X 2.1 infrastructure. In short, the deployment was wildly successful. I was up and running popular containerized demo applications in a relatively short amount of time. In Part II of this series, I will go deeper into the technical side, sharing some of the steps I followed to deploy Amazon EKS Anywhere on PowerStore X.
Author: Jason Boche
Twitter: (@jasonboche)

Dell PowerStore: vVol Replication with PowerCLI
Wed, 14 Jun 2023 14:57:44 -0000
|Read Time: 0 minutes
Overview
In PowerStoreOS 2.0, we introduced asynchronous replication of vVol-based VMs. In addition to using VMware SRM to manage and control the replication of vVol-based VMs, you can also use VMware PowerCLI to replicate vVols. This blog shows you how.
To protect vVol-based VMs, the replication leverages vSphere storage policies for datastores. Placing VMs in a vVol storage container with a vSphere storage policy creates a replication group. The solution uses VASA 3.0 storage provider configurations in vSphere to control the replication of all individual configuration-, swap-, and data vVols in a vSphere replication group on PowerStore. All vVols in a vSphere replication group are managed in a single PowerStore replication session.
Requirements for PowerStore asynchronous vVol replication with PowerCLI:

**As in VMware SRM, I’m using the term “site” to differentiate between primary and DR installation. However,
depending on the use case, all systems could also be located at a single location.
Let’s start with some terminology used in this blog.
PowerStore cluster | A configured PowerStore system that consists of one to four PowerStore appliances. |
PowerStore appliance | A single PowerStore entity that comes with two nodes (node A and node B). |
PowerStore Remote Systems (pair) | Definition of a relationship of two PowerStore clusters, used for replication. |
PowerStore Replication Rule | A replication configuration used in policies to run asynchronous replication. The rule provides information about the remote systems pair and the targeted recovery point objective time (RPO). |
PowerStore Replication Session | One or more storage objects configured with a protection policy that include a replication rule. The replication session controls and manages the replication based on the replication rule configuration. |
VMware vSphere VM Storage Policy | A policy to configure the required characteristics for a VM storage object in vSphere. For vVol replication with PowerStore, the storage policy leverages the PowerStore replication rule to set up and manage the PowerStore replication session. A vVol-based VM consists of a config vVol, swap vVol, and one or more data vVols. |
VMware vSphere Replication Group | In vSphere, the replication is controlled in a replication group. For vVol replication, a replication group includes one or more vVols. The granularity for failover operations in vSphere is replication group. A replication group uses a single PowerStore replication session for all vVols in that replication group. |
VMware Site Recovery Manager (SRM) | A tool that automates failover from a production site to a DR site. |
Preparing for replication
For preparation, similar to VMware SRM, there are some steps required for replicated vVol-based VMs:
Note: When frequently switching between vSphere and PowerStore, an item may not be available as expected. In this case, a manual synchronization of the storage provider in vCenter might be required to make the item immediately available. Otherwise, you must wait for the next automatic synchronization.
- Using the PowerStore UI, set up a remote system relationship between participating PowerStore clusters. It’s only necessary to perform this configuration on one PowerStore system. When a remote system relationship is established, it can be used by both PowerStore systems.
Select Protection > Remote Systems > Add remote system.

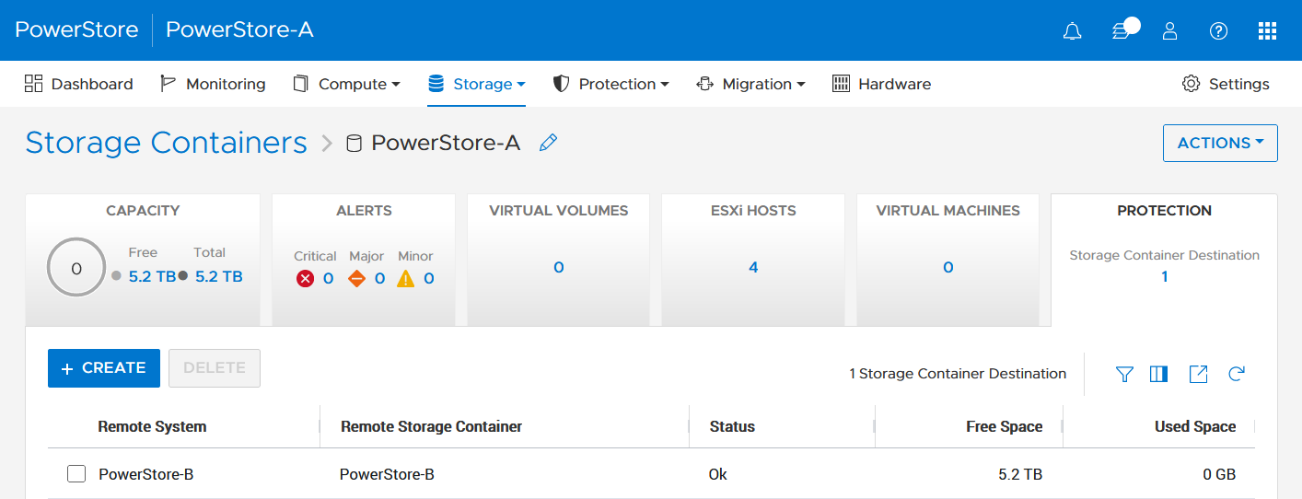
When there is only a single storage container on each PowerStore in a remote system relationship, PowerStoreOS also creates the container protection pairing required for vVol replication.
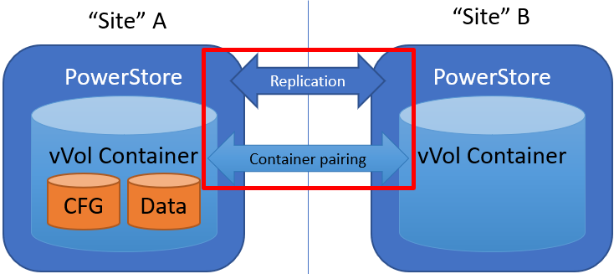
To check the configuration or create storage container protection pairing when more storage containers are configured, select Storage > Storage Containers > [Storage Container Name] > Protection.
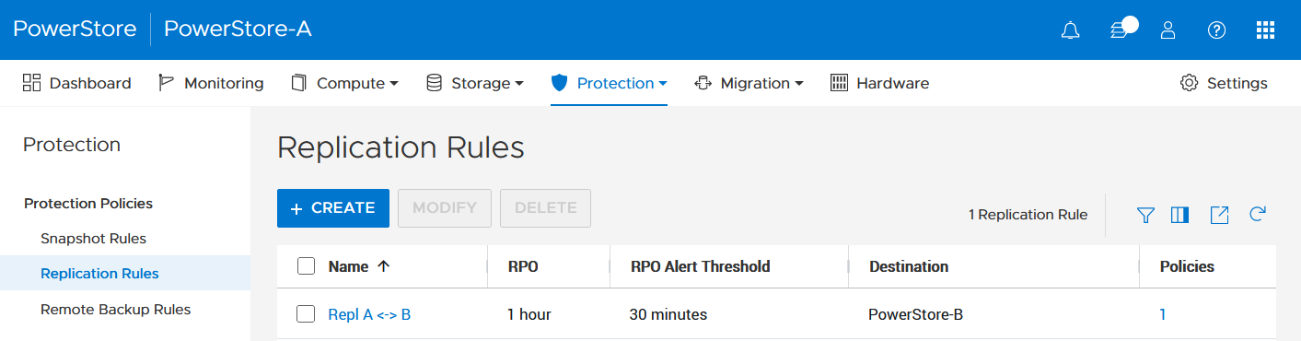
2. The VMware Storage Policy (which is created in a later step) requires existing replication rules on both PowerStoresystems, ideally with same characteristics. For this example, the replication rule replicates from PowerStore-A to PowerStore-B with a RPO of one hour, and 30 minutes for the RPO Alert Threshold.
Select Protection > Protection Policies > Replication Rules.
3. As mentioned in the Overview, VASA 3.0 is used for the communication between PowerStore and vSphere. If not configured already, register the local PowerStore in both vCenters as the storage provider in the corresponding vSphere vCenter instance.
In the vSphere Client, select [vCenter server] > Configuration > Storage Providers.

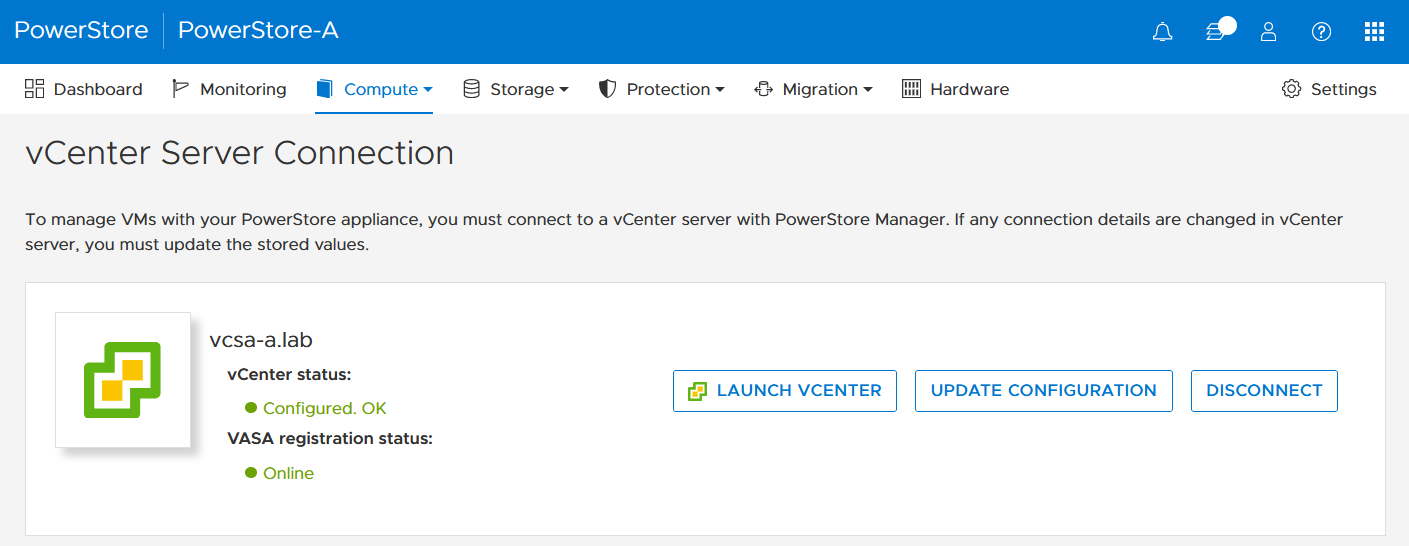
Use https://<PowerStore>:8443/version.xml as the URL with the PowerStore user and password to register the PowerStore cluster.
Alternatively, use PowerStore for a bidirectional registration. When vCenter is registered in PowerStore, PowerStoreOS gets more insight about running VMs for that vCenter. However, in the current release, PowerStoreOS can only handle a single vCenter connection for VM lookups. When PowerStore is used by more than one vCenter, it’s still possible to register a PowerStore in a second vCenter as the storage provider, as mentioned before.
In the PowerStore UI, select Compute > vCenter Server Connection.
4. Set up a VMware storage policy with a PowerStore replication rule on both vCenters.
The example script in the section section Using PowerCLI and on myScripts4u@github requires the same Storage Policy name for both vCenters.
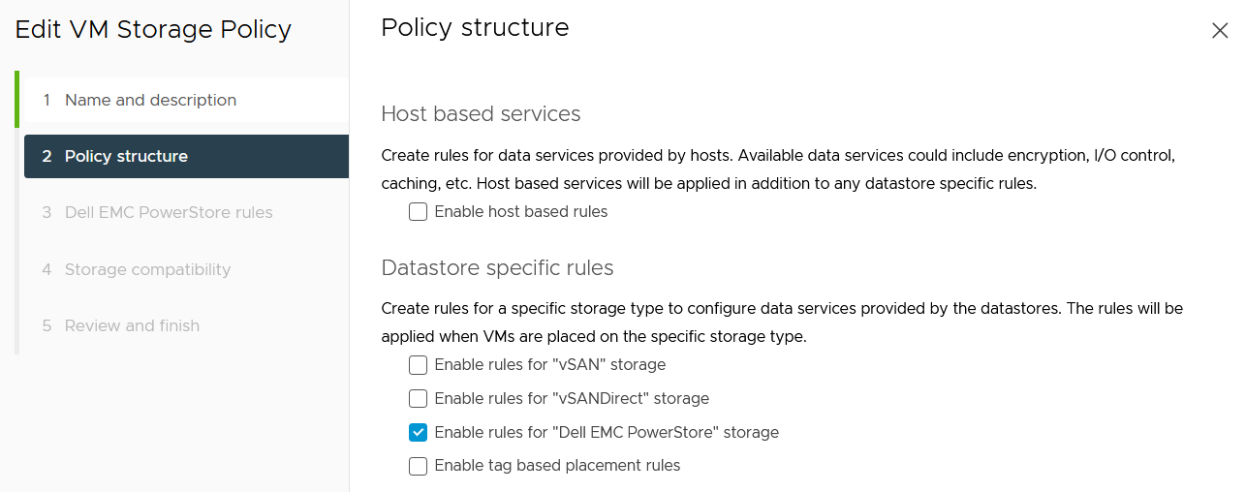
In the vSphere Client, select Policies and Profiles > VM Storage Policies > Create.
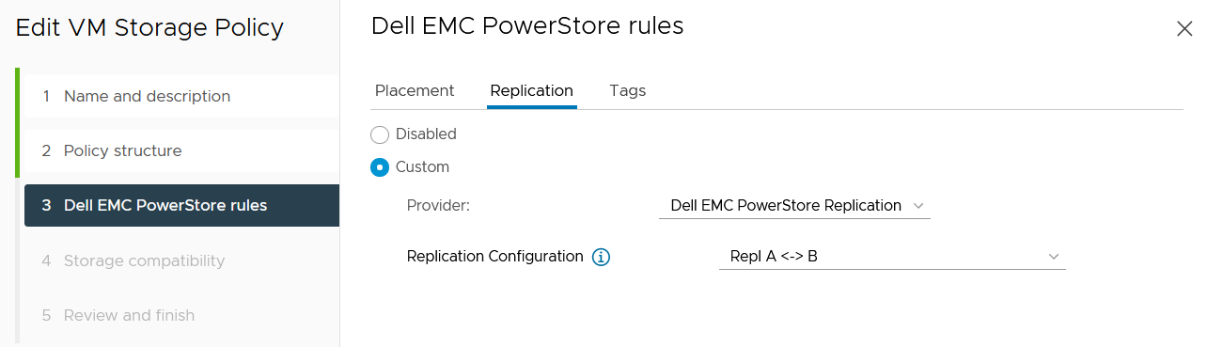
Enable “Dell EMC PowerStore” storage for datastore specific rules:
then choose the PowerStore replication rule:
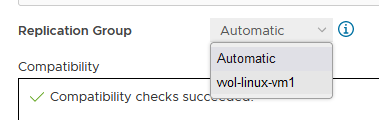
5. Create a VM on a vVol storage container and assign the storage protection policy with replication.
When a storage policy with replication is set up for a VM, you must specify a replication group. Selecting “automatic” creates a replication group with the name of the VM. Multiple VMs can be protected in one replication group.
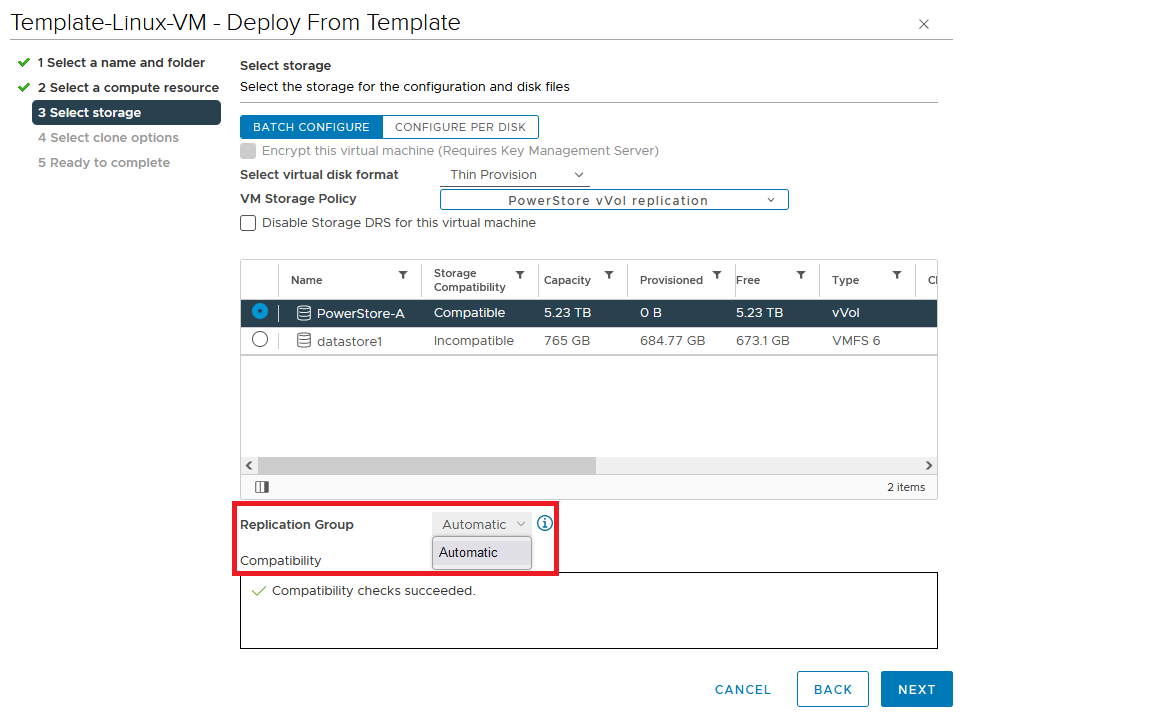
When deploying another VM on the same vVol datastore, the name of the other replicated VM appears in the list for the Replication Group.
All vVol replication operations are on a Replication Group granularity. For instance, it’s not possible to failover only a single VM of a replication group.
That’s it for the preparation! Let’s continue with PowerCLI.
Using PowerCLI
Disclaimer: The PowerShell snippets shown below are developed only for educational purposes and provided only as examples. Dell Technologies and the blog author do not guarantee that this code works in your environment or can provide support in running the snippets.
To get the required PowerStore modules for PowerCLI, start PowerShell or PowerShell ISE and use Install-Module to install VMware.PowerCLI:
PS C:\> Install-Module -Name VMware.PowerCLI
The following example uses the replication group “vvol-repl-vm1”, which includes the virtual machines “vvol-repl-vm1” and “vvol-repl-vm2”. Because a replication group name might not be consistent with a VM to failover, the script uses the virtual machine name “vvol-repl-vm2” to get the replication group for failover.
Failover
This section shows an example failover of a vVol-based VM “vvol-vm2” from a source vCenter to a target vCenter.
1. Load modules, allow PowerStore to connect to multiple vCenter instances, and set variables for the VM, vCenters, and vCenter credentials. The last two commands in this step establishes the connection to both vCenters.
Import-Module VMware.VimAutomation.Core
Import-Module VMware.VimAutomation.Common
Import-Module VMware.VimAutomation.Storage
Set-PowerCLIConfiguration -DefaultVIServerMode 'Multiple' -Scope ([VMware.VimAutomation.ViCore.Types.V1.ConfigurationScope]::Session) -Confirm:$false  | Out-Null
$virtualmachine = "vvol-vm2"                   # Enter VM name of a vVol VM which should failover
$vcUser = 'administrator@vsphere.local'        # Change this to your VC username
$vcPass = 'xxxxxxxxxx'                         # VC password
$siteA = "vcsa-a.lab"                          # first vCenter
$siteB = "vcsa-b.lab"                          # second vCenter
Connect-VIServer -User "$vcUser" -Password "$vcPass" -Server $siteA -WarningAction SilentlyContinue
Connect-VIServer -User "$vcUser" -Password "$vcPass" -Server $siteB -WarningAction SilentlyContinue
2. Get replication group ($rg), replication group pair ($rgPair), and storage policy ($stoPol) for the VM. Because a replication group may have additional VMs, all VMs in the replication group are stored in $rgVMs.
$vm = get-vm $virtualmachine
# find source vCenter – this allows the script to failover (Site-A -> Site-B) and failback (Site-B -> Site-A)
$srcvCenter=$vm.Uid.Split(":")[0].Split("@")[1]
if ( $srcvCenter -like $siteA ) {
     $siteSRC=$siteA
     $siteDST=$siteB
} else {
     $siteSRC=$siteB
    $siteDST=$siteA
}
$rg = get-spbmreplicationgroup -server $siteSRC -VM $vm
$rgPair = Get-SpbmReplicationPair -Source $rg
$rgVMs=(Get-SpbmReplicationGroup -server $siteSRC -Name $rg| get-vm)
$stoPol = ( $vm | Get-SpbmEntityConfiguration).StoragePolicy.Name
3. Try a graceful shutdown of VMs in $rgVMs and wait ten seconds. Shut down VMs after three attempts.
$rgVMs | ForEach-Object {
     if ( (get-vm $_).PowerState -eq "PoweredOn")
     {
         stop-vmguest -VM $_ -confirm:$false -ErrorAction silentlycontinue | Out-Null
         start-sleep -Seconds 10
         $cnt=1
         while ((get-vm $_).PowerState -eq "PoweredOn" -AND $cnt -le 3 ) {
            Start-Sleep -Seconds 10
            $cnt++
         }
         if ((get-vm $_).PowerState -eq "PoweredOn") {
            stop-vm $_ -Confirm:$false  | Out-Null
         }
     }
}
4. It’s now possible to prepare and execute the failover. At the end, $vmxfile contains the vmx files that are required to register the VMs at the destination. During failover, a final synchronize before doing the failover ensures that all changes are replicated to the destination PowerStore. When the failover is completed, the vVols at the failover destination are available for further steps.
$syncRg = Sync-SpbmReplicationGroup -PointInTimeReplicaName "prePrepSync" -ReplicationGroup $rgpair.target
$prepareFailover = start-spbmreplicationpreparefailover $rgPair.Source -Confirm:$false -RunAsync
Wait-Task $prepareFailover
$startFailover = Start-SpbmReplicationFailover $rgPair.Target -Confirm:$false -RunAsync
$vmxfile = Wait-Task $startFailover
5. For clean up on the failover source vCenter, we remove the failed over VM registrations. On the failover target, we search for a host ($vmhostDST) and register, start, and set the vSphere Policy on VMs. The array @newDstVMs will contain VM information at the destination for the final step.
$rgvms | ForEach-Object {
     $_ | Remove-VM -ErrorAction SilentlyContinue -Confirm:$false
}
$vmhostDST = get-vmhost -Server $siteDST | select -First 1
$newDstVMs= @()
$vmxfile | ForEach-Object {
     $newVM = New-VM -VMFilePath $_ -VMHost $vmhostDST
     $newDstVMs += $newVM
}
$newDstVms | forEach-object {
     $vmtask = start-vm $_ -ErrorAction SilentlyContinue -Confirm:$false -RunAsync
     wait-task $vmtask -ErrorAction SilentlyContinue | out-null
     $_ | Get-VMQuestion | Set-VMQuestion -Option ‘button.uuid.movedTheVM’ -Confirm:$false

     $hdds = Get-HardDisk -VM $_ -Server $siteDST
     Set-SpbmEntityConfiguration -Configuration $_ -StoragePolicy $stopol -ReplicationGroup  $rgPair.Target | out-null
     Set-SpbmEntityConfiguration -Configuration $hdds -StoragePolicy $stopol -ReplicationGroup  $rgPair.Target | out-null
}
6. The final step enables the protection from new source.
start-spbmreplicationreverse $rgPair.Target  | Out-Null
$newDstVMs  | foreach-object {
    Get-SpbmEntityConfiguration -HardDisk $hdds -VM $_ | format-table -AutoSize
}
Additional operations
Other operations for the VMs are test-failover and an unplanned failover on the destination. The test failover uses the last synchronized vVols on the destination system and allows us to register and run the VMs there. The vVols on the replication destination where the test is running are not changed. All changes are stored in a snapshot. The writeable snapshot is deleted when the test failover is stopped.
Test failover
For a test failover, follow Step 1 through Step 3 from the failover example and continue with the test failover. Again, $vmxfile contains VMX information for registering the test VMs at the replication destination.
$sync=Sync-SpbmReplicationGroup -PointInTimeReplicaName "test" -ReplicationGroup $rgpair.target
$prepareFailover = start-spbmreplicationpreparefailover $rgPair.Source -Confirm:$false -RunAsync
$startFailover = Start-SpbmReplicationTestFailover $rgPair.Target -Confirm:$false -RunAsync
$vmxfile = Wait-Task $startFailover
It’s now possible to register the test VMs. To avoid IP network conflicts, disable the NICs, as shown here.
$newDstVMs= @()
$vmhostDST = get-vmhost -Server $siteDST | select -First 1
$vmxfile | ForEach-Object {
    write-host $_
    $newVM = New-VM -VMFilePath $_ -VMHost $vmhostDST
    $newDstVMs += $newVM
}
$newDstVms | forEach-object {
    get-vm -name $_.name -server $siteSRC | Start-VM -Confirm:$false -RunAsync | out-null # Start VM on Source
    $vmtask = start-vm $_ -server $siteDST -ErrorAction SilentlyContinue -Confirm:$false -RunAsync
    wait-task $vmtask -ErrorAction SilentlyContinue | out-null
    $_ | Get-VMQuestion | Set-VMQuestion -Option ‘button.uuid.movedTheVM’ -Confirm:$false
    while ((get-vm -name $_.name -server $siteDST).PowerState -eq "PoweredOff" ) {
        Start-Sleep -Seconds 5
    }
    $_ | get-networkadapter | Set-NetworkAdapter -server $siteDST -connected:$false -StartConnected:$false -Confirm:$false
}
After stopping and deleting the test VMs at the replication destination, use stop-SpbmReplicationFailoverTest to stop the failover test. In a new PowerShell or PowerCLI session, perform Steps 1 and 2 from the failover section to prepare the environment, then continue with the following commands.
$newDstVMs | foreach-object {
    stop-vm -Confirm:$false $_
    remove-vm -Confirm:$false $_
}
Stop-SpbmReplicationTestFailover $rgpair.target
Unplanned failover
For an unplanned failover, the cmdlet Start-SpbmReplicationFailover provides the option -unplanned which can be executed against a replication group on the replication destination for immediate failover in case of a DR. Because each infrastructure and DR scenario is different, I only show the way to run the unplanned failover of a single replication group in case of a DR situation.
To run an unplanned failover, the script requires the replication target group in $RgTarget. The group pair information is only available when connected to both vCenters. To get a mapping of replication groups, use Step 1 from the Failover section and execute the Get-SpbmReplicationPair cmdlet:
PS> Get-SpbmReplicationPair | Format-Table -autosize
Source Group Target Group
------------ ------------
vm1          c6c66ee6-e69b-4d3d-b5f2-7d0658a82292
The following part shows how to execute an unplanned failover for a known replication group. The example connects to the DR vCenter and uses the replication group id as an identifier for the unplanned failover. After the failover is executed, the script registers the VMX in vCenter to bring the VMs online.
Import-Module VMware.VimAutomation.Core
Import-Module VMware.VimAutomation.Common
Import-Module VMware.VimAutomation.Storage
$vcUser = 'administrator@vsphere.local'                # Change this to your VC username
$vcPass = 'xxxxxxxxxx'                                 # VC password
$siteDR = "vcsa-b.lab"                                 # DR vCenter
$RgTarget = "c6c66ee6-e69b-4d3d-b5f2-7d0658a82292"     # Replication Group Target – required from replication Source before running the unplanned failover
                                                       # to get the information run get-SpbmReplicationPair | froamt-table -autosize when connected to both vCenter
Connect-VIServer -User "$vcUser" -Password "$vcPass" -Server $siteDR -WarningAction SilentlyContinue
# initiate the failover and preserve vmxfiles in $vmxfile
$vmxfile = Start-SpbmReplicationFailover -server $siteDR -Unplanned -ReplicationGroup $RgTarget
$newDstVMs= @()
$vmhostDST = get-vmhost -Server $siteDR | select -First 1
$vmxfile | ForEach-Object {
    write-host $_
    $newVM = New-VM -VMFilePath $_ -VMHost $vmhostDST
    $newDstVMs += $newVM
}
$newDstVms | forEach-object {
    $vmtask = start-vm $_ -server $siteDST -ErrorAction SilentlyContinue -Confirm:$false -RunAsync
    wait-task $vmtask -ErrorAction SilentlyContinue | out-null
    $_ | Get-VMQuestion | Set-VMQuestion -Option ‘button.uuid.movedTheVM’ -Confirm:$false
}
To recover from an unplanned failover after both vCenters are back up, perform the following required steps:
- Add a storage policy with the previous target recovery group to VMs and associated HDDs.
- Shutdown (just in case) and remove the VMs on the previous source.
- Start reprotection of VMs and associated HDDs.
- Use Spmb-ReplicationReverse to reestablish the protection of the VMs.
Conclusion
Even though Dell PowerStore and VMware vSphere do not provide native vVol failover handling, this example shows that vVol failover operations are doable with some script work. This blog should give you a quick introduction to a script based vVol mechanism, perhaps for a proof of concept in your environment. Note that it would need to be extended, such as with additional error handling, when running in a production environment.
Resources
- GitHub - myscripts4u/PowerStore-vVol-PowerCLI: Dell PowerStore vVol failover with PowerCLI
- Dell PowerStore: Replication Technologies
- Dell PowerStore: VMware Site Recovery Manager Best Practices
- VMware PowerCLI Installation Guide
Author: Robert Weilhammer, Principal Engineering Technologist
https://www.xing.com/profile/Robert_Weilhammer