


OneFS SupportAssist Architecture and Operation

The previous article in this series looked at an overview of OneFS SupportAssist. Now, we’ll turn our attention to its core architecture and operation.
Under the hood, SupportAssist relies on the following infrastructure and services:
Service | Name |
ESE | Embedded Service Enabler. |
isi_rice_d | Remote Information Connectivity Engine (RICE). |
isi_crispies_d | Coordinator for RICE Incidental Service Peripherals including ESE Start. |
Gconfig | OneFS centralized configuration infrastructure. |
MCP | Master Control Program – starts, monitors, and restarts OneFS services. |
Tardis | Configuration service and database. |
Transaction journal | Task manager for RICE. |
Of these, ESE, isi_crispies_d, isi_rice_d, and the Transaction Journal are new in OneFS 9.5 and exclusive to SupportAssist. By contrast, Gconfig, MCP, and Tardis are all legacy services that are used by multiple other OneFS components.
The Remote Information Connectivity Engine (RICE) represents the new SupportAssist ecosystem for OneFS to connect to the Dell backend. The high level architecture is as follows:
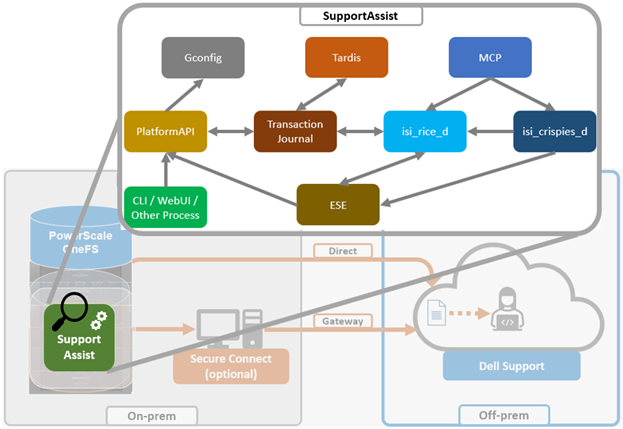
Dell’s Embedded Service Enabler (ESE) is at the core of the connectivity platform and acts as a unified communications broker between the PowerScale cluster and Dell Support. ESE runs as a OneFS service and, on startup, looks for an on-premises gateway server. If none is found, it connects back to the connectivity pipe (SRS). The collector service then interacts with ESE to send telemetry, obtain upgrade packages, transmit alerts and events, and so on.
Depending on the available resources, ESE provides a base functionality with additional optional capabilities to enhance serviceability. ESE is multithreaded, and each payload type is handled by specific threads. For example, events are handled by event threads, binary and structured payloads are handled by web threads, and so on. Within OneFS, ESE gets installed to /usr/local/ese and runs as ‘ese’ user and group.
The responsibilities of isi_rice_d include listening for network changes, getting eligible nodes elected for communication, monitoring notifications from CRISPIES, and engaging Task Manager when ESE is ready to go.
The Task Manager is a core component of the RICE engine. Its responsibility is to watch the incoming tasks that are placed into the journal and to assign workers to step through the tasks until completion. It controls the resource utilization (Python threads) and distributes tasks that are waiting on a priority basis.
The ‘isi_crispies_d’ service exists to ensure that ESE is only running on the RICE active node, and nowhere else. It acts, in effect, like a specialized MCP just for ESE and RICE-associated services, such as IPA. This entails starting ESE on the RICE active node, re-starting it if it crashes on the RICE active node, and stopping it and restarting it on the appropriate node if the RICE active instance moves to another node. We are using ‘isi_crispies_d’ for this, and not MCP, because MCP does not support a service running on only one node at a time.
The core responsibilities of ‘isi_crispies_d’ include:
- Starting and stopping ESE on the RICE active node
- Monitoring ESE and restarting, if necessary. ‘isi_crispies_d’ restarts ESE on the node if it crashes. It will retry a couple of times and then notify RICE if it’s unable to start ESE.
- Listening for gconfig changes and updating ESE. Stopping ESE if unable to make a change and notifying RICE.
- Monitoring other related services.
The state of ESE, and of other RICE service peripherals, is stored in the OneFS tardis configuration database so that it can be checked by RICE. Similarly, ‘isi_crispies_d’ monitors the OneFS Tardis configuration database to see which node is designated as the RICE ‘active’ node.
The ‘isi_telemetry_d’ daemon is started by MCP and runs when SupportAssist is enabled. It does not have to be running on the same node as the active RICE and ESE instance. Only one instance of ‘isi_telemetry_d’ will be active at any time, and the other nodes will be waiting for the lock.
You can query the current status and setup of SupportAssist on a PowerScale cluster by using the ‘isi supportassist settings view’ CLI command. For example:
# isi supportassist settings view
        Service enabled: Yes
       Connection State: enabled
      OneFS Software ID: ELMISL08224764
          Network Pools: subnet0:pool0
        Connection mode: direct
           Gateway host: -
           Gateway port: -
    Backup Gateway host: -
    Backup Gateway port: -
  Enable Remote Support: Yes
Automatic Case Creation: Yes
       Download enabled: Yes
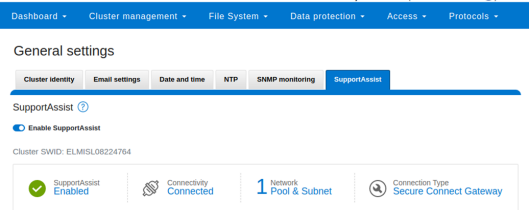
You can also do this from the WebUI by navigating to Cluster management > General settings > SupportAssist:
You can enable or disable SupportAssist by using the ‘isi services’ CLI command set. For example:
# isi services isi_supportassist disable
The service 'isi_supportassist' has been disabled.
# isi services isi_supportassist enable
The service 'isi_supportassist' has been enabled.
# isi services -a | grep supportassist
   isi_supportassist    SupportAssist Monitor                    Enabled
You can check the core services, as follows:
# ps -auxw | grep -e 'rice' -e 'crispies' | grep -v grep
root    8348    9.4   0.0 109844  60984  -   Ss   22:14        0:00.06 /usr/libexec/isilon/isi_crispies_d /usr/bin/isi_crispies_d
root    8183    8.8   0.0 108060  64396  -   Ss   22:14        0:01.58 /usr/libexec/isilon/isi_rice_d /usr/bin/isi_rice_d
Note that when a cluster is provisioned with SupportAssist, ESRS can no longer be used. However, customers that have not previously connected their clusters to Dell Support can still provision ESRS, but will be presented with a message encouraging them to adopt the best practice of using SupportAssist.
Additionally, SupportAssist in OneFS 9.5 does not currently support IPv6 networking, so clusters deployed in IPv6 environments should continue to use ESRS until SupportAssist IPv6 integration is introduced in a future OneFS release.
Author: Nick Trimbee
Related Blog Posts

OneFS Log Gather Transmission
Wed, 17 Apr 2024 15:45:51 -0000
|Read Time: 0 minutes
The OneFS isi_gather_info utility is the ubiquitous method for collecting and uploading a PowerScale cluster’s context and configuration to assist with the identification and resolution of bugs and issues. As such, it performs the following roles:
- Executes many commands, scripts, and utilities on a cluster, and saves their results
- Collates, or gathers, all these files into a single ‘gzipped’ package
- Optionally transmits this log gather package back to Dell using a choice of several transport methods
By default, a log gather tarfile is written to the /ifs/data/Isilon_Support/pkg/ directory. It can also be uploaded to Dell by the following means:
Upload mechanism | Description | TCP port | OneFS release support |
SupportAssist / ESRS | Uses Dell Secure Remote Support (SRS) for gather upload. | 443/8443 | Any |
FTP | Use FTP to upload the completed gather. | 21 | Any |
FTPS | Use SSH-based encrypted FTPS to upload the gather. | 22 | Default in OneFS 9.5 and later |
HTTP | Use HTTP to upload the gather. | 80/443 | Any |
As indicated in this table, OneFS 9.5 and later releases now leverage FTPS as the default option for FTP upload, thereby protecting the upload of cluster configuration and logs with an encrypted transmission session.
Under the hood, the log gather process comprises an eight phase workflow, with transmission comprising the penultimate ‘Upload’ phase:
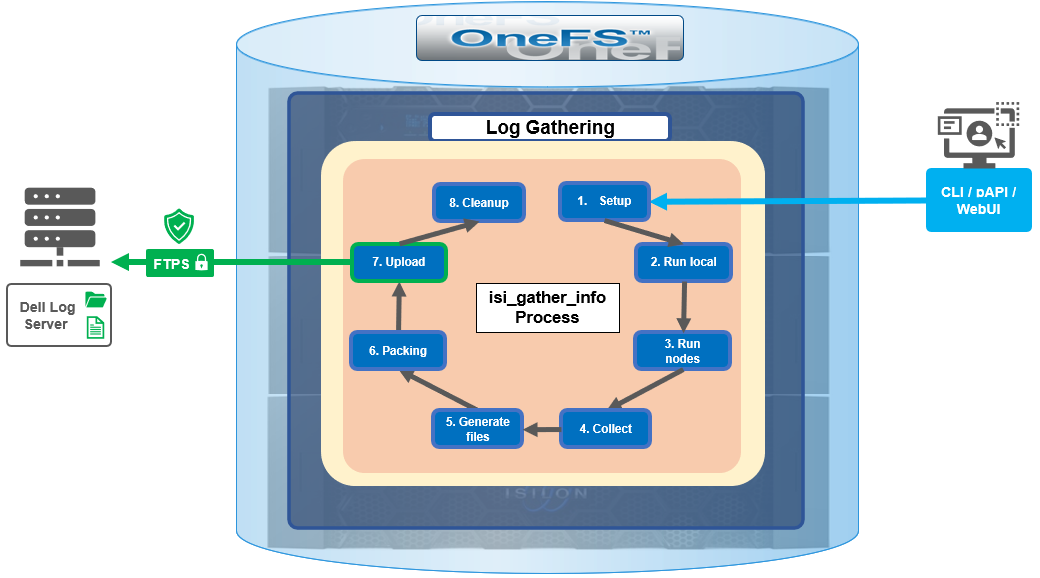
The details of each phase are as follows:
Phase | Description |
1. Setup | Reads from the arguments passed in, and from any config files on disk, and sets up the config dictionary, which will be used throughout the rest of the codebase. Most of the code for this step is contained in isilon/lib/python/gather/igi_config/configuration.py. This is also the step in which the program is most likely to exit, if some config arguments end up being invalid. |
2. Run local | Executes all the cluster commands, which are run on the same node that is starting the gather. All these commands run in parallel (up to the current parallelism value). This is typically the second longest running phase. |
3. Run nodes | Executes the node commands across all of the cluster’s nodes. This runs on each node, and while these commands run in parallel (up to the current parallelism value), they do not run in parallel with the ‘Run local’ step. |
4. Collect | Ensures that all of the results end up on the overlord node (the node that started the gather). If the gather is using /ifs, it is very fast; if it is not using /ifs, it needs to SCP all the node results to a single node. |
5. Generate Extra Files | Generates nodes_info.xml and package_info.xml. These two files are present in every gather, and provide important metadata about the cluster. |
6. Packing | Packs (tars and gzips) all the results. This is typically the longest running phase, often by an order of magnitude. |
7. Upload | Transports the tarfile package to its specified destination using SupportAssist, ESRS, FTPS, FTP, HTTP, and so on. Depending on the geographic location, this phase might also be lengthy. |
8. Cleanup | Cleans up any intermediary files that were created on the cluster. This phase will run even if the gather fails, or is interrupted. |
Because the isi_gather_info tool is primarily intended for troubleshooting clusters with issues, it runs as root (or compadmin in compliance mode), because it needs to be able to execute under degraded conditions (such as without GMP, during upgrade, and under cluster splits, and so on). Given these atypical requirements, isi_gather_info is built as a standalone utility, rather than using the platform API for data collection.
While FTPS is the new default and recommended transport, the legacy plaintext FTP upload method is still available in OneFS 9.5 and later. As such, Dell’s log server, ftp.isilon.com, also supports both encrypted FTPS and plaintext FTP, so will not impact older release FTP log upload behavior.
This OneFS 9.5 FTPS security enhancement encompasses three primary areas where an FTPS option is now supported:
- Directly executing the /usr/bin/isi_gather_info utility
- Running using the isi diagnostics gather CLI command set
- Creating a diagnostics gather through the OneFS WebUI
For the isi_gather_info utility, two new options are included in OneFS 9.5 and later releases:
New option for isi_gather_info | Description | Default value |
--ftp-insecure | Enables the gather to use unencrypted FTP transfer. | False |
--ftp-ssl-cert | Enables the user to specify the location of a special SSL certificate file. | Empty string. Not typically required. |
Similarly, there are two corresponding options in OneFS 9.5 and later for the isi diagnostics CLI command:
New option for isi diagnostics | Description | Default value |
--ftp-upload-insecure | Enables the gather to use unencrypted FTP transfer. | No |
--ftp-upload-ssl-cert | Enables the user to specify the location of a special SSL certificate file. | Empty string. Not typically required. |
Based on these options, the following table provides some command syntax usage examples, for both FTPS and FTP uploads:
FTP upload type | Description | Example isi_gather_info syntax | Example isi diagnostics syntax |
Secure upload (default) | Upload cluster logs to the Dell log server (ftp.isilon.com) using encrypted FTP (FTPS). | # isi_gather_info Or # isi_gather_info --ftp | # isi diagnostics gather start Or # isi diagnostics gather start --ftp-upload-insecure=no |
Secure upload | Upload cluster logs to an alternative server using encrypted FTPS. | # isi_gather_info --ftp-host <FQDN> --ftp-ssl-cert <SSL_CERT_PATH> | # isi diagnostics gather start --ftp-upload-host=<FQDN> --ftp-ssl-cert= <SSL_CERT_PATH> |
Unencrypted upload | Upload cluster logs to the Dell log server (ftp.isilon.com) using plaintext FTP. | # isi_gather_info --ftp-insecure | # isi diagnostics gather start --ftp-upload-insecure=yes |
Unencrypted upload | Upload cluster logs to an alternative server using plaintext FTP. | # isi_gather_info --ftp-insecure --ftp-host <FQDN> | # isi diagnostics gather start --ftp-upload-host=<FQDN> --ftp-upload-insecure=yes |
Note that OneFS 9.5 and later releases provide a warning if the cluster admin elects to continue using non-secure FTP for the isi_gather_info tool. Specifically, if the --ftp-insecure option is configured, the following message is displayed, informing the user that plaintext FTP upload is being used, and that the connection and data stream will not be encrypted:
# isi_gather_info --ftp-insecure
You are performing plain text FTP logs upload.
This feature is deprecated and will be removed
in a future release. Please consider the possibility
of using FTPS for logs upload. For further information,
please contact PowerScale support
...
In addition to the command line, log gathers can also be configured using the OneFS WebUI by navigating to Cluster management > Diagnostics > Gather settings.
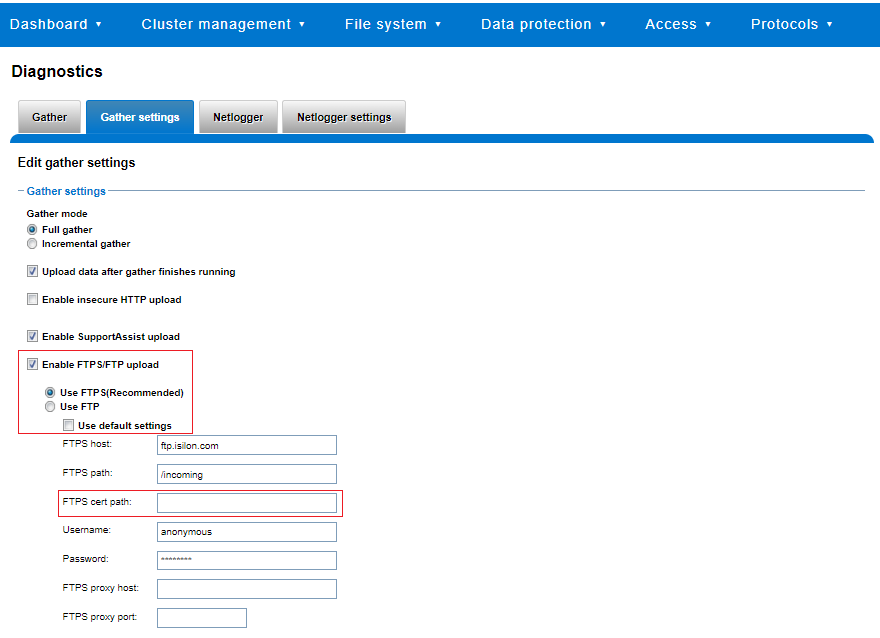
The Edit gather settings page in OneFS 9.5 and later has been updated to reflect FTPS as the default transport method, plus the addition of radio buttons and text boxes to accommodate the new configuration options.
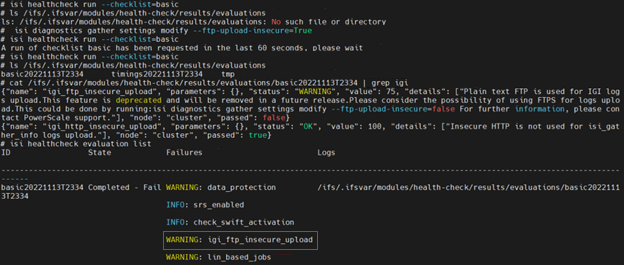
If plaintext FTP upload is configured, the healthcheck command will display a warning that plaintext upload is used and is no longer a recommended option. For example:
For reference, the OneFS 9.5 and later isi_gather_info CLI command syntax includes the following options:
Option | Description |
--upload <boolean> | Enable gather upload. |
--esrs <boolean> | Use ESRS for gather upload. |
--noesrs | Do not attempt to upload using ESRS. |
--supportassist | Attempt SupportAssist upload. |
--nosupportassist | Do not attempt to upload using SupportAssist. |
--gather-mode (incremental | full) | Type of gather: incremental or full. |
--http-insecure <boolean> | Enable insecure HTTP upload on completed gather. |
--http-host <string> | HTTP Host to use for HTTP upload. |
--http-path <string> | Path on HTTP server to use for HTTP upload. |
--http-proxy <string> | Proxy server to use for HTTP upload. |
--http-proxy-port <integer> | Proxy server port to use for HTTP upload. |
--ftp <boolean> | Enable FTP upload on completed gather. |
--noftp | Do not attempt FTP upload. |
--set-ftp-password | Interactively specify alternate password for FTP. |
--ftp-host <string> | FTP host to use for FTP upload. |
--ftp-path <string> | Path on FTP server to use for FTP upload. |
--ftp-port <string> | Specifies alternate FTP port for upload. |
--ftp-proxy <string> | Proxy server to use for FTP upload. |
--ftp-proxy-port <integer> | Proxy server port to use for FTP upload. |
--ftp-mode <value> | Mode of FTP file transfer. Valid values are both, active, and passive. |
--ftp-user <string> | FTP user to use for FTP upload. |
--ftp-pass <string> | Specify alternative password for FTP. |
--ftp-ssl-cert <string> | Specifies the SSL certificate to use in FTPS connection. |
--ftp-upload-insecure <boolean> | Whether to attempt a plaintext FTP upload. |
--ftp-upload-pass <string> | FTP user to use for FTP upload password. |
--set-ftp-upload-pass | Specify the FTP upload password interactively. |
When a logfile gather arrives at Dell, it is automatically unpacked by a support process and analyzed using the logviewer tool.
Author: Nick Trimbee

OneFS Security and USB Device Control
Fri, 19 Apr 2024 17:34:44 -0000
|Read Time: 0 minutes
As we’ve seen over the course of the last several articles, OneFS 9.5 delivers a wealth of security focused features. These span the realms of core file system, protocols, data services, platform, and peripherals. Among these security enhancements is the ability to manually or automatically disable a cluster’s USB ports from either the CLI, platform API, or by activating a security hardening policy.
In support of this functionality, the basic USB port control architecture is as follows:
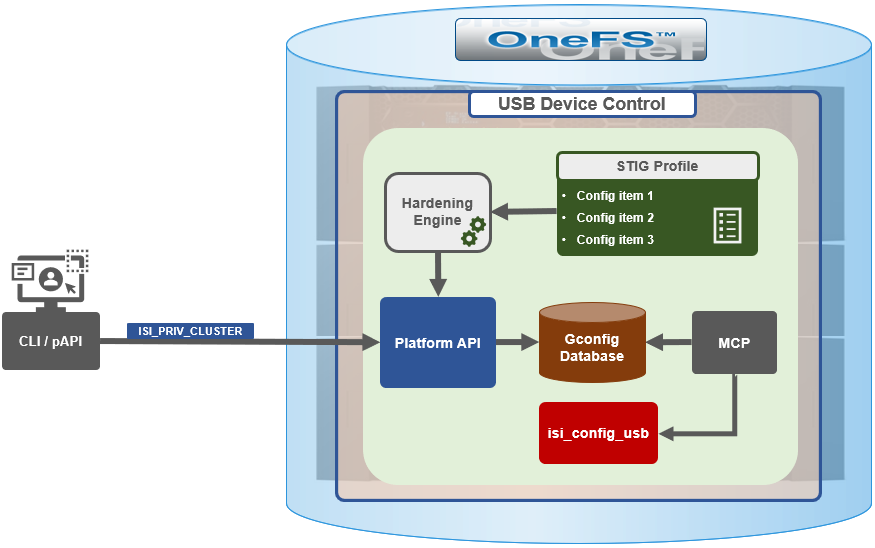
To facilitate this, OneFS 9.5 and subsequent releases see the addition of a new gconfig variable, ‘usb_ports_disabled’, in ‘security_config’, specifically to track the status of USB Ports on a cluster. On receiving an admin request either from the CLI or the platform API handler to disable the USB port, OneFS modifies the security config parameter in gconfig. For example:
# isi_gconfig -t security_config | grep -i usb
usb_ports_disabled (bool) = true
Under the hood, the MCP (master control process) daemon watches for any changes to the ‘isi_security.gcfg’ security config file on the cluster. If the value for the ‘usb_ports_disabled’ variable in the ‘isi_security.gcfg’ file is updated, then MCP executes the ‘isi_config_usb’ utility to enact the desired change. Note that because ‘isi_config_usb’ operates per-node but the MCP actions are global (executed cluster wide), isi_config_usb is invoked across each node by a Python script to enable or disable the cluster’s USB Ports.
The USB Ports enable/disable feature is only supported on PowerScale F900, F600, F200, H700/7000, and A300/3000 clusters running OneFS 9.5 and later, and PowerScale F710 and F210 running OneFS 9.7 or later.
In OneFS 9.5 and later, USB port control can be manually configured from either the CLI or platform API.
Note that there is no WebUI option at this time.
The following table lists the CLI and platform API configuration options for USB port control in OneFS 9.5 and later:
Action | CLI Syntax | Description |
View | isi security settings view | Report the state of a cluster’s USB ports. |
Enable | isi security settings modify --usb-ports-disabled=False | Activate a cluster’s USB ports. |
Disable | isi security settings modify --usb-ports-disabled=True | Disable a cluster’s USB ports. |
For example:
# isi security settings view | grep -i usb
      USB Ports Disabled: No
# isi security settings modify --usb-ports-disabled=True
# isi security settings view | grep -i usb
      USB Ports Disabled: Yes
Similarly, to re-enable a cluster’s USB ports:
# isi security settings modify --usb-ports-disabled=False
# isi security settings view | grep -i usb
      USB Ports Disabled: No
Note that a user account with the OneFS ISI_PRIV_CLUSTER RBAC privilege is required to configure USB port changes on a cluster.
In addition to the ‘isi security settings’ CLI command, there is also a node-local CLI utility:
# whereis isi_config_usb
isi_config_usb: /usr/bin/isi_hwtools/isi_config_usb
As mentioned previously, ‘isi security settings’ acts globally on a cluster, using ‘isi_config_usb’ to effect its changes on each node.
Alternatively, cluster USB ports can also be enabled and disabled using the OneFS platform API with the following endpoints:
API | Method | Argument | Output |
/16/security/settings | GET | No argument required. | JSON object for security settings with USB ports setting. |
/16/security/settings | PUT | JSON object with boolean value for USB ports setting. | None or Error. |
For example:
# curl -k -u <username>:<passwd> https://localhost:8080/platform/security/settings”

 {
 "settings" :
 {
 "fips_mode_enabled" : false,
 "restricted_shell_enabled" : false,
 "usb_ports_disabled" : true
 }
 }
In addition to manual configuration, the USB ports are automatically disabled if the STIG security hardening profile is applied to a cluster.
This is governed by the following section of XML code in the isi_hardening configuration file, which can be found at /etc/isi_hardening/profiles/isi_hardening.xml:
<CONFIG_ITEM id ="isi_usb_ports" version = "1">
              <PapiOperation>
                           <DO>
                                        <URI>/security/settings</URI>
                                        <BODY>{"usb_ports_disabled": true}</BODY>
                                        <KEY>settings</KEY>
                           </DO>
                           <UNDO>
                                        <URI>/security/settings</URI>
                                        <BODY>{"usb_ports_disabled": false}</BODY>
                                        <KEY>settings</KEY>
                           </UNDO>
                           <ACTION_SCOPE>CLUSTER</ACTION_SCOPE>
                           <IGNORE>FALSE</IGNORE>
              </PapiOperation>
 </CONFIG_ITEM>
The ‘isi_config_usb’ CLI utility can be used to display the USB port status on a subset of nodes. For example:
# isi_config_usb --nodes 1-10 --mode display
    Node   |   Current  |  Pending
-----------------------------------
    TME-9  |   UNSUP    | INFO: This platform is not supported to run this script.
    TME-8  |   UNSUP    | INFO: This platform is not supported to run this script.
    TME-1  |     On     |
    TME-3  |     On     |
    TME-2  |     On     |
   TME-10  |     On     |
    TME-7  |   AllOn    |
    TME-5  |   AllOn    |
    TME-6  |   AllOn    |
Unable to connect: TME-4
Note: In addition to port status, the output identifies any nodes that do not support USB port control (nodes 8 and 9 above) or that are unreachable (node 4 above).
When investigating or troubleshooting issues with USB port control, the following log files are the first places to check:
Log file | Description |
/var/log/isi_papi_d.log | Will log any requests to enable or disable USB ports. |
/var/log/isi_config_usb.log | Logs activity from the isi_config_usb script execution. |
/var/log/isi_mcp | Logs activity related to MCP actions on invoking the API. |
Author: Nick Trimbee