


OneFS Host-Based Firewall

Among the array of security features introduced in OneFS 9.5 is a new host-based firewall. This firewall allows cluster administrators to configure policies and rules on a PowerScale cluster in order to meet the network and application management needs and security mandates of an organization.
The OneFS firewall protects the cluster’s external, or front-end, network and operates as a packet filter for inbound traffic. It is available upon installation or upgrade to OneFS 9.5 but is disabled by default in both cases. However, the OneFS STIG hardening profile automatically enables the firewall and the default policies, in addition to manual activation.
The firewall generally manages IP packet filtering in accordance with the OneFS Security Configuration Guide, especially in regards to the network port usage. Packet control is governed by firewall policies, which have one or more individual rules.
Item | Description | Match | Action |
Firewall Policy | Each policy is a set of firewall rules. | Rules are matched by index in ascending order. | Each policy has a default action. |
Firewall Rule | Each rule specifies what kinds of network packets should be matched by Firewall engine and what action should be taken upon them. | Matching criteria includes protocol, source ports, destination ports, source network address). | Options are allow, deny, or reject. |
A security best practice is to enable the OneFS firewall using the default policies, with any adjustments as required. The recommended configuration process is as follows:
Step | Details |
1. Access | Ensure that the cluster uses a default SSH or HTTP port before enabling. The default firewall policies block all nondefault ports until you change the policies. |
2. Enable | Enable the OneFS firewall. |
3. Compare | Compare your cluster network port configurations against the default ports listed in Network port usage. |
4. Configure | Edit the default firewall policies to accommodate any non-standard ports in use in the cluster. NOTE: The firewall policies do not automatically update when port configurations are changed. |
5. Constrain | Limit access to the OneFS Web UI to specific administrator terminals. |
Under the hood, the OneFS firewall is built upon the ubiquitous ipfirewall, or ipfw, which is FreeBSD’s native stateful firewall, packet filter, and traffic accounting facility.
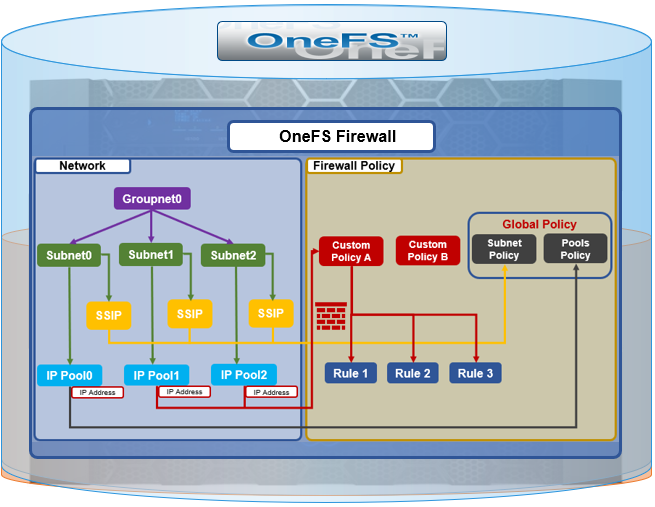
Firewall configuration and management is through the CLI, or platform API, or WebUI, and OneFS 9.5 introduces a new Firewall Configuration page to support this. Note that the firewall is only available once a cluster is already running OneFS 9.5 and the feature has been manually enabled, activating the isi_firewall_d service. The firewall’s configuration is split between gconfig, which handles the settings and policies, and the ipfw table, which stores the rules themselves.

The firewall gracefully handles SmartConnect dynamic IP movement between nodes since firewall policies are applied per network pool. Additionally, being network pool based allows the firewall to support OneFS access zones and shared/multitenancy models.
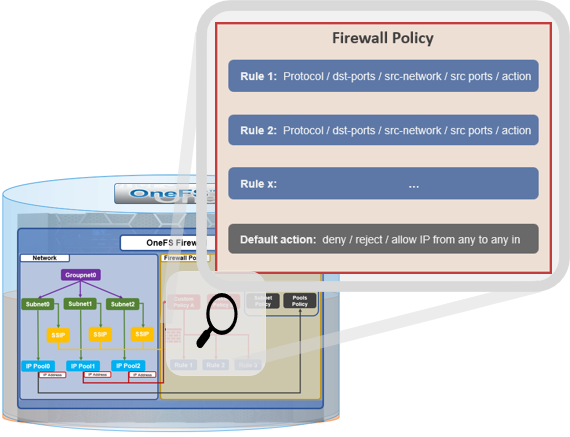
The individual firewall rules, which are essentially simplified wrappers around ipfw rules, work by matching packets through the 5-tuples that uniquely identify an IPv4 UDP or TCP session:
- Source IP address
- Source port
- Destination IP address
- Destination port
- Transport protocol
The rules are then organized within a firewall policy, which can be applied to one or more network pools.
Note that each pool can only have a single firewall policy applied to it. If there is no custom firewall policy configured for a network pool, it automatically uses the global default firewall policy.
When enabled, the OneFS firewall function is cluster wide, and all inbound packets from external interfaces will go through either the custom policy or default global policy before reaching the protocol handling pathways. Packets passed to the firewall are compared against each of the rules in the policy, in rule-number order. Multiple rules with the same number are permitted, in which case they are processed in order of insertion. When a match is found, the action corresponding to that matching rule is performed. A packet is checked against the active ruleset in multiple places in the protocol stack, and the basic flow is as follows:
- Get the logical interface for incoming packets.
- Find all network pools assigned to this interface.
- Compare these network pools one by one with destination IP address to find the matching pool (either custom firewall policy, or default global policy).
- Compare each rule with service (protocol and destination ports) and source IP address in this pool in order of lowest index value. If matched, perform actions according to the associated rule.
- If no rule matches, go to the final rule (deny all or allow all), which is specified upon policy creation.
The OneFS firewall automatically reserves 20,000 rules in the ipfw table for its custom and default policies and rules. By default, each policy can have a maximum of 100 rules, including one default rule. This translates to an effective maximum of 99 user-defined rules per policy, because the default rule is reserved and cannot be modified. As such, a maximum of 198 policies can be applied to pools or subnets since the default-pools-policy and default-subnets-policy are reserved and cannot be deleted.
Additional firewall bounds and limits to keep in mind include:
Name | Value | Description |
MAX_INTERFACES | 500 | Maximum number of Layer 2 interfaces per node (including Ethernet, VLAN, LAGG interfaces). |
MAX _SUBNETS | 100 | Maximum number of subnets within a OneFS cluster. |
MAX_POOLS | 100 | Maximum number of network pools within a OneFS cluster. |
DEFAULT_MAX_RULES | 100 | Default value of maximum rules within a firewall policy. |
MAX_RULES | 200 | Upper limit of maximum rules within a firewall policy. |
MAX_ACTIVE_RULES | 5000 | Upper limit of total active rules across the whole cluster. |
MAX_INACTIVE_POLICIES | 200 | Maximum number of policies that are not applied to any network subnet or pool. They will not be written into ipfw table. |
The firewall default global policy is ready to use out of the box and, unless a custom policy has been explicitly configured, all network pools use this global policy. Custom policies can be configured by either cloning and modifying an existing policy or creating one from scratch.
Component | Description |
Custom policy | A user-defined container with a set of rules. A policy can be applied to multiple network pools, but a network pool can only apply one policy. |
Firewall rule | An ipfw-like rule that can be used to restrict remote access. Each rule has an index that is valid within the policy. Index values range from 1 to 99, with lower numbers having higher priority. Source networks are described by IP and netmask, and services can be expressed either by port number (i.e., 80) or service name (i.e., http, ssh, smb). The * wildcard can also be used to denote all services. Supported actions include allow, drop, and reject. |
Default policy | A global policy to manage all default services, used for maintaining OneFS minimum running and management. While Deny any is the default action of the policy, the defined service rules have a default action to allow all remote access. All packets not matching any of the rules are automatically dropped. Two default policies:
Note that these two default policies cannot be deleted, but individual rule modification is permitted in each. |
Default services | The firewall’s default predefined services include the usual suspects, such as: DNS, FTP, HDFS, HTTP, HTTPS, ICMP, NDMP, NFS, NTP, S3, SMB, SNMP, SSH, and so on. A full listing is available in the isi network firewall services list CLI command output. |
For a given network pool, either the global policy or a custom policy is assigned and takes effect. Additionally, all configuration changes to either policy type are managed by gconfig and are persistent across cluster reboots.
In the next article in this series we’ll take a look at the CLI and WebUI configuration and management of the OneFS firewall.
Related Blog Posts

OneFS and HTTP Security
Mon, 22 Apr 2024 20:35:30 -0000
|Read Time: 0 minutes
To enable granular HTTP security configuration, OneFS provides an option to disable nonessential HTTP components selectively. This can help reduce the overall attack surface of your infrastructure. Disabling a specific component’s service still allows other essential services on the cluster to continue to run unimpeded. In OneFS 9.4 and later, you can disable the following nonessential HTTP services:
Service | Description |
PowerScaleUI | The OneFS WebUI configuration interface. |
Platform-API-External | External access to the OneFS platform API endpoints. |
Rest Access to Namespace (RAN) | REST-ful access by HTTP to a cluster’s /ifs namespace. |
RemoteService | Remote Support and In-Product Activation. |
SWIFT (deprecated) | Deprecated object access to the cluster using the SWIFT protocol. This has been replaced by the S3 protocol in OneFS. |
You can enable or disable each of these services independently, using the CLI or platform API, if you have a user account with the ISI_PRIV_HTTP RBAC privilege.
You can use the isi http services CLI command set to view and modify the nonessential HTTP services:
# isi http services list
ID                     Enabled
------------------------------
Platform-API-External Yes
PowerScaleUI          Yes
RAN                   Yes
RemoteService         Yes
SWIFT                 No
------------------------------
Total: 5
For example, you can easily disable remote HTTP access to the OneFS /ifs namespace as follows:
# isi http services modify RAN --enabled=0
You are about to modify the service RAN. Are you sure? (yes/[no]): yes
Similarly, you can also use the WebUI to view and edit a subset of the HTTP configuration settings, by navigating to Protocols > HTTP settings:
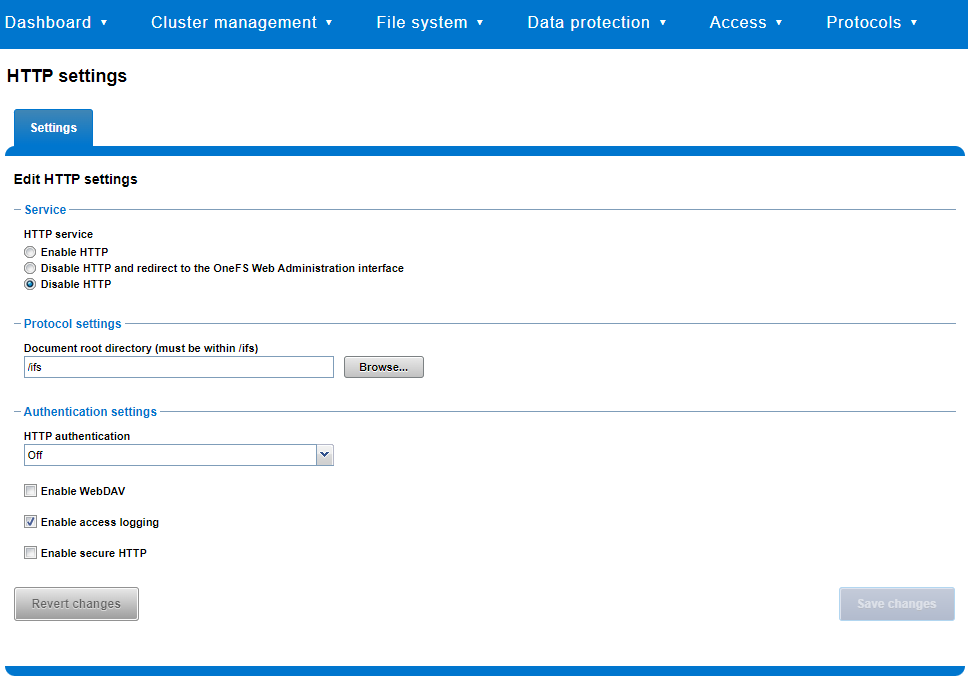
That said, the implications and impact of disabling each of the services is as follows:
Service | Disabling impacts |
WebUI | The WebUI is completely disabled, and access attempts (default TCP port 8080) are denied with the warning Service Unavailable. Please contact Administrator. If the WebUI is re-enabled, the external platform API service (Platform-API-External) is also started if it is not running. Note that disabling the WebUI does not affect the PlatformAPI service. |
Platform API | External API requests to the cluster are denied, and the WebUI is disabled, because it uses the Platform-API-External service. Note that the Platform-API-Internal service is not impacted if/when the Platform-API-External is disabled, and internal pAPI services continue to function as expected. If the Platform-API-External service is re-enabled, the WebUI will remain inactive until the PowerScaleUI service is also enabled. |
RAN | If RAN is disabled, the WebUI components for File System Explorer and File Browser are also automatically disabled. From the WebUI, attempts to access the OneFS file system explorer (File System > File System Explorer) fail with the warning message Browse is disabled as RAN service is not running. Contact your administrator to enable the service. This same warning also appears when attempting to access any other WebUI components that require directory selection. |
RemoteService | If RemoteService is disabled, the WebUI components for Remote Support and In-Product Activation are disabled. In the WebUI, going to Cluster Management > General Settings and selecting the Remote Support tab displays the message The service required for the feature is disabled. Contact your administrator to enable the service. In the WebUI, going to Cluster Management > Licensing and scrolling to the License Activation section displays the message The service required for the feature is disabled. Contact your administrator to enable the service. |
SWIFT | Deprecated object protocol and disabled by default. |
You can use the CLI command isi http settings view to display the OneFS HTTP configuration:
# isi http settings view
            Access Control: No
      Basic Authentication: No
    WebHDFS Ran HTTPS Port: 8443
                        Dav: No
         Enable Access Log: Yes
                      HTTPS: No
 Integrated Authentication: No
               Server Root: /ifs
                    Service: disabled
           Service Timeout: 8m20s
          Inactive Timeout: 15m
           Session Max Age: 4H
Httpd Controlpath Redirect: No
Similarly, you can manage and change the HTTP configuration using the isi http settings modify CLI command.
For example, to reduce the maximum session age from four to two hours:
# isi http settings view | grep -i age
           Session Max Age: 4H
# isi http settings modify --session-max-age=2H
# isi http settings view | grep -i age
           Session Max Age: 2H
The full set of configuration options for isi http settings includes:
Option | Description |
--access-control <boolean> | Enable Access Control Authentication for the HTTP service. Access Control Authentication requires at least one type of authentication to be enabled. |
--basic-authentication <boolean> | Enable Basic Authentication for the HTTP service. |
--webhdfs-ran-https-port <integer> | Configure Data Services Port for the HTTP service. |
--revert-webhdfs-ran-https-port | Set value to system default for --webhdfs-ran-https-port. |
--dav <boolean> | Comply with Class 1 and 2 of the DAV specification (RFC 2518) for the HTTP service. All DAV clients must go through a single node. DAV compliance is NOT met if you go through SmartConnect, or using 2 or more node IPs. |
--enable-access-log <boolean> | Enable writing to a log when the HTTP server is accessed for the HTTP service. |
--https <boolean> | Enable the HTTPS transport protocol for the HTTP service. |
--https <boolean> | Enable the HTTPS transport protocol for the HTTP service. |
--integrated-authentication <boolean> | Enable Integrated Authentication for the HTTP service. |
--server-root <path> | Document root directory for the HTTP service. Must be within /ifs. |
--service (enabled | disabled | redirect | disabled_basicfile) | Enable/disable the HTTP Service or redirect to WebUI or disabled BasicFileAccess. |
--service-timeout <duration> | The amount of time (in seconds) that the server will wait for certain events before failing a request. A value of 0 indicates that the service timeout value is the Apache default. |
--revert-service-timeout | Set value to system default for --service-timeout. |
--inactive-timeout <duration> | Get the HTTP RequestReadTimeout directive from both the WebUI and the HTTP service. |
--revert-inactive-timeout | Set value to system default for --inactive-timeout. |
--session-max-age <duration> | Get the HTTP SessionMaxAge directive from both WebUI and HTTP service. |
--revert-session-max-age | Set value to system default for --session-max-age. |
--httpd-controlpath-redirect <boolean> | Enable or disable WebUI redirection to the HTTP service. |
Note that while the OneFS S3 service uses HTTP, it is considered a tier-1 protocol, and as such is managed using its own isi s3 CLI command set and corresponding WebUI area. For example, the following CLI command forces the cluster to only accept encrypted HTTPS/SSL traffic on TCP port 9999 (rather than the default TCP port 9021):
# isi s3 settings global modify --https-only 1 –https-port 9921
# isi s3 settings global view
         HTTP Port: 9020
        HTTPS Port: 9999
        HTTPS only: Yes
S3 Service Enabled: Yes
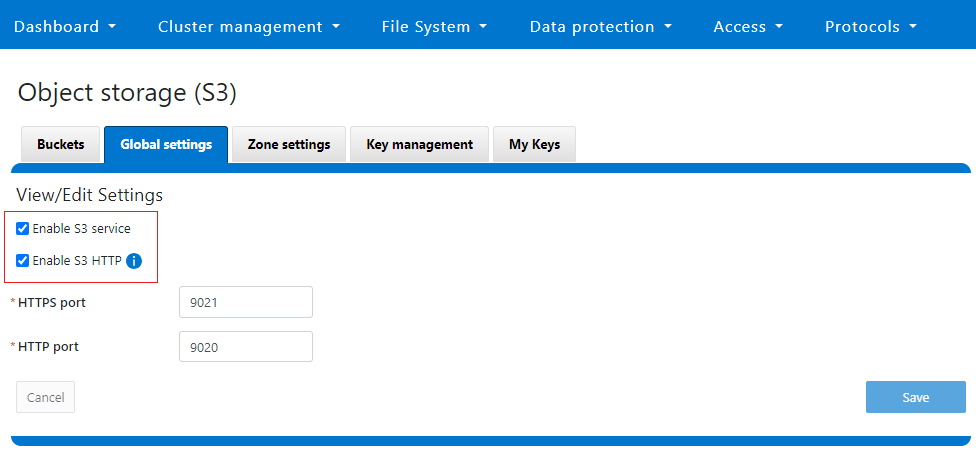
Additionally, you can entirely disable the S3 service with the following CLI command:
# isi services s3 disable
The service 's3' has been disabled.
Or from the WebUI, under Protocols > S3 > Global settings:
Author: Nick Trimbee

OneFS Key Manager Rekey Support
Mon, 24 Jul 2023 19:16:34 -0000
|Read Time: 0 minutes
The OneFS key manager is a backend service that orchestrates the storage of sensitive information for PowerScale clusters. To satisfy Dell’s Secure Infrastructure Ready requirements and other public and private sector security mandates, the manager provides the ability to replace, or rekey, cryptographic keys.
The quintessential consumer of OneFS key management is data-at-rest encryption (DARE). Protecting sensitive data stored on the cluster with cryptography ensures that it’s guarded against theft, in the event that drives or nodes are removed from a PowerScale cluster. DARE is a requirement for federal and industry regulations, ensuring data is encrypted when it is stored. OneFS has provided DARE solutions for many years through secure encrypted drives (SEDs) and the OneFS key management system.
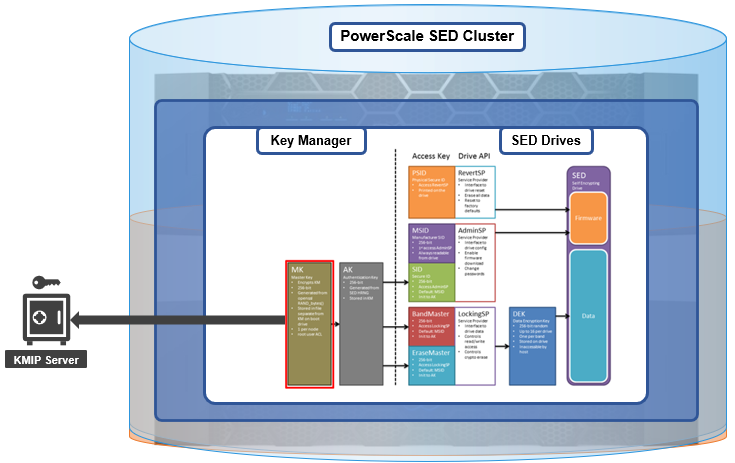
A 256-bit key (MK) encrypts the Key Manager Database (KMDB) for SED and cluster domains. In OneFS 9.2 and later, the MK for SEDs can either be stored off-cluster on a KMIP server or locally on a node (the legacy behavior).
However, there are a variety of other consumers of the OneFS key manager, in addition to DARE. These include services and protocols such as:
| Service | Description |
|---|---|
CELOG | Cluster event log |
CloudPools | Cluster tier to cloud service |
Electronic mail | |
FTP | File transfer protocol |
IPMI | Intelligent platform management interface for remote cluster console access |
JWT | JSON web tokens |
NDMP | Network data management protocol for cluster backups and DR |
Pstore | Active directory and Kerberos password store |
S3 | S3 object protocol |
SyncIQ | Cluster replication service |
SmartSync | OneFS push and pull replication cluster and cloud replication service |
SNMP | Simple network monitoring protocol |
SRS | Old Dell support remote cluster connectivity |
SSO | Single sign-on |
SupportAssist | Remote cluster connectivity to Dell Support |
OneFS 9.5 introduces a number of enhancements to the venerable key manager, including:
- The ability to rekey keystores. Rekey operation will generate a new MK and re-encrypt all entries stored with the new key.
- New CLI commands and WebUI options to perform a rekey operation or schedule key rotation on a time interval.
- New commands to monitor the progress and status of a rekey operation.
As such, OneFS 9.5 now provides the ability to rekey the MK, irrespective of where it is stored.
Note that when you are upgrading from an earlier OneFS release, the new rekey functionality is only available once the OneFS 9.5 upgrade has been committed.
Under the hood, each provider store in the key manager consists of secure backend storage and an MK. Entries are kept in a SQLite database or key-value store. A provider datastore uses its MK to encrypt all its entries within the store.
During the rekey process, the old MK is only deleted after a successful re-encryption with the new MK. If for any reason the process fails, the old MK is available and remains as the current MK. The rekey daemon retries the rekey every 15 minutes if the process fails.
The OneFS rekey process is as follows:

- A new MK is generated, and internal configuration is updated.
- Any entries in the provider store are decrypted and encrypted with the new MK.
- If the prior steps are successful, the previous MK is deleted.
To support the rekey process, the MK in OneFS 9.5 now has an ID associated with it. All entries have a new field referencing the MK ID.
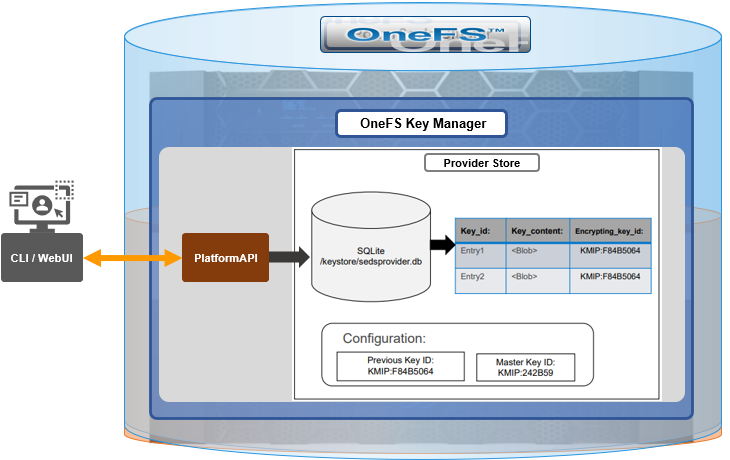
During the rekey operation, there are two MK values with different IDs, and all entries in the database will associate which key they are encrypted by.
In OneFS 9.5, the rekey configuration and management is split between the cluster keys and the SED keys:
| Rekey component | Detail |
|---|---|
SED |
|
Cluster |
|
SED keys rekey

The SED key manager rekey operation can be managed through a DARE cluster’s CLI or WebUI, and it can either be automatically scheduled or run manually on demand. The following CLI syntax can be used to manually initiate a rekey:
# isi keymanager sed rekey start
Alternatively, to schedule a rekey operation, for example, to schedule a key rotation every two months:
# isi keymanager sed rekey modify --key-rotation=2m
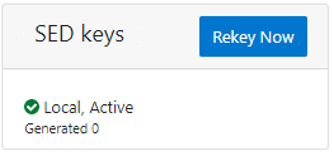
The key manager status for SEDs can be viewed as follows:
# isi keymanager sed status
 Node Status  Location   Remote Key ID  Key Creation Date   Error Info(if any)
-----------------------------------------------------------------------------
1   LOCAL   Local                    1970-01-01T00:00:00
-----------------------------------------------------------------------------
Total: 1
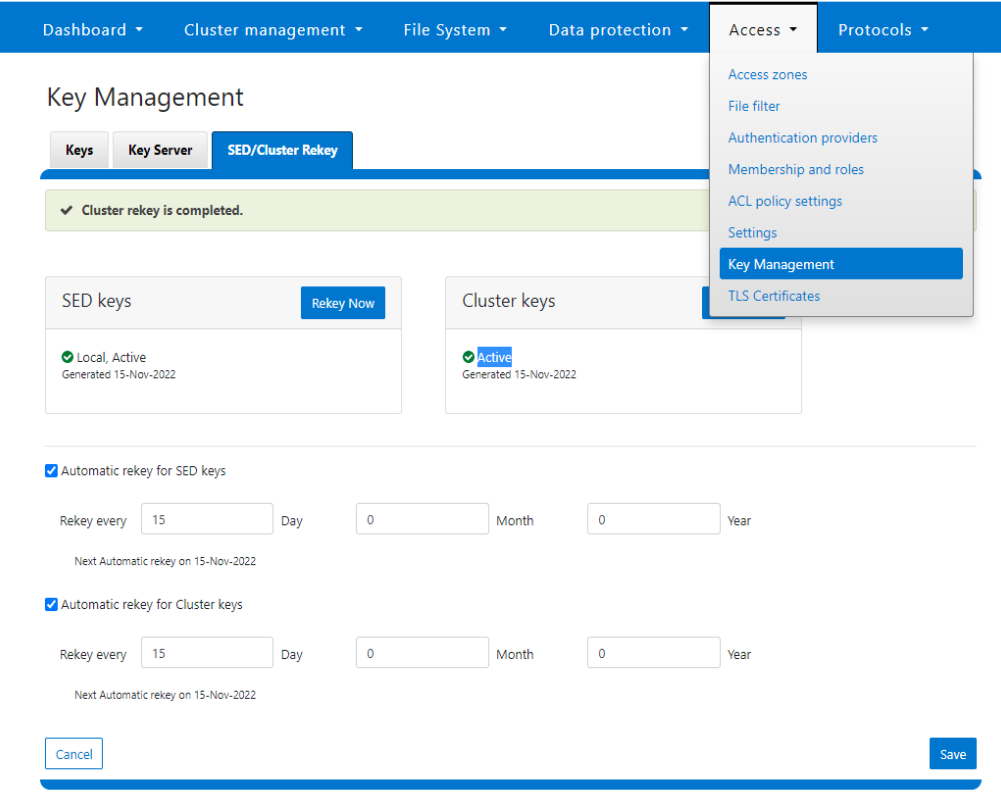
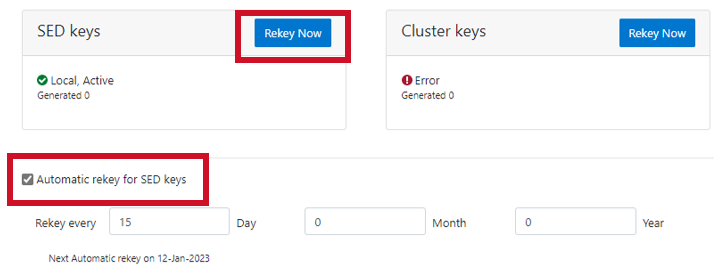
Alternatively, from the WebUI, go to Access > Key Management > SED/Cluster Rekey, select Automatic rekey for SED keys, and configure the rekey frequency:
Note that for SED rekey operations, if a migration from local cluster key management to a KMIP server is in progress, the rekey process will begin once the migration is complete.
Cluster keys rekey

As mentioned previously, OneFS 9.5 also supports the rekey of cluster keystore domains. This cluster rekey operation is available through the CLI and the WebUI and may either be scheduled or run on demand. The available cluster domains can be queried by running the following CLI syntax:
# isi keymanager cluster status
Domain     Status  Key Creation Date   Error Info(if any)
----------------------------------------------------------
CELOG      ACTIVE  2023-04-06T09:19:16
CERTSTORE  ACTIVE  2023-04-06T09:19:16
CLOUDPOOLS ACTIVE   2023-04-06T09:19:16
EMAIL      ACTIVE  2023-04-06T09:19:16
FTP        ACTIVE  2023-04-06T09:19:16
IPMI_MGMT  IN_PROGRESS  2023-04-06T09:19:16
JWT        ACTIVE  2023-04-06T09:19:16
LHOTSE     ACTIVE  2023-04-06T09:19:11
NDMP       ACTIVE  2023-04-06T09:19:16
NETWORK    ACTIVE  2023-04-06T09:19:16
PSTORE     ACTIVE  2023-04-06T09:19:16
RICE       ACTIVE  2023-04-06T09:19:16
S3         ACTIVE  2023-04-06T09:19:16
SIQ        ACTIVE  2023-04-06T09:19:16
SNMP       ACTIVE  2023-04-06T09:19:16
SRS        ACTIVE  2023-04-06T09:19:16
SSO        ACTIVE  2023-04-06T09:19:16
----------------------------------------------------------
Total: 17
The rekey process generates a new key and re-encrypts the entries for the domain. The old key is then deleted.
Performance-wise, the rekey process does consume cluster resources (CPU and disk) as a result of the re-encryption phase, which is fairly write-intensive. As such, a good practice is to perform rekey operations outside of core business hours or during scheduled cluster maintenance windows.
During the rekey process, the old MK is only deleted once a successful re-encryption with the new MK has been confirmed. In the event of a rekey process failure, the old MK is available and remains as the current MK.
A rekey may be requested immediately or may be scheduled with a cadence. The rekey operation is available through the CLI and the WebUI. In the WebUI, go to Access > Key Management > SED/Cluster Rekey.
To start a rekey of the cluster domains immediately, from the CLI run the following syntax:
# isi keymanager cluster rekey start
Are you sure you want to rekey the master passphrase? (yes/[no]):yes
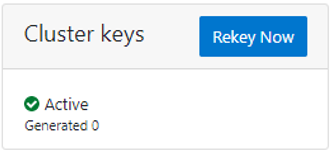
Alternatively, from the WebUI, go to Access under the SED/Cluster Rekey tab, and click Rekey Now next to Cluster keys:

A scheduled rekey of the cluster keys (excluding the SED keys) can be configured from the CLI with the following syntax:
# isi keymanager cluster rekey modify –-key-rotation [YMWDhms]
Specify the frequency of the Key Rotation field as an integer, using Y for years, M for months, W for weeks, D for days, h for hours, m for minutes, and s for seconds. For example, the following command will schedule the cluster rekey operation to run every six weeks:
# isi keymanager cluster rekey view
 Rekey Time: 1970-01-01T00:00:00
 Key Rotation: Never
 # isi keymanager cluster rekey modify --key-rotation 6W
 # isi keymanager cluster rekey view
 Rekey Time: 2023-04-28T18:38:45
 Key Rotation: 6W
The rekey configuration can be easily reverted back to on demand from a schedule as follows:
# isi keymanager cluster rekey modify --key-rotation Never
 # isi keymanager cluster rekey view
 Rekey Time: 2023-04-28T18:38:45
 Key Rotation: Never
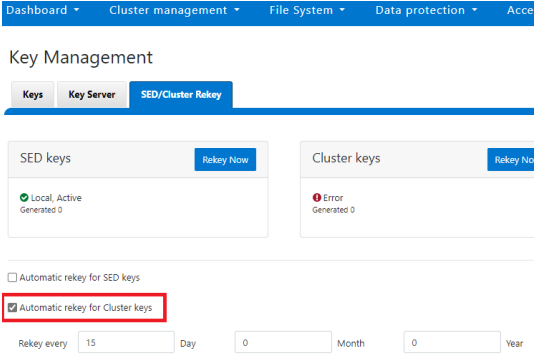
Alternatively, from the WebUI, under the SED/Cluster Rekey tab, select the Automatic rekey for Cluster keys checkbox and specify the rekey frequency. For example:
In an event of a rekeying failure, a CELOG KeyManagerRekeyFailed or KeyManagerSedsRekeyFailed event is created. Since SED rekey is a node-local operation, the KeyManagerSedsRekeyFailed event information will also include which node experienced the failure.
Additionally, current cluster rekey status can also be queried with the following CLI command:
# isi keymanager cluster status
Domain     Status  Key Creation Date   Error Info(if any)
----------------------------------------------------------
CELOG      ACTIVE  2023-04-06T09:19:16
CERTSTORE  ACTIVE  2023-04-06T09:19:16
CLOUDPOOLS ACTIVE   2023-04-06T09:19:16
EMAIL      ACTIVE  2023-04-06T09:19:16
FTP        ACTIVE  2023-04-06T09:19:16
IPMI_MGMT  ACTIVE  2023-04-06T09:19:16
JWT        ACTIVE  2023-04-06T09:19:16
LHOTSE     ACTIVE  2023-04-06T09:19:11
NDMP       ACTIVE  2023-04-06T09:19:16
NETWORK    ACTIVE  2023-04-06T09:19:16
PSTORE     ACTIVE  2023-04-06T09:19:16
RICE       ACTIVE  2023-04-06T09:19:16
S3         ACTIVE  2023-04-06T09:19:16
SIQ        ACTIVE  2023-04-06T09:19:16
SNMP       ACTIVE  2023-04-06T09:19:16
SRS        ACTIVE  2023-04-06T09:19:16
SSO        ACTIVE  2023-04-06T09:19:16
----------------------------------------------------------
Total: 17
Or, for SEDs rekey status:
# isi keymanager sed status
 Node Status  Location   Remote Key ID  Key Creation Date   Error Info(if any)
-----------------------------------------------------------------------------
1   LOCAL   Local                    1970-01-01T00:00:00
2   LOCAL   Local                    1970-01-01T00:00:00
3   LOCAL   Local                    1970-01-01T00:00:00
4   LOCAL   Local                    1970-01-01T00:00:00
-----------------------------------------------------------------------------
Total: 4
The rekey process also outputs to the /var/log/isi_km_d.log file, which is a useful source for additional troubleshooting.
If an error in rekey occurs, the previous MK is not deleted, so entries in the provider store can still be created and read as normal. The key manager daemon will retry the rekey operation in the background every 15 minutes until it succeeds.
Author: Nick Trimbee