


OneFS Firewall Configuration—Part 1

The new firewall in OneFS 9.5 enhances the security of the cluster and helps prevent unauthorized access to the storage system. When enabled, the default firewall configuration allows remote systems access to a specific set of default services for data, management, and inter-cluster interfaces (network pools).
The basic OneFS firewall provisioning process is as follows:

Note that role-based access control (RBAC) explicitly limits who has access to manage the OneFS firewall. In addition to the ubiquitous root, the cluster’s built-in SystemAdmin role has write privileges to configure and administer the firewall.
1. Upgrade cluster to OneFS 9.5.
First, to provision the firewall, the cluster must be running OneFS 9.5.

If you are upgrading from an earlier release, the OneFS 9.5 upgrade must be committed before enabling the firewall.
Also, be aware that configuration and management of the firewall in OneFS 9.5 requires the new ISI_PRIV_FIREWALL administration privilege.
# isi auth privilege | grep -i firewall
ISI_PRIV_FIREWALL                   Configure network firewall
This privilege can be granted to a role with either read-only or read/write permissions. By default, the built-in SystemAdmin role is granted write privileges to administer the firewall:
# isi auth roles view SystemAdmin | grep -A2 -i firewall
             ID: ISI_PRIV_FIREWALL
     Permission: w
Additionally, the built-in AuditAdmin role has read permission to view the firewall configuration and logs, and so on:
# isi auth roles view AuditAdmin | grep -A2 -i firewall
             ID: ISI_PRIV_FIREWALL
     Permission: r
Ensure that the user account that will be used to enable and configure the OneFS firewall belongs to a role with the ISI_PRIV_FIREWALL write privilege.
2. Activate firewall.

The OneFS firewall can be either enabled or disabled, with the latter as the default state.
The following CLI syntax will display the firewall’s global status (in this case disabled, the default):
# isi network firewall settings view
Enabled: False
Firewall activation can be easily performed from the CLI as follows:
# isi network firewall settings modify --enabled true
# isi network firewall settings view
Enabled: True
Or from the WebUI under Cluster management > Firewall Configuration > Settings:
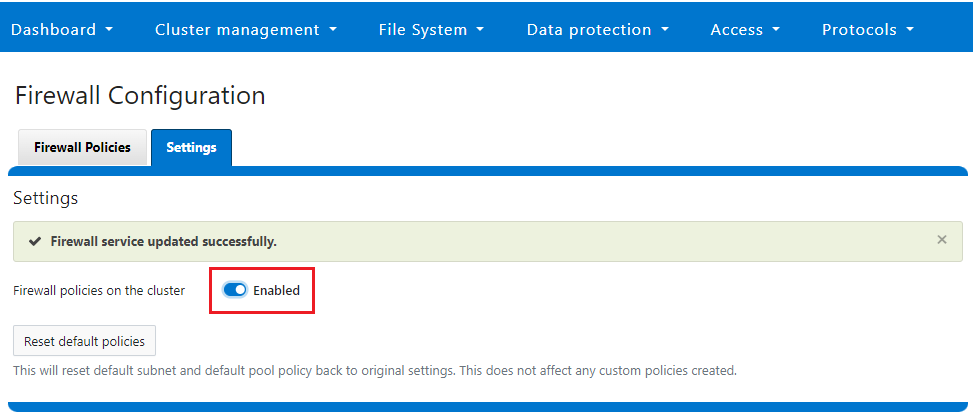
Note that the firewall is automatically enabled when STIG hardening is applied to a cluster.
3. Select policies.

A cluster’s existing firewall policies can be easily viewed from the CLI with the following command:
# isi network firewall policies list
ID        Pools                    Subnets                   Rules
 -----------------------------------------------------------------------------
 fw_test1  groupnet0.subnet0.pool0  groupnet0.subnet1         test_rule1
 -----------------------------------------------------------------------------
 Total: 1
Or from the WebUI under Cluster management > Firewall Configuration > Firewall Policies:

The OneFS firewall offers four main strategies when it comes to selecting a firewall policy:
- Retaining the default policy
- Reconfiguring the default policy
- Cloning the default policy and reconfiguring
- Creating a custom firewall policy
We’ll consider each of these strategies in order:
a. Retaining the default policy
In many cases, the default OneFS firewall policy value provides acceptable protection for a security-conscious organization. In these instances, once the OneFS firewall has been enabled on a cluster, no further configuration is required, and the cluster administrators can move on to the management and monitoring phase.
The firewall policy for all front-end cluster interfaces (network pool) is the default. While the default policy can be modified, be aware that this default policy is global. As such, any change against it will affect all network pools using this default policy.
The following table describes the default firewall policies that are assigned to each interface:
Policy | Description |
Default pools policy | Contains rules for the inbound default ports for TCP and UDP services in OneFS |
Default subnets policy | Contains rules for:
|
These can be viewed from the CLI as follows:
# isi network firewall policies view default_pools_policy
            ID: default_pools_policy
          Name: default_pools_policy
    Description: Default Firewall Pools Policy
Default Action: deny
      Max Rules: 100
          Pools: groupnet0.subnet0.pool0, groupnet0.subnet0.testpool1, groupnet0.subnet0.testpool2, groupnet0.subnet0.testpool3, groupnet0.subnet0.testpool4, groupnet0.subnet0.poolcava
        Subnets: -
          Rules: rule_ldap_tcp, rule_ldap_udp, rule_reserved_for_hw_tcp, rule_reserved_for_hw_udp, rule_isi_SyncIQ, rule_catalog_search_req, rule_lwswift, rule_session_transfer, rule_s3, rule_nfs_tcp, rule_nfs_udp, rule_smb, rule_hdfs_datanode, rule_nfsrdma_tcp, rule_nfsrdma_udp, rule_ftp_data, rule_ftps_data, rule_ftp, rule_ssh, rule_smtp, rule_http, rule_kerberos_tcp, rule_kerberos_udp, rule_rpcbind_tcp, rule_rpcbind_udp, rule_ntp, rule_dcerpc_tcp, rule_dcerpc_udp, rule_netbios_ns, rule_netbios_dgm, rule_netbios_ssn, rule_snmp, rule_snmptrap, rule_mountd_tcp, rule_mountd_udp, rule_statd_tcp, rule_statd_udp, rule_lockd_tcp, rule_lockd_udp, rule_nfsrquotad_tcp, rule_nfsrquotad_udp, rule_nfsmgmtd_tcp, rule_nfsmgmtd_udp, rule_https, rule_ldaps, rule_ftps, rule_hdfs_namenode, rule_isi_webui, rule_webhdfs, rule_ambari_handshake, rule_ambari_heartbeat, rule_isi_esrs_d, rule_ndmp, rule_isi_ph_rpcd, rule_cee, rule_icmp, rule_icmp6, rule_isi_dm_d
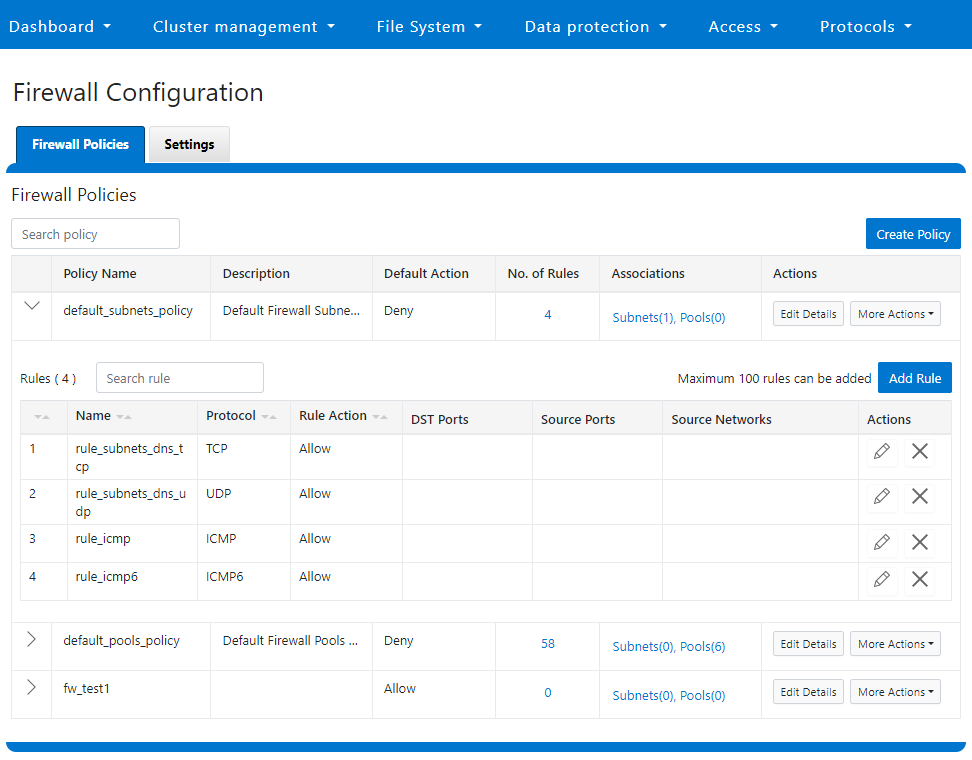
 # isi network firewall policies view default_subnets_policy
            ID: default_subnets_policy
          Name: default_subnets_policy
    Description: Default Firewall Subnets Policy
Default Action: deny
      Max Rules: 100
          Pools: -
        Subnets: groupnet0.subnet0
          Rules: rule_subnets_dns_tcp, rule_subnets_dns_udp, rule_icmp, rule_icmp6
Or from the WebUI under Cluster management > Firewall Configuration > Firewall Policies:
b. Reconfiguring the default policy
Depending on an organization’s threat levels or security mandates, there may be a need to restrict access to certain additional IP addresses and/or management service protocols.
If the default policy is deemed insufficient, reconfiguring the default firewall policy can be a good option if only a small number of rule changes are required. The specifics of creating, modifying, and deleting individual firewall rules is covered later in this article (step 3).
Note that if new rule changes behave unexpectedly, or firewall configuration generally goes awry, OneFS does provide a “get out of jail free” card. In a pinch, the global firewall policy can be quickly and easily restored to its default values. This can be achieved with the following CLI syntax:
# isi network firewall reset-global-policy
This command will reset the global firewall policies to the original system defaults. Are you sure you want to continue? (yes/[no]):
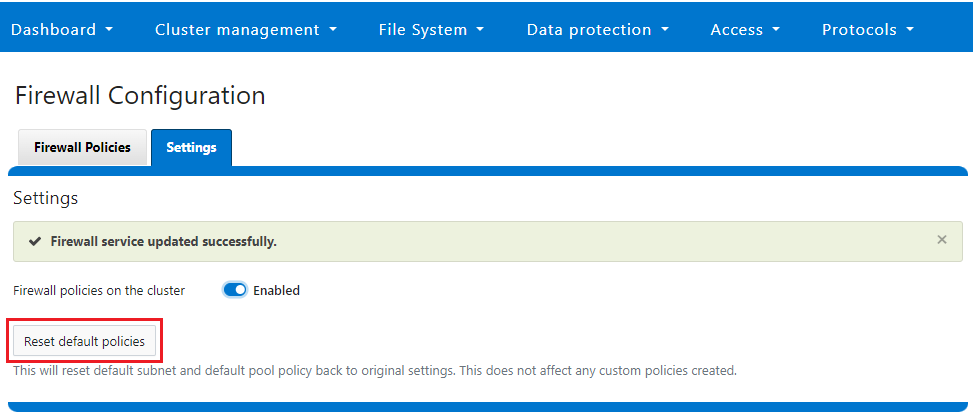
Alternatively, the default policy can also be easily reverted from the WebUI by clicking the Reset default policies:
c. Cloning the default policy and reconfiguring
Another option is cloning, which can be useful when batch modification or a large number of changes to the current policy are required. By cloning the default firewall policy, an exact copy of the existing policy and its rules is generated, but with a new policy name. For example:
# isi network firewall policies clone default_pools_policy clone_default_pools_policy
# isi network firewall policies list | grep -i clone
clone_default_pools_policy -
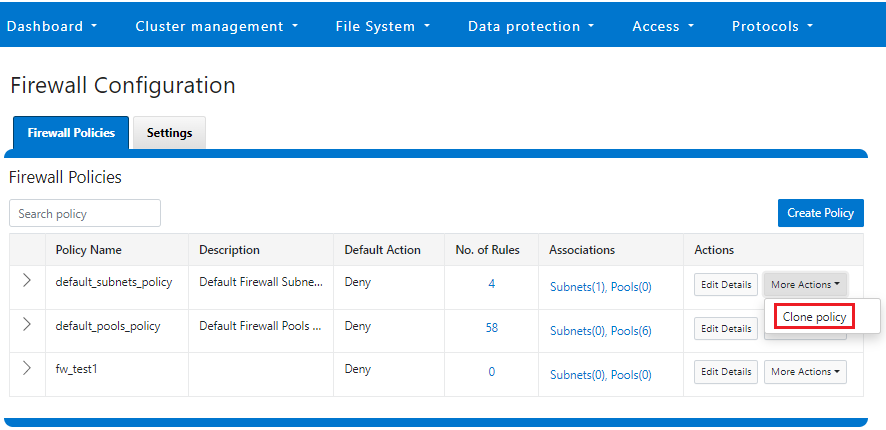
Cloning can also be initiated from the WebUI under Firewall Configuration > Firewall Policies > More Actions > Clone Policy:
Enter a name for the clone in the Policy Name field in the pop-up window, and click Save:

Once cloned, the policy can then be easily reconfigured to suit. For example, to modify the policy fw_test1 and change its default-action from deny-all to allow-all:
# isi network firewall policies modify fw_test1 --default-action allow-all
When modifying a firewall policy, you can use the --live CLI option to force it to take effect immediately. Note that the --live option is only valid when issuing a command to modify or delete an active custom policy and to modify default policy. Such changes will take effect immediately on all network subnets and pools associated with this policy. Using the --live option on an inactive policy will be rejected, and an error message returned.
Options for creating or modifying a firewall policy include:
Option | Description |
--default-action | Automatically add one rule to deny all or allow all to the bottom of the rule set for this created policy (Index = 100). |
--max-rule-num | By default, each policy when created could have a maximum of 100 rules (including one default rule), so user could configure a maximum of 99 rules. User could expand the maximum rule number to a specified value. Currently this value is limited to 200 (and user could configure a maximum of 199 rules). |
--add-subnets | Specify the network subnet(s) to add to policy, separated by a comma. |
--remove-subnets | Specify the networks subnets to remove from policy and fall back to global policy. |
--add-pools | Specify the network pool(s) to add to policy, separated by a comma. |
--remove-pools | Specify the networks pools to remove from policy and fall back to global policy. |
When you modify firewall policies, OneFS issues the following warning to verify the changes and help avoid the risk of a self-induced denial-of-service:
# isi network firewall policies modify --pools groupnet0.subnet0.pool0 fw_test1
Changing the Firewall Policy associated with a subnet or pool may change the networks and/or services allowed to connect to OneFS. Please confirm you have selected the correct Firewall Policy and Subnets/Pools. Are you sure you want to continue? (yes/[no]): yes
Once again, having the following CLI command handy, plus console access to the cluster is always a prudent move:
# isi network firewall reset-global-policy
So adding network pools or subnets to a firewall policy will cause the previous policy to be removed from them. Similarly, adding network pools or subnets to the global default policy will revert any custom policy configuration they might have. For example, to apply the firewall policy fw_test1 to IP Pool groupnet0.subnet0.pool0 and groupnet0.subnet0.pool1:
# isi network pools view groupnet0.subnet0.pool0 | grep -i firewall
       Firewall Policy: default_pools_policy
# isi network firewall policies modify fw_test1 --add-pools groupnet0.subnet0.pool0, groupnet0.subnet0.pool1
# isi network pools view groupnet0.subnet0.pool0 | grep -i firewall
       Firewall Policy: fw_test1
Or to apply the firewall policy fw_test1 to IP Pool groupnet0.subnet0.pool0 and groupnet0.subnet0:
# isi network firewall policies modify fw_test1 --apply-subnet groupnet0.subnet0.pool0, groupnet0.subnet0
# isi network pools view groupnet0.subnet0.pool0 | grep -i firewall
 Firewall Policy: fw_test1
# isi network subnets view groupnet0.subnet0 | grep -i firewall
 Firewall Policy: fw_test1
To reapply global policy at any time, either add the pools to the default policy:
# isi network firewall policies modify default_pools_policy --add-pools groupnet0.subnet0.pool0, groupnet0.subnet0.pool1
# isi network pools view groupnet0.subnet0.pool0 | grep -i firewall
 Firewall Policy: default_subnets_policy
# isi network subnets view groupnet0.subnet1 | grep -i firewall
 Firewall Policy: default_subnets_policy
Or remove the pool from the custom policy:
# isi network firewall policies modify fw_test1 --remove-pools groupnet0.subnet0.pool0 groupnet0.subnet0.pool1
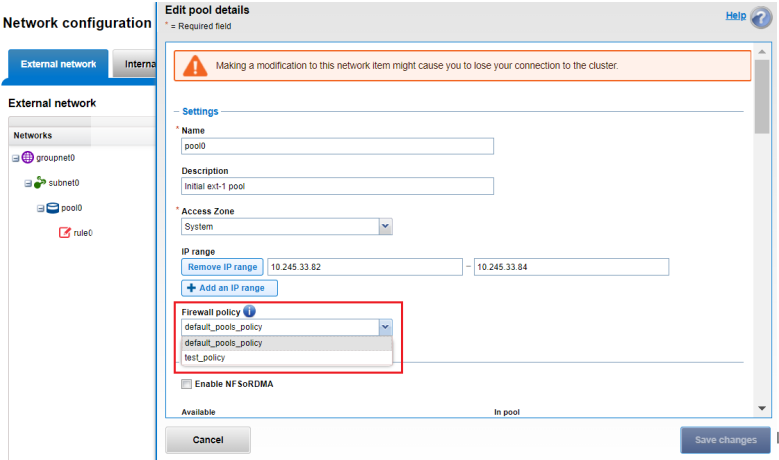
You can also manage firewall policies on a network pool in the OneFS WebUI by going to Cluster configuration > Network configuration > External network > Edit pool details. For example:
Be aware that cloning is also not limited to the default policy because clones can be made of any custom policies too. For example:
# isi network firewall policies clone clone_default_pools_policy fw_test1
d. Creating a custom firewall policy
Alternatively, a custom firewall policy can also be created from scratch. This can be accomplished from the CLI using the following syntax, in this case to create a firewall policy named fw_test1:
# isi network firewall policies create fw_test1 --default-action deny
# isi network firewall policies view fw_test1
            ID: fw_test1
          Name: fw_test1
    Description:
Default Action: deny
      Max Rules: 100
          Pools: -
        Subnets: -
          Rules: -
Note that if a default-action is not specified in the CLI command syntax, it will automatically default to deny.
Firewall policies can also be configured in the OneFS WebUI by going to Cluster management > Firewall Configuration > Firewall Policies > Create Policy:
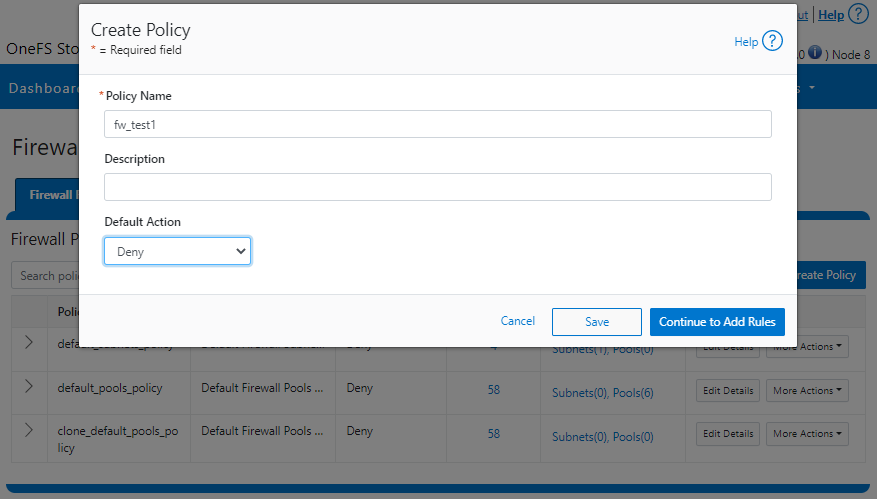
However, in contrast to the CLI, if a default-action is not specified when a policy is created in the WebUI, the automatic default is to Allow because the drop-down list works alphabetically.
If and when a firewall policy is no longer required, it can be swiftly and easily removed. For example, the following CLI syntax deletes the firewall policy fw_test1, clearing out any rules within this policy container:
# isi network firewall policies delete fw_test1
Are you sure you want to delete firewall policy fw_test1? (yes/[no]): yes
Note that the default global policies cannot be deleted.
# isi network firewall policies delete default_subnets_policy
Are you sure you want to delete firewall policy default_subnets_policy? (yes/[no]): yes
Firewall policy: Cannot delete default policy default_subnets_policy.
4. Configure firewall rules.

In the next article in this series, we’ll turn our attention to this step, configuring the OneFS firewall rules.
Related Blog Posts

OneFS Key Manager Rekey Support
Mon, 24 Jul 2023 19:16:34 -0000
|Read Time: 0 minutes
The OneFS key manager is a backend service that orchestrates the storage of sensitive information for PowerScale clusters. To satisfy Dell’s Secure Infrastructure Ready requirements and other public and private sector security mandates, the manager provides the ability to replace, or rekey, cryptographic keys.
The quintessential consumer of OneFS key management is data-at-rest encryption (DARE). Protecting sensitive data stored on the cluster with cryptography ensures that it’s guarded against theft, in the event that drives or nodes are removed from a PowerScale cluster. DARE is a requirement for federal and industry regulations, ensuring data is encrypted when it is stored. OneFS has provided DARE solutions for many years through secure encrypted drives (SEDs) and the OneFS key management system.
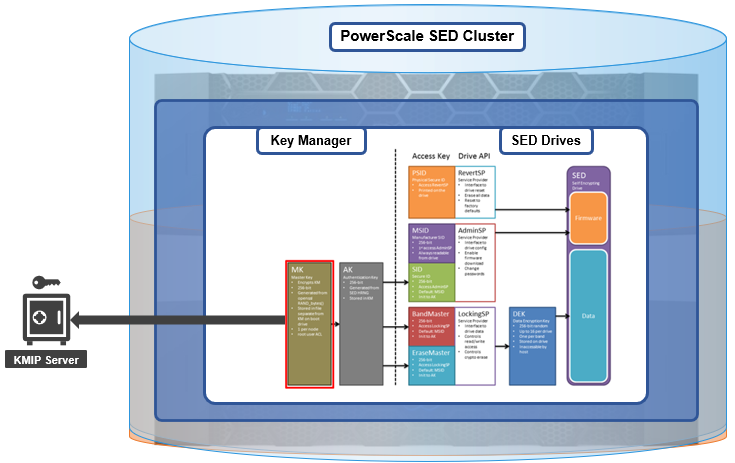
A 256-bit key (MK) encrypts the Key Manager Database (KMDB) for SED and cluster domains. In OneFS 9.2 and later, the MK for SEDs can either be stored off-cluster on a KMIP server or locally on a node (the legacy behavior).
However, there are a variety of other consumers of the OneFS key manager, in addition to DARE. These include services and protocols such as:
| Service | Description |
|---|---|
CELOG | Cluster event log |
CloudPools | Cluster tier to cloud service |
Electronic mail | |
FTP | File transfer protocol |
IPMI | Intelligent platform management interface for remote cluster console access |
JWT | JSON web tokens |
NDMP | Network data management protocol for cluster backups and DR |
Pstore | Active directory and Kerberos password store |
S3 | S3 object protocol |
SyncIQ | Cluster replication service |
SmartSync | OneFS push and pull replication cluster and cloud replication service |
SNMP | Simple network monitoring protocol |
SRS | Old Dell support remote cluster connectivity |
SSO | Single sign-on |
SupportAssist | Remote cluster connectivity to Dell Support |
OneFS 9.5 introduces a number of enhancements to the venerable key manager, including:
- The ability to rekey keystores. Rekey operation will generate a new MK and re-encrypt all entries stored with the new key.
- New CLI commands and WebUI options to perform a rekey operation or schedule key rotation on a time interval.
- New commands to monitor the progress and status of a rekey operation.
As such, OneFS 9.5 now provides the ability to rekey the MK, irrespective of where it is stored.
Note that when you are upgrading from an earlier OneFS release, the new rekey functionality is only available once the OneFS 9.5 upgrade has been committed.
Under the hood, each provider store in the key manager consists of secure backend storage and an MK. Entries are kept in a SQLite database or key-value store. A provider datastore uses its MK to encrypt all its entries within the store.
During the rekey process, the old MK is only deleted after a successful re-encryption with the new MK. If for any reason the process fails, the old MK is available and remains as the current MK. The rekey daemon retries the rekey every 15 minutes if the process fails.
The OneFS rekey process is as follows:

- A new MK is generated, and internal configuration is updated.
- Any entries in the provider store are decrypted and encrypted with the new MK.
- If the prior steps are successful, the previous MK is deleted.
To support the rekey process, the MK in OneFS 9.5 now has an ID associated with it. All entries have a new field referencing the MK ID.
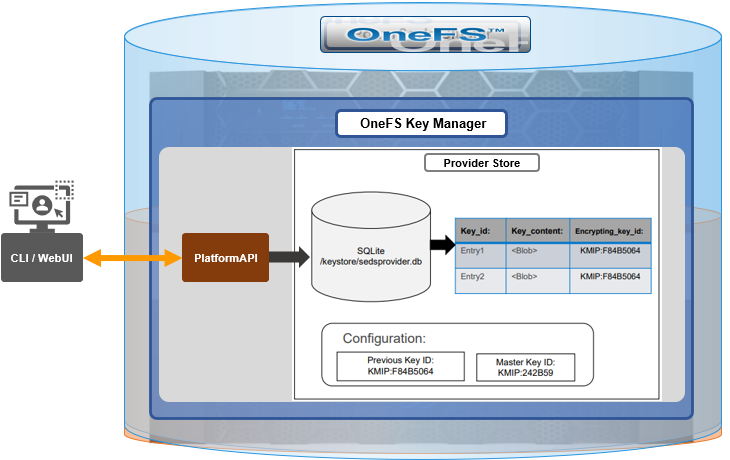
During the rekey operation, there are two MK values with different IDs, and all entries in the database will associate which key they are encrypted by.
In OneFS 9.5, the rekey configuration and management is split between the cluster keys and the SED keys:
| Rekey component | Detail |
|---|---|
SED |
|
Cluster |
|
SED keys rekey

The SED key manager rekey operation can be managed through a DARE cluster’s CLI or WebUI, and it can either be automatically scheduled or run manually on demand. The following CLI syntax can be used to manually initiate a rekey:
# isi keymanager sed rekey start
Alternatively, to schedule a rekey operation, for example, to schedule a key rotation every two months:
# isi keymanager sed rekey modify --key-rotation=2m
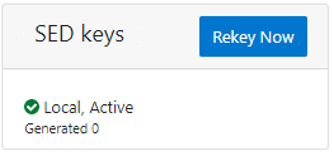
The key manager status for SEDs can be viewed as follows:
# isi keymanager sed status
 Node Status  Location   Remote Key ID  Key Creation Date   Error Info(if any)
-----------------------------------------------------------------------------
1   LOCAL   Local                    1970-01-01T00:00:00
-----------------------------------------------------------------------------
Total: 1
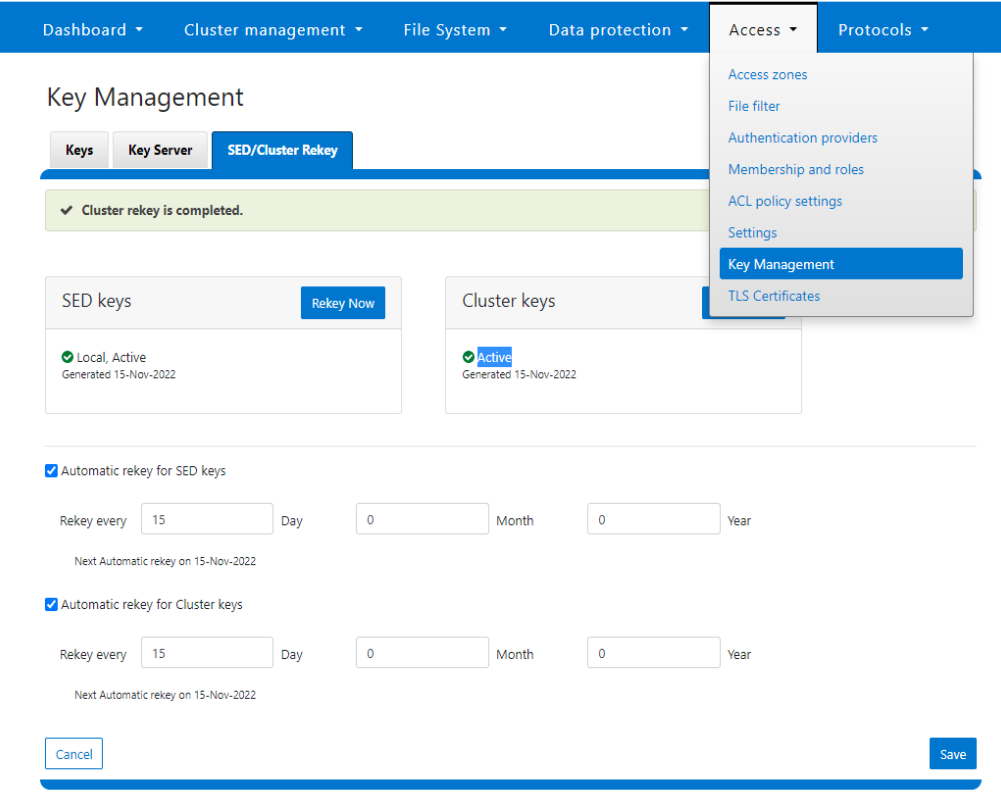
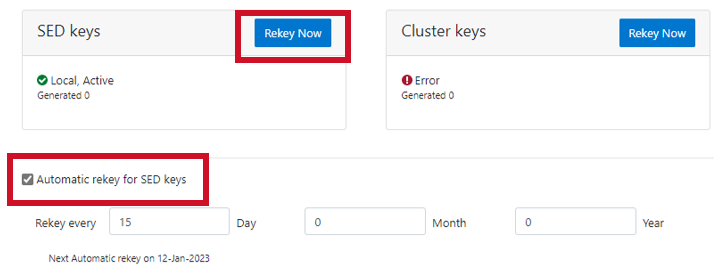
Alternatively, from the WebUI, go to Access > Key Management > SED/Cluster Rekey, select Automatic rekey for SED keys, and configure the rekey frequency:
Note that for SED rekey operations, if a migration from local cluster key management to a KMIP server is in progress, the rekey process will begin once the migration is complete.
Cluster keys rekey

As mentioned previously, OneFS 9.5 also supports the rekey of cluster keystore domains. This cluster rekey operation is available through the CLI and the WebUI and may either be scheduled or run on demand. The available cluster domains can be queried by running the following CLI syntax:
# isi keymanager cluster status
Domain     Status  Key Creation Date   Error Info(if any)
----------------------------------------------------------
CELOG      ACTIVE  2023-04-06T09:19:16
CERTSTORE  ACTIVE  2023-04-06T09:19:16
CLOUDPOOLS ACTIVE   2023-04-06T09:19:16
EMAIL      ACTIVE  2023-04-06T09:19:16
FTP        ACTIVE  2023-04-06T09:19:16
IPMI_MGMT  IN_PROGRESS  2023-04-06T09:19:16
JWT        ACTIVE  2023-04-06T09:19:16
LHOTSE     ACTIVE  2023-04-06T09:19:11
NDMP       ACTIVE  2023-04-06T09:19:16
NETWORK    ACTIVE  2023-04-06T09:19:16
PSTORE     ACTIVE  2023-04-06T09:19:16
RICE       ACTIVE  2023-04-06T09:19:16
S3         ACTIVE  2023-04-06T09:19:16
SIQ        ACTIVE  2023-04-06T09:19:16
SNMP       ACTIVE  2023-04-06T09:19:16
SRS        ACTIVE  2023-04-06T09:19:16
SSO        ACTIVE  2023-04-06T09:19:16
----------------------------------------------------------
Total: 17
The rekey process generates a new key and re-encrypts the entries for the domain. The old key is then deleted.
Performance-wise, the rekey process does consume cluster resources (CPU and disk) as a result of the re-encryption phase, which is fairly write-intensive. As such, a good practice is to perform rekey operations outside of core business hours or during scheduled cluster maintenance windows.
During the rekey process, the old MK is only deleted once a successful re-encryption with the new MK has been confirmed. In the event of a rekey process failure, the old MK is available and remains as the current MK.
A rekey may be requested immediately or may be scheduled with a cadence. The rekey operation is available through the CLI and the WebUI. In the WebUI, go to Access > Key Management > SED/Cluster Rekey.
To start a rekey of the cluster domains immediately, from the CLI run the following syntax:
# isi keymanager cluster rekey start
Are you sure you want to rekey the master passphrase? (yes/[no]):yes
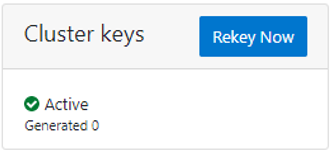
Alternatively, from the WebUI, go to Access under the SED/Cluster Rekey tab, and click Rekey Now next to Cluster keys:

A scheduled rekey of the cluster keys (excluding the SED keys) can be configured from the CLI with the following syntax:
# isi keymanager cluster rekey modify –-key-rotation [YMWDhms]
Specify the frequency of the Key Rotation field as an integer, using Y for years, M for months, W for weeks, D for days, h for hours, m for minutes, and s for seconds. For example, the following command will schedule the cluster rekey operation to run every six weeks:
# isi keymanager cluster rekey view
 Rekey Time: 1970-01-01T00:00:00
 Key Rotation: Never
 # isi keymanager cluster rekey modify --key-rotation 6W
 # isi keymanager cluster rekey view
 Rekey Time: 2023-04-28T18:38:45
 Key Rotation: 6W
The rekey configuration can be easily reverted back to on demand from a schedule as follows:
# isi keymanager cluster rekey modify --key-rotation Never
 # isi keymanager cluster rekey view
 Rekey Time: 2023-04-28T18:38:45
 Key Rotation: Never
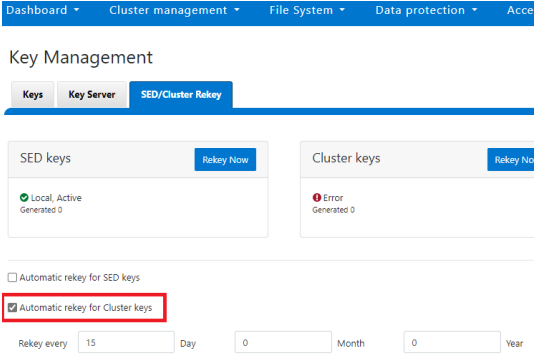
Alternatively, from the WebUI, under the SED/Cluster Rekey tab, select the Automatic rekey for Cluster keys checkbox and specify the rekey frequency. For example:
In an event of a rekeying failure, a CELOG KeyManagerRekeyFailed or KeyManagerSedsRekeyFailed event is created. Since SED rekey is a node-local operation, the KeyManagerSedsRekeyFailed event information will also include which node experienced the failure.
Additionally, current cluster rekey status can also be queried with the following CLI command:
# isi keymanager cluster status
Domain     Status  Key Creation Date   Error Info(if any)
----------------------------------------------------------
CELOG      ACTIVE  2023-04-06T09:19:16
CERTSTORE  ACTIVE  2023-04-06T09:19:16
CLOUDPOOLS ACTIVE   2023-04-06T09:19:16
EMAIL      ACTIVE  2023-04-06T09:19:16
FTP        ACTIVE  2023-04-06T09:19:16
IPMI_MGMT  ACTIVE  2023-04-06T09:19:16
JWT        ACTIVE  2023-04-06T09:19:16
LHOTSE     ACTIVE  2023-04-06T09:19:11
NDMP       ACTIVE  2023-04-06T09:19:16
NETWORK    ACTIVE  2023-04-06T09:19:16
PSTORE     ACTIVE  2023-04-06T09:19:16
RICE       ACTIVE  2023-04-06T09:19:16
S3         ACTIVE  2023-04-06T09:19:16
SIQ        ACTIVE  2023-04-06T09:19:16
SNMP       ACTIVE  2023-04-06T09:19:16
SRS        ACTIVE  2023-04-06T09:19:16
SSO        ACTIVE  2023-04-06T09:19:16
----------------------------------------------------------
Total: 17
Or, for SEDs rekey status:
# isi keymanager sed status
 Node Status  Location   Remote Key ID  Key Creation Date   Error Info(if any)
-----------------------------------------------------------------------------
1   LOCAL   Local                    1970-01-01T00:00:00
2   LOCAL   Local                    1970-01-01T00:00:00
3   LOCAL   Local                    1970-01-01T00:00:00
4   LOCAL   Local                    1970-01-01T00:00:00
-----------------------------------------------------------------------------
Total: 4
The rekey process also outputs to the /var/log/isi_km_d.log file, which is a useful source for additional troubleshooting.
If an error in rekey occurs, the previous MK is not deleted, so entries in the provider store can still be created and read as normal. The key manager daemon will retry the rekey operation in the background every 15 minutes until it succeeds.
Author: Nick Trimbee

OneFS Password Security Policy
Mon, 24 Jul 2023 20:08:49 -0000
|Read Time: 0 minutes
Among the slew of security enhancements introduced in OneFS 9.5 is the ability to mandate a more stringent password policy. This is required to comply with security requirements such as the U.S. military STIG, which stipulates:
| Requirement | Description |
|---|---|
Length | An OS or network device must enforce a minimum 15-character password length. |
Percentage | An OS must require the change of at least 50% of the total number of characters when passwords are changed. |
Position | A network device must require that when a password is changed, the characters are changed in at least eight of the positions within the password. |
Temporary password | The OS must allow the use of a temporary password for system logons with an immediate change to a permanent password. |
The OneFS password security architecture can be summarized as follows:
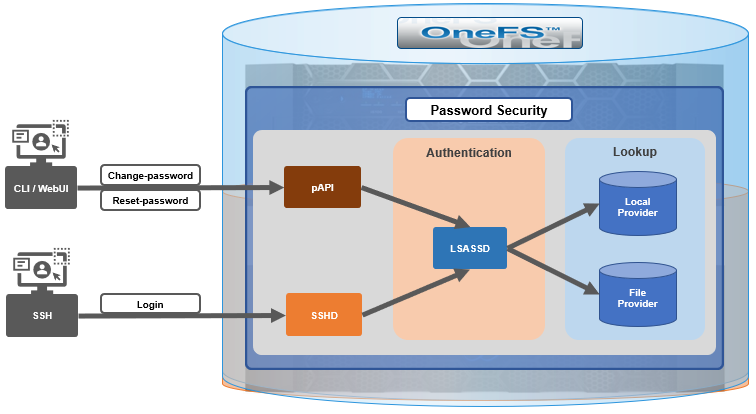
Within the OneFS security subsystem, authentication is handled in OneFS by LSASSD, the daemon used to service authentication requests for lwiod.
| Component | Description |
|---|---|
LSASSD | The local security authority subsystem service (LSASS) handles authentication and identity management as users connect to the cluster. |
File provider | The file provider includes users from /etc/password and groups from /etc/groups. |
Local provider | The local provider includes local cluster accounts such as anonymous, guest, and so on. |
SSHD | The OpenSSH Daemon provides secure encrypted communications between a client and a cluster node over an insecure network. |
pAPI | The OneFS Platform API provides programmatic interfaces to OneFS configuration and management through a RESTful HTTPS service. |
In OneFS AIMA, there are several different kinds of backend providers: Local provider, file provider, AD provider, NIS provider, and so on. Each provider is responsible for the management of users and groups inside the provider. For OneFS password policy enforcement, the local and file providers are the focus.
The local provider is based on an SamDB style file stored with prefix path of /ifs/.ifsvar, and its provider settings can be viewed by the following CLI syntax:
# isi auth local view System
On the other hand, the file provider is based on the FreeBSD spwd.db file, and its configuration can be viewed by the following CLI command:
# isi auth file view System
Each provider stores and manage its own users. For the local provider, isi auth users create CLI command will create a user inside the provider by default. However, for the file provider, there is no corresponding command. Instead, the OneFS pw CLI command can be used to create a new file provider user.
After the user is created, the isi auth users modify <USER> CLI command can be used to change the attributes of the user for both the file and local providers. However, not all attributes are supported for both providers. For example, the file provider does not support password expiry.
The fundamental password policy CLI changes introduced in OneFS 9.5 are as follows:
| Operation | OneFS 9.5 change | Details |
|---|---|---|
change-password | Modified | Needed to provide old password for changing so that we can calculate how many chars/percent changed |
reset-password | Added | Generates a temp password that meets current password policy for user to log in |
set-password | Deprecated | Doesn't need to provide old password |
A user’s password can now be set, changed, and reset by either root or admin. This is supported by the new isi auth users change-password or isi auth users reset-password CLI command syntax. The latter, for example, returns a temporary password and requires the user to change it on next login. After logging in with the temporary (albeit secure) password, OneFS immediately forces the user to change it:
# whoami
admin
# isi auth users reset-password user1
4$_x\d\Q6V9E:sH
# ssh user1@localhost
(user1@localhost) Password:
(user1@localhost) Your password has expired.
You are required to immediately change your password.
Changing password for user1
New password:
(user1@localhost) Re-enter password:
Last login: Wed May 17 08:02:47 from 127.0.0.1
PowerScale OneFS 9.5.0.0
# whoami
user1
Also in OneFS 9.5 and later, the CLI isi auth local view system command sees the addition of four new fields:
- Password Chars Changed
- Password Percent Changed
- Password Hash Type
- Max Inactivity Days
For example:
# isi auth local view system
                    Name: System
                  Status: active
          Authentication: Yes
    Create Home Directory: Yes
 Home Directory Template: /ifs/home/%U
        Lockout Duration: Now
       Lockout Threshold: 0
          Lockout Window: Now
             Login Shell: /bin/zsh
            Machine Name:
        Min Password Age: Now
        Max Password Age: 4W
      Min Password Length: 0
     Password Prompt Time: 2W
      Password Complexity: -
 Password History Length: 0
   Password Chars Changed: 0
Password Percent Changed: 0
      Password Hash Type: NTHash
      Max Inactivity Days: 0
The following CLI command syntax configures OneFS to require a minimum password length of 15 characters, a 50% or greater change, and 8 or more characters to be altered for a successful password reset:
# isi auth local modify system --min-password-length 15 --password-chars-changed 8 --password-percent-changed 50
Next, a command is issued to create a new user, user2, with a 10-character password:
# isi auth users create user2 --password 0123456789
Failed to add user user1: The specified password does not meet the configured password complexity or history requirements
This attempt fails because the password does not meet the configured password criteria (15 chars, 50% change, 8 chars to be altered).
Instead, the password for the new account, user2, is set to an appropriate value: 0123456789abcdef. Also, the --prompt-password-change flag is used to force the user to change their password on next login.
# isi auth users create user2 --password 0123456789abcdef –prompt-password-change 1
When the user logs in to the user2 account, OneFS immediately prompts for a new password. In the following example, a non-compliant password (012345678zyxw) is entered.
0123456789abcdef -> 012345678zyxw = Failure
This returns an unsuccessful change attempt failure because it does not meet the 15-character minimum:
# su user2
New password:
Re-enter password:
The specified password does not meet the configured password complexity requirements.
Your password must meet the following requirements:
  * Must contain at least 15 characters.
  * Must change at least 8 characters.
  * Must change at least 50% of characters.
New password:
Instead, a compliant password and successful change could be:
0123456789abcdef -> 0123456zyxwvuts = Success
The following command can also be used to change the password for a user. For example, to update user2’s password:
# isi auth users change-password user2
Current password (hit enter if none):
New password:
Confirm new password:
If a non-compliant password is entered, the following error is returned:
Password change failed: The specified password does not meet the configured password complexity or history requirements
When employed, OneFS hardening automatically enforces security-based configurations. The hardening engine is profile-based, and its STIG security profile is predicated on security mandates specified in the U.S. Department of Defense (DoD) Security Requirements Guides (SRGs) and Security Technical Implementation Guides (STIGs).
On applying the STIG hardening security profile to a cluster (isi hardening apply --profile=STIG), the password policy settings are automatically reconfigured to the following values:
| Field | Normal value | STIG hardened |
|---|---|---|
Lockout Duration | Now | Now |
Lockout Threshold | 0 | 3 |
Lockout Window | Now | 15m |
Min Password Age | Now | 1D |
Max Password Age | 4W | 8W4D |
Min Password Length | 0 | 15 |
Password Prompt Time | 2W | 2W |
Password Complexity | - | lowercase, numeric, repeat, symbol, uppercase |
Password History Length | 0 | 5 |
Password Chars Changed | 0 | 8 |
Password Percent Changed | 0 | 50 |
Password Hash Type | NTHash | SHA512 |
Max Inactivity Days | 0 | 35 |
For example:
# uname -or
Isilon OneFS 9.5.0.0

# isi hardening list
Name  Description                       Status
---------------------------------------------------
STIG  Enable all STIG security settings Applied
---------------------------------------------------
Total: 1

# isi auth local view system
                    Name: System
                  Status: active
          Authentication: Yes
   Create Home Directory: Yes
 Home Directory Template: /ifs/home/%U
        Lockout Duration: Now
       Lockout Threshold: 3
          Lockout Window: 15m
             Login Shell: /bin/zsh
             Machine Name:
        Min Password Age: 1D
        Max Password Age: 8W4D
     Min Password Length: 15
    Password Prompt Time: 2W
     Password Complexity: lowercase, numeric, repeat, symbol, uppercase
 Password History Length: 5
  Password Chars Changed: 8
Password Percent Changed: 50
      Password Hash Type: SHA512
     Max Inactivity Days: 35
Note that Password Hash Type is changed from the default NTHash to the more secure SHA512 encoding, in addition to setting the various password criteria.
The OneFS 9.5 WebUI also sees several additions and alterations to the Password policy page. These include:
| Operation | OneFS 9.5 change | Details |
|---|---|---|
Policy page | Added | New Password policy page under Access > Membership and roles |
reset-password | Added | Generates a random password that meets current password policy for user to log in |
The most obvious change is the transfer of the policy configuration elements from the local provider page to a new dedicated Password policy page.
Here’s the OneFS 9.4 View a local provider page, under Access > Authentication providers > Local providers > System:
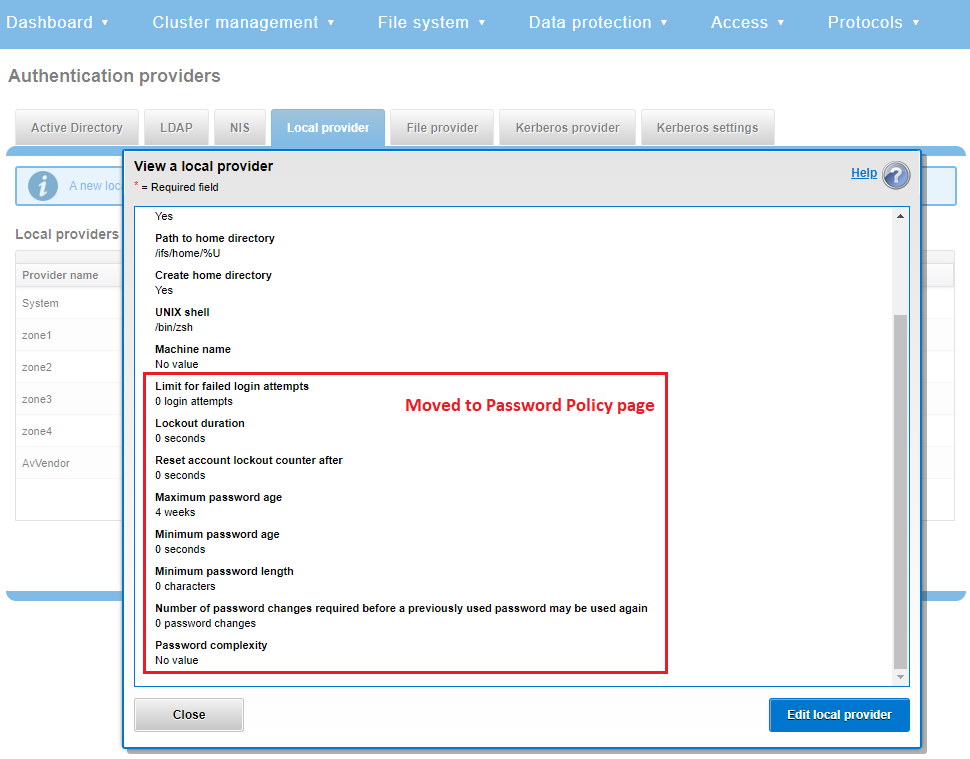
This is replaced and augmented in the OneFS 9.5 WebUI with the following page, located under Access > Membership and roles > Password policy:
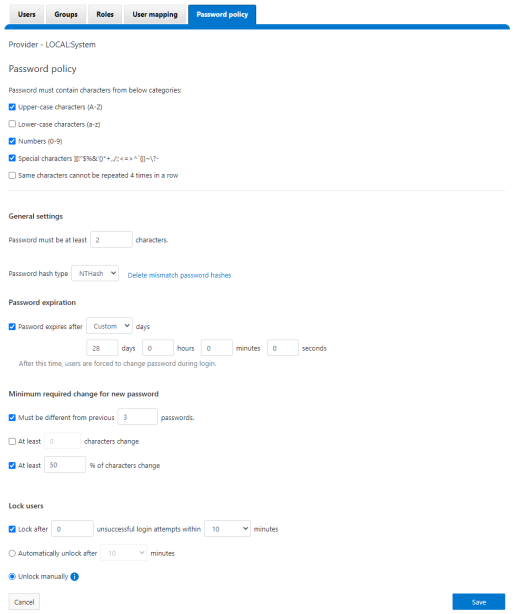
New password policy configuration options are included to require uppercase, lowercase, numeric, or special characters and limit the number of contiguous repeats of a character, and so on.
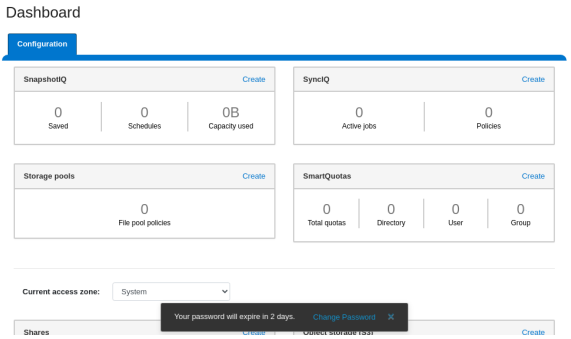
When it comes to changing a password, only a permitted user can make their change. This can be performed from a couple of locations in the WebUI. First, the user options on the task bar at the top of each screen now provides a Change password option:

A pop-up warning message will also be displayed by the WebUI, informing the user when password expiration is imminent. This warning provides a Change Password link:
Clicking on the Change Password link displays the following page:
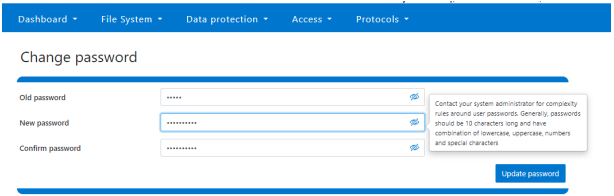
A new password complexity tool-tip message is also displayed, informing the user of safe password selection.
Note that re-login is required after a password change.
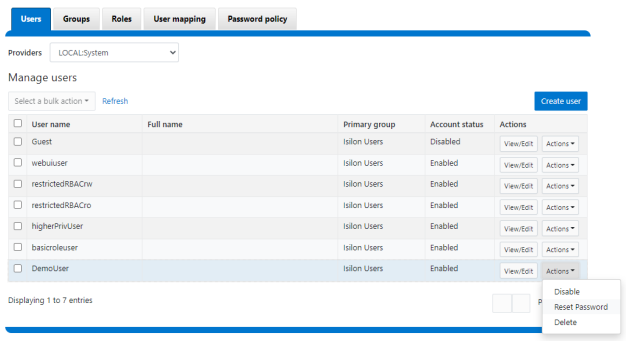
On the Users page under Access > Membership and roles > Users, the Action drop-down list on the now also contains a Reset Password option:
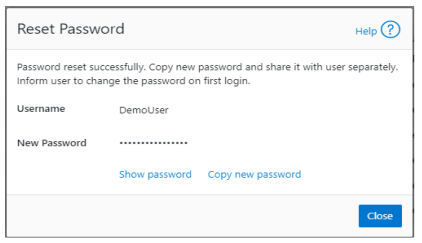
The successful reset confirmation pop-up offers both a show and copy option, while informing the cluster administrator to share the new password with the user, and for them to change their password during their next login:
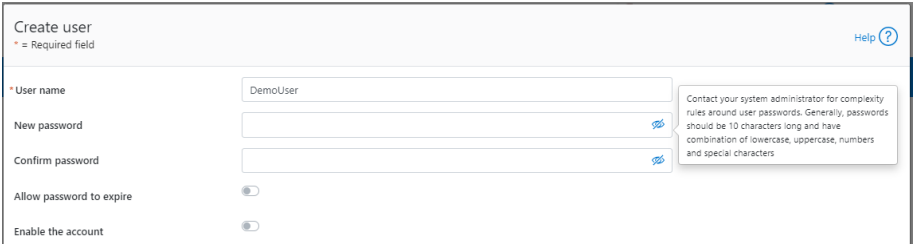
The Create user page now provides an additional field that requires password confirmation. Additionally, the password complexity tool-tip message is also displayed:
The redesigned Edit user details page no longer provides a field to edit the password directly:
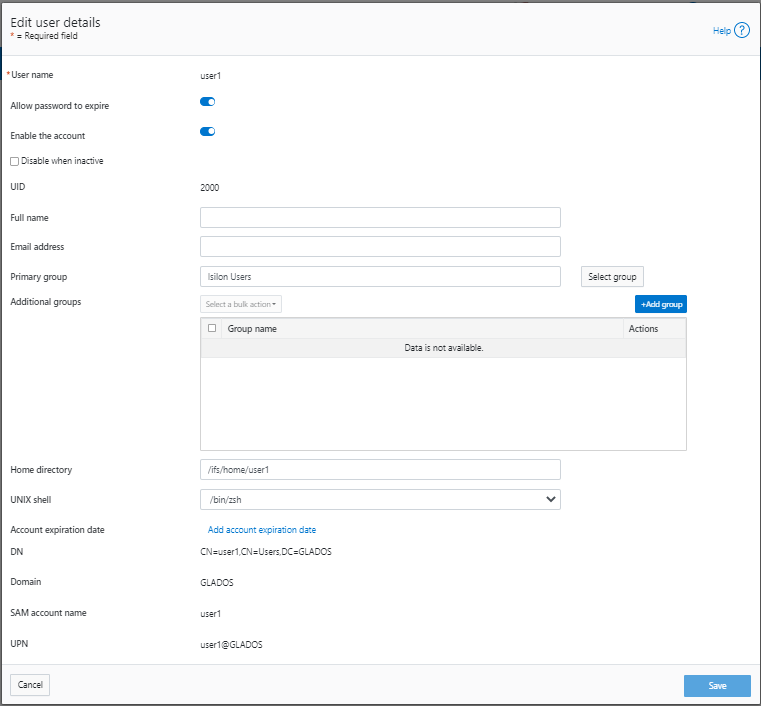
Instead, the Action drop-down list on the Users page now contains a Reset Password option.
Author: Nick Trimbee