


OneFS Data Reduction and Efficiency Reporting

Among the objectives of OneFS reduction and efficiency reporting is to provide ‘industry standard’ statistics, allowing easier comprehension of cluster efficiency. It’s an ongoing process, and prior to OneFS 9.2 there was limited tracking of certain filesystem statistics – particularly application physical and filesystem logical – which meant that data reduction and storage efficiency ratios had to be estimated. This is no longer the case, and OneFS 9.2 and later provides accurate data reduction and efficiency metrics at a per-file, quota, and cluster-wide granularity.
The following table provides descriptions for the various OneFS reporting metrics, while also attempting to rationalize their naming conventions with other general industry terminology:
OneFS Metric | Also Known As | Description |
Protected logical | Application logical | Data size including sparse data, zero block eliminated data, and CloudPools data stubbed to a cloud tier. |
Logical data | Effective
Filesystem logical | Data size excluding protection overhead and sparse data, and including data efficiency savings (compression and deduplication). |
Zero-removal saved |
| Capacity savings from zero removal. |
Dedupe saved |
| Capacity savings from deduplication. |
Compression saved |
| Capacity savings from in-line compression. |
Preprotected physical | Usable
Application physical | Data size excluding protection overhead and including storage efficiency savings. |
Protection overhead |
| Size of erasure coding used to protect data. |
Protected physical | Raw
Filesystem physical | Total footprint of data including protection overhead FEC erasure coding) and excluding data efficiency savings (compression and deduplication). |
Dedupe ratio |
| Deduplication ratio. Will be displayed as 1.0:1 if there are no deduplicated blocks on the cluster. |
Compression ratio |
| Usable reduction ratio from compression, calculated by dividing ‘logical data’ by ‘preprotected physical’ and expressed as x:1. |
Inlined data ratio |
| Efficiency ratio from storing small files’ data within their inodes, thereby not requiring any data or protection blocks for their storage. |
Data reduction ratio | Effective to Usable | Usable efficiency ratio from compression and deduplication. Will display the same value as the compression ratio if there is no deduplication on the cluster. |
Efficiency ratio | Effective to Raw | Overall raw efficiency ratio expressed as x:1 |
So let’s take these metrics and look at what they represent and how they’re calculated.
- Application logical, or protected logical, is the application data that can be written to the cluster, irrespective of where it’s stored.
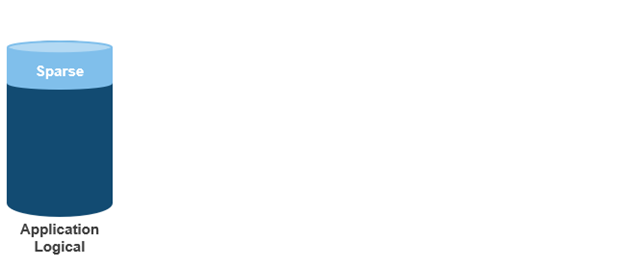
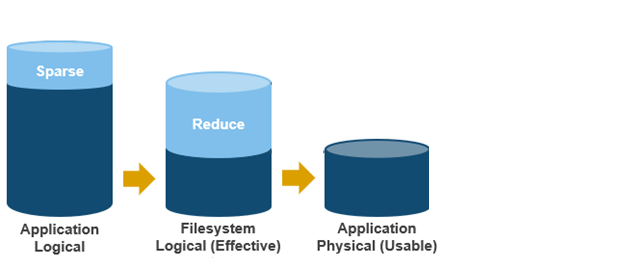
- Removing the sparse data from application logical results in filesystem logical, also known simply as logical data or effective. This can be data that was always sparse, was zero block eliminated, or data that has been tiered off-cluster by means of CloudPools, and so on.
(Note that filesystem logical was not accurately tracked in releases prior to OneFS 9.2, so metrics prior to this were somewhat estimated.)
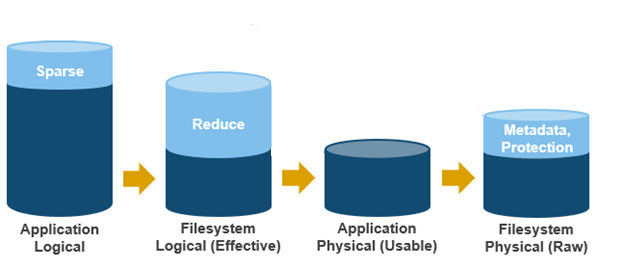
- Next, data reduction techniques such as compression and deduplication further reduce filesystem logical to application physical, or pre-protected physical. This is the physical size of the application data residing on the filesystem drives, and does not include metadata, protection overhead, or data moved to the cloud.
- Filesystem physical is application physical with data protection overhead added – including inode, mirroring, and FEC blocks. Filesystem physical is also referred to as protected physical.
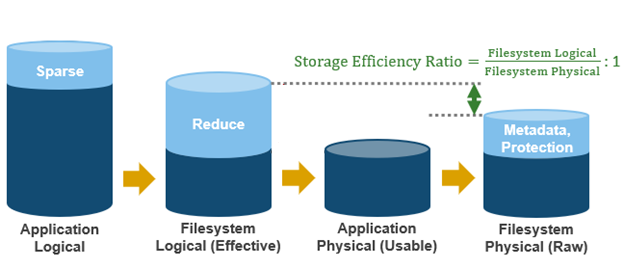
- The data reduction ratio is the amount that’s been reduced from the filesystem logical down to the application physical.

- Finally, the storage efficiency ratio is the filesystem logical divided by the filesystem physical.
With the enhanced data reduction reporting in OneFS 9.2 and later, the actual statistics themselves are largely the same, just calculated more accurately.

The storage efficiency data was available in releases prior to OneFS 9.2, albeit somewhat estimated, but the data reduction metrics were introduced with OneFS 9.2.
The following tools are available to query these reduction and efficiency metrics at file, quota, and cluster-wide granularity:
Realm | OneFS Command | OneFS Platform API |
File | isi get -D | |
Quota | isi quota list -v | 12/quota/quotas |
Cluster-wide | isi statistics data-reduction | 1/statistics/current?key=cluster.data.reduce.* |
Detailed Cluster-wide | isi_cstats | 1/statistics/current?key=cluster.cstats.* |
Note that the ‘isi_cstats’ CLI command provides some additional, behind-the-scenes details. The interface goes through platform API to fetch these stats.
The ‘isi statistics data-reduction’ CLI command is the most comprehensive of the data reduction reporting CLI utilities. For example:
# isi statistics data-reduction
                      Recent Writes Cluster Data Reduction
                           (5 mins)
--------------------- ------------- ----------------------
Logical data                  6.18M                  6.02T
Zero-removal saved                0                      -
Deduplication saved          56.00k                  3.65T
Compression saved             4.16M                  1.96G
Preprotected physical         1.96M                  2.37T
Protection overhead           5.86M                910.76G
Protected physical            7.82M                  3.40T
Zero removal ratio         1.00 : 1                      -
Deduplication ratio        1.01 : 1               2.54 : 1
Compression ratio          3.12 : 1               1.02 : 1
Data reduction ratio       3.15 : 1               2.54 : 1
Inlined data ratio         1.04 : 1               1.00 : 1
Efficiency ratio           0.79 : 1               1.77 : 1
The ‘recent writes’ data in the first column provides precise statistics for the five-minute period prior to running the command. By contrast, the ‘cluster data reduction’ metrics in the second column are slightly less real-time but reflect the overall data and efficiencies across the cluster. Be aware that, in OneFS 9.1 and earlier, the right-hand column metrics are designated by the ‘Est’ prefix, denoting an estimated value. However, in OneFS 9.2 and later, the ‘logical data’ and ‘preprotected physical’ metrics are tracked and reported accurately, rather than estimated.
The ratio data in each column is calculated from the values above it. For instance, to calculate the data reduction ratio, the ‘logical data’ (effective) is divided by the ‘preprotected physical’ (usable) value. From the output above, this would be:
6.02 / 2.37 = 1.76 Or a Data Reduction ratio of 2.54:1
Similarly, the ‘efficiency ratio’ is calculated by dividing the ‘logical data’ (effective) by the ‘protected physical’ (raw) value. From the output above, this yields:
6.02 / 3.40 = 0.97 Or an Efficiency ratio of 1.77:1
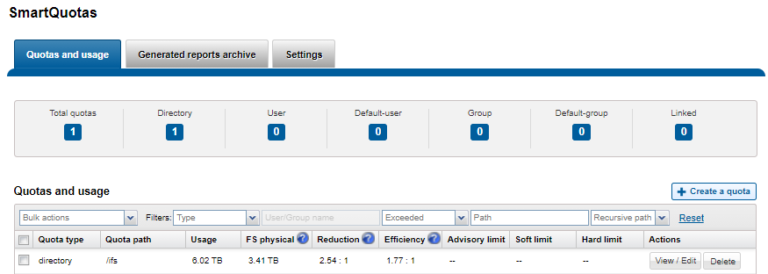
OneFS SmartQuotas reports the capacity saving from in-line data reduction as a storage efficiency ratio. SmartQuotas reports efficiency as a ratio across the desired data set as specified in the quota path field. The efficiency ratio is for the full quota directory and its contents, including any overhead, and reflects the net efficiency of compression and deduplication. On a cluster with licensed and configured SmartQuotas, this efficiency ratio can be easily viewed from the WebUI by navigating to File System > SmartQuotas > Quotas and Usage. In OneFS 9.2 and later, in addition to the storage efficiency ratio, the data reduction ratio is also displayed.
Similarly, the same data can be accessed from the OneFS command line by using the ‘isi quota quotas list’ CLI command. For example:
# isi quota quotas list
Type    AppliesTo   Path  Snap  Hard   Soft  Adv  Used   Reduction  Efficiency
----------------------------------------------------------------------------
directory DEFAULT    /ifs   No    -     -      -    6.02T 2.54 : 1   1.77 : 1
----------------------------------------------------------------------------
Total: 1
More detail, including both the physical (raw) and logical (effective) data capacities, is also available by using the ‘isi quota quotas view <path> <type>’ CLI command. For example:
# isi quota quotas view /ifs directory
                        Path: /ifs
                        Type: directory
                   Snapshots: No
                    Enforced: No
                   Container: No
                      Linked: No
                       Usage
                           Files: 5759676
         Physical(With Overhead): 6.93T
        FSPhysical(Deduplicated): 3.41T
         FSLogical(W/O Overhead): 6.02T
        AppLogical(ApparentSize): 6.01T
                   ShadowLogical: -
                    PhysicalData: 2.01T
                      Protection: 781.34G
     Reduction(Logical/Data): 2.54 : 1
Efficiency(Logical/Physical): 1.77 : 1
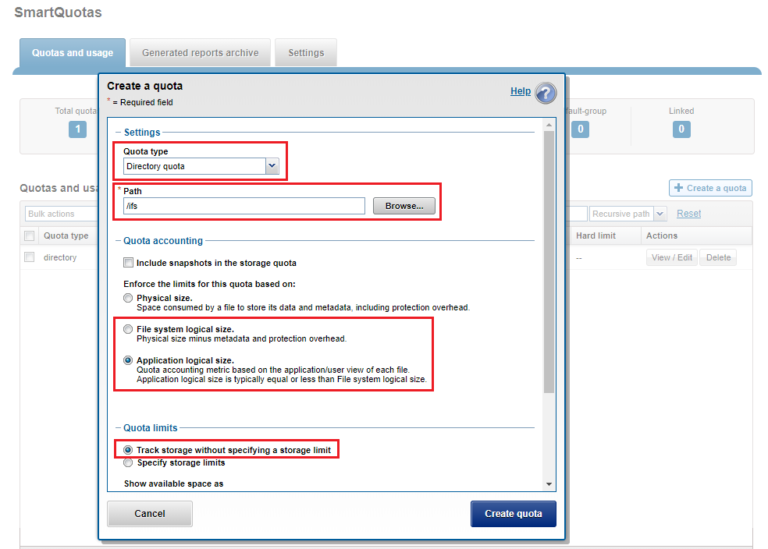
To configure SmartQuotas for in-line data efficiency reporting, create a directory quota at the top-level file system directory of interest, for example /ifs. Creating and configuring a directory quota is a simple procedure and can be performed from the WebUI by navigating to File System > SmartQuotas > Quotas and Usage and selecting Create a Quota. In the Create a quota dialog, set the Quota type to ‘Directory quota’, add the preferred top-level path to report on, select ’Application logical size’ for Quota Accounting, and set the Quota Limits to ‘Track storage without specifying a storage limit’. Finally, click the ‘Create Quota’ button to confirm the configuration and activate the new directory quota.
The efficiency ratio is a single, current-in time efficiency metric that is calculated per quota directory and includes the sum of in-line compression, zero block removal, in-line dedupe, and SmartDedupe. This is in contrast to a history of stats over time, as reported in the ‘isi statistics data-reduction’ CLI command output, described above. As such, the efficiency ratio for the entire quota directory will reflect what is actually there.
Author: Nick Trimbee
Related Blog Posts

Understanding ‘Total inlined data savings’ When Using ’isi_cstats’
Thu, 12 May 2022 14:22:45 -0000
|Read Time: 0 minutes
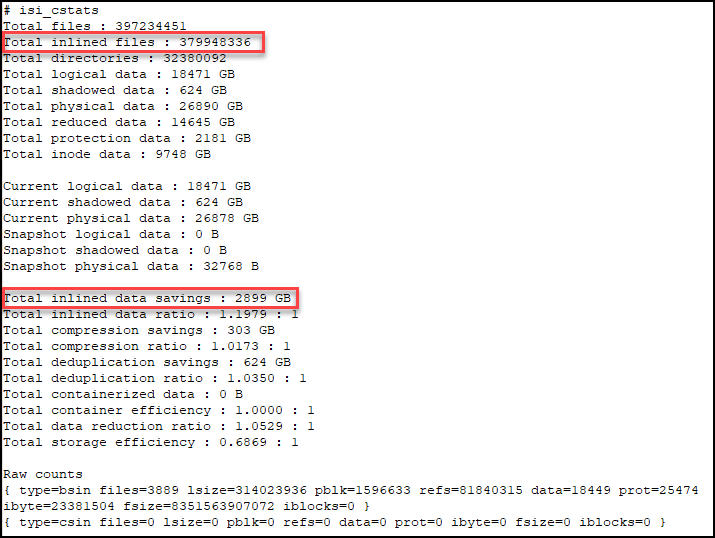
Recently a customer contacted us to tell us that he thought that there was an error in the output of the OneFS CLI command ‘isi_cstats’. Starting with OneFS 9.3, the ‘isi_cstats’ command includes the accounted number of inlined files within /ifs. It also contains a statistic called “Total inlined data savings”.
This customer expected that the ‘Total inlined data savings’ number was simply ‘Total inlined files’ multiplied by 8KB. The reason he thought this number was wrong was that this number does not consider the protection level.
In OneFS, for the 2d:1n protection level, each file smaller than 128KB is stored as 3X mirrors. Take the screenshot below as an example.
If we do some calculation here,
379,948,336 * 8KB = 3,039,586,688KiB = 2898.78GiB
we can see that the 2,899GiB from the command output is calculated as one block per inlined file. So, in our example, the customer would think that ‘Total inlined data savings’ should report 2898.78 GiB * 3, because of the 2d:1n protection level.
Well, this statistic is not the actual savings, it is really the logical on-disk cost for all inlined files. We can't accurately report the physical savings because it depends on the non-inlined protection overhead, which can vary. For example:
- If the protection level is 2d:1n, without the data inlining in 8KB inode feature, each of the inlined files would cost 8KB * 3.
- If the protection level is 3d:1n1d, it will become 8KB * 4.
One more thing to consider, if a file is smaller than 8KB after compression, it will be inlined into an inode as well. Therefore, this statistic doesn't represent logical savings either, because it doesn't take compression into account. To report the logical savings, total logical size for all inlined files should be tracked.
To avoid any confusion, we plan to rename this statistic to “Total inline data” in the next version of OneFS. We also plan to show more useful information about total logical data of inlined files, in addition to “Total inline data”.
For more information about the reporting of data reduction features, see the white paper PowerScale OneFS: Data Reduction and Storage Efficiency on the Info Hub.
Author: Yunlong Zhang, Principal Engineering Technologist

OneFS and HTTP Security
Mon, 22 Apr 2024 20:35:30 -0000
|Read Time: 0 minutes
To enable granular HTTP security configuration, OneFS provides an option to disable nonessential HTTP components selectively. This can help reduce the overall attack surface of your infrastructure. Disabling a specific component’s service still allows other essential services on the cluster to continue to run unimpeded. In OneFS 9.4 and later, you can disable the following nonessential HTTP services:
Service | Description |
PowerScaleUI | The OneFS WebUI configuration interface. |
Platform-API-External | External access to the OneFS platform API endpoints. |
Rest Access to Namespace (RAN) | REST-ful access by HTTP to a cluster’s /ifs namespace. |
RemoteService | Remote Support and In-Product Activation. |
SWIFT (deprecated) | Deprecated object access to the cluster using the SWIFT protocol. This has been replaced by the S3 protocol in OneFS. |
You can enable or disable each of these services independently, using the CLI or platform API, if you have a user account with the ISI_PRIV_HTTP RBAC privilege.
You can use the isi http services CLI command set to view and modify the nonessential HTTP services:
# isi http services list
ID                     Enabled
------------------------------
Platform-API-External Yes
PowerScaleUI          Yes
RAN                   Yes
RemoteService         Yes
SWIFT                 No
------------------------------
Total: 5
For example, you can easily disable remote HTTP access to the OneFS /ifs namespace as follows:
# isi http services modify RAN --enabled=0
You are about to modify the service RAN. Are you sure? (yes/[no]): yes
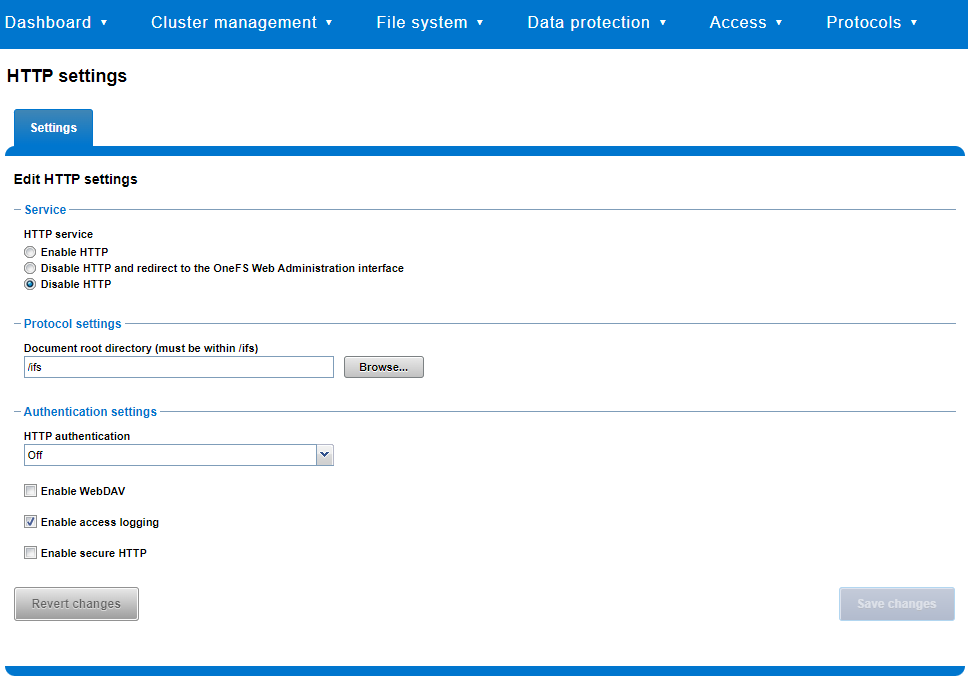
Similarly, you can also use the WebUI to view and edit a subset of the HTTP configuration settings, by navigating to Protocols > HTTP settings:
That said, the implications and impact of disabling each of the services is as follows:
Service | Disabling impacts |
WebUI | The WebUI is completely disabled, and access attempts (default TCP port 8080) are denied with the warning Service Unavailable. Please contact Administrator. If the WebUI is re-enabled, the external platform API service (Platform-API-External) is also started if it is not running. Note that disabling the WebUI does not affect the PlatformAPI service. |
Platform API | External API requests to the cluster are denied, and the WebUI is disabled, because it uses the Platform-API-External service. Note that the Platform-API-Internal service is not impacted if/when the Platform-API-External is disabled, and internal pAPI services continue to function as expected. If the Platform-API-External service is re-enabled, the WebUI will remain inactive until the PowerScaleUI service is also enabled. |
RAN | If RAN is disabled, the WebUI components for File System Explorer and File Browser are also automatically disabled. From the WebUI, attempts to access the OneFS file system explorer (File System > File System Explorer) fail with the warning message Browse is disabled as RAN service is not running. Contact your administrator to enable the service. This same warning also appears when attempting to access any other WebUI components that require directory selection. |
RemoteService | If RemoteService is disabled, the WebUI components for Remote Support and In-Product Activation are disabled. In the WebUI, going to Cluster Management > General Settings and selecting the Remote Support tab displays the message The service required for the feature is disabled. Contact your administrator to enable the service. In the WebUI, going to Cluster Management > Licensing and scrolling to the License Activation section displays the message The service required for the feature is disabled. Contact your administrator to enable the service. |
SWIFT | Deprecated object protocol and disabled by default. |
You can use the CLI command isi http settings view to display the OneFS HTTP configuration:
# isi http settings view
            Access Control: No
      Basic Authentication: No
    WebHDFS Ran HTTPS Port: 8443
                        Dav: No
         Enable Access Log: Yes
                      HTTPS: No
 Integrated Authentication: No
               Server Root: /ifs
                    Service: disabled
           Service Timeout: 8m20s
          Inactive Timeout: 15m
           Session Max Age: 4H
Httpd Controlpath Redirect: No
Similarly, you can manage and change the HTTP configuration using the isi http settings modify CLI command.
For example, to reduce the maximum session age from four to two hours:
# isi http settings view | grep -i age
           Session Max Age: 4H
# isi http settings modify --session-max-age=2H
# isi http settings view | grep -i age
           Session Max Age: 2H
The full set of configuration options for isi http settings includes:
Option | Description |
--access-control <boolean> | Enable Access Control Authentication for the HTTP service. Access Control Authentication requires at least one type of authentication to be enabled. |
--basic-authentication <boolean> | Enable Basic Authentication for the HTTP service. |
--webhdfs-ran-https-port <integer> | Configure Data Services Port for the HTTP service. |
--revert-webhdfs-ran-https-port | Set value to system default for --webhdfs-ran-https-port. |
--dav <boolean> | Comply with Class 1 and 2 of the DAV specification (RFC 2518) for the HTTP service. All DAV clients must go through a single node. DAV compliance is NOT met if you go through SmartConnect, or using 2 or more node IPs. |
--enable-access-log <boolean> | Enable writing to a log when the HTTP server is accessed for the HTTP service. |
--https <boolean> | Enable the HTTPS transport protocol for the HTTP service. |
--https <boolean> | Enable the HTTPS transport protocol for the HTTP service. |
--integrated-authentication <boolean> | Enable Integrated Authentication for the HTTP service. |
--server-root <path> | Document root directory for the HTTP service. Must be within /ifs. |
--service (enabled | disabled | redirect | disabled_basicfile) | Enable/disable the HTTP Service or redirect to WebUI or disabled BasicFileAccess. |
--service-timeout <duration> | The amount of time (in seconds) that the server will wait for certain events before failing a request. A value of 0 indicates that the service timeout value is the Apache default. |
--revert-service-timeout | Set value to system default for --service-timeout. |
--inactive-timeout <duration> | Get the HTTP RequestReadTimeout directive from both the WebUI and the HTTP service. |
--revert-inactive-timeout | Set value to system default for --inactive-timeout. |
--session-max-age <duration> | Get the HTTP SessionMaxAge directive from both WebUI and HTTP service. |
--revert-session-max-age | Set value to system default for --session-max-age. |
--httpd-controlpath-redirect <boolean> | Enable or disable WebUI redirection to the HTTP service. |
Note that while the OneFS S3 service uses HTTP, it is considered a tier-1 protocol, and as such is managed using its own isi s3 CLI command set and corresponding WebUI area. For example, the following CLI command forces the cluster to only accept encrypted HTTPS/SSL traffic on TCP port 9999 (rather than the default TCP port 9021):
# isi s3 settings global modify --https-only 1 –https-port 9921
# isi s3 settings global view
         HTTP Port: 9020
        HTTPS Port: 9999
        HTTPS only: Yes
S3 Service Enabled: Yes
Additionally, you can entirely disable the S3 service with the following CLI command:
# isi services s3 disable
The service 's3' has been disabled.
Or from the WebUI, under Protocols > S3 > Global settings:
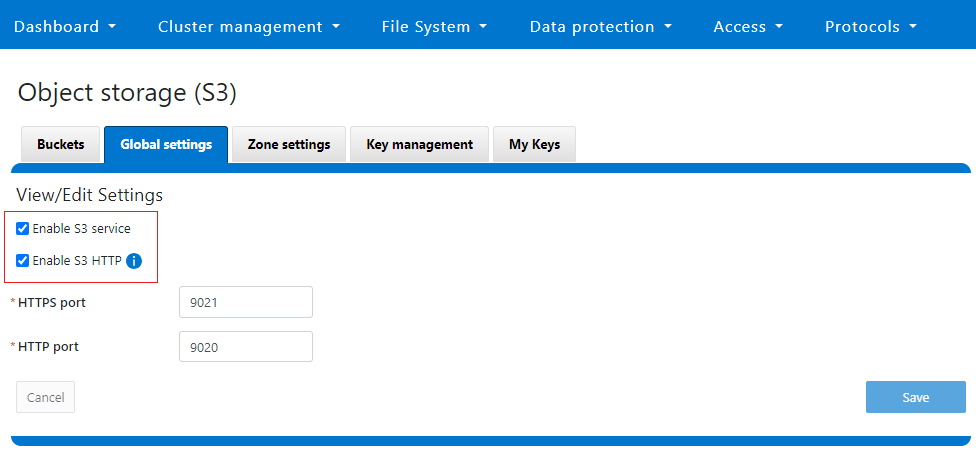
Author: Nick Trimbee