


Deploying ML Application on APEX Private
The purpose of this blog is to show users how to develop applications in the APEX Private Cloud services with VMware Tanzu environment. I will demonstrate this by walking through the steps required to deploy an image recognition application. This initial, hefty, post contains important details that will be helpful for understanding key concepts about the deployment process, so take your time and follow along.
For the machine learning portion of this project, I am using TensorFlow. I researched the framework and I am learning as I go. I’ll share my experiences and explain all the different components that come with this project.
We can break down the process into six sections:
- The environment: APEX Cloud services with VMware Tanzu
- Deploying and testing a custom model with TensorFlow.
- Creating a basic user interface with Python and Flask
- Using Docker to deploy the application locally
- Deploying the application to the APEX Private/Hybrid with VMware Tanzu
- Note: Similar steps can be taken to deploy the application in an APEX Hybrid environment
- Consistent hybrid cloud offering public and private deployment options
The environment: APEX Cloud services with VMware Tanzu
APEX Cloud services offers two options, Private and Hybrid. APEX Private Cloud is based on VMware vSphere Enterprise Plus and VMware vSAN. APEX Hybrid Cloud is built on VMware Cloud Foundation, which allows full automation and workload orchestration spanning a customer’s complete cloud environment.
Here are the details of the appliances and software used in the environment for this walkthrough.
I am using an APEX Private Cloud instance, which is composed of four VxRail nodes (E560F) running version 7.0.203. I have also enabled Tanzu workloads on my instance. For my Tanzu Kubernetes Grid (TKG) cluster (v1.19.7+vmware.1-tkg.1.fc82c41), I am running one control plane node and three worker nodes, running the best-effort-large t-shirt size (4 cores x 16 GB of RAM) and 100 GB of vSAN storage. I am also using a CentOS 8 virtual machine deploy in my APEX Private Cloud instance. The specs of this VM are the same as my TKG nodes, but with 500GB of vSAN storage to hold the training images. This VM will serve as my developer VM to train my custom model and login to my TKG cluster.
Deploying and testing a custom model with TensorFlow.
First, I need to configure my developer machine. To do this, I have to install the latest versions of Docker, Python, TensorFlow, TKG CLI, Kubernetes CLI, and Kompose. I will also use Docker Hub to store the containers, which requires me to log in to my account.
I'll use the official TensorFlow serving container, but there are many other variations available, such as the Bitnami TensorFlow container.
I recommend using the Bitnami container after you are ready to deploy an application to production because it has several security features such as non-root containers.
Note: The details on how to create a custom TensorFlow model are located in the Bitbucket repository.
First, I pull the image from Docker:
$ docker pull tensorflow/serving
Now that the image is on our local machine, I can run the container with our model using the following command:
$ docker run -p 8500:8500 -p 8501:8501 \
   --mount type=bind,source=/path/to/[my_model_name]/,target=/models/[my_model_name]/1 \
--name [container_name] -it tensorflow/serving
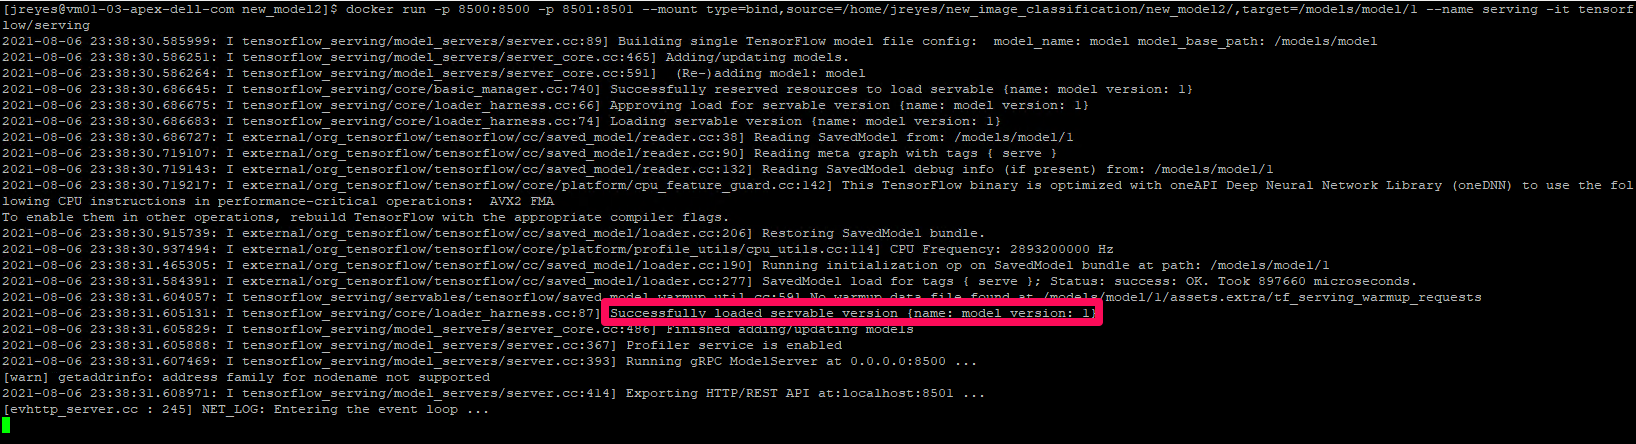
Note: In the mount target, the number 1 after the model name represents the version of your model. You can have various model versions and then specify which version you want the container to run.
Sanity check: If the container can’t find a model, it will keep logging a message indicating the model was not found. If it finds the protobuf file in the expected location, it will display the message highlighted in the previous above. You can also open a new terminal, log into the docker container, and navigate to the models:
/[my_model_name]/1 folder to view the protobuf file:
$ docker exec -it [container_name] /bin/bash
$ ls models/[my_model_name]/1

If for some reason your model didn’t copy during start up, you can manually copy your files to the container:
$ docker cp /path/to/[my_model_name]/ [container_name]:/models/[my_model_name ]/1/
The gRPC port (8500) and the REST API port (8501) were exposed when the container was initialized. In the following steps, I test both protocols to see if they are responding appropriately.
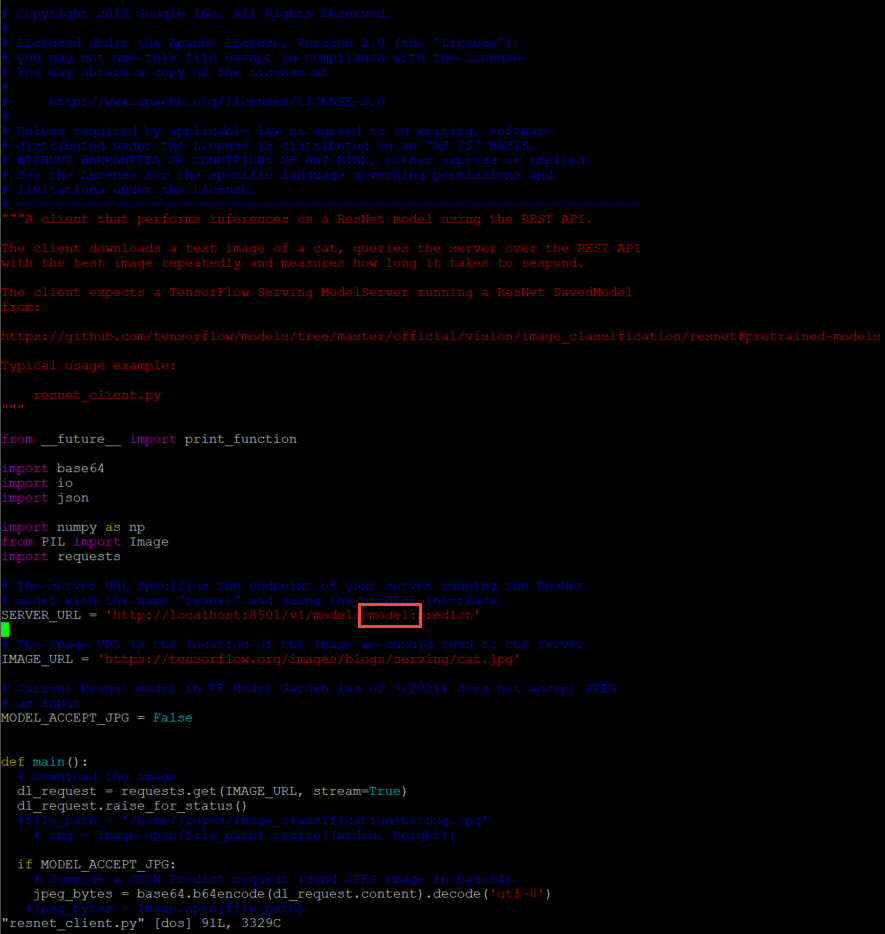
The TensorFlow git has template scripts to call a protobuf model via the gRPC protocol (resnet_client_grpc.py) and the REST API (resnet_client.py), and they need a few modifications.
The gRPC script needs the model signature, input, and output variable names of the model. To get this information, run the saved_model CLI:
$ saved_model_cli show --dir
/home/jreyes/HotDog_App/hotdog_image_classification_model/new_model –all
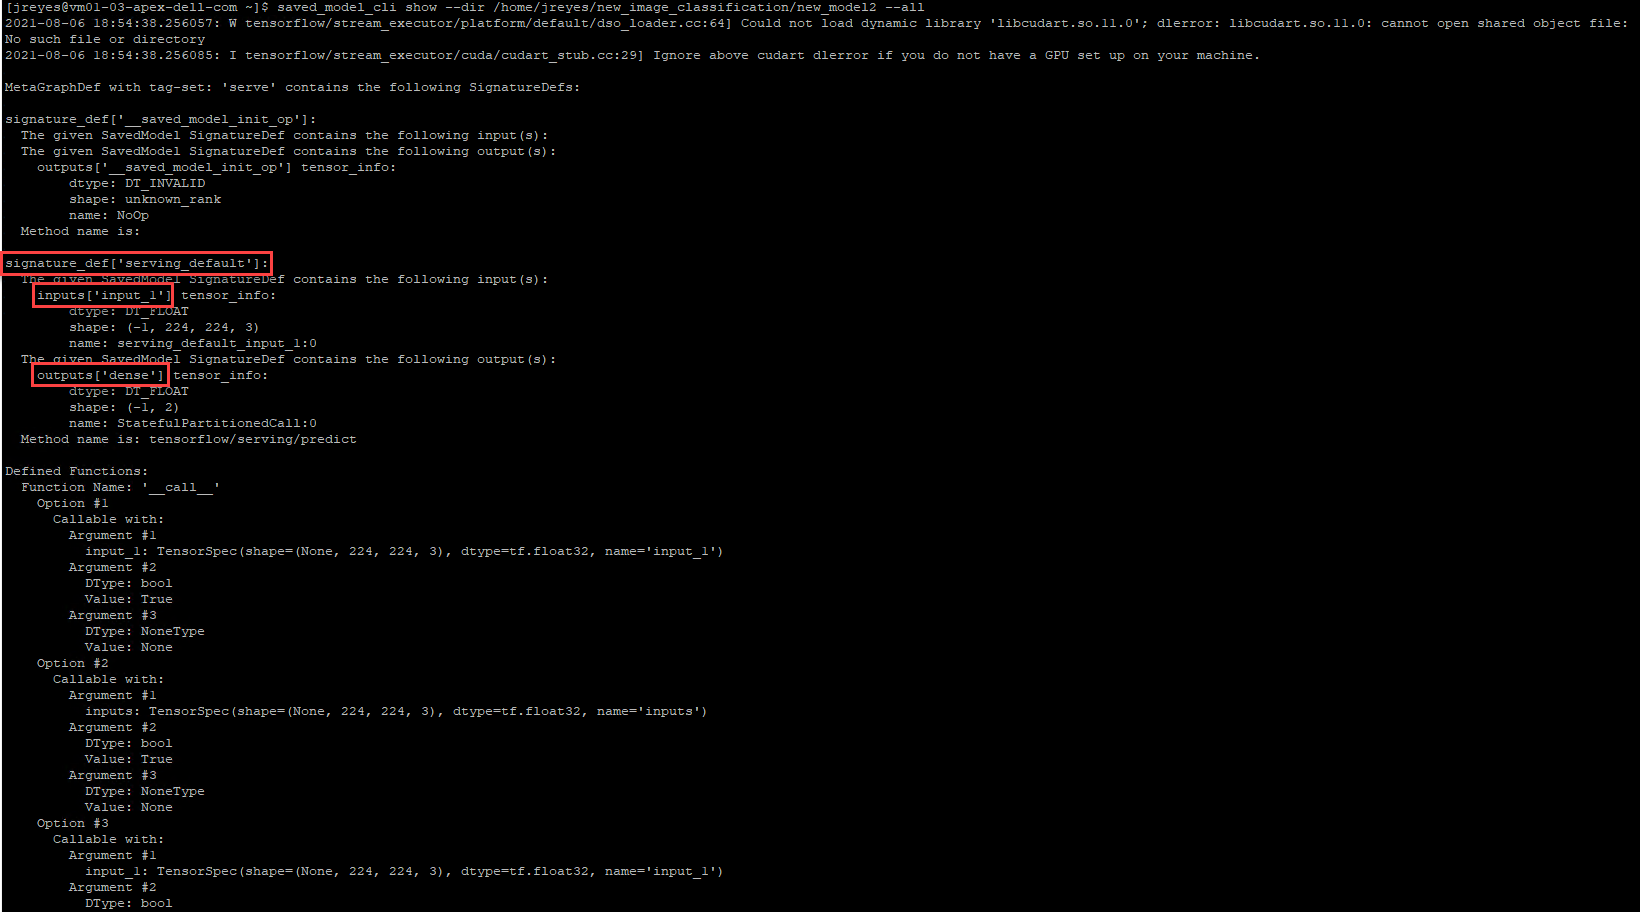
After the output is displayed, I can record the necessary values to modify the gRPC script accordingly.
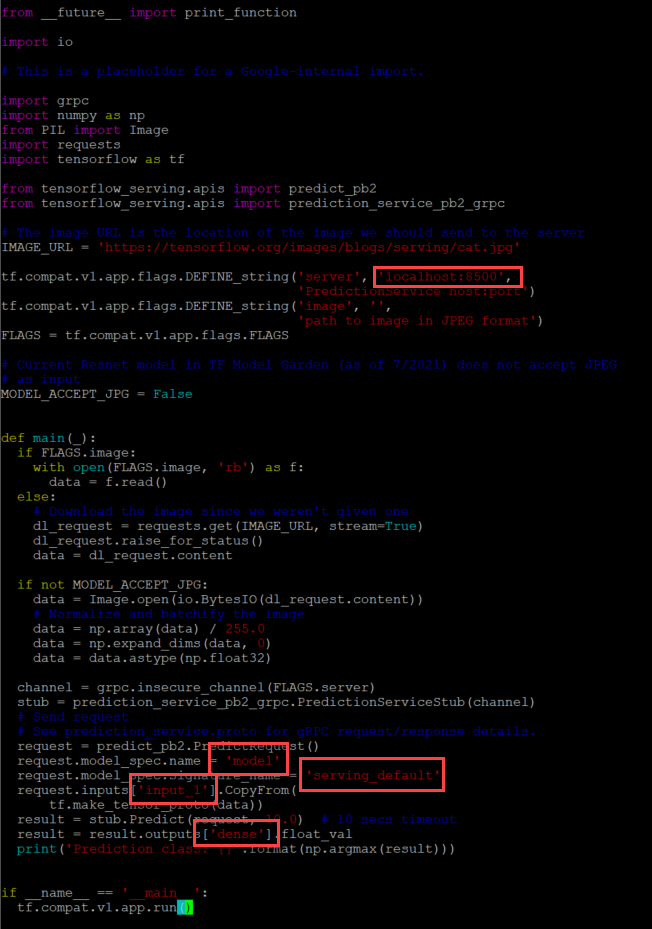
For the REST API script, I have to modify the URL to call the correct model.
Now let's test these scripts.
$ python3 resnet_client_grpc.py

$ python3 resnet_client.py

Success! The results show the value 1, which points to the not_hot_dog value in the labels array. The default image is a cat.png, so the label is appropriate. You can modify the image processed to a hot dog image to verify that the script labels it correctly.
Note: In my repository, you will see that I made some modifications to the scripts to call different images inline (time saver while debugging so I wouldn't have to modify the script every time). I added a time variable to the gRPC script to check how long it takes the server to respond with a prediction.
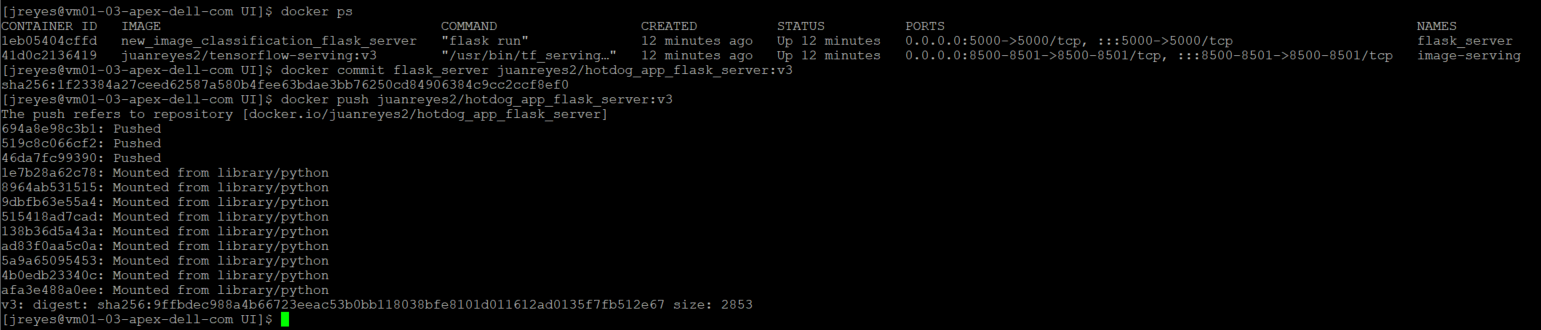
The next step is to save the custom model container and push it to Docker Hub.
Note: It is also possible to save the image to a private container registry such as Harbor Registry. If you want to create a local instance of Harbor Registry, you can deploy it from the Bitnami apps to your Kubernetes cluster. Or if you are running APEX Hybrid Cloud you can enable the embedded Harbor Registry on the Supervisor Cluster.
Use the following commands to commit the TensorFlow serving container:
 $ docker commit --change "ENV MODEL_NAME [my_model_name ]" [container_name] [docker_username]/ [image_name]:[tag]
$ docker push [docker_username]/ [image_name]:[tag]

Creating a basic user interface with Python and Flask
Now that I have verified that the model works, I can create the user interface.
To begin, I created a new folder that contains all of my UI files to separate them from my model files. I'll be using a simple flask web server interface. Users will be able to upload a file and submit the request to the TensorFlow server. The output will be the uploaded image, the label predicted by the model, and the time it took for the model to make the prediction.
Here is the link to the repository for further inspection.
The structure of the HTML portion looks like this:
 Main UI folder
Templates
            Layout.html
Index.html
                Upload.html
Static
            CSS
                        Main.css
            Uploads - location where images will be saved
                        Test images
Here’s a breakdown of the HTML structure:
- The Index HTML file holds the default page information.
- The upload HTML displays the output of the processed request.
- The CSS file makes things look a bit nicer.
- The uploads folder will be the location where I will store the images sent for prediction.
- Note: I created two python files, one with the main app and another with the application's helper functions.
- There are two defined routes in the main app script, the default renders and the uploader route.
- The uploader sends the arguments selected in the UI, like the image and protocol, along with predefined variables such as the model name and the TensorFlow server name/IP.The app helper script contains the get prediction function, which calls the TensorFlow serving container via gRPC or REST API. I am recycling the scripts I used earlier and making modifications to get the prediction name and time accordingly.
- There is also a load labels function that gets the labels created by the model.
Next, I will run the flask server locally and test the functionality of the UI before moving it to a container.
$ python3 app.py

With the app.py program running, I can open a browser, go to the address the UI is running on, localhost:4500, and test it.
Awesome! The UI works as expected.
Using Docker to deploy the application locally
Now I have functioning frontend and backend components. Before I deploy the application in a Docker container, I need to containerize the UI.
This step requires a Dockerfile and a requirements text file. The requirements text file will contain all the dependencies needed to run the Flask web server and our python scripts. More than likely, when you first run the provided python scripts, a modules not found display will appear followed by a prompt asking you to install them on your machine. Typically, you don't want users to log into the container directly and install the dependencies for an application on the fly. Thus, all these dependencies need to be installed when the container is first created, these are defined in this text file.
A Dockerfile is a YAML file that outlines the instructions on how to construct this flask server container. The first line in the YAML file is the python image version, in this case I used a 3.9.6. Docker hub which has several python version images available. Then I need to specify the folder that contains all the python, HTML, and CSS files, and set them as the working directory.
Note: The python scripts must locate our label image text file in this directory and any other files that our code depends on.
Then run a couple of commands in the container: upgrade pip and install the requirements mentioned in the text file. Finally, the entry point, flask run is added.
With a complete Dockerfile, I can run the Docker build command to construct the container, however, I will write a Docker-compose file. This docker-compose file calls the Dockerfile that constructs the flask server and configures the TensorFlow serving image.
In the docker-compose script, I defined some environment variables for the UI and specify the ports for both containers. The containers have to reach each other, which requires me to create a network where both containers will be placed.
Before running the docker-compose file, I must modify the app.py file to make sure it calls the TensorFlow container by name (not localhost). Not changing this value will cause issues because the frontend and the backend containers will be in different pods in Kubernetes.
I must also move the class label text file to the UI folder so that the python scripts can find the text file. To do so, I have to modify the file path in the python script.
I can now execute the Docker-compose file.
$ docker compose up
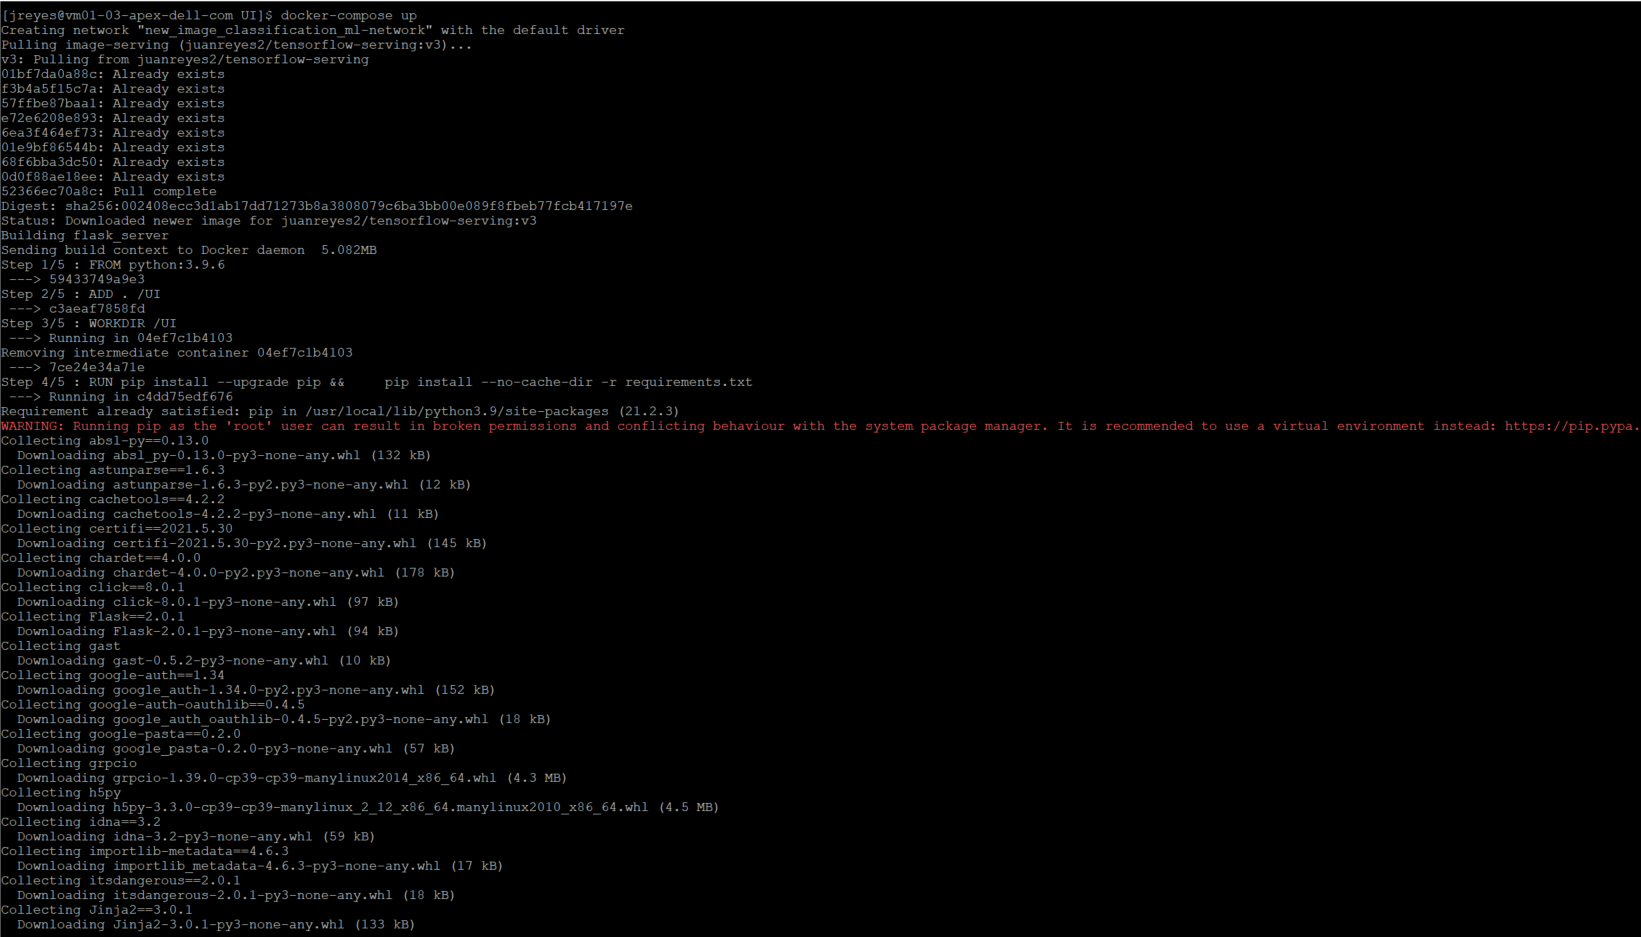
The first time performing this command will take a couple of minutes because it is building the UI container for the first time.
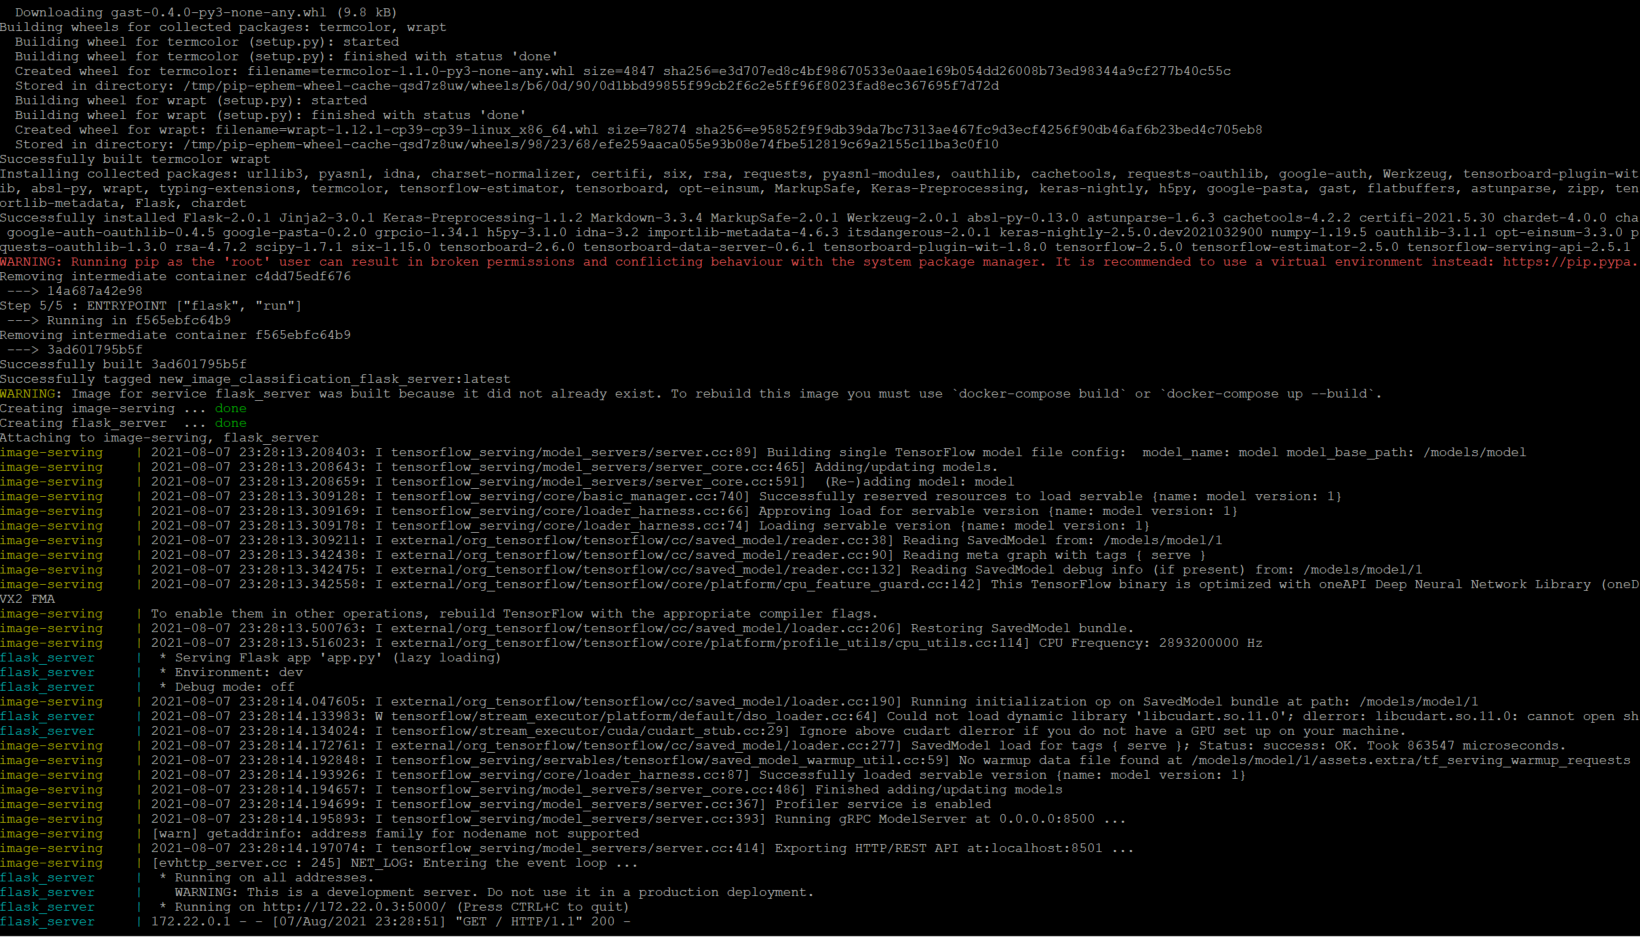
Now that both pods are running, I will navigate to the webserver running on port 5000 and run a few tests to make sure that both ports of the TensorFlow server are responding correctly.
Success!
Note: If modifications are required for the UI container, you will have to flag the docker-compose command with “--build.” Without the flag, Docker will use the existing container found in the local machine.
Deploying the application to the APEX Private/Hybrid with VMware Tanzu
Before I move on to deploying this application to my TKG cluster, I have to save the flask server container image to my Docker Hub registry.
Use the following commands to commit the flask server:
$ docker commit [flask_container_name] [docker_username]/[image_name]:[tag]
$ docker push [docker_username]/ [image_name]:[tag]
Now I can move my application to the APEX Private Tanzu Kubernetes cluster. To do so, I have to log in to my TKG cluster.
$ kubectl vsphere login --vsphere-username [user] --server=[IP/DNS] --insecure-skip-tls-verify=true --tanzu-kubernetes-cluster-namespace [namespace_name] --tanzu-kubernetes-cluster-name [cluster_name]
To deploy my application to my Kubernetes cluster requires a Kubernetes YAML file that defines the various components of the application. Thankfully, there is a tool, Kompose, that translates a docker-compose file into Kubernetes resources.
Use the following command to install the tool in a CentOS VM:
$ sudo yum -y install kompose
Once installed, I can use the tool with the following command:
$ kompose --file [docker-compose file] convert
Each resource defined in the docker-compose file will generate its own individual YAML file.

For simplicity, I decided to add all the resources into one YAML file. Now I can call the YAML file and deploy the components of my application:
$ kubectl apply -f [YAML_file(s)]
After a successful deployment, I can view the pods and the services that Kubernetes created.
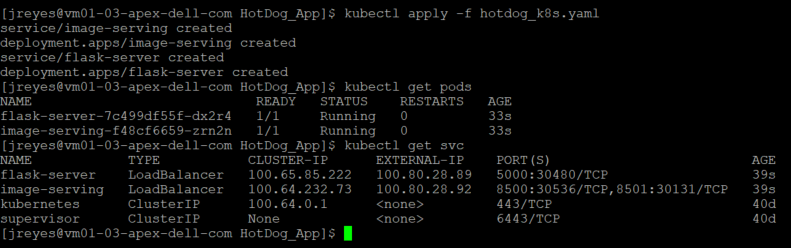
Note: I don't need an external IP for the TensorFlow serving component, but I had it on for debugging purposes. The label “type” in the service definition can be deleted or explicitly say ClusterIP instead loadbalancer.
I will test the application by going to the external IP address that the load balancer assigned to the flask server.
Note: In this APEX Private environment I am using HAProxy as the load balancer for Tanzu workloads. If you are running an older version of the VMware HAProxy ova (<0.1.8), then you have to add the "proto h2" flag to the HAProxy config file. This is required because the gRPC calls would drop intermittently without the flag since HAProxy didn't handle gRPC calls properly until later releases. I recommend upgrading the HAProxy appliance to the latest version because this issue is fixed and you don't have to mess with the HAProxy config file.
backend local_node_h2mode httpserver localhost localhost:8080 proto h2
Great! Now I have successfully deployed an image recognition application in APEX Private with VMware Tanzu.
Consistent hybrid cloud offering public and private deployment options
We've reached the end of this walkthrough.
In summary, I deployed a custom TensorFlow model, created a basic frontend to call the model, containerized the frontend, and deployed all the components to APEX Private with VMware Tanzu. VMware Tanzu is available in all the major public cloud solutions and this provides users with the flexibility to move workloads between cloud providers.
This application can now be deployed to the public cloud or migrated from APEX Private Cloud services. APEX Private/Hybrid Cloud services provides a powerful space for modern application development.
Note: If you want to deploy the components of this application to a public cloud, I recommend similar specs of the Kubernetes cluster and developer machine so that everything runs smoothly. Remember to turn off or delete all the components after you complete the project, to avoid unwanted charges.
In a future blog, I will instrument Knative, a serverless framework, and demonstrate how it works in APEX Private Cloud. After that, I will also have a write up on how to migrate your workloads between APEX Cloud services and other public cloud providers.
That's all, folks.
Author Information
Juan Carlos Reyes
https://www.linkedin.com/in/juancreyes1/
Related Blog Posts

Let Robin Systems Cloud Native Be Your Containerized AI-as-a-Service Platform on Dell PE Servers
Fri, 06 Aug 2021 21:31:26 -0000
|Read Time: 0 minutes
Robin Systems has a most excellent platform that is well suited to simultaneously running a mix of workloads in a containerized environment. Containers offer isolation of varied software stacks. Kubernetes is the control plane that deploys the workloads across nodes and allows for scale-out, adaptive processing. Robin adds customizable templates and life cycle management to the mix to create a killer platform.
AI which includes the likes of machine learning for things like scikit-learn with dask, H2o.ai, spark MLlib and PySpark along with deep learning which includes tensor flow, PyTorch, MXNET, keras and Caffe2 are all things that can be run simultaneously in Robin. Nodes are identified by their resources during provisioning for cores, memory, GPUs and storage.
Cultivated data pipelines can be constructed with a mix of components. Consider a use case with ingest from kafka, store to Cassandra and then run spark MLlib to find loans submitted from last week that will be denied. All that can be automated with Robin.
The as-a-service aspect for things like MLops & AutoML can be implemented with a combination of Robin capabilities and other software to deliver a true AI-as-a-Service experience.
Nodes to run these workloads on can support disaggregated compute and storage. Some sample servers might be a combination of Dell PowerEdge C6520s for compute & R750s for storage. The compute servers are very dense and can run four server hosts in 2U offering a full range of Intel Ice Lake processors. For storage nodes the R750s can have onboard NVMe or SSDs (up to 28). For the OS image a hot swappable m.2 BOSS card with self-contained RAID1 can be used for Linux with all 15G servers.

Dell Technologies Shines in MLPerf™ Stable Diffusion Results
Tue, 12 Dec 2023 14:51:21 -0000
|Read Time: 0 minutes
Abstract
The recent release of MLPerf Training v3.1 results includes the newly launched Stable Diffusion benchmark. At the time of publication, Dell Technologies leads the OEM market in this performance benchmark for training a Generative AI foundation model, especially for the Stable Diffusion model. With the Dell PowerEdge XE9680 server submission, Dell Technologies is differentiated as the only vendor with a Stable Diffusion score for an eight-way system. The time to converge by using eight NVIDIA H100 Tensor Core GPUs is 46.7 minutes.
Overview
Generative AI workload deployment is growing at an unprecedented rate. Key reasons include increased productivity and the increasing convergence of multimodal input. Creating content has become easier and is becoming more plausible across various industries. Generative AI has enabled many enterprise use cases, and it continues to expand by exploring more frontiers. This growth can be attributed to higher resolution text to image, text-to-video generations, and other modality generations. For these impressive AI tasks, the need for compute is even more expansive. Some of the more popular generative AI workloads include chatbot, video generation, music generation, 3D assets generation, and so on.
Stable Diffusion is a deep learning text-to-image model that accepts input text and generates a corresponding image. The output is credible and appears to be realistic. Occasionally, it can be hard to tell if the image is computer generated. Consideration of this workload is important because of the rapid expansion of use cases such as eCommerce, marketing, graphics design, simulation, video generation, applied fashion, web design, and so on.
Because these workloads demand intensive compute to train, the measurement of system performance during their use is essential. As an AI systems benchmark, MLPerf has emerged as a standard way to compare different submitters that include OEMs, accelerator vendors, and others in a like-to-like way.
MLPerf recently introduced the Stable Diffusion benchmark for v3.1 MLPerf Training. It measures the time to converge a Stable Diffusion workload to reach the expected quality targets. The benchmark uses the Stable Diffusion v2 model trained on the LAION-400M-filtered dataset. The original LAION 400M dataset has 400 million image and text pairs. A subset of those images (approximately 6.5 million) is used for training in the benchmark. The validation dataset is a subset of 30 K COCO 2014 images. Expected quality targets are FID <= 90 and CLIP>=0.15.
The following figure shows a latent diffusion model[1]:
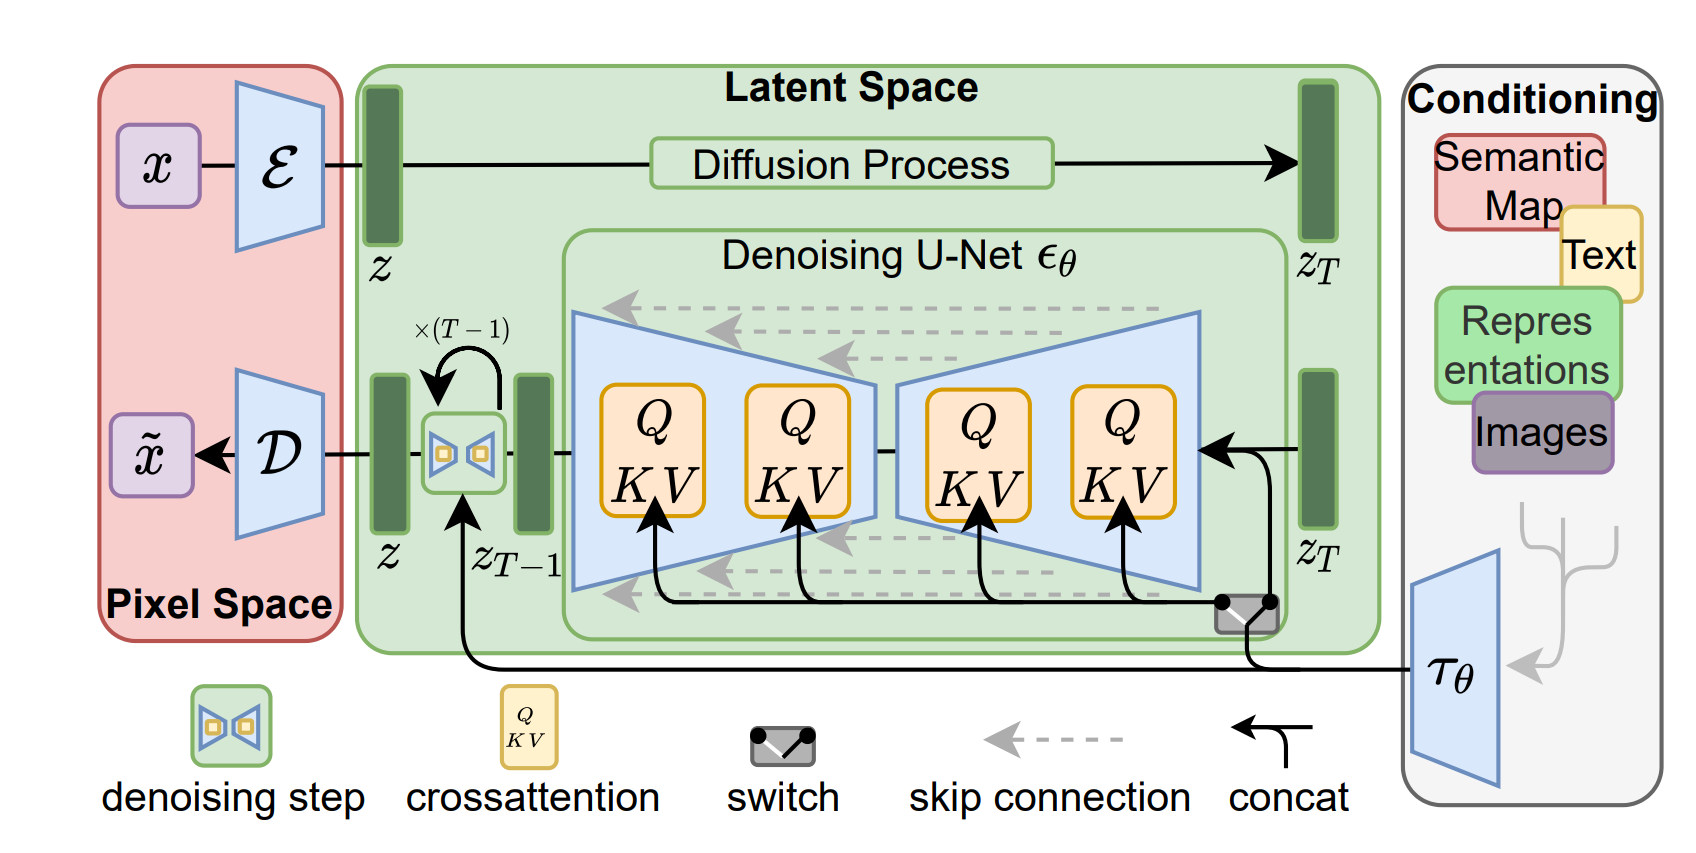
Figure 1: Latent diffusion model
[1] Source: https://arxiv.org/pdf/2112.10752.pdf
Stable Diffusion v2 is a latent diffusion model that combines an autoencoder with a diffusion model that is trained in the latent space of the autoencoder. MLPerf Stable Diffusion focuses on the U-Net denoising network, which has approximately 865 M parameters. There are some deviations from the v2 model. However, these adjustments are minor and encourage more submitters to make submissions with compute constraints.
The submission uses the NVIDIA NeMo framework, included with NVIDIA AI Enterprise, for secure, supported, and stable production AI. It is a framework to build, customize, and deploy generative AI models. It includes training and inferencing frameworks, guard railing toolkits, data curation tools, and pretrained models, offering enterprises an easy, cost effective, and a fast way to adopt generative AI.
Performance of the Dell PowerEdge XE9680 server and other NVIDIA-based GPUs on Stable Diffusion
The following figure shows the performance of NVIDIA H100 Tensor Core GPU-based systems on the Stable Diffusion benchmark. It includes submissions from Dell Technologies and NVIDIA that use different numbers of NVIDIA H100 GPUs. The results shown vary from eight GPUs (Dell submission) to 1024 GPUs (NVIDIA submission). The following figure shows the expected performance of this workload and demonstrates that strong scaling is achievable with less scaling loss.
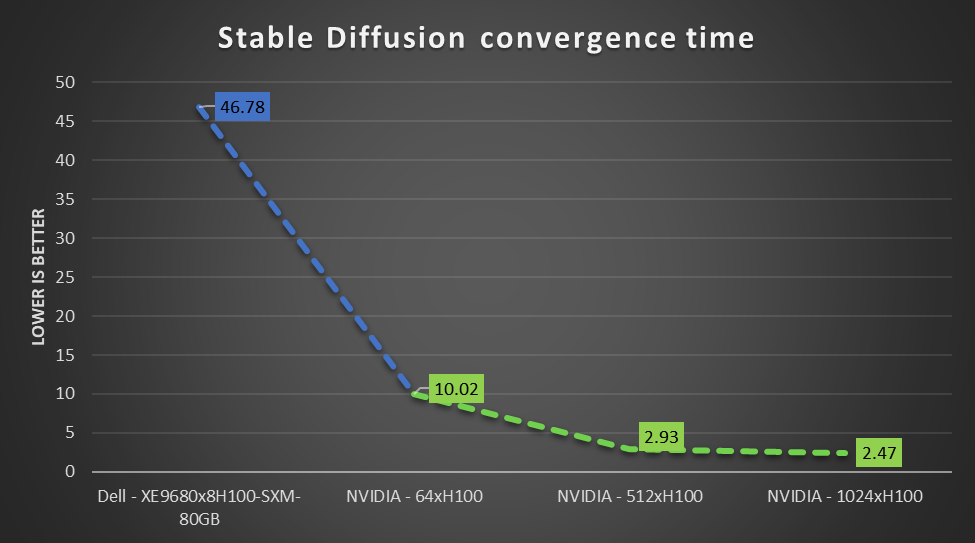
Figure 2: MLPerf Training Stable Diffusion scaling results on NVIDIA H100 GPUs from Dell Technologies and NVIDIA
End users can use state-of-the-art compute to derive faster time to value.
Conclusion
The key takeaways include:
- The latest released MLPerf Training v3.1 measures Generative AI workloads like Stable Diffusion.
- Dell Technologies is the only OEM vendor to have made an MLPerf-compliant Stable Diffusion submission.
- The Dell PowerEdge XE9680 server is an excellent choice to derive value from Image Generation AI workloads for marketing, art, gaming, and so on. The benchmark results are outstanding for Stable Diffusion v2.
MLCommons Results
https://mlcommons.org/benchmarks/training/
The preceding graphs are MLCommons results for MLPerf IDs 3.1-2019, 3.1-2050, 3.1-2055, and 3.1-2060.
The MLPerf™ name and logo are trademarks of MLCommons Association in the United States and other countries. All rights reserved. Unauthorized use strictly prohibited. See www.mlcommons.org for more information.