

Deep Learning Training Performance on Dell EMC PowerEdge R7525 Servers with NVIDIA A100 GPUs
Mon, 21 Jun 2021 20:03:09 -0000
|Read Time: 0 minutes
Overview
The Dell EMC PowerEdge R7525 server, which was recently released, supports NVIDIA A100 Tensor Core GPUs. It is a two-socket, 2U rack-based server that is designed to run complex workloads using highly scalable memory, I/O capacity, and network options. The system is based on the 2nd Gen AMD EPYC processor (up to 64 cores), has up to 32 DIMMs, and has PCI Express (PCIe) 4.0-enabled expansion slots. The server supports SATA, SAS, and NVMe drives and up to three double-wide 300 W or six single-wide 75 W accelerators.
The following figure shows the front view of the server: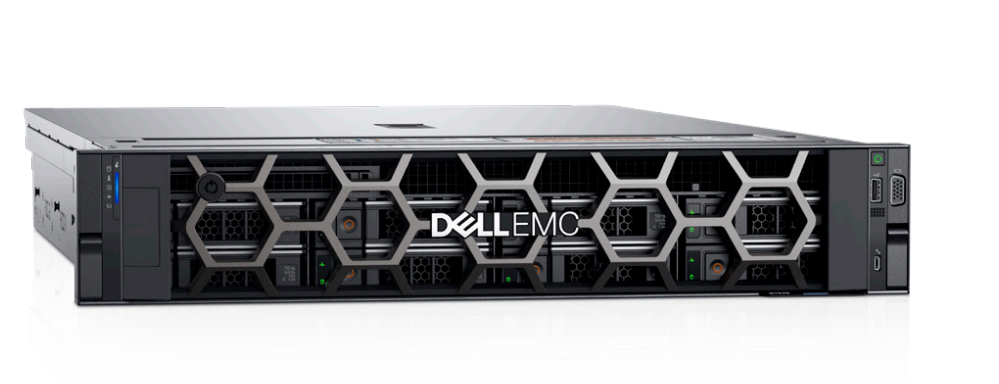
Figure 1: Dell EMC PowerEdge R7525 server
This blog focuses on the deep learning training performance of a single PowerEdge R7525 server with two NVIDIA A100-PCIe GPUs. The results of using two NVIDIA V100S GPUs in the same PowerEdge R7525 system are presented as reference data. We also present results from the cuBLAS GEMM test and the ResNet-50 model form the MLPerf Training v0.7 benchmark.
The following table provides the configuration details of the PowerEdge R7525 system under test:
Component | Description |
Processor | AMD EPYC 7502 32-core processor |
Memory | 512 GB (32 GB 3200 MT/s * 16) |
Local disk | 2 x 1.8 TB SSD (No RAID) |
Operating system | RedHat Enterprise Linux Server 8.2 |
GPU | Either of the following:
|
CUDA driver | 450.51.05 |
CUDA toolkit | 11.0 |
Processor Settings > Logical Processors | Disabled |
System profiles | Performance |
CUDA Basic Linear Algebra
The CUDA Basic Linear Algebra (cuBLAS) library is the CUDA version of standard basic linear algebra subroutines, part of CUDA-X. NVIDIA provides the cublasMatmulBench binary, which can be used to test the performance of general matrix multiplication (GEMM) on a single GPU. The results of this test reflect the performance of an ideal application that only runs matrix multiplication in the form of the peak TFLOPS that the GPU can deliver. Although GEMM benchmark results might not represent real-world application performance, it is still a good benchmark to demonstrate the performance capability of different GPUs.
Precision formats such as FP64 and FP32 are important to HPC workloads; precision formats such as INT8 and FP16 are important for deep learning inference. We plan to discuss these observed performances in our upcoming HPC and inference blogs.
Because FP16, FP32, and TF32 precision formats are imperative to deep learning training performance, the blog focuses on these formats.
The following figure shows the results that we observed:
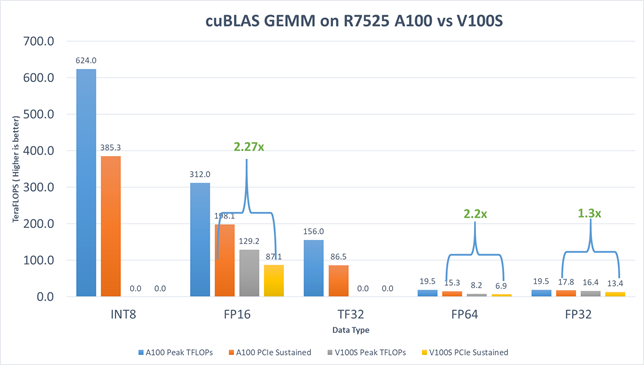
Figure 2: cuBLAS GEMM performance on the PowerEdge R7525 server with NVIDIA V100S-PCIe-32G and NVIDIA A100-PCIe-40G GPUs
The results include:
- For FP16, the HGEMM TFLOPs of the NVIDIA A100 GPU is 2.27 times faster than the NVIDIA V100S GPU.
- For FP32, the SGEMM TFLOPs of the NVIDIA A100 GPU is 1.3 times faster than the NVIDIA V100S GPU.
- For TF32, performance improvement is expected without code changes for deep learning applications on the new NVIDIA A100 GPUs. This expectation is because math operations are run on NVIDIA A100 Tensor Cores GPUs with the new TF32 precision format. Although TF32 reduces the precision by a small margin, it preserves the range of FP32 and strikes an excellent balance between speed and accuracy. Matrix multiplication gained a sizable boost from 13.4 TFLOPS (FP32 on the NVIDIA V100S GPU) to 86.5 TFLOPS (TF32 on the NVIDIA A100 GPU).
MLPerf Training v0.7 ResNet-50
MLPerf is a benchmarking suite that measures the performance of machine learning (ML) workloads. The MLPerf Training benchmark suite measures how fast a system can train ML models.
The following figure shows the performance results of the ResNet-50 under the MLPerf Training v0.7 benchmark:
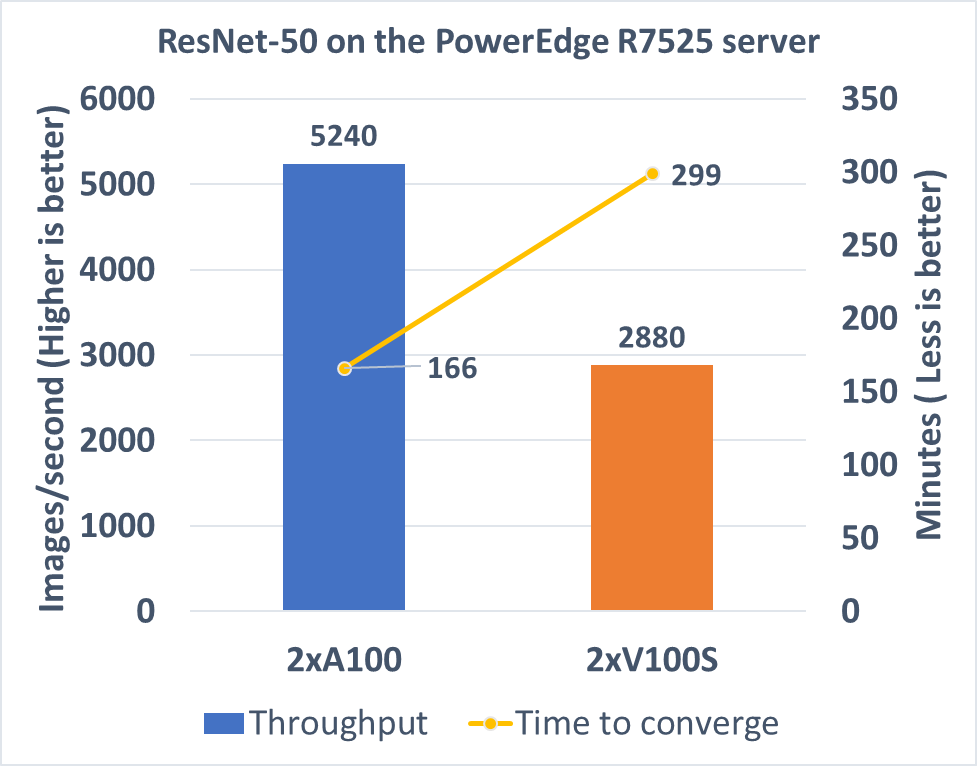
Figure 3: MLPerf Training v0.7 ResNet-50 performance on the PowerEdge R7525 server with NVIDIA V100S-PCIe-32G and NVIDIA A100-PCIe-40G GPUs
The metric for the ResNet-50 training is the minutes that the system under test spends to train the dataset to achieve 75.9 percent accuracy. Both runs using two NVIDIA A100 GPUs and two NVIDIA V100S GPUs converged at the 40th epoch. The NVIDIA A100 run took 166 minutes to converge, which is 1.8 times faster than the NVIDIA V100S run. Regarding throughput, two NVIDIA A100 GPUs can process 5240 images per second, which is also 1.8 times faster than the two NVIDIA V100S GPUs.
Conclusion
The Dell EMC PowerEdge R7525 server with two NVIDIA A100-PCIe GPUs demonstrates optimal performance for deep learning training workloads. The NVIDIA A100 GPU shows a greater performance improvement over the NVIDIA V100S GPU.
To evaluate deep learning and HPC workload and application performance with the PowerEdge R7525 server powered by NVIDIA GPUs, contact the HPC & AI Innovation Lab.
Next steps
We plan to provide performance studies on:
- Three NVIDIA A100 GPUs in a PowerEdge R7525 server
- Results of other deep learning models in the MLPerf Training v0.7 benchmark
- Training scalability results on multiple PowerEdge R7525 servers
Related Blog Posts

Quantifying Performance of Dell EMC PowerEdge R7525 Servers with NVIDIA A100 GPUs for Deep Learning Inference
Tue, 17 Nov 2020 21:10:22 -0000
|Read Time: 0 minutes
The Dell EMC PowerEdge R7525 server provides exceptional MLPerf Inference v0.7 Results, which indicate that:
- Dell Technologies holds the #1 spot in performance per GPU with the NVIDIA A100-PCIe GPU on the DLRM-99 Server scenario
- Dell Technologies holds the #1 spot in performance per GPU with the NVIDIA A100-PCIe on the DLRM-99.9 Server scenario
- Dell Technologies holds the #1 spot in performance per GPU with the NVIDIA A100-PCIe on the ResNet-50 Server scenario
Summary
In this blog, we provide the performance numbers of our recently released Dell EMC PowerEdge R7525 server with two NVIDIA A100 GPUs on all the results of the MLPerf Inference v0.7 benchmark. Our results indicate that the PowerEdge R7525 server is an excellent choice for inference workloads. It delivers optimal performance for different tasks that are in the MLPerf Inference v0.7 benchmark. These tasks include image classification, object detection, medical image segmentation, speech to text, language processing, and recommendation.
The PowerEdge R7525 server is a two-socket, 2U rack server that is designed to run workloads using flexible I/O and network configurations. The PowerEdge R7525 server features the 2nd Gen AMD EPYC processor, supports up to 32 DIMMs, has PCI Express (PCIe) Gen 4.0-enabled expansion slots, and provides a choice of network interface technologies to cover networking options.
The following figure shows the front view of the PowerEdge R7525 server:
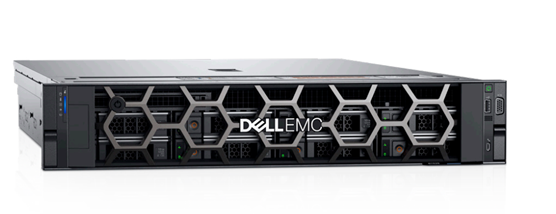
Figure 1. Dell EMC PowerEdge R7525 server
The PowerEdge R7525 server is designed to handle demanding workloads and for AI applications such as AI training for different kinds of models and inference for different deployment scenarios. The PowerEdge R7525 server supports various accelerators such as NVIDIA T4, NVIDIA V100S, NVIDIA RTX, and NVIDIA A100 GPU s. The following sections compare the performance of NVIDIA A100 GPUs with NVIDIA T4 and NVIDIA RTX GPUs using MLPerf Inference v0.7 as a benchmark.
The following table provides details of the PowerEdge R7525 server configuration and software environment for MLPerf Inference v0.7:
Component | Description |
Processor | AMD EPYC 7502 32-Core Processor |
Memory | 512 GB (32 GB 3200 MT/s * 16) |
Local disk | 2x 1.8 TB SSD (No RAID) |
Operating system | CentOS Linux release 8.1 |
GPU | NVIDIA A100-PCIe-40G, T4-16G, and RTX8000 |
CUDA Driver | 450.51.05 |
CUDA Toolkit | 11.0 |
Other CUDA-related libraries | TensorRT 7.2, CUDA 11.0, cuDNN 8.0.2, cuBLAS 11.2.0, libjemalloc2, cub 1.8.0, tensorrt-laboratory mlperf branch |
Other software stack | Docker 19.03.12, Python 3.6.8, GCC 5.5.0, ONNX 1.3.0, TensorFlow 1.13.1, PyTorch 1.1.0, torchvision 0.3.0, PyCUDA 2019.1, SacreBLEU 1.3.3, simplejson, OpenCV 4.1.1 |
System profiles | Performance |
For more information about how to run the benchmark, see Running the MLPerf Inference v0.7 Benchmark on Dell EMC Systems.
MLPerf Inference v0.7 performance results
The MLPerf inference benchmark measures how fast a system can perform machine learning (ML) inference using a trained model in various deployment scenarios. The following results represent the Offline and Server scenarios of the MLPerf Inference benchmark. For more information about different scenarios, models, datasets, accuracy targets, and latency constraints in MLPerf Inference v0.7, see Deep Learning Performance with MLPerf Inference v0.7 Benchmark.
In the MLPerf inference evaluation framework, the LoadGen load generator sends inference queries to the system under test, in our case, the PowerEdge R7525 server with various GPU configurations. The system under test uses a backend (for example, TensorRT, TensorFlow, or PyTorch) to perform inferencing and sends the results back to LoadGen.
MLPerf has identified four different scenarios that enable representative testing of a wide variety of inference platforms and use cases. In this blog, we discuss the Offline and Server scenario performance. The main differences between these scenarios are based on how the queries are sent and received:
- Offline—One query with all samples is sent to the system under test. The system under test can send the results back once or multiple times in any order. The performance metric is samples per second.
- Server—Queries are sent to the system under test following a Poisson distribution (to model real-world random events). One query has one sample. The performance metric is queries per second (QPS) within latency bound.
Note: Both the performance metrics for Offline and Server scenario represent the throughput of the system.
In all the benchmarks, two NVIDIA A100 GPUs outperform eight NVIDIA T4 GPUs and three NVIDIA RTX800 GPUs for the following models:
- ResNet-50 image classification model
- SSD-ResNet34 object detection model
- RNN-T speech recognition model
- BERT language processing model
- DLRM recommender model
- 3D U-Net medical image segmentation model
The following graphs show PowerEdge R7525 server performance with two NVIDIA A100 GPUs, eight NVIDIA T4 GPUs, and three NVIDIA RTX8000 GPUs with 99% accuracy target benchmarks and 99.9% accuracy targets for applicable benchmarks:
- 99% accuracy (default accuracy) target benchmarks: ResNet-50, SSD-Resnet34, and RNN-T
- 99% and 99.9% accuracy (high accuracy) target benchmarks: DLRM, BERT, and 3D-Unet
99% accuracy target benchmarks
ResNet-50
The following figure shows results for the ResNet-50 model:
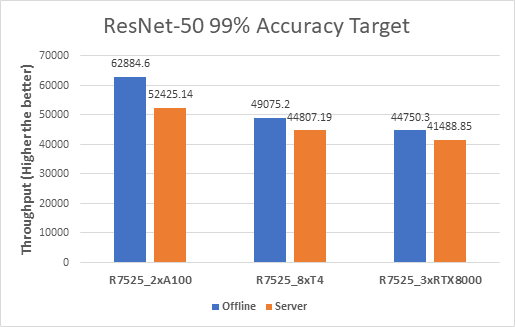
Figure 2. ResNet-50 Offline and Server inference performance
From the graph, we can derive the per GPU values. We divide the system throughput (containing all the GPUs) by the number of GPUs to get the Per GPU results as they are linearly scaled.
SSD-Resnet34
The following figure shows the results for the SSD-Resnet34 model:
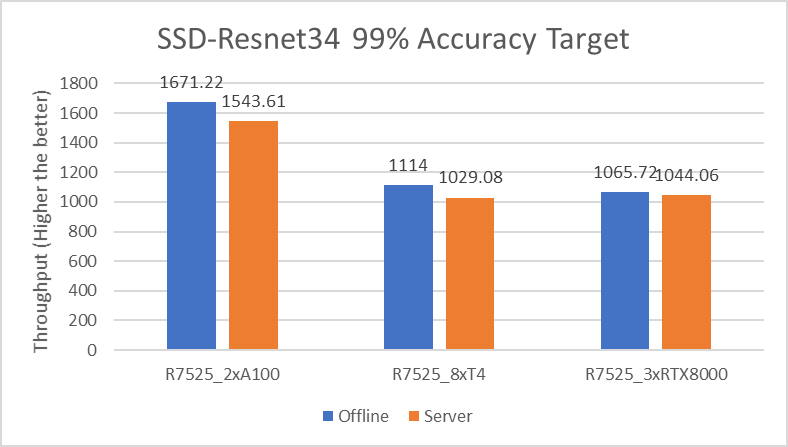
Figure 3. SSD-Resnet34 Offline and Server inference performance
RNN-T
The following figure shows the results for the RNN-T model:
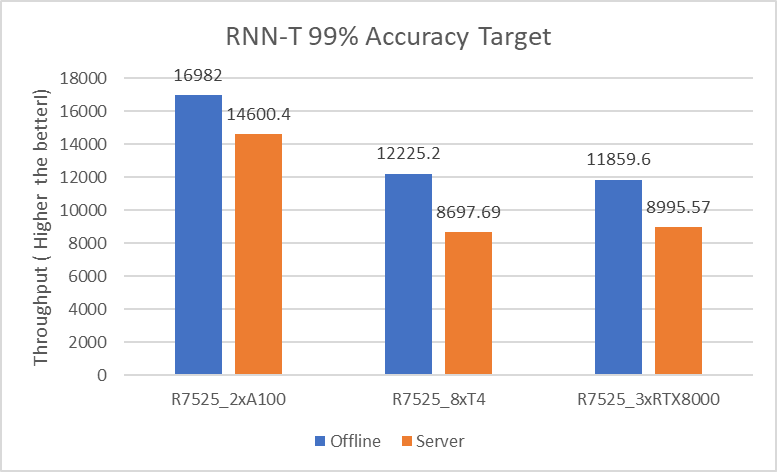
Figure 4. RNN-T Offline and Server inference performance
99.9% accuracy target benchmarks
DLRM
The following figures show the results for the DLRM model with 99% and 99.9% accuracy:

Figure 5. DLRM Offline and Server Scenario inference performance – 99% and 99.9% accuracy
For the DLRM recommender and 3D U-Net medical image segmentation (see Figure 7) models, both 99% and 99.9% accuracy have the same throughput. The 99.9% accuracy benchmark also satisfies the required accuracy constraints with the same throughput as that of 99%.
BERT
The following figures show the results for the BERT model with 99% and 99.9% accuracy:

Figure 6. BERT Offline and Server inference performance – 99% and 99.9% accuracy
For the BERT language processing model, two NVIDIA A100 GPUs outperform eight NVIDIA T4 GPUs and three NVIDIA RTX8000 GPUs. However, the performance of three NVIDIA RTX8000 GPUs is a little better than that of eight NVIDIA T4 GPUs.
3D U-Net
For the 3D-Unet medical image segmentation model, only the Offline scenario benchmark is available.
The following figure shows the results for the 3D U-Net model Offline scenario:
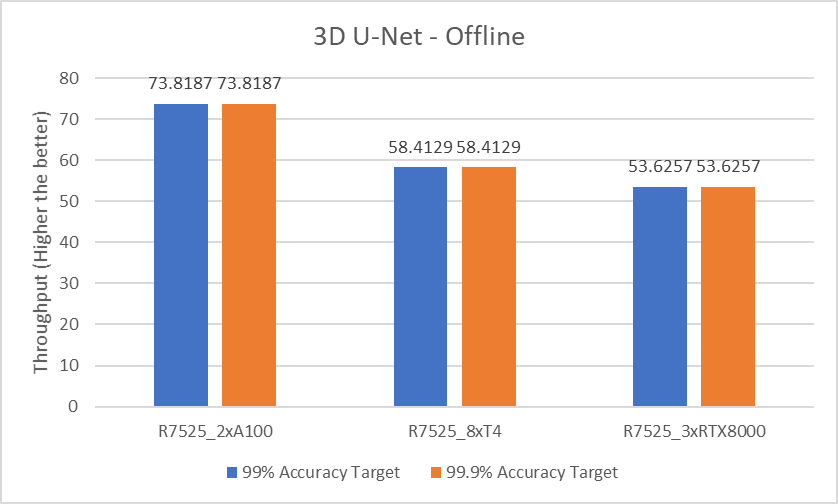
Figure 7. 3D U-Net Offline inference performance
For the 3D-Unet medical image segmentation model, since there is only offline scenario benchmark for 3D-Unet the above graph represents only Offline scenario.
The following table compares the throughput between two NVIDIA A100 GPUs, eight NVIDIA T4 GPUs, and three NVIDIA RTX8000 GPUs with 99% accuracy target benchmarks and 99.9% accuracy targets:
Model | Scenario | Accuracy | 2 x A100 GPUs vs 8 x T4 GPUs | 2 x A100 GPUs vs 3 x RTX8000 GPUs |
ResNet-50 | Offline | 99% | 5.21x | 2.10x |
Server | 4.68x | 1.89x | ||
SSD-Resnet34 | Offline | 6.00x | 2.35x | |
Server | 5.99x | 2.21x | ||
RNN-T | Offline | 5.55x | 2.14x | |
Server | 6.71x | 2.43x | ||
DLRM | Offline | 6.55x | 2.52x | |
Server | 5.92x | 2.47x | ||
Offline | 99.9% | 6.55x | 2.52x | |
Server | 5.92x | 2.47x | ||
BERT | Offline | 99% | 6.26x | 2.31x |
Server | 6.80x | 2.72x | ||
Offline | 99.9% | 7.04x | 2.22x | |
Server | 6.84x | 2.20x | ||
3D U-Net | Offline | 99% | 5.05x | 2.06x |
Server | 99.9% | 5.05x | 2.06x |
Conclusion
With support of NVIDIA A100, NVIDIA T4, or NVIDIA RTX8000 GPUs, Dell EMC PowerEdge R7525 server is an exceptional choice for various workloads that involve deep learning inference. However, the higher throughput that we observed with NVIDIA A100 GPUs translates to performance gains and faster business value for inference applications.
Dell EMC PowerEdge R7525 server with two NVIDIA A100 GPUs delivers optimal performance for various inference workloads, whether it is in a batch inference setting such as Offline scenario or Online inference setting such as Server scenario.
Next steps
In future blogs, we will discuss sizing the system (server and GPU configurations) correctly based on the type of workload (area and task).

Running the MLPerf Inference v0.7 Benchmark on Dell EMC Systems
Mon, 21 Jun 2021 18:22:09 -0000
|Read Time: 0 minutes
MLPerf is a benchmarking suite that measures the performance of Machine Learning (ML) workloads. It focuses on the most important aspects of the ML life cycle:
- Training—The MLPerf training benchmark suite measures how fast a system can train ML models.
- Inference—The MLPerf inference benchmark measures how fast a system can perform ML inference by using a trained model in various deployment scenarios.
The MLPerf inference v0.7 suite contains the following models for benchmark:
- Resnet50
- SSD-Resnet34
- BERT
- DLRM
- RNN-T
- 3D U-Net
Note: The BERT, DLRM, and 3D U-Net models have 99% (default accuracy) and 99.9% (high accuracy) targets.
This blog describes the steps to run MLPerf inference v0.7 tests on Dell Technologies servers with NVIDIA GPUs. It helps you run and reproduce the results that we observed in our HPC and AI Innovation Lab. For more details about the hardware and the software stack for different systems in the benchmark, see this GitHub repository.
Getting started
A system under test consists of a defined set of hardware and software resources that will be measured for performance. The hardware resources may include processors, accelerators, memories, disks, and interconnect. The software resources may include an operating system, compilers, libraries, and drivers that significantly influences the running time of a benchmark. In this case, the system on which you clone the MLPerf repository and run the benchmark is known as the system under test (SUT).
For storage, SSD RAID or local NVMe drives are acceptable for running all the subtests without any penalty. Inference does not have strict requirements for fast-parallel storage. However, the BeeGFS or Lustre file system, the PixStor storage solution, and so on help make multiple copies of large datasets.
Clone the MLPerf repository
Follow these steps:
- Clone the repository to your home directory or another acceptable path:
cd -
git clone https://github.com/mlperf/inference_results_v0.7.git
- Go to the closed/DellEMC directory:
cd inference_results_v0.7/closed/DellEMC - Create a “scratch” directory to store the models, datasets, preprocessed data, and so on:
mkdir scratchThis scratch directory requires at least 3 TB of space. - Export the absolute path for MLPERF_SCRATCH_PATH with the scratch directory:
export MLPERF_SCRATCH_PATH=/home/user/inference_results_v0.7/closed/DellEMC/scratch
Set up the configuration file
The closed/DellEMC/configs directory includes a config.json file that lists configurations for different Dell servers that were systems in the MLPerf Inference v0.7 benchmark. If necessary, modify the configs/<benchmark>/<Scenario>/config.json file to include the system that will run the benchmark.
Note: If your system is already present in the configuration file, there is no need to add another configuration.
In the configs/<benchmark>/<Scenario>/config.json file, select a similar configuration and modify it based on the current system, matching the number and type of GPUs in your system.
For this blog, we considered our R7525 server with a one-A100 GPU. We chose R7525_A100x1 as the name for this new system. Because the R7525_A100x1 system is not already in the list of systems, we added the R7525_A100x1 configuration.
Because the R7525_A100x2 reference system is the most similar, we modified that configuration and picked Resnet50 Server as the example benchmark.
The following example shows the reference configuration for two GPUs for the Resnet50 Server benchmark in the configs/<benchmark>/<Scenario>/config.json file:
"R7525_A100x2": {
         "active_sms": 100,
         "config_ver": {
        },
         "deque_timeout_us": 2000,
         "gpu_batch_size": 64,
         "gpu_copy_streams": 4,
         "gpu_inference_streams": 3,
         "input_dtype": "int8",
         "input_format": "linear",
         "map_path": "data_maps/dataset/val_map.txt",
         "precision": "int8",
         "server_target_qps": 52400,
         "tensor_path": "${PREPROCESSED_DATA_DIR}/dataset/ResNet50/int8_linear",
         "use_cuda_thread_per_device": true,
         "use_deque_limit": true,
         "use_graphs": true
    },
This example shows the modified configuration for one GPU:
"R7525_A100x1": {
         "active_sms": 100,
         "config_ver": {
        },
         "deque_timeout_us": 2000,
         "gpu_batch_size": 64,
         "gpu_copy_streams": 4,
         "gpu_inference_streams": 3,
         "input_dtype": "int8",
         "input_format": "linear",
         "map_path": "data_maps/dataset/val_map.txt",
         "precision": "int8",
         "server_target_qps": 26200,
         "tensor_path": "${PREPROCESSED_DATA_DIR}/datset/ResNet50/int8_linear",
         "use_cuda_thread_per_device": true,
         "use_deque_limit": true,
         "use_graphs": true
    },
We modified the QPS parameter (server_target_qps) to match the number of GPUs. The server_target_qps parameter is linearly scalable, therefore the QPS = number of GPUs x QPS per GPU.
We only modified the server_target_qps parameter to get a baseline run first. You can also modify other parameters such as gpu_batch_size, gpu_copy_streams, and so on. We will discuss these other parameters in a future blog that describes performance tuning.
Finally, we added the modified configuration for the new R7525_A100x1 system to the configuration file at configs/resnet50/Server/config.json.
Register the new system
After you add the new system to the config.json file, register the new system in the list of available systems. The list of available systems is in the code/common/system_list.py file.
Note: If your system is already registered, there is no need to add it to the code/common/system_list.py file.
To register the system, add the new system to the list of available systems in the code/common/system_list.py file, as shown in the following:
# (system_id, gpu_name_from_driver, gpu_count)
system_list = ([
     ("R740_vT4x4", "GRID T4-16Q", 4),
     ("XE2420_T4x4", "Tesla T4", 4),
     ("DSS8440_T4x12", "Tesla T4", 12),
     ("R740_T4x4", "Tesla T4", 4),
     ("R7515_T4x4", "Tesla T4", 4),
     ("DSS8440_T4x16", "Tesla T4", 16),
     ("DSS8440_QuadroRTX8000x8", "Quadro RTX 8000", 8),
     ("DSS8440_QuadroRTX6000x10", "Quadro RTX 6000", 10),
     ("DSS8440_QuadroRTX8000x10", "Quadro RTX 8000", 10),
     ("R7525_A100x2", "A100-PCIE-40GB", 2),
     ("R7525_A100x3", "A100-PCIE-40GB", 3),
     ("R7525_QuadroRTX8000x3", "Quadro RTX 8000", 3),
    ("R7525_A100x1", "A100-PCIE-40GB", 1),
])
In the preceding example, the last line under system_list is the newly added R7525_A100x1 system. It is a tuple of the form (<system name>, <GPU name>, <GPU count>). To find the GPU name from the driver, run the nvidia-smi -L command.
Note: Ensure that you add the system configuration for all the benchmarks that you intend to run and add the system to the system_list.py file. Otherwise, the results might be suboptimal. The benchmark might choose the wrong system configuration or not run at all because it could not find appropriate configuration.
Build the Docker image and required libraries
Build the Docker image and then launch an interactive container. Then, in the interactive container, build the required libraries for inferencing.
- To build the Docker image, run the following command:
make prebuild………
Launching Docker interactive session
docker run --gpus=all --rm -ti -w /work -v /home/user/inference_results_v0.7/closed/DellEMC:/work -v /home/user:/mnt// user \
        --cap-add SYS_ADMIN -e NVIDIA_MIG_CONFIG_DEVICES="all" \
        -v /etc/timezone:/etc/timezone:ro -v /etc/localtime:/etc/localtime:ro \
        --security-opt apparmor=unconfined --security-opt seccomp=unconfined \
        --name mlperf-inference-user -h mlperf-inference-userv0.7 --add-host mlperf-inference-user:127.0.0.1 \
        --user 1004:1004 --net host --device /dev/fuse --cap-add SYS_ADMIN   \
        -e MLPERF_SCRATCH_PATH=”/home/user/ inference_results_v0.7 /closed/DellEMC/scratch” mlperf-inference:user
(mlperf) user@mlperf-inference-user:/work$
The Docker container is launched with all the necessary packages installed. - Access the interactive terminal on the container.
- To build the required libraries for inferencing, run the following command inside the interactive container:
make build(mlperf) user@mlperf-inference-user:/work$ make build ……. [ 92%] Built target harness_triton [ 96%] Linking CXX executable /work/build/bin/harness_default [100%] Linking CXX executable /work/build/bin/harness_rnnt make[4]: Leaving directory '/work/build/harness' [100%] Built target harness_default make[4]: Leaving directory '/work/build/harness' [100%] Built target harness_rnnt make[3]: Leaving directory '/work/build/harness' make[2]: Leaving directory '/work/build/harness' Finished building harness. make[1]: Leaving directory '/work' (mlperf) user@mlperf-inference-user:/work
Download and preprocess validation data and models
To run MLPerf inference v0.7, download datasets and models, and then preprocess them. MLPerf provides scripts that download the trained models. The scripts also download the dataset for benchmarks other than Resnet50, DLRM, and 3D U-Net.
For Resnet50, DLRM, and 3D U-Net, register for an account and then download the datasets manually:
- DLRM—Download the Criteo Terabyte dataset and extract the downloaded file to $MLPERF_SCRATCH_PATH/data/criteo/
- 3D U-Net—Download the BraTS challenge data and extract the downloaded file to $MLPERF_SCRATCH_PATH/data/BraTS/MICCAI_BraTS_2019_Data_Training
Except for the Resnet50, DLRM, and 3D U-Net datasets, run the following commands to download all the models, datasets, and then preprocess them:
$ make download_model # Downloads models and saves to $MLPERF_SCRATCH_PATH/models
$ make download_data # Downloads datasets and saves to $MLPERF_SCRATCH_PATH/data
$ make preprocess_data # Preprocess data and saves to $MLPERF_SCRATCH_PATH/preprocessed_data
Note: These commands download all the datasets, which might not be required if the objective is to run one specific benchmark. To run a specific benchmark rather than all the benchmarks, see the following sections for information about the specific benchmark.
After building the libraries and preprocessing the data, the folders containing the following are displayed:
(mlperf) user@mlperf-inference-user:/work$ tree -d -L 1.
├── build—Logs, preprocessed data, engines, models, plugins, and so on
├── code—Source code for all the benchmarks
├── compliance—Passed compliance checks
├── configs—Configurations that run different benchmarks for different system setups
├── data_maps—Data maps for different benchmarks
├── docker—Docker files to support building the container
├── measurements—Measurement values for different benchmarks
├── results—Final result logs
├── scratch—Storage for models, preprocessed data, and the dataset that is symlinked to the preceding build directory
├── scripts—Support scripts
└── systems—Hardware and software details of systems in the benchmark
Running the benchmarks
Run any of the benchmarks that are required for your tests.
The Resnet50, SSD-Resnet34, and RNN-T benchmarks have 99% (default accuracy) targets.
The BERT, DLRM, and 3D U-Net benchmarks have 99% (default accuracy) and 99.9% (high accuracy) targets. For information about running these benchmarks, see the Running high accuracy target benchmarks section below.
If you downloaded and preprocessed all the datasets (as shown in the previous section), there is no need to do so again. Skip the download and preprocessing steps in the procedures for the following benchmarks.
NVIDIA TensorRT is the inference engine for the backend. It includes a deep learning inference optimizer and runtime that delivers low latency and high throughput for deep learning applications.
Run the Resnet50 benchmark
To set up the Resnet50 dataset and model to run the inference:
- If you already downloaded and preprocessed the datasets, go step 5.
- Download the required validation dataset (https://github.com/mlcommons/training/tree/master/image_classification).
- Extract the images to $MLPERF_SCRATCH_PATH/data/dataset/.
- Run the following commands:
make download_model BENCHMARKS=resnet50
make preprocess_data BENCHMARKS=resnet50
- Generate the TensorRT engines:
# generates the TRT engines with the specified config. In this case it generates engine for both Offline and Server scenario

 make generate_engines RUN_ARGS="--benchmarks=resnet50 --scenarios=Offline,Server --config_ver=default"
- Run the benchmark:
# run the performance benchmark

make run_harness RUN_ARGS="--benchmarks=resnet50 --scenarios=Offline --config_ver=default --test_mode=PerformanceOnly"
make run_harness RUN_ARGS="--benchmarks=resnet50 --scenarios=Server --config_ver=default --test_mode=PerformanceOnly"

# run the accuracy benchmark

make run_harness RUN_ARGS="--benchmarks=resnet50 --scenarios=Offline --config_ver=default --test_mode=AccuracyOnly"
make run_harness RUN_ARGS="--benchmarks=resnet50 --scenarios=Server --config_ver=default --test_mode=AccuracyOnly"
The following output is displayed for a “PerformanceOnly” mode:
The following is a “VALID“ result:
======================= Perf harness results: =======================
R7525_A100x1_TRT-default-Server:
     resnet50: Scheduled samples per second : 26212.91 and Result is : VALID
======================= Accuracy results: =======================
R7525_A100x1_TRT-default-Server:
     resnet50: No accuracy results in PerformanceOnly mode.
Run the SSD-Resnet34 benchmark
To set up the SSD-Resnet34 dataset and model to run the inference:
- If necessary, download and preprocess the dataset:
make download_model BENCHMARKS=ssd-resnet34
make download_data BENCHMARKS=ssd-resnet34
make preprocess_data BENCHMARKS=ssd-resnet34
- Generate the TensorRT engines:
# generates the TRT engines with the specified config. In this case it generates engine for both Offline and Server scenario

make generate_engines RUN_ARGS="--benchmarks=ssd-resnet34 --scenarios=Offline,Server --config_ver=default"
- Run the benchmark:
# run the performance benchmark

make run_harness RUN_ARGS="--benchmarks=ssd-resnet34 --scenarios=Offline --config_ver=default --test_mode=PerformanceOnly"
make run_harness RUN_ARGS="--benchmarks=ssd-resnet34 --scenarios=Server --config_ver=default --test_mode=PerformanceOnly"

# run the accuracy benchmark

make run_harness RUN_ARGS="--benchmarks=ssd-resnet34 --scenarios=Offline --config_ver=default --test_mode=AccuracyOnly"
make run_harness RUN_ARGS="--benchmarks=ssd-resnet34 --scenarios=Server --config_ver=default --test_mode=AccuracyOnly"
Run the RNN-T benchmark
To set up the RNN-T dataset and model to run the inference:
- If necessary, download and preprocess the dataset:
make download_model BENCHMARKS=rnnt
make download_data BENCHMARKS=rnnt
make preprocess_data BENCHMARKS=rnnt
- Generate the TensorRT engines:
# generates the TRT engines with the specified config. In this case it generates engine for both Offline and Server scenario

make generate_engines RUN_ARGS="--benchmarks=rnnt --scenarios=Offline,Server --config_ver=default"
- Run the benchmark:
# run the performance benchmark

make run_harness RUN_ARGS="--benchmarks=rnnt --scenarios=Offline --config_ver=default --test_mode=PerformanceOnly"
make run_harness RUN_ARGS="--benchmarks=rnnt --scenarios=Server --config_ver=default --test_mode=PerformanceOnly"

# run the accuracy benchmark

make run_harness RUN_ARGS="--benchmarks=rnnt --scenarios=Offline --config_ver=default --test_mode=AccuracyOnly"
make run_harness RUN_ARGS="--benchmarks=rnnt --scenarios=Server --config_ver=default --test_mode=AccuracyOnly"
Running high accuracy target benchmarks
The BERT, DLRM, and 3D U-Net benchmarks have high accuracy targets.
Run the BERT benchmark
To set up the BERT dataset and model to run the inference:
- If necessary, download and preprocess the dataset:
make download_model BENCHMARKS=bert
make download_data BENCHMARKS=bert
make preprocess_data BENCHMARKS=bert
- Generate the TensorRT engines:
# generates the TRT engines with the specified config. In this case it generates engine for both Offline and Server scenario and also for default and high accuracy targets.

make generate_engines RUN_ARGS="--benchmarks=bert --scenarios=Offline,Server --config_ver=default,high_accuracy"
- Run the benchmark:
# run the performance benchmark

make run_harness RUN_ARGS="--benchmarks=bert --scenarios=Offline --config_ver=default --test_mode=PerformanceOnly"
make run_harness RUN_ARGS="--benchmarks=bert --scenarios=Server --config_ver=default --test_mode=PerformanceOnly"
make run_harness RUN_ARGS="--benchmarks=bert --scenarios=Offline --config_ver=high_accuracy --test_mode=PerformanceOnly"
make run_harness RUN_ARGS="--benchmarks=bert --scenarios=Server --config_ver=high_accuracy --test_mode=PerformanceOnly"

# run the accuracy benchmark

make run_harness RUN_ARGS="--benchmarks=bert --scenarios=Offline --config_ver=default --test_mode=AccuracyOnly"
make run_harness RUN_ARGS="--benchmarks=bert --scenarios=Server --config_ver=default --test_mode=AccuracyOnly"
make run_harness RUN_ARGS="--benchmarks=bert --scenarios=Offline --config_ver=high_accuracy --test_mode=AccuracyOnly"
make run_harness RUN_ARGS="--benchmarks=bert --scenarios=Server --config_ver=high_accuracy --test_mode=AccuracyOnly"
Run the DLRM benchmark
To set up the DLRM dataset and model to run the inference:
- If you already downloaded and preprocessed the datasets, go to step 5.
- Download the Criteo Terabyte dataset.
- Extract the images to $MLPERF_SCRATCH_PATH/data/criteo/ directory.
- Run the following commands:
make download_model BENCHMARKS=dlrm
make preprocess_data BENCHMARKS=dlrm
- Generate the TensorRT engines:
# generates the TRT engines with the specified config. In this case it generates engine for both Offline and Server scenario and also for default and high accuracy targets.

make generate_engines RUN_ARGS="--benchmarks=dlrm --scenarios=Offline,Server --config_ver=default, high_accuracy"
- Run the benchmark:
# run the performance benchmark

make run_harness RUN_ARGS="--benchmarks=dlrm --scenarios=Offline --config_ver=default --test_mode=PerformanceOnly"
make run_harness RUN_ARGS="--benchmarks=dlrm --scenarios=Server --config_ver=default --test_mode=PerformanceOnly"
make run_harness RUN_ARGS="--benchmarks=dlrm --scenarios=Offline --config_ver=high_accuracy --test_mode=PerformanceOnly"
make run_harness RUN_ARGS="--benchmarks=dlrm --scenarios=Server --config_ver=high_accuracy --test_mode=PerformanceOnly"

# run the accuracy benchmark

make run_harness RUN_ARGS="--benchmarks=dlrm --scenarios=Offline --config_ver=default --test_mode=AccuracyOnly"
make run_harness RUN_ARGS="--benchmarks=dlrm --scenarios=Server --config_ver=default --test_mode=AccuracyOnly"
make run_harness RUN_ARGS="--benchmarks=dlrm --scenarios=Offline --config_ver=high_accuracy --test_mode=AccuracyOnly"
make run_harness RUN_ARGS="--benchmarks=dlrm --scenarios=Server --config_ver=high_accuracy --test_mode=AccuracyOnly"
Run the 3D U-Net benchmark
Note: This benchmark only has the Offline scenario.
To set up the 3D U-Net dataset and model to run the inference:
- If you already downloaded and preprocessed the datasets, go to step 5
- Download the BraTS challenge data.
- Extract the images to the $MLPERF_SCRATCH_PATH/data/BraTS/MICCAI_BraTS_2019_Data_Training directory.
- Run the following commands:
make download_model BENCHMARKS=3d-unet
make preprocess_data BENCHMARKS=3d-unet
- Generate the TensorRT engines:
# generates the TRT engines with the specified config. In this case it generates engine for both Offline and Server scenario and for default and high accuracy targets.

make generate_engines RUN_ARGS="--benchmarks=3d-unet --scenarios=Offline --config_ver=default,high_accuracy"
- Run the benchmark:
# run the performance benchmark

make run_harness RUN_ARGS="--benchmarks=3d-unet --scenarios=Offline --config_ver=default --test_mode=PerformanceOnly"
make run_harness RUN_ARGS="--benchmarks=3d-unet --scenarios=Offline --config_ver=high_accuracy --test_mode=PerformanceOnly"

# run the accuracy benchmark

make run_harness RUN_ARGS="--benchmarks=3d-unet --scenarios=Offline --config_ver=default --test_mode=AccuracyOnly"
make run_harness RUN_ARGS="--benchmarks=3d-unet --scenarios=Offline --config_ver=high_accuracy --test_mode=AccuracyOnly"
Limitations and Best Practices
Note the following limitations and best practices:
- To build the engine and run the benchmark by using a single command, use the make run RUN_ARGS… shortcut. The shortcut is valid alternative to the make generate_engines … && make run_harness.. commands.
- If the server results are “INVALID”, reduce the QPS. If the latency constraints are not met during the run, “INVALID” results are expected.
- If you change the batch size, rebuild the engine.
- Only the BERT, DLRM, 3D-Unet benchmarks support high accuracy targets.
- 3D-UNet only has Offline scenario.
Conclusion
This blog provided the step-by-step procedures to run and reproduce MLPerf inference v0.7 results on Dell Technologies servers with NVIDIA GPUs.
Next steps
In future blogs, we will discuss techniques to improvise performance.


