


Creating Ansible Execution Environments for Dell Technologies Storage

Dell Technologies has been providing Ansible Collections via Ansible Galaxy and GitHub for some time. This has greatly simplified the setup of Ansible configurations so that playbooks can be run quickly. However, in some environments the need to be even more dynamic means that even this process can provide challenges. This is where ansible execution environments can help.
Ansible execution environments are self-contained container environments that provide reproducible environments as container images that can be run as needed, keeping configurations to a bare minimum. They also ensure that the storage automation environment and its dependencies can be spun up when needed, knowing that these environments are tested and have no configuration clashes with other automation environments. Here’s a great introduction to the Ansible execution environment.
Creating an execution environment is done in Python with an optional Python package called Ansible-builder that helps users create their own Ansible execution environments packaged as containers. An organization can build up a repository of execution environment images for use with their playbook libraries from multiple different vendors, to reduce complexity and eliminate any dependency clashes. Organizations can even maintain versions of execution environments for their automation for different configurations of the same products, ensuring that what is tested and known to work will always work.
In order to create an execution environment, you will need to create three files:
- execution-environment.yml
- requirements.txt
- environment.yml
The contents and purpose of these files are as follows.
execution-environment.yml
execution-environment.yml – This YAML file describes the setup and dependencies from Ansible Galaxy. It also points to any Python requirements in requirements.txt. Here’s an example of its contents:
# sample execution-environment.yml
---
version: 1
build_arg_defaults:
  EE_BASE_IMAGE: 'quay.io/Ansible/Ansible-runner:latest'
Ansible_config: 'Ansible.cfg'
dependencies:
  galaxy: requirements.yml
  python: requirements.txt
An example of the requirements.yml file is below.
# Sample requirements.yml
collections:
- name: dellemc.powermax
  version: 1.6
requirements.txt
Here is a sample requirements.txt file:
# Sample requirements.txt
PyU4V==9.2.1.4
After the requirements.yml, requirements.txt and execution-environment.yml files have been created, you can go on to create the execution environment container.
To create the container, simply run the command as follows. (Note that the tag can be anything that makes sense in your environment.)
ansible-builder build –tag dellemc_ee_powermax1.6 –container-runtime podman

After the execution environment has been created, run the build command for podman or Docker to create the execution environment container image. You must run this from the context directory that was created by the Ansible-builder command.
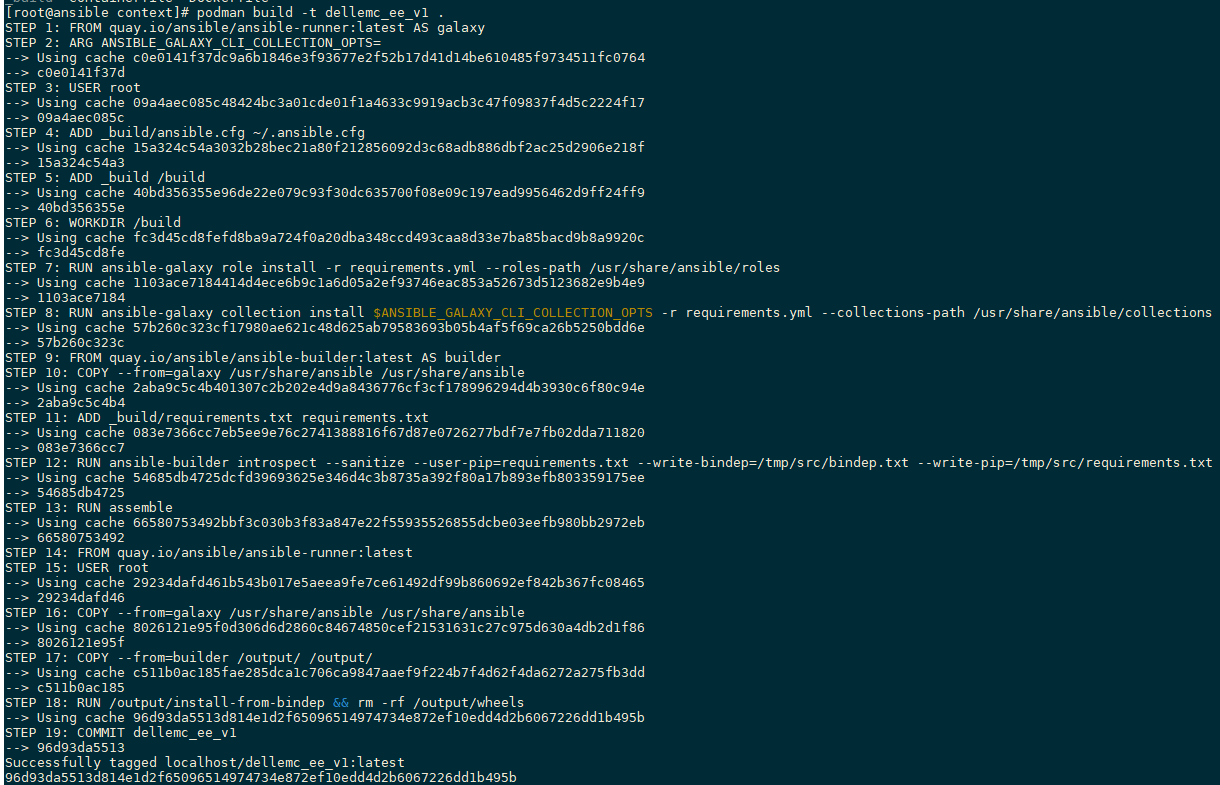
After the image is built and in the local registry, you can run the container and verify that everything is installed as expected.
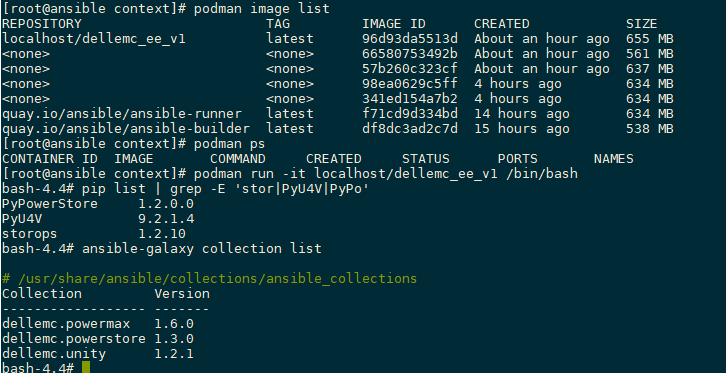
The picture above shows the Ansible execution environment running with an interactive terminal. The pip list command executed in the terminal shows all the Python dependencies installed as expected. The ansible-galaxy list command shows the collections installed.
This environment is ready to execute playbooks or to be distributed to a container registry to be used on demand.
Uploading to a container registry such as quay.io will make the container available to anyone in your organization that requires it or will make it available to tools like Ansible Automation Controller.
To upload to quay.io, follow the steps detailed here.
For additional information about getting started with Ansible, and using Ansible automation controller with Dell Technologies Storage products, see the Dell PowerMax: Ansible Modules Best Practices white paper on the PowerMax Info Hub.
With each new release of Ansible collections, we will publish a copy of the requirements.txt, requirements.yml, and execution-environment.yml files on https://github.com/dell/{{collection_name}}. We hope this will help people streamline the process of creating new execution environments. Users will create their own execution-environment.yml file and build as described, using the processes outlined here.
Author: Paul Martin, Senior Principal Technical Marketing Engineer
Twitter: @rawstorage
Related Blog Posts

RESTing on our Laurels - What’s New with the PowerMax API and Unisphere 10.1
Tue, 17 Oct 2023 13:12:28 -0000
|Read Time: 0 minutes
Unisphere 10.1 has just been released! Although the internal code name was Laurel, we are doing a lot in the API, so we definitely haven’t been RESTing on our laurels!
With this release the Unisphere for PowerMax team focused on what could be done better in the PowerMax API, to make things easier for developers and to reduce the amount of code people must maintain to work with the PowerMax API. Personally, I think they have knocked it out of the park with some new features. These features lay the groundwork for more of the same in the future. As always, there is a full change log for the API published along with updated OpenAPI documents available on https://developer.dell.com. In this blog I provide my own take and highlight some areas that I think will help you as a customer.
Let’s start with the traditional Unisphere for PowerMax API. With this new version of Unisphere there is a new version of the API and simpler versioning referencing throughout the API. For example, the following GET version API call returns the api_version (in this case, 101), and the currently supported API versions with this release (101, 100, and 92). As always, the previous two versions are supported. Here, the supported_api_versions key takes any guesswork out of the equation. If you are using PyU4V, a new version (10.1) is available, which supports all of the new functionality mentioned here.
https://Unisphere:8443/univmax/restapi/version (GET)
{
  "version": "T10.1.0.468",
  "api_version": "101",
  "supported_api_versions": [
    "101",
    "100",
    "92"
  ]
}
I’ll break the other changes down by functional resource so you can skip any that you’re not using:
- Serviceability API calls
- Replication Call Enhancements
- Sloprovisioning Call Enhancements
- System Call Enhancements
- Performance API Call Enhancements
- The All New Enhanced PowerMax API – Bulk API calls
Serviceability API calls
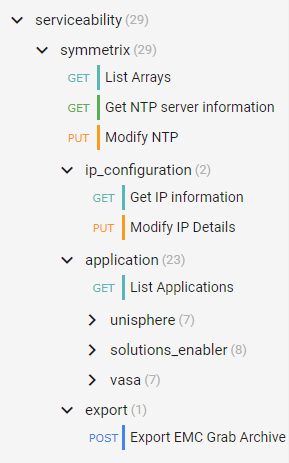
For embedded Unisphere for PowerMax users, when the system is updated to the latest version of Unipshere, a new Serviceability API Resource becomes available.
The new serviceability API calls (as shown in the following figure) give control over the embedded Unisphere, providing access to solutions enabler settings, and Unisphere settings that up until now have only been accessible in the UI, such as:
- Setting up the nethosts file for client/server access from CLI hosts running Solutions Enabler
- Host based access control
- Certificate Management of the Solutions Enabler Guest OS
- And more
Here’s the tree of the Serviceability API resource:
Note: When executing API calls to update the Unisphere application, the server will restart as a result of these changes. You must wait for these to complete before you can issue more API calls. Also, as a reminder, if you are changing the IP address of the Unisphere server you must update your API connection for future calls.
Replication call enhancements
Good news for customers using snapshots and snapshot policies. New replication calls and keys will make the management workflows easier for anyone automating snapshot control and using policies.
An updated API call adds keys for directly associated policies vs inherited policies:
101/replication/symmetrix/{symmetrixId}/storagegroup/{storageGroupId} (GET)In the API, identifying and tracking back linked snapshots has been time consuming in the past. Based on valued customer feedback, our product management and developers have implemented key changes that will help.
The ability to list storage groups that are linked targets has been there for a while, with query parameters in the following GET call:
101/replication/symmetrix/{symmetrixId}/storagegroup?is_link_target=trueHowever, finding out which snapshot was linked, and which source storage group owned that snapshot was a challenge. To make this easier, new keys now appear:
101/replication/symmetrix/{symmetrixId}/storagegroup/{storageGroupId} (GET)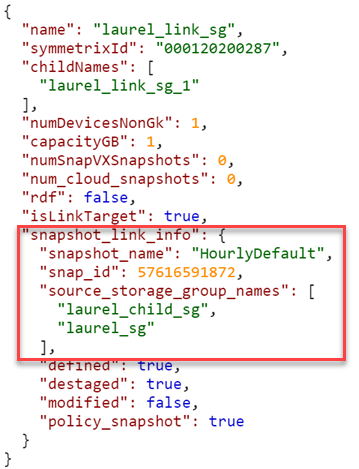
As you can see, the 10.1 API call returns a new key (snapshot_link_info) that includes all the information you need to be able to manipulate the linked snapshots, without having to engineer any trickery yourself.
Sloprovisioning call enhancements
Probably the single biggest change to the Provisioning API calls is the ability to Validate and return a Bad Request when the performance_impact_validation_option is set for sloprovisoning the /maskingview POST call. This gives the developer a way to check, at the time of provisioning, whether a workload is suited to run on the supplied PowerMax serial number. This call uses performance data from the workload planner database and can help create enhanced provisioning workloads with performance and zoning in mind.
The Payload can now accept a new key (performance_impact_validation_option) which can be set to:
- IfRecommended – Run performance impact tests. If no performance capacity threshold is breached, run the requested configuration change.
- Preview – Run performance impact tests and return performance impact scores for the requested operation. Return the input object (with generated fields, if applicable) for relevant follow up API calls.
In addition, the payload has a “portGroupSelection” key that can automatically create a new port group or use an existing port group based. If automatic selection is used, selection can be either UtilizationBased or ZoningBased. (Note: Automatic port selection is only available for Fibre (SCSI FC))
If you choose to use an existing port group, existing port groups are evaluated by the workload planner algorithms examining port groups that are already configured on the system. The algorithm will select the least loaded port group for the provisioning and ignore zoning. Users have the Option to restrict selection to a supplied list of port groups using the API keys. See documentation for details of the various keys.
Note: When using the performance impact selection, you can’t specify an existing storage group because it’s assumed that they are already provisioned. Full documentation for the API call mentioned is here with the supported parameters.
The provisioning API calls include other additions:
- Update POST for Create Masking View, to allow the specifying of a Starting LUN Address. This was a customer enhancement to make it easier to configure boot from SAN.
- Update PUT for Modify SG, to allow the specifying of a Starting LUN Address when adding volumes. .
- Update PUT for Modify SG, to allow terminating snapshots associated with volumes being removed from a SG in a single call. This is very useful because it prevents stranded snapshots from consuming space on the array.
System call enhancements
We have added system calls to enable the refresh of Unisphere. This is useful to customers who are working in a distributed environment and who want to ensure that Unisphere data is up to the second with the latest information. This should be the case, but in the event that there were changes made on a remote system, it could take a minute or so before these are reflected in the object model. The new refresh call has some guardrails, in that you can only run it once every five minutes. If you try to execute too soon, status code 429 will return with message telling you to wait for it to come back:
“Bad or unexpected response from the storage volume backend API: Error POST None resource. The status code received is 429 and the message is {'retry_after_ms': 285417}.”The documentation for this API call (/101/system/symmetrix/{array_serial}/refresh) is here.
Getting information about REST API resources and server utilization was previously only ever available in the user interface. It made sense to make this information available through the REST API because the information pertains to REST. The new GET call to obtain this information (/101/system/management_server_resources) is available, documentation is here.
Along the same lines, we have also added the following calls:
- Change Log Level - /101/system/logging (PUT/GET)
- Configure/Check SNMP Destination - /101/system/snmp (GET/POST/PUT/DELETE)
- Server Cert management - /101/system/snmp/server_cert (POST)
- Configure SNMPv3 with TLS - /101/system/snmp/v3_tls (POST)
- Manage PowerMax Licensing via API
Performance API call enhancements
There is only one minor change in the traditional API for performance with this release. We are adding the ability to register a list of storage groups for real time performance and also bring file metrics for SDNAS onto the Unisphere for PowerMax array for monitoring. The POST call /performance/Array/register has been updated to take new keys, selectedSGs, and a file.
The new payload would look something like this:
{
  "symmetrixId": "01234568779",
  "selectedSGs": "sg1,sg2,sg3",
  "diagnostic": "true",
  "realtime": "true",
  "file": "true"
}
There are some additional changes for mainframe and also Workload Planner which are covered in the changelog documentation. I just want to highlight here what I think most customers will be interested in and give some background.
The all new enhanced PowerMax API – Bulk API calls
I’ve been looking forward to being able to announce some very nice enhancements to the PowerMax API. The API provides new calls with resources accessible under a different Base URI. Rather than https:// {server_ip}:{port}/univmax/restapi/, the new API calls are under https://{server_ip}:{port}/univmax/rest/v1.
The difference between the two entry points will become apparent as you get used to these calls and the versioning will be arguably simpler going forward. Documentation is here.
- GET - /systems/{id}/volumes
- GET - /systems/{id}/storage-groups
- GET - /systems/{id}/performance-categories
- GET - /systems/{id}/performance-categories/{id}
For complete details about these endpoints, see:
- The API documentation marked "POWERMAX - ENHANCED ENDPOINTS"
- The Unisphere for PowerMax 10.1 REST API Changelog
“Ok” I hear you say, “so what’s the big deal?”. Well, these endpoints behave differently from our existing API calls. The provide more information faster so that developers don’t have to maintain a lot of code to get the information they need.
The volumes GET call returns details about every volume on a system in a single call. There is no pagination required and you don’t need to worry about iterators or have to deal with anything fancy. The API just gives you back one big JSON response with all the information you need. This eliminates the need to loop on calls and will dramatically cut down the number of API calls you need to issue to the server.
The same is true for the storage groups calls. With a single call, you can get information on all storage groups on the system, their attributes, and which volumes are in those groups.
But wait, there’s more…
We have implemented a modified form of filtering of the response. You can now filter on all attributes and nested attributes that are returned in the response:
../storage-groups?filter=cap_gb eq 100
../storage-groups?filter=volumes.wwn like 12345678
The available filter options are:
 The endpoints require you to “select” the desired attributes instead of returning everything up front. By doing so, you can control how server-intensive each request is by omitting or including only the relevant info:
…/storage-groups?select=cap_gb,uuid,type,num_of_volumes
This returns only the cap_gb,uuid, type and num_of_volumes for each storage group.
This also applies to nested attributes (a full stop is used to define child attributes):
…/storage-groups?select=volumes.wwn,volumes.effective_wwn,snapshots.timestamp_ms
If no attributes are defined in the “select”, only the default values, such as “id”, are returned. The list of attributes that can be selected is available in the documentation here.
Functions are also available for this in PyU4V. Currently multiple filter options are combined in an AND pattern and select can be applied to the data to reduce the output to only what you are interested in. The following is an example of this functionality as executed through PyU4V 10.1:
With this new functionality you can get all details for your volumes and storage groups in two calls per array, reduced from tens of thousands of calls on larger systems.
Enhanced performance metrics with the new Bulk API
In addition to the new GET calls for Volumes and Storage groups, there are new calls for the performance metrics.
The /systems/{id}/performance-categories (GET) call returns a list of performance categories valid for the arrays you are querying.
When you query each category, the API returns the last interval of diagnostic performance data using the new /systems/{id}/performance-categories/{id} GET call. This returns all key performance indicator metrics at the diagnostic level for the category and all instances in that category for the last five minutes.
These new enhanced API calls reduce the amount of code that developers need to write and maintain. The API call is intentionally designed to provide only the latest information. This reduces the amount of code for which developers need to maintain performance data collection for dashboard type tools and data collectors.
The following example shows a PyU4V script executing a few lines of code to gather all performance stats for every category on every component of a PowerMax array. It’s also gathering details on all volumes and all storage groups using the new Enhanced API calls. On my system, the code takes about eight seconds on average to gather all that information.
To wrap up
Hopefully this blog has provided some insight into the latest changes in the PowerMax REST API. As you can see, our developers have not been RESTing on their laurels!
Watch this space for more about the PowerMax API, and if there are topics that are of interest to you and you would like to learn more, send a request to @rawstorage on Twitter and I’ll try to accommodate your request!
Be sure to provide feedback through your account team for any enhancement requests or start a discussion on https://www.dell.com/community/en/topics/automation. Our product managers will take your requests and bring them to the development team.
Author: Paul Martin

What’s New with Ansible Collection for PowerMax Version 1.7
Mon, 25 Apr 2022 14:39:01 -0000
|Read Time: 0 minutes
Ansible Modules for Dell PowerMax help automate and orchestrate the configuration and management of Dell PowerMax arrays. Specifically, they are used for managing volumes, storage groups, ports, port groups, host, host groups, masking views, initiators, SRDF links, RDF groups, snapshots, job, snapshot policies, storage pools, role for automatic volume provisioning, and Metro DR environments for PowerMax arrays. The modules use playbooks to list, show, create, delete, and modify each of the entities.
Ansible Modules for Dell PowerMax support the following features:
- Create volumes, storage groups, hosts, host groups, port groups, masking views, Metro DR environments, snapshot policies, and snapshots of a storage group.
- Modify volumes, storage groups, hosts, host groups, Metro DR environments, snapshot policies, initiators and port groups in the array.
- Delete volumes, storage groups, hosts, host groups, port groups, masking views, Metro DR environments, snapshot policies, and snapshots of a storage group.
- Get details of volumes, storage groups, hosts, host groups, port, port groups, masking views, Metro DR environments, Job, RDF groups, snapshot policies, storage pools, initiators, and snapshots of a storage group.
Each quarter we are improving our Ansible collections and modules for our storage platforms. This quarter sees the release of version 1.7 of the Ansible Collection for PowerMax available on GitHub and Ansible Galaxy. This blog highlights a few major changes in Version 1.7, and a few minor ones too. Full release notes are here.
Module name changes
To start off, there have been some naming changes to the Ansible modules. In previous releases, the modules were handed a very long name with dellemc_powermax_<function>. This made sense when modules were installed standalone. However with the advent of collections, if the user followed Ansible best practices and used the Fully Qualified Collection Name (FCQN) when referencing the modules in playbooks, the name became redundant and quite long.
For example, with Ansible collection for PowerMax <=1.6.x, calling the modules in a playbook would look like this:
  tasks:
    - name: Create Storage group
       dellemc.powermax.dellemc_powermax_storagegroup:
        <<: *uni_connection_vars
        sg_name: "{{ sg_name }}"
        service_level: "Diamond"
        state: 'present'
With Ansible Modules for PowerMax 1.7 and higher, the new syntax is shorter:
  tasks:
    - name: Create Storage group
       dellemc.powermax.storagegroup:
        <<: *uni_connection_vars
        sg_name: "{{ sg_name }}"
        service_level: "Diamond"
        state: 'present'
The name changes have been made in such a way that upgrading will not affect your existing playbooks for some time. Redirection has been implemented so that existing playbooks continue to work exactly as before, but you’ll get a warning message if you use the older names, as shown here:

(You won’t see this message if you have turned off deprecation warnings in your ansible.cfg file.)
The warning states that you have two years to update playbooks to use the new naming conventions, so there’s plenty of time!
Another naming change is the dellemc_powermax_gather_facts module. This has been renamed to info, in line with what other vendors are doing, and with current Ansible standards. All existing functionality remains. If the old name is used in a playbook, redirection yields a similar deprecation warning.
New initiator module
PowerMax customers have historically used initiator aliases for host WWNs to make management tasks easier. From the UI, it is easy to see which HBA belongs to which host when listing all initiators. Some of our customers have asked for the ability to set these aliases in the Ansible management suite. The initiator module allows us to do just that.
The new module lets you get initiator details using a WWN or an alias, and to rename the initiator alias using either the alias or the WWN. Some example tasks are shown here:
- name: Get initiator details using initiator WWN
   dellemc.powermax.initiator:
    unispherehost: "{{unispherehost}}"
    universion: "{{universion}}"
    verifycert: "{{verifycert}}"
    user: "{{user}}"
    password: "{{password}}"
    serial_no: "{{serial_no}}"
    initiator_id: 1000000000000001
    state: 'present'

- name: Get initiator details using alias
   dellemc.powermax.initiator:
    unispherehost: "{{unispherehost}}"
    universion: "{{universion}}"
    verifycert: "{{verifycert}}"
    user: "{{user}}"
    password: "{{password}}"
    serial_no: "{{serial_no}}"
    alias: 'test/host_initiator'
    state: 'present'

- name: Rename initiator alias using initiator id
   dellemc.powermax.initiator:
    unispherehost: "{{unispherehost}}"
    universion: "{{universion}}"
    verifycert: "{{verifycert}}"
    user: "{{user}}"
    password: "{{password}}"
    serial_no: "{{serial_no}}"
    initiator_id: 1000000000000001
    new_alias:
      new_node_name: 'test_rename'
      new_port_name: 'host_initiator_rename'
    state: 'present'

- name: Rename initiator alias using alias
   dellemc.powermax.initiator:
    unispherehost: "{{unispherehost}}"
    universion: "{{universion}}"
    verifycert: "{{verifycert}}"
    user: "{{user}}"
    password: "{{password}}"
    serial_no: "{{serial_no}}"
    alias: 'test/host_initiator'
    new_alias:
      new_node_name: 'test_rename'
      new_port_name: 'host_initiator_rename'
    state: 'present'
The host module has also been updated with this release, making it possible for you to modify a host initiator by either WWN or Host Alias, as shown here:
- name: Create host with host_flags
  dellemc.powermax.host:
    unispherehost: "{{unispherehost}}"
    universion: "{{universion}}"
    verifycert: "{{verifycert}}"
    user: "{{user}}"
    password: "{{password}}"
    serial_no: "{{serial_no}}"
    host_name: "VMWARE_HOST1"
    initiators:
      - 1000000000000001
      - 'VMWARE_HOST1/VMHBA1'
    host_type: default
    state: 'present'
    initiator_state: 'present-in-host'
If you run into any issues or need assistance, the GitHub Issues tracking section has been opened to the world. You can also request new features, report problems, seek assistance from the Dell Technologies engineering team here, and see where other customers have commented about their own experiences.
I hope you found this information useful! Check back on our Info Hub site regularly for more updates about our products and services.
Author: Paul Martin, Senior Principal Technical Marketing Engineer
Twitter: @rawstorage