


Cloud DR - Deployments over a Private Network
Thu, 21 Jul 2022 16:21:20 -0000
|Read Time: 0 minutes
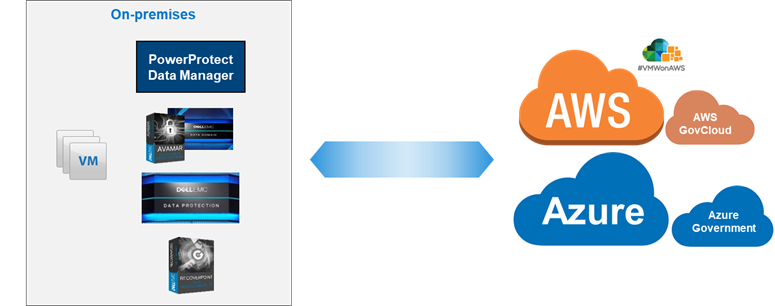
Dell EMC launched Cloud Disaster Recovery (Cloud DR) in 2017, to help customers expand their DR to the cloud and meet their compliance demands, and to give them peace of mind about running their workloads in the cloud in case of a disaster scenario.
The initial phase was to support the most used cloud platforms back then, AWS and Azure, and focus on simplicity and automation, all while leveraging existing data protection technologies that customers already have, such as Avamar and Data Domain.
From its first release, Cloud DR supported automated deployment. This process created everything the solution needed on the customer’s cloud account, and was initiated from the on-prem component (the Cloud DR Add-on (CDRA)) over the internet -- the most common way to connect small or medium size organizations to the cloud.
Over time, more and more organizations reached a level of maturity of cloud usage: in the way they worked with it, protected their resources running on the cloud, and in how they planned to combine that with their on-prem resources. All of this resulted in larger organizations requiring more advanced and up-to-date features that Cloud DR already offered.
To support those new and larger organizations, Cloud DR’s core functionality was integrated into additional data protection technologies, such as RecoverPoint for VMs, PowerProtect Data Manager, and PowerProtect DP (what used to be called IDPA), so organizations who were already working and using these solutions would also be able to benefit from Cloud DR features and to protect and recover their VMs to, and on, the cloud.
Naturally, larger organizations are more complex. They usually combine their cloud and on-prem resources, connecting the environments with VPN. Some also use a dedicated network (such as Direct Connect in AWS or ExpressRoute in Azure).
These customers wanted to leverage their private connections for the deployment and usage, but since Cloud DR's core ability was to deploy over the public internet and create its AWS or Azure resources with an auto generated public IP (because it was the original design that fit almost all of the customers, and because some customers had strict security rules preventing any public IP creation), there was naturally a rising demand to add support for VPN connections, without creating or using any public IP.
To address that concern, a solution was introduced for CDRA users to switch the way the CDRA communicates with the Cloud DR Server (CDRS), changing its default deployment from using a public IP to using its private IP, but this was relevant only for CDRA and only for specific Cloud DR releases (19.5 - 19.8).
In Cloud DR 19.9 (which is also included in PowerProtect Data Manager 19.9), released in September 2021, this requirement is further simplified. Cloud DR allows you to deploy over your existing private connection. In the web UI, you can also easily select whether you want to deploy through the internet and create a public IP, or deploy through your private network.
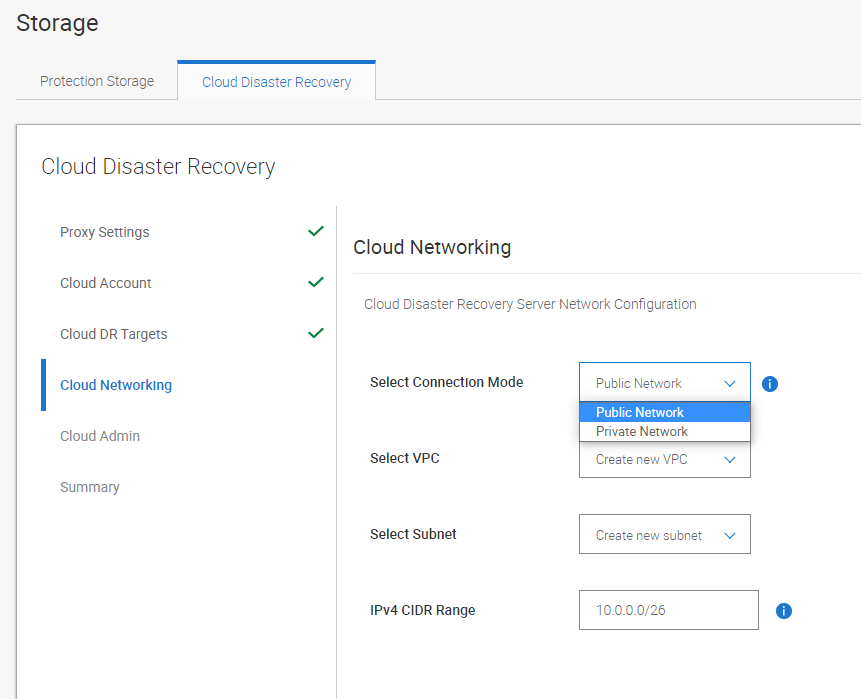
While the Cloud DR interface makes it easy and intuitive to select the connection mode, it’s important that you configure the networks properly to support private connectivity. (The most common cause for failed deployments is related to misconfigured networks, routing, and firewalls.)
This new feature should work as-is for well configured environments. You need to make sure your on-prem CDRA or PowerProtect Data Manager can reach and send its protected data to the cloud object storage (AWS S3 bucket / Azure Storage Account) over VPN. That’s because by default the object storage is reachable through the internet. Of course, you can also keep and use that default behavior and make sure that the CDRA or PowerProtect Data Manager can also send files through the internet, and connect to the CDRS through your VPN connection.
With Cloud DR and PowerProtect Data Manager you can protect your workloads with an easy deployment to your cloud account, and now also with a simplified deployment over your VPN.
Be sure to check out our Cloud DR best practices white paper, demos, and interactive demos:
Cloud DR Best practices whitepaper
Demos:
- PowerProtect Data Manager - Cloud DR Configuration and Deployment to AWS Demo
- PowerProtect Data Manager - Protection to the Cloud Demo
- PowerProtect Data Manager - Recovery from the Cloud Demo
- Cloud Disaster Recovery - Configuration and Deployment using CDRA to AWS Demo
- Cloud Disaster Recovery - Protection to the Cloud using Avamar Demo
- Cloud Disaster Recovery - Recovery Demo
Interactive Demos:
- Cloud DR with Avamar, RecoverPoint for VMs and PowerProtect DP
- Cloud DR with PowerProtect Data Manager
Author: Eli Persin
Related Blog Posts

Multi-cloud Protection with PowerProtect Data Manager
Thu, 14 Apr 2022 20:12:59 -0000
|Read Time: 0 minutes
What I like most about PowerProtect Data Manager is that it supports the rising demand for data protection for all kind of organizations. It’s powerful, efficient, scalable and most importantly: a simple-to-use solution. And what could be simpler than using the same product with the same user interface on any environment, including any supported cloud platform?
PowerProtect Data Manager is usually used for deploying and protecting on-prem virtual machines running on VMware vSphere environments.
While PowerProtect Data Manager excels in protecting any on-prem machines and different types of technologies, such as Kubernetes, some organizations also have a cloud strategy where some or all their workloads and services are running on the cloud.
There are also organizations that use multiple cloud platforms to host and manage their workloads, and these resources need to be protected as well, especially in the cloud where there could be additional risk management and security considerations.
The good news is that PowerProtect Data Manager provides cloud and backup admins the same abilities and interface across all the supported cloud platforms: Amazon Web Services (AWS), Microsoft Azure, and Google Cloud Platform (GCP).
AWS users can use the AWS Marketplace to deploy “Dell EMC PowerProtect Data Manager and PowerProtect DD Virtual Edition” which will trigger an automated deployment using the AWS CloudFormation service.
In this deployment method you’re asked to provide all the networking and security details ahead, and then it does everything else for you, including deploying a DDVE instance that will manage the backup copies for you (with deduplication!).
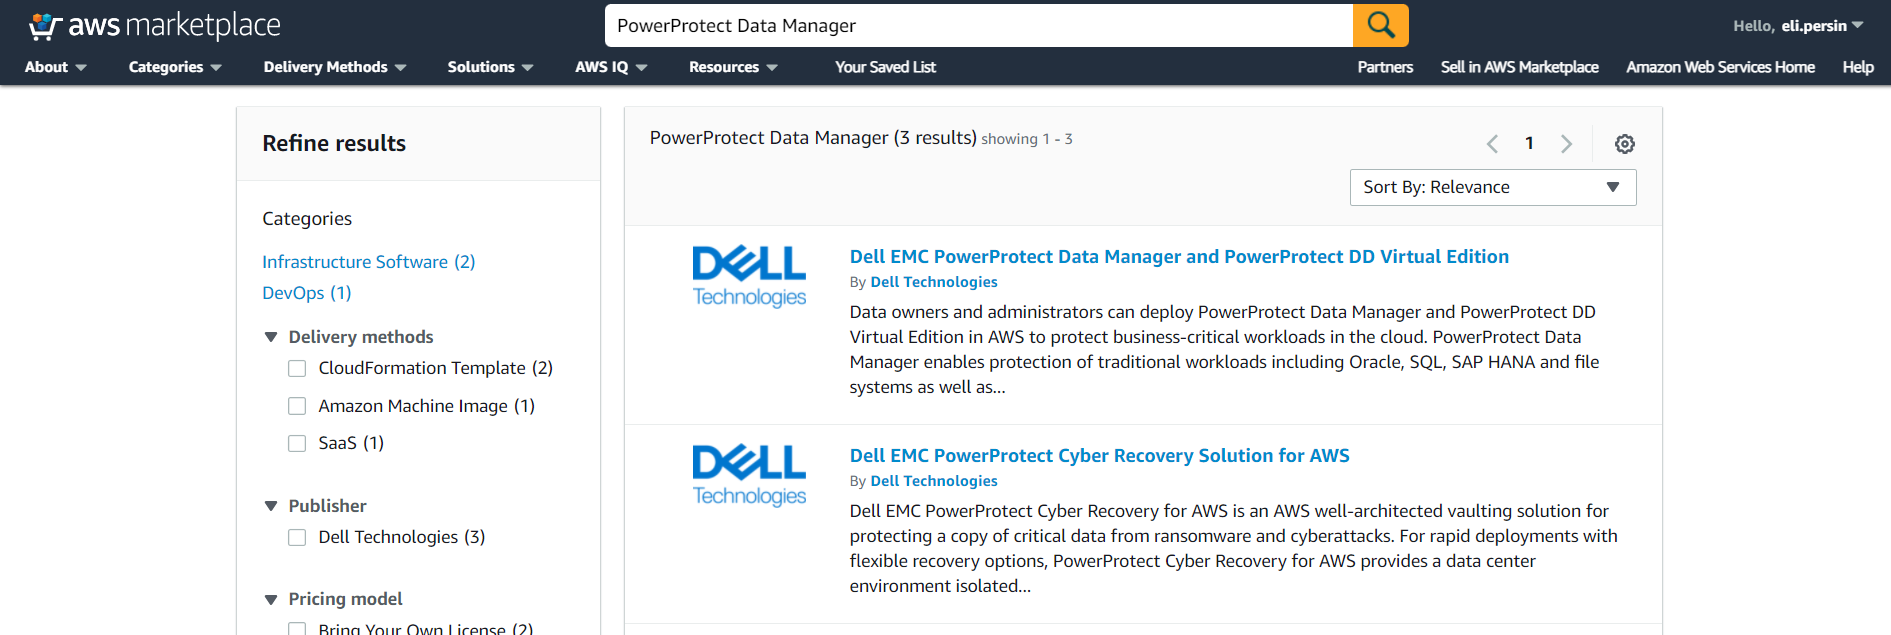
Once the CloudFormation stack is deployed, you can access the PowerProtect Data Manager through any web browser, and then add and protect your cloud resources, just as if it were an on-prem deployment – super intuitive and super easy!!
I think the trickiest part in the deployment is probably to make sure that all of the networking and firewall or other security and policy restrictions allow you to connect to the PowerProtect Data Manager VM and to the DDVE.
Check out this great whitepaper that describes the entire process of deploying PowerProtect Data Manager on AWS.
For Microsoft Azure users, the process here is similar. You can deploy PowerProtect Data Manager using the Azure Marketplace service:

This whitepaper will take you through the exact steps required to successfully deploy PowerProtect Data Manager and PowerProtect DDVE on your Azure subscription.
Didn’t I say it’s really easy and works the same way in all the cloud platforms?
GCP users can use the GCP Marketplace to deploy their PowerProtect Data Manager:
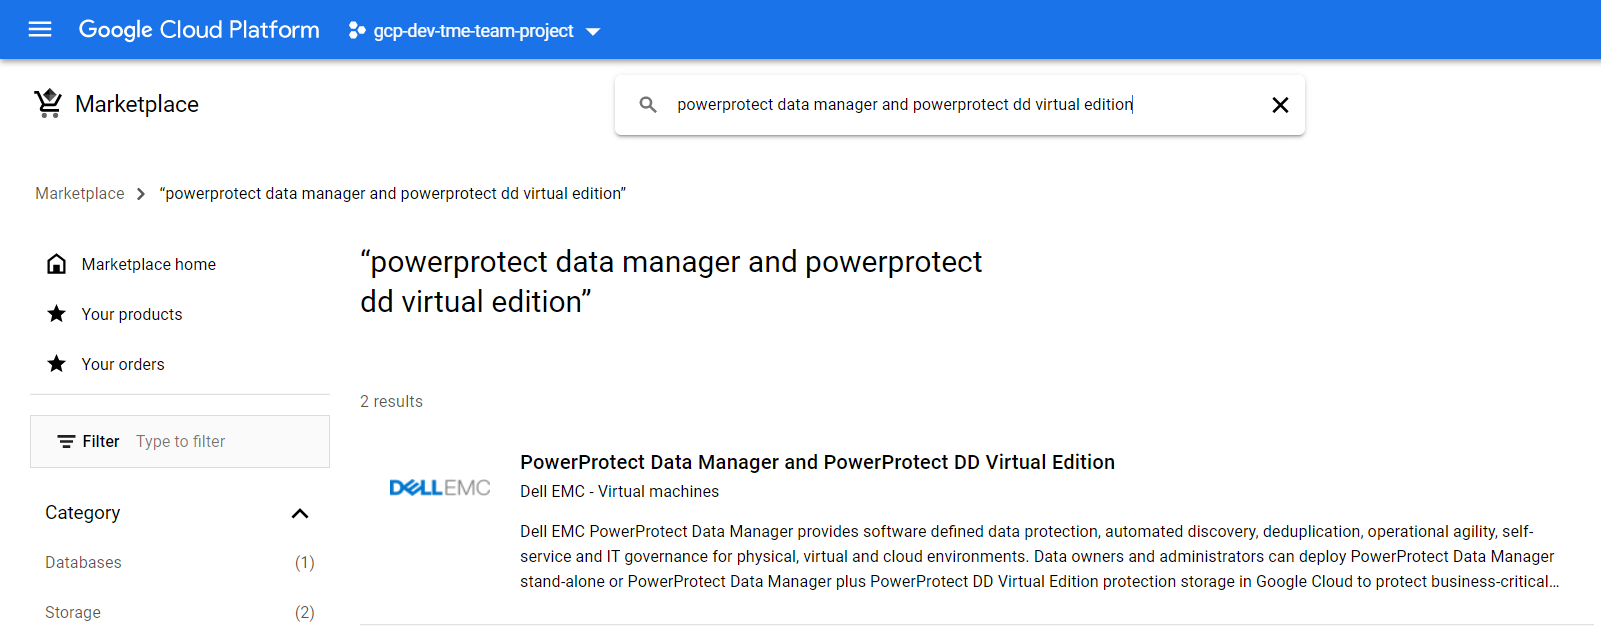
This whitepaper describes the entire deployment process with detailed screenshots on GCP.
Now you can easily protect your multi-cloud resources with the same powerful protection solution!
Author: Eli Persin

PowerProtect Data Manager – Protecting AWS EKS (Elastic Kubernetes Service)
Tue, 29 Nov 2022 22:22:38 -0000
|Read Time: 0 minutes
NOTE: After seeing several questions and mails about the process, I want to clarify: the process described in this blog is relevant for PPDM 19.9. I recommend that you check the latest EKS protection with PowerProtect Data Manager in this blog by Idan Kentor: https://infohub.delltechnologies.com/p/powerprotect-data-manager-how-to-protect-aws-eks-elastic-kubernetes-service-workloads/.
Recently I had the chance to deploy PowerProtect Data Manager 19.9 on AWS with a PowerProtect DD Virtual Edition and I wanted to test the AWS EKS (Elastic Kubernetes Service) protection feature to see the differences between any other Kubernetes deployments.
The PowerProtect Data Manager deployment itself was super easy. Initiated from the AWS marketplace, it created a CloudFormation stack that deployed all of the needed services after asking for network and other settings. What I especially liked about it was that it deployed the PowerProtect DD as well, so I didn’t have to deploy it separately.
Deploying and configuring the EKS cluster and its Node-Group was easy, but the installation of AWS EBS CSI drivers was a bit challenging, so I decided to share the procedure and my thoughts so others could do it just as easily.
Before you begin, you should make sure that you have kubectl and AWS CLI installed on your computer.
I started by deploying the EKS cluster using the AWS management console and used the 1.21 version (which was also the default one). I then created a Node-Group just as described in the AWS documentation. (This step involved attaching a role, but other than that it’s very intuitive and you could manage on your own without the documentation).
It’s highly recommended to read all of the relevant documentation to understand the following steps. I’ll summarize what I did.
I know it has a lot of steps and it looks scary, but this would probably make your life so much easier and will get you protecting EKS namespaces in no time!
1. Configure kubectl to allow you to connect to the EKS cluster:
aws eks --region <region-code> update-kubeconfig --name <eks-cluster-name>
2. Create a secret.yaml file on your computer, which will be used to configure the AWS EBS CSI drivers.
Add your credentials to the file itself. The required permissions are described here:
https://docs.aws.amazon.com/eks/latest/userguide/ebs-csi.html).
The yaml structure and more details are available at the AWS EBS CSI driver git page here:
aws-ebs-csi-driver/secret.yaml at master · kubernetes-sigs/aws-ebs-csi-driver · GitHub
3. Apply the secret:
kubectl apply -f secret.yaml
4. Install the EBS CSI driver:
kubectl apply -k "github.com/kubernetes-sigs/aws-ebs-csi-driver/deploy/kubernetes/overlays/stable/?ref=release-1.2"
5. The default storage class on EKS is gp2. Because PowerProtect Data Manager does not support it, it needs to be changed to EBS-SC which works with the EBS CSI driver.
Install the EBS Storage Class.
kubectl apply -f ebs-sc.yaml
6. Apply all of these:
kubectl apply -f https://raw.githubusercontent.com/kubernetes-csi/external-snapshotter/master/client/config/crd/snapshot.storage.k8s.io_volumesnapshotclasses.yaml
kubectl apply -f https://raw.githubusercontent.com/kubernetes-csi/external-snapshotter/master/client/config/crd/snapshot.storage.k8s.io_volumesnapshotcontents.yaml
kubectl apply -f https://raw.githubusercontent.com/kubernetes-csi/external-snapshotter/master/client/config/crd/snapshot.storage.k8s.io_volumesnapshots.yaml
kubectl apply -f https://raw.githubusercontent.com/kubernetes-sigs/aws-ebs-csi-driver/master/examples/kubernetes/snapshot/specs/classes/snapshotclass.yaml
kubectl apply -f https://raw.githubusercontent.com/kubernetes-csi/external-snapshotter/master/deploy/kubernetes/snapshot-controller/rbac-snapshot-controller.yaml
kubectl apply -f https://raw.githubusercontent.com/kubernetes-csi/external-snapshotter/master/deploy/kubernetes/snapshot-controller/setup-snapshot-controller.yaml
7. Change the default Storage Class to EBS:
kubectl patch storageclass gp2 -p "{\"metadata\": {\"annotations\":{\"storageclass.kubernetes.io/is-default-class\":\"false\"}}}"
kubectl patch storageclass ebs-sc -p "{\"metadata\": {\"annotations\":{\"storageclass.kubernetes.io/is-default-class\":\"true\"}}}"
8. Create a service account on the EKS cluster in order to connect to the PowerProtect Data Manager server and allow the EKS cluster discovery:
kubectl apply -f ppdm-discovery.yaml
9. Create another one for the protection itself:
kubectl apply -f ppdm-rbac.yaml
Both of the previous yaml files can be found on any PowerProtect Data Manager at the following path: /usr/local/brs/lib/cndm/misc/rbac.tar.gz
At this point you should already have, or should create, a new namespace on your EKS cluster and have an application that you want to protect running on it.
10. List the secrets in the powerprotect namespace that was created by running the previous yaml file:
kubectl get secret -n powerprotect
11. Get the relevant secret from the list that you got from the previous command (the name will change in every deployment, but should be in the following format):
kubectl describe secret ppdm-discovery-serviceaccount-token-45abc -n powerprotect
This will output a string with the secret that you need in order to register the EKS cluster in PowerProtect Data Manager.
12. Get the FQDN to register the EKS cluster (You’re looking for the Kubernetes control plane, and must remove the “https://”):
kubectl cluster-info
13. Get the EKS Cluster Certificate authority from the AWS EKS cluster UI, and convert it from BASE64. Use this website for example: https://www.base64decode.org/.
14. SSH to the PowerProtect Data Manager server, then create a new eks-root.pem file with the decoded BASE64 result (including the BEGIN and END CERTIFICATE lines).
15. Run the following command:
keytool -importcert -alias <your-eks-cluster-name> -keystore /etc/ssl/certificates/extserver/extserver.truststore -storepass extserver -file eks-root.pem
16. Connect to the PowerProtect Data Manager UI, and add a new Kubernetes Asset Source.
Use the FQDN from Step 12 (again, without the https://) and create new credentials with the Service Account Token that you got in Step 11.
After the EKS cluster is added as an Asset Source, you can protect the namespaces in your EKS cluster by creating a new Protection Policy. For more info, check out the interactive demos at the Dell Technologies Demo Center.
Author: Eli Persin