


Breaking down the barriers for VDI with VxRail and NVIDIA vGPU
Wed, 21 Apr 2021 15:17:54 -0000
|Read Time: 0 minutes
Desktop transformation initiatives often lead customers to look at desktop and application virtualization. According to Gartner, “Although few organizations planned for the global circumstances of COVID-19, many will now decide to have some desktop virtualization presence to expedite business resumption.”
However, customers looking to embrace these technologies have faced several hurdles, including:
- Significant up-front CapEx investments for storage, compute, and network infrastructure
- Long planning, design, and procurement cycles
- High cost of adding additional capacity to meet demand
- Difficulty delivering a consistent user experience across locations and devices
These hurdles have often caused desktop transformation initiatives to fail fast, but there is good news on the horizon. Dell Technologies and VMware have come together to provide customers with a superior solution stack that will allow them to get started more quickly than ever, with simple and cost-effective end-to-end desktop and application virtualization solutions using NVIDIA vGPU and powered by VxRail.
Dell Technologies VDI solutions powered by VxRail
Dell Technologies VDI solutions based on VxRail feature a superior solution stack at an exceptional total cost of ownership (TCO). The solutions are built on Dell EMC VxRail and they leverage VMware Horizon 8 or Horizon Apps and NVIDIA GPU for those who need high-performance graphics. Wyse Thin and Zero client, OptiPlex micro form factor desktop, and Dell monitors are also available as part of these solutions. Simply plug in, power up, and provision virtual desktops in less than an hour, reducing the time needed to plan, design, and scale your virtual desktop and application environment.
VxRail HCI system software provides out-of-the-box automation and orchestration for deployment and day-to-day system-based operational tasks, reducing the overall IT OpEx required to manage the stack. You are not likely to find any build-it-yourself solution that provides this level of lifecycle management, automation, and operational simplicity
Dell EMC VxRail and NVIDIA GPU a powerful combination
Remote work has become the new normal, and organizations must enable their workforces to be productive anywhere while ensuring critical data remains secure.
Enterprises are turning to GPU-accelerated virtual desktop infrastructure (VDI) because GPU-enabled VDI provides workstation-like performance, allowing creative and technical professionals to collaborate on large models and access the most intensive 3D graphics applications.
Together with VMware Horizon, NVIDIA virtual GPU solutions help businesses to securely centralize all applications and data while providing users with an experience equivalent to the traditional desktop.
NVIDIA vGPU software included with the latest VMware Horizon release, which is available now, helps transform workflows so users can access data outside the confines of traditional desktops, workstations, and offices. Enterprises can seamlessly collaborate in real time, from any location, and on any device.
With NVIDIA vGPU and VMware Horizon, professional artists, designers, and engineers can access new features such as 10bit HDR and high-resolution 8K display support while working from home by accessing their virtual workstation.
How NVIDIA GPU and Dell EMC VxRail power VDI
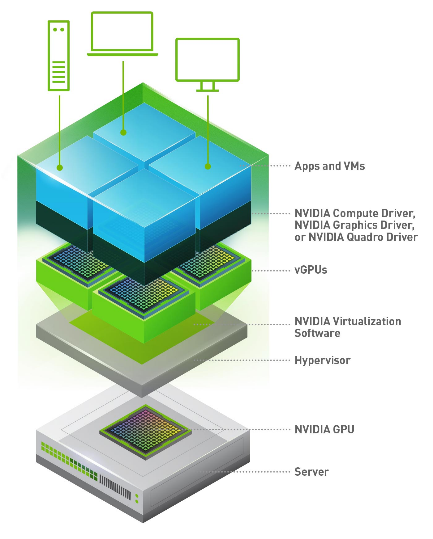
In a VDI environment powered by NVIDIA virtual GPU, the virtual GPU software is installed at the virtualization layer. The NVIDIA software creates virtual GPUs that enable every virtual machine to share a physical GPU installed on the server or allows for multiple GPUs to be allocated on a single VM to power the most demanding workloads. The NVIDIA virtualization software includes a driver for every VM. Because work that was previously done by the CPU is offloaded to the GPU, the users, even demanding engineering and creative users, have a much better experience.
Virtual GPU for every workload on Dell EMC VxRail
 As more knowledge workers are added on a server, the server will run out of CPU resources. Adding an NVIDIA GPU offloads CPU operations that would otherwise use the CPU, resulting in an improved user experience and performance. We used the NVIDIA nVector knowledge worker VDI workload to test user experience and performance with NVIDIA GPU. The NVIDIA M10, T4, A40, RTX6000/8000 and V100S, all of which are available on Dell EMC VxRail, achieve similar performance for this workload.
Customers are realizing the benefits of increased resource utilization by leveraging GPU-accelerated Dell EMC VxRail to run virtual desktops and workstations. They are also leveraging these resources to run compute workloads, for example AI or ML, when users are logged off. Customers who want to be able to run compute workloads on the same infrastructure on which they run VDI, might leverage a V100S to do so. For the complete list, see NVIDIA GPU cards supported on Dell EMC VxRail.
Conclusion
With the prevalence of graphics-intensive applications and the deployment of Windows 10 across the enterprise, adding graphics acceleration to VDI powered by NVIDIA virtual GPU technology is critical to preserving the user experience. Moreover, adding NVIDIA GRID with NVIDIA GPU to VDI deployments increases user density on each server, which means that more users can be supported with a better experience.
To learn more about measuring user experience in your own environments, contact your Dell Account Executive.
Useful links
Video: VMware Horizon on Dell Technologies Cloud
Dell Technologies Solutions: Empowering your remote workforce
Certified GPU for VxRail: NVIDIA vGPU for VxRail[
Everything VxRail: Dell EMC VxRail
VDI Design Guide: VMware Horizon on VxRail and vSAN Ready Nodes
Latest VxRail release: Simpler cloud operations and more deployment options!
Related Blog Posts

Next-Generation Graphics Acceleration for Digital Workplaces from Dell EMC and NVIDIA
Fri, 09 Dec 2022 13:58:56 -0000
|Read Time: 0 minutes
Originally published June 2019
For most organizations undergoing a digital transformation, maintaining a good user experience on virtual desktops—an essential component of digital workplaces—is a challenge. Users naturally compare their new virtual desktop experience to their previous physical endpoint experience. As the user experience continues to gain importance in digital workplaces (see this blog for more information), it is essential that virtualized environments keep pace with growing demands for user experience improvements.
This focus on the new user experience is being addressed by developers of modern-day operating systems and applications, who strive to meet the high expectations of their consumers. For example, the Windows 10 operating system, which plays a significant role in today's digital transformation initiatives, is more graphics-intensive than its predecessors. A study by Lakeside Software's SysTrack Community showed a 32 percent increase in graphics requirements when you move from Windows 7 to Windows 10. Microsoft Office applications (PowerPoint, Outlook, Excel, and so on), Skype for Business collaboration software, and all modern-day web browsers are designed to use more graphics acceleration in their newest releases.
Dell EMC Ready Solutions for VDI with NVIDIA Tesla T4 GPU
Dell EMC Ready Solutions for VDI, coupled with NVIDIA GRID Virtual PC (GRID vPC) and Virtual Apps (GRID vApps) software, provides comprehensive graphics acceleration solutions for your desktop virtualization workloads. The core of the NVIDIA GRID software is NVIDIA vGPU technology. This technology creates virtual GPUs, which enables sharing of the underlying GPU hardware among multiple users or virtual desktops running concurrently on a single host. This video compares the quality of a “CPU-only” VDI desktop with a VDI desktop powered by NVIDIA vGPU technology.
The latest NVIDIA GPU offering that supports virtualization is the NVIDIA Tesla T4, which is a universal GPU that can cater to a variety of workloads. The Tesla T4 comes with a 16 GB DDR6 memory. It operates at 70 W, providing higher energy efficiency and lower operating costs than its predecessors, and has a single-slot PCIe form factor. You can configure up to six Tesla T4s in a single Dell EMC PowerEdge R740xd server, providing the highest density for GPU-accelerated VMs in a Dell EMC server. For more details about the NVIDIA Tesla T4 GPU, see the Tesla T4 for Virtualization Technology Brief.
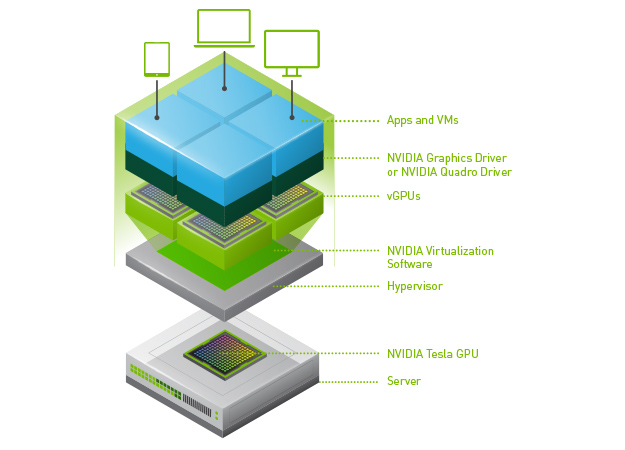
Image courtesy NVIDIA Corporation
Figure 1. NVIDIA vGPU technology stack
Tesla T4 vs. earlier Tesla GPU cards
Let's compare the NVIDIA Tesla T4 with other widely used cards—the NVIDIA Tesla P40 and the NVIDIA Tesla M10.
Tesla T4 vs. Tesla P40:
- The Tesla T4 comes with a maximum framebuffer of 16 GB. In a PowerEdge R740xd server, T4 cards can provide up to 96 GB of memory (16 GB x 6 GPUs), compared to the maximum 72 GB provided by the P40 cards (24 GB x 3 GPUs). So, for higher user densities and cost efficiency, the Tesla T4 is a better option in VDI workloads.
- You might have to sacrifice 3, 6, 12, and 24 GB profiles when using the T4, but 2 GB and 4 GB profiles, which are the most tested and configured profiles in VDI workloads, work well with the Tesla T4. However, NVIDIA Quadro vDWS use cases, which require higher memory per profile, are encouraged to use Tesla P40.
Tesla T4 vs. Tesla M10:
- In the PowerEdge R740xd server, three Tesla M10 cards can give you the same 96 GB memory as six Tesla T4 cards in a PowerEdge R740xd server. However, when it comes to power consumption, the six Tesla T4 cards consume only 420 W (70 W x 6 GPUs), while the three Tesla M10 GPUs consume 675 W (225 W x 3 GPUs), a substantial difference of 255 W per server. When compared to the Tesla M10, the Tesla T4 provides power savings, reducing your data center operating costs.
- Tesla M10 cards support a 512 MB profile, which is not supported by the Tesla T4. However, the 512 MB profile is not a viable option in today’s modern-day workplaces, where graphics-intensive Windows 10 operating systems, multi-monitors, and 4k monitors are prevalent.
The following table provides a summary of the Tesla T4, P40, and M10 cards.
Table 1. Comparison of NVIDIA Tesla T4, P40 & M10
GPU | Form factor | GPUs/board | Memory size | vGPU profiles | Power |
T4 | PCIe 3.0 single slot | 1 | 16 GB GDDR6 | 1 GB, 2 GB, 4 GB, 8 GB, 16 GB | 70 W |
P40 | PCIe 3.0 dual slot | 1 | 24 GB GDDR5 | 1 GB, 2 GB, 3 GB, 4 GB, 6 GB, 8 GB, 12 GB, 24 GB | 250 W |
M10 | PCIe 3.0 dual slot | 4 | 32 GB GDDR5 | .5 GB, 1 GB, 2 GB, 4 GB, 8 GB | 225 W |
(8 per GPU) |
GPU sizing and support for mixed workloads
With multi-monitors and 4K monitors becoming a norm in the modern workplace, streaming high-resolution videos can saturate the encoding engine on the GPUs and increase the load on the CPUs, affecting the performance and scalability of VDI systems. Thus, it is important to size the GPUs based on the number of encoding streams and required frames per second (fps). The Tesla T4 comes with an enhanced NVIDIA NVENC encoder that can provide higher compression and better image quality in H.264 and H.265 (HEVC) video codecs. The Tesla T4 can encode 22 streams at 720 progressive scan (p) resolution, with simultaneous display in high-quality mode. On average, the Tesla T4 can also handle 10 streams at 1080p and 2–3 streams at Ultra HD (2160p) resolutions. Running in a low-latency mode, it can encode 37 streams at 720p resolution, 17–18 streams at 1080p resolution, and 4–5 streams in Ultra HD.
VDI remote protocols such as VMware Blast Extreme can use NVIDIA GRID software and the Tesla T4 to encode video streams in H.265 and H.264 codecs, which can reduce the encoding latency and improve fps, providing a better user experience in digital workplaces. The new Tesla T4 NVENC encoder provides up to 25 percent bitrate savings for H.265 and up to 15 percent bitrate savings for H.264. Refer to this NVIDIA blog to learn more about the Tesla T4 NVENC encoding improvements.
The Tesla T4 is well suited for use in a data center with mixed workloads. For example, it can run VDI workloads during the day and compute workloads at night. This concept, known as VDI by Day, HPC by Night, increases the productivity and utilization of data center resources and reduces data center operating costs.
Tesla T4 testing on Dell EMC VDI Ready Solution
At Dell EMC, our engineering team tested the NVIDIA Tesla T4 on our Ready Solutions VDI stack based on the Dell EMC VxRail hyperconverged infrastructure. The test bed environment was a 3-node VxRail V570F appliance cluster that was optimized for VDI workloads. The cluster was configured with 2nd Generation Intel Xeon Scalable processors (Cascade Lake) and with NVIDIA Tesla T4 cards in one of the compute hosts. The environment included the following components:
- PowerEdge R740xd server
- Intel Xeon Gold 6248, 2 x 20-core, 2.5 GHz processors (Cascade Lake)
- NVIDIA Tesla T4 GPUs with 768 GB memory (12 x 64 GB @ 2,933 MHz)
- VMware vSAN hybrid datastore using an SSD caching tier
- VMware ESXi 6.7 hypervisor
- VMware Horizon 7.7 VDI software layer
Dell EMC Engineering used the Power Worker workload from Login VSI for testing. You can find background information about Login VSI analysis at Login VSI Analyzing Results.
The GPU-enabled PowerEdge compute server hosted 96 VMs with a GRID vPC vGPU profile (T4-1B) of 1 GB memory each. The host was configured with six NVIDIA Tesla T4 cards, the maximum possible configuration for the NVIDIA Tesla T4 in a Dell PowerEdge R740xd server.
With all VMs powered on, the host server recorded a steady-state average CPU utilization of approximately 95 percent and a steady-state average GPU utilization of approximately 34 percent. Login VSImax—the active number of sessions at the saturation point of the system—was not reached, which means the performance of the system was very good. Our standard threshold of 85 percent for average CPU utilization was relaxed for this testing to demonstrate the performance when graphics resources are fully utilized (96 profiles per host). You might get a better user experience with managing CPU at a threshold of 85 percent by decreasing user density or by using a higher-binned CPU. However, if your CPU is a previous generation Intel Xeon Scalable processor (Skylake), the recommendation is to use only up to four NVIDIA Tesla cards per PowerEdge R740xd server. With six T4 cards per PowerEdge R740xd server, the GPUs were connected to both x8 and x16 lanes. We found no issues using both x8 and x16 lanes and, as indicated by the Login VSI test results, system performance was very good.
Dell EMC Engineering performed similar tests with a Login VSI Multimedia Workload using 48 vGPU-enabled VMs on a GPU-enabled compute host, each having a Quadro vDWS-vGPU profile (T4-2Q) with a 2 GB frame buffer. With all VMs powered on, the average steady-state CPU utilization was approximately 48 percent, and the average steady-state GPU utilization was approximately 35 percent. The system performed well and the user experience was very good.
For more information about the test-bed environment configuration and additional resource utilization metrics, see the design and validation guides for VMware Horizon on VxRail and vSAN on our VDI Info Hub.
Summary
Just as Windows 10 and modern applications are incorporating more graphics to meet user expectations, virtualized environments must keep pace with demands for an improved user experience. Dell EMC Ready Solutions for VDI, coupled with the NVIDIA Tesla T4 vGPU, are tested and validated solutions that provide the high-quality user experience that today’s workforce demands. Dell EMC Engineering used Login VSI’s Power Worker Workload and Multimedia Workload to test Ready Solutions for VDI with the Tesla T4, and observed very good results in both system performance and user experience.
In the next blog, we will discuss the affect of memory speed on VDI user density based on testing done by Dell EMC VDI engineering team. Stay tuned and we’d love to get your feedback!

MLPerf™ Inference v4.0 Performance on Dell PowerEdge R760xa and R7615 Servers with NVIDIA L40S GPUs
Fri, 05 Apr 2024 17:41:56 -0000
|Read Time: 0 minutes
Abstract
Dell Technologies recently submitted results to the MLPerf™ Inference v4.0 benchmark suite. This blog highlights Dell Technologies’ closed division submission made for the Dell PowerEdge R760xa, Dell PowerEdge R7615, and Dell PowerEdge R750xa servers with NVIDIA L40S and NVIDIA A100 GPUs.
Introduction
This blog provides relevant conclusions about the performance improvements that are achieved on the PowerEdge R760xa and R7615 servers with the NVIDIA L40S GPU compared to the PowerEdge R750xa server with the NVIDIA A100 GPU. In the following comparisons, we held the GPU constant across the PowerEdge R760xa and PowerEdge R7615 servers to show the excellent performance of the NVIDIA L40S GPU. Additionally, we also compared the PowerEdge R750xa server with the NVIDIA A100 GPU to its successor the PowerEdge R760xa server with the NVIDIA L40S GPU.
System Under Test configuration
The following table shows the System Under Test (SUT) configuration for the PowerEdge servers.
Table 1: SUT configuration of the Dell PowerEdge R750xa, R760xa, and R7615 servers for MLPerf Inference v4.0
Server | PowerEdge R750xa | PowerEdge R760xa | PowerEdge R7615 |
MLPerf Version | V4.0
| ||
GPU | NVIDIA A100 PCIe 80 GB | NVIDIA L40S
| |
Number of GPUs | 4 | 2 | |
MLPerf System ID | R750xa_A100_PCIe_80GBx4_TRT | R760xa_L40Sx4_TRT | R7615_L40Sx2_TRT
|
CPU | 2 x Intel Xeon Gold 6338 CPU @ 2.00GHz | 2 x Intel Xeon Platinum 8470Q | 1 x AMD EPYC 9354 32-Core Processor |
Memory | 512 GB | ||
Software Stack | TensorRT 9.3.0 CUDA 12.2 cuDNN 8.9.2 Driver 535.54.03 / 535.104.12 DALI 1.28.0 | ||
The following table lists the technical specifications of the NVIDIA L40S and NVIDIA A100 GPUs.
Table 2: Technical specifications of the NVIDIA A100 and NVIDIA L40S GPUs
Model | NVIDIA A100 | NVIDIA L40S | ||
Form factor | SXM4 | PCIe Gen4 | PCIe Gen4 | |
GPU architecture | Ampere | Ada Lovelace | ||
CUDA cores | 6912 | 18176 | ||
Memory size | 80 GB | 48 GB | ||
Memory type | HBM2e | HBM2e | ||
Base clock | 1275 MHz | 1065 MHz | 1110 MHz | |
Boost clock | 1410 MHz | 2520 MHz | ||
Memory clock | 1593 MHz | 1512 MHz | 2250 MHz | |
MIG support | Yes | No | ||
Peak memory bandwidth | 2039 GB/s | 1935 GB/s | 864 GB/s | |
Total board power | 500 W | 300 W | 350 W | |
Dell PowerEdge R760xa server
The PowerEdge R760xa server shines as an Artificial Intelligence (AI) workload server with its cutting-edge inferencing capabilities. This server represents the pinnacle of performance in the AI inferencing space with its processing prowess enabled by Intel Xeon Platinum processors and NVIDIA L40S GPUs. Coupled with NVIDIA TensorRT and CUDA 12.2, the PowerEdge R760xa server is positioned perfectly for any AI workload including, but not limited to, Large Language Models, computer vision, Natural Language Processing, robotics, and edge computing. Whether you are processing image recognition tasks, natural language understanding, or deep learning models, the PowerEdge R760xa server provides the computational muscle for reliable, precise, and fast results.
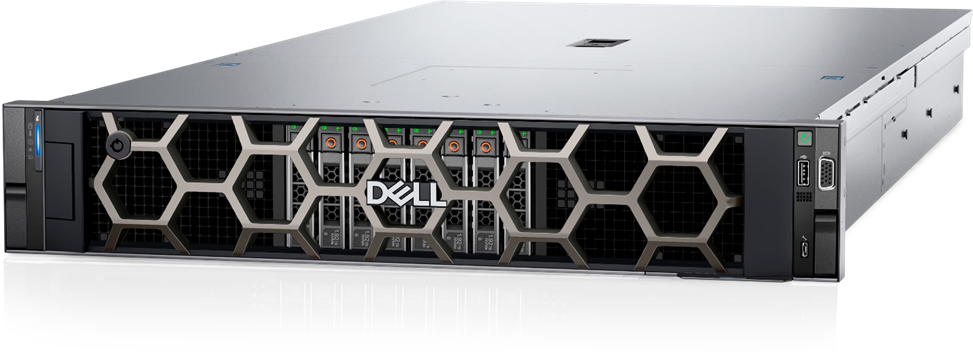
Figure 1: Front view of the Dell PowerEdge R760xa server
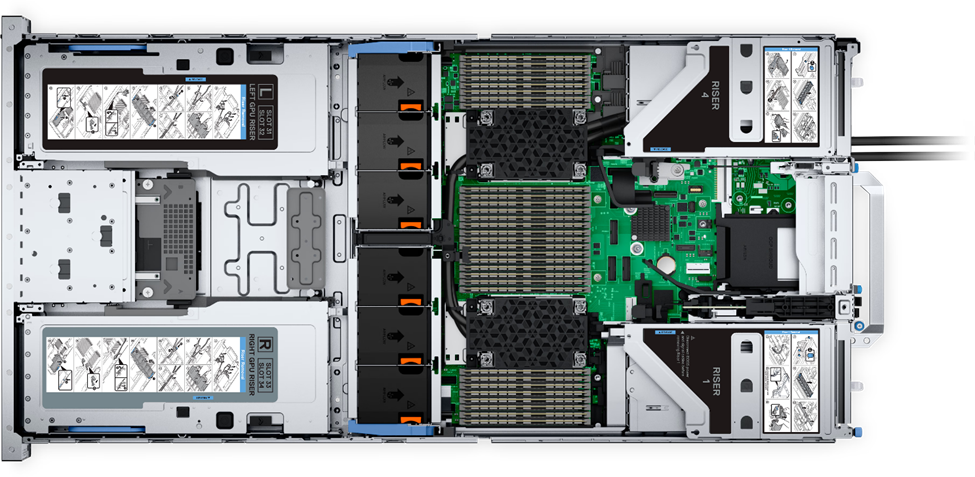
Figure 2: Top view of the Dell PowerEdge R760xa server
Dell PowerEdge R7615 server
The PowerEdge R7615 server stands out as an excellent choice for AI, machine learning (ML), and deep learning (DL) workloads due to its robust performance capabilities and optimized architecture. With its powerful processing capabilities including up to three NVIDIA L40S GPUs supported by TensorRT, this server can handle complex neural network inference and training tasks with ease. Powered by a single AMD EPYC processor, this server performs well for any demanding AI workloads.
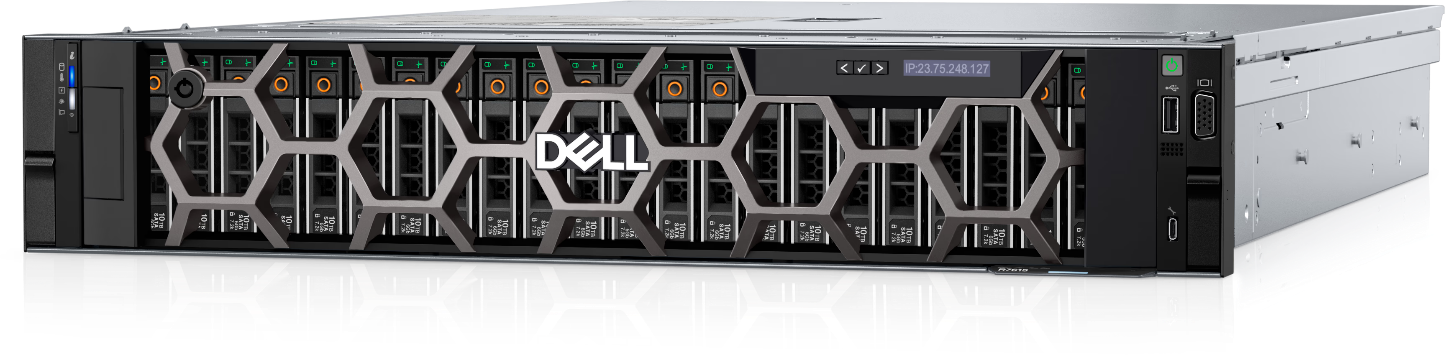
Figure 3: Front view of the Dell PowerEdge R7615 server
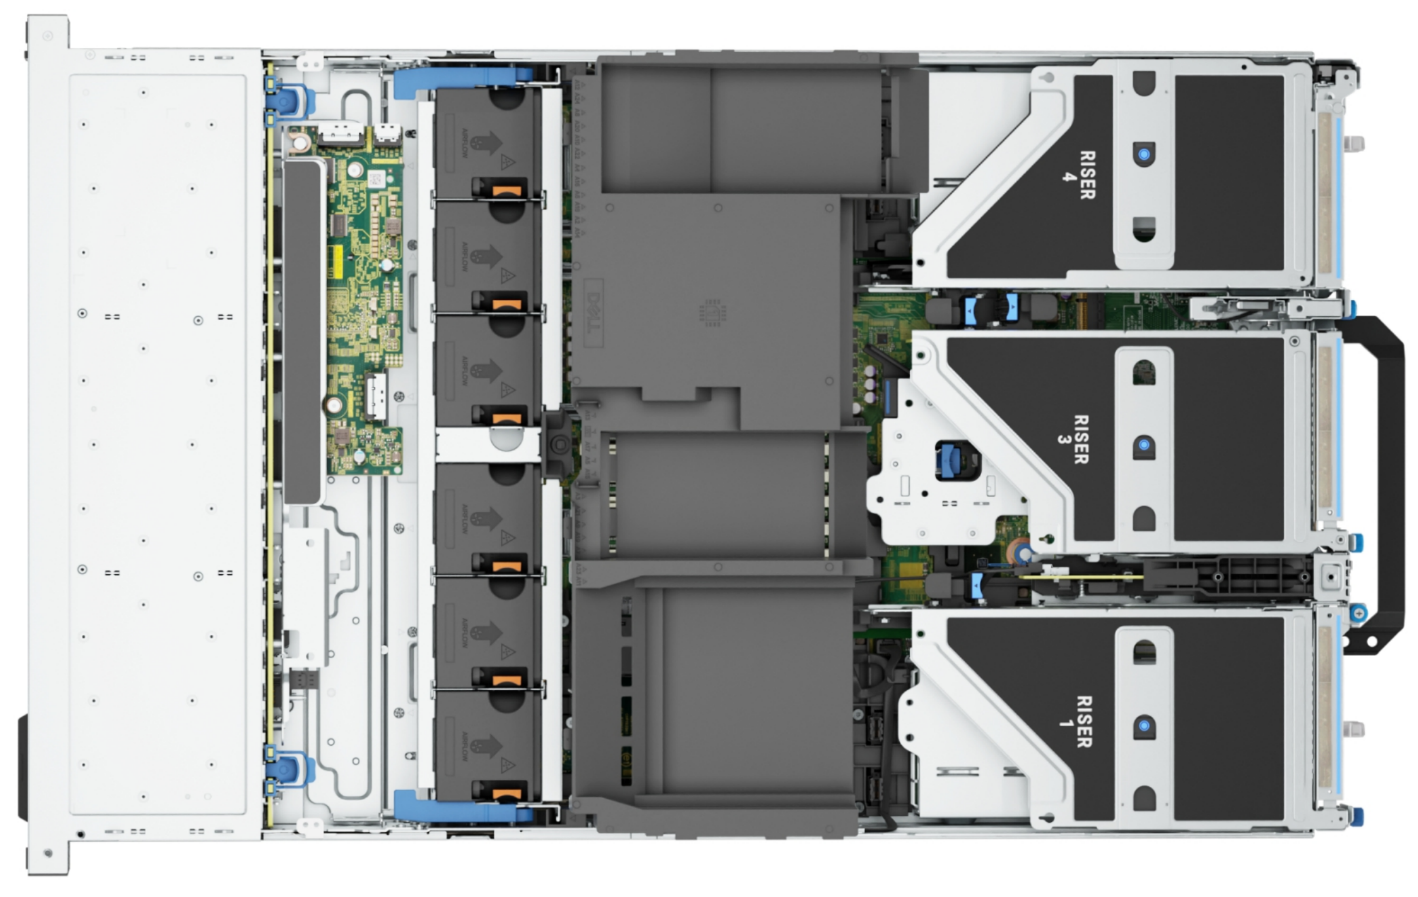
Figure 4: Top view of the Dell PowerEdge R7615 server
Dell PowerEdge R750xa server
The PowerEdge R750xa server is a perfect blend of technological prowess and innovation. This server is equipped with Intel Xeon Gold processors and the latest NVIDIA GPUs. The PowerEdge R760xa server is designed for the most demanding AI, ML, and DL workloads as it is compatible with the latest NVIDIA TensorRT engine and CUDA version. With up to nine PCIe Gen4 slots and availability in a 1U or 2U configuration, the PowerEdge R750xa server is an excellent option for any demanding workload.
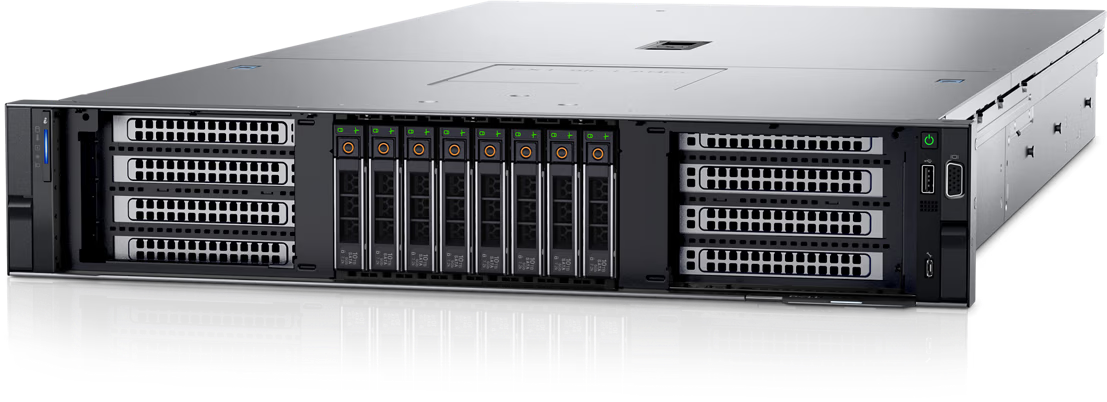
Figure 5: Front view of the Dell PowerEdge R750xa server
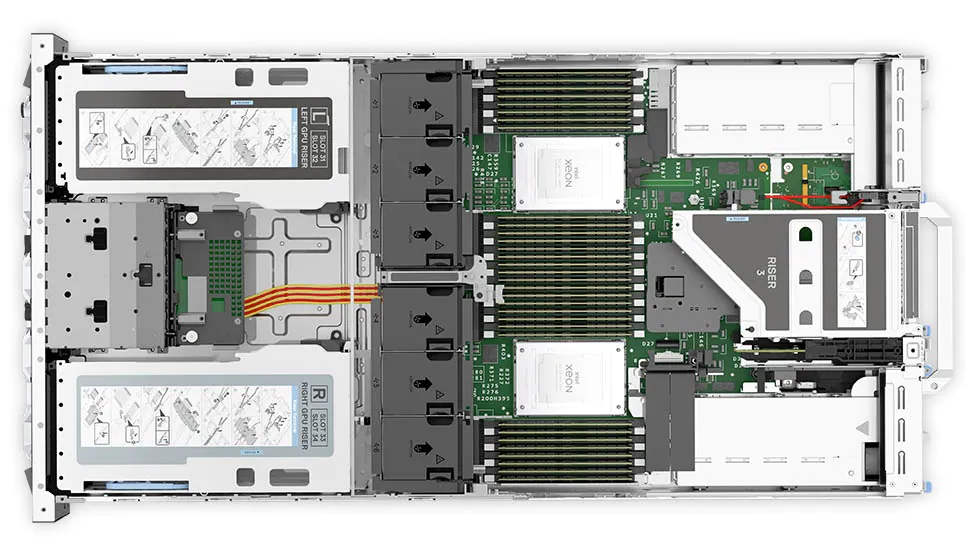
Figure 6: Top view of the Dell PowerEdge R750xa server
Performance results
Classical Deep Learning models performance
The following figure presents the results as a ratio of normalized numbers over the Dell PowerEdge R750xa server with four NVIDIA A100 GPUs. This result provides an easy-to-read comparison of three systems and several benchmarks.
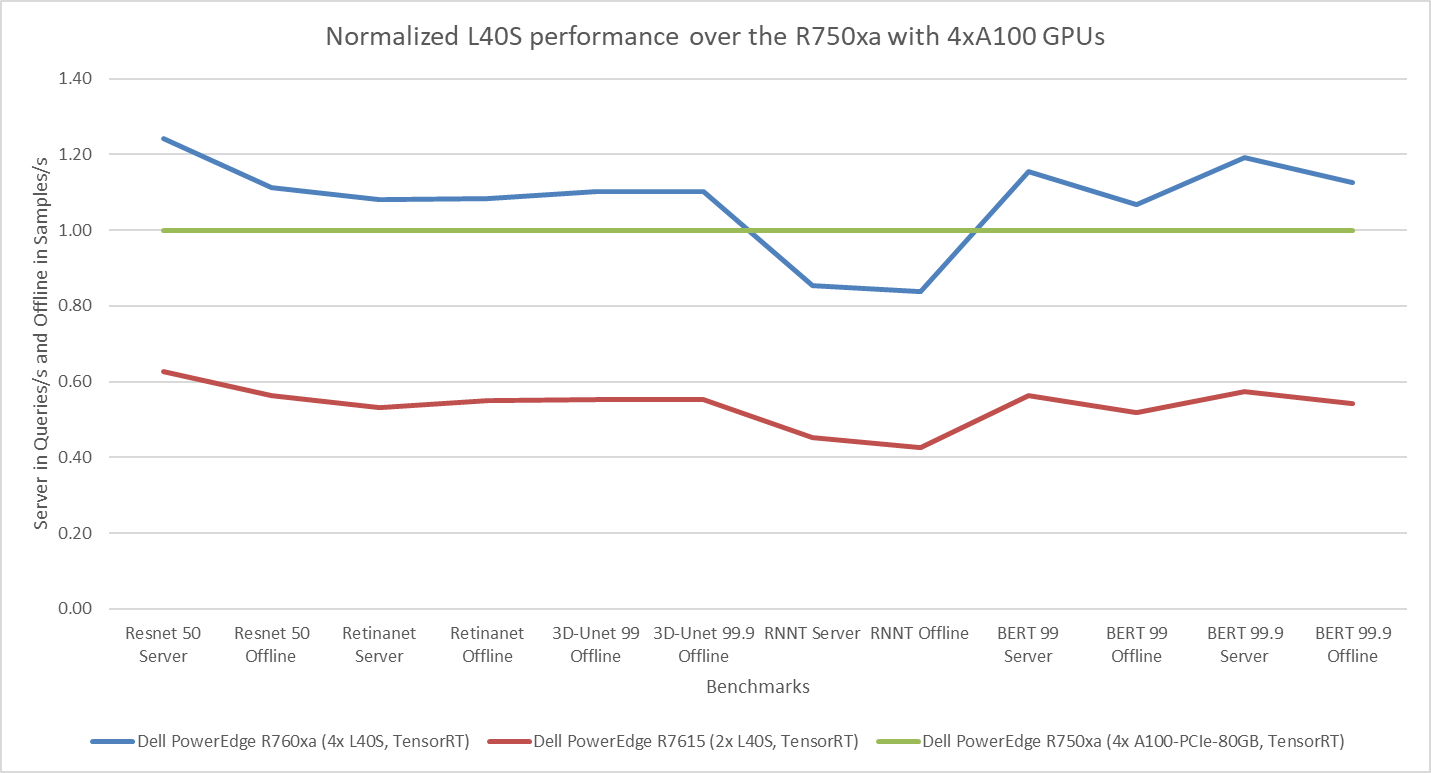
Figure 7: Normalized NVIDIA L40S GPU performance over the PowerEdge R750xa server with four A100 GPUs
The green trendline represents the performance of the Dell PowerEdge R750xa server with four NVIDIA A100 GPUs. With a score of 1.00 for each benchmark value, the results have been divided by themselves to serve as the baseline in green for this comparison. The blue trendline represents the performance of the PowerEdge R760xa server with four NVIDIA L40S GPUs that has been normalized by dividing each benchmark result by the corresponding score achieved by the PowerEdge R750xa server. In most cases, the performance achieved on the PowerEdge R760xa server outshines the results of the PowerEdge R750xa server with NVIDIA A100 GPUs, proving the expected improvements from the NVIDIA L40S GPU. The red trendline has also been normalized over the PowerEdge R750xa server and represents the performance of the PowerEdge R7615 server with two NVIDIA L40S GPUs. It is interesting that the red line almost mimics the blue line. This result suggests that the PowerEdge R7615 server, despite having half the compute resources, still performs comparably well in most cases, showing its efficiency.
Generative AI performance
The latest submission saw the introduction of the new Stable Diffusion XL benchmark. In the context of generative AI, stable diffusion is a text to image model that generates coherent image samples. This result is achieved gradually by refining and spreading out information throughout the generation process. Consider the example of dropping food coloring into a large bucket of water. Initially, only a small, concentrated portion of the water turns color, but gradually the coloring is evenly distributed in the bucket.
The following table shows the excellent performance of the PowerEdge R760xa server with the powerful NVIDIA L40S GPU for the GPT-J and Stable Diffusion XL benchmarks. The PowerEdge R760xa takes the top spot in GPT-J and Stable Diffusion XL when compared to other NVIDIA L40S results.
Table 3: Benchmark results for the PowerEdge R760xa server with the NVIDIA L40S GPU
Benchmark | Dell PowerEdge R760xa L40S result (Server in Queries/s and Offline in Samples/s) | Dell’s % gain to the next best non-Dell results (%) |
Stable Diffusion XL Server | 0.65 | 5.24 |
Stable Diffusion XL Offline | 0.67 | 2.28 |
GPT-J 99 Server | 12.75 | 4.33 |
GPT-J 99 Offline | 12.61 | 1.88 |
GPT-J 99.9 Server | 12.75 | 4.33 |
GPT-J 99.9 Offline | 12.61 | 1.88 |
Conclusion
The MLPerf Inference submissions elicit insightful like-to-like comparisons. This blog highlights the impressive performance of the NVIDIA L40S GPU in the Dell PowerEdge R760xa and PowerEdge R7615 servers. Both servers performed well when compared to the performance of the Dell PowerEdge R750xa server with the NVIDIA A100 GPU. The outstanding performance improvements in the NVIDIA L40S GPU coupled with the Dell PowerEdge server position Dell customers to succeed in AI workloads. With the advent of the GPT-J and Stable diffusion XL Models, the Dell PowerEdge server is well positioned to handle Generative AI workloads.