


Announcing iDRAC Credential Management in OpenManage Enterprise 4.0
Download PDF
Summary
Dell OpenManage Enterprise is an infrastructure management console that offers a full lifecycle management solution for Dell PowerEdge Servers and provides many other features. Since its initial release, OpenManage Enterprise (or OME for short) has continued to add new features with every release. Among the list of new features, OME release 4.0 now supports optional iDRAC credential management. iDRAC credentials are required by OME for server management tasks. This new feature offers customers support for either internal OME iDRAC password rotation or iDRAC credential retrieval from CyberArk Central Credential Provider, an external third-party credential provider solution.
iDRAC password rotation
Overview
Many customers have a password rotation policy for iDRACs. OME 4.0 can now support this requirement by removing the need for administration accounts with static credentials on managed iDRACs. This feature is supported on iDRAC 7, 8, and 9. The internal password rotation feature in OME 4.0 can create and then update credentials on a scheduled basis for the managed iDRACs. The frequency of rotation can be set in the OME password management section and can range from daily to annual, as shown in the following figure.
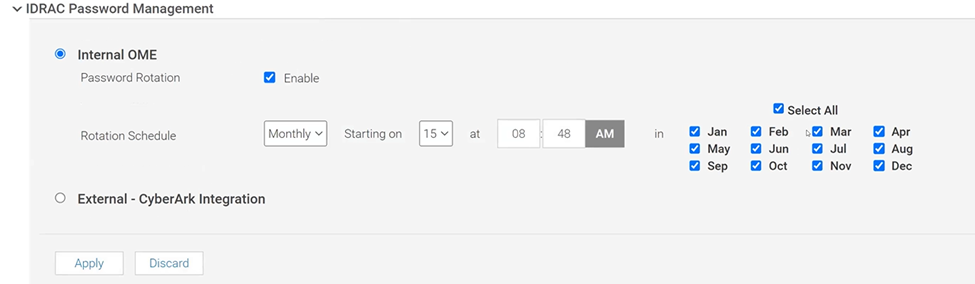
Figure 1. OME iDRAC Password Management with Internal rotation selected
Enablement
After the OpenManage Enterprise version 4.0 virtual appliance has been installed, and the basic configuration has been applied, the first time an administrator logs into OME, an initial onboarding wizard executes. As part of this wizard, the iDRAC password rotation feature is enabled by default. Note: This rotation feature can only be disabled/enabled during this initial onboarding.
After the feature is enabled, the process to implement a rotation policy starts with the standard OME device discovery job, using an existing administrator level iDRAC account such as root / Calvin. To enable support for password rotation, an OME Advanced or OME Advanced+ license is required to be present on each iDRAC. During the server onboarding task, as OME discovers the new servers, OME automatically creates a unique OME service account with OME specific user account IDs and strong passwords on each iDRAC.
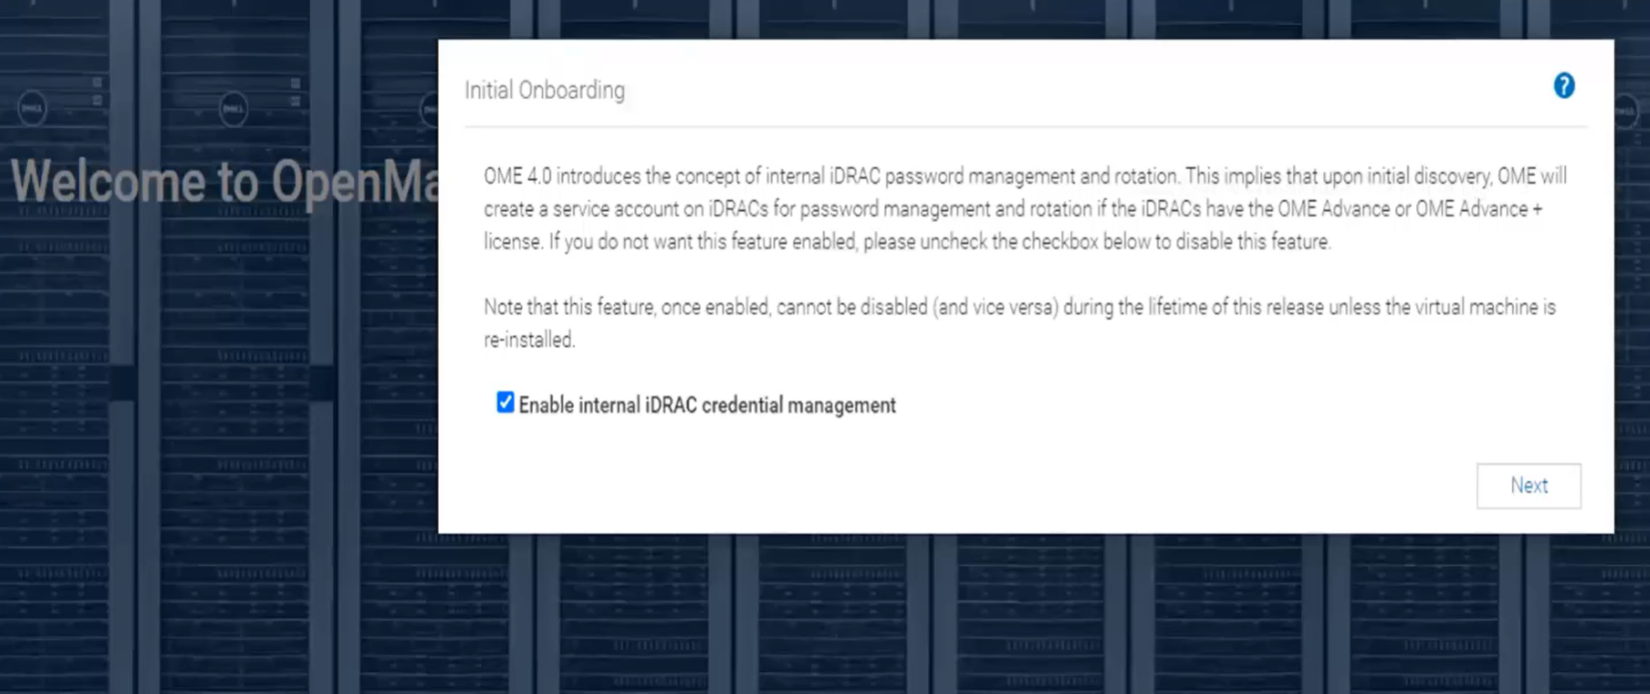
Figure 2. Initial OME onboarding wizard - One-time credential management enablement
After one or more servers are onboarded and the OME service accounts have been automatically created on each iDRAC, the credential type used for each server is displayed in OME on the All Devices page. Any server where password rotation is enabled is reported as credential type “Internal”. Servers for which rotation is not supported, for example where there is no OME Advanced license, are reported as “Discovery” (which means that OME will continue to use the credentials set at discovery). See Figure 3.
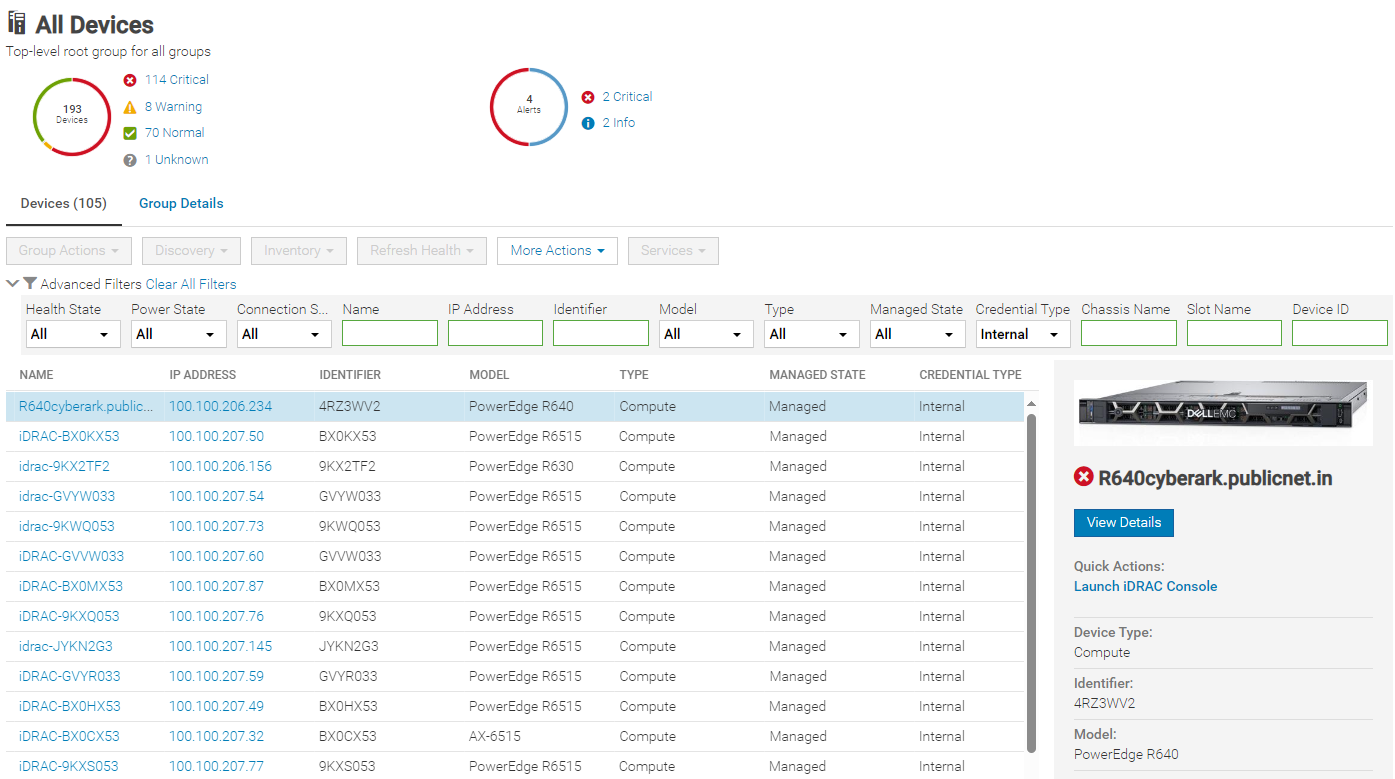
Figure 3. Credential type reporting
Using CyberArk for iDRAC credential retrieval
Overview
CyberArk is a third-party Identity and Access Management (IAM) security tool that offers comprehensive solutions to store and manage passwords across organizations. OME can be configured to interface with the CyberArk Central Credential Provider for managing iDRAC credentials.
Enabling CyberArk
To enable CyberArk, you must configure support details about the CyberArk vault on the iDRAC Password Management page in OME (Figure 4). An OME Advanced+ license is required to be present on each iDRAC.
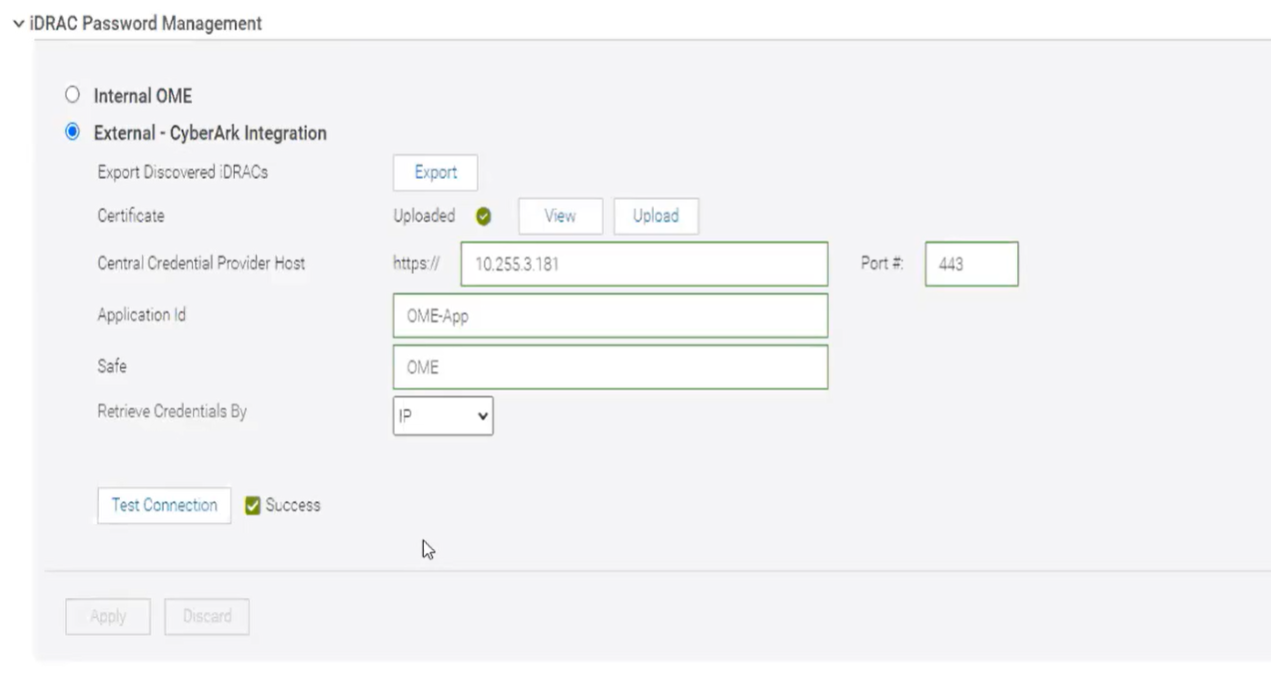
Figure 4. CyberArk enablement
Servers with iDRAC CyberArk support enabled are reported as credential type “CyberArk” (Figure 5).
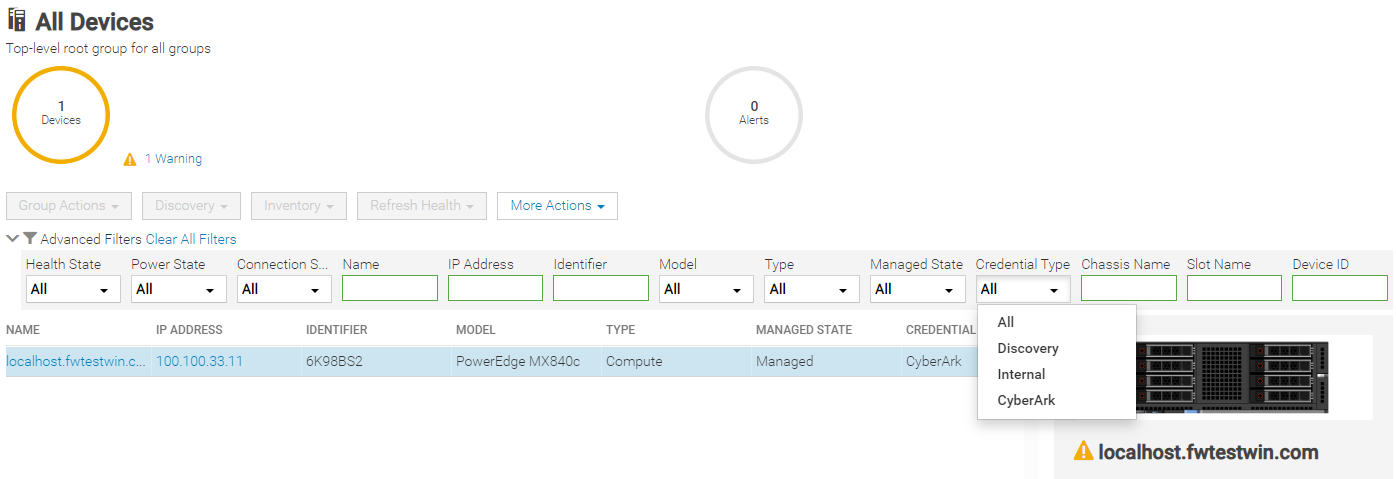
Figure 5. Credential type CyberArk reporting with drop down filter by type
Conclusion
With the new credentials features now available in OpenManage Enterprise release 4.0, Dell has added additional security features to OME that can support customers’ password rotation policies.
References
- Support page for OpenManage Enterprise (includes white papers and videos)
- OpenManage Documentation (User Guide, API Guide, and support matrix)
- OpenManage Enterprise API - Dell Technologies Developer
- GitHub Dell OpenManage Ansible Modules and example API scripts
- Dell Systems Management Info Hub (for white papers, tech notes, videos, and infographics)
- CyberArk.com
Related Documents

Good, Better, Best Automation of Bare Metal Server Deployment using OpenManage Enterprise
Wed, 01 Nov 2023 15:01:08 -0000
|Read Time: 0 minutes
Introduction
Customers looking for a simple method to automate Dell PowerEdge server deployment at scale need to review the use of Dell OpenManage Enterprise (OME). During a typical server deployment, customers need to configure firmware settings such as boot order, RAID storage configuration details, iDRAC settings, and security standards, in addition to loading a server operating system. All these manual tasks can be repetitive and time-consuming.
Customers can save a substantial amount of administration time by leveraging automated deployment mechanisms. Dell offers many deployment solutions the choice of which depend on customer requirements and elements such as network environment and server operating system. OME offers its own solution and can also integrate into many popular third-party tools such as Ansible, Terraform, Microsoft System Center, or VMware vCenter.
This Direct from Development (DfD) tech note describes the capabilities and results that customers can expect when using OME to deploy bare metal servers. This document covers the deployment features and how to streamline server deployment when using OpenManage Enterprise orchestration controlling the iDRAC that is built into each Dell PowerEdge server.
OpenManage Enterprise – bare metal deployment
OpenManage Enterprise (OME) is Dell's on-premises server lifecycle management console. Its capabilities include discovery, monitoring, updating firmware, reporting, and of course configuration/deployment. During deployment, OME can discover a bare metal server and install both a firmware configuration setting and an operating system.
There are two typical approaches:
- The first: A previously discovered server gets a configuration template manually pushed from OME.
- The second is more automated: OME is configured with a list of tag numbers of arriving servers. OME then regularly examines an IP address range. When OME identifies a new server by its unique service tag, OME pushes the template to the new server's iDRAC for deployment. The customer can either obtain a list of service tag numbers associated with an order from Dell by email at the time of shipping, or collect the service tag numbers from external labels on the packaging or from the actual servers as they are being physically installed.
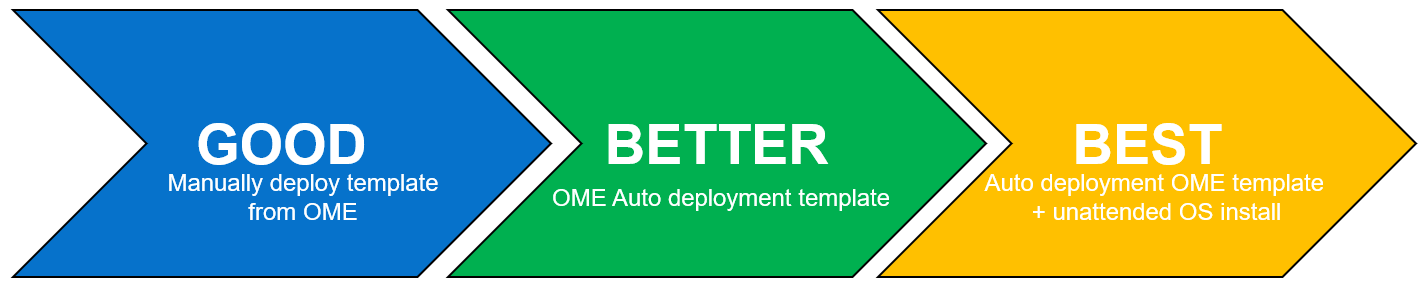
Each method supports an optional delivery of a bootable ISO file. This is an industry standard image file that contains all the required the files and configuration information to install an operating system. To automate the OS install, the operating system ISO is configured for an automated unattended install. All these features require no PXE boot support and no additional DNS/DHCP customization.
Server template
Let’s look at configuration settings first. This is based on iDRAC’s “server configuration profile” concept. A template encapsulates the server’s BIOS, iDRAC, and components’ firmware configuration settings as a machine-readable file. A template can consist of hundreds of firmware configuration values including iDRAC, BIOS, PERC RAID, NICs, and FC HBA settings. OME can create a template by obtaining these settings from a reference server. A customer can also clone and edit a template for simple updates, or OME can import a template exported from another OME instance.
Testing and results
To understand the profound impact of the automation of this process, we have tested it against a manual process for 1, 10*, and 100* servers[1]. Based on the testing of the OME auto deploy approach for a customer with 100* servers, we found significant differences between automation and the manual process. The following graph illustrates the considerable time savings when using automation.
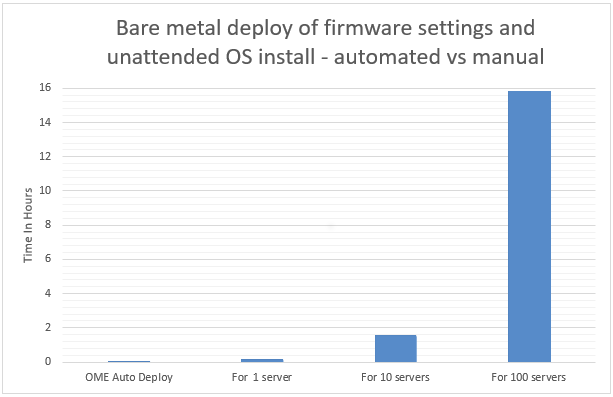
In internal testing at the Dell TME server lab, we found that manually importing the server configuration profile (SCP or deployment template), and then starting the unattended OS install ISO using virtual media in the iDRAC GUI, took 9 minutes 31 seconds. However, creating an auto deployment and importing a list of target server(s) took only 13 steps in 2 minutes 11 seconds. In addition, whether creating an auto deployment job for 1, 10, or 100 servers, this task took the same amount of time. However, when using the manual process, each additional server added a further 9 minutes 31 seconds.
Testing overview
To demonstrate both the ease of use and the impact of automation, we tested two different approaches: manual versus automated. Both methods used a template approach to configure firmware settings using previously collected data. The testing was conducted using a PowerEdge R540 server with an iDRAC 9 as the target server and OME 3.10 as a deployment solution. Testing results do not include any pre-work such as exporting the server SCP server configuration profile from the iDRAC, creating file shares, collecting Dell Service Tag information, setting the initial IP address on the iDRAC, or installing OME.
Steps for a manual approach to server deployment using SCP and ISO
Included are all installation steps until the server is booting from the OS ISO that contains the OS unattended installation information.
Starting from the iDRAC home page after signing in:
- Select configuration from the main tabs
- Select server configuration profile sub-tab
- Select import
- Select network share
- Enter XML SCP file name
- Enter IP address of file share
- Enter share name of file share
- Enter user account / password
- Select All for Import Components
- Select Off for Power state after import
- Click Import
- Click Job to watch configuration task running
- Wait for status to be completed (100%)
- Select Virtual Media sub tab
- Scroll down the page to remote file share
- Enter Image File Path for the file share for the ISO file
- Enter user account / password
- Click Connect
- Once connected click OK
- Select Dashboard from the main tabs
- Select Start the Virtual Console
- Click boot
- From the boot controls menu click Virtual CD/DVD/ISO
- Click Yes to confirm boot action
- Click Power
- Click Power on System
- Confirm Power action
Steps for an automated approach to server delopyment using OME
Starting from the iDRAC home page after signing in:
- From Configuration drop down menu select Auto Deploy
- Click Create
- In the auto deploy template wizard select the required server template
- Select Import CSV
- Click Import CSV
- Select required CSV file contain list of new server tag numbers
- Select Target Group Information
- Select Boot to Network ISO
- Enter ISO path and file name
- Enter IP address of file share
- Enter user account / password
- For target IP setting leave as Don’t change IP settings
- For Target attributes leave unchanged
Test results data
Table 1. Results of testing
Number of servers
| OpenManage Enterprise auto deploy | Manual Config Using iDRAC |
1 | 2 Min 11 Sec | 9 mins 31 secs |
10 | 2 Min 11 Sec | 1 hour 35 mins 10 secs* |
100 | 2 Min 11 Sec | 15 hours 51 mins 40 secs* |
*Projected outcomes based on analysis of results of 1. Customer results may vary.
Advanced features
In addition to the template and ISO deployment, OME offers many advanced features, such as Server-initiated discovery in which new servers are automatically registered with OME through a DNS entry. This negates the need for OME to have a discovery job running to search for new bare metal servers. OME also offers support for stateless servers with the concept of a pool of MAC and WWN addresses that can be allocated and moved as required. This means that zoning and any storage LUN allocation done using MAC addresses and address related based rules becomes mobile between physical servers.
To support the demand for further automation and integration, OpenManage Enterprise provides a RESTful API.
This fully documented API supports all features found on the GUI. Dell also maintains a collection of example PowerShell and Python scripts in the Dell repository on GitHub.
One size does not fit all
Given Dell Technologies’ open approach to servers and the large number of PowerEdge customers, Dell has developed other methods to streamline server configuration, such as:
- Deeper VMware deployment customization available from the OME plugin OpenManage integration with VMware vCenter (OMEVV)
- OME plugin for Microsoft System Center and Config Manager
- Zero touch provisioning built into iDRAC that uses DHCP provisioning options 43 and 60. This method uses an iDRAC SCP xml file that can include OS unattended installation information.
- Integration for ServiceNow, Terraform, and Ansible
- PXE support
- A Dell embedded lifecycle management GUI is included with iDRAC for 1-to1 deployments
A word about unattended OS installs
Using OME to install an OS on the target server(s) requires a level of OS installation automation. This is commonly referred to as an unattended OS installation. For example, Windows Server requires including a bootable ISO image with the unattended installation information contained in an autounattend.xml file to automate the installation. Microsoft’s Windows System Image Manager (WSIM), part of Windows Assessment and Deployment Kit ADK, can be used to create this answer file. A fresh bootable ISO is then created with the answer file in the root and OS install files copied from a standard Microsoft ISO image. You can use the OSCDIMG command line utility, which is shipped as part of ADK, to create a new customized bootable Windows OS unattended installation ISO. OME controls and automates the mounting and booting of this ISO on the target servers’ iDRACs during the deployment task.
Summary
Customers can realize the benefits of the deployment automation built into OpenManage Enterprise with ease. These benefits multiply as the number of servers you are deploying increases. Taking the 100-server example, it takes over 15 hours of administrator time to complete the task manually, but only 2 minutes 11 seconds of administrator time to perform the deployment using OME. Our testing showed that using automation brought major benefits, not only in administration time saved but also in accuracy, repeatability, predictability, and of course, efficiency.
References
- Support page for Dell OpenManage Enterprise
- List of OME Documentation including User Guide, API Guide, and Support Matrix
- Support Page for OpenManage Enterprise Integration for VMware vCenter (OMEVV)
- Support page for Integrated Dell Remote Access Controller 9 (iDRAC9)
- GitHub Dell OpenManage Ansible Modules
- Dell Technologies Developer
- Zero-Touch Bare-metal-Server Provisioning Using iDRAC9 with Auto Config
- Dell iDRAC9 v4 SCP OS deployment (video)
[1] Based on internal testing at the Dell TME server lab, October 2023.

Upgrading To OpenManage Enterprise 4.0
Thu, 07 Dec 2023 17:39:47 -0000
|Read Time: 0 minutes
Upgrading To OpenManage Enterprise 4.0
Authors: Mark Maclean, PowerEdge Technical Marketing Engineering / Manoj Malhotra, Product Manager, OME
Summary
Dell OpenManage Enterprise is an infrastructure management console for Dell PowerEdge Servers offering a full lifecycle management solution plus many other features. Since its initial release OpenManage Enterprise (often abbreviated to OME) has continued to develop adding new features every release. Customers on older versions of OME 3.x can migrate to OME 4.0 to leverage the new features, such as iDRAC credentials rotation and multi-faction authentication with RSA SecurID.
Migation
Overview
Unlike earlier versions, OME 4.0 does not offer an in-place upgrade, rather a transfer of existing data to a new instance of the appliance.
The upgrade is achieved through:
- Deploy a new instance of OME 4.0 virtual appliance
- Migrate data from OME 3.10.x to OME 4.0
- Decommission old OME 3.10.x virtual appliance
The migration is only required when you need to upgrade from OME 3.10.x (CentOS-based) to OME 4.0 (SLES-based). In the future, when upgrading (for example, from OME 4.0 to OME 4.1) the in-place upgrade will be supported.
This transfer of existing OME data such as discovered servers, deployment templates, policies, logs and credentials is achieved via the migration feature built in to OME. This migration wizard is step-based to export data from the OME 3.10.x appliance and import into a fresh OME 4.0 appliance. In order to migrate, customers must have OME 4.0 installed and configured with a new IP address and administrator account. Also, the existing OME 3.10.x and new OME 4.0 instances must be able to communicate with each other over the network.
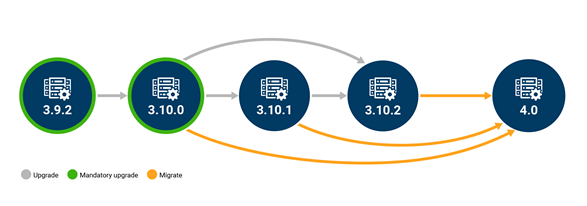
Figure 1 Possible upgrade paths to OME 4.0
This migration feature is only supported when going from OME 3.10.x to OME 4.0. Customers on early versions must apply in-place upgrades to reach OME 3.10.x before migrating to OME 4.0, see figure 1.
Enablement
As with previous versions, OME 4.0 is delivered as a virtual appliance. The virtual appliance is offered in three formats to be deployed on VMware or Microsoft Hyper-V or KMV. Once commissioned the OME appliance will manage any Dell PowerEdge host regardless of operating system. All three versions of the appliance can be downloaded from the Dell support site and detailed installation instructions for the virtual appliances are included in chapter 2 of the OME user guide. See link to the OME support page at the bottom of this document. Migration should run in a maintenance window period or a quiet time to lower the risk of critical alerts bring missed.
Once a new OpenManage Enterprise version 4.0 virtual appliance has been installed and the basic configuration has been applied, migration can begin. The logical steps are shown in figure 2. Starting with the existing source host, that needs to be OME version 3.10.x. The migration overseer needs local administrator/backup administrator rights to access backup/restore menu. From the drop-down backup/restore menu the migration wizard can be started. The steps include: checking SSL certificate match using the default Dell or customer supplied certificate for secure access, checking network access to the new OME 4.0 virtual appliance, supplying a passphrase to secure the backed-up data, checking for the completion of or stopping non-migration tasks. Backup encryption passphrase needs to be a minimum of 8 charters, certain characters such as commas full stops/periods and several other characters are not supported as special characters. At the end of the process the 3.10.x appliance will then automatically transition in to “maintenance mode pending” status.
Note: For customer supplied certificate client and server authentication are required from issuing CA.
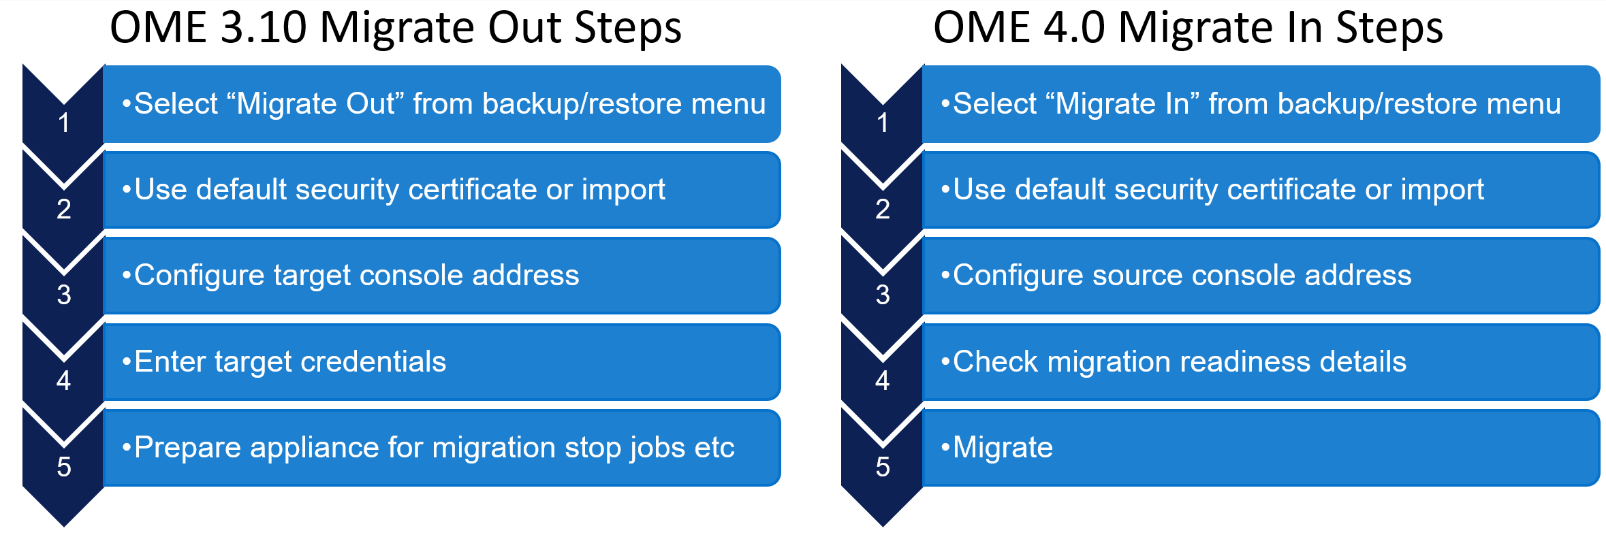
Figure 2 OME high level migration step
Then on the new OME 4.0 appliance, the first time an administrator logs into OME, an initial onboarding wizard starts automatically. There is no need to install any plugins, because the automation built into the migration tool handles this task. As part of this onboarding wizard, the migration feature can be selected to be run.
Note: This migration feature can also be run from the drop-down backup/restore menu post completion of the initial wizard if required, see figure 3.

Figure 3 Initial OME onboarding wizard – Migration step
The “migrate-in” steps to import data are as follows: once communications have been established via the supplied IP address and credentials, the migration engine automatically checks the plugin status and appliance status. If all is ready, then the backup passphrase used during “migrate-out” is re-entered and the “migrate-in” task is started via the import button, see figure 4.
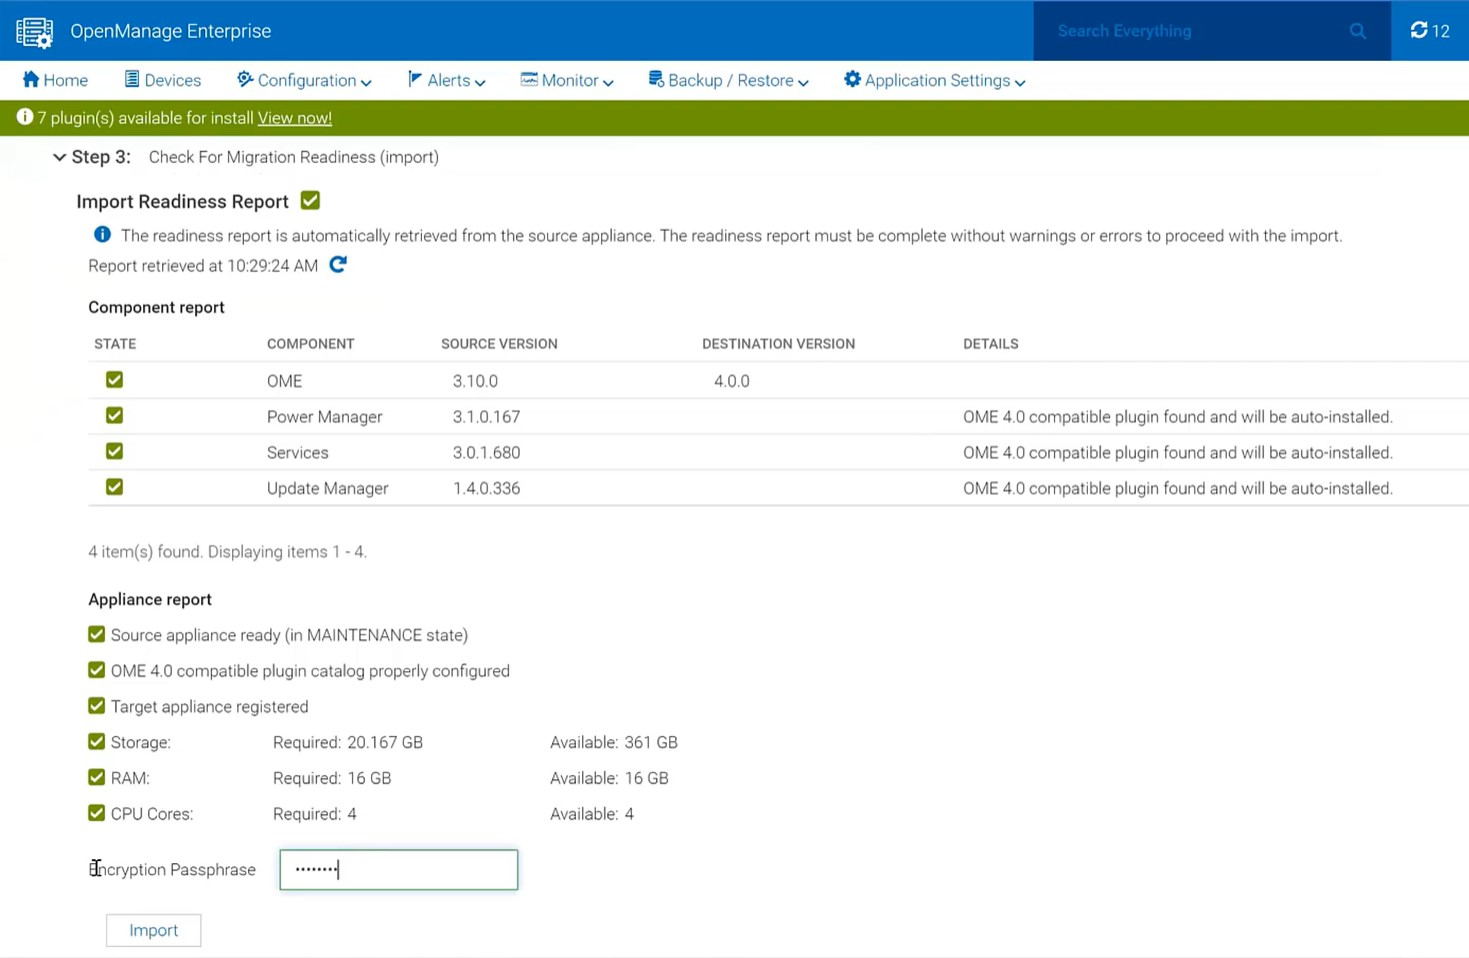
Figure 4 Migrate in wizard showing import steps
The wizard displays migration status and the various steps as they run and complete, see figure 5. These steps are also recorded in the migration log and can be viewed post-migration. As the IP address of the OME 3.10 appliance is not migrated across, post successful migration the OME 4.0 appliance executes a task to configure all the known iDRAC that have SNMP enabled with the IP details of the new management console as a trap destination.
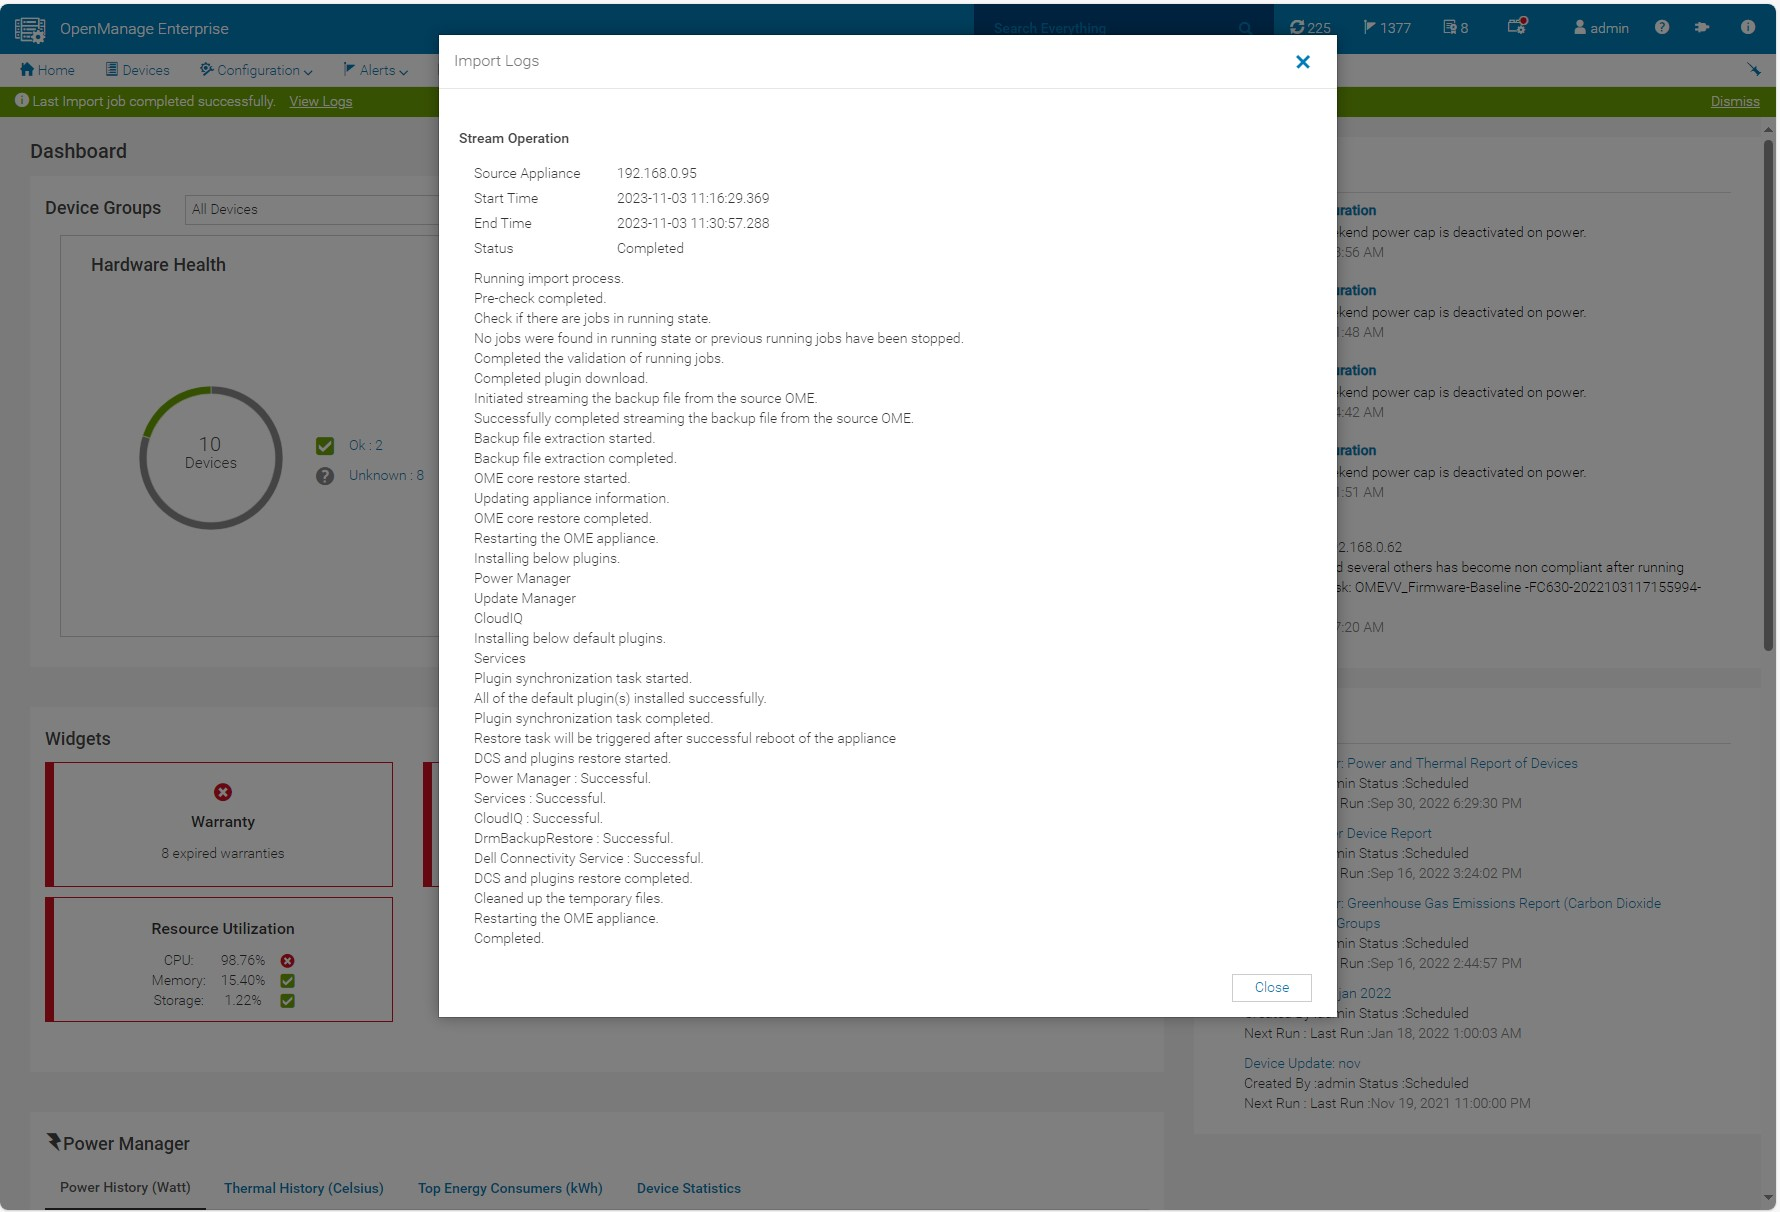
Figure 5 Log displaying successful migration
If necessary, the administrator can cancel the migration at the source using the Cancel migration hyperlink in the wizard. This will take the source appliance out of maintenance mode and back into working mode.
At the end of a successful migration, the source migrate-out appliance automatically enters the Decommission Ready status. The login GUI color changes to burgundy and text is modified to warn that the appliance is decommissioned.
NOTE: Only an admin can login to the console.
Instead of the dashboard, a message is displayed declaring that the appliance is ready to be decommissioned. At this point, the administrator recommended action is to power down and archive the virtual appliance. The admin can bring the appliance back to the running state however, this is highly discouraged, see figure 6. Finally, it is recommended to take a backup of the newly commissioned OME 4.0 appliance post migration before any further operations.
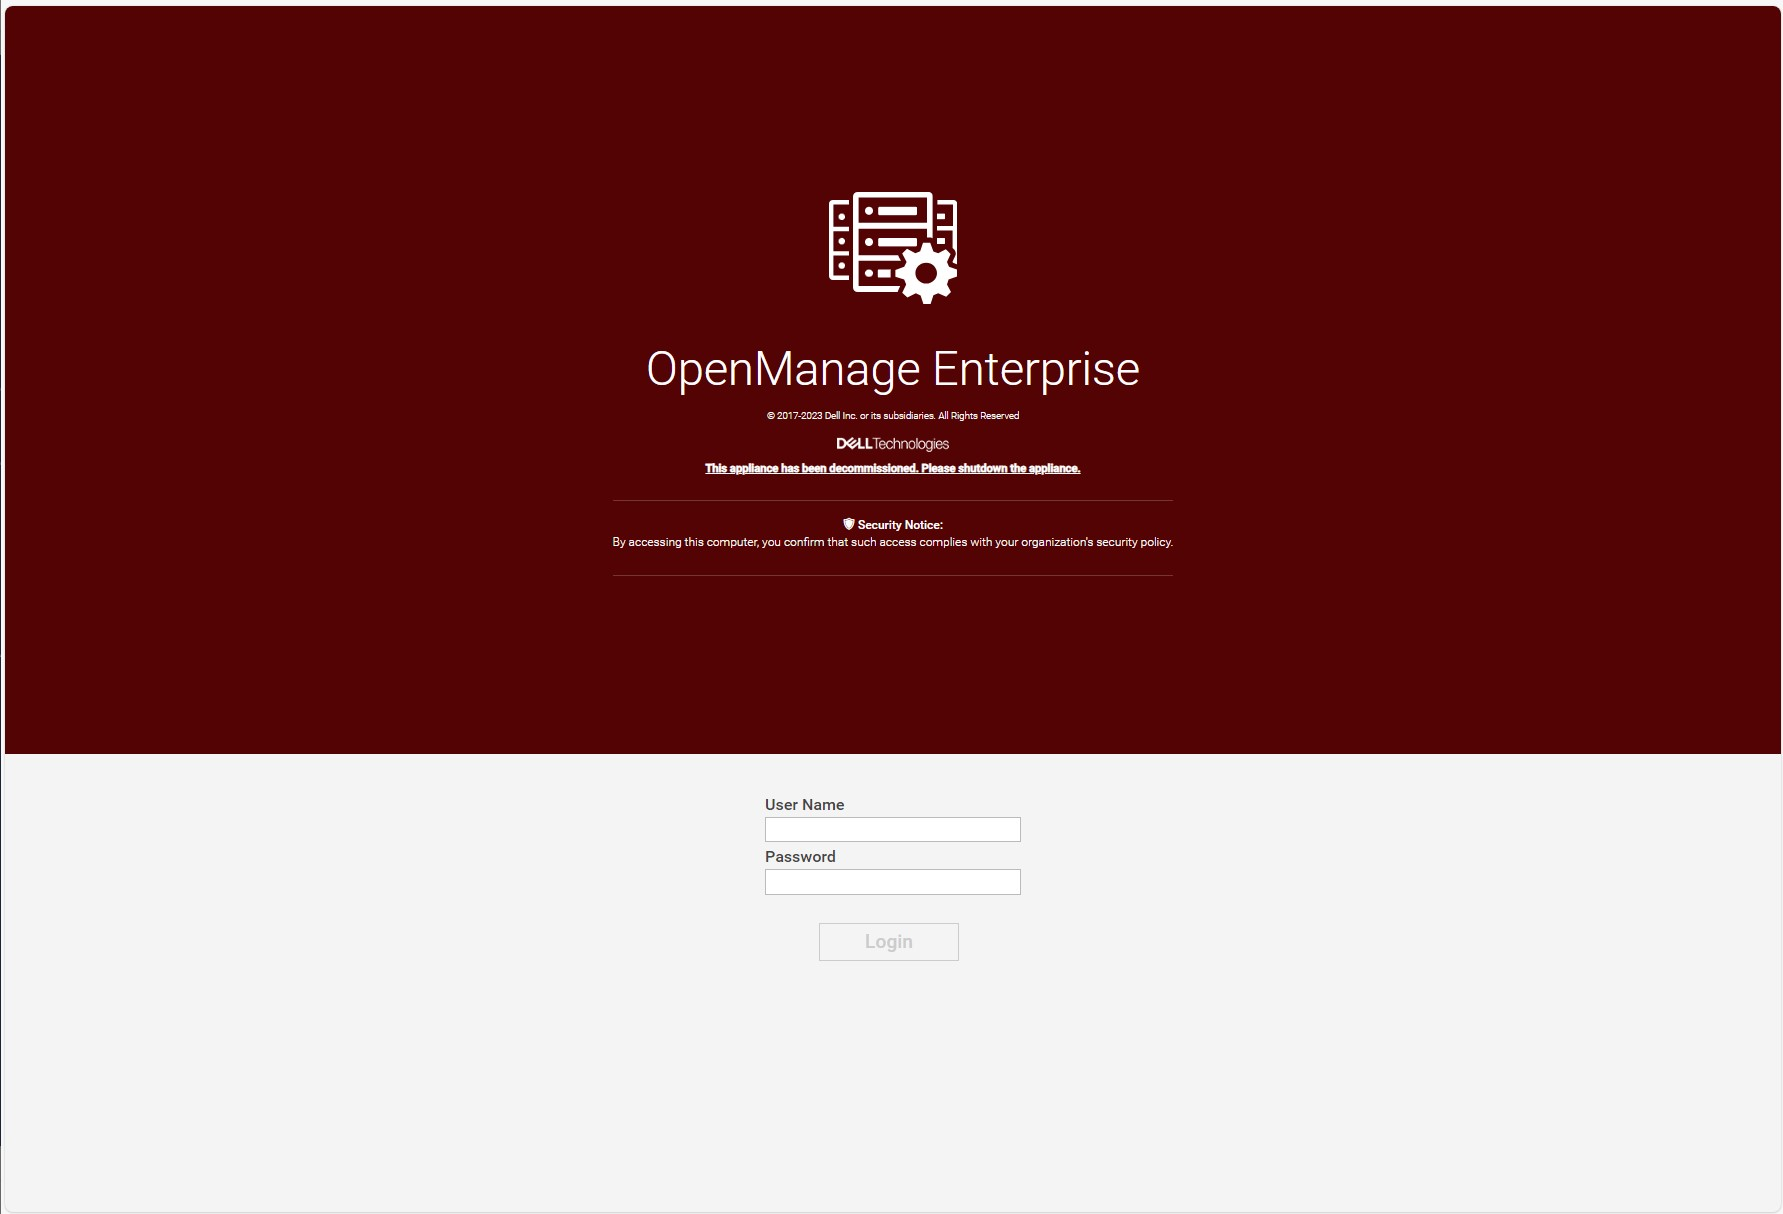
Figure 6 Example of a decommissioned OME 3.10.x login screen
Migration will move data such as application settings, device inventory, and plugin data, see table 1 for more details. For example, the Site ID details used by the OME CloudIQ plugin is migrated across to ensure continuation of server management traffic movement and the historic power data held by power manager is also transferred. Only one backup, restore or migrate process is supported at a time. Running more than one backup/restore process at a time can lead to unexpected system behavior.
Table 1 Data Considered During Migrate Jobs
Item | Description |
Database
|
|
Configuration files
|
|
Auto install plugins |
|
Plugin data restore |
|
Conclusion
Using the built in migration feature, customers can upgrade to OME 4.0 quickly and easily. Using the step-based wizard with integrated pre-transfer checks, and automated data streaming makes migration simple and hassle free. For more details, see chapter 18 of the OpenManage Enterprise 4.0 User's Guide.
References
- OpenManage Enterprise migration video : https://youtu.be/uckcVIKr3xo?si=ZuMgsm_XHgZJgzsv
- OpenManage Enterprise white papers / videos / links Support page
- OpenManage Enterprise Documentation User Guide, API Guide and support matrix etc
- OpenManage Enterprise API Dell Technologies Developer
- OpenManage Ansible Modules and example API scripts GitHub Dell OpenManage Ansible Modules
- Dell System Management Info Hub Tech notes, videos, infographics