
enableAutoSSLCertGen.sh
enableAutoSSLCertGen.sh
-
enableAutoSSLCertGen.sh
After the adapter is installed, copy the enableAutoSSLCertGen.sh to the SRM Appliance and then run as the root user. The script serves the following two purposes:
- Creates a file called “hostname” with the SRM Appliance hostname and moves it to the Docker volume of the SRDF SRA.
- Adds credentials for the protection or recovery vCenter in order to satisfy some parameters in the global options file. This is optional.
Because containers are used by VMware for SRM, the hostname of these are not the same as the SRM Appliance. Use of the container hostname would result in a certificate mismatch with the Solutions Enabler server and an inability to discover array pairs. Therefore the script generates the proper hostname file which is used in the certificate exchange.
Note: The SRDF SRA does not support the use of custom CA-certificates with Solutions Enabler and the SRM Appliance.
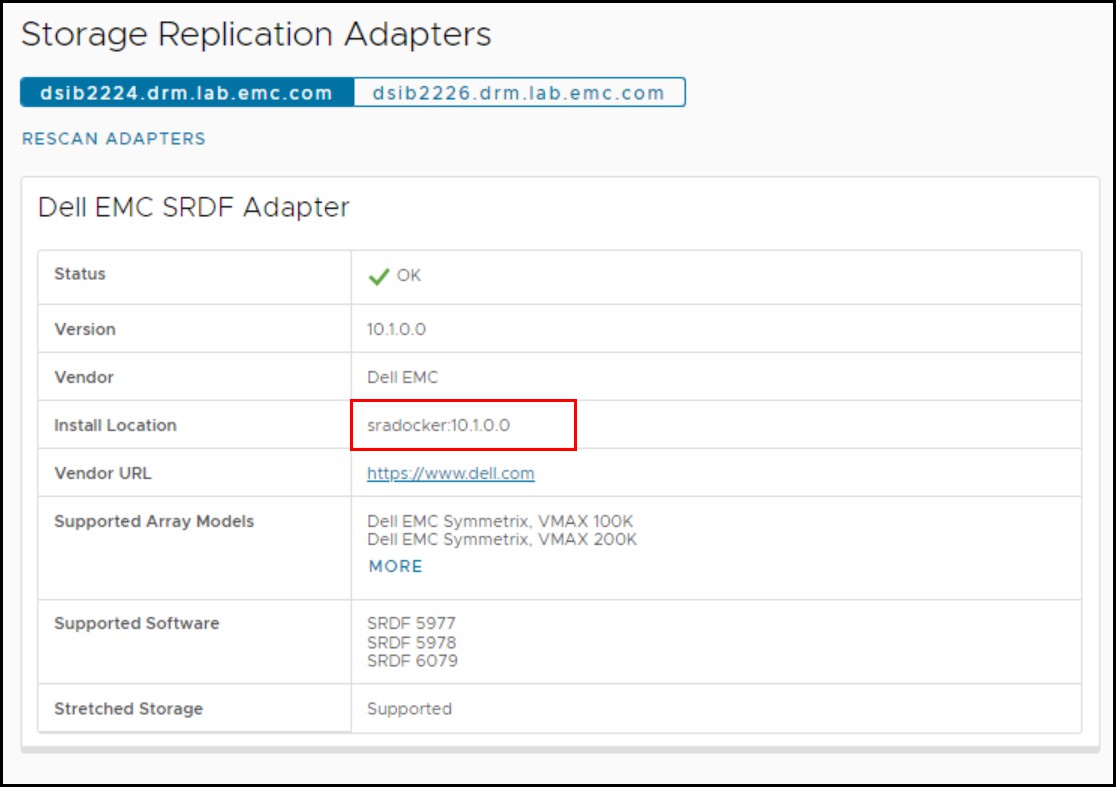
The script takes a single parameter, that being the repository tags from the adapter. The repository tags can be found in the SRM Appliance Management in the Storage Replication Adapter screen. The value for the GA release of SRA 10.1.0.0 is sradocker:10.1.0.0. An example is shown in Figure 16.
Figure 16. Repository tags for the SRDF SRA
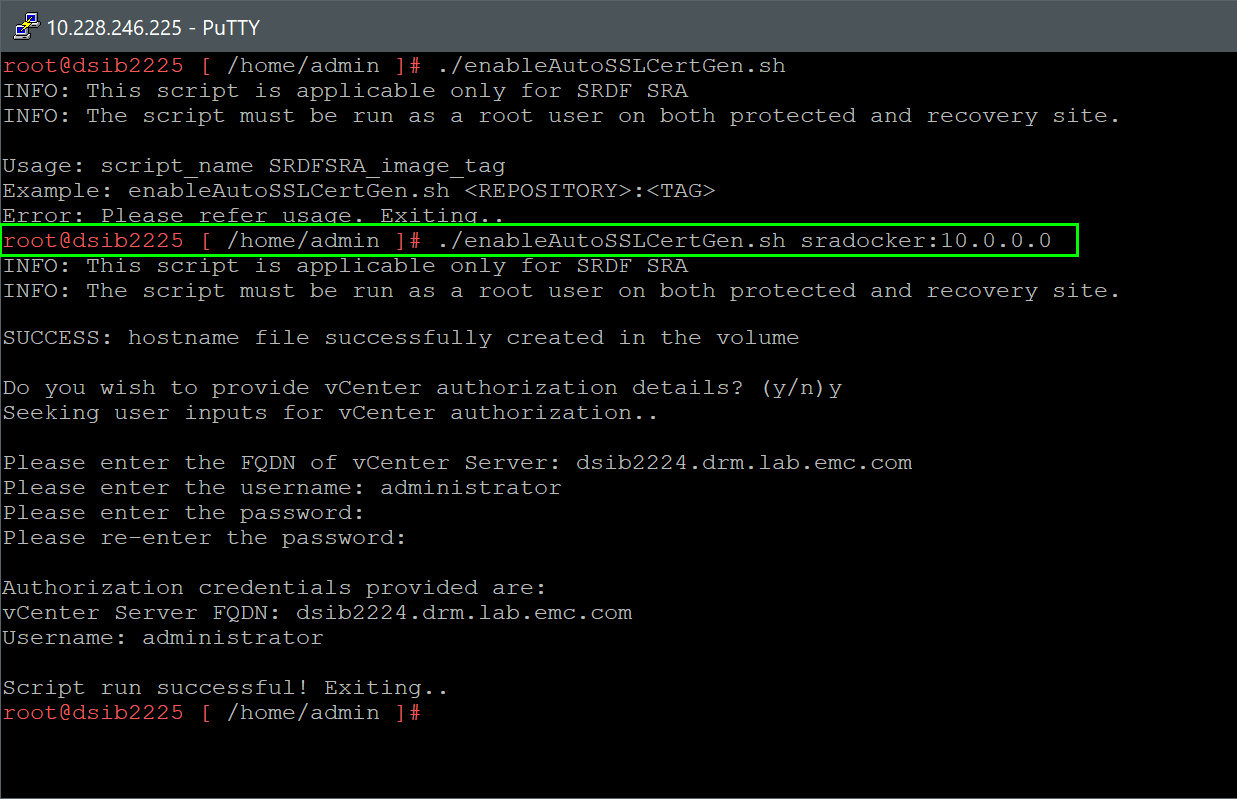
Supply this value with the script as seen in Figure 17. In this example, credentials were also supplied for the vCenter though they are not required. The script may also be run at a later time if the user wishes to add credentials, or if the password is changed.
Figure 17. enableAutoSSLCertGen.sh script to set hostname on SRM Appliance
The script is only run once. Failure to run the script will produce errors in the storsrvd.log file similar to the following, where the container generated hostname (9bdc6c1454c2) is shown:
<Error> [6488 SESS 0003] Jan-27 23:46:13.923 : ANR0151E
Common Name in client certificate not valid: expected "dsib2225.lss.emc.com", received "storsrvd 9bdc6c1454c2"
<Error> [6488 SESS 0003] Jan-27 23:46:13.923 : ANR0155E
Subject Alternative Names in the client certificate not valid: expected "dsib2225.lss.emc.com", received "9bdc6c1454c2"
SRDF SRA container
As noted, the SRDF SRA runs as a Docker container on the SRM Appliance. The SRM Appliance Management and SRM Site Recovery Manager are actually two different VMware applications accessing the same SRDF SRA image on the backend of the SRM host machine.
Therefore, both these applications will create a Docker container; however, the SRM DR commands will be executed only in the container created by SRM Site Recovery Manager application.
With respect to when the container gets created by these two applications, SRM Appliance Management will create a container once the SRDF SRA is successfully uploaded, whereas SRM Site Recovery Manager will create a container when Rescan Adapter is performed.
Solutions Enabler client/server and daemon_users file
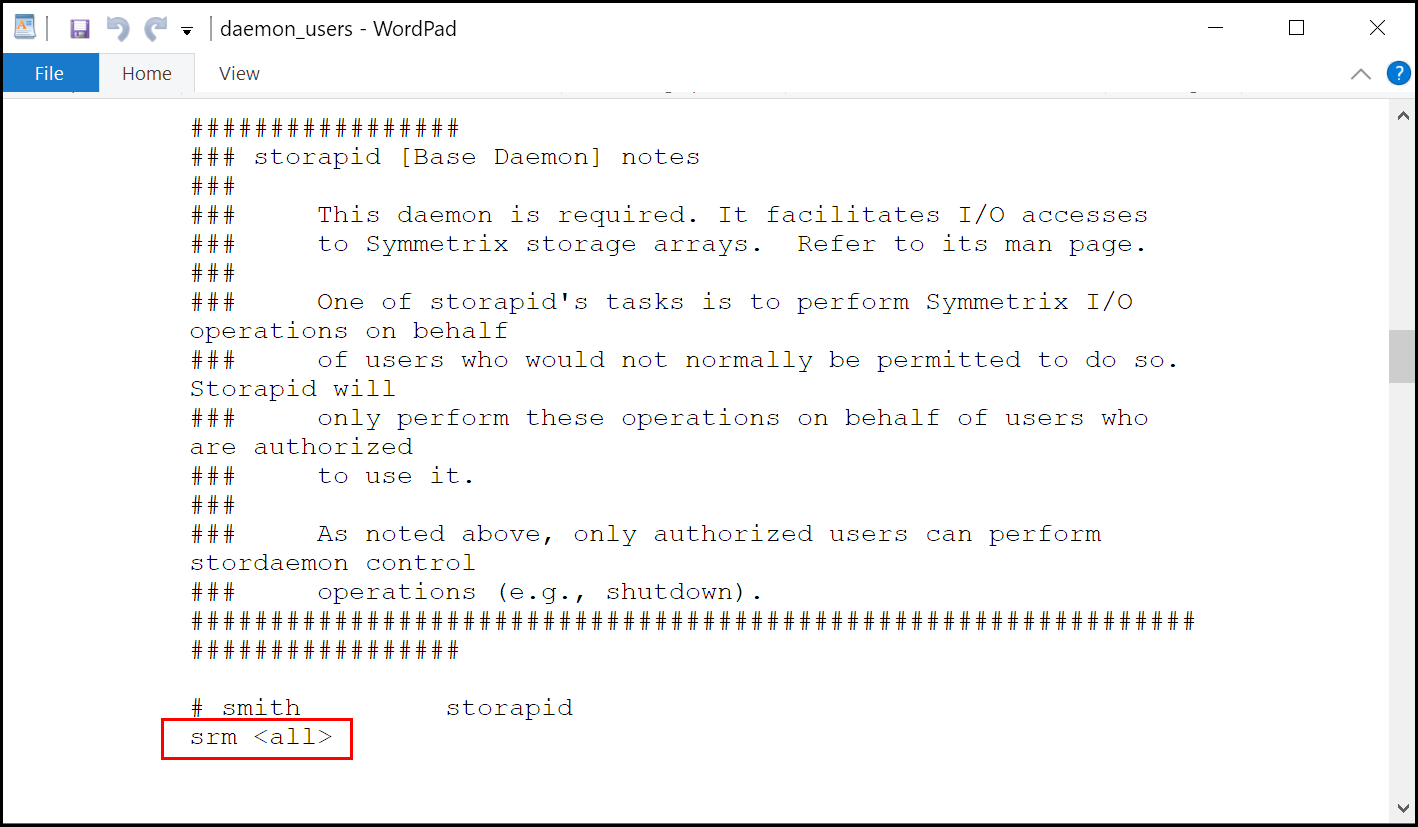
VMware SRM executes commands as the “srm” user on the Appliance. Because of this, it is necessary to give that user privileges on the Solutions Enabler daemons. This is controlled by the daemon_users file. Therefore this file has a default entry in it which should not be changed seen in Figure 18.
Figure 18. Daemon_users file with srm user entry
This is not an issue on Windows because the daemons are services that normally have the same user as the one executing the SRM commands.
Solutions Enabler client/server and netcnfg file
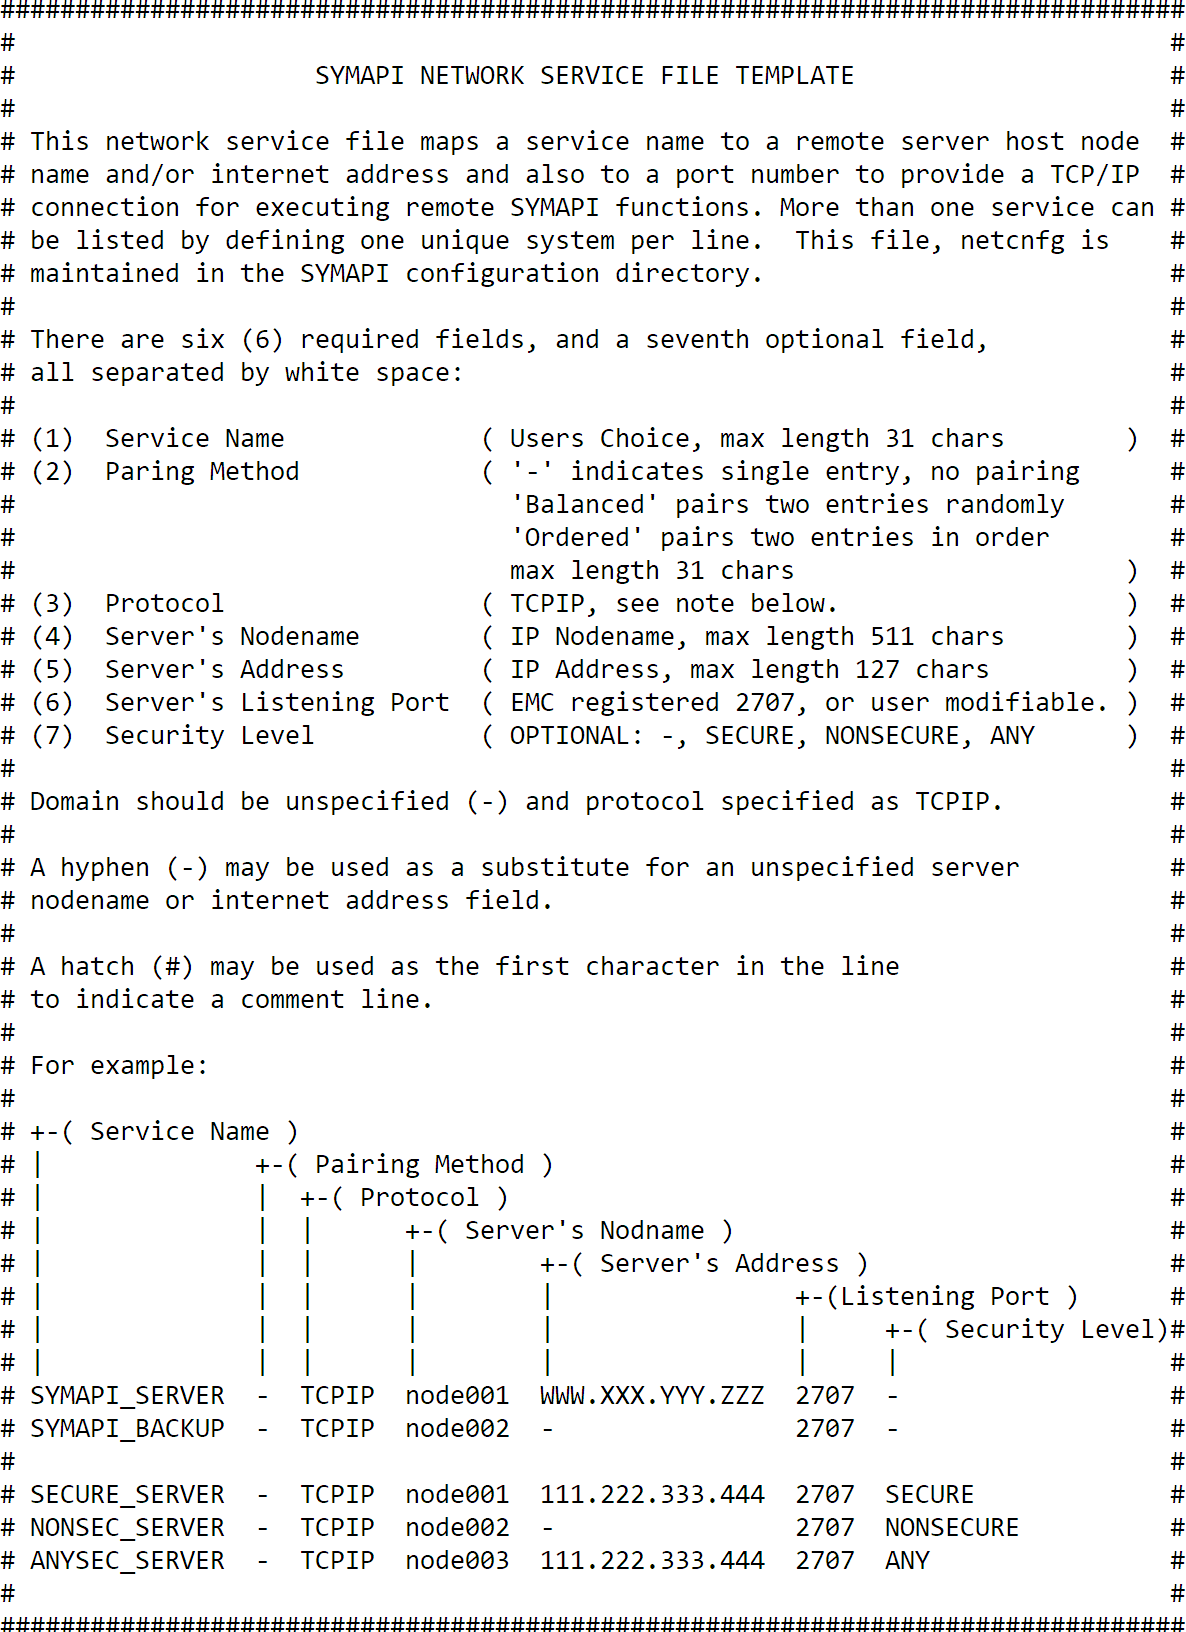
If there is a desire to run Solutions Enabler commands from within the Docker container, which is not recommended, it is necessary to modify the netcnfg file. This is an optional step, and for most customers this will not be necessary; however it is included here for completeness. While the SRDF SRA contains the client portion of Solutions Enabler in the container, it is not configured to make calls to the remote Solutions Enabler server. By modifying the netcnfg file to point to the remote server, calls can be made in the container. The netcnfg file is of the following format in Figure 19:
Figure 19. Netcnfg file
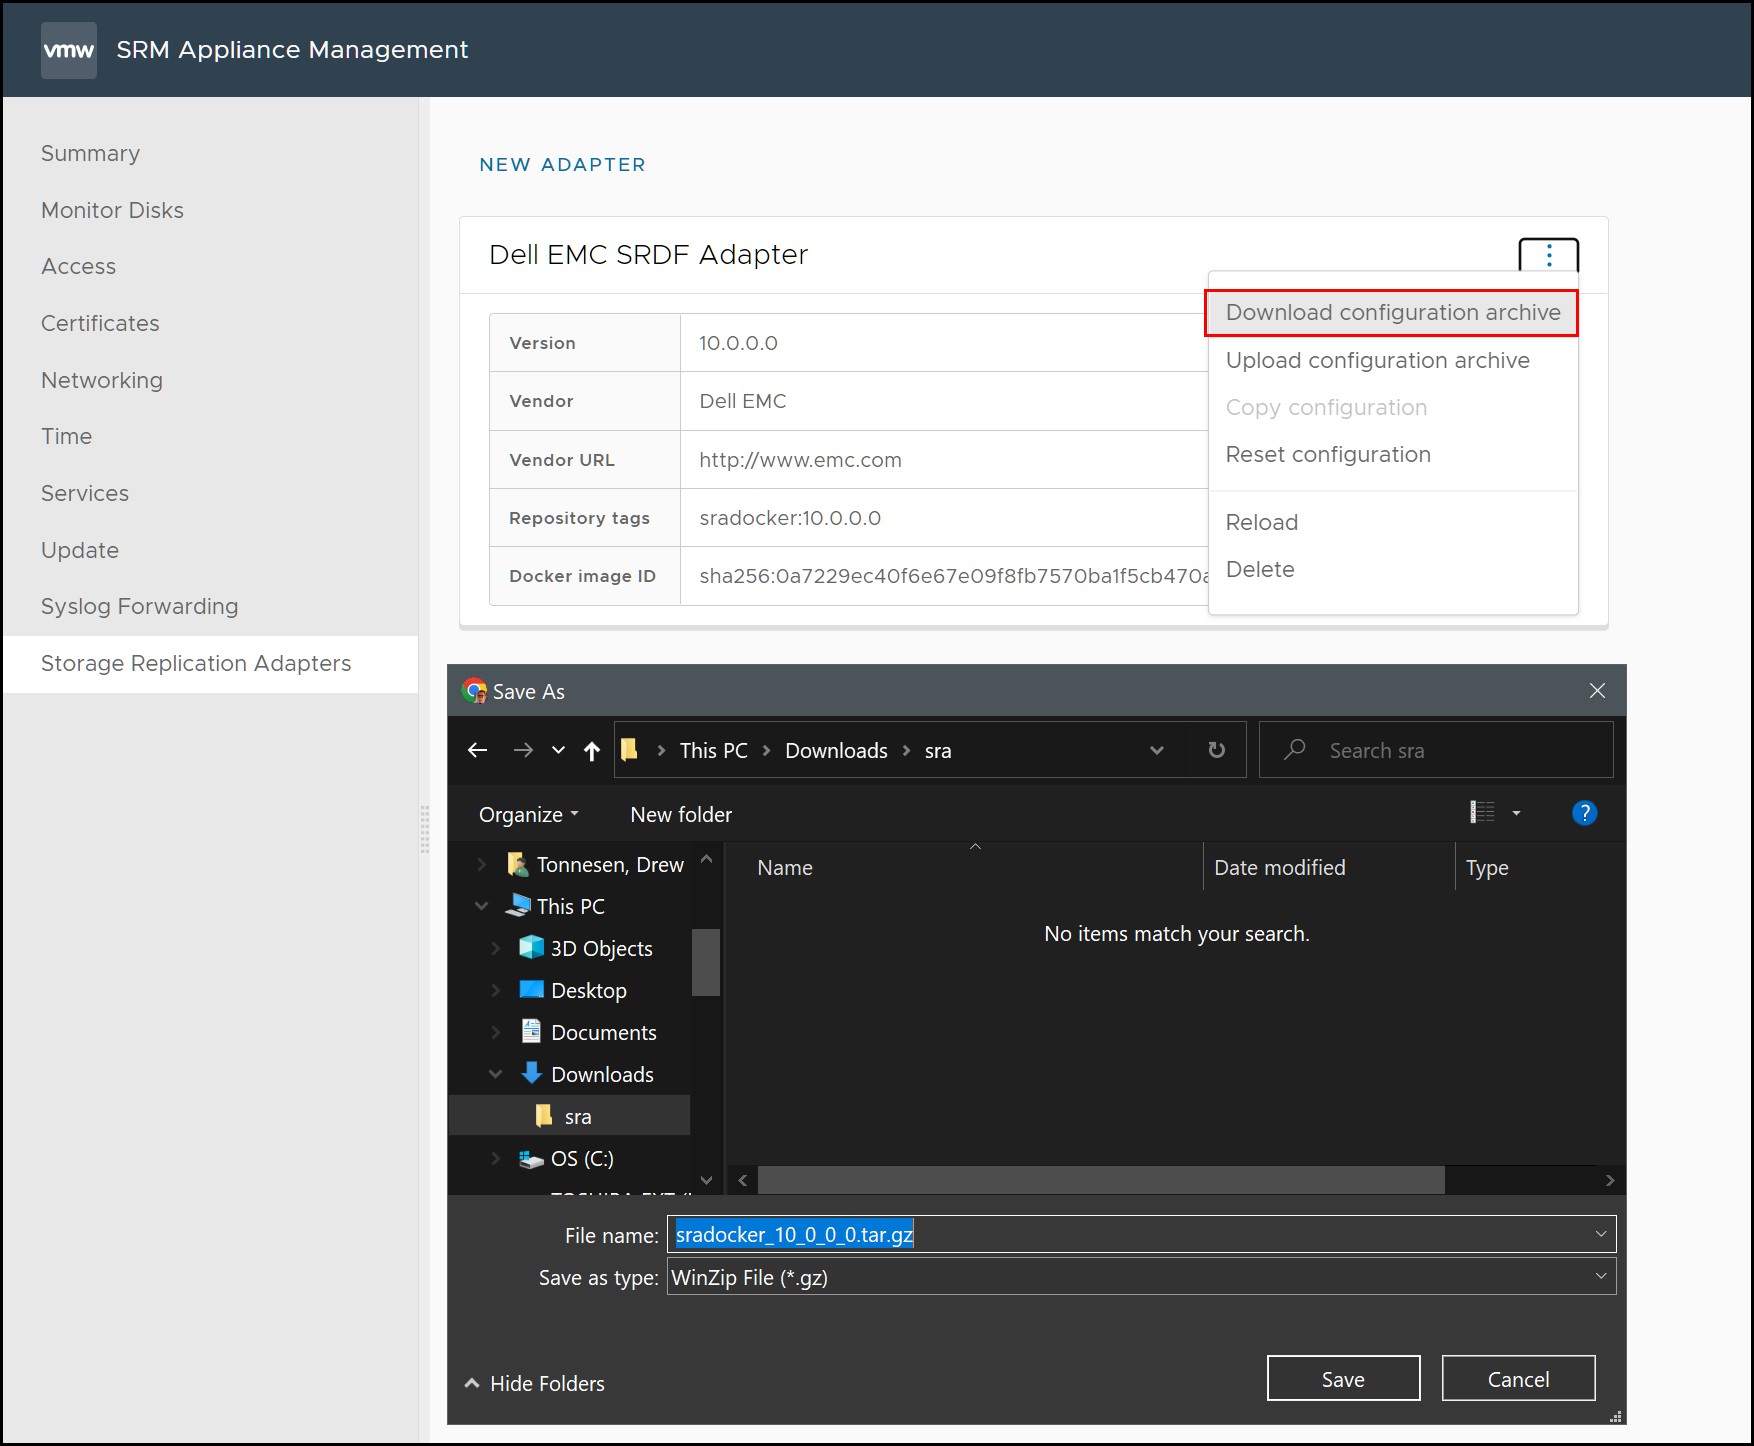
Start by downloading the configuration archive from either the protection or recovery site shown in Figure 20.
Figure 20. Download configuration archive
Extract the archive file keeping the existing directory structure. As the Appliance is Linux-based, it is best to extract and edit the files on a similar OS, though do not use the SRM Appliance itself. If Windows is used, be sure there are no extra characters in the file when saving it. There is no syntax checking of the files when the archive is uploaded, and any incorrect information may cause the software to operate incorrectly or not at all.
Using an editor like VI open the netcnfg file which is located in the /symapi/config directory. Add a single line to the bottom which references the Solutions Enabler server for that site (protection or recovery site as appropriate):
SYMAPI_SERVER - TCPIP node001 <SE SERVER IP> 2707 SECURE
When complete, tar and compress all the configuration files, maintaining the directory structure. Upload the configuration archive using the SRM Appliance Management interface in Figure 21 for both the protection and recovery sites if desired. Note that the archive configuration file need not have the same name as when downloaded.
Figure 21. Uploading SRDF SRA configuration archive

Whenever Solution Enabler files are changed (this does not apply to the XML files), the SRDF SRA must be reloaded so that the changes can be incorporated. Using the same SRM Management interface, run a Reload after the upload as in Figure 22.
Figure 22. Reloading SRDF SRA configuration archive
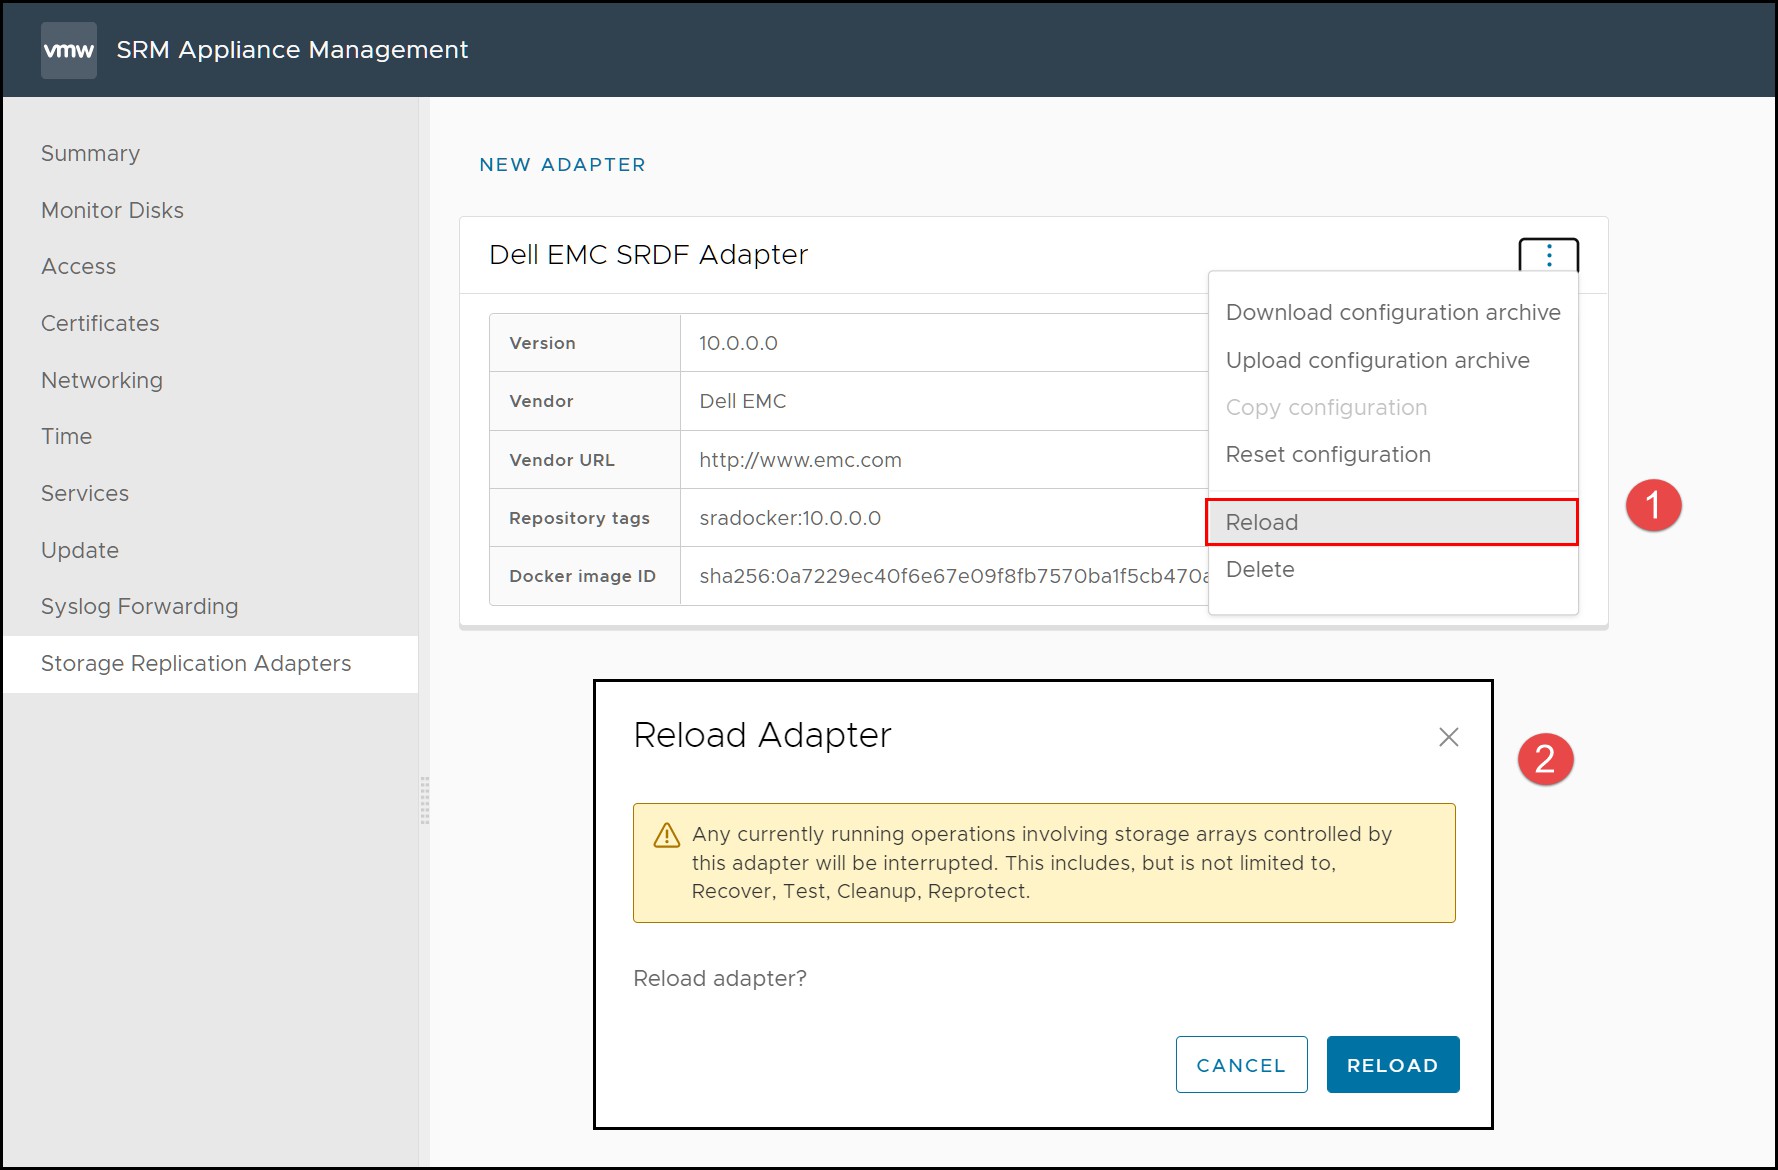
During a reload, the Solution Enabler daemons will be restarted and use the new settings.
Note: Although it is possible to edit the Solution Enabler configuration files from within the Docker container on the appliance, it is strongly discouraged and is not a supported methodology. The configuration archive process as outlined above should be used.
SRA XML files
The SRDF SRA install includes five options files. On Windows, these are stored in the Dell application folder “%programdata%\EMC\EmcSrdfSra\Config”. On the SRM Appliance these are embedded. These files are essential to the operation of the SRDF SRA with SRM, particularly when running test failover scenarios.
These files are:
- EmcSrdfSraGlobalOptions.xml — Global options for adapter behavior during SRM operations. These settings are both common and advanced.
- EmcSrdfSraTestFailoverConfig.xml — File for test failover device configuration pairings when auto device creation is not in use.
- EmcSrdfSraProtectionSiteGoldcopyConfig.xml — File for gold copy device configuration pairings of R1 devices.
- EmcSrdfSraRecoverySiteGoldcopyConfig.xml — File for gold copy device configuration pairings of R2 devices.
- EmcSrdfSraDeviceMaskingControl.xml — File for associations of SRDF or TimeFinder devices with storage groups for automated masking/unmasking of devices by the SRDF SRA.
These configuration files and their modifications are discussed in detail in the relevant sections later in this book.
Upgrading an existing installation of the SRDF SRA
Note: The SRDF SRA does not support rolling upgrades. Both the protection and recovery sites must be upgraded at the same time. For example, the protection site may not run SRDF SRA 9.2 while the recovery site is running SRDF SRA 10.0.
The installer for the SRDF SRA supports an upgrade of the SRA from earlier versions to the latest. The process for the upgrade is similar to a fresh install of the adapter discussed in the previous section with the exception that the old files will be removed and the new SRA files will be loaded into the new directories.
The newer versions of the SRDF SRA may introduce new global options and other enhancements so current options files will be replaced with new versions. On Windows, when upgrading from a previous version of SRDF SRA the older XML files will not be deleted but will be renamed to “.bak” files. When upgrading on the SRM Appliance, the files need to be backed up manually by downloading them from the management interface as previously shown in Figure 20.
If the user needs to reference old configurations from either implementation, these archived files can be viewed with any standard text editor.
When upgrading the SRDF SRA and SRM together, first start with Solutions Enabler, then the SRDF SRA, and finally SRM can be upgraded.
Upgrade from SRM Windows to SRM Appliance
VMware instructions for upgrading from SRM Windows to the SRM Appliance should be followed. The SRDF SRA requires a new install as there is no way to upgrade across platforms. Before upgrading to the Appliance, backup the SE and XML files from Windows. Then, after installing the SRM Appliance, install the SRDF SRA as instructed by VMware. Download the configuration archive and modify the files to match the ones from the Windows environment. Do not use the Windows configuration files directly as they will not work properly. They should only be used for reference to modify the ones from the Appliance. The array managers will migrate over so it is possible to keep the previous Solutions Enabler installations if desired.