
Configuring protected site target gold copies
Configuring protected site target gold copies
-
Configuring protected site target gold copies
The SRDF SRA has the ability to create a gold copy of the R1 devices on the protected site during a failover. This additional gold copy adds a further layer of protection to a VMware environment during failover.
Like recovery site gold copies, the SRDF SRA supports the use of both TimeFinder technologies (Clone and SnapVX) to create the replica.
Note: There is a protected site gold copy XML file on both SRM servers. For a particular failover, edit the file on the source/R1/protection SRM server.
When configuring protected site gold copies, the onus is on the user to correctly select the candidate devices. As previously discussed, the XML file requires four things:
- VMAX/PowerMax array serial number
- TimeFinder technology (Clone, SnapVX)
- R1 VMAX/PowerMax device numbers
- Target replica VMAX/PowerMax device numbers
Note: If the protected site is down during the failover or there are connectivity issues to the array, the protected side gold copies may fail regardless of proper configuration.
The following process should be followed to configure the protected site gold copy XML file:
- Identify the recovery plan and included protection groups. The user must first decide for which recovery plan(s) they want gold copy protection. Navigate through the SRM interface to select the desired recovery plan and identify the protection groups. This can be seen in Figure 99. Also take note of the direction of the protection groups. In the next step, you will need to select the array manager of the source SRM server noted in the “Direction” column. In the example in Figure 99 there is only one protection group named “Datastore_Group_PG” and the local or source SRM server is “dsib2015.lss.emc.com”.
Figure 99. Identifying protection groups for gold copy configuration
- Identify VMAX/PowerMax serial number. Once the correct protection groups have been identified, navigate to the “Array Pairs” and select the discovered array pair and expand it as in Figure 100. As the Protection Site is currently logged into, the first array listed is the local array and the one to list in the <ArrayId> tag in the XML file.[1]
Figure 100. Select array manager panel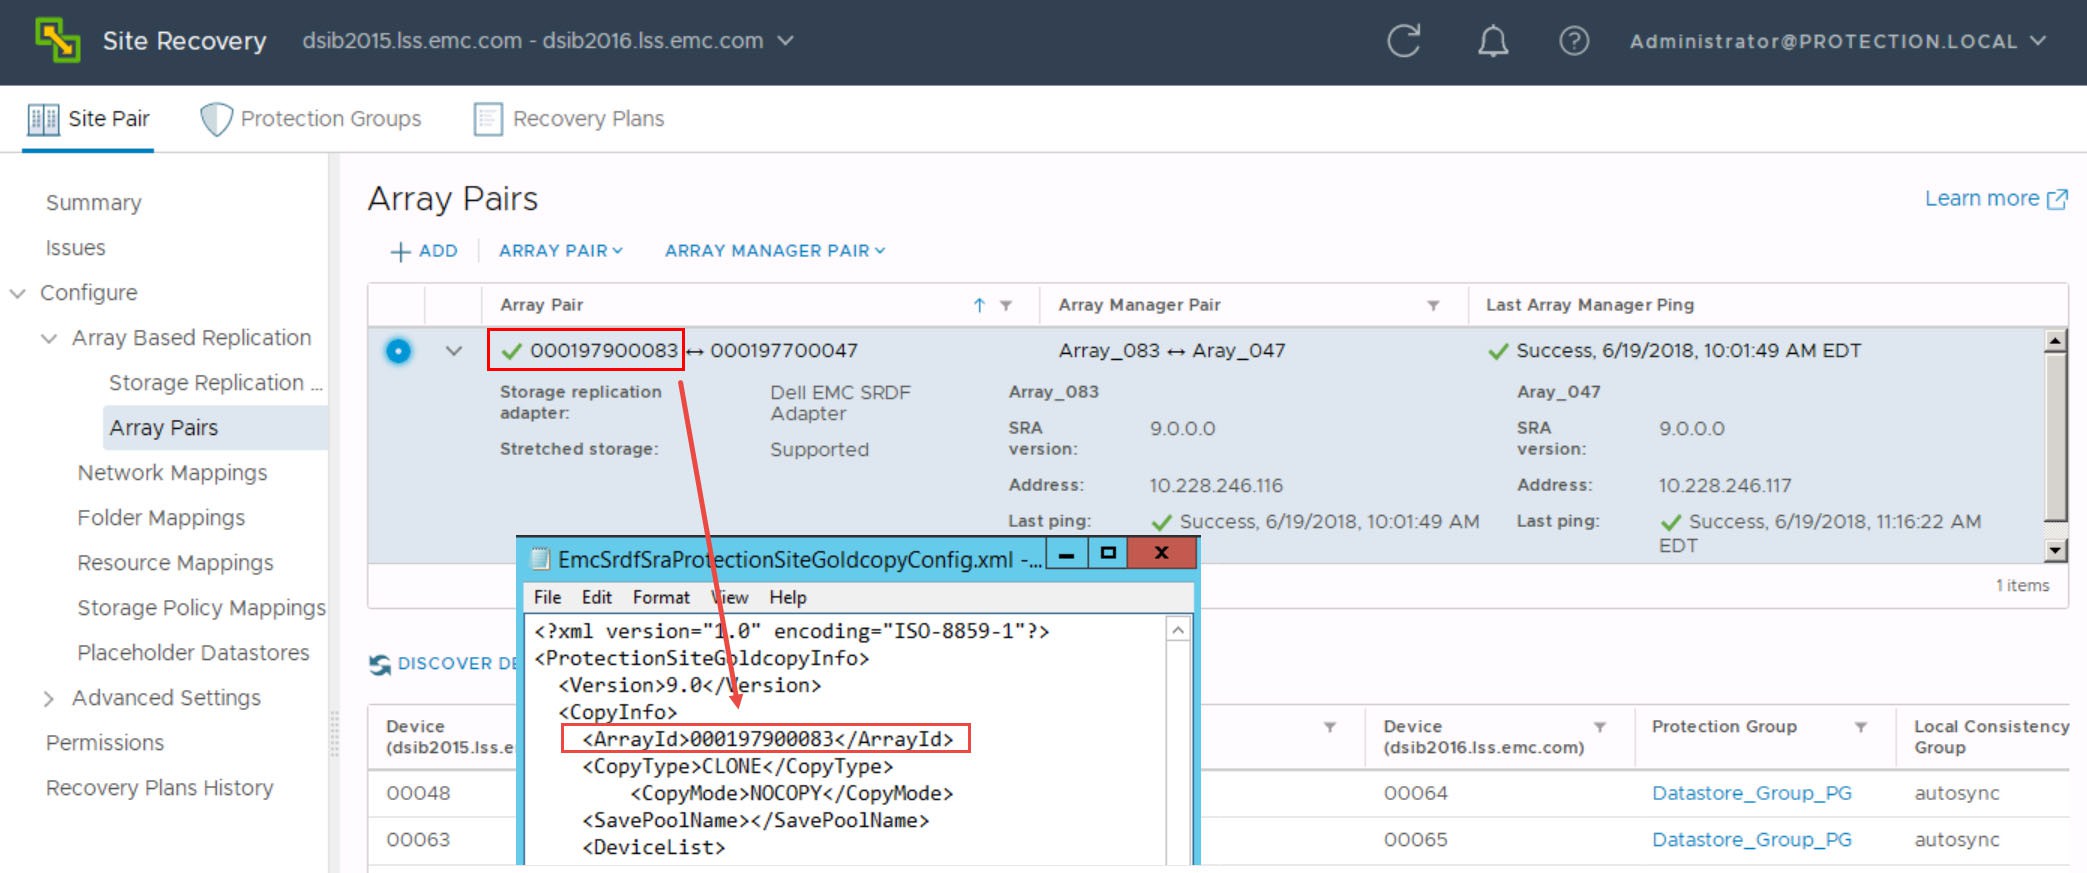
- Identify R1 devices. Using the same screen as Figure 100, identify the R1 devices in the first column. VMware uses the site to identify the R1 or the R2. In this case, “dsib2015.lss.emc.com” is the Protection Site, and the devices in that column are R1s. Every device that is in the column that is in one of the corresponding protections groups identified in the previous step should be entered into its own DevicePair stanza in the gold copy XML file. In the example used in Figure 101, each device in the protection group “Datastore_Group_PG” has been entered into the Source tag in a DevicePair stanza under the ArrayID of 000197900083. By default there is only one DevicePair stanza under the DeviceList stanza, so the user will need to manually add a new DevicePair stanza for each R1 device. All DevicePair stanzas must be enveloped in the DeviceList stanza. In other words, for every CopyInfo stanza there is only one ArrayID, one CopyType and one DeviceList. A DeviceList may contain many DevicePairs. A CopyInfo stanza should equal a protection group.
Figure 101, Identifying R1 devices and adding them to the gold copy config XML
- Choose TimeFinder method. Once all of the R1 devices have been entered into the options file as well as the array ID, a TimeFinder method must be chosen for the gold copies. The recommendation, if possible, is SNAPVX.
- Identify replica candidate(s). Once a TimeFinder method has been decided upon, suitable replica devices must be identified (or created) and added to the options file. Gold copy devices, unlike test failover replicas, do not have the requirement of being presented to hosts. Therefore the pool of devices that can be used may be larger.
If the user does not want to use a device presented to the VMware environment for the gold copy replica or there are no valid candidates, they can create their own or find an unpresented pre-existing device.
When using pre-existing devices it is important to follow these three guidelines:
- Ensure the candidate replica device is not involved in any other TimeFinder (or another replication technology) session.
- It is strongly recommended that the device not be masked to any other environments. If it is, there is a good chance that the device contains data which will be overwritten by the TimeFinder gold copy operation leading to data loss. Therefore, ensure the device does not belong to another host by examining masking information.
- Enable CheckForVirtualDisks on the protected side SRDF SRA. This will enable the SRA to make sure the chosen replica is not in use in the protected VMware environment.
6. Enter replica VMAX/PowerMax device numbers into options file. Once the replicas have been identified, enter each device into a Target line in a DevicePair stanza until each source R1 device has a valid pair as shown in Figure 102. Save the file and initiate the failover.
Figure 102. Completed protection gold copy XML configuration file

Targetless protection site gold copies
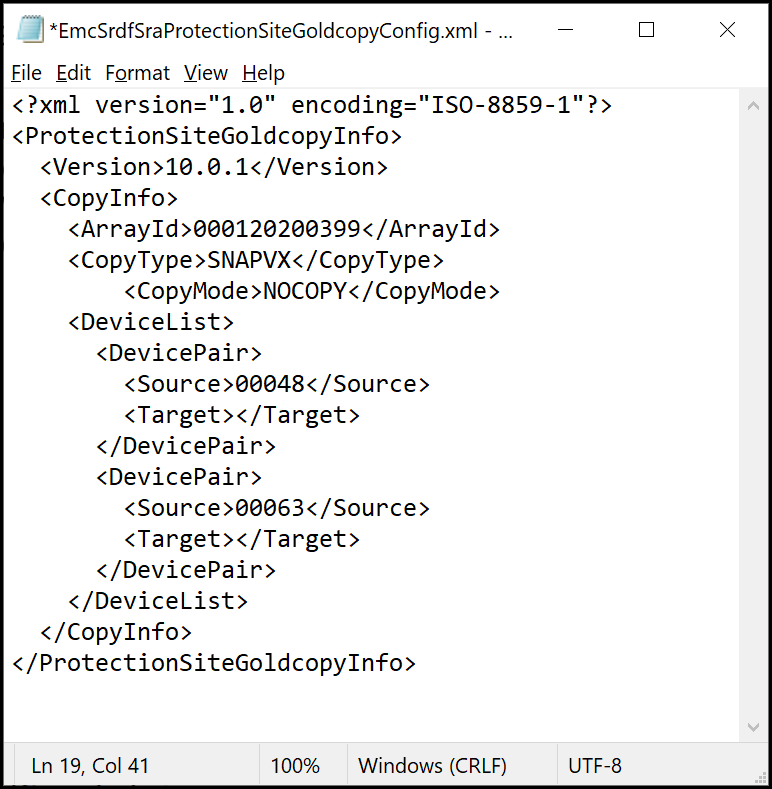
When using the <FailoverWithTargetlessGoldCopy> option, if the user wishes to create targetless snapshots on the protection site but not the recovery site, it is necessary to configure a protection site gold copy XML file. The XML file would be similar in format to Figure 102, except the <Target> device field would be left blank for all R1 sources as shown in Figure 103.
Figure 103. Completed targetless protection gold copy XML configuration file
Note: If the protection gold copy XML file is configured, the SRDF SRA will not automatically create a targetless snapshot on the recovery site. If a gold copy is desired on the recovery site, a recovery gold copy XML must be configured in addition to the protection gold copy XML.
[1] If the recovery plan has protection groups that use different arrays you will need a new CopyInfo stanza for each VMAX/PowerMax array.