
Configuring a Solutions Enabler server
Configuring a Solutions Enabler server
-
Configuring a Solutions Enabler server
Regardless of whether the Solutions Enabler server used as an array manager is local to the SRM server (when using Windows) or is on a separate, dedicated server (or embedded), there are a few simple configurations required before it can service the SRDF SRA. Note that these steps are only required on the Solutions Enabler installation with Gatekeepers and are not required on the client-side Solutions Enabler install in a client/server configuration.
These steps should be performed on both the protected and recovery Solutions Enabler server installations. For more information on any of these steps or options please refer to the Solutions Enabler Installation Guide on support.dell.com
A VMware SRM and SRDF environment requires two separate Solutions Enabler servers—one for each location. Each Solutions Enabler server must see their local arrays as “local” (have direct access to them via Gatekeepers) and their respective paired arrays as “remote” (have indirect access to them via the RDF connection). If a Solutions Enabler server sees the arrays from both sides of an RDF pair as “local”, this is not supported and issues can result. Figure 7 demonstrates the proper setup in Solutions Enabler. If more than one remote array is seen by Solutions Enabler and this is undesirable, a symavoid file can be employed to remove it from discovery; however it is not necessary.
Note: If desired, the array managers can be the embedded management implementation of Solutions Enabler that is part of Unisphere for PowerMax on the array. Dell, however, recommends using independent implementations of Solutions Enabler for the array managers, if possible, to avoid any control and performance implications.
Figure 7. Solutions Enabler server configuration

For environments with multiple arrays at each location, it is possible to configure more than one array as local in Solutions Enabler at each site. This is the case when using MetroDR where the R1 and R2 SRDF/Metro arrays should discover as local on the protection site. When adding the array manager, both array pairs will present for enabling. See Array Manager configuration.
Note: In large environments with multiple arrays and multiple SRM deployments, it is possible to share a single Solutions Enabler environment for each protection and recovery site. For example, assume an environment has two SRM implementations. Each protection site uses arrays A and B and each recovery site uses arrays C and D. The customer could deploy a Solutions Enabler implementation for the protection site that sees A and B as local and C and D as remote. Then a second Solutions Enabler implementation would be deployed seeing arrays C and D as local and A and B as remote. Within each SRM environment, the same two Solution Enabler environments could be used for the array pairs. While this may help reduce the number of deployed VMs, it creates a single point of failure for both environments. If either Solutions Enabler environment becomes inaccessible, it impacts both SRM environments. Therefore, Dell recommends that each SRM environment has its own Solutions Enabler for the protection and recovery sites.
Daemon configuration
The storsrvd daemon (allows Solutions Enabler to receive remote Solutions Enabler connections) and storrdfd daemon (provides consistency protection for RDF device configurations) should be installed and configured. Since these daemons are not enabled by default in standard Solutions Enabler installations, they may not be active. These daemons can be installed by executing the following commands on the server(s):
stordaemon install storsrvd -autostart
stordaemon install storrdfd -autostart
These commands must be run from the binary location of the SYMCLI commands (if not already in the path), usually /opt/emc/SYMCLI/bin in Unix or <install path>\EMC\SYMCLI\bin in Windows.
The SYMAPI_USE_RDFD parameter must also be enabled in the options file in /usr/emc/API/symapi/config in Unix or C:\Program Files\EMC\Solutions Enabler\config[1] in Windows to enable the use of the storrdfd.
Nethost configuration
In order to control and restrict trusted-user and node access[2] an optional nethost file can be created in the Solutions Enabler server configuration directory. When this file exists, only the nodes/users listed in this file are allowed to connect to the server to execute remote Solutions Enabler functions. If the security functionality provided by the nethost file is not desired, the file itself can just be deleted from the Solutions Enabler server.
The identity of a client host may vary from the perspective of the server since the server can accept connections from IPv4 and IPv6 clients. Thus the network address of the client could be an IPv4 or IPv6 address. If the network address is specified in the nethost file instead of the node name, then the exact syntax of the address is important. If the address is incorrect, connections from some clients may be denied (see the end of this section for more information on troubleshooting). In general, specifying the node name (or the FQDN) is advised, since proper DNS configuration will usually ensure that the name of the host will be consistent, regardless of the network address of the client.
In addition to specifying the node, each user that requires access from a particular host must also be authorized. For ease of use, an asterisk (*) can be entered as the user or host and this will allow all users or all hosts (or a combination of the two) to have API access.
For SRM environments on Windows, the account running the VMware vCenter SRM service (this is the account that the SRDF SRA, when called, runs under) must be entered into the nethost file (only if the file exists). For the SRM Appliance, this user is “srm”. The protection and recovery side SRM server FQDNs[3] and the respective accounts used on both should be added to both the protection and recovery side Solutions Enabler servers. This will allow for full use of the SRDF SRA.
The user will have to manually edit or create the file in a standard text editor using the syntax displayed in Figure 8.
FIgure 8. Nethost file syntax

If the file is not present in the config folder and the user desires to use the option, the user must create a new file entitled nethost. The new file must have no file extension/type.
As an example, imagine the following SRM environment:
Protected side information
- SRM admin username: john
- SRM service account name: srm1
- SRM server FQDN: srm1.ebc.emc.local
Recovery side information
- SRM admin user username: lisa
- SRM service account name: srm2
- SRM server FQDN: srm2.ebc.emc.local
If the storage admin wanted to limit Solutions Enabler access to just the SRM service accounts, Lisa and John, the nethost file on both Solutions Enabler servers should look like Figure 9.
Figure 9. Nethost example with limited user access
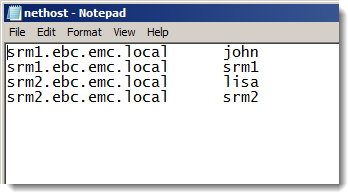
If the storage admin wanted to limit Solutions Enabler access to the SRM servers and anyone who was able to log on to them, the nethost files would look like what is shown in Figure 10.
Figure 10. Nethost example with full user access

Note: The nethost file does not distinguish between domain and local host accounts and therefore no domain prefix for the user is needed or allowed.
Troubleshooting nethost permissions
If the nethost information is incorrect or missing, the SRDF SRA will report an error such as the one below in their log files:
Failed connection to Solutions Enabler server (192.168.160.127:2707). Error = The trusted host file disallowed a client server connection.
The trusted host file is another name for the nethost file. This error means that either the host or user was incorrectly entered or not entered at all. Verify the listings in the nethost file or refer to the storsrvd log on the target Solutions Enabler server for a message such as the one below that indicates a blocked session due to a nethost issue:
<Error> [1232 API_Listener] Jul-09 16:46:44.488 :
ANR0018E Rejecting session 927 for
hostec@ch-vcenter3.ebc.emc.local: The trusted host file disallowed a client server connection
Note the bold portion which indicates the user (before the @ symbol) and the host FQDN (after the @ symbol). If what is displayed in the storsrvd log is the correct user/host, ensure that they are entered into the nethost file in the proper format as discussed above.
Troubleshooting remote Solutions Enabler service
When connecting remote clients to a remote Solutions Enabler server, common situations can occur that prevent remote access from a client. Table 10 shows the typically encountered errors and the usual resolution to the issue.
Table 10. Common client/server Solutions Enabler connection errors
Error message
Common explanation
The remote client/server handshake failed
Typically caused by inconsistent information in the client host security certificates. When using the SRM Appliance, this may be due to a failure to run the enableAutoSSLCertGen.sh script.
The remote connection is refused. The server may not be running.
Typically caused by inconsistent information in the client host security certificates. When using the SRM Appliance, this may be due to a failure to run the enableAutoSSLCertGen.sh script.
A network data operation failed
Caused by incorrect firewall settings or a network outage
The server refused a connection due to a security level mismatch
Caused by a difference in settings between the target Solutions Enabler server's storsrvd daemon security level and the client's security settings. It is recommended that both be set to SECURE.
Host system not recognized or authenticated
The hostname entered was incorrect or has no DNS entry.
The trusted host file disallowed a client server connection
The Solutions Enabler server’s nethost file is incorrectly configured.
[Solutions Enabler_C_DB_PERMISSION_DEN IED: Read or Read/Write permission/access not present]
The symapi_db.bin file on the Solutions Enabler server (the database) is write protected. Grant R/W access to the file.
Certificate errors can be handled in one of two ways; either the client certificate must be fixed or the Solutions Enabler server can be altered to ignore invalid certificates. To fix the certificate, regenerate it with the correct hostname.
If using SRM on Windows (protected or remote): Execute the create command:
"C:\Program Files\EMC\SYMCLI\bin\manage_server_cert.exe" create <FQDN> or <IP>
A new certificate will be created.
If using the SRM Appliance (protected or remote): Execute the create command from within the Docker container:
/opt/emc/SYMCLI/bin/manage_server_cert create <FQDN> or <IP>
A new certificate will be created. Note that issues with certificates may be related to a failure to run the enableAutoSSLCertGen.sh script which generates the correct hostname for Solutions Enabler certificate exchange.
Alternatively, to alter Solutions Enabler certificate handling the following process should be used:
- Log on to the Solutions Enabler server
- Navigate to <install location>\EMC\Solutions Enabler\config or /usr/emc/API/symapi/config.
- Open the daemon_options file (using a standard text editor like VI)
- Find the line storsrvd:SECURITY_CLT_SECURE_LVL = VERIFY
- Uncomment the line by removing the preceding pound sign (#) and change the value from VERIFY to NOVERIFY
- Restart the storsrvd service with the following Solutions Enabler commands:
stordaemon shutdown storsrvd
stordaemon start storsrvd
If there is a security mismatch, the Solutions Enabler server behavior may need to be changed. To alter Solutions Enabler certificate handling the following process should be used:
- Log on to the Solutions Enabler server
- Navigate to <install location>\EMC\Solutions Enabler\config
- Open the options file (using a standard text editor like VI or Wordpad)
- Find the line SYMAPI_SECURITY_LEVEL = SECURE
- Uncomment the line by removing the preceding pound sign (#) and change the value from SECURE to NONSECURE or ANY.
- Restart the storsrvd service with the following solutions enabler commands:
stordaemon shutdown storsrvd
stordaemon start storsrvd
Note: For security reasons it is not recommended to alter the security level or remove certificate handling. Furthermore, changing the Solutions Enabler security setting mentioned above in step 4 may affect/block other applications remotely accessing that Solutions Enabler server. Change this option with care.
Enabling Solutions Enabler interaction debug logging
In certain situations standard logging is not detailed enough to supply adequate information for troubleshooting an issue. If an issue is suspected to be within Solutions Enabler, enabling debugging for the SRA interactions might be required for advanced troubleshooting.
- On the Solutions Enabler server[4] run the following command to enable debug logging on the server:
stordaemon setvar storsrvd -name permit_symapi_debug=client - Then on the client (the SRM server) set the following environmental variable[5]:
SYMAPI_SERVER_DEBUG_SCOPE=SERVER - Finally, set the advanced option for the SRDF SRA for debug in the global options XML file. Editing the file is explained in the section Configuring SRDF SRA behavior.
Once enabled the Solutions Enabler server will create a debug log for the interaction with the SRDF SRA in the <install location>\EMC\SYMAPI\log\debug\ folder. The file will be named <hostname>_symapi_debug_YYYYMMDD.log.
[1] The root drive letter may change depending on the location of the installation. C:\Program Files is the default for Windows.
[2] The nethost functionality is a per-Solutions Enabler server feature. It is unrelated to and performs a different function than Symmetrix Access Control Lists and Symmetrix Authorizations. These features are discussed later in this book. Nevertheless, these three security features can be used in a complementary fashion.
[3] Note that to use FQDNs the Solutions Enabler instance must be able to perform forward and reverse lookups of the address. Therefore properly configured DNS servers or host files are required. Otherwise IP addresses can be used.
[4] If the Solutions Enabler server is local (Gatekeepers presented) to the Windows SRM server then the client and server system would both be the SRM server.
[5] Refer to EMC support article emc270687 for more information. Note that it is not necessary to set the variable SYMAPI_DEBUG or SYMAPI_DEBUG_FILENAME at all since setting the SRA global option, SYMAPI_DEBUG to 1 will have the SRA set these automatically on a temporary basis.