
Snapshot procedures
Snapshot procedures
-
Snapshot procedure
When taking a snapshot, devices are managed as an atomic unit by creating a device group, composite group, or using the storage group. Composite groups must be used if the virtual machines that are being cloned use VMFS and/or RDM volumes from multiple PowerMax storage arrays. Solutions Enabler or Unisphere for PowerMax can be used to create the device group and to manage the snapshot process. Composite groups can only be created by Solutions Enabler. Both methods will be presented here for completeness.
Note: Virtual volume datastores or individual vVols cannot be copied with this process as there is no external snapshot management.
Environment
The environment for this example consists of:
- PowerMax array
- 2 vCenters - production and backup
- 3 devices
- 2 (250 GB) used for VMFS
- 1 (10 GB) used for RDM
- 2 VMs, 1 with an RDM
Solutions Enabler steps
The following presents the CLI steps required to copy a group of virtual machines utilizing SnapVX technology. Before beginning the process, gracefully shutdown any VMs running on the selected datastores as this is a cold process.
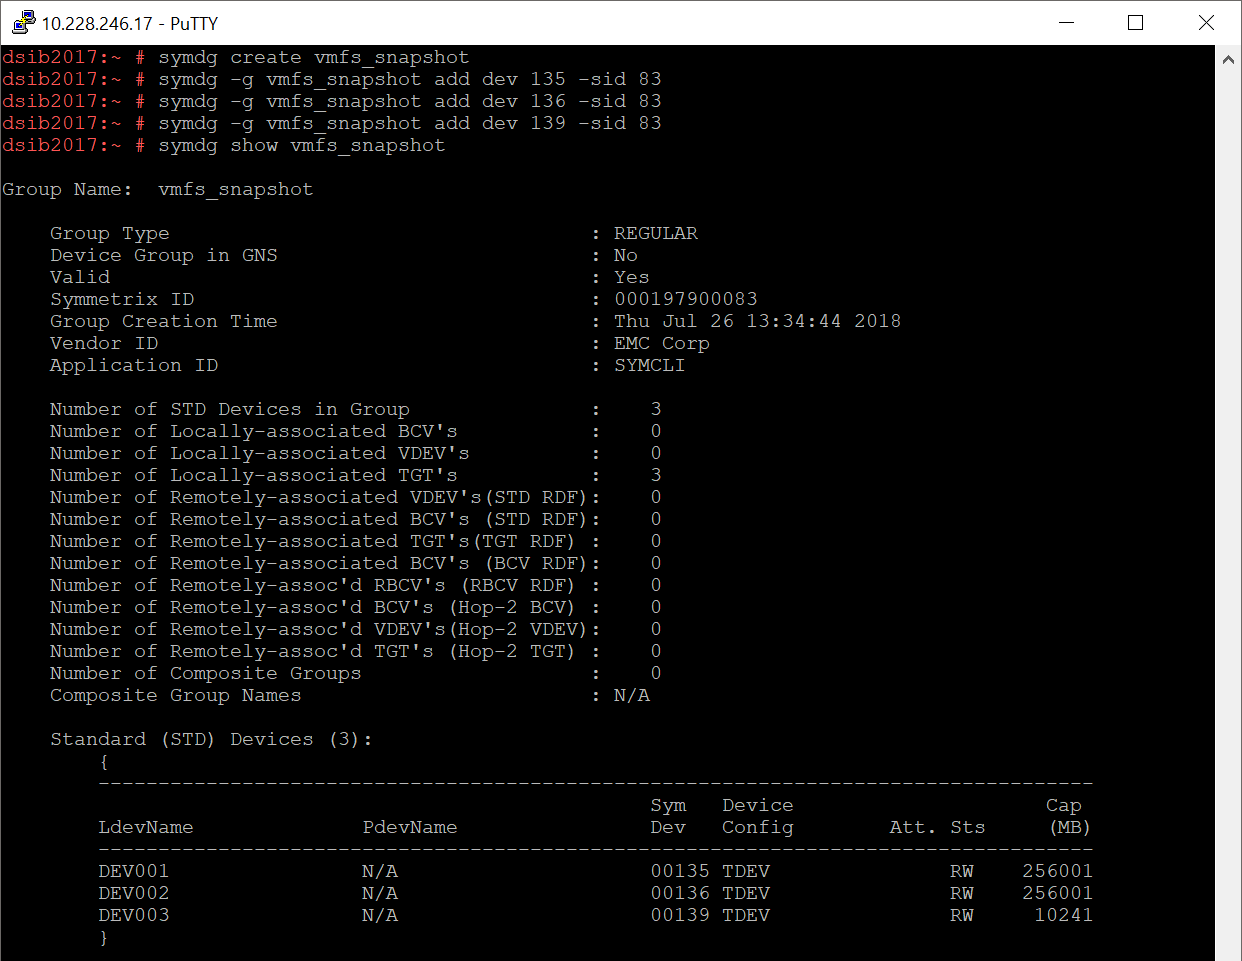
- Identify the device id of the PowerMax volumes used by the VMFS. This can be achieved most easily by utilizing VSI. A device group containing the member(s) of the VMFS should be created. In Solutions Enabler, issue the following commands to create the device group and add the devices to it.
symdg create <group_name>
symdg -g <group_name> add dev <dev #> -sid <array SN>
Figure 144 demonstrates the commands and then outputs the content of the device group.
Figure 144. Creating a device group in Solutions Enabler
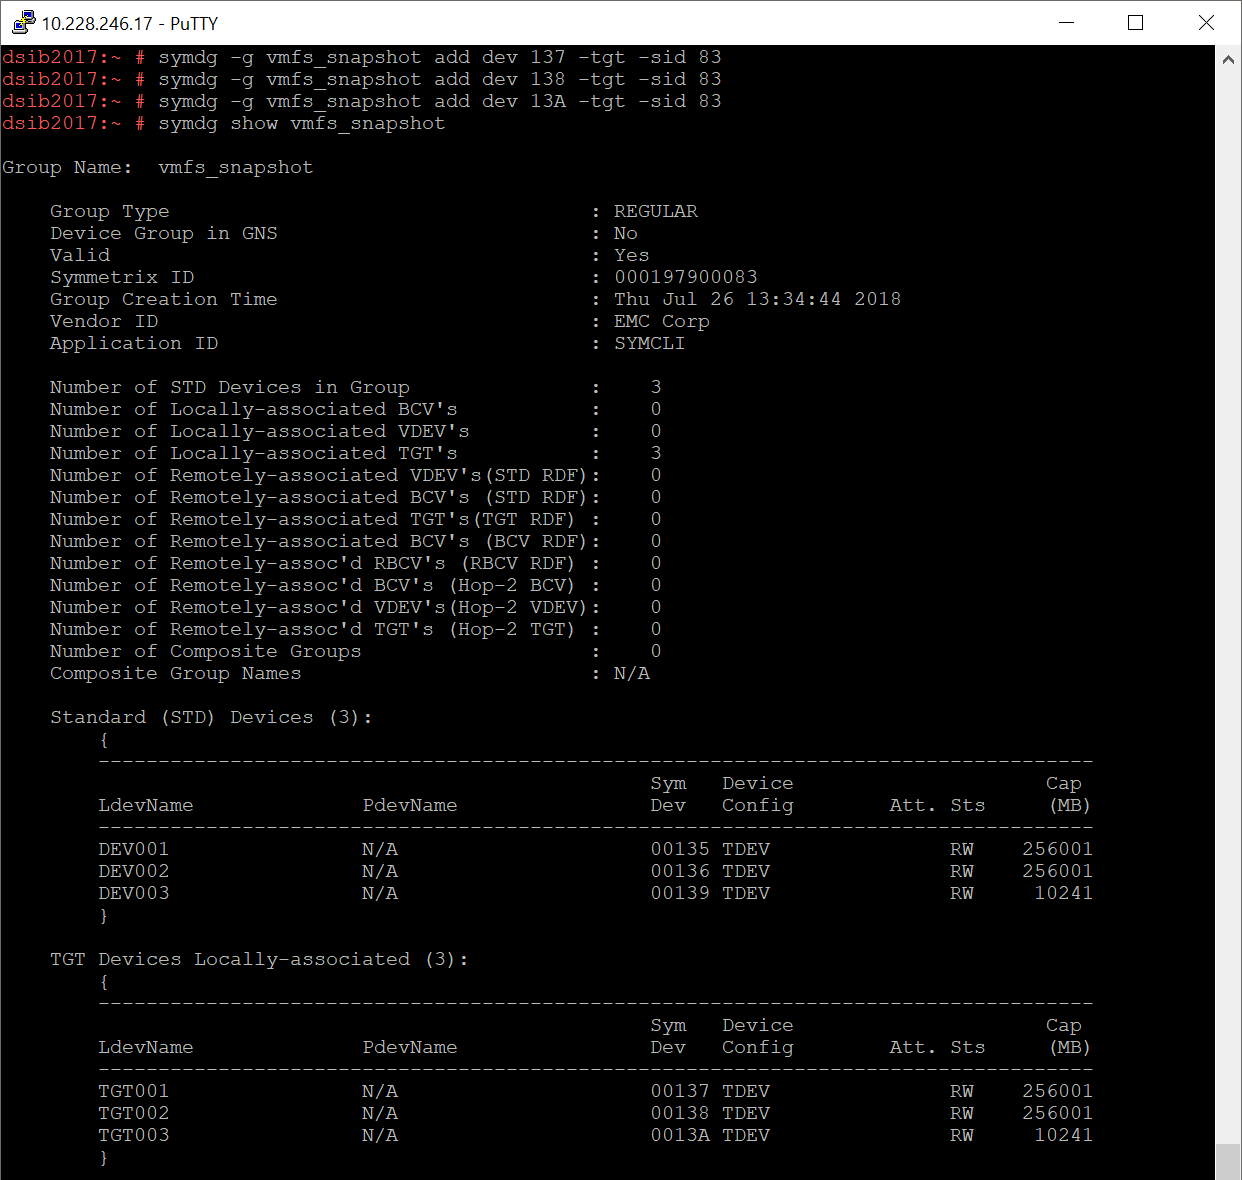
2. The devices that hold the copy of the data need to be added or associated with the group. In order to distinguish the devices as targets for linking the snapshot, add the -tgt to the symdg command as in Figure 145.
symdg -g <group_name> -sid <array SN> -tgt add dev <dev #>
Figure 145. Adding symsnapvx targets to the device group in Solutions Enabler
3. The next step is to take the snapshot seen in Figure 146. Snapshots are created with the establish command along with a custom name for the snapshot.
symsnapvx -g <group_name> -name <snapshot name> establish
Figure 146. Taking a snapshot of the device group in Solutions Enabler

Unlike other TimeFinder technologies, the user can take up to 256 snapshots of these group of devices if desired without ever linking them to a target (1024 for storage groups). In this example, however, the next step is to link the devices. Note that 1024 linked targets are supported.
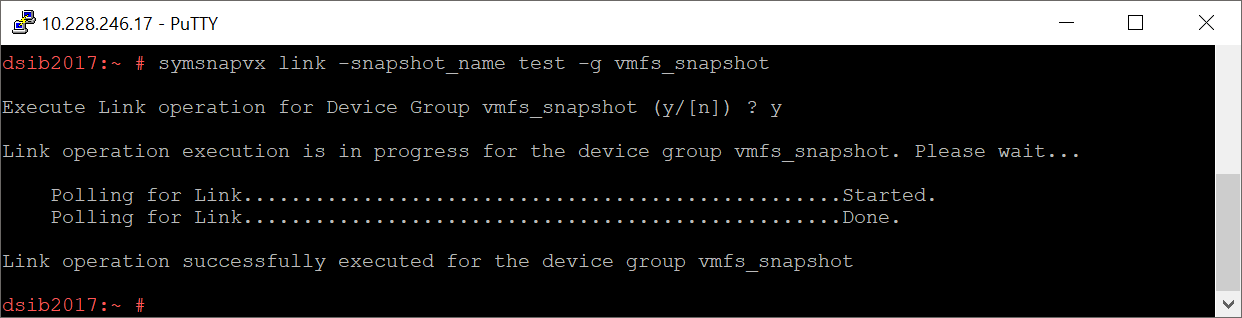
4. With the snapshot complete, it now can be linked to the three target devices added to the group as in Figure 147.
symsnapvx -g <group_name> -snapshot_name <snapshot name> link
Figure 147. Linking a snapshot in Solutions Enabler
The copy is now complete. The devices, i.e. linked targets, can be presented to a VMware environment and used as required.
Unisphere for PowerMax steps
The following presents the GUI steps required to copy a group of virtual machines utilizing SnapVX technology. Before beginning the process, gracefully shutdown any VMs running on the selected datastores.
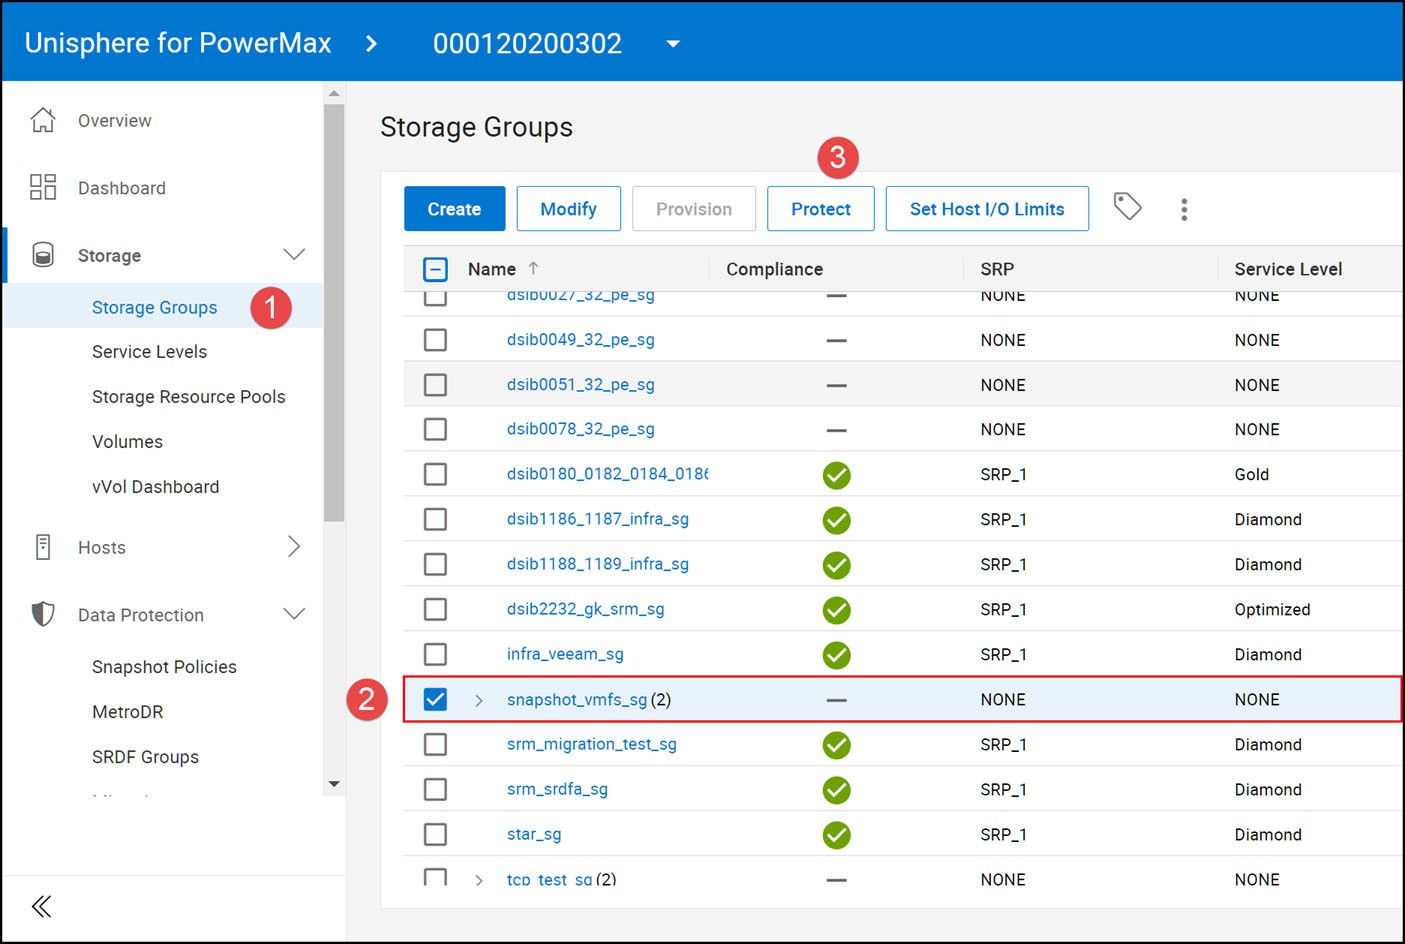
- In Unisphere for PowerMax navigate to the Storage Groups page under the Storage menu on the left-hand side. Check the box next to the correct storage group name and select Protect from the options in the sub-menu like Figure 148.
Figure 148. Selecting the storage group for snapshot protection in Unisphere for PowerMax
2. In the next step, navigate through the three-step wizard:
- Select Point in Time using SnapVX
- Type in the snapshot name
- Run the job
Unisphere for PowerMax has other options available (which are also available through CLI). In this example in Figure 149, the Time To Live is set which indicates when the snapshot will expire. Setting this is always recommended so resources are reclaimed when the snapshot is no longer needed.
Figure 149. Creating a snapshot in Unisphere for PowerMax

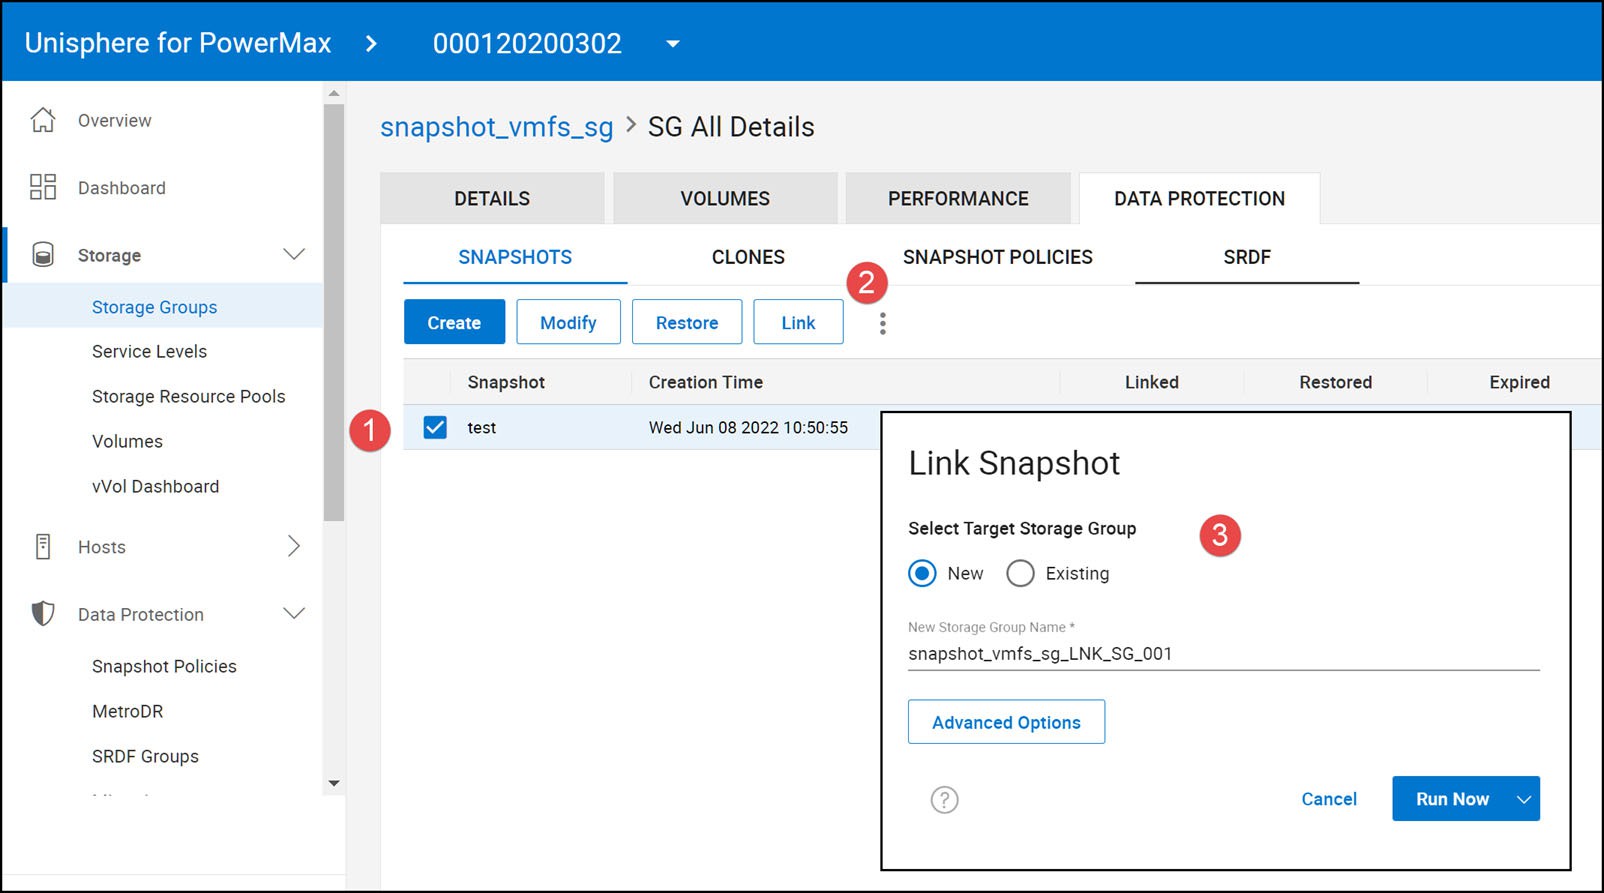
3. The next step is to link the snapshot. Navigate to the SnapVX Snapshots screen of the selected storage group or simply to the Storage Groups menu under Data Protection. Check the box and select Link. In step 3, either choose the existing storage group with the target devices or leave the default for a new group and execute. In this example, New is chosen so Unisphere will create a new storage group with the necessary devices. The steps are seen in Figure 150.
Figure 150. Linking a snapshot in Unisphere for PowerMax
The copy is now complete. The devices can be presented to a VMware environment and used as required.
Virtual Storage Integrator (VSI) integration
Dell VSI version 8.5+ also offers some limited snapshot integration. Figure 151 shows one of the interfaces where, after taking a snapshot of a datastore, it can be linked to a new device that VSI will automatically create. For additional detail, refer to the VSI Product Guide.
Figure 151. VSI 8.5 snapshot integration

Presenting copies to VMware
VMware assigns a unique signature to all VMFS volumes when they are formatted with VMFS. Furthermore, the VMFS label is also stored on the device.
Since storage array technologies create exact replicas of the source volumes, all information including the unique signature and label is replicated. If a copy of a VMFS volume is presented to any VMware ESXi host or cluster group, the VMware ESXi, by default, automatically masks the copy. The device holding the copy is determined by comparing the signature stored on the device with the computed signature. The SnapVX targets, for example, have a different ID from the standard device it is associated with it. Therefore, the computed signature for a target device always differs from the one stored on it. This enables VMware ESXi to always identify the copy correctly.
VMware vSphere has the ability to individually resignature and/or mount VMFS volume copies through the use of the vSphere Client or with the CLI utility esxcfg-volume (or vicfg-volume with the VMware remote CLI tools). Since it is volume-specific, it allows for much greater control in the handling of snapshots. This feature is very useful when creating and managing volume copies created by local replication products such as SnapVX or remote replication technologies such as SRDF.
While either the CLI or the GUI can be used to perform these operations, the GUI (vSphere Client) is always recommended. Nevertheless, there are a few features available in the CLI that cannot be performed in vSphere Client.
Steps
In two of the above cases of creating SnapVX copies, CLI or GUI, once the steps are complete, the copied devices can be presented to a vCenter. (When using VSI, it will facilitate presentation to VMware automatically.) In the following steps, a backup vCenter is utilized, however copies can be presented back to the original vCenter. In such cases it is important to understand how duplicate extents work. An explanation can be found later in this chapter here Using TimeFinder copies.
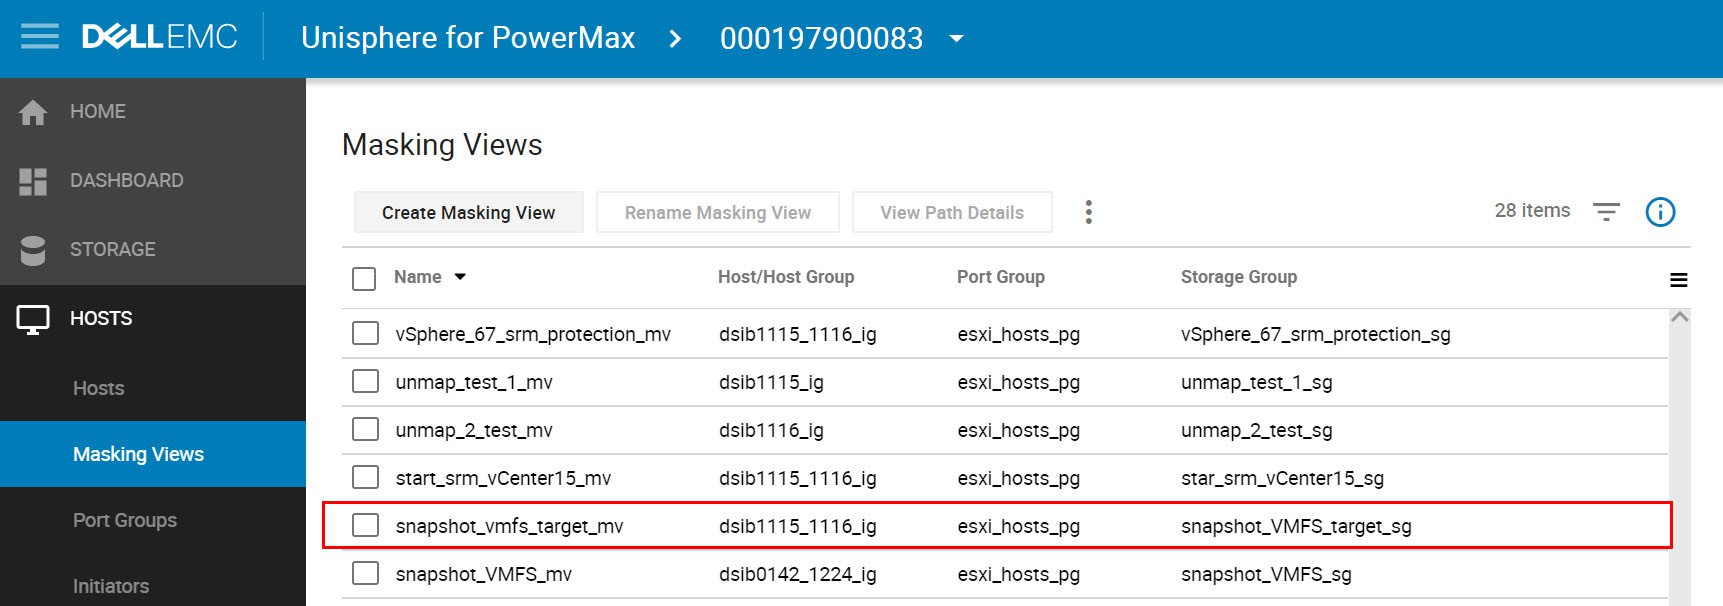
The steps below will use a linked target storage group named snapshot_VMFS_target_sg which has two 250 GB VMFS devices and one 10 GB RDM device.
- Assuming the storage group is not presented to the ESXi hosts, create a masking view for the storage group snapshot_VMFS_target_sg (Figure 152).
Figure 152. Creating masking view for copied devices
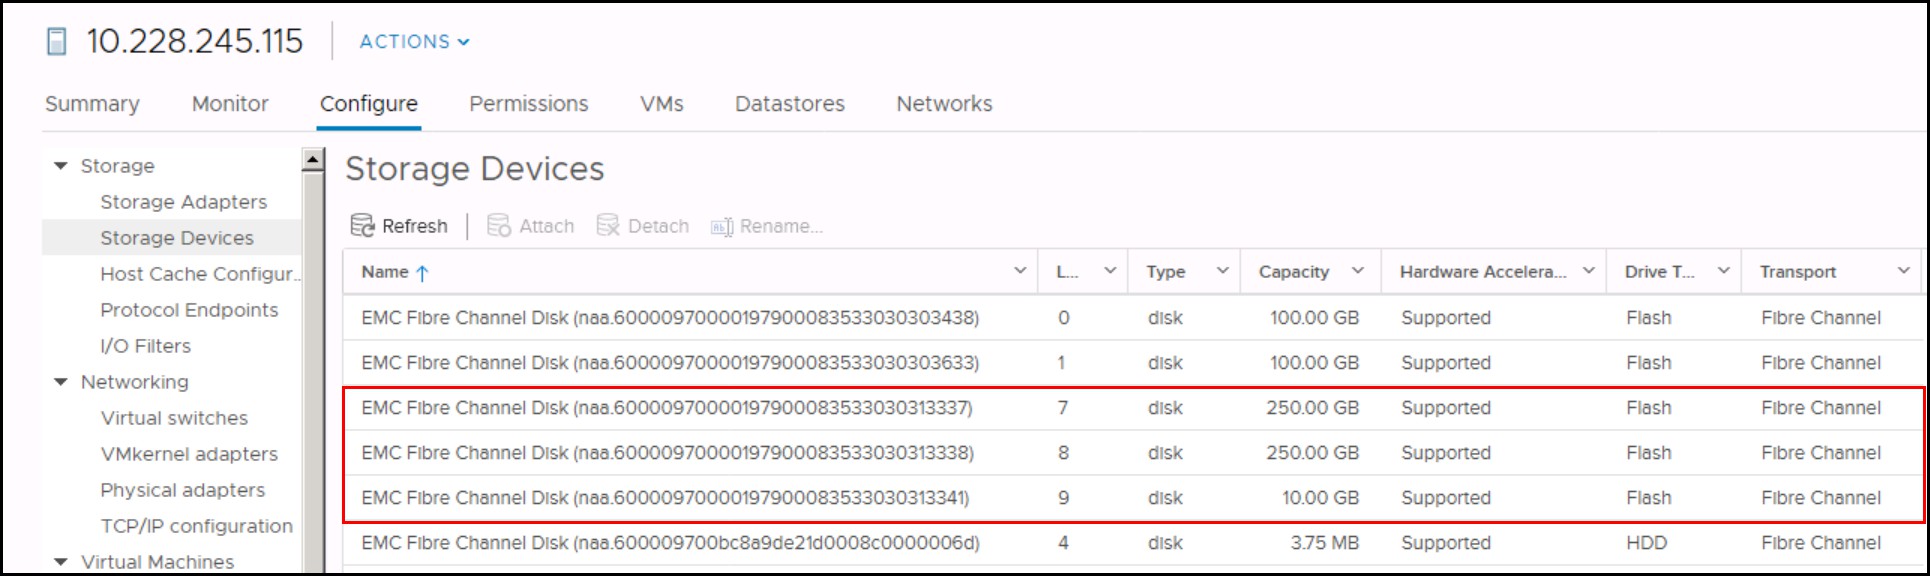
2. If using FC or iSCSI as in this example, rescan the ESXi hosts on the backup vCenter so the devices are seen as in Figure 153.
Figure 153. Rescan ESXi hosts for copied devices
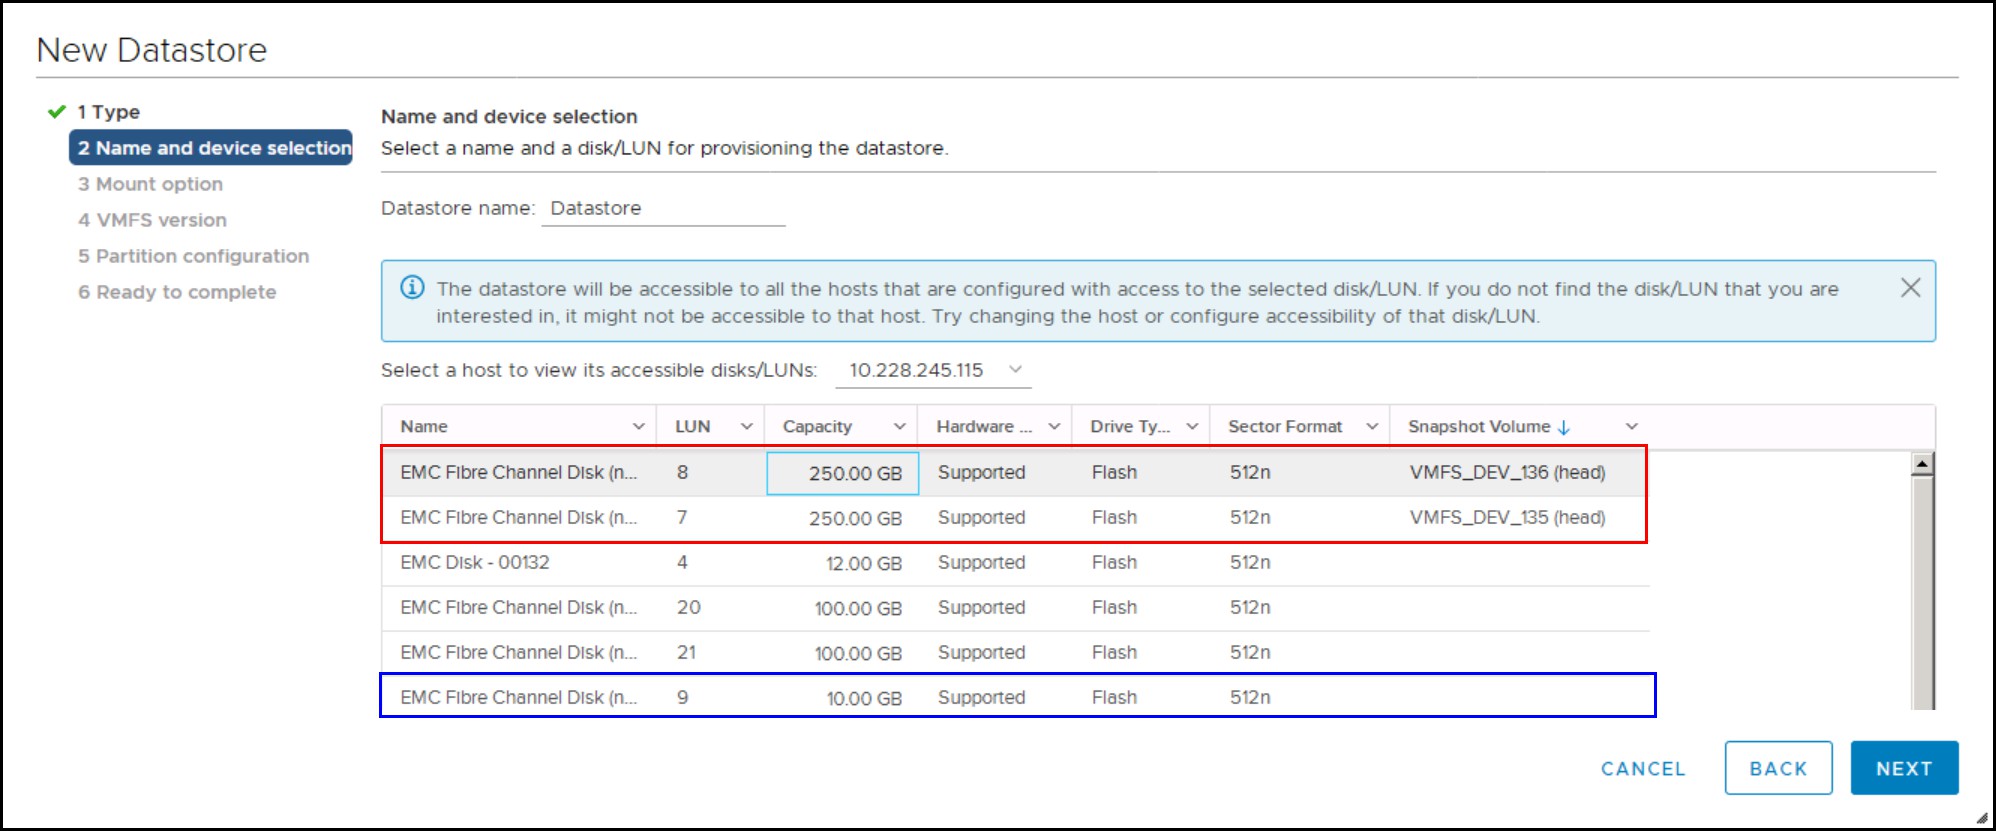
3. Once the devices are available, the two 250 GB with VMFS partitions can be mounted. As vSphere queries the devices during the create datastore wizard, it will recognize that the two copied devices have existing VMS partitions on them. In so doing, it will show them as Snapshot Volumes, noted in Figure 154 in the red box. The single RDM is also shown in the blue box. As it has no VMFS extent, VMware does not recognize a Snapshot Volume.
Figure 154. Snapshot volumes recognized from copied devices
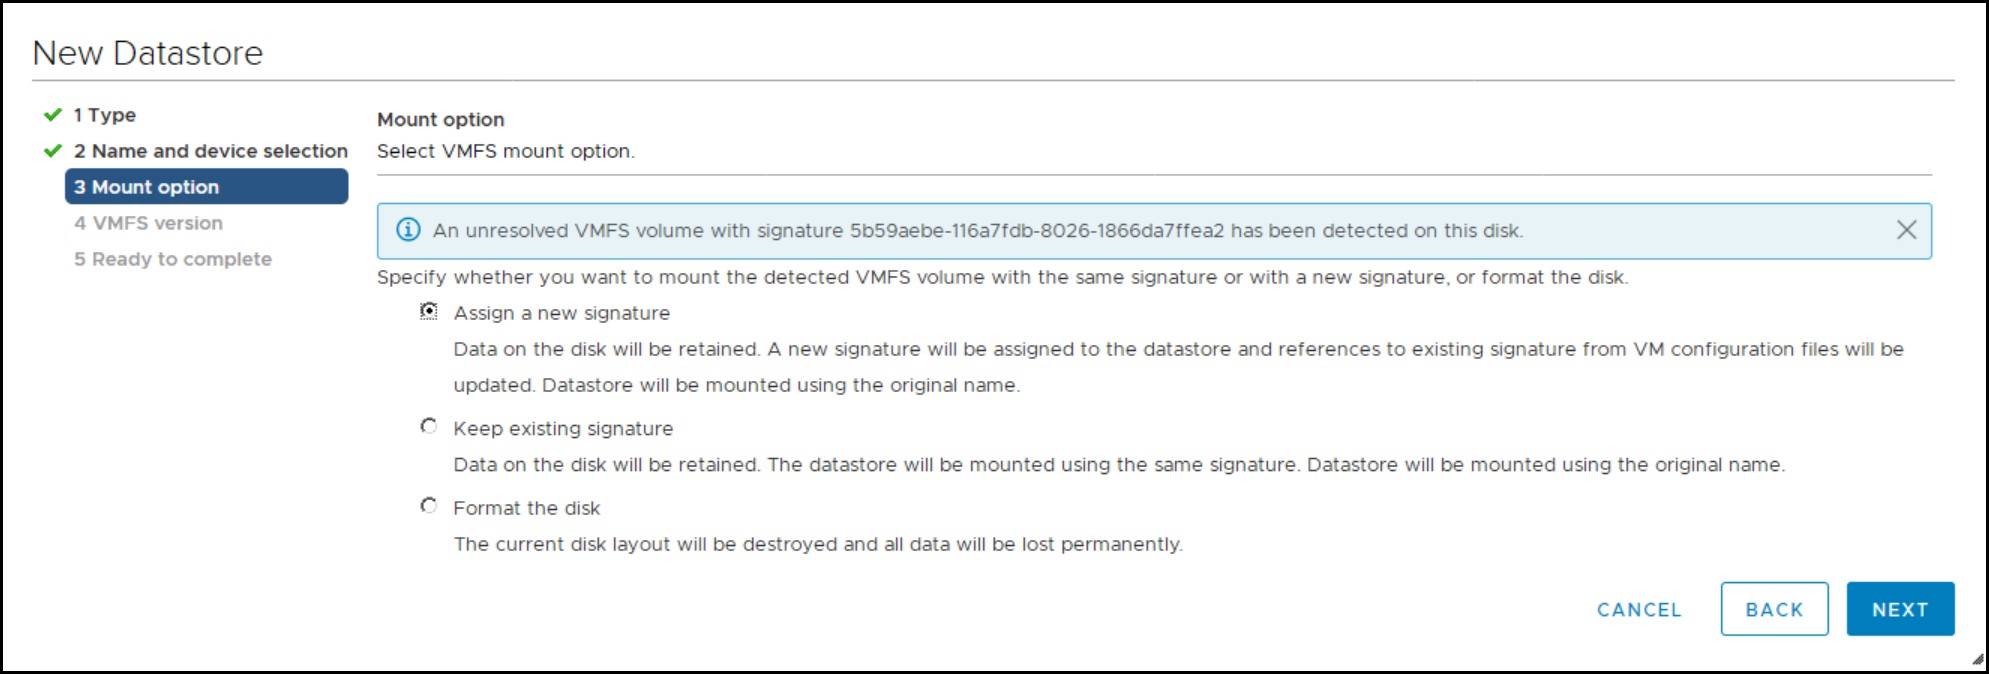
4. Select one of the snapshot volumes in Figure 154 and click through to the next screen in Figure 155. Here the user will be given three options:
- Assign a new signature — This option will resignature the VMFS volume copy entirely and will therefore allow it to be presented to the same host as the original VMFS volume.
- Keep the existing signature — This option initiates a persistent force-mount. This will cause the VMFS volume copy to be persistently mounted on the ESXi host server (in other words it will remain an accessible datastore over reboots of the ESXi host).[1] If the original VMFS volume is already presented to the same ESXi host the mounting of the volume copy will fail. The ability to non-persistently mount a VMFS volume copy is a feature only available through the CLI. In addition, CLI utility has to be used to force-mount a VMFS datastore copy while retaining the existing signature on multiple ESXi servers. The CLI is covered in Using the command line to mount VMFS volume copies.
- Format the disk — This option wipes out any data on the device and creates an entirely new VMFS volume with a new signature.
Dell recommends assigning a new signature to prevent any duplicate extents in the future. If the devices have been presented to a different vCenter, however, it is possible to keep the existing signature. Note that it is unnecessary to type a new datastore name as VMware automatically generates one.
Figure 155. Assigning a new signature
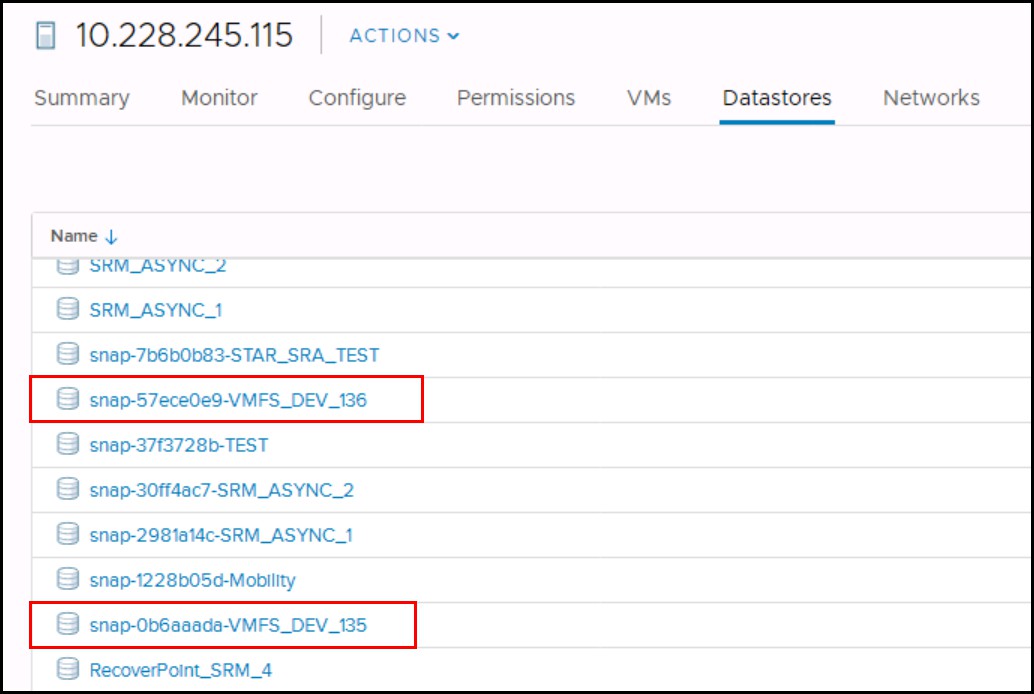
5. Repeat the process for the second snapshot volume. VMware will automatically assign a prefix to the volume names, snap-xxxx-. The newly mounted volumes are in red in Figure 156.
Figure 156. Mounted and renamed snapshot volumes
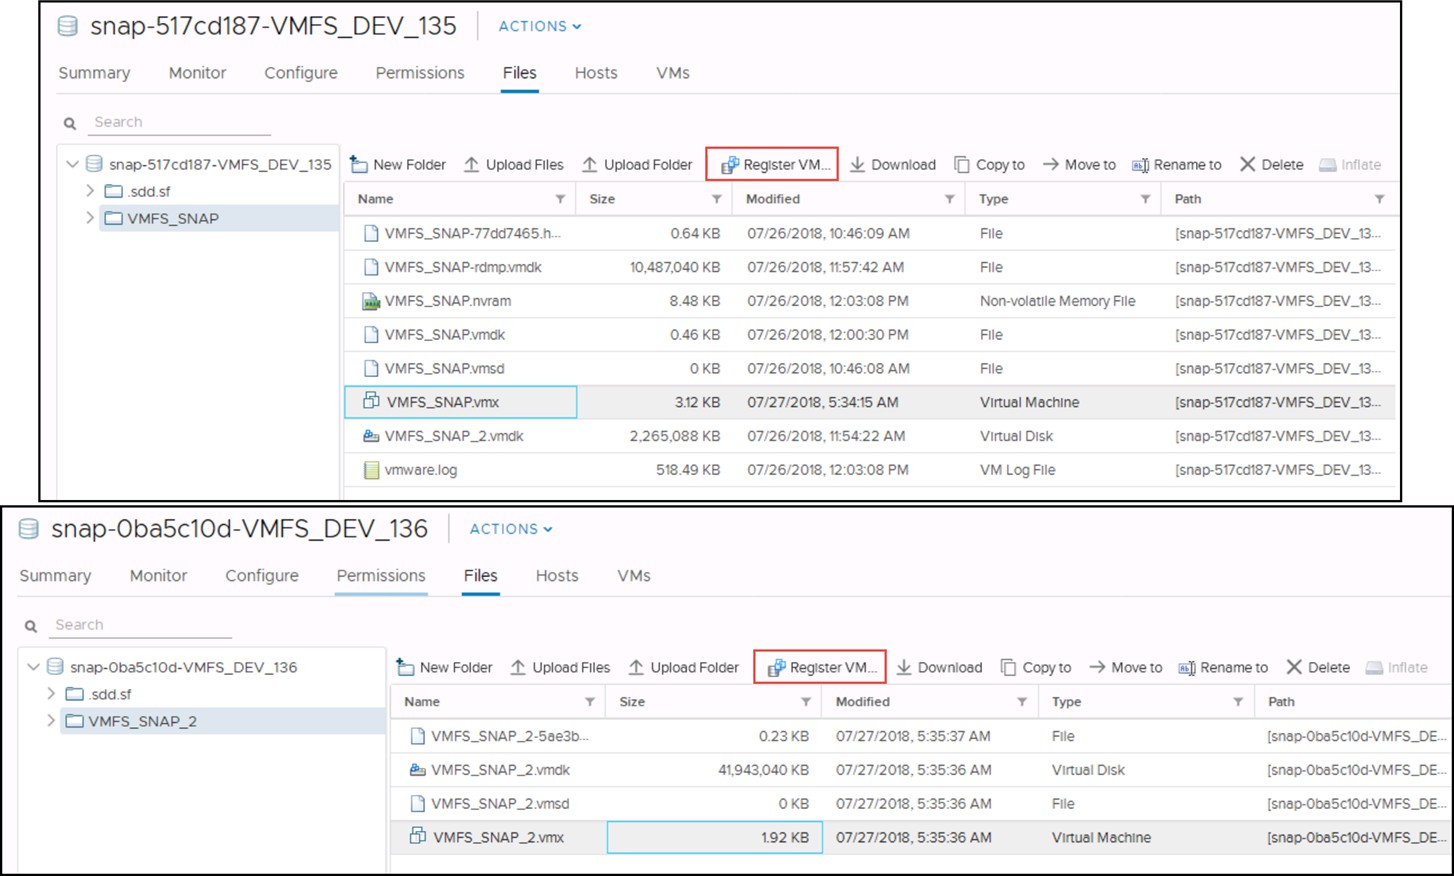
6. Once the volumes are mounted, register the virtual machines. In this example in Figure 157 there is a VM in each mounted datastore. Although the VMFS_SNAP VM has an RDM, it is still registered normally.
Figure 157. Register VMs in snapshot volumes
7. As one of the VMs has an RDM, a further manual step is required since the pointer in the vmx file is no longer valid as it points to the original RDM which is not presented to this environment. Edit the VM and notice that the RDM device is now showing ‘0’ and has an error in Figure 158.
Figure 158. RDM is no longer valid in the backup environment
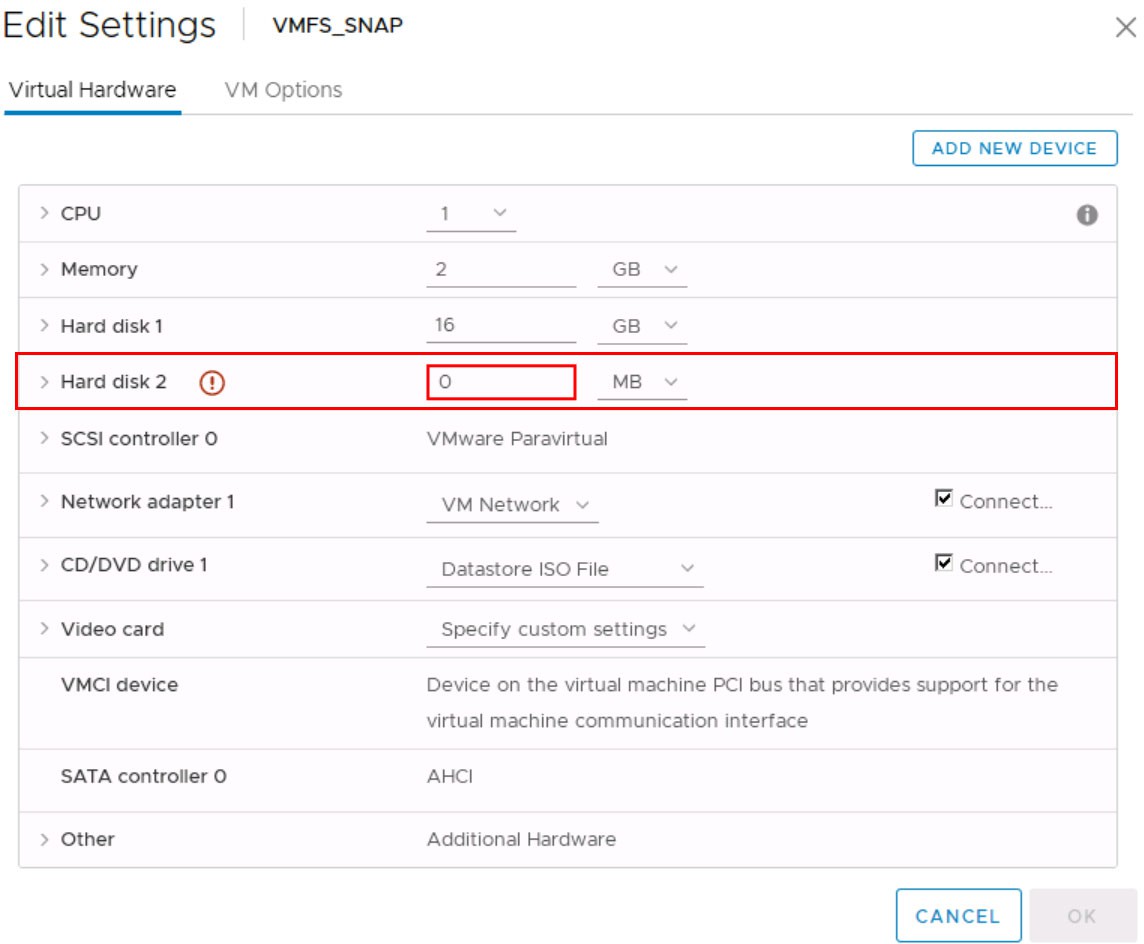
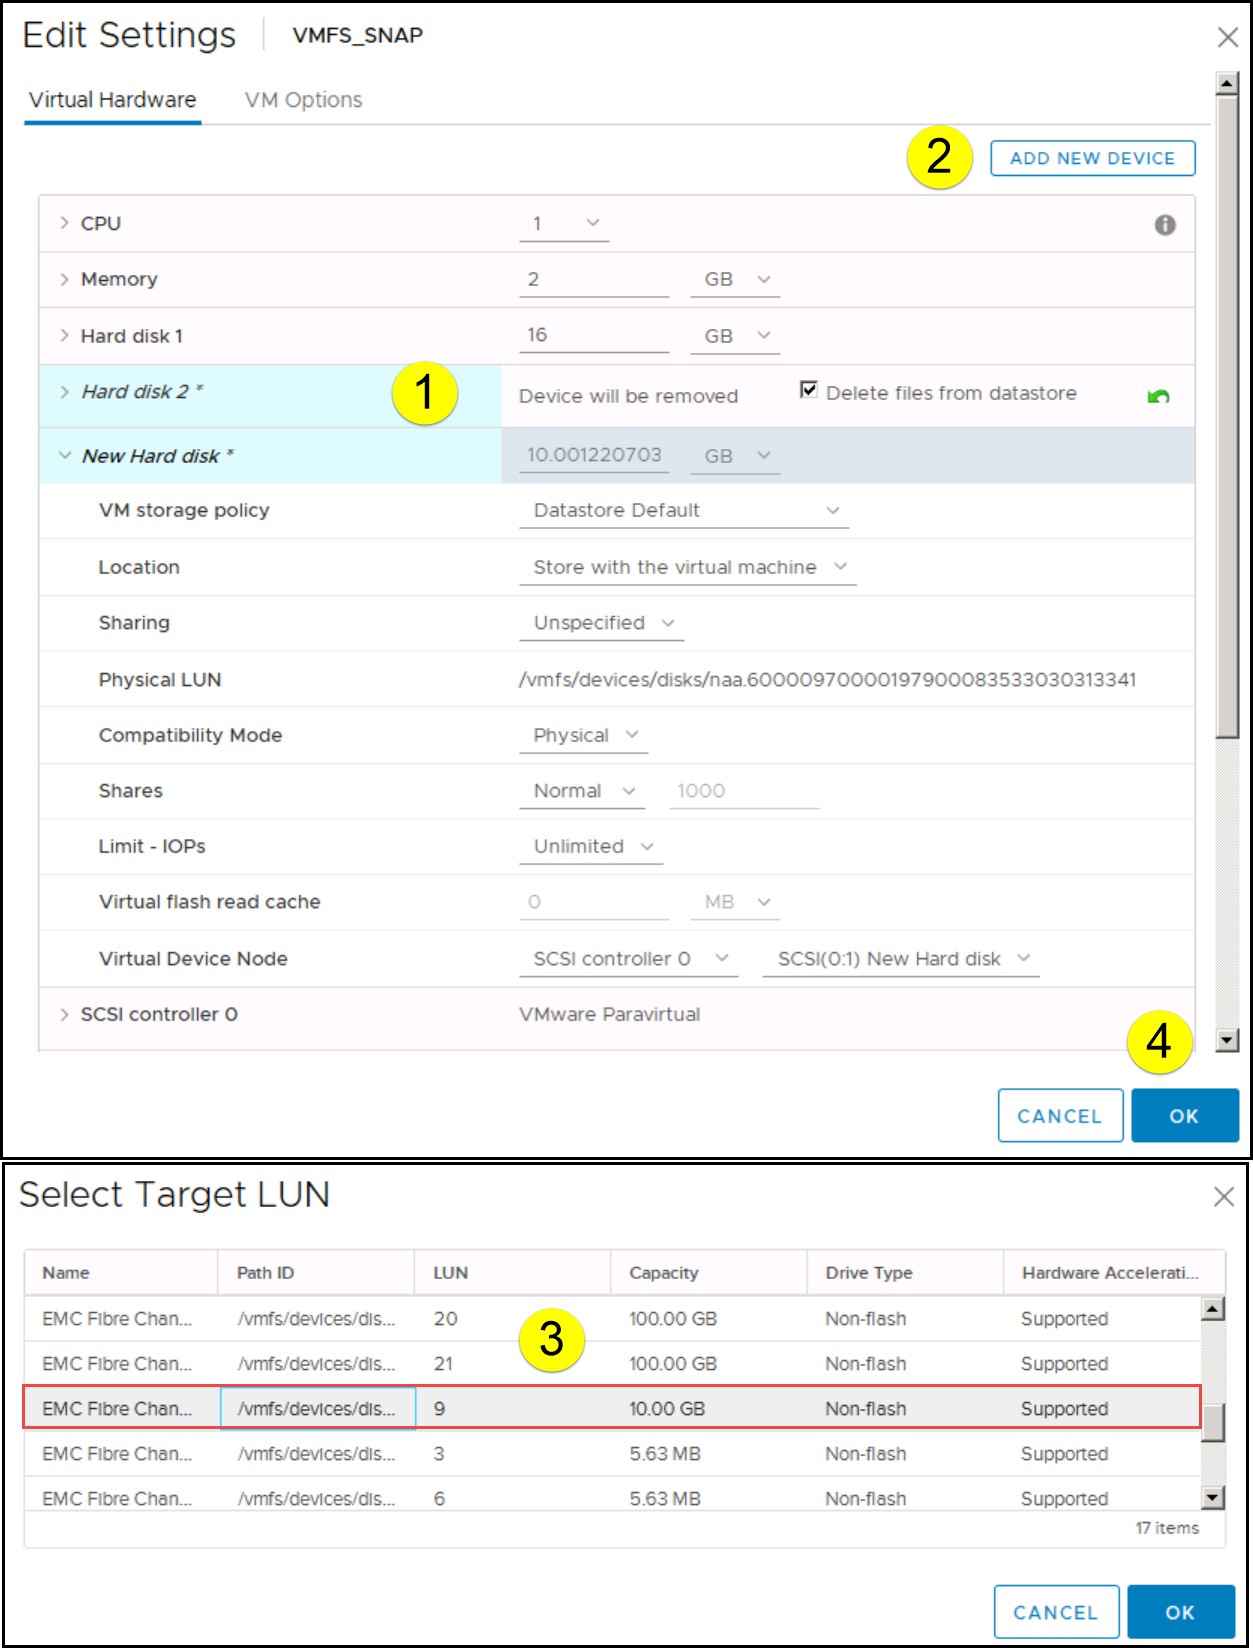
8. Delete the existing Hard disk 2 including the file, and add a new RDM, selecting the snapshotted device from the list. The steps are shown in Figure 159.
Figure 159. Adding the copied RDM to VM
9. The VM can now be powered on successfully.
Note: After the new RDM is configured on the copied VM (using the same vmdk file name as the original VM), it may be useful to make a copy of the new vmx file. In the event the environment is refreshed, and only the VM data has changed and not the devices, the saved vmx file can be copied back to the refreshed environment which will avoid having to re-add the RDM, and instead the VM can be immediately powered-on.
Using the command line to mount VMFS volume copies
In the ESXi CLI, the esxcfg-volume (or vicfg-volume with the VMware remote CLI tools) command is the function used to resignature VMFS volume copies or mount cloned ones. A feature that is unique to esxcfg-volume and not available in vSphere Client is the ability to non-persistently force-mount a volume copy (meaning it will not be mounted after a reboot of the ESXi host).
esxcfg-volume comes with the following parameter options:
-l | --list
-m | --mount <vmfs uuid|label>
-u | --umount <vmfs uuid|label>
-r | --resignature <vmfs uuid|label>
-M | --persistent-mount <vmfs uuid|label
The command esxcfg-volume -l will list all of the volumes that have been detected as snapshots or replicas. If a volume copy is found, it displays the UUID, whether or not it can be mounted (decided by the presence of the original VMFS volume), whether or not it can be resignatured, and its extent name.
Figure 160 shows the list command returns two VMFS volume copies. The first volume copy cannot be mounted because the original volume is still online. The second volume can be mounted due to the fact that the original VMFS volume is not present on that ESXi host.
Figure 160. Listing available VMFS volume copies using the esxcfg-volume CLI command

In this example the first discovered volume copy “62603e14-5f601c30-5f40-34800d0ed39c/STAR_341_ASYNC_302” will be non-persistently force-mounted using the command esxcfg-volume -m. Since it does not have its original VMFS volume present it can be mounted without the need to resignature.
In Figure 161, this volume is non-persistently mounted through the CLI and then esxcfg-scsidevs -m is executed to list the VMFS volumes and the newly mounted volume is listed. Since it is non-persistent, it will disappear after the next reboot of the ESXi host.
Figure 161. Non-persistently force-mounting a VMFS volume copy using the esxcfg-volume CLI command

Otherwise, if the cloned volume is never going to be presented to this host again it can be mounted persistently, which is the equivalent of using the vSphere Client Add Storage wizard to do it, by using the esxcfg-volume -M command.
Using TimeFinder/SnapVX with hot virtual machines
Using TimeFinder/SnapVX with cold virtual machines discussed use of the TimeFinder/SnapVX to clone virtual machines that have been shut down. Although this is the ideal way to obtain a copy of the data, it is impractical in most production environments. Fortunately, all SnapVX snapshots are consistent-consistent copies when created using the symsnapvx establish command. Depending on the state of the devices at the time of the snapshot, SnapVX pauses IO to ensure there are no writes to the source device while the snapshot is created. The image created in this way is a dependent-write consistent data state and can be utilized as a restartable copy of the virtual machine.
Virtual machines running modern operating systems such as Microsoft Windows and database management systems enforce the principle of dependent-write IO. That is, no dependent write is issued until the predecessor write it is dependent upon has completed. For example, Microsoft Windows does not update the contents of a file on a NT file system (NTFS) until an appropriate entry in the file system journal is made. This technique enables the operating system to quickly bring NTFS to a consistent state when recovering from an unplanned outage such as a power failure.
As the process for taking snapshots of hot virtual machines is the same as cold, it is not repeated here. Two important concepts are included concerning quiescing and databases.
Note: If TimeFinder/Clone is preferred over SnapVX, be sure to utilize the -consistent flag when taking the clone. This is particularly essential if the VMs contain databases like Oracle since it can corrupt it without the flag.
Quiescing
Although snapshots produce a consistent copy, some applications require quiescing before any copy is taken. This is most common in Windows operating systems where Microsoft has a process called Windows Volume Shadow Copy Service (VSS) to specifically handle it. VSS is a set of COM interfaces that implements a framework to allow volume backups to be performed while applications on a system continue to write to the volumes. The quiescing scripts are called before and after the snapshot to ensure this OS/application consistency. Note that integration with VMware requires the use of the UUID with VSS. More detail is available from VMware KB 102888.
Databases
When a snapshot is taken of a VM running a relational database (RDBMS) like Oracle or SQL Server, a crash-consistent copy is produced. This is exactly the same as if the database or the VM itself crashed. When the copied VM is powered on, the database will recover by applying committed transactions and rolling back uncommitted ones. For recent versions of Oracle, a crash-consistent copy of the database can be used much the same as a cold copy of the database. Oracle permits using the crash copy as the basis for applying future logs and thus is a viable backup. SQL Server, on the other hand, does not. In order to use similar functionality with SQL Server, Microsoft has a service similar to VSS known as SQL Server Virtual Device Interface (VDI). When VDI is employed with SQL Server an application consistent copy of the database can be taken with SnapVX.
[1] This is true so long as the original device is not presented to the ESXi host, in which case the mount of the VMFS volume copy will fail.