
PowerProtect DP Series Appliance: VMware Workload Protection
Deploy VM proxy
Deploy VM proxy
-
Avamar Proxy plays the most important role in backup and restore. It is the mechanism behind the backups/restore process. Avamar proxy talks to Hypervisor Manager API to get the snapshots done of the service being backed up. Below are the steps to deploy VM Proxy on the Hypervisor Manager.
- Log in to Data Protection Central and go to Avamar UI.
- At the Avamar UI dashboard, under Administration on the left pane, click Proxy Management.
- Select Proxy Deployment.
- Under Config, provide the requested details:
- vCenter: Select the Hypervisor Manager from the drop-down menu.
- Data Change Rate (%):
- Backup Window (minutes):
- Protect Virtual Machines on local storage: Select this option if service needs to be on local storage.
- Under the Recommendations section, you can create recommendation by clicking Create Recommendations, which creates the internal proxy.
- Click the DataCenter drop-down menu.
- Select the Hypervisor Manager where the proxy gets installed.
- Select the Hypervisor and click the + sign.
- Enter the details of the VM Proxy:
- Name: <Name of VM Proxy>
- Domain: /<domain>
- IP: <IP address of the VM>
- Datastore: Select the datastore from the drop-down menu.
- Network: Provide the required network (switch).
- DNS: <IP address of DNS server>
- Gateway: <IP address of gateway>
- Netmask: <Mask address>
- NTP: <IP address of NTP server>
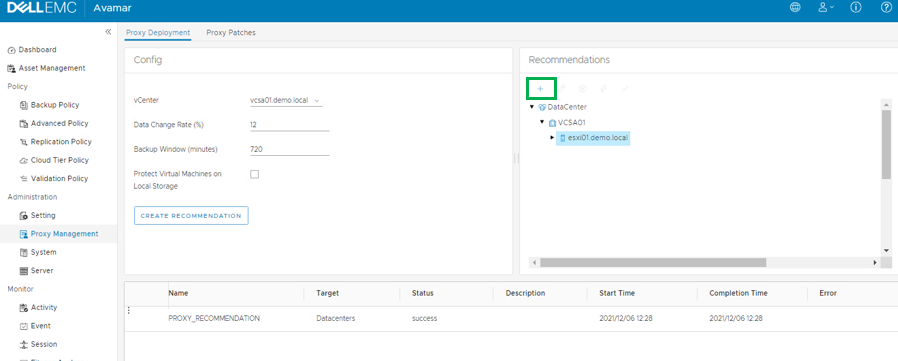
Figure 18. Avamar UI showing proxy deployment option