
Step 1: Install Docker, Kubernetes, and the CSI plug-in for PowerFlex systems
Step 1: Install Docker, Kubernetes, and the CSI plug-in for PowerFlex systems
-
Step 1a: Install Docker Enterprise Edition
The first step in creating a developer environment using Docker containers is licensing and installing the Docker runtime.
The Docker administrator installs the Enterprise Edition by running the following installation command:
$ yum -y install docker-ee-18.09.9 docker-ee-cli-18.09.9 containerd.io
In a vSphere environment, the VM limits CPU and memory resources. Collaboration between the virtualization and Docker administrators is important because most Docker environments have multiple containers. VMs hosting Docker containers trend on the larger size, requiring more CPU and memory resources to support containers.
Step 1b: Install the Docker registry
Docker registry placement is a key consideration when building a dev/test environment. The factors that influence Docker registry placement include:
- Variety—Number of images in the registry
- Velocity—Frequency of application provisioning
- Security—Protection of application images
For our lab validation, we used a local private registry, which addressed our key variety, velocity, and security requirements.
To create a local registry from Docker Hub, the developer runs the following commands:
$ docker pull registry
$ mkdir -p /registry/private
$ docker run -d -p 5000:5000 -name registry -v /var/lib/registry --restart
The Docker administrator must work closely with network engineers and security experts to address the placement of the Docker registry. Depending on the size of the container environment, the velocity can place a significant load on the network. Further, customized registry images might contain sensitive configuration settings that must remain secure.
Step 1c: Install Kubernetes
Many Kubernetes solutions are available today. For example, turnkey-managed Kubernetes offerings from cloud providers give IT organizations a zero-data-center-footprint solution that requires no installation. An on-premises private-cloud Kubernetes implementation offers greater control and flexibility but requires investment in infrastructure and training. For this use case, we show an open-source Kubernetes installation to demonstrate how having the container orchestration system on our LAN provides greater performance and control as well as the ability to customize the configuration.
Install Kubernetes as follows.
Note: For complete Kubernetes installation instructions, see the Kubernetes documentation.
cat <<EOF > /etc/yum.repos.d/kubernetes.repo
[kubernetes]
name=Kubernetes
baseurl=https://packages.cloud.google.com/yum/repos/kubernetes-el7-x86_64
enabled=1
gpgcheck=1
repo_gpgcheck=1
gpgkey=https://packages.cloud.google.com/yum/doc/yum-key.gpg https://packages.cloud.google.com/yum/doc/rpm-package-key.gpg
exclude=kube*
EOF
# Set SELinux in permissive mode (effectively disabling it)
setenforce 0
sed -i 's/^SELINUX=enforcing$/SELINUX=permissive/' /etc/selinux/config
yum install -y kubelet kubeadm kubectl --disableexcludes=kubernetes
systemctl enable --now kubelet
Step 1d: Install the CSI plug-in for PowerFlex systems
In addition to our Kubernetes environment, we also need a CSI plug-in to complete our automation journey. CSI plug-ins are a Kubernetes-defined standard that Dell Technologies and others use to expose block and file storage to container orchestration systems. CSI plug-ins unify storage management across many different container orchestration systems including Mesos, Docker Swarm, and Kubernetes.
The CSI plug-in for PowerFlex systems for Kubernetes provides the following orchestration capabilities:
- Dynamic provisioning and decommissioning of volumes
- Attachment and detachment of volumes from a host node
- Mounting and unmounting a volume from a host node
- Snapshot capabilities: create, delete, and list
The Kubernetes administrator works with the storage administrator to download, modify, and install the CSI plug-in as follows.
Note: An overview is available on YouTube and in the product guide.
- On the master node of Kubernetes, edit the YAML and CONF files.
- Install the Helm package manager.
- Install the PowerFlex SDC.
- Download the plug-in from GitHub:
$ git clone https://github.com/dell/csi-vxflexos
- Modify the CSI.ini file to connect to the PowerFlex array.
- Install the CSI plug-in on the first node:
$ sh install.vxflexos
The PowerFlex storage is then available in Kubernetes. The following figure shows the kubectl get pods –n -vxflexos output when the CSI plug-in is running on all Kubernetes worker nodes:
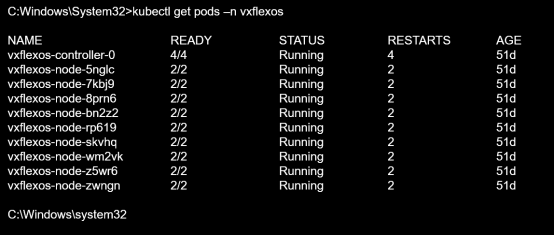
Figure 12. CSI plug-in for PowerFlex systems, running on Kubernetes worker nodes
The following figure shows the PowerFlex configuration. Using the System Overview, a storage administrator can easily understand physical capacity usage, number of volumes, and number of SDS nodes and SDCs.
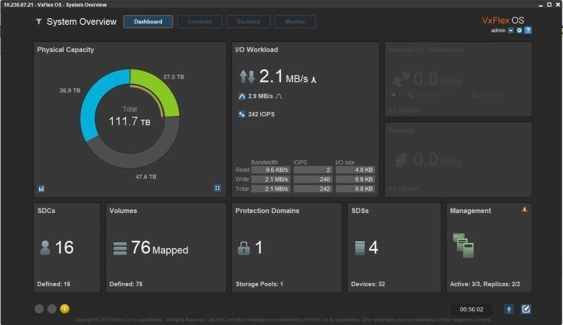
Figure 13. PowerFlex cluster configuration
Step 2a: Pull the Big Data Cluster image from the Microsoft Container Registry