
Step 2: Deploy Big Data Cluster
Step 2: Deploy Big Data Cluster
-
The Docker administrator downloads the latest Big Data Cluster image from the Microsoft Container Registry to the local private registry. The Docker administrator collaborates with the SQL Server administrator to ensure that all stated requirements for this Big Data Cluster image are met.
Note: Access to high-quality container images from a trusted source can save many hours of labor that are typically required to create and manage images that are built locally from Docker files. Always check requirements before attempting to deploy a container image.
To download the image, the Docker administrator runs the following Docker pull command:
$ docker pull mcr.start.com/mssql/bdc/<SOURCE_IMAGE_NAME>;<SOURCE_DOCKER_TAG>
This Docker pull command shows how to manually pull images from trusted public registries. Because we were performing an offline installation from our local private registry, we used a Python script to automate pulling of all the required images.
For details about how to use a Python script to automate this work, see Perform an offline deployment of a SQL Server big data cluster in Microsoft SQL Docs. The key step is to download the script, using the Bash shell, with Curl:
curl -o push-bdc-images-to-custom-private-repo.py "https://raw.githubusercontent.com/Microsoft/sql-server-samples/master/samples/features/sql-big-data-cluster/deployment/offline/push-bdc-images-to-custom-private-repo.py"
Step 2b: Push the Big Data Cluster image to the local private registry
To manually populate the local private Docker registry with the Big Data Cluster, the Docker administrator runs the following Docker push command:
$ docker push localhost:5000/<SOURCE_IMAGE_NAME>;<SOURCE_DOCKER_TAG>
To automate populating the local registry, run the Microsoft Python script with the Linux command:
sudo python push-bdc-images-to-custom-private-repo.py
Note: If you customize the Big Data Cluster container image (we did not), save the base image or images and any customization to the local private registry with appropriate annotations, if required for your use case.
Step 2c: Configure vSphere dynamic storage provisioning
A key question related to the implementation of this Big Data Cluster environment concerns storage provisioning. In a bare-metal infrastructure, the control plane is Kubernetes. But when vSphere is part of the application stack, does the control plane remain with Kubernetes or vSphere?
vSphere Storage Policy Based Management (SPBM) provides a single unified control plane for storage services such as Kubernetes. SPBM is an abstraction layer that enables disparate storage services to be unified under a universal framework for vSphere. The use of SPBM enables vSphere administrators to manage storage in a container environment, as shown in the following figure:
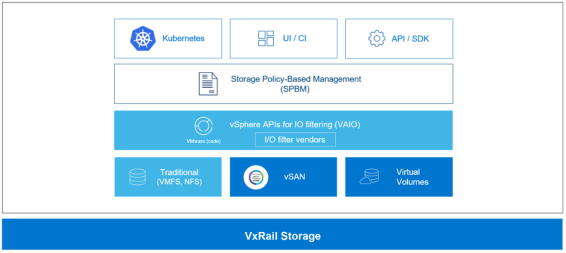
Figure 9. vSphere SPBM
The management process includes creating StorageClass definitions for dynamic storage provisioning. The StorageClass parameters are contained in a YAML file. Parameters in the YAML file for VMFS and NFS include:
- diskformat: thin, zeroedthick, eagerzeroedthick
- storagePolicyName: <user defined, example: gold>
Use of StorageClass parameters enables granular control of persistent storage provisioning.
# cat SQLBDC-storageclass.yaml
kind: StorageClass
apiVersion: storage.k8s.io/v1
metadata:
name: sqlbdc-sc
annotations:
storageclass.kubernetes.io/is-default-class: "true"
provisioner: csi.vsphere.vmware.com
parameters:
storagepolicyname: "Space-Efficient"
fstype: ext4
# kubectl get storageclass sqlbdc-sc
NAME PROVISIONER AGE
sqlbdc-sc csi.vsphere.vmware.com 5s
After the storage classes have been defined, Kubernetes can create PersistentVolumes for Big Data Cluster.
Note: For more information about using vSphere to dynamically provision storage in a Kubernetes environment, see Dynamic Provisioning on GitHub and Storage Policy Based Management in VMware Docs.
Step 2d: Install Big Data Cluster
Big Data Cluster installation prerequisites include installing tools such as Python, azdata, and kubectl. For detailed installation steps, see How to deploy SQL Server Big Data Clusters on Kubernetes in Microsoft SQL Docs.
- Run the following command to create a copy of the base deployment profile in the custom directory from the source bdc-test-profile01:
azdata bdc config init -–source bdc-test-profile –target custom
- Customize your copy of the base deployment profile for your infrastructure by using Visual Studio Code or a similar JSON editing tool.
- Run the following command to install Big Data Cluster:
azdata bdc create –-config-profile custom –accept-eula yes
In approximately 15 to 30 minutes, the following notification is displayed in the window where the installation was started, indicating that the controller pod is up and running:
Cluster controller endpoint is available at <IP_address>:<port_number>
Cluster control plane is ready.
When the entire installation is complete, the following message is displayed:
Cluster deployed successfully.
The use of a local private registry requires more preparation but significantly accelerates the deployment of Big Data Cluster. In contrast, an installation using the Microsoft Container Registry requires pulling all the image files over the Internet, which might take hours for every Big Data Cluster installation.
Useful commands to check the health of the cluster post installation are:
- azdata bdc endpoint list -o table—Provides a description of each service with its corresponding endpoint, as shown in the following figure:
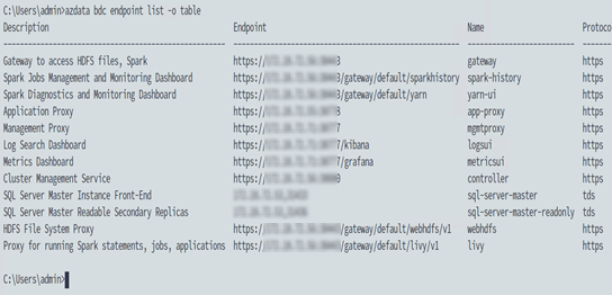
Figure 10. Big Data Cluster services and corresponding endpoints
- azdata bdc status show—Shows a detailed list of service names, their state, health status, and details
The following figure shows the status of SQL Server 2019 Big Data Cluster from Azure Data Studio:
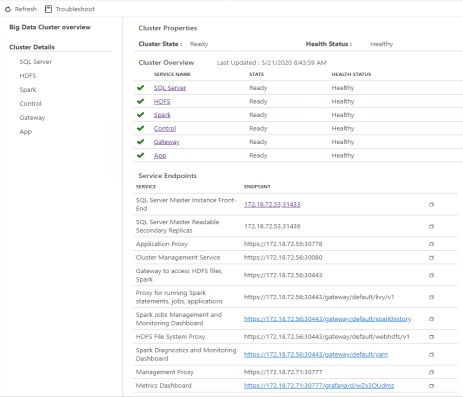
Figure 11. Big Data Cluster status in Azure Data Studio
Key benefits of automated Big Data Cluster installation
The simplicity of the automated installation of Big Data Cluster overshadows the significant value that the automation provides. The application architecture is complex, consisting of many tools and software stacks that might take days, if not weeks, to manually install. In this step, coordination of azdata, Kubernetes, and Docker enables automated installation of Big Data Cluster in minutes or hours. This time savings reflects one of the core benefits of containers, which is the capability to provision Big Data Cluster and other applications quickly.
Kubernetes and azdata combined are the automation and orchestration engines. When the Big Data Cluster installation is complete, the containers, configuration, and storage are provisioned, and the cluster is in a ready state. This automation and orchestration move Big Data Cluster into a self-serve, on-demand platform. The IT organization can then easily stand up multiple Big Data Clusters for different teams within the organization.
Some Big Data Clusters, including dev/test Big Data Clusters that are regularly refreshed, might only be needed for a few months. Docker containers are designed to be ephemeral—that is, they can be stopped and destroyed easily, and new containers can be built from the same image and put in place with minimal setup and configuration. The ephemeral nature of Docker containers is ideal for dev/test scenarios, where most developers and other team members use the containers for only a short time.
Step 2e: Import the TPC-H data into Big Data Cluster
You can ingest data into Big Data Cluster through any of the following methods:
- Load data into the storage pool by using the Curl utility. See Using Curl to ingest data.
- Load data into the data pool by using SQL Server and T-SQL. See Using SQL Server and T-SQL to ingest data.
- Load data into the data pool by using Spark jobs. See Using Spark jobs to ingest data.
The optimal method for ingesting data depends on the amount of data, type of data, and the target location of data. For example, if the goal is to ingest files into the storage pool (HDFS data node), using the Curl command line works well. In contrast, using SQL Server and Spark jobs works well if the goal is to ingest data into the data pool. In this use case, the goal was to ingest approximately 1 TB of TPC-H data into the Big Data Cluster storage pool, with smaller tables going into a stand-alone Oracle database and a stand-alone SQL Server database.
TPC-H data uses eight distinct and separate tables. The larger tables with more rows were ingested into the Big Data Cluster data pool. The medium-size tables were ingested into a stand-alone SQL Server database unrelated to the Big Data Cluster configuration. Finally, the smallest tables were ingested into the Oracle database. The goal was to place the largest tables in Big Data Cluster.
The following table summarizes where the TPC‑H data was ingested:
Table 2. TPC-H data locations after ingestion
Data location
Table
Scale Factor (SF)
Table size
Big Data Cluster storage pool (HDFS)
PARTSUPP
SF*800,000
Large
CUSTOMER
SF*150,000
Large
LINEITEM
SF*6,000,000
Large
ORDERS
SF*1,500,000
Large
Big Data Cluster data pool (SQL Server)
PART
SF*200,000
Medium
SUPPLIER
SF*10,000
Medium
External data source—MongoDB
NATION
25
Small
External data source—Oracle
REGION
5
Small
The scale factor column in the table refers to the size of the TPC-H database in gigabytes. In our use case, the database size was 1,000 GB (1 TB); thus, the scale factor is 1,000. To calculate the number of rows in a table, multiply the SF by the base row number. For example, for the first table, PARTSUPP:
1,000 (SF) * 800,000 = 8,000,000,000 rows
For more information, see TPC Benchmark H.
Key benefits of Big Data Cluster data ingestion
A key benefit of Big Data Cluster is the ability to easily ingest big data. In our use case, we used Curl to ingest approximately 1 TB of decision-support data. The tutorials in Microsoft SQL Docs enabled our SQL Server experts to quickly start the ingest of data. In testing, we took one extra step to optimize performance by moving from comma-separated value (CSV) files in HDFS to Parquet files, as described in Using Curl to ingest data.
By placing the medium-size tables in a stand-alone SQL Server database and the smaller tables in the Oracle database, our data virtualization tests validate:
- Access to disparate data in its native form—The capability to access data without any transformation.
- Access to data outside of Big Data Cluster—The capability to access data almost anywhere and without modification, that is, without having to modify or install an agent on the data source to facilitate data access.
Using Curl to ingest data
Curl is a command-line tool that is designed for transferring data over a broad set of protocols. The benefit of using Curl is the ability to put local files into HDFS, which is the approach that we used in our lab testing.
We cleansed the TPC-H data and saved it to a CSV file. We then used a PowerShell script to dynamically create and run Curl to ingest the CSV file into HDFS. Part of the script creates an HDFS directory:
curl -L -k -u root:%KNOX_PASSWORD% -X PUT “https://%KNOX_ENDPOINT%/gateway/webhdfs/v1/%DIR_NAME%/csv/PART?OP=MKDIRS”
where:
- %KNOX_PASSWORD% is the root user’s password for the Apache KNOX gateway.
- %KNOX_ENDPOINT% is the KNOX IP and port in <KNOX_IP>:<KNOX_PORT> format.
- %DIR_NAME% is the name of directory that will be created at HDFS (if it does not exist); the CSV files will be uploaded to this location.
We then put the CSV files into the HDFS directory:
curl -L -k -u root:%KNOX_PASSWORD% -X PUT https://%KNOX_ENDPOINT%/gateway/webhdfs/v1/%DIR_NAME%/csv/part/final_F00001_part.csv?op=create&overwrite=true -H “Content-type:application/octet-stream” -T “C:\stage\ps\v5\final\part\final_F00001_part.csv”
In the last Curl command, the file name is final_F00001_part.csv because the CSV file was split into eight parts and placed in the HDFS storage pool. For each of the eight files, the number in the file name was incremented (00001–00008). Splitting the file into eight parts enabled distribution of the data across the nodes in the storage pool, which optimizes performance.
In addition, to improve performance and gain capacity savings, we converted the CSV files in HDFS to Parquet files. Parquet is an Apache Software Foundation tool that is used to convert files into columnar data. When the data is in columnar form, Parquet can efficiently compress and encode it.
Using SQL Server and T-SQL to ingest data
A second way to ingest data is to bring it into the data pool by using SQL Server and T‑SQL. The first step in this process is to create an external table in the data pool. An external table is an object that enables PolyBase to access data that is stored outside the database. Using an external table, PolyBase can access data in an Oracle database, Hadoop cluster, Azure blob storage, and, as in our lab tests, a text file with TPC-H data.
Create and use an external table, and then ingest data, as follows:
- Connect to the SQL Server master instance and create an external data source to the remote database:
IF NOT EXISTS(SELECT * FROM sys.external_data_sources
WHERE name = 'SqlDataPool')
CREATE EXTERNAL DATA SOURCE SqlDataPool
WITH (LOCATION = 'sqldatapool://controller-svc/default');
GO
- Create the schema at the storage pool (HDFS) that serves as the source table (EXT_HDFS_PARTSUPP) on the storage pool and points to the Parquet files on the /TPCH1TB/parquet/partsupp directory on HDFS:
USE [TPCH1TB]
GO
IF NOT EXISTS(SELECT * FROM sys.external_tables WHERE name = 'EXT_HDFS_PARTSUPP')
CREATE EXTERNAL TABLE EXT_HDFS_PARTSUPP (
"PS_PARTKEY" BIGINT NOT NULL,
"PS_SUPPKEY" bigint,
"PS_AVAILQTY" INT,
"PS_SUPPLYCOST" float,
"PS_COMMENT" VARCHAR(199)
)
WITH
(
DATA_SOURCE = SqlStoragePool,
LOCATION = '/TPCH1GB/parquet/partsupp',
FILE_FORMAT = parquet_file
);
GO
- Create an external table named EXT_DP_PARTSUPP in the data pool with round-robin data distribution:
IF NOT EXISTS(SELECT * FROM sys.external_tables WHERE name = 'EXT_DP_PARTSUPP')
CREATE EXTERNAL TABLE [EXT_DP_PARTSUPP] (
"PS_PARTKEY" BIGINT NOT NULL,
"PS_SUPPKEY" bigint,
"PS_AVAILQTY" INT,
"PS_SUPPLYCOST" float,
"PS_COMMENT" VARCHAR(199)
)
WITH (
DATA_SOURCE = SqlDataPool,
DISTRIBUTION = ROUND_ROBIN
);
GO
- Ingest the data into the data pool:
INSERT INTO EXT_DP_PARTSUPP(
"PS_PARTKEY",
"PS_SUPPKEY",
"PS_AVAILQTY",
"PS_SUPPLYCOST",
"PS_COMMENT"
)
SELECT
"PS_PARTKEY",
"PS_SUPPKEY",
"PS_AVAILQTY",
"PS_SUPPLYCOST",
"PS_COMMENT"
FROM EXT_HDFS_PARTSUPP
GO
- To test if the ingest was successful, select count from the external table to show the number of rows:
Select count(1) from [owner_name].[external table name]
For example:
Select count(1) from [dbo].[EXT_DP_PARTSUPP]
Using Spark jobs to ingest data
The third way to ingest data is with Spark jobs. The following steps provide a broad outline of how to ingest data using a Spark job.
Note: For detailed steps, see Tutorial: Ingest data into a SQL Server data pool with Spark jobs in Microsoft SQL Docs.
- Create an external data source.
- Create an external table.
See the example in Using SQL Server and T-SQL to ingest data.
- Configure Spark-SQL connector parameters and run the Spark job.
Step 2f: Test data virtualization
After ingesting the decision-support data into Big Data Cluster, SQL Server, MongoDB, and Oracle, test data virtualization as follows:
- Create a data source for Big Data Cluster, Oracle, and MongoDB.
A data source is a row in the sys.external_data_sources table in the Big Data Cluster master SQL Server database. The row contains the name, source, and location of the data source. Creating data sources enables PolyBase in Big Data Cluster to access the other database systems.
Note: The stand-alone SQL Server database requires no data source because Big Data Cluster can natively access the data.
- Run the following script to create a data source for the Big Data Cluster storage pool:
IF NOT EXISTS(SELECT * FROM sys.external_data_sources WHERE name = 'SqlStoragePool')
CREATE EXTERNAL DATA SOURCE SqlStoragePool
WITH (LOCATION = 'sqlhdfs://controller-svc/default’);
- Create a data source for the Oracle database as follows:
i Create a master key for encrypting the database password:
CREATE MASTER KEY ENCRYPTION BY PASSWORD = '@StrongPasword!!!’;
ii Create the credentials to connect to the Oracle database in the master SQL Server instance.
The following T-SQL command assigns a name (oracle_cred) and saves a user account (oracle_user) with the password that you created in the preceding step:
CREATE DATABASE SCOPED CREDENTIAL oracle_cred
WITH IDENTITY = ‘oracle_user’, SECRET = ‘StrongOraclePassword!!!!’;
iii Run the following T-SQL command to finish creating the data source for the Oracle database:
CREATE EXTERNAL DATA SOURCE Oracle_Data_Source
WITH
( LOCATION = 'oracle://<Oracle_instance_IP>:<Oracle_Instance_Port>'
, CREDENTIAL = oracle_cred
);
- Create a data source for the MongoDB database as follows:
i Create the MongoDB database credentials:
USE DATABASE TPCH1TB
GO
CREATE DATABASE SCOPED CREDENTIAL mongodb_poly
WITH IDENTITY = 'superuser', Secret = 'test123';
ii Create the data source:
CREATE EXTERNAL DATA SOURCE source_mongodb_poly
WITH (
LOCATION = 'mongodb://mongoserver:27017',
CONNECTION_OPTIONS='SSL=0',
PUSHDOWN = OFF,
CREDENTIAL = mongodb_poly
);
- For Big Data Cluster, create external tables that define the DDL of the remote tables:
IF NOT EXISTS(SELECT * FROM sys.external_tables WHERE name = 'EXT_HDFS_ORDERS')
CREATE EXTERNAL TABLE EXT_HDFS_ORDERS (
"O_ORDERKEY" bigint NOT NULL, "O_CUSTKEY" bigint NOT NULL,
"O_ORDERSTATUS" char(1) NOT NULL,
"O_TOTALPRICE" decimal(12, 2) NOT NULL,
"O_ORDERDATE" date NOT NULL,
"O_ORDERPRIORITY" char(15) NOT NULL,
"O_CLERK" char(15) NOT NULL,
"O_SHIPPRIORITY" int NOT NULL,
"O_COMMENT" varchar(79) NOT NULL
)
WITH
(
DATA_SOURCE = SqlStoragePool,
LOCATION = '/TPCH1GB/parquet/orders',
FILE_FORMAT = parquet_file
);
GO
This script:
- Uses a table name (EXT_HDFS_PART) that easily identifies the table type (EXT), location (HDFS), and the name (PART)
- Uses the DDL to define the table
- References the data source and location
- References the file format—in this case, the Parquet files in the HDFS storage pool
- For Oracle, create external tables that define the DDL of the remote tables, as follows:
IF NOT EXISTS(SELECT * FROM sys.external_tables WHERE name = 'EXT_ORA_REGION')
CREATE EXTERNAL TABLE EXT_ORA_REGION (
"R_REGIONKEY" int,
"R_NAME" Varchar(25) COLLATE Latin1_General_100_BIN2_UTF8,
"R_COMMENT" VARCHAR(152) COLLATE Latin1_General_100_BIN2_UTF8)
WITH (DATA_SOURCE=bdcOracleDataSource,
LOCATION='<oracle-database>.<oracle-schema>.REGION');
GO
- For MongoDB, create external tables that define the DDL of the remote tables, as follows:
IF NOT EXISTS(SELECT * FROM sys.external_tables WHERE name = 'EXT_MONGO_NATION')
CREATE EXTERNAL TABLE EXT_MONGO_NATION (
N_NATIONKEY int,
N_NAME NVARCHAR(25) COLLATE SQL_Latin1_General_CP1_CI_AS,
N_REGIONKEY int,
N_COMMENT NVARCHAR(152) COLLATE SQL_Latin1_General_CP1_CI_AS)
WITH(
LOCATION='TPCH1TB.nation',
DATA_SOURCE=source_mongodb_poly
);
GO
For this use case, we created additional external tables for relevant tables in HDFS, Oracle, and MongoDB.
- Implement container automation.
When the setup of connecting and defining external data sources is complete, the transition to data virtualization is seamless. Now, consider whether to use custom images or scripting for container automation.
If you will need to refresh the Big Data Cluster environment, save the state of the existing containers as custom images in the registry. Saving these custom images enables you to deploy a Big Data Cluster environment with the data virtualization configuration completed. Developers and data scientists can then start working without having to wait for additional setup.
Another approach is container automation through scripting. In testing Big Data Cluster, our experts created scripts to automate manual steps such as creating connections to external data resources. As part of the validation work, the Big Data Cluster was refreshed to ensure that the steps were repeatable. The initial container rollout took approximately 3 hours. Any refresh of the Big Data Cluster system took approximately 30 minutes. Scripting the post-installation steps worked well and enabled teams to start using the Big Data Cluster system quickly.
- Run a T-SQL query that uses all the decision-support tables.
The ability to access all three data sources without any data transformation proves the value of data virtualization. The TPC-H benchmark has several queries that run against decision-support data. We selected TPC-H query 8, which is called National Market Share, to test our data virtualization configuration:
/* TPC_H Query 8 - National Market Share */
SELECT O_YEAR,
SUM(CASE WHEN NATION = 'CHINA'
THEN VOLUME
ELSE 0
END) / SUM(VOLUME) AS MKT_SHARE
FROM ( SELECT datepart(yy,O_ORDERDATE) AS O_YEAR,
L_EXTENDEDPRICE * (1-L_DISCOUNT) AS VOLUME,
N2.N_NAME AS NATION
FROM EXT_SQL_PART, -- Points to SQL Server
EXT_SQL_SUPPLIER, -- Points to SQL Server
EXT_HDFS_LINEITEM, -- Points to HDFS
EXT_HDFS_ORDERS, -- Points to HDFS
EXT_HDFS_CUSTOMER, -- Points to HDFS
EXT_MONGO_NATION N1, -- Points to Mongo
EXT_MONGO_NATION N2, -- Points to Mongo
EXT_ORA_REGION -- Points to Oracle
WHERE P_PARTKEY = L_PARTKEY AND
S_SUPPKEY = L_SUPPKEY AND
L_ORDERKEY = O_ORDERKEY AND
O_CUSTKEY = C_CUSTKEY AND
C_NATIONKEY = N1.N_NATIONKEY AND
N1.N_REGIONKEY = R_REGIONKEY AND
R_NAME = 'ASIA' AND
S_NATIONKEY = N2.N_NATIONKEY AND
O_ORDERDATE BETWEEN '1995-01-01' AND '1996-12-31' AND
P_TYPE = 'SMALL BRUSHED COPPER'
) AS ALL_NATIONS
GROUP BY O_YEAR
ORDER BY O_YEAR
The body of the query (between FROM and WHERE) shows all the selected tables. This query uses seven of the eight tables in the decision-support benchmark. (PARTSUPP was not selected.) Of the seven selected tables, each of the four data sources (SQL, HDFS, Oracle, and MongoDB) were used:
- Big Data Cluster: EXT_HDFS_LINEITEM, EXT_HDFS_ORDERS, EXT_HDFS_CUSTOMER
- SQL Server: EXT_SQL_SUPPLIER, EXT_SQL_PART
- Oracle database: EXT_ORA_REGION
- MongoDB database: EXT_MONGO_NATION
The query completed quickly with no errors. PolyBase with Big Data Cluster enabled data virtualization.
Key benefits of implementing Big Data Cluster with data virtualization
Data scientists and developers can now access external databases without having to transform the data or migrate it into a data warehouse or data lake. In this use case, data virtualization simplified accessing data and eliminated the complexity that is associated with ETL processes. Less complexity can translate into time savings. Further, in our testing of Big Data Cluster with PolyBase data virtualization, we experienced impressively fast connection to external data sources.
Big Data Cluster unifies and centralizes big data and connects to external data sources. Combining big data and data virtualization gives data scientists one place to access information. Centralized data access, a common set of tools, and the ability to access information with less complexity provides the foundation for increased productivity.