
Technical Installation Specifications
Technical Installation Specifications
-
RUNNING AND TRACKING YOUR ML EXPERIMENTS WITH KUBEFLOW AND COMET
- SIMPLE NOTEBOOK SERVER EXAMPLE
- END-TO-END DOCKERIZED Kubeflow + GCP EXAMPLE
- DIRECT KUBERNETES CLUSTER INSTALLATION DETAILS
[A] NOTEBOOK EXAMPLE
An End-to-End ML Pipeline with Jupyter Notebooks and Comet on Kubeflow and MiniKF
- Set up a Kubeflow Cluster
- Create a Kubeflow Notebook Server
- Install Comet on Kubeflow Notebook Server
- Track an Experiment on Kubeflow with Comet
***************
1. Set up a Kubeflow Cluster
*Steps dependent on system configuration*
2. Create a Notebook Server
On the Kubeflow Dashboard, click the Notebook Servers link on the left pane to go to the Notebook Manager UI.
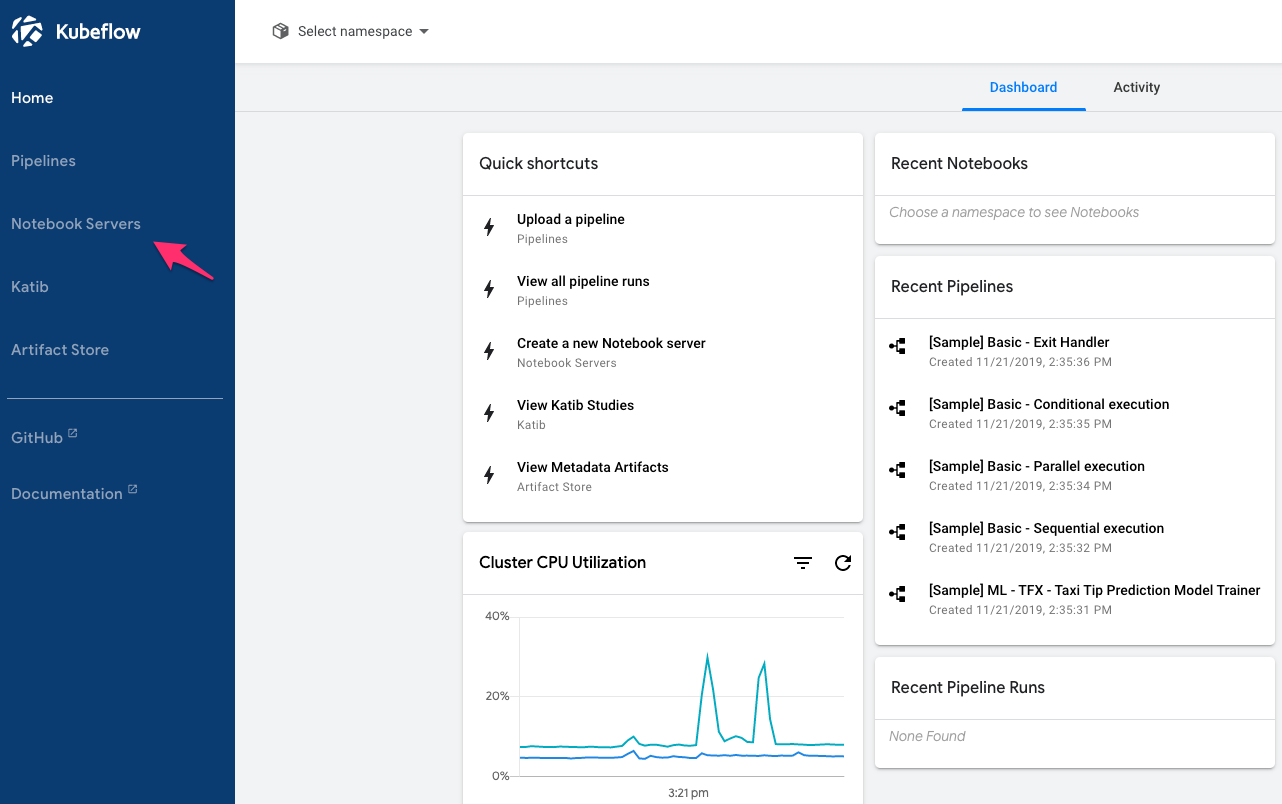
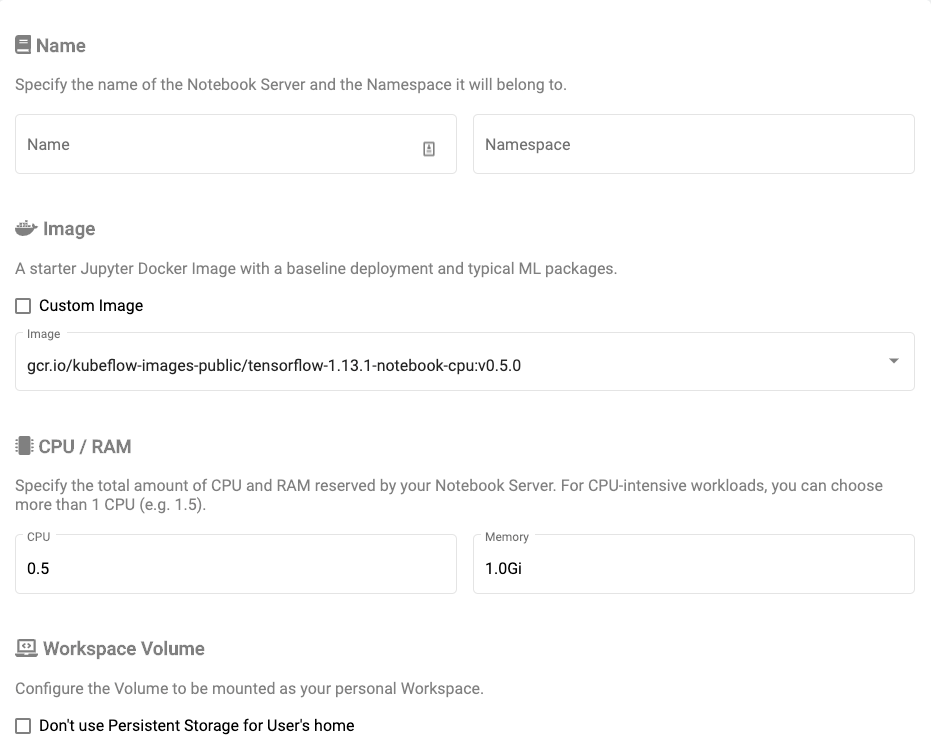
From the list of Notebook Servers, click “+ New Server” to create a new Notebook Server.

Define a new server with your Kubeflow namespace and deployment information.
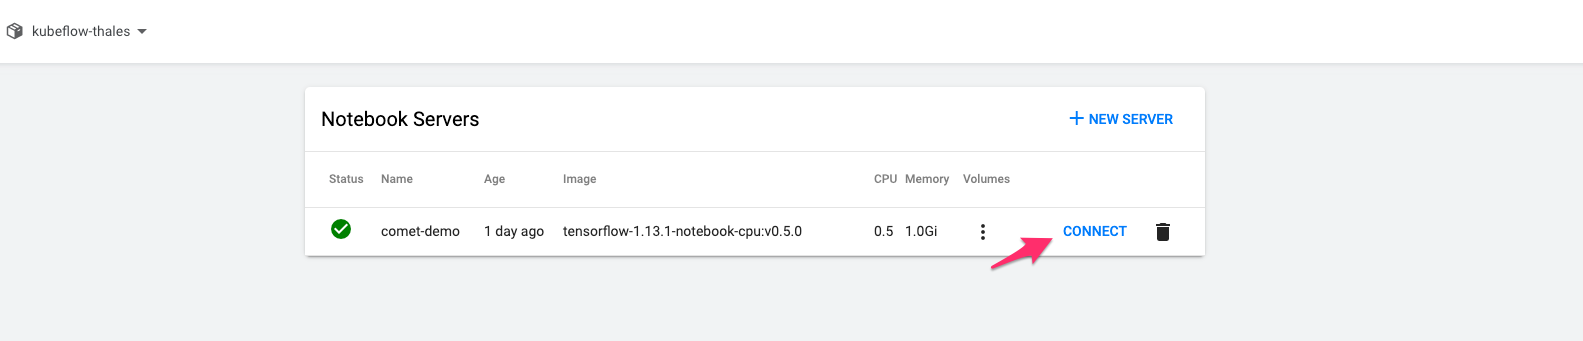
Once you’ve created your Notebook Server, wait a few minutes for it to boot up. Once it’s ready, click “Connect” to access your Kubeflow Notebook Server.
3. Install Comet on Notebook Server
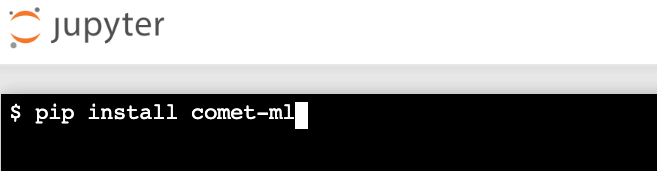
Once you’ve connected to your notebook server, open a new terminal window.
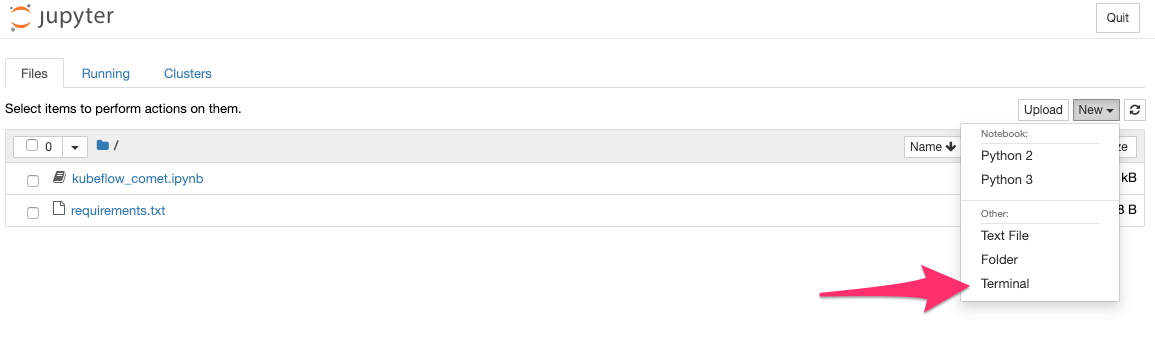
With a simple pip install command, install Comet in your server environment.
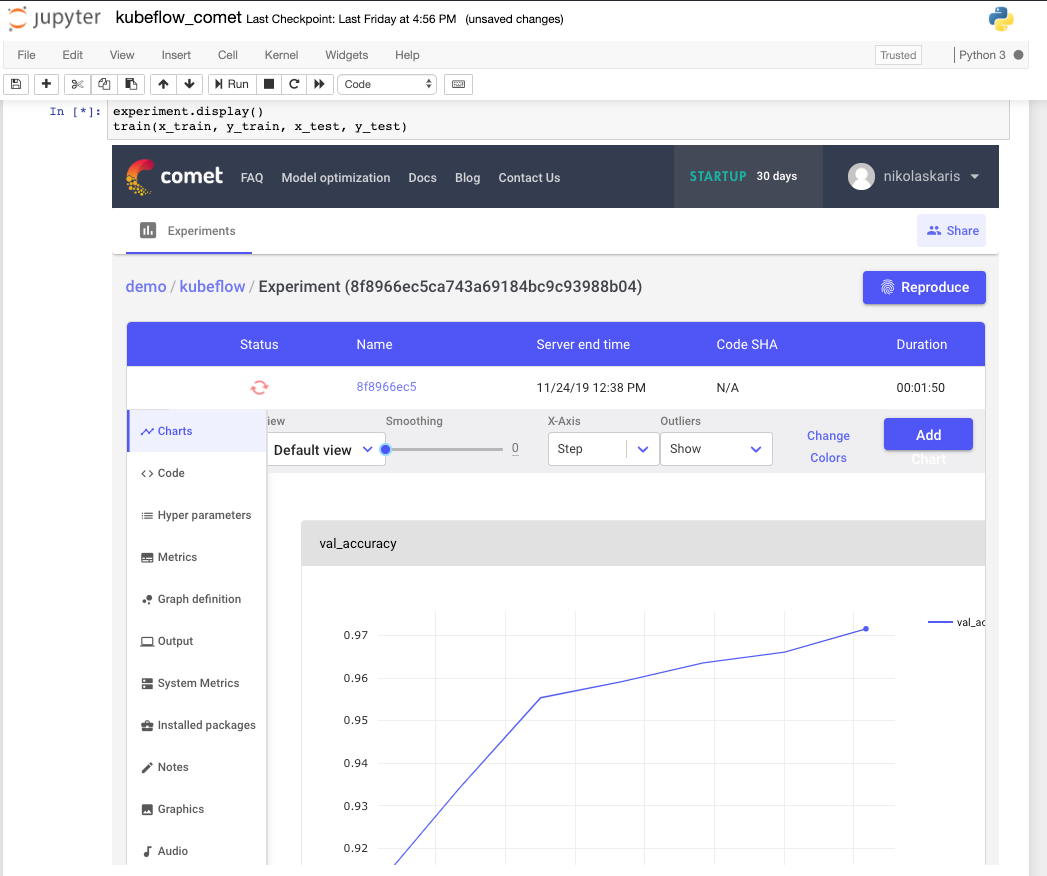
4. Track an ML Experiment with Comet
Once Comet is installed, open a python kernel and import your dependencies. The only changes you need to make to your ML pipeline to start logging your experiments with Comet are importing the Comet SDK and creating a Comet experiment.
from comet_ml import Experiment
experiment = Experiment(api_key="API_KEY", project_name="PROJECT", workspace="WORKSPACE")To initialize a Comet experiment, enter your API KEY (unique to each Comet user) and project and workspace names to specify which Comet project your experiment belongs to.
And that's it! Run your code as usual and Comet will automatically capture all hyperparameters, real-time training metrics, system and dependency information, dataset debugging samples, and much more. You can even view your experiment in real-time from the Kubeflow Notebook.
[B] END-TO-END DOCKERIZED Kubeflow + GCP EXAMPLE
Adapted from an official Kubeflow example.
The overall workflow:
- Setting up Kubeflow in a GKE cluster
- Testing the code locally using a Jupyter notebook
- Training the model:
- Packaging a TensorFlow program in a Kubernetes container
- Uploading the container to the container registry
- Submitting a TensorFlow training (tf.train) job
- Setting up and using Comet to track all of your training jobs
Set up your environment
Download the project files
To simplify this tutorial, you can use a set of prepared files that include a TensorFlow application for training your model, a web UI to send prediction requests and display the results, and the Docker files to build runnable containers for the training and prediction applications. The project files are in the Kubeflow examples repository on GitHub.
Clone the project files and go to the directory containing the MNIST example:
cd ${HOME}
git clone https://github.com/kubeflow/examples.git
cd examples/mnist
WORKING_DIR=$(pwd)Set up your GCP account and SDK
Follow these steps to set up your GCP environment:
- Create a project on the GCP Console.
- Make sure that billing is enabled for your project.
- Install the Cloud SDK. If you already have the SDK installed, run gcloud components update to get the latest versions of the SDK tools.
Install Docker
Follow the Docker installation guide.
Install kubectl
Run the following Cloud SDK command to install the kubectl command-line tool for Kubernetes:
gcloud components install kubectl
Install kustomize
Kubeflow makes use of kustomize to help manage deployments.
Set up some handy environment variables
Set up the following environment variables for use throughout the tutorial:
Set your GCP project ID. In the command below, replace <YOUR-PROJECT-ID> with your project ID:
$ export PROJECT=<YOUR-PROJECT-ID> gcloud config set project / {PROJECT}
Set the zone for your GCP configuration. Choose a zone that offers the resources you need. See the guide to GCP regions and zones.
- Ensure you have enough Compute Engine regional capacity. By default, the GKE cluster setup described in this guide requires 16 CPUs.
- If you want a GPU, ensure your zone offers GPUs.
For example, the following commands set the zone to us-central1-c:
$ export ZONE=us-central1-c /
gcloud config set compute/zone ${ZONE}If you want a custom name for your Kubeflow deployment, set the DEPLOYMENT_NAME environment variable. If you don’t set this environment variable, your deployment gets the default name of kubeflow:
export DEPLOYMENT_NAME=kubeflow
Deploy Kubeflow
Follow the instructions in the guide to deploying Kubeflow on GCP, taking note of the following:
- Make sure you deploy Kubeflow v0.7.0 or later.
- Set up OAuth client credentials and Cloud Identity-Aware Proxy (IAP) as prompted during the deployment process.
When the cluster is ready, you can do the following:
Connect your local kubectl session to the cluster:
gcloud container clusters get-credentials \
${DEPLOYMENT_NAME} --zone ${ZONE} --project ${PROJECT}Switch to the kubeflow namespace to see the resources on the Kubeflow cluster:
kubectl config set-context $(kubectl config current-context) --namespace=kubeflow
Check the resources deployed in the kubeflow namespace:
kubectl get all
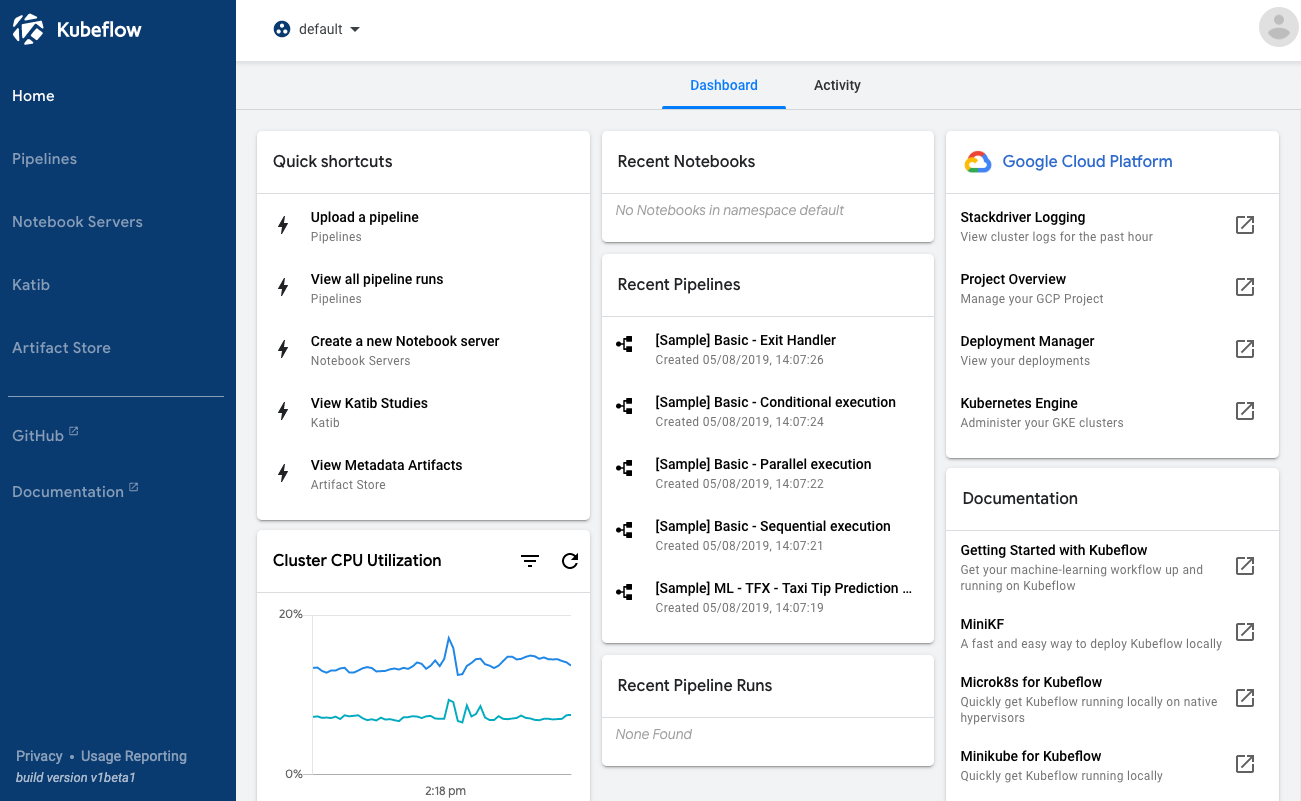
Access the Kubeflow UI, which becomes available at the following URI after several minutes:
https://<deployment-name>.endpoints.<project>.cloud.goog/The following screenshot shows the Kubeflow UI:
Notes:
- When the deployment has finished, you should have a running cluster in the cloud ready to run your code. You can interact with the cluster either by using kubectl or by going to the GKE page on the GCP Console.
- While the deployment is running, you can watch your resources appear on the GCP console:
- It can take 10 to 15 minutes for the URI to become available. Kubeflow needs to provision a signed SSL certificate and register a DNS name.
If you own/manage the domain or a subdomain with Cloud DNS then you can configure this process to be much faster.
Create a Cloud Storage bucket
The next step is to create a Cloud Storage bucket to hold your trained model.
Cloud Storage is a scalable, fully managed object/blob store. You can use it for a range of scenarios including serving website content, storing data for archival and disaster recovery, or distributing large data objects to users via direct download. This tutorial uses Cloud Storage to hold the trained machine learning model and associated data.
Use the gsutil mb command to create a storage bucket. Your bucket name must be unique across all of Cloud Storage. The following commands create a bucket in the us-central1 region, which corresponds to the us-central1-c zone used earlier in the tutorial:
export BUCKET_NAME=${PROJECT}-${DEPLOYMENT_NAME}-bucket
gsutil mb -c regional -l us-central1 gs://${BUCKET_NAME}
Adding Comet: Configure your Dockerfile and Training Scripts
Update your Dockerfile.model to pip install Comet and any other dependencies you may need.
Dockerfile.model
FROM python:3.6.9
RUN pip install comet-ml
RUN pip install numpy # If required
RUN pip install keras # If required
RUN pip install tensorflow # If required
ADD model.py /opt/model.py
RUN chmod +x /opt/model.py
CMD [ "python" , "/opt/model.py" ]Add the Comet tracking code to your modeling scripts. In this example, the model training occurs in the model.py file. You can access your Comet API KEY from the Comet UI, and your project name and workspace are abstractions to help you organize your various modeling tasks.
from comet_ml import Experiment
experiment = Experiment(api_key="API_KEY",
project_name="PROJECT_NAME", workspace="WORKSPACE_NAME")While Comet will capture most experiment artifacts for you automatically, the Comet Experiment provides a rich and flexible set of methods to customize experiment logging. Consult the docs to tailor your experiment tracking to your specific needs.
Prepare to run your training application on GKE
When you downloaded the project files into your ${WORKING_DIR} directory at the start of the tutorial, you downloaded the TensorFlow code for your training application. The code is in a Python file, model.py, in your ${WORKING_DIR} directory.
The model.py program does the following:
- Downloads the MNIST dataset and loads it for use by the model training code.
- Offers a choice between two models:
- A two-layer convolutional neural network (CNN). This tutorial uses the CNN, which is the default model in model.py.
- A linear classifier, not used in this tutorial.
- Defines TensorFlow operations to train and evaluate the model.
- Runs a number of training cycles.
- Saves the trained model to a specified location, such as your Cloud Storage bucket.
Build the container for your training application.
To deploy your code to Kubernetes, you must first build your local project into a Docker container image and push the image to Container Registry so that it’s available in the cloud.
Create a version tag from the current UNIX timestamp, to be associated with your model each time it runs.
export VERSION_TAG=$(date +%s)
Set the path in Container Registry that you want to push the image to:
export TRAIN_IMG_PATH=gcr.io/${PROJECT}/${DEPLOYMENT_NAME}-train:${VERSION_TAG}
Build the Docker image for your working directory:
docker build $WORKING_DIR -t $TRAIN_IMG_PATH -f $WORKING_DIR/Dockerfile.model
The container is tagged with its eventual path in Container Registry, but it hasn’t been uploaded to Container Registry yet. If everything went well, your program is now encapsulated in a new container. Test the container locally:
docker run -it ${TRAIN_IMG_PATH}
You may see some warnings from TensorFlow about deprecated functionality. Then you should see training logs start appearing in your output, similar to these:
Train and evaluate
INFO:tensorflow:Running training and evaluation locally (non-distributed).
INFO:tensorflow:Start train and evaluate loop. The evaluate will happen after 1 secs (eval_spec.throttle_secs) or training is finished.
INFO:tensorflow:Calling model_fn.
INFO:tensorflow:Done calling model_fn.
INFO:tensorflow:Create CheckpointSaverHook.INFO:tensorflow:Graph was finalized.
2019-02-02 04:17:20.655001: I tensorflow/core/platform/cpu_feature_guard.cc:140] Your CPU supports instructions that this TensorFlow binary was not compiled to use: AVX2 FMA
INFO:tensorflow:Running local_init_op.
INFO:tensorflow:Done running local_init_op.
...When you see log entries similar to those above, your model training is working. You can terminate the container with Ctrl+c.
Next, upload the container image to the Container Registry so that you can run it on your GKE cluster.
Run the following command to authenticate to Container Registry:
gcloud auth configure-docker --quiet
Push the container to Container Registry:
docker push ${TRAIN_IMG_PATH}
The push may take a few minutes to complete. You should see Docker progress updates in your command window.
Wait until the process is complete, then you should see your new container image listed on the Container Registry page on the GCP console.
Prepare your training component to run on GKE.
Enter the training/GCS directory:
cd ${WORKING_DIR}/training/GCS
Give the job a name so that you can identify it later:
kustomize edit add configmap mnist-map-training --from-literal=name=mnist-train-dist
Configure your custom training image:
kustomize edit set image training-image=${TRAIN_IMG_PATH}
Configure the image to run distributed by setting the number of parameter servers and workers to use.
The numPs means the number of Ps (parameter server) and the numWorkers means the number of worker:
../base/definition.sh --numPs 1 --numWorkers 2
Set the training parameters (training steps, batch size and learning rate):
kustomize edit add configmap mnist-map-training --from-literal=trainSteps=200
kustomize edit add configmap mnist-map-training --from-literal=batchSize=100
kustomize edit add configmap mnist-map-training --from-literal=learningRate=0.01Configure parameters for where the training results and exported model will be saved in Cloud Storage. Use a subdirectory based on the VERSION_TAG, so that if the tutorial is run more than once, the training can start fresh each time.
export BUCKET_PATH=${BUCKET_NAME}/${VERSION_TAG}
kustomize edit add configmap mnist-map-training --from-literal=modelDir=gs://${BUCKET_PATH}/
kustomize edit add configmap mnist-map-training --from-literal=exportDir=gs://${BUCKET_PATH}/export
Check the permissions for your training component.
You need to ensure that your Python code has the required permissions to read/write to your Cloud Storage bucket. Kubeflow solves this by creating a user service account within your project as a part of the deployment. You can use the following command to list the service accounts for your Kubeflow deployment:
gcloud iam service-accounts list | grep ${DEPLOYMENT_NAME}
Kubeflow granted the user service account the necessary permissions to read and write to your storage bucket. Kubeflow also added a Kubernetes secret named user-gcp-sa to your cluster, containing the credentials needed to authenticate as this service account within the cluster:
kubectl describe secret user-gcp-sa
To access your storage bucket from inside the train container, you must set the GOOGLE_APPLICATION_CREDENTIALS environment variable to point to the JSON file contained in the secret. Set the variable by passing the following parameters:
kustomize edit add configmap mnist-map-training --from-literal=secretName=user-gcp-sa
kustomize edit add configmap mnist-map-training --from-literal=secretMountPath=/var/secretskustomize edit add configmap mnist-map-training --from-literal=GOOGLE_APPLICATION_CREDENTIALS=/var/secrets/user-gcp-sa.json
Train the model on GKE
Now you are ready to run the TensorFlow training job on your cluster on GKE.
Apply the container to the cluster:
kustomize build . |kubectl apply -f -
When the command finishes running, there should be a new workload on the cluster, with the name mnist-train-dist-chief-0. If you set the option to run a distributed workload, the worker workloads show up on the cluster too. You can see the workloads on the GKE Workloads page on the GCP console. To see the logs, click the mnist-train-dist-chief-0 workload, then click Container logs.
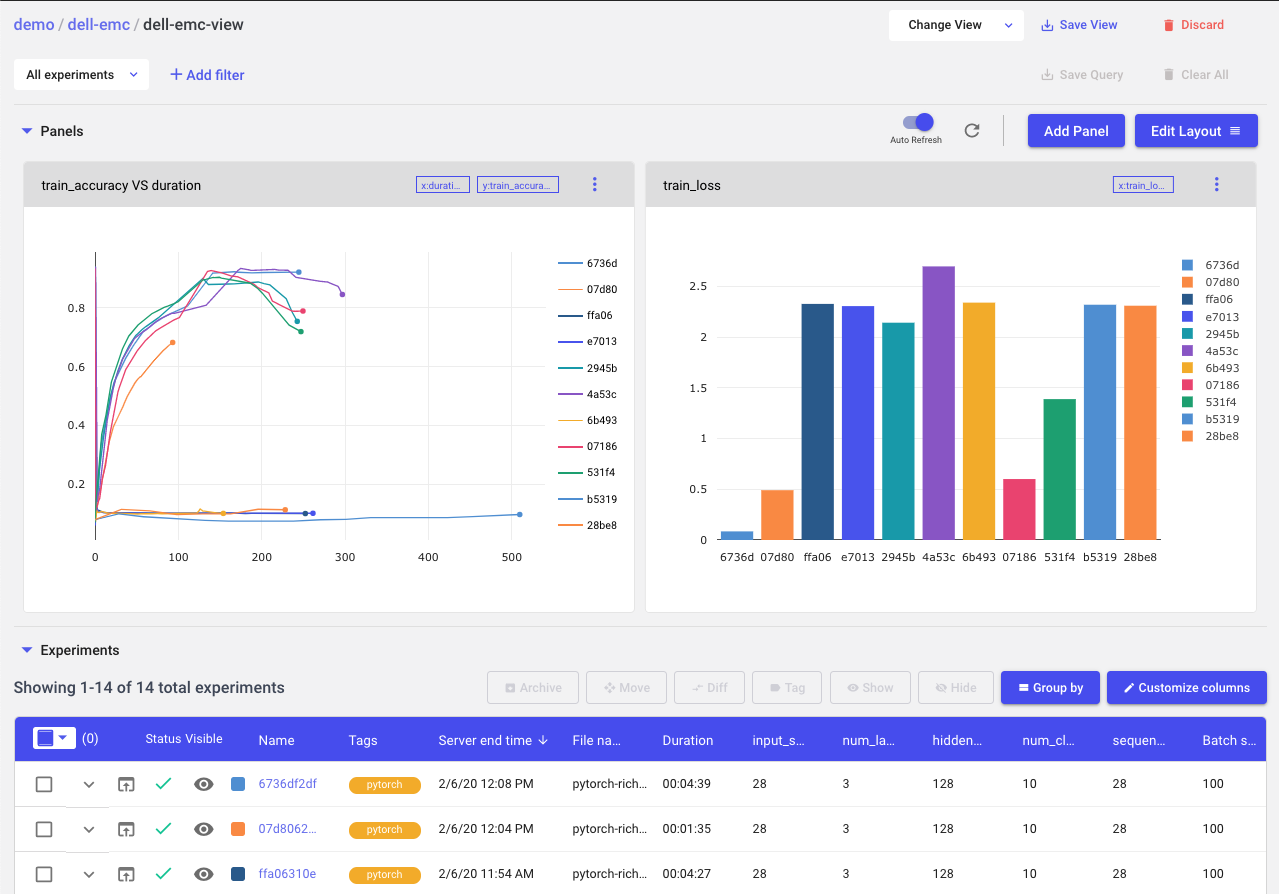
Use Comet to Visualize and Share Experiment Results
When training is complete, head to Comet and you will see all your training run metadata: metrics, hyperparameters, code, system information, dependencies and more.
[C] KUBERNETES CLUSTER DIRECT DEPLOYMENT
Comet can also be installed directly onto a Dell EMC AI-Enabled Kubernetes Cluster. For details, please contact Comet and Dell for more information. Comet Enterprise can be deployed on premises and was tested on the Canonical/Dell EMC Kubeflow architecture described below.
Dell EMC Kubeflow solution overview
The Dell EMC rack level solution for Kubeflow is comprised of pools of compute, storage and networking resources, which are managed through a single point of rack management. All nodes in the rack are Dell PowerEdge servers handling compute, control and storage functions, as assigned by the Metal as a Service (MAAS) management nodes.
Dell EMC architecture for Kubeflow on Charmed Kubernetes
This architecture test is based on Charmed Kubernetes — upstream code of Kubernetes release 1.16 delivered by Canonical. Canonical commercially distributes and supports the pure upstream version of Kubernetes. Ubuntu is the reference operating system for Kubernetes deployments, making it an easy way to build Kubernetes clusters.
Canonical reference architectures are delivered on a converged infrastructure approach, where any of the servers can accommodate more than one specific Kubernetes role or service simultaneously. This converged approach has many benefits, including simplicity of operation and management overhead. Canonical can also deploy Kubernetes in a more traditional manner, grouping servers per role — controllers, storage and container pods.
Canonical is an active member of the Kubeflow community and strongly believes in its role in democratising AI/ML by making model training and deployment as frictionless as possible. Canonical delivers the upstream components of the Kubeflow ecosystem as an add-on to Kubernetes, wrapping it with automation so that it can be easily deployed, managed and upgraded.
Core components
Component
Codename
Persistent storage
Ceph RBD
Compute
Kubernetes Worker (Docker based)
Machine learning platform
Kubeflow
Networking
Flannel or Canal
Logging
Graylog
Monitoring
Prometheus
The standards-based APIs are the same between all Kubernetes deployments, and they enable customer and vendor ecosystems to operate across multiple clouds. The site-specific infrastructure combines open and proprietary software, Dell EMC hardware and operational processes to deliver cloud resources as a service.
The implementation choices for each cloud infrastructure are highly specific to the requirements of each site. Many of these choices can be standardized and automated using the tools in this reference architecture. Conforming to best practices helps reduce operational risk by leveraging the accumulated experience of Dell EMC and Canonical.
Canonical’s Metal as a Service (MAAS) is used as a bare metal and virtual machine (VM) provisioning tool. The foundation cluster is composed of MAAS and other services (running in highly available (HA) mode) that are used to deploy, manage and update the Kubernetes cluster nodes.
The reference architecture solution is based on the Dell EMC PowerEdge R640, R740xd and R740xd2. The reference architecture uses the following rack and server specifications.
Dell EMC PowerEdge rack specifications
Component type
Component description
Quantity
Rack
Standard data center rack (1) with enough capacity to hold 12x 1RU nodes, and 3x 1RU
switches
1
Chassis
Dell PowerEdge R740xd (3 Infras3 Cloud nodes)
Dell PowerEdge R740 (3 Cloud nodes)
Dell PowerEdge R740xd2 (4 storage nodes)
3
3
4
Data switches
S5248F-ON (25G ToR, 48 ports)
2
iDRAC/Provisioning switch
S3048-ON
1
Because the optimum solution configuration will depend on the specific mix of applications and types of data analytics, artificial intelligence and advanced computing workloads, recommended and engineering-validated options are provided, along with relevant criteria to consider when making these selections. As always, Dell Technologies HPC and AI experts are available to assist you with designing a solution for your specific needs. And Dell Technologies Services — ranging from consulting and education to deployment and support — are available when and where you need them