


Dell APEX Block Storage for AWS with Amazon EKS
Kubernetes is becoming an effective containerization platform for deploying and running microservices and modern applications. In this blog, we look at how Dell APEX Block Storage can be configured as persistent block storage for Amazon Elastic Kubernetes Service (Amazon EKS) deployments in AWS.
Overview
What is Amazon EKS?
Amazon EKS is a managed Kubernetes service that assists users in running Kubernetes clusters in an AWS cloud and on premises. Amazon EKS automatically manages the availability and scalability of the Kubernetes control plane nodes responsible for scheduling containers, managing application availability, storing cluster data, and other key tasks. EKS users benefit from AWS ease of management of their Kubernetes control planes, allowing them to focus on their data planes (worker nodes, applications, and related infrastructure).
For more information, see Amazon Elastic Kubernetes Service.
Dell APEX Block Storage for AWS
Dell APEX Block Storage, which is powered by Dell PowerFlex, enables you to deploy your applications in the public cloud, gaining many multicloud benefits, while preserving your core mission-critical applications requirements. Dell APEX Block Storage for AWS delivers mission-critical block storage performance, scale, resilience, and management of APEX Block Storage with the ability to use existing cloud credits. Enterprise-class features such as thin provisioning, snapshots, replication, volume migration, and backup/restore are also available with Dell APEX Block Storage for AWS. With its exceptional performance, scalability, and proven enterprise data services—this solution is well suited to support the most challenging workloads including large databases, analytics, Dev/Test, virtualization, and containers.
Dell APEX Block Storage for AWS enables diverse workloads in the public cloud. With Dell APEX Block Storage for AWS, you get the best of both worlds with Dell’s enterprise-class storage performance, scalability, and resiliency combined with the economics, compute, and agility provided by the public cloud.
The fundamental building blocks of Dell APEX Block storage include:
- MDM─ Meta Data Manager (MDM), which stores information about the cluster, monitors, rebalances, and rebuilds
- SDC─ Storage Data Client (SDC), which provides frontend volume access to applications and file systems
- SDS─ Storage Data Server (SDS), which abstracts local storage, maintains storage pools, and presents volumes to the SDCs
For more details about these components, see Dell APEX Block Storage components.
Dell APEX Block Storage for AWS supports deployments across multiple availability zones (AZ) by using native fault sets. The data is distributed across multiple AZs to offer protection against an AZ failure. Also, Amazon EKS runs and scales the Kubernetes control plane across multiple AZs to ensure high availability. Amazon EKS automatically scales control plane instances based on load, detects and replaces unhealthy control plane instances, and automatically updates the control plane.
For more information, see Dell APEX Block Storage for AWS solution brief.
What makes the integration of Amazon EKS and Dell APEX Block Storage so important?
Amazon EKS provides ease of use, security, management, and automation for the deployment of Kubernetes clusters. Dell APEX Block Storage provides highly available, scalable, extremely performant, and resilient storage with many features such as snapshots, replication, multi-AZ data access, and more. Combining the two solutions allows the end-user to benefit from both technologies.
With this integration, you can take advantage of the combined solution with all its benefits. You can eliminate the need for deploying and managing your own Kubernetes cluster with Dell APEX Block Storage or deploying Amazon EKS with AWS EBS storage volumes.
There are three challenges to the integration that this blog addresses:
- When EKS deploys (initiates) new Kubernetes nodes, the nodes must be able to connect to the Dell APEX Block Storage. This challenge is resolved by adding Dell APEX Block Storage’s SDC (which provides the storage connectivity to Dell APEX Block Storage) using the Amazon EKS user-data script feature. The script includes the commands to add the SDC drivers to the Kubernetes node when it is initiated. After the script is completed, then install the CSI driver, which is a standard interface for Kubernetes clusters to take advantage of external storage (rather than the local disk on the node).
- AWS updates its operating systems frequently, which risks a mismatch between the SDC driver build and the Kubernetes node operating system kernel build. To overcome this challenge, there is an EKS user-data script to recompile the SDC driver libraries with the current EKS operating system build to ensure compatibility.
- The SDC package must be available for the user-data script to copy to the newly initialized Kubernetes node. This task is performed by placing the SDC driver packages in a local repository in your VPC.
Let’s see how the integration of Dell APEX Block storage for AWS and Amazon EKS works.
Logical architecture
The following figure shows a logical view of the Amazon EKS environment on APEX Block Storage for AWS: 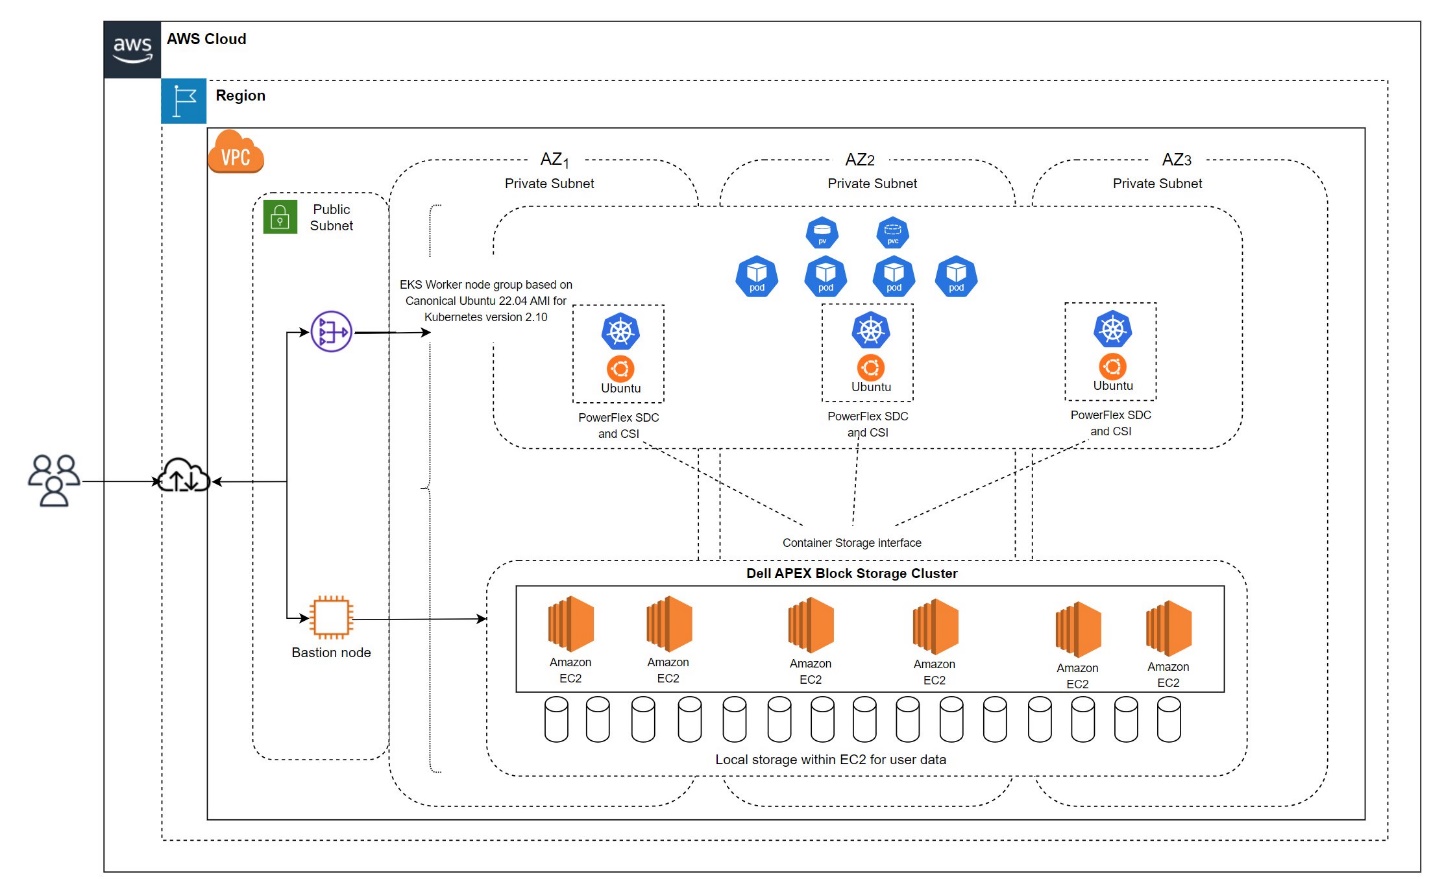
Figure 1: Logical architecture
An EKS cluster and Dell APEX Block Storage for AWS are deployed across a multi-AZ setup in the same AWS region. Both entities are interconnected in the same VPC that has private-only networking, which is typical of an enterprise system.
For more information about multiple availability zones, see Dell APEX Block Storage for AWS Multiple-availability zones.
Deployment
Key steps for the AWS EKS deployment and configuration include:
- Create an Amazon EKS cluster.
- Deploy an EKS worker node group by using the launch template.
- Install and recompile SDC.
- Deploy PowerFlex Container Storage Interface (CSI) drivers on the EKS worker node group.
- EKS worker node expansion.
Software versions
The following table shows the software versions that are used in the examples in this blog:
Component | Version |
EKS | 1.29 |
Ubuntu OS for EKS worker nodes | 22.04 |
PowerFlex CSI driver for Dell APEX Block Storage | 2.10 |
PowerFlex SDC | 4.5.2 (the ability to recompile the SDC driver is only available starting with release 4.5.2) |
EKS cluster details
Before we get into the EKS cluster deployment, let's briefly review the components.
The EKS cluster consists of two primary components: the Amazon EKS control plane and the Amazon EKS worker nodes that are registered with the control plane.
AWS manages the EKS control plane. The Amazon EKS endpoint associated with your cluster exposes the Kubernetes application programming interface (API). It consists of Kubernetes software, such as etcd and the Kubernetes API server. Every EKS cluster has a fully configured AWS-manager control plane, therefore, no master node (control plane) configuration is required.
EKS nodes (worker nodes) run your application pods. Each node connects to the cluster's control plane by the API server endpoint to fetch information related to Kubernetes resources such as pods, secrets, and volumes to be configured on the node.
The AWS EKS deployment process is simpler than a traditional Kubernetes deployment. A UI-based method is used for the deployment of the EKS cluster, which is uncomplicated and straightforward. With a simple flow and click, you can deploy the full cluster.
The following figure shows the cluster overview:
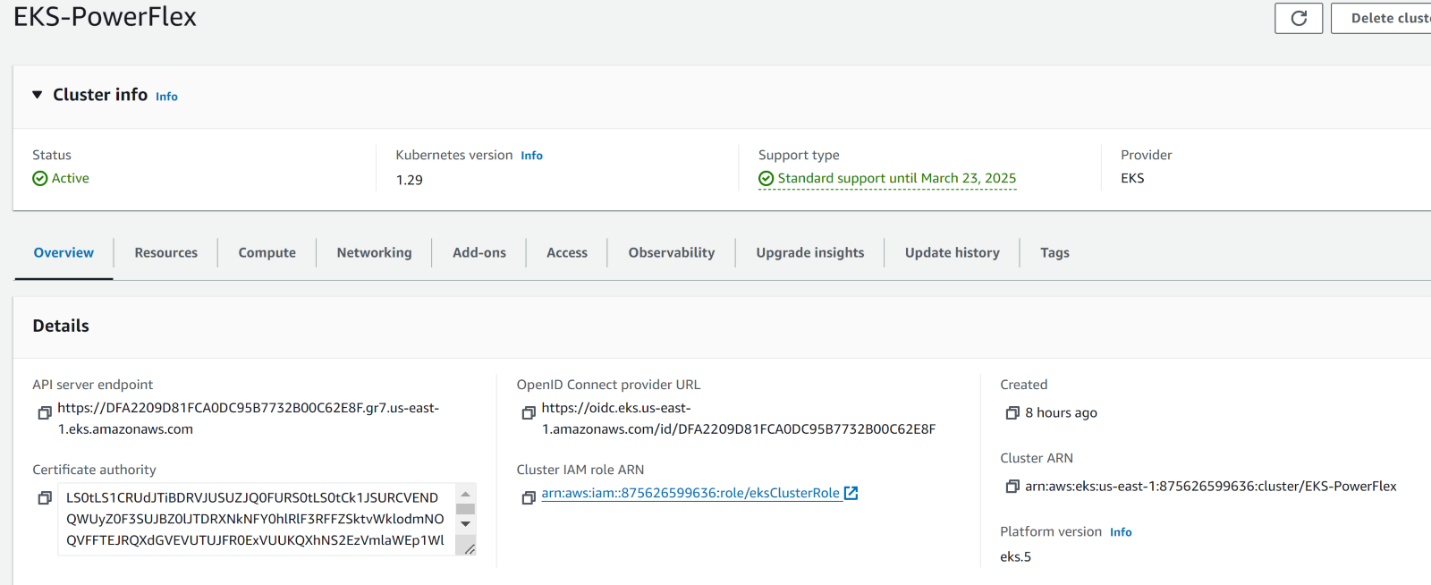
Figure 2: Cluster overview
For information about creating an EKS cluster, see Amazon EKS clusters.
EKS worker node deployment
Amazon EKS supports operating systems such as Amazon Linux, Bottlerocket, and Windows Server. With the help of the launch template option, a template is created using Canonical Ubuntu AMI and worker nodes are deployed using the same.
The cluster node group template is based on Canonical Ubuntu 22.04 AMI for EKS 1.29. See Ubuntu on Amazon Kubernetes Service (EKS) and identify the correct AMI matching the Kubernetes version that is running in the cluster and the associated region.
EKS-optimized Ubuntu AMIs provide the familiarity and consistency of using Ubuntu, optimized for performance and security on EKS clusters.
To start the EKS Worker node deployment, create a launch template using the AMI. Input the name, the instance-type, the network, the associated security-group, and so on. For more information, see Customizing managed nodes with launch templates. It not only helps with deployment but also with upgrades, updates, and so on. Be sure to apply updates to the template and push the updated template to the nodes.
The launch template also includes a custom user data section. User-based manual steps can be automated by passing information from this custom user data. For information about how you can add the required configurations for the node group in the user data section, see Amazon EC2 user data.
Worker node deployment with SDC installation and its recompilation
The storage access requires a Storage Data Client (SDC) driver to be installed on each of the EKS worker nodes. The driver communicates and consumes Dell APEX Block Storage volumes that the CSI driver automatically provisions to meet the container’s storage requirements.
With the latest Dell APEX Block Storage version (4.5.2 and above), you can compile a perfect match of the SDC driver for the currently running operating system kernel without relying on the availability of a matching SDC in the driver’s repository.
With the help of the launch template’s user data section, SDC installation and recompilation can be combined. This will perform the required steps during the bootstrap itself and avoids manual steps for each of the worker nodes.
Note: For information about SDC recompilation, see Knowledge Base Article 224134. Access to this document requires login credentials. If you do not have access, contact your Dell Technologies representative.
The following steps describe the launch template flow, followed by EKS worker node deployment:
- Connect to the Amazon web service and navigate to the EC2 instance.
- Select the Launch Templates option and click Create launch template.
For detailed information, see Customizing managed nodes with launch templates. - Provide necessary information, such as
- Name, version (if there are any changes, the same template can be maintained with a different version), AMI for the application or operating system, instance type, key, network, and storage.
- Scroll down and expand Advance details in the User data section. Update the following script for SDC installation to avoid manual steps.
- In the following example, the SDC package is downloaded and stored in an S3 bucket.
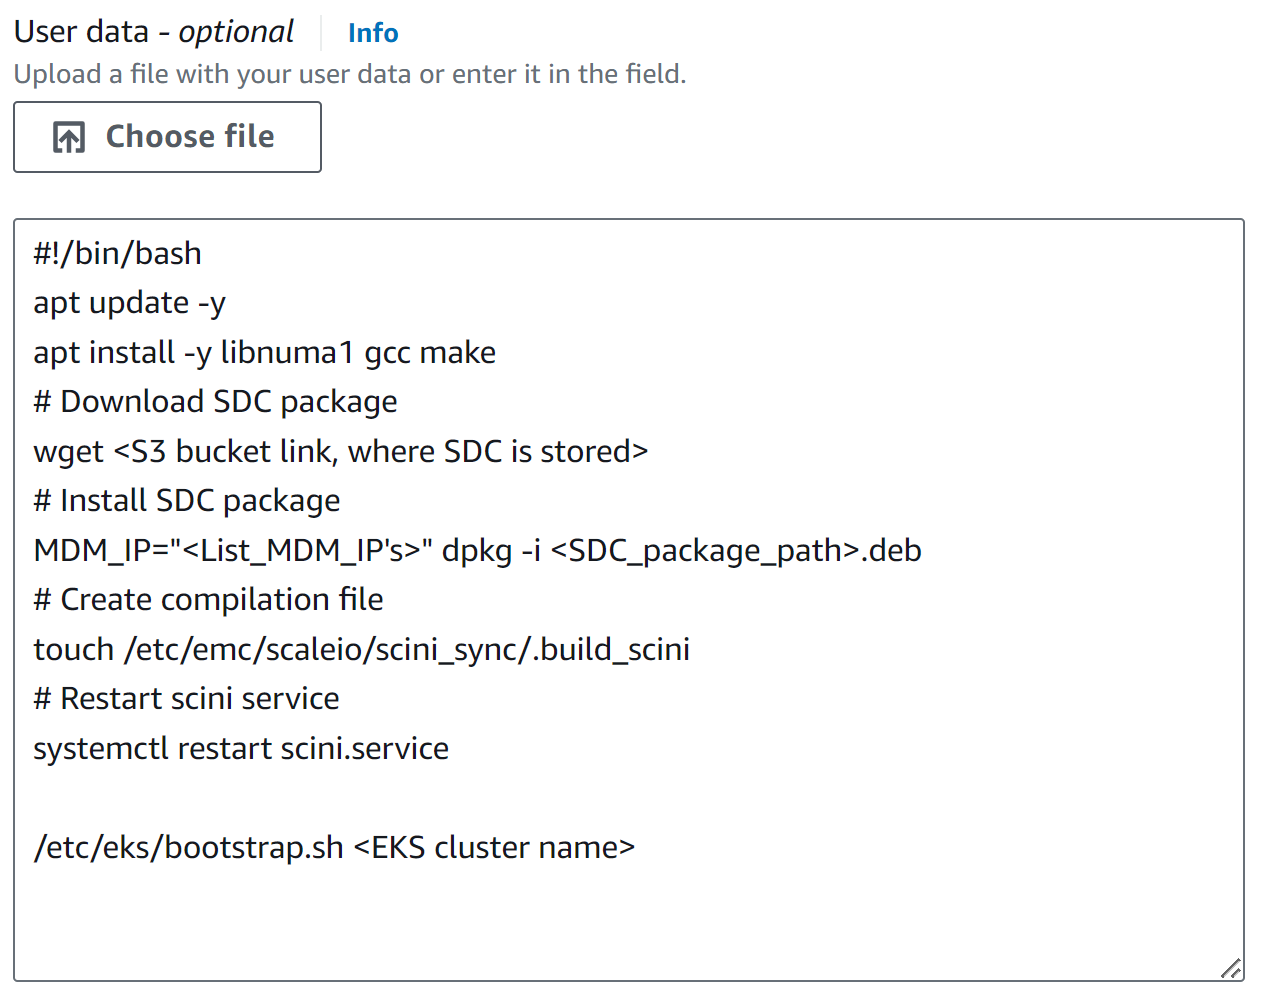
Figure 3: SDC installation script
The following is a brief explanation of the user data script:
- The following packages must be installed for the SDC recompilation procedure to succeed:
- As a part of dependency install libnuma1
apt update -y
apt install -y libnuma1
- Pre-requisites for recompilations:
apt install -y gcc
apt install -y make
- As a part of dependency install libnuma1
- The officially supported SDC package is available from the Dell Support site or from an FTP link which is accessible and supported. In our example, SDC has already been downloaded and stored in the S3 bucket.
- The following command starts the SDC installation on each of the worker nodes:
MDM_IP=<LIST_MDM_IPS> dpkg -i <SDC_package_path>.deb
where MDM_IP is the Meta Data Manager IP address.
- The following command enables SDC recompilation by creating a file:
touch /etc/emc/scaleio/scini_sync/.build_scini
- The following command restarts the SDC service:
systemctl restart scini
- When bringing up the SDC service, the software looks for an SDC driver matching the operating system kernel version.
- Because an exact match is not found, a recompilation is triggered to build an SDC driver for the current operating system kernel version.
- This task is used to bring up the SDC service on the worker node.
4. Click Create launch template, which creates a template immediately.
When the wanted launch template is created, use it to create worker node groups:
- Go to the EKS cluster and click the Compute tab.
- Scroll down and click Add node group.
- Provide information such as name, role (create prior to the settings), and so on. Then, enable the launch template option; select the template, which we created previously, as shown in the following figures:
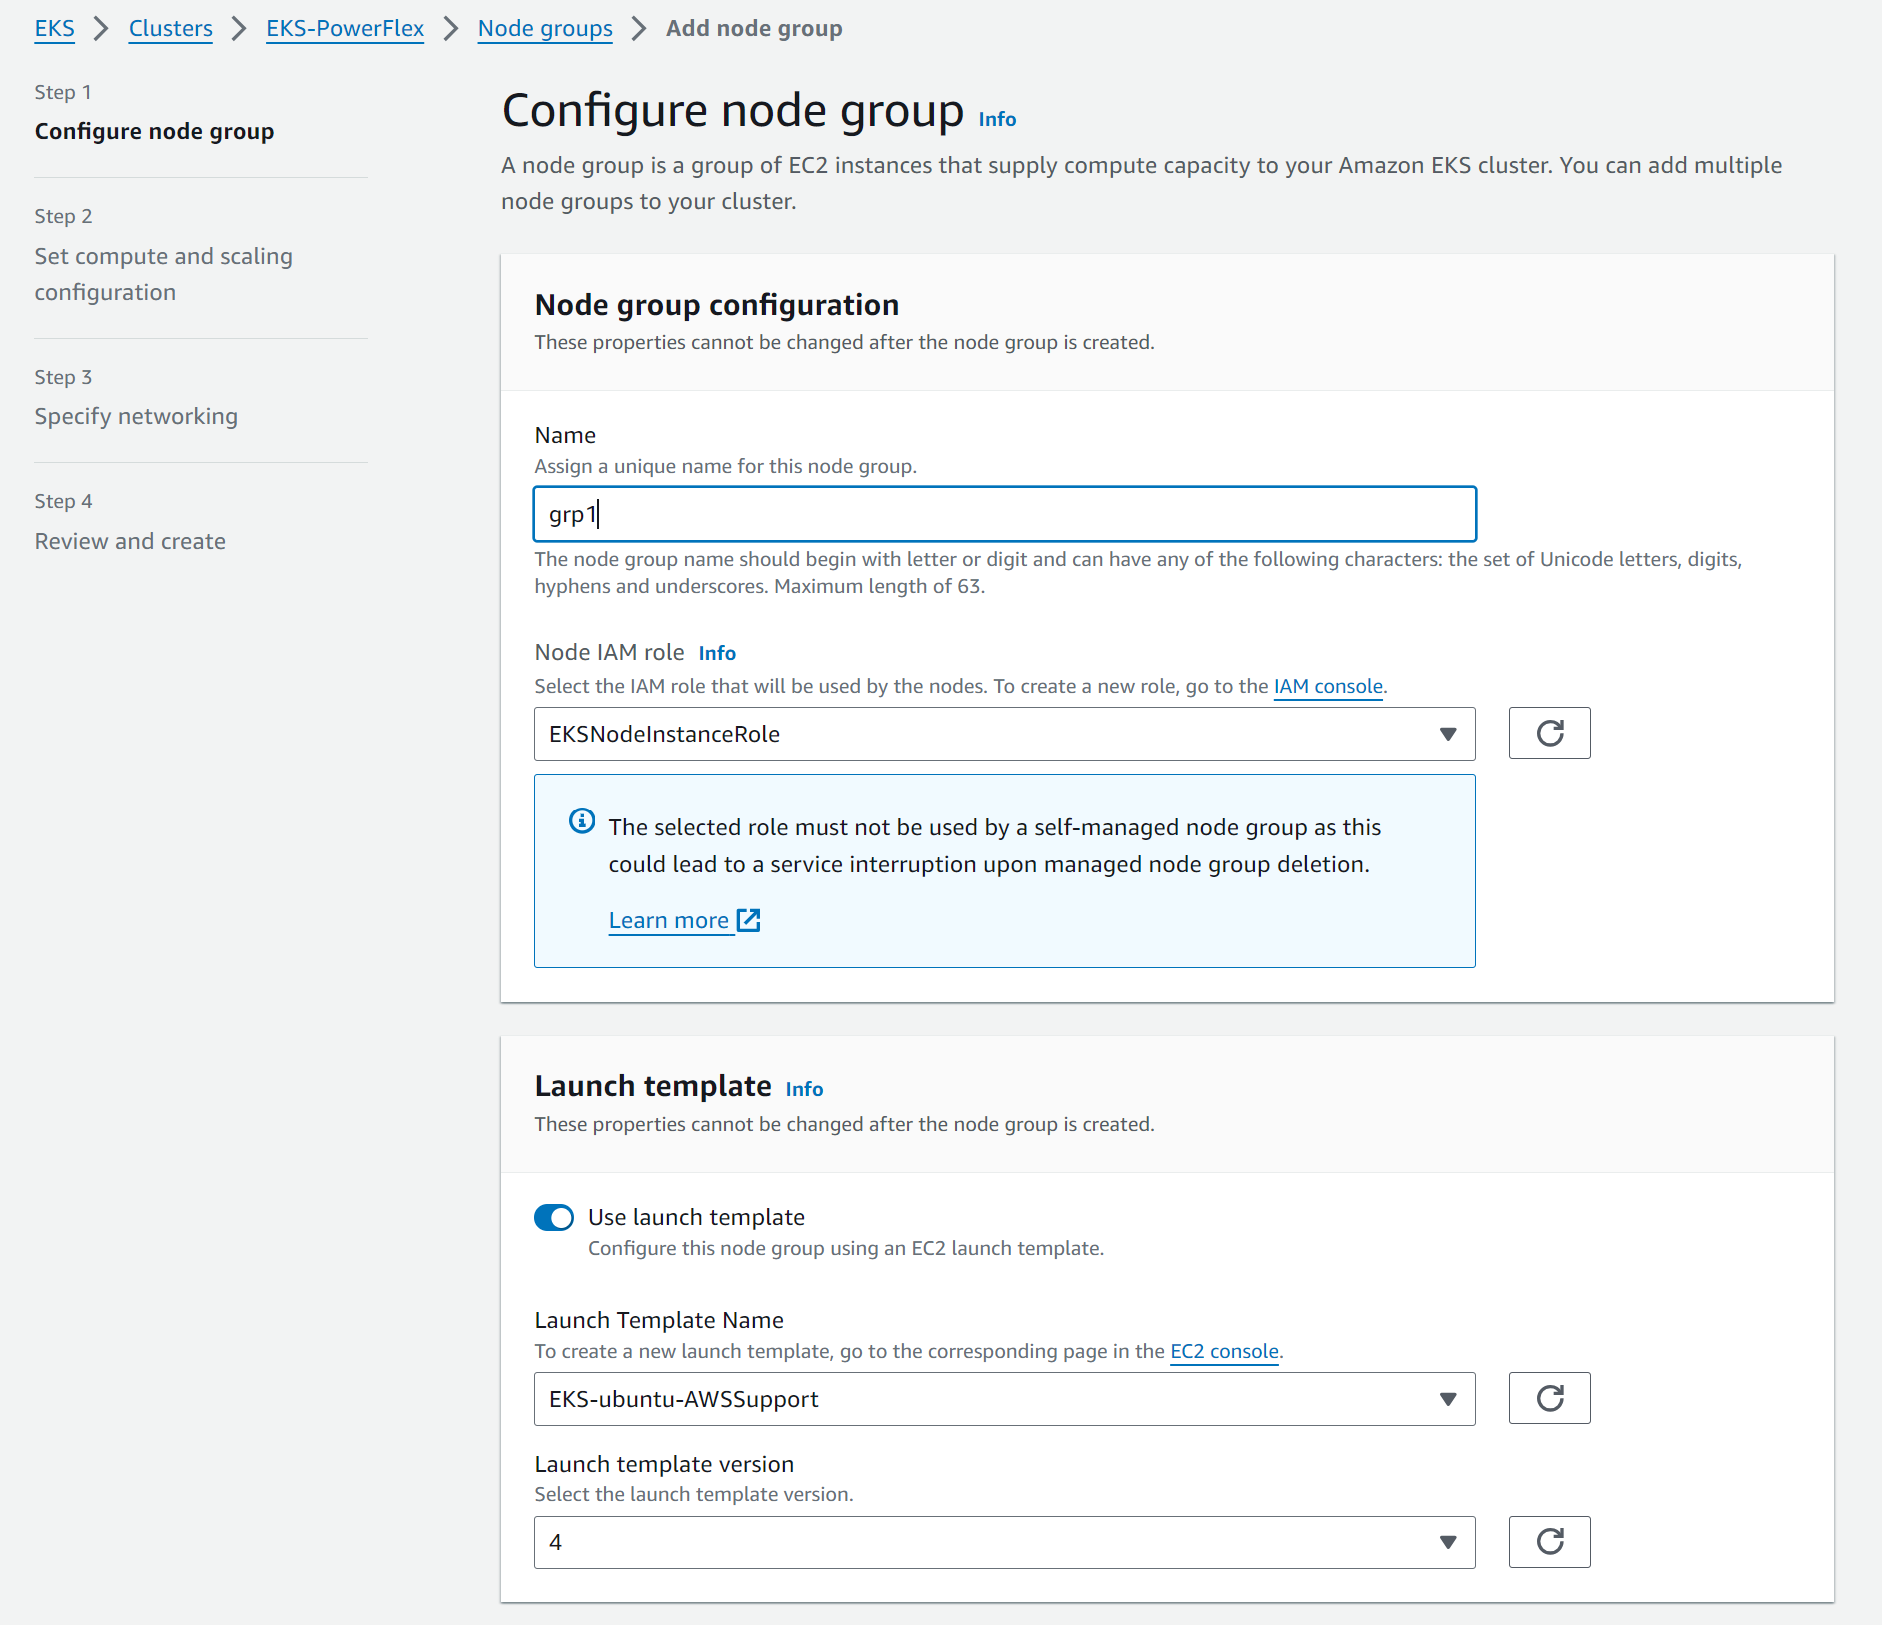
Figure 4: Configure the node group - Click Next to proceed. All other options are auto filled because the required information has already been provided in the template.
- When the required information has been entered, proceed by clicking Next and then clicking Create.
Node group creation can take some time. After the creation is completed, the status shows as Active and the individual node status is Ready, as shown in the following figure:
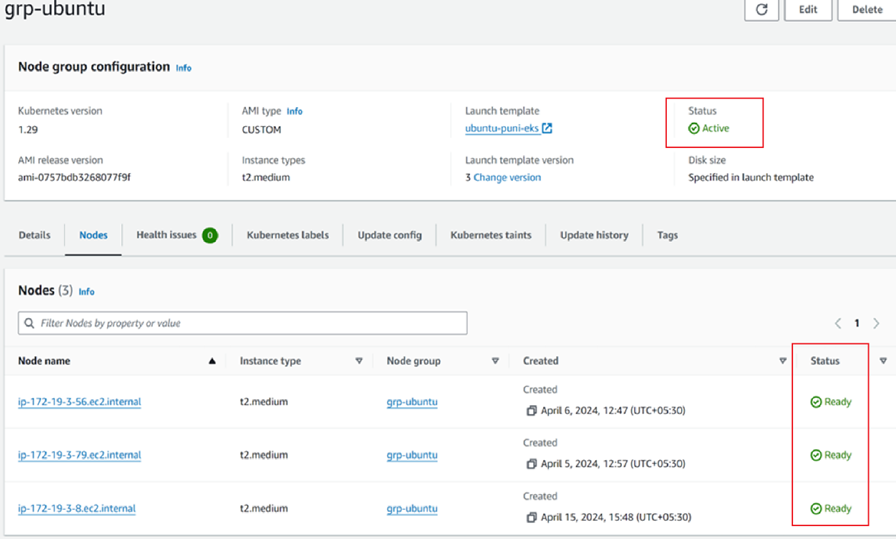
Figure 5: Node group overview
You can also verify the status from the Amazon admin VM by connecting to the EKS cluster:

Figure 6: Verifying the status
Verifying the SDC
When the node group has been deployed, we can verify the SDC functionality. The following steps verify that the SDC is working correctly:
- Connect to the worker node using the private key. Verify the SDC installation by running the following command, which provides the SDC service status:
systemctl status scini
- Verify that the MDM details have been configured in the cfg file by running the following command:
/opt/emc/scaleio/sdc/bin/drv_cfg --query_mdm

- Verify the SDC connectivity from PowerFlex Manager:
- Log in to the PowerFlex Manager.
- From the Block menu, click Hosts to list the connected SDCs, as shown in the following figure:

Figure 7: Listing the connected SDCs
PowerFlex CSI driver manual installation
Container Storage Interface (CSI) is an interface between CSI-enabled Container Orchestrator and Dell APEX Block Storage. It is a plug-in that is installed in Kubernetes to provide persistent storage.
For more information about the CSI driver, see CSI Drivers.
Because SDC was installed during the bootstrap, as mentioned earlier, the administrator can proceed directly with the CSI installation. Install the CSI driver by following Dell’s documentation at https://dell.github.io/csm-docs/docs/deployment/helm/drivers/installation/powerflex/.
When the installation is completed, verify the installation by connecting to the admin VM and running the following command, as shown in the following figure:
Kubectl get pods -n <namespace>
Where namespace is created as a part of the CSI setup.
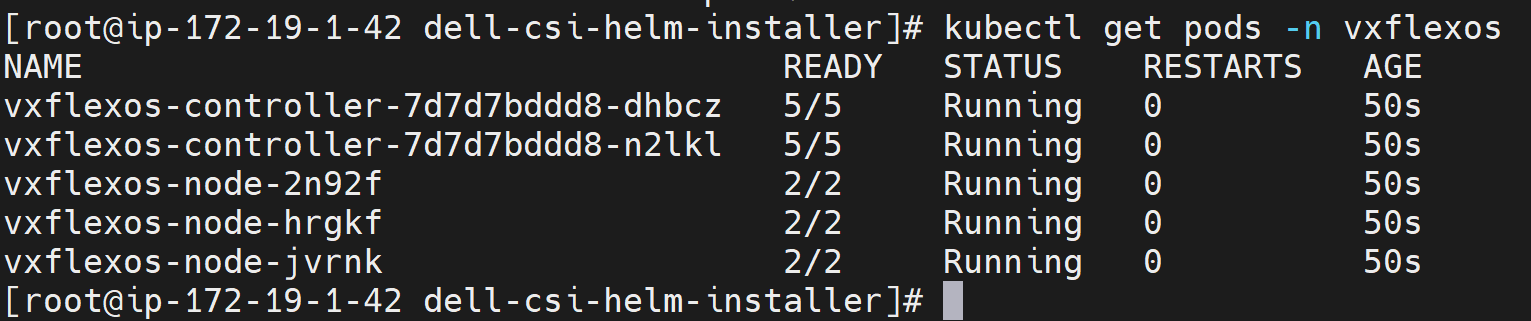
Figure 8: Verify the installation
EKS worker node expansion
Scaling up and scaling down the worker nodes in AWS EKS is simple. The previous sections showed how to include SDC installation in the user data option, which reduces manual steps. For node expansion, the system automatically uses the same template that is used for node group creation. Therefore, you do not need to make any changes other than changing the number of required nodes.
To expand the EKS worker node:
- Connect the AWS EKS cluster and go to the Compute tab.
- Select the wanted node group and click Edit.
- Adjust the minimum, maximum, or wanted count of the instances in your managed node group as required and click Apply.
- Note that the expansion process takes some time to expand the worker nodes. When it is completed, the node group shows as Active.
Example
We initially deployed the following group with two worker nodes. The following figure shows that we then edited the group and scaled to five nodes:
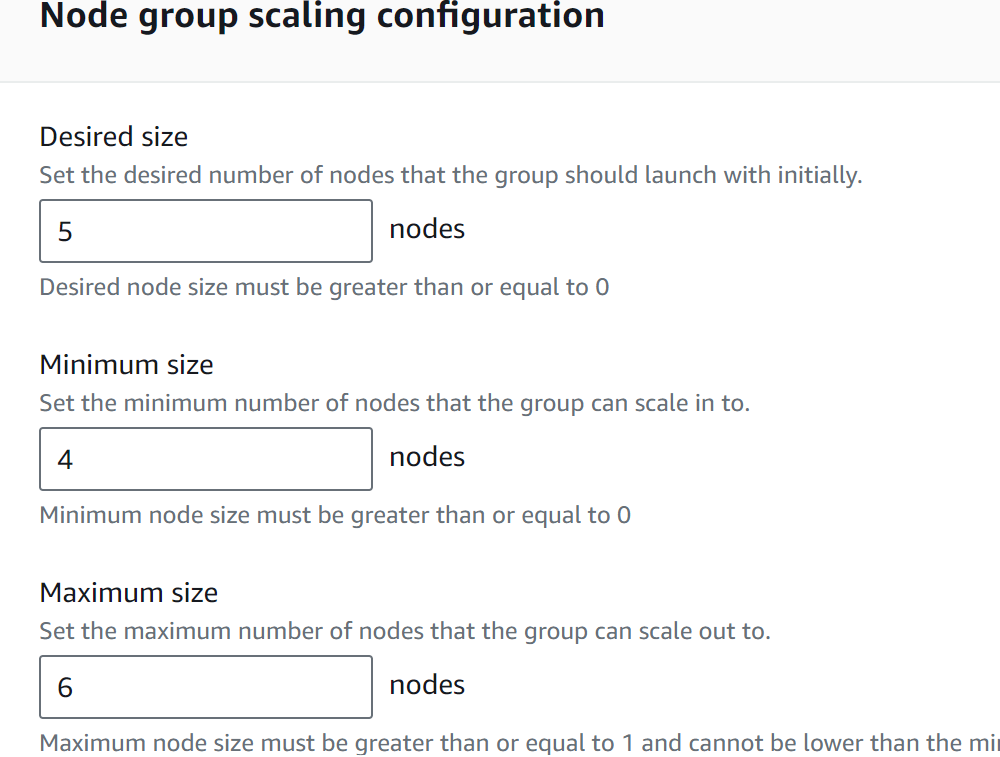
Figure 9: Configuring the node group
The following figure shows the status in the AWS UI:
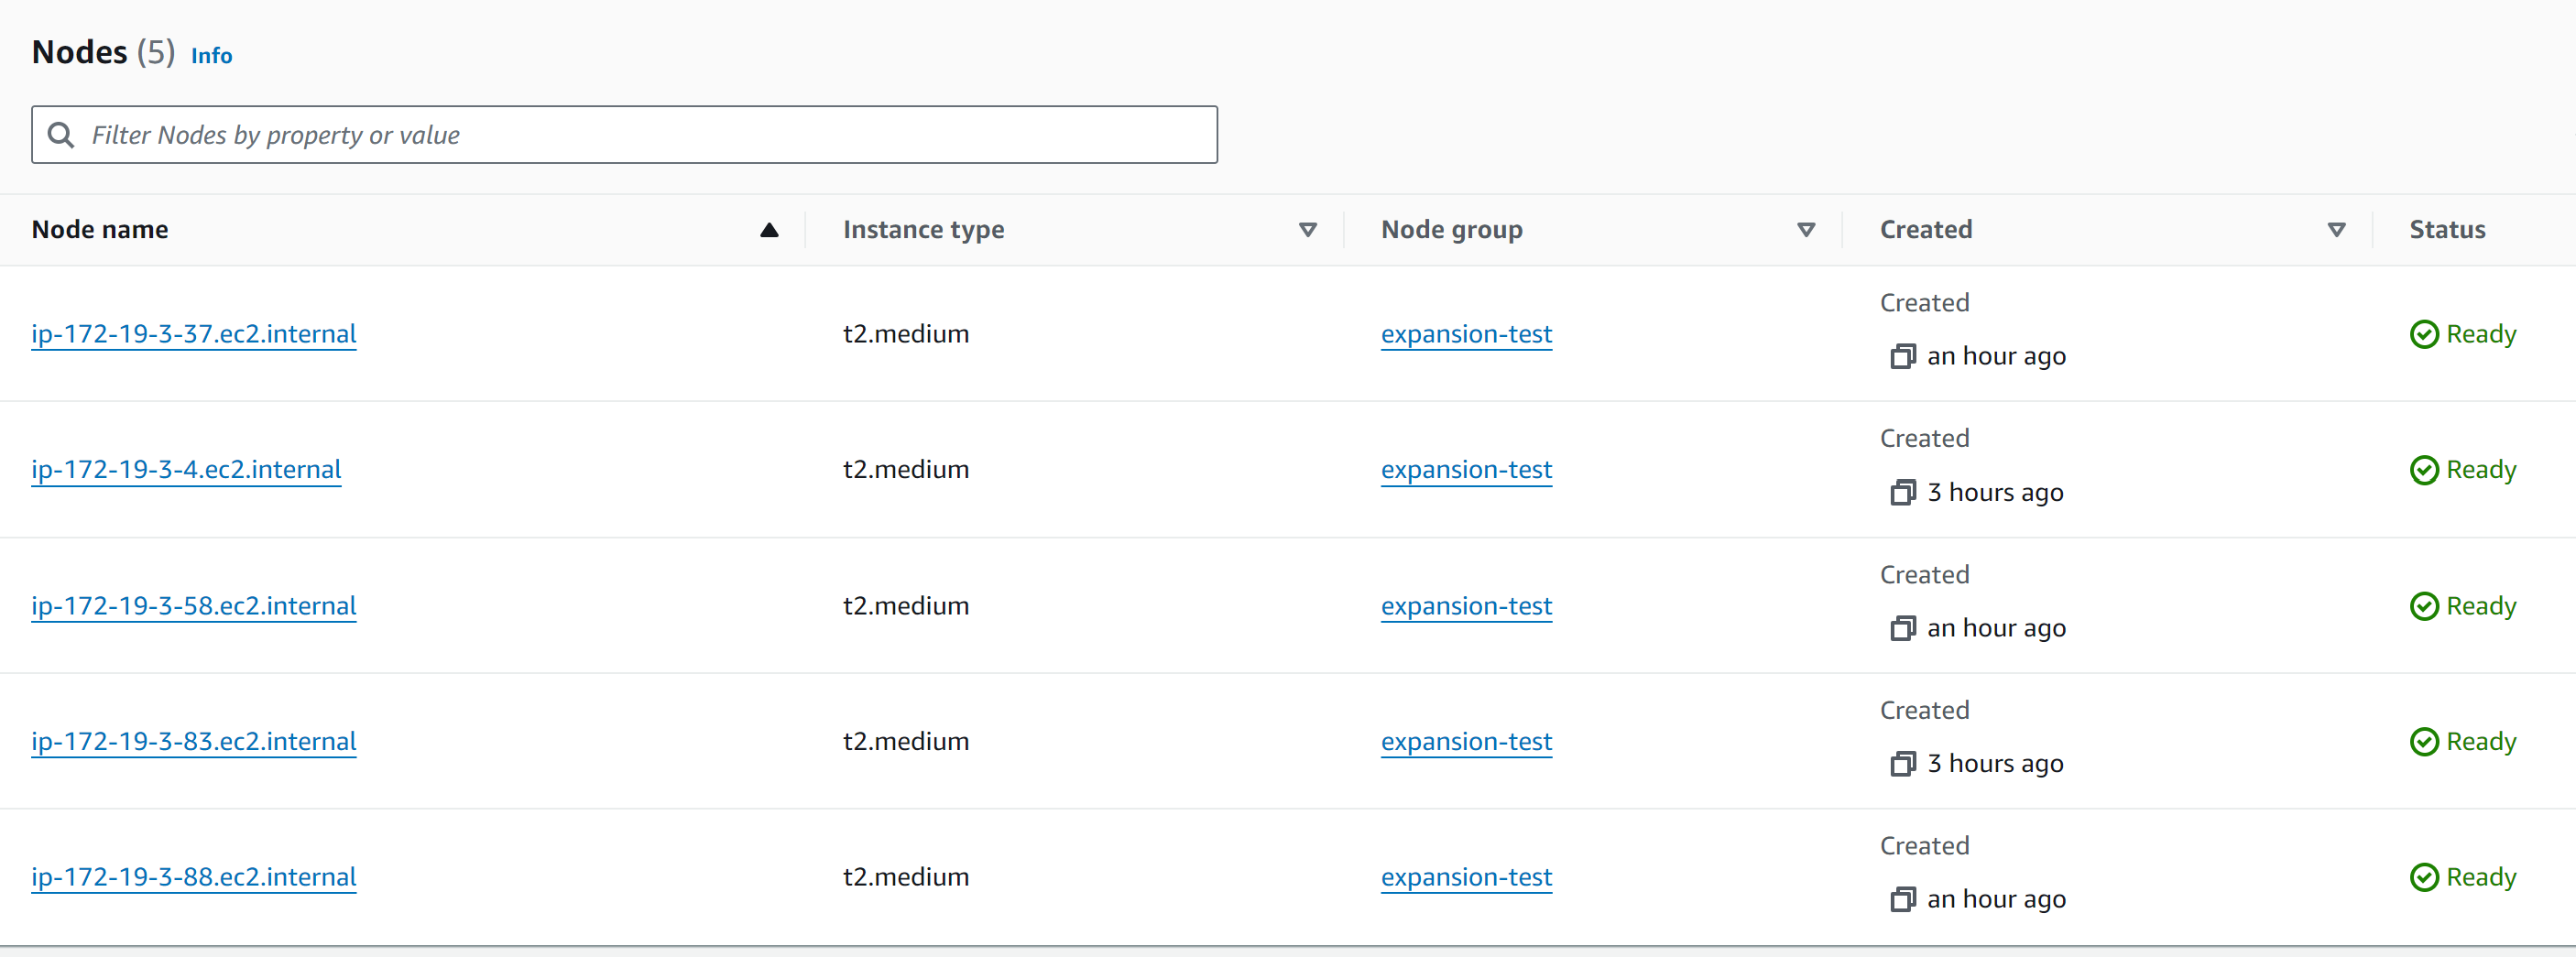
Figure 10: Verifying the status in the UI
The following figure shows the status from the AWS admin VM:
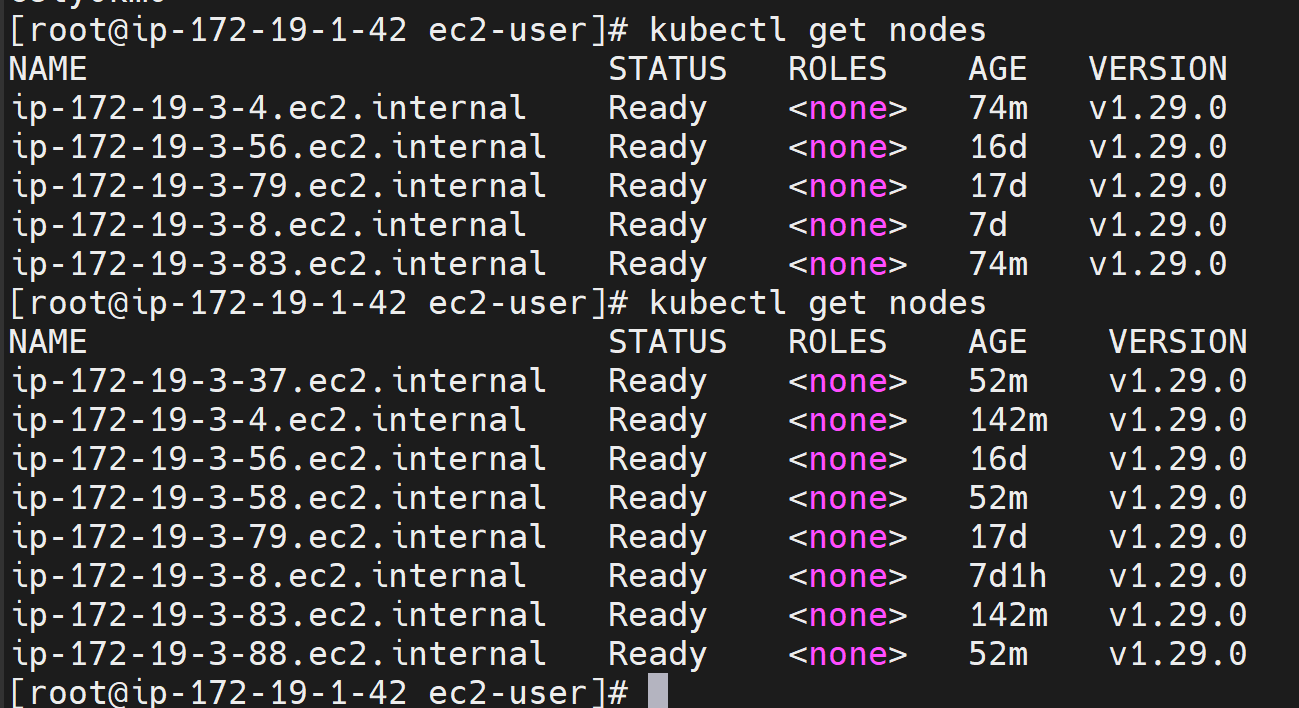
Figure 11: Verifying the status from the VM
Conclusion
In this blog, we showed how to configure Dell APEX Block Storage as persistent storage with Amazon EKS deployments. By using the launch template’s user-data script option, the SDC installation and its recompilation can be automated.
If you are interested in finding more information, contact your Dell Technologies representative.