
Installing SAP
Installing SAP
-
Prerequisites
When installing SAP, ensure that:
- Operating systems are already installed on the servers
- Hostnames and IP addresses are configured
- The SAP components are installed in the following order:
- ASCS instance
- Database instance and clustering
- Primary application server (PAS)
- Additional application servers (at least one)
Prepare the file systems
On all the servers, run the following commands:
mkdir -p {/sapmnt,/sapinst,/usr/sap/TR1/SYS}
mount <nfsServerIP>:/sapmnt /sapmnt
mount <nfsServerIP>:/sapinst /sapinst
mount <nfsServerIP>:/sapsys /usr/sap/TR1/SYSInstall the ASCS instance on nwascs
Assign the cluster IP to the first node on which the ASCS instance is running initially:
ascs01# cd /sapinst/SWPM
ascs01# ./sapinst SAPINST_USE_HOSTNAME=nwascs01Download and configure SWPM
Download the Software Provisioning Manager (SWPM) and choose the appropriate instance based on the following SAP NetWeaver version and architecture:
- ASCS instance
- Database instance and clustering
- Primary application server
- Additional application servers (at least one)
Install SAP NetWeaver 7.5
- Under SID id TR1, apply the following settings:
- Use instance number 00.
- Clear the Using FQDN option.
- For all passwords, use <yourSecurePwd>.
- During the parameter review, verify that the nwascs01 virtual name is used.
- Ensure that the user IDs that are specified in Table 9 are used.
- If a permissions error appears, change the ownership of the ASCS directory by running the following command:
chown -R tr1adm:sapsys /usr/sap/TR1/ASCS00
Steps
Install SAP HANA on the hana01 and hana02 servers
Ensure that:
- The three required file systems for the SAP HANA database (/hana/data, /hana/log, and /hana/shared) are already configured on the system.
- The system is fast enough to support the wanted workload.
Install the empty database on both hosts so that you can use the latest SAP HANA patch release.
Note: While SWPM assumes that the installation media is used, it is recommended to install the latest SAP HANA patch packages instead of installing the base version first and then updating to the latest patch release.
- To add the SAP HANA cluster IP to the hana01 server, run the following command:
hana01# ip addr add 10.14.20.50/24 dev eth0
- On both the hana01 and hana02 servers, run the following command:
cd /sapinst/SAP_HANA_DATABASE/
./hdblcm --ignore=check_signature_file
Note:
Use the ignore parameter only if an SAP HANA database patch release is installed without creating a signature with SAPcar during the extraction.
Enter the values that are specified in Table 6 and Table 7.
Ensure that you enter the recommended value for the sapsys group. Do not use the SAP HANA default value of 79.Import the SAP HANA database
On hana01, run the following command:
nw01# cd /sapinst/SWPM
./sapinst SAPINST_USE_HOSTNAME=hana-ha
Install the primary application server on nw01
In SWPM:
- Run the following commands:
nw01# cd /sapinst/SWPM/
nw01# ./sapinst SAPINST_USE_HOSTNAME=nw01
- Select Installing SAP NetWeaver 7.5 > SAP HANA Database > Installation > Application Server ABAP > High-Availability System > Primary Application Server Instance (PAS).
- Apply the following settings:
- Instance number 21.
- Clear the Using FQDN option.
- Other required parameters for the environment (such as SLD).
Install the additional application server on nw02
- Run the following commands:
nw02# cd /sapinst/SWPM/
nw02# ./sapinst SAPINST_USE_HOSTNAME=nw02
- In SWPM, select Installing SAP NetWeaver 7.5 > SAP HANA Database > Installation > Application Server ABAP > High-Availability System > Primary Application Server Instance (PAS).
- Apply the following settings:
- Select instance number 22.
- Clear the Using FQDN option.
Configure fencing for the cluster
For information about the scenarios in which fencing is required and the required configuration steps, see SLEHA 15 SP4 | Administration Guide | Fencing and STONITH .
- Configure the srConnectionChangedhooks on both cluster nodes:
- Stop the database instances:
hana01:# su – th0adm
th0adm@hana01:# HDB stophana02:# su – th0adm
th0adm@hana02:# HDB stop- Copy the files on both nodes by running the following command:
[root]# mkdir -p /hana/shared/myHooks
[root]# cp /usr/share/SAPHanaSR/srHook/SAPHanaSR.py /hana/shared/myHooks
[root]# chown -R th0adm:sapsys /hana/shared/myHooks
- On both database nodes, modify the configuration file by editing the /hana/shared/TH0/global/hdb/custom/config/global.ini file:
[ha_dr_provider_SAPHanaSR]
provider = SAPHanaSR
path = /hana/shared/myHooks
execution_order = 1
[trace]
ha_dr_saphanasr = info
- Create the /etc/sudoers.d/20-saphana file with the following content.
Note:
Adjust the values for th0 with the lowercase SAP SID of your database.
Adjust Node1 and Node2 with the database names that you provided during the replication setup.Cmnd_Alias Node1_SOK = /usr/sbin/crm_attribute -n hana_th0_site_srHook_Node1 -v SOK -t crm_config -s SAPHanaSR
Cmnd_Alias Node1_SFAIL = /usr/sbin/crm_attribute -n hana_th0_site_srHook_Node1 -v SFAIL -t crm_config -s SAPHanaSR
Cmnd_Alias Node2_SOK = /usr/sbin/crm_attribute -n hana_th0_site_srHook_Node2 -v SOK -t crm_config -s SAPHanaSR
Cmnd_Alias Node_SFAIL = /usr/sbin/crm_attribute -n hana_th0_site_srHook_Node2 -v SFAIL -t crm_config -s SAPHanaSR
th0adm ALL=(ALL) NOPASSWD: Node1_SOK, Node1_SFAIL, Node2_SOK, Node2_SFAIL
Defaults!Node1_SOK, Node1_SFAIL, Node2_SOK, Node2_SFAIL !requiretty
- Start the databases again:
hana01:# su – th0adm
th0adm@hana01:# HDB starthana02:# su – th0adm
th0adm@hana02:# HDB start- Configure the cluster resources:
- Enable the cluster maintenance mode. This ensures that the cluster software does not try to make any changes to the SAP HANA database replication until the configuration of the failover cluster is complete.
hana01# pcs property set maintenance-mode=true
- Define global parameters for all cluster resources:
pcs resource defaults update resource-stickiness=1000
pcs resource defaults update migration-threshold=5000
- Add the configuration for the SAP host resource:
pcs resource create SAPHanaTopology_TH0_00 SAPHanaTopology SID=TH0 InstanceNumber=00 \
op start timeout=600 \
op stop timeout=300 \
op monitor interval=10 timeout=600 \
clone clone-max=2 clone-node-max=1 interleave=true
- Add the resource configuration for the active-passive SAP HANA database:
pcs resource create SAPHana_TH0_00 SAPHana SID=TH0 InstanceNumber=00 \
PREFER_SITE_TAKEOVER=true DUPLICATE_PRIMARY_TIMEOUT=7200 AUTOMATED_REGISTER=true \
op start timeout=3600 \
op stop timeout=3600 \
op monitor interval=61 role="Slave" timeout=700 \
op monitor interval=59 role="Master" timeout=700 \
op promote timeout=3600 \
op demote timeout=3600 \
promotable notify=true clone-max=2 clone-node-max=1 interleave=true
- Add the virtual IP as a cluster resource:
pcs resource create vip_TH0_00 IPaddr2 ip="10.14.20.10"
- Add resource constraints so that the different cluster resources run on the nodes where they belong respectively, such as the virtual IP address on the node with the writable primary database:
pcs constraint order SAPHanaTopology_TH0_00-clone then SAPHana_TH0_00-clone symmetrical=false
pcs constraint colocation add vip_TH0_00 with master SAPHana_TH0_00-clone 2000
- Disable maintenance mode on the cluster:
pcs property set maintenance-mode=false
All the resources are now configured properly.
- Verify that the cluster is installed on hana01 by running:
hana01:~ # crm_mon -r1
The following output is displayed:
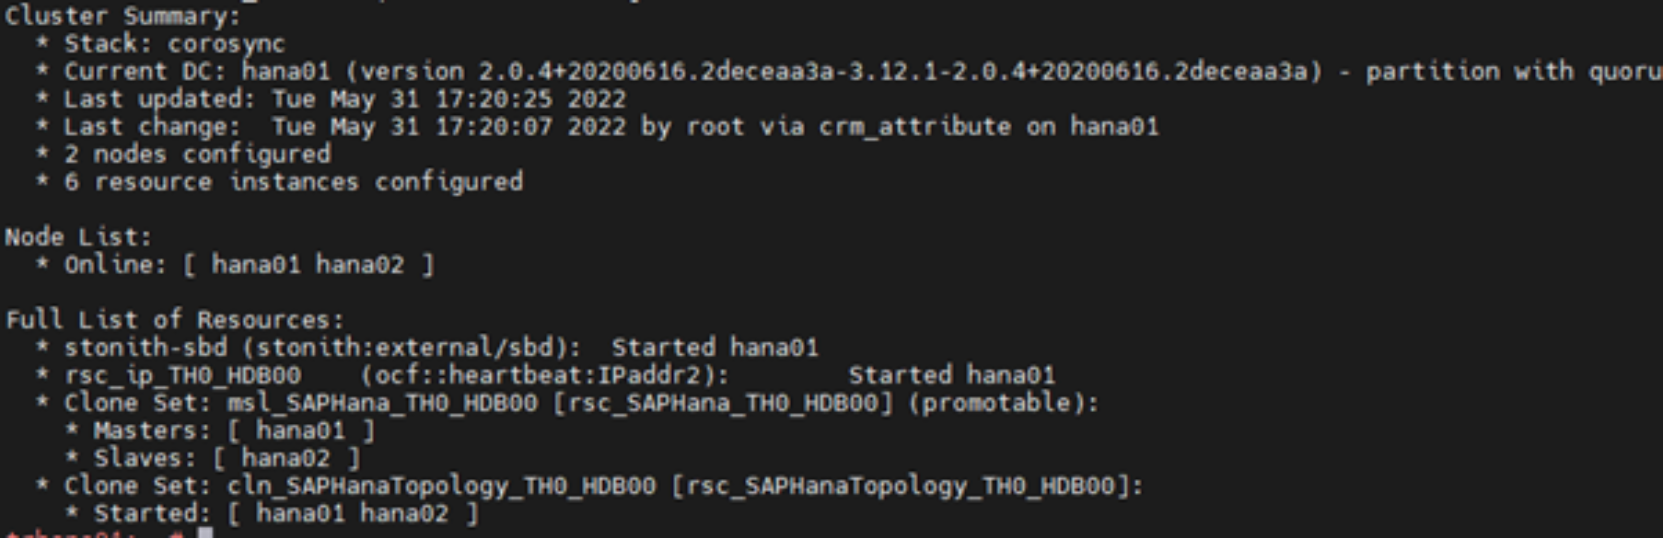
Figure 4. Checking the cluster installation status
- Verify the status of the replication by running:
trhana01:# su – th0adm
th0adm@hana01:# cdpy
th0adm@hana01:# python systemReplicationStatus.py

Figure 5. Checking the replication status
Cluster configuration
Install and set up a cluster quorum service
SUSE strongly recommends using a quorum service for an SAP HANA failover cluster to prevent a “split brain” scenario when a network failure occurs (see Solution benefits). A split brain situation could cause valid transaction requests to reach two databases, which would require a manual intervention to resolve after the network is back online. Without a quorum service, it is necessary to discard transactions on one side and accept data loss.
Note: The YaST guidance cannot be used instead, because YaST requires shared SAN disks between the nodes. This requirement is unnecessary when a dedicated witness server is used.
The quorum service itself is lightweight and can be run on any system on top of the normal workload of an existing server. From most to least efficient, the options are:
- Install the service on a physical or virtual server outside the VMware cluster that runs the SAP workload, such as a central DNS server
- Install the service on a virtual server on the VMware cluster that runs the SAP workload
- Do not install the service
Note: Installing the service on a physical or virtual server outside the VMware cluster is preferable to having no quorum service because VMware uses SAN-based cluster communication in addition to network communication. Accordingly, the quorum VM is not started a second time when only a network outage happens.
To install the required software on the quorum host, run the following command:
sapquorum:# zypper install corosync-qnetd
Note: For more information about how to set up and use quorum services, see the SUSE Linux Enterprise High Availability Extension 15 SP4 Administration Guide.
Configure the SAP HANA replication
Before configuring the SAP HANA replication:
- Set up the hdbuser-store for a backup user. This design guide uses “backup” as the username.
- On both hosts, run the following commands:
su – th0adm
hdbuserstore -i add backup localhost:30013@SYSTEMDB systemNote: For data protection reasons, create a backup user with the appropriate permissions on your databases. The SYSTEM user permissions can also be used.
To configure the replication:
- Create a backup on the first node, which becomes the primary database, and then enable system replication by running the following commands:
hana01:# su – th0adm
hdbsql -i 00 -U backup -d SYSTEMDB "BACKUP DATA USING FILE ('/tmp/foo')"hdbsql -i 00 -U backup -d SYSTEMDB "BACKUP DATA FOR TH0 USING FILE ('/tmp/foo2')"
Note: Ensure that the backup file destination has enough free space available and is writable for the th0adm user.
- After running the backups, prepare the primary node for system replication:
th0adm@hana01:# hdbnsutil -sr_enable --name=Node1
- Add the second database server to the replication by running:
hana02:# su – th0adm
th0adm@hana02:# HDB stop- As user root, copy the security keys from the first server to the second server:
hana02:# scp root@hana01:/usr/sap/TH0/SYS/global/security/rsecssfs/key/SSFS_TH0.KEY /usr/sap/TH0/SYS/global/security/rsecssfs/key/SSFS_TH0.KEY
hana02:# scp root@hana01:/usr/sap/TH0/SYS/global/security/rsecssfs/data/SSFS_TH0.DAT /usr/sap/TH0/SYS/global/security/rsecssfs/data/SSFS_TH0.DAT
- Register the second node by running:
hana02:# su - th0adm
th0adm@hana02:# hdbnsutil -sr_register --remoteHost=hana01 --remoteInstance=00 --replicationMode=sync --force_full_replica --name=Node2- Start the database on the second node by running:
hana02:# su – th0adm
th0adm@hana02:# HDB start- (Optional) Verify the status of the replication by running the following commands on the first node:
hana01:# su – th0adm
th0adm@hana01:# cdpy
th0adm@hana01:# python systemReplicationStatus.py
The following code snippet shows the output of a successful replication command:

Configure the SUSE system replication callback.
To configure the replication callback:
- Install the required packages on both SAP HANA nodes by running:
zypper in pacemaker corosync-qdevice SAPHanaSR ha-cluster-bootstrap
Note: Alternatively, run “zypper in -t pattern ha_sles sap-hana”
- Configure the srConnectionChangedhooks on both cluster nodes:
- Stop the database instances:
hana01:# su – th0adm
th0adm@hana01:# HDB stophana02:# su – th0adm
th0adm@hana02:# HDB stop- Copy the files on both nodes by running the following command:
[root]# mkdir -p /hana/shared/myHooks
[root]# cp /usr/share/SAPHanaSR/srHook/SAPHanaSR.py /hana/shared/myHooks
[root]# chown -R th0adm:sapsys /hana/shared/myHooks
- On both database nodes, modify the configuration file by editing the /hana/shared/TH0/global/hdb/custom/config/global.ini file:
[ha_dr_provider_SAPHanaSR]
provider = SAPHanaSR
path = /hana/shared/myHooks
execution_order = 1
[trace]
ha_dr_saphanasr = info
- Create the /etc/sudoers.d/20-saphana file with the following content.
Note:
Adjust the values for th0 with the lowercase SAP SID of your database.
Adjust Node1 and Node2 with the database names that you provided during the replication setup.Cmnd_Alias Node1_SOK = /usr/sbin/crm_attribute -n hana_th0_site_srHook_Node1 -v SOK -t crm_config -s SAPHanaSR
Cmnd_Alias Node1_SFAIL = /usr/sbin/crm_attribute -n hana_th0_site_srHook_Node1 -v SFAIL -t crm_config -s SAPHanaSR
Cmnd_Alias Node2_SOK = /usr/sbin/crm_attribute -n hana_th0_site_srHook_Node2 -v SOK -t crm_config -s SAPHanaSR
Cmnd_Alias Node_SFAIL = /usr/sbin/crm_attribute -n hana_th0_site_srHook_Node2 -v SFAIL -t crm_config -s SAPHanaSR
th0adm ALL=(ALL) NOPASSWD: Node1_SOK, Node1_SFAIL, Node2_SOK, Node2_SFAIL
Defaults!Node1_SOK, Node1_SFAIL, Node2_SOK, Node2_SFAIL !requiretty
- Start the databases again:
hana01:# su – th0adm
th0adm@hana01:# HDB starthana02:# su – th0adm
th0adm@hana02:# HDB startConfigure Pacemaker
To configure Pacemaker:
- Create the cluster with no cluster resources defined (run the following commands on one host only).
Note: Relevant responses are marked in red in the following code snippet.
Hana01# crm cluster init
INFO: Loading “default” profile from /etc/crm/profiles.yml
INFO: Configuring csync2
INFO: BEGIN Generating csync2 shared key (this may take a while)
INFO: END Generating csync2 shared key (this may take a while)
INFO: BEGIN csync2 checking files
INFO: END csync2 checking files
INFO: Configure Corosync (unicast):
This will configure the cluster messaging layer. You will need
to specify a network address over which to communicate (default
is eth0’s network, but you can use the network address of any
active interface).
INFO: Address for ring0 [10.14.20.51]
INFO: Port for ring0 [5405]
INFO: Configure SBD:
If you have shared storage, for example a SAN or iSCSI target,
you can use it avoid split-brain scenarios by configuring SBD.
This requires a 1 MB partition, accessible to all nodes in the
cluster. The device path must be persistent and consistent
across all nodes in the cluster, so /dev/disk/by-id/* devices
are a good choice. Note that all data on the partition you
specify here will be destroyed.
INFO: Do you wish to use SBD (y/n)? n
WARNING: Not configuring SBD – STONITH will be disabled.
INFO: Hawk cluster interface is now running. To see cluster status, open:
INFO: https://10.14.20.51:7630/
INFO: Log in with username ‘hacluster’
INFO: BEGIN Starting pacemaker
INFO: END Starting pacemaker
INFO: BEGIN Waiting for cluster
…........ INFO: END Waiting for cluster
INFO: Loading initial cluster configuration
INFO: Configure Administration IP Address:
Optionally configure an administration virtual IP
address. The purpose of this IP address is to
provide a single IP that can be used to interact
with the cluster, rather than using the IP address
of any specific cluster node.
INFO: Do you wish to configure a virtual IP address (y/n)? n
INFO: Configure Qdevice/Qnetd:
QDevice participates in quorum decisions. With the assistance of
a third-party arbitrator Qnetd, it provides votes so that a cluster
is able to sustain more node failures than standard quorum rules
allow. It is recommended for clusters with an even number of nodes
and highly recommended for 2 node clusters.
INFO: Do you want to configure QDevice (y/n)? y
INFO: HOST or IP of the QNetd server to be used []10.14.20.200
INFO: TCP PORT of QNetd server [5403]
INFO: QNetd decision ALGORITHM (ffsplit/lms) [ffsplit]
INFO: QNetd TIE_BREAKER (lowest/highest/valid node id) [lowest]
INFO: Whether using TLS on QDevice/QNetd (on/off/required) [on]
INFO: Heuristics COMMAND to run with absolute path; For multiple commands, u“e”";" to separate []
INFO: Configure Qdevice/Qnetd:
INFO: BEGIN Qdevice certification process
INFO: END Qdevice certification process
INFO: BEGIN Update configuration
INFO: END Update configuration
INFO: Enable corosync-qdevice.service in cluster
INFO: Restarting cluster service
INFO: BEGIN Waiting for cluster
........... INFO: END Waiting for cluster
INFO: Enable corosync-qnetd.service on 10.14.20.200
INFO: Starting corosync-qnetd.service on 10.14.20.200
INFO: Done (log saved to /var/log/crmsh/crmsh.log)
- Add the second host to the cluster by running:
hana02# crm cluster join
- Enter the IP of the hana01 node.
- Use the SUSE Hawk web interface to configure the HANA resource on the cluster.
The following figure shows the SUSE Hawk login page:
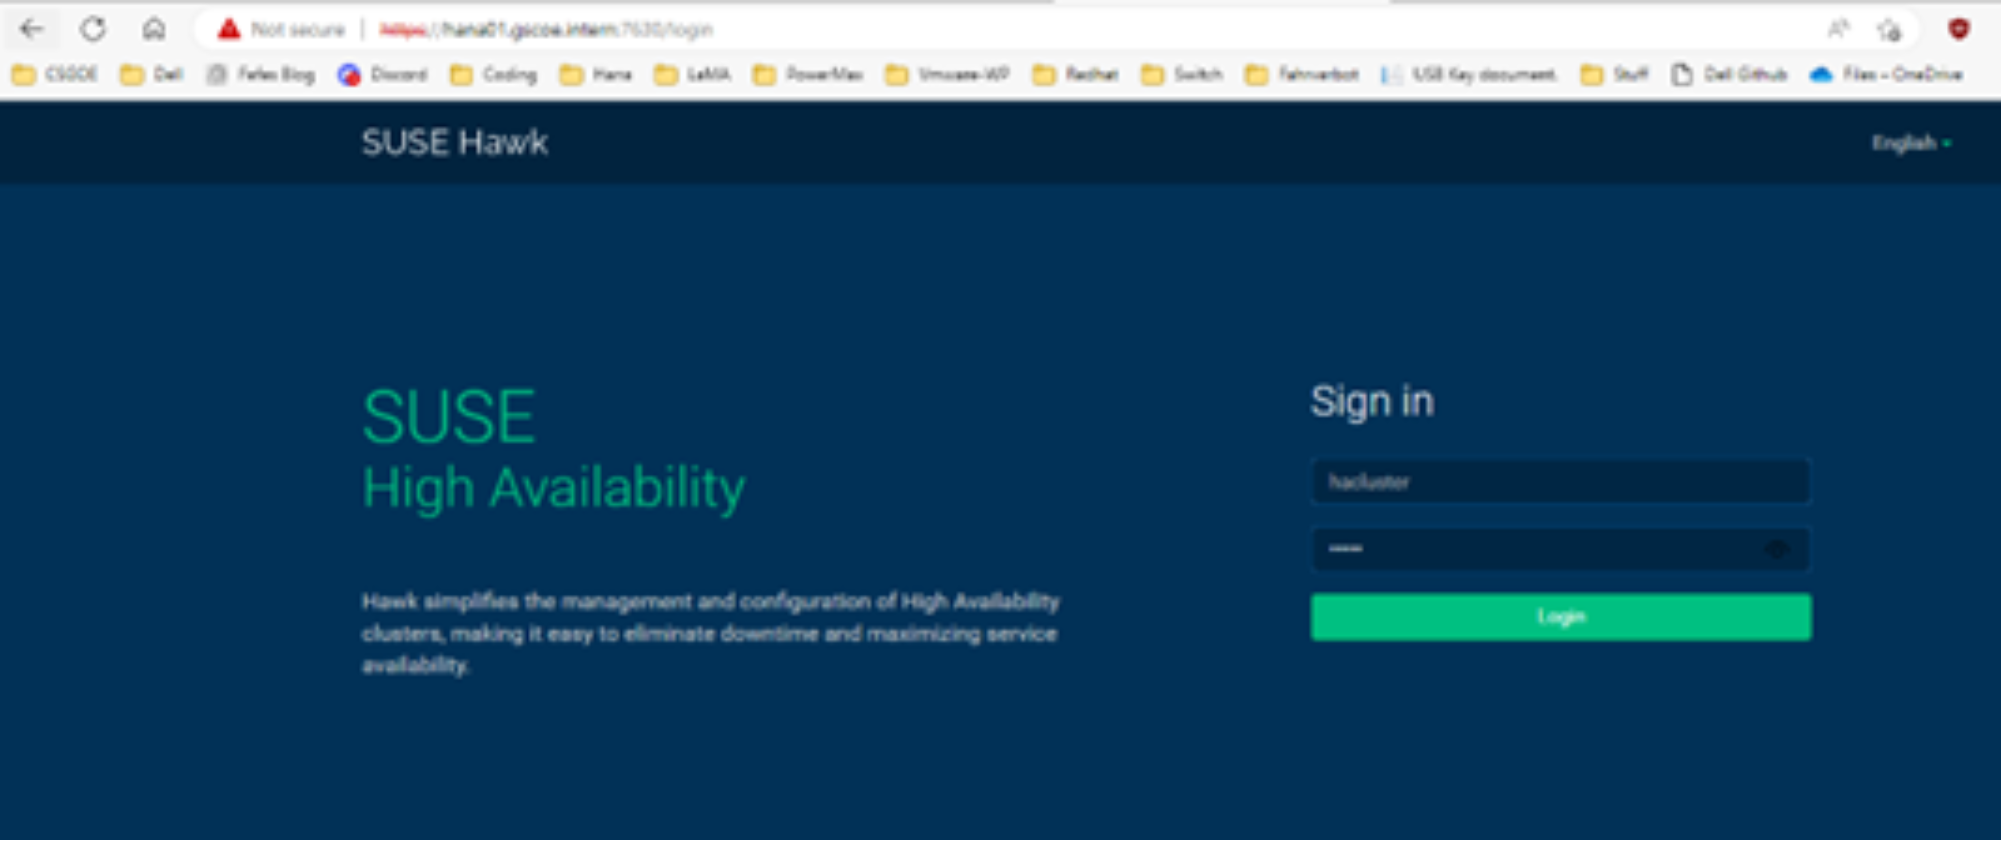
Figure 6. SUSE Hawk login page
- Log in to Hawk on the hana01 node using the following credentials:
- username: hacluster
- pw: linux
The View Cluster Details page is displayed, as shown in the following figure:
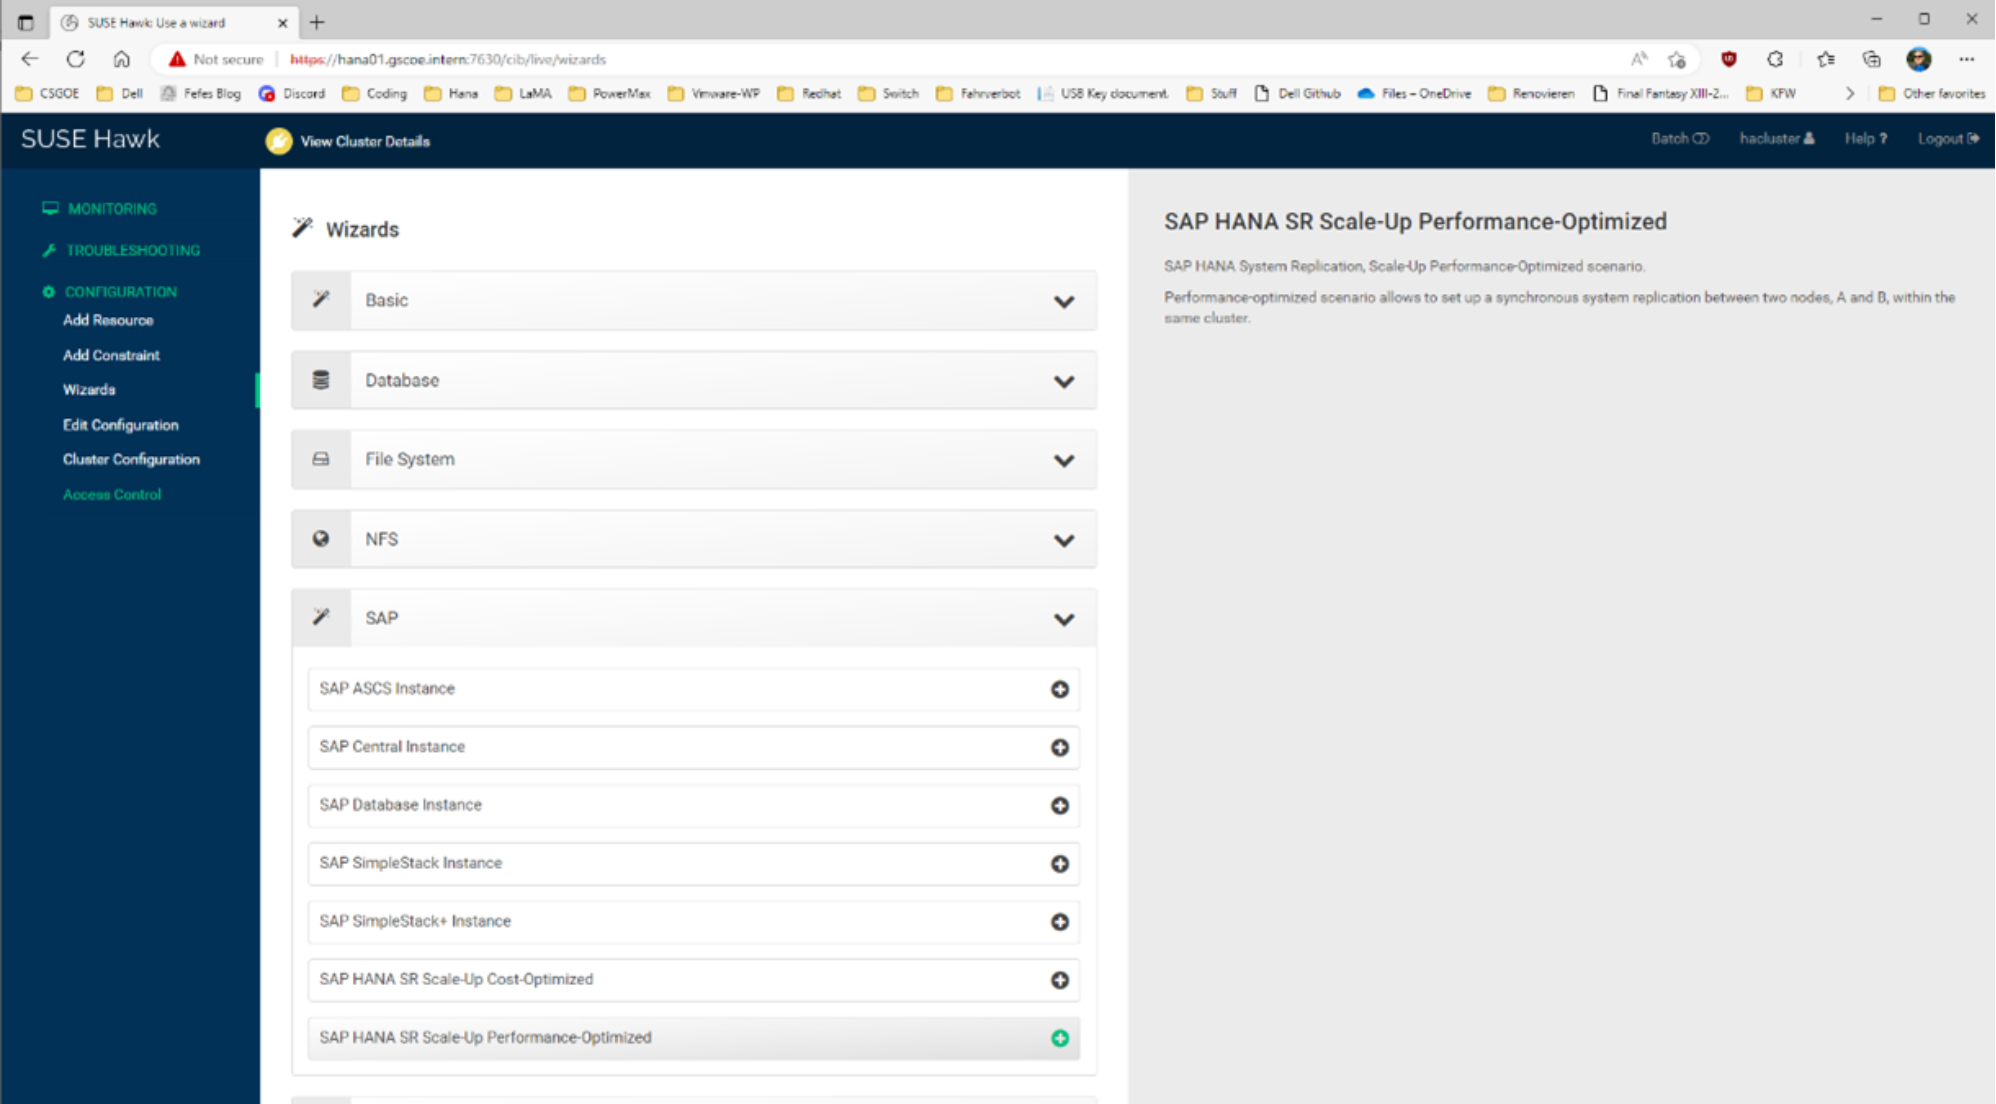
Figure 7. View Cluster Details
- Select SAP HANA SR-Scale-Up Performance-Optimized.
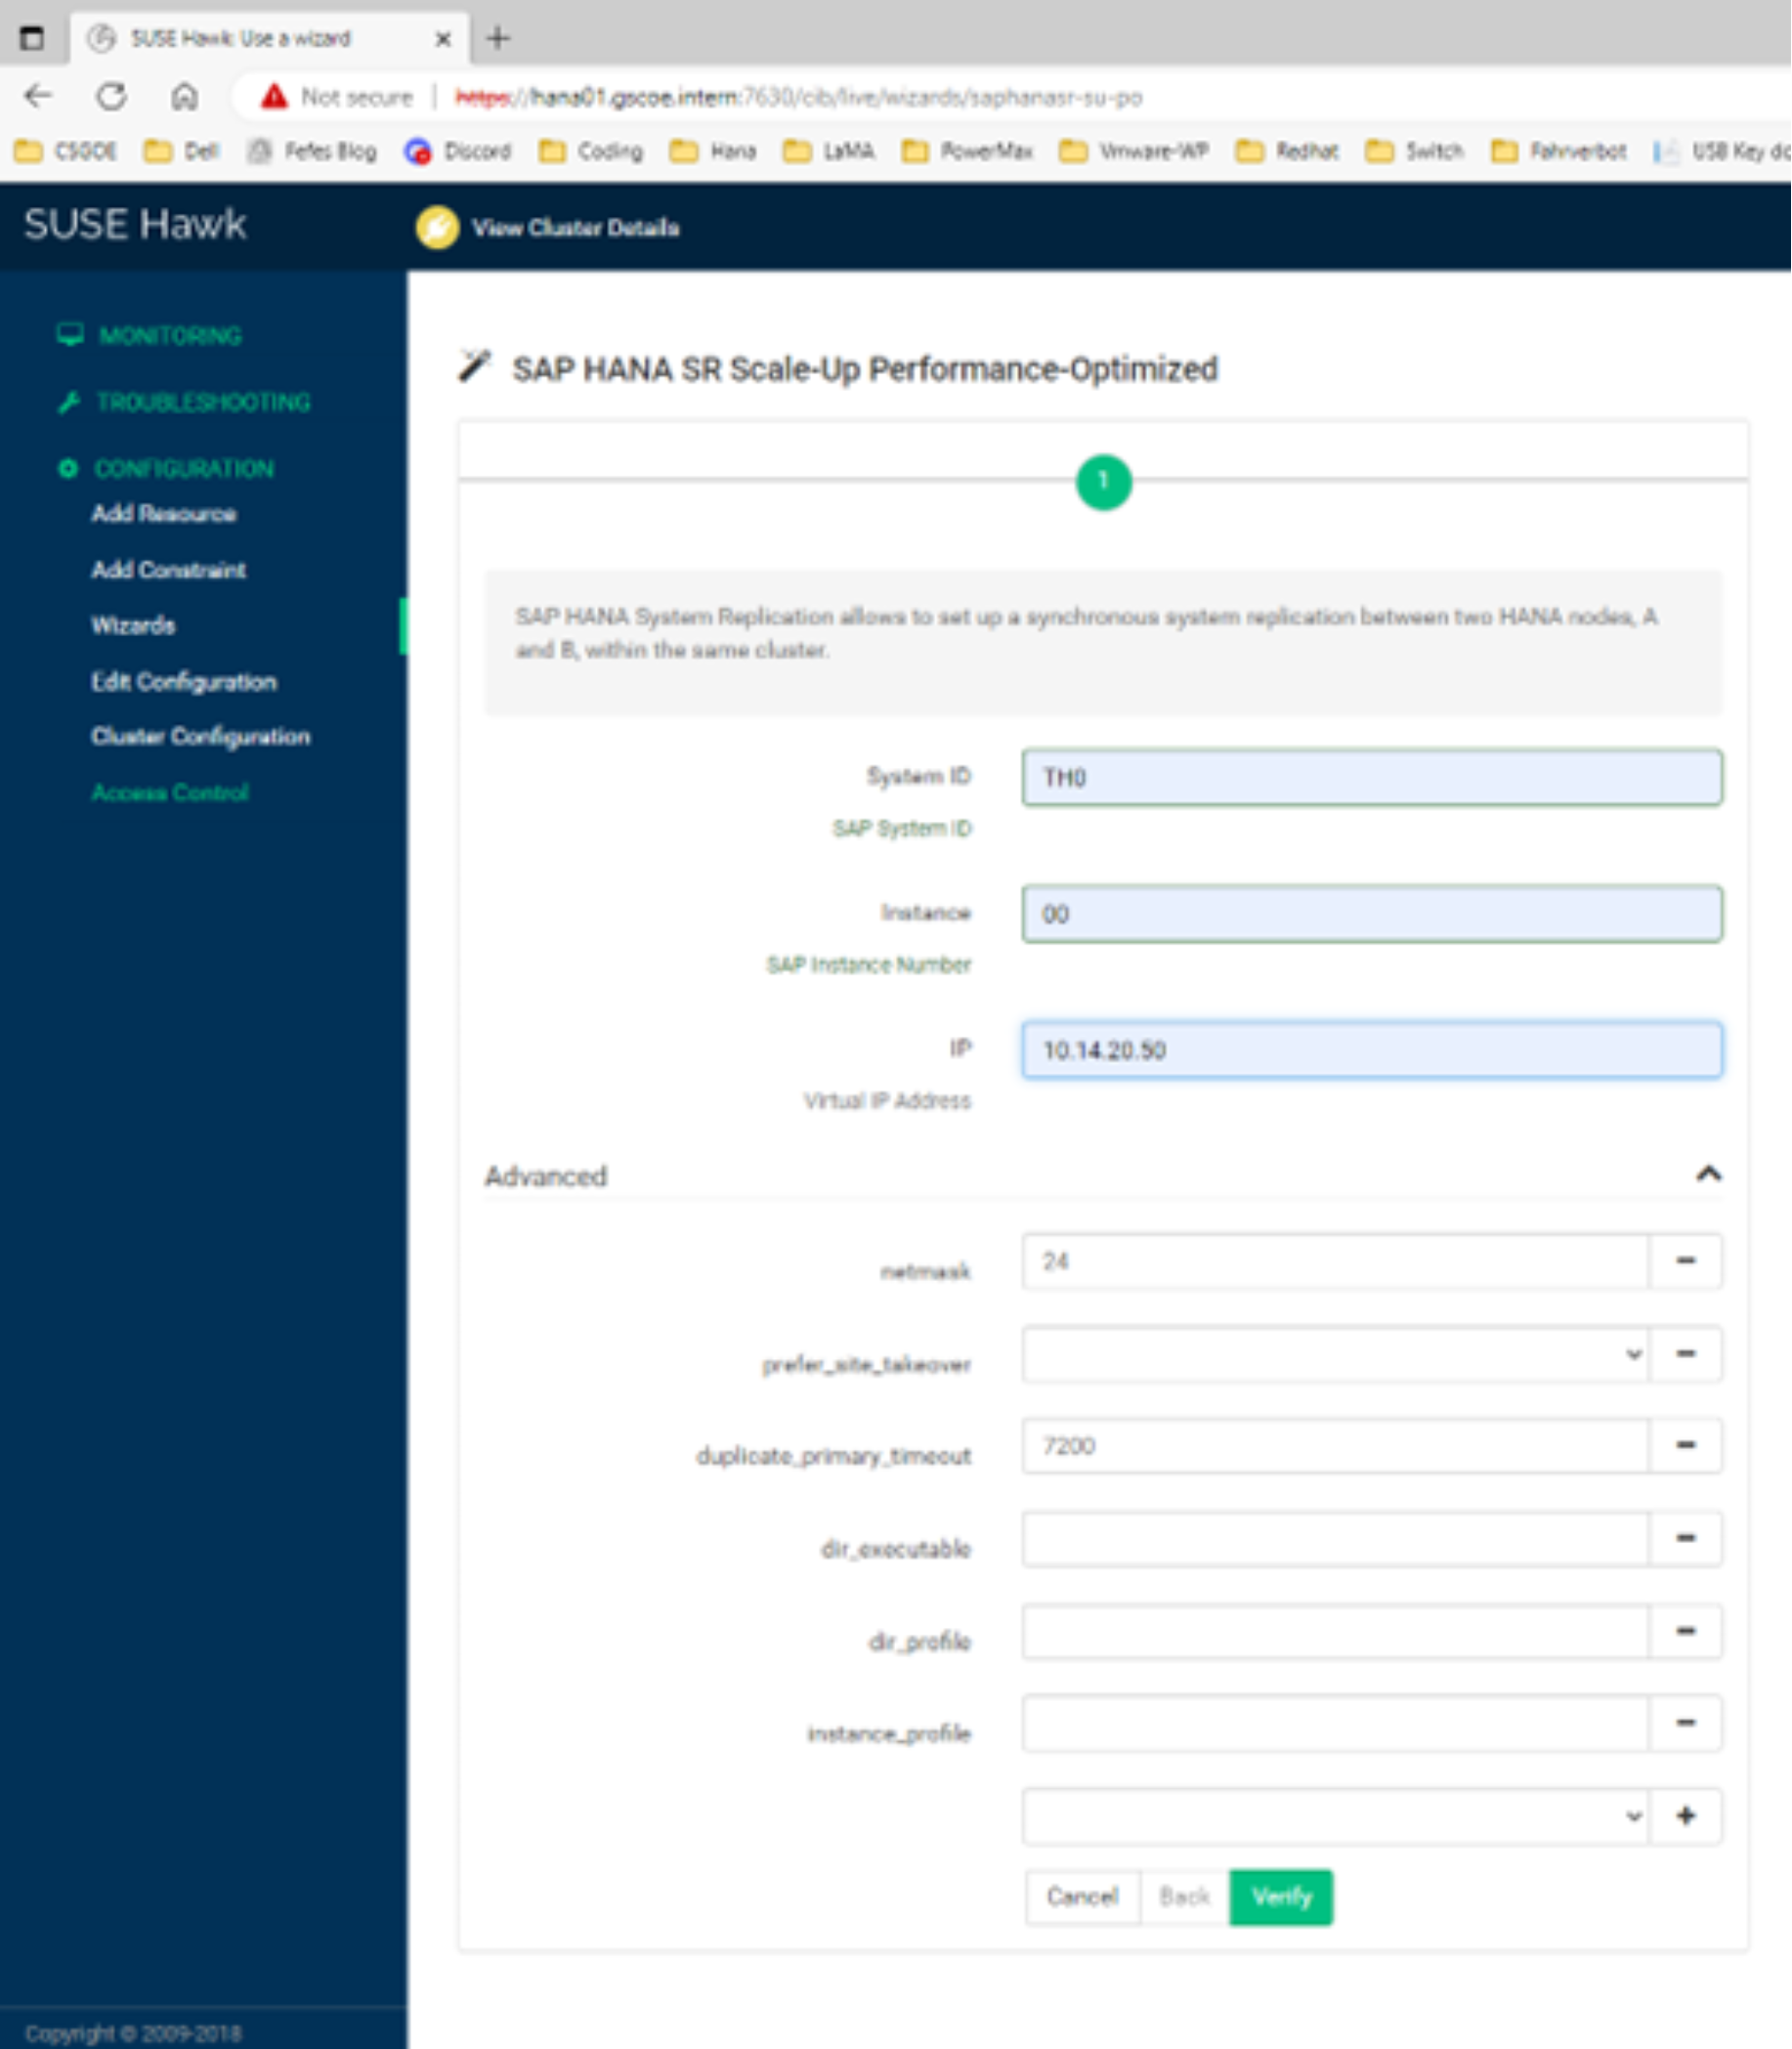
Figure 8. Entering the cluster details
- Enter the three values shown for System ID, Instance, and IP, and then click Verify.
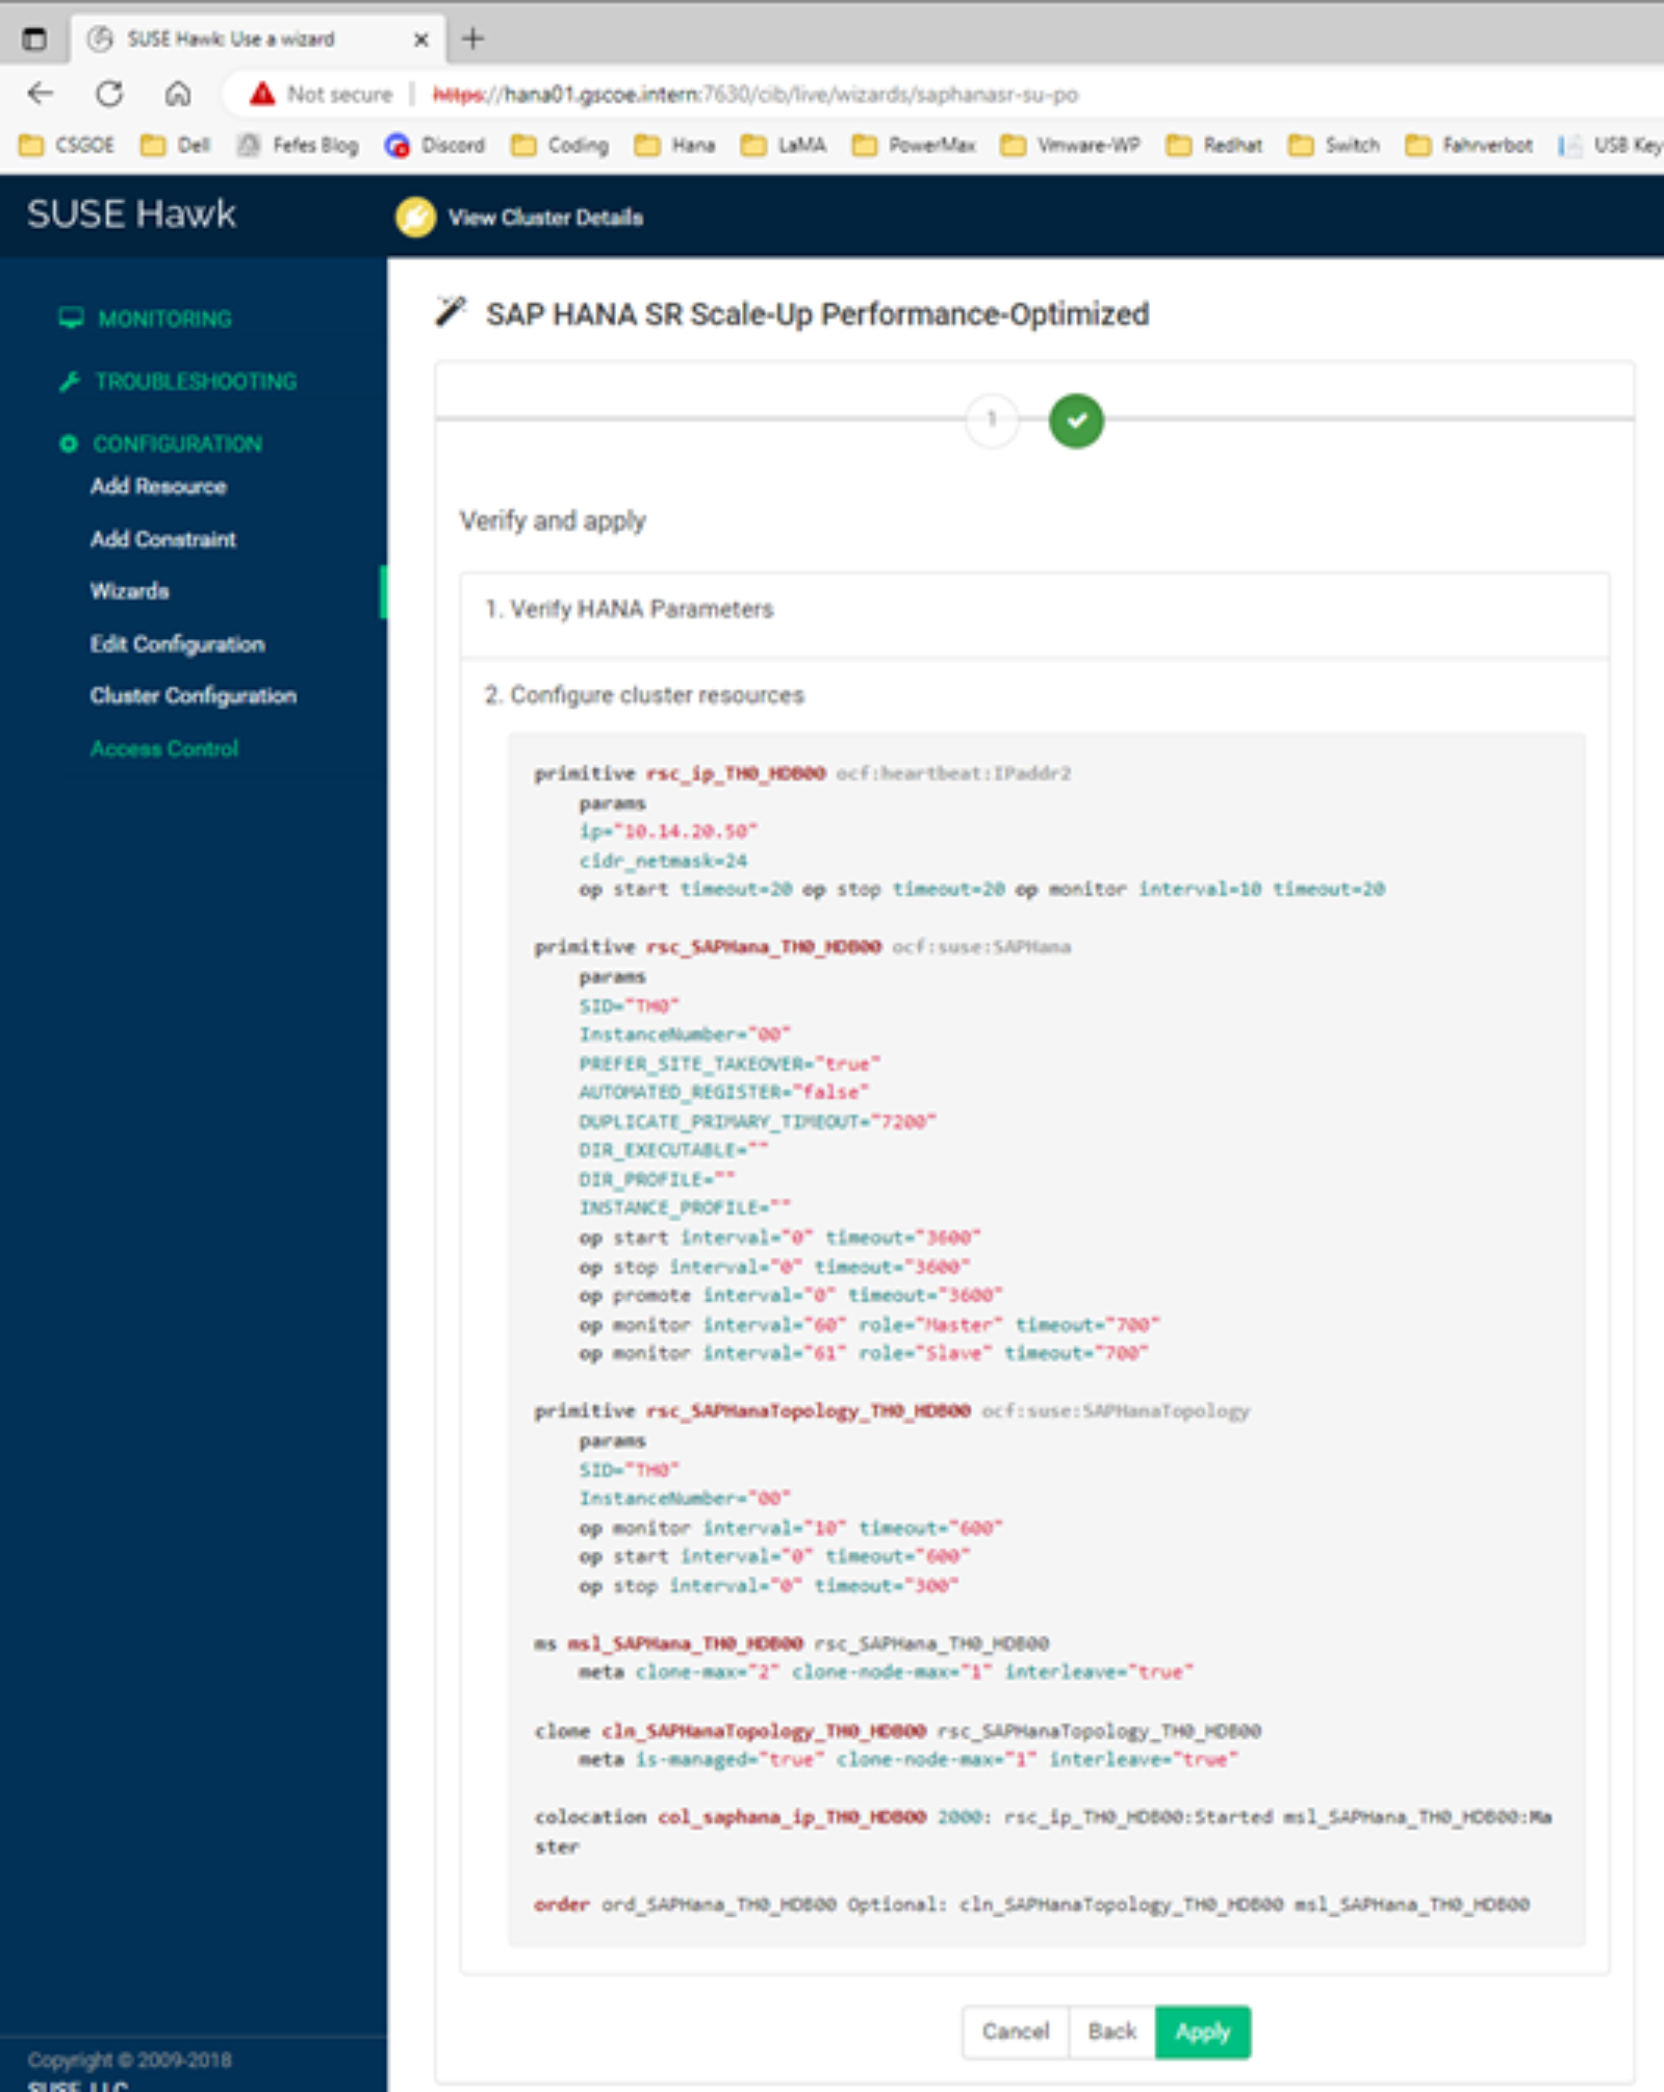
Figure 9. Verifying the cluster details