
Installing SAP
Installing SAP
-
Prerequisites
- Operating systems are already installed on the servers
- Hostnames and IP addresses are configured
For fault tolerance at the network level, Dell Technologies recommends using active-passive network bonding devices. For information about how to configure these devices, see the SUSE Administration Guide.
Install the SAP components in the following order:
- ASCS instance
- ERS instance
- Database instance and clustering
- Primary application server
- Additional application servers (at least one)
Preparing the file systems
Dell strongly recommends using two Fiber Channel fabrics and multipathing for the shared disks.
Share the disk for the ASCS and ERS instances and assign it to the cluster nodes nwacsc01 and nwacsc02. Dell SAP engineering created the file systems on the first server and mounted only the required disk by running:
nwacsc01# mkfs.xfs /dev/sdb
nwacsc01# mkfs.xfs /dev/sdc
nwacsc01# mkdir -p /usr/sap/TR1/{ASCS00,ERS10}
nwacsc01# mount /dev/sdb /usr/sap/TR1/ASCS00nwacsc02# mkdir -p /usr/sap/TR1/{ASCS00,ERS10}
nwacsc02# mount /dev/sdc /usr/sap/TR1/ERS10On all the servers, run:
# mkdir -p {/sapmnt,/sapinst,/usr/sap/TR1/SYS}
# mount <nfsServerIP>:/sapmnt /sapmnt
# mount <nfsServerIP>:/sapinst /sapinst
# mount <nfsServerIP>:/sapsys /usr/sap/TR1/SYSInstalling the ASCS instance on nwascs01
Manually add the cluster IP for the ASCS instance by running:
nwacsc01# ip addr add 10.14.20.19/24 dev bond0
nwacsc01# cd /sapinst/SWPM
nwacsc01# ./sapinst SAPINST_USE_HOSTNAME=nwascs-haThe Software Provisioning Manager (SWPM) option to use depends on the SAP NetWeaver version and architecture:
- ASCS instance
- ERS instance
- Database instance and clustering
- Primary application server
- Additional application servers (at least one)
Installing SAP NetWeaver 7.5
In the SWPM interface:- Select SAP HANA Database > Installation > Application Server ABAP > High-Availability System > ASCS Instance.
- Under SID id TR1:
- Use instance number 00.
- Deselect Using FQDN.
- For all passwords, use <yourSecurePwd>.
- During the parameter review, confirm that the virtual name nwascs-ha is used.
- Ensure that you use the user IDs that are specified in Table 11.
- If you receive a permissions error, change the ownership of the ASCS directory by running:
chown -R tr1adm:sapsys /usr/sap/TR1/ASCS00
Installing ERS on nwascs02
Manually add the cluster IP for the ASCS instance by running:
nwacsc02# ip addr add 10.14.20.20/24 dev bond0
nwacsc02# cd /sapinst/SWPM
nwacsc02# ./sapinst SAPINST_USE_HOSTNAME=nwers-haSWPM product installation
To install SAP S/4HANA Server 1809:
- In the SWPM interface, select SAP HANA Database > Installation > Application Server ABAP > High-Availability System > ERS Instance.
- Use instance number 10.
- Deselect using FQDN.
- If you receive a permissions error during the installation, change the ownership of the ERS directory by running:
chown -R tr1adm:sapsys /usr/sap/TR1/ERS10
Post installation tasks for ASCS and ERS
Stopping the ASCS and ERS Instances
On nwascs01, run:
# su - tr1adm
# sapcontrol -nr 00 -function Stop
# sapcontrol -nr 00 -function StopService
On nwascs02, run:
# su - tr1adm
# sapcontrol -nr 10 -function Stop
# sapcontrol -nr 10 -function StopService
Integrating the SUSE cluster framework connector
On hosts nwascs01 and nwascs02, run:
# zypper in sap-suse-cluster-connector
Add the following lines to /usr/sap/TR1/SYS/profile/TR1_ASCS00_trnwacs-ha and /usr/sap/TR1/SYS/profile/TR1_ERS10_trners-ha:
service/halib = $(DIR_CT_RUN)/saphascriptco.so
service/halib_cluster_connector = /usr/bin/sap_suse_cluster_connectorEditing SAP profiles
Perform this step on any server that has /sapmnt mounted on it:
# sed -i -e 's/Restart_Program_01/Start_Program_01/' /sapmnt/TR1/profile/TR1_ASCS00_nwascs-ha
# sed -i -e 's/Restart_Program_00/Start_Program_00/' /sapmnt/TR1/profile/TR1_ERS10_nwers-ha
Starting ASCS and ERS
On nwascs01, run:
# su -tr1adm
# sapcontrol -nr 00 -function StartService TR1
# sapcontrol -nr 00 -function Start
On nwascs02, run:
# su - tr1adm
# sapcontrol -nr 10 -function StartService TR1
# sapcontrol -nr 10 -function Start
Installing SAP HANA on hana01 and hana02
Prerequisites:
- The three required file systems for the SAP HANA database (/hana/data, /hana/log, and /hana/shared) are already configured on your system.
- Your system is fast enough to support the desired workload.
Start by installing the empty database on both hosts so that you can use the latest SAP HANA patch release.
Note: While SWPM assumes that you are using the installation media, installing the latest SAP HANA patch packages is recommended in preference to installing the base version first and updating to the latest patch release afterwards.
- To add the SAP HANA cluster IP to the hana01 server, run:
hana01# ip addr add 10.14.20.19/24 dev bond0
- On both servers (hana01 and hana02), run:
# cd /sapinst/SAP_HANA_DATABASE/
# ./hdblcm –ignore=check_signature_file
Note:
The ignore parameter is only needed if you install an SAP HANA database patch release and did not create a signature with SAPcar during the extraction.
Enter the values that are specified in Table 7 and Table 8.
Ensure that you enter the correct value for the sapsys group. Do not use the SAP HANA default value of 79.Importing the database
On hana01, run:
hana01 # cd /sapinst/SWPM
./sapinst SAPINST_USE_HOSTNAME=hana-ha
Installing the primary application server on nwwrk01
Run:
# cd /sapinst/SWPM/
# ./sapinst SAPINST_USE_HOSTNAME=nwwrk01
Then, in the SWPM interface:
- Select Installing SAP NetWeaver 7.5 > SAP HANA Database > Installation > Application Server ABAP > High-Availability System > Primary Application Server Instance (PAS).
- Apply the following settings:
- Instance number 21.
- Deselect Using FQDN.
- The other required parameters for your environment (such as SLD).
Installing the additional application server on nwwrk02
Run:
# cd /sapinst/SWPM/
# ./sapinst SAPINST_USE_HOSTNAME=nwwrk02
In the SWPM interface:
- Select Installing SAP NetWeaver 7.5 > SAP HANA Database > Installation > Application Server ABAP > High-Availability System > Primary Application Server Instance (PAS).
- Apply the following settings:
- Select instance number 22.
- Deselect Using FQDN.
Cluster configuration
SAP HANA cluster
Before you configure the SAP HANA replication, set up the hdbuser store for a backup user. This design guide uses “backup” as the username.
On both hosts, run:
# su – th0adm
# hdbuserstore -i add backup localhost:30013@SYSTEMDB systemNote: For safety reasons, create a backup user with the appropriate permissions on your databases. You can also use the SYSTEM permissions.
To cluster the SAP HANA database:
- Open YaST and select High Availability > HA Setup for SAP Products > Scale Up: Performance-optimized.
The Communication Layer page is displayed:
- Select two rings and assign the networks, as shown in the following figure:
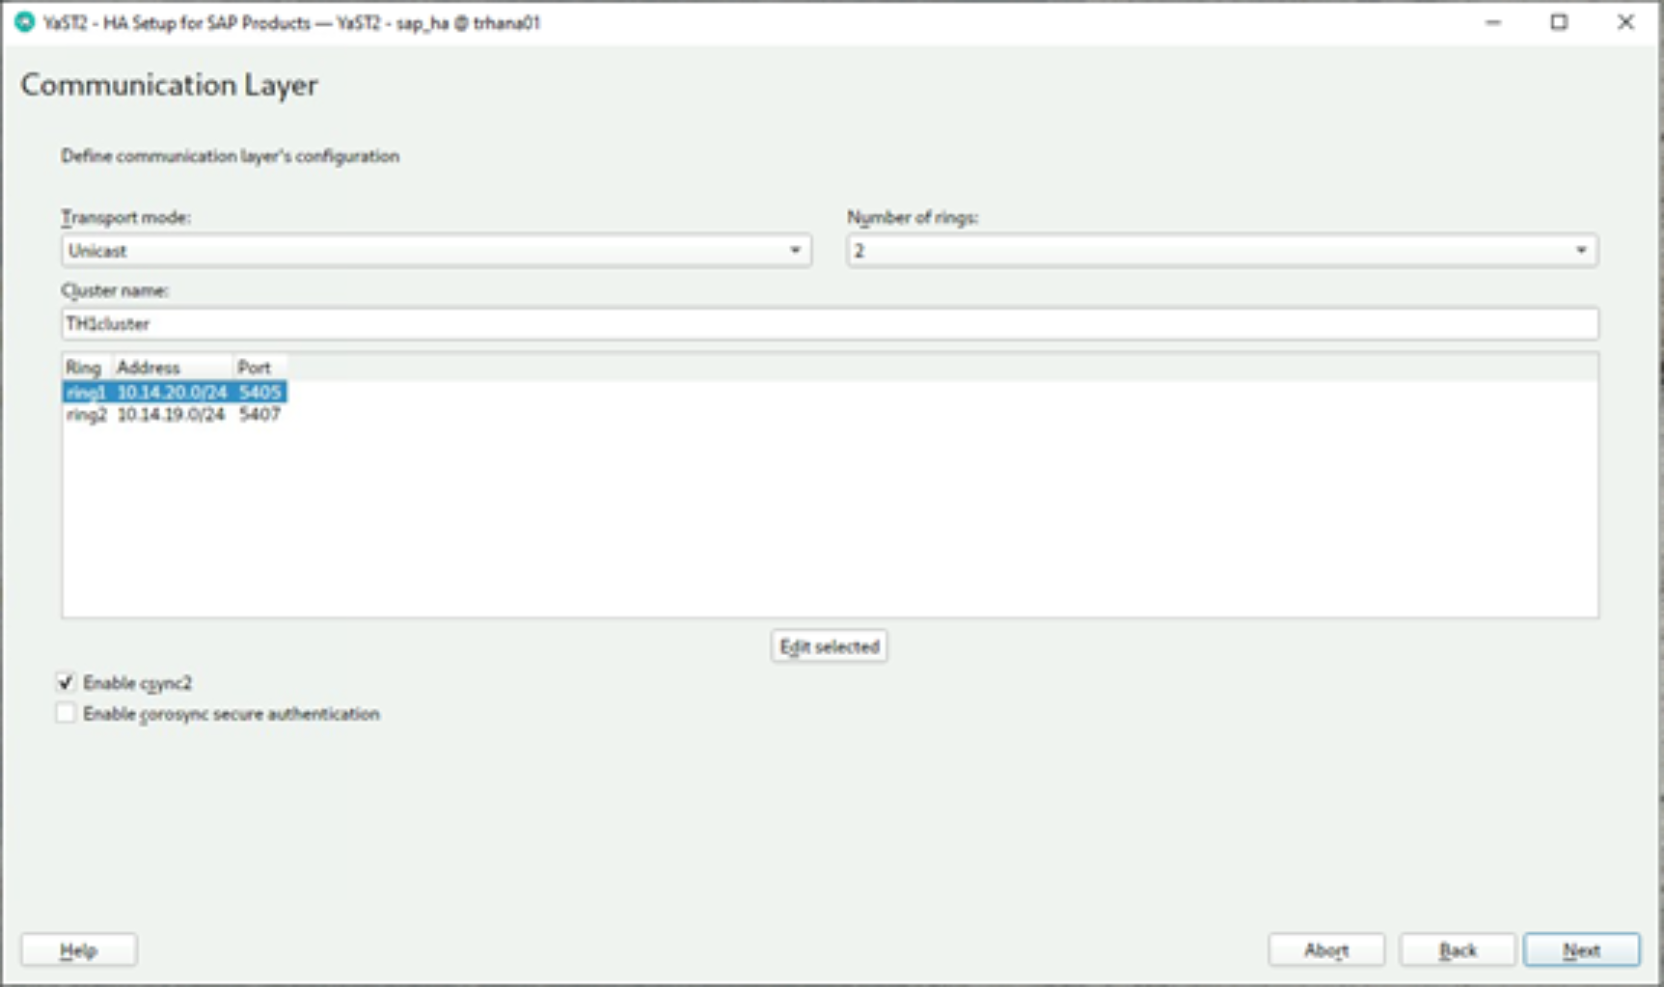
Figure 3. Assigning the networks
- Enter the hostnames and IP addresses of the hosts. Do not assign new IPs.
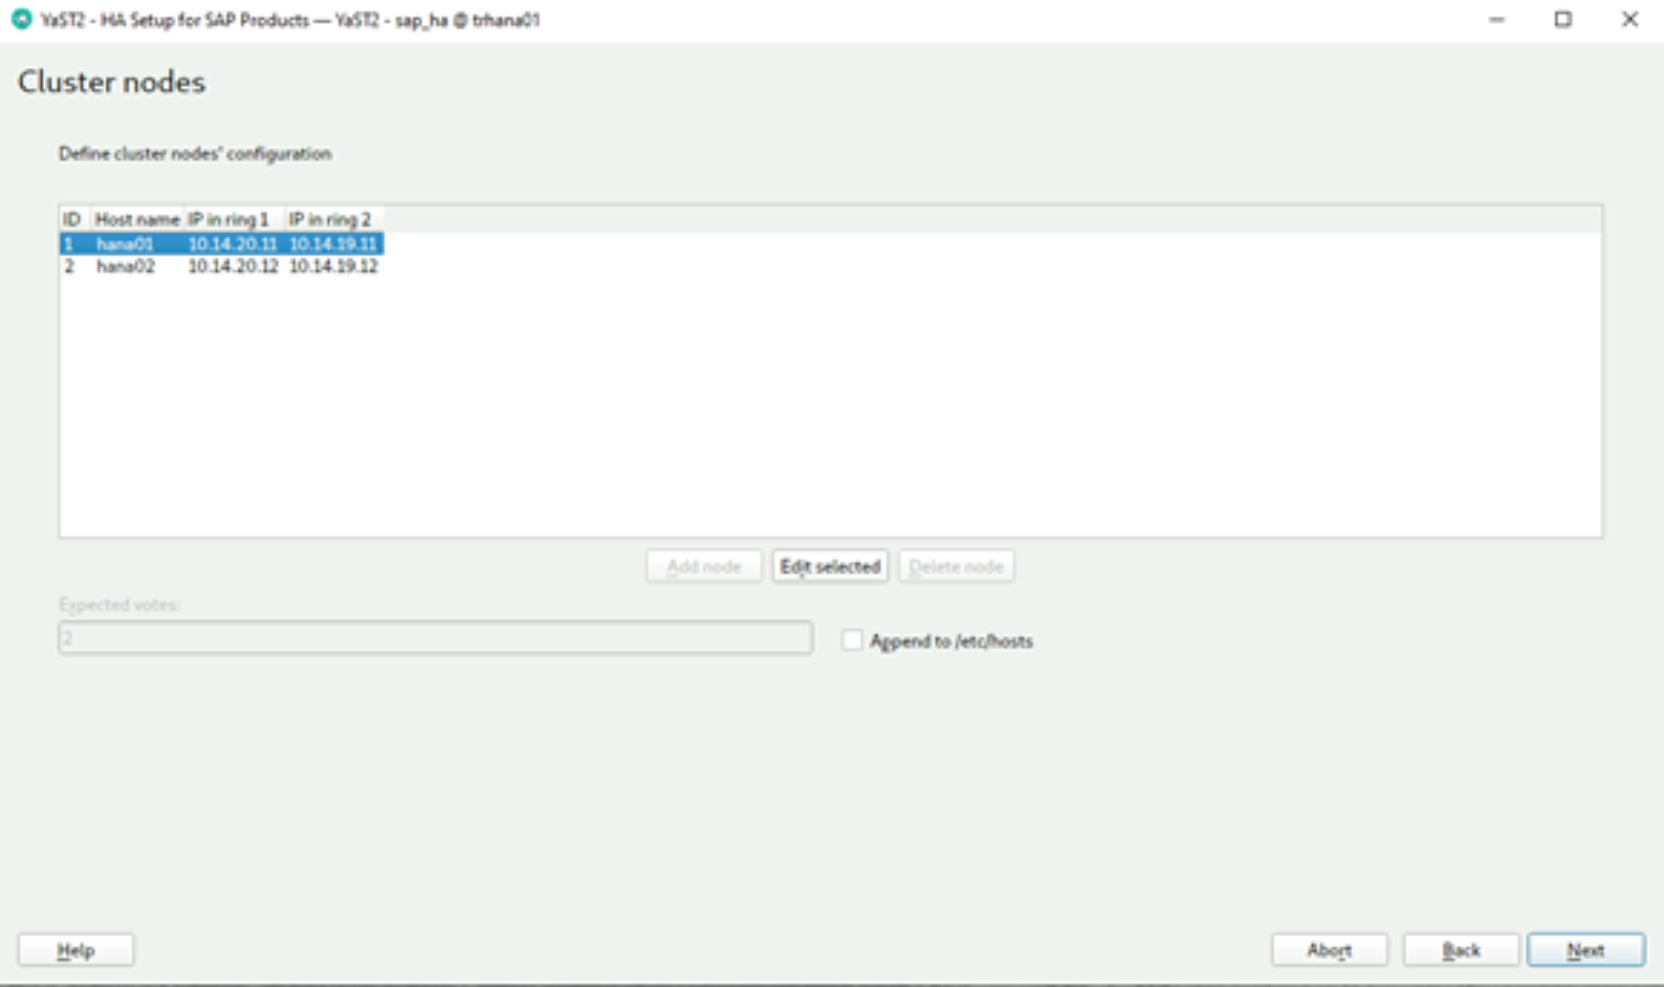
Figure 4. Entering IP addresses
- Configure the time server on your servers.
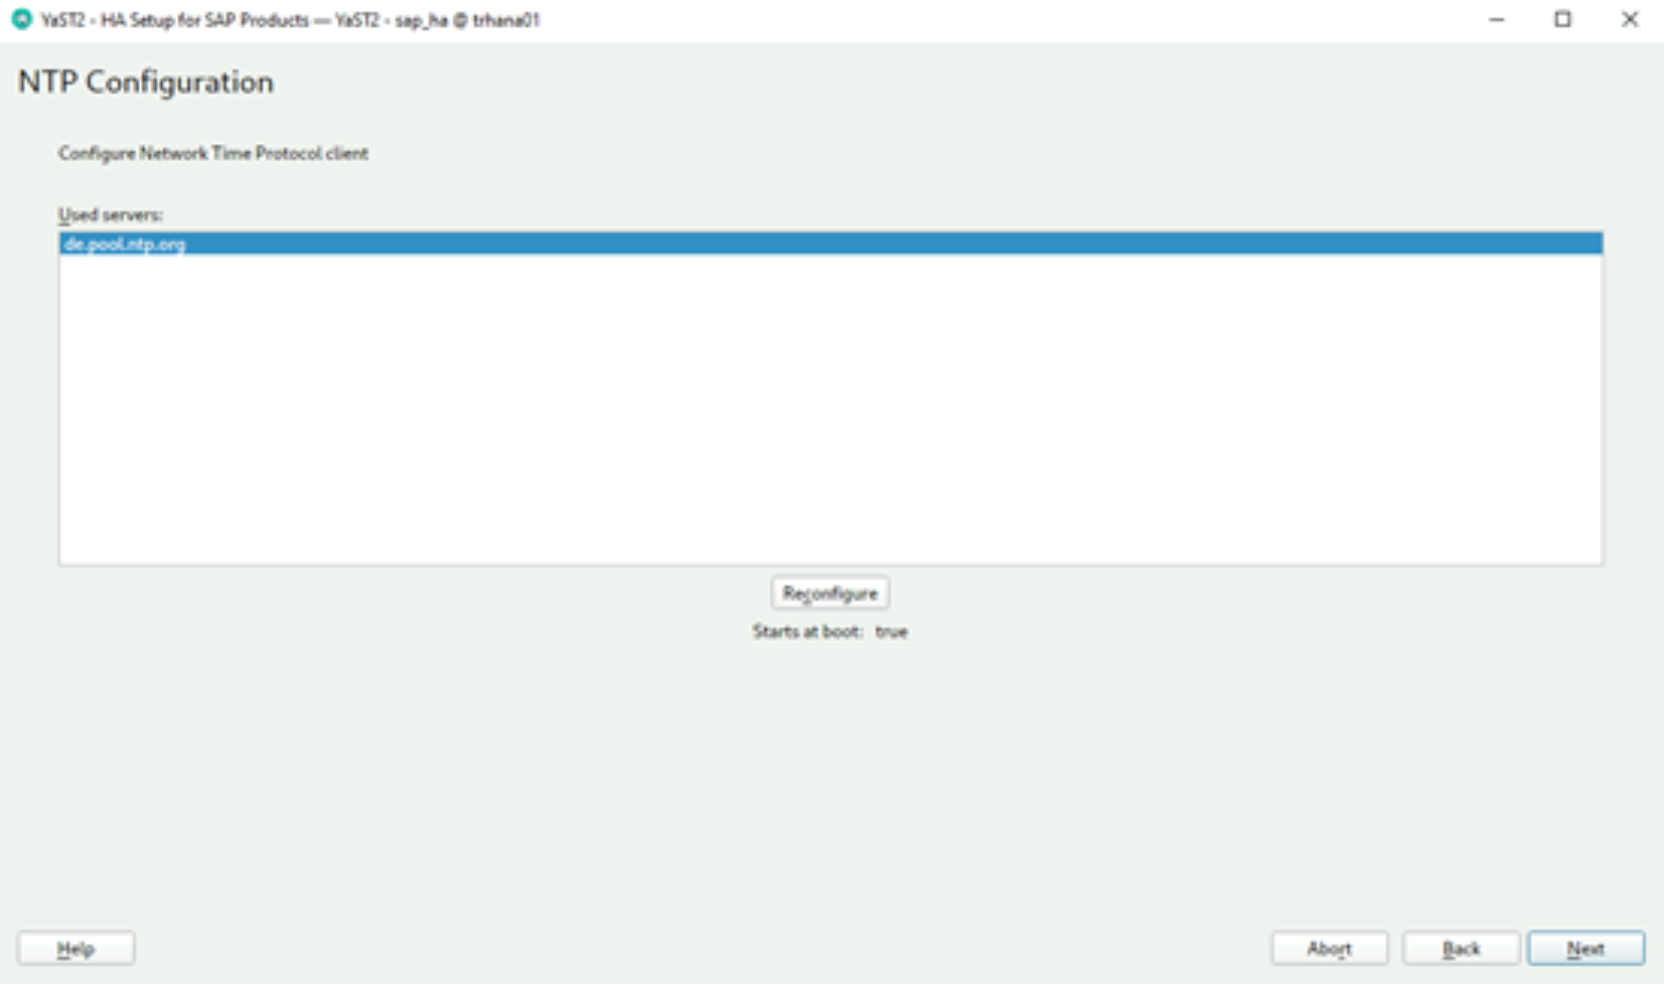
Figure 5. Configuring NTP
Note: Ensure that the NTP service starts on boot. SUSE recommends adding at least three NTP servers as sources. A minimum of three time sources are required to provide a majority decision in case drifts happen. If one source displays the wrong time, it will be consistent on both cluster nodes, which will not be a problem for normal operation.
- Add the two small 7 MB shared disks as SBD devices:
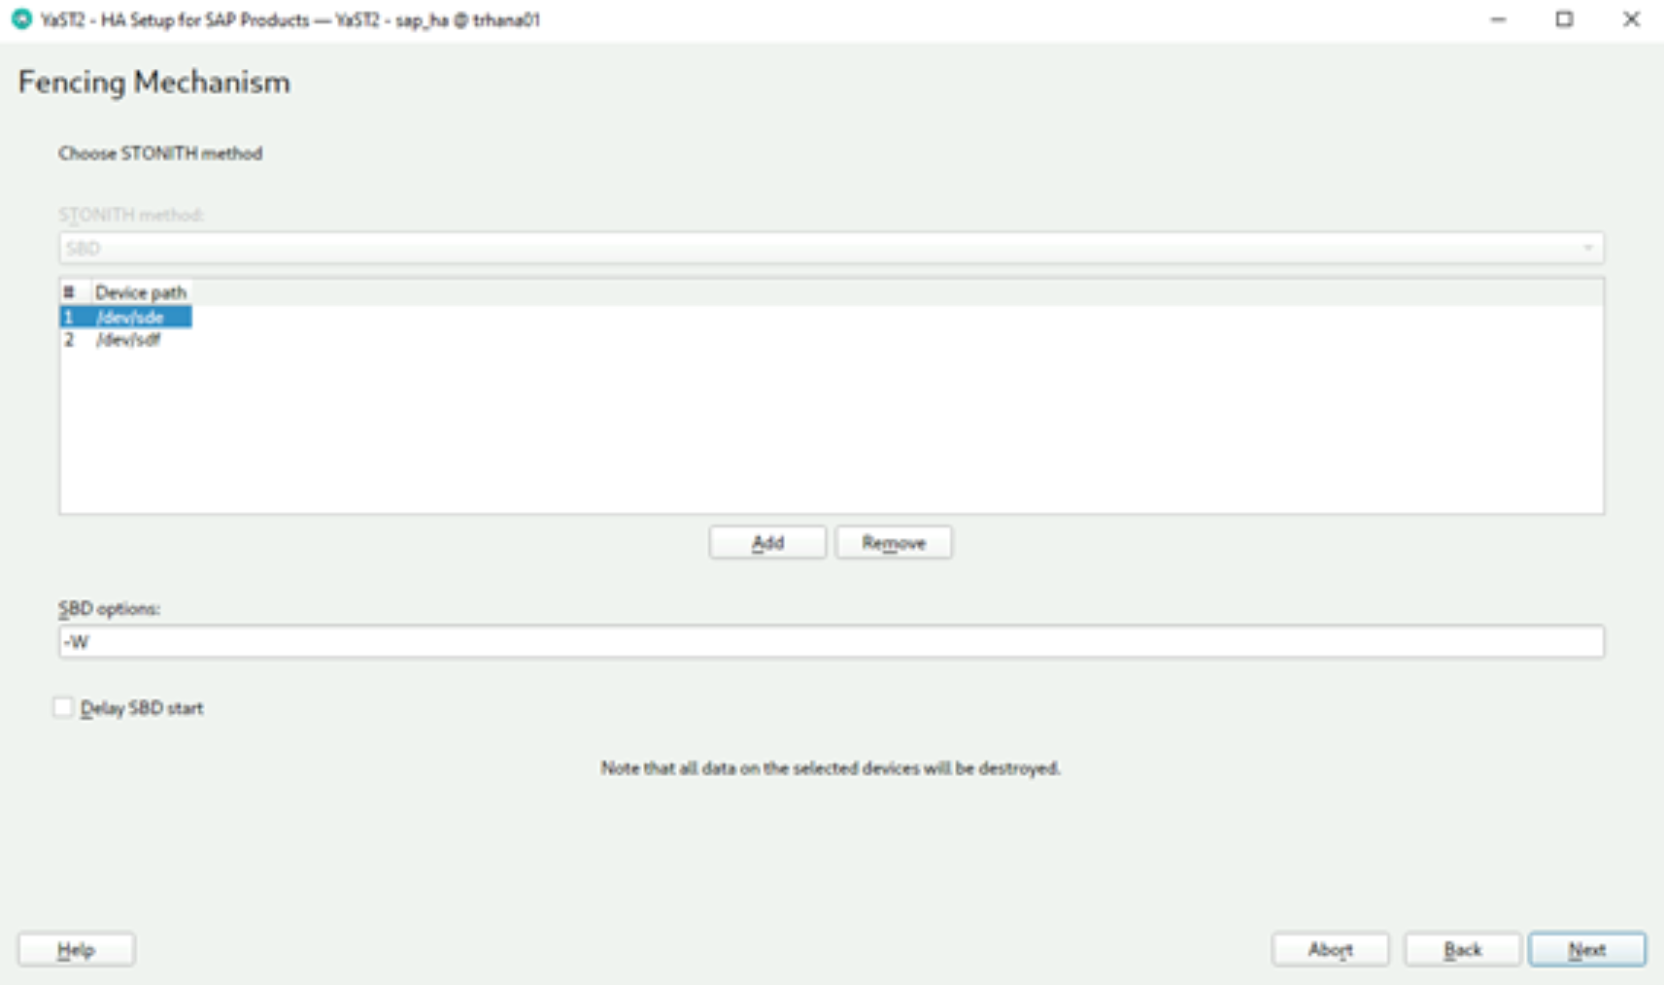
Figure 6. Creating the fencing mechanism
Note: The number of SBD disks to add depends on the number of available storage systems. For more information, see the SUSE document Storage Protection and SBD | Administration Guide | SUSE Linux Enterprise High Availability Extension 15 SP2.
- As a watchdog device, add “softdog”:
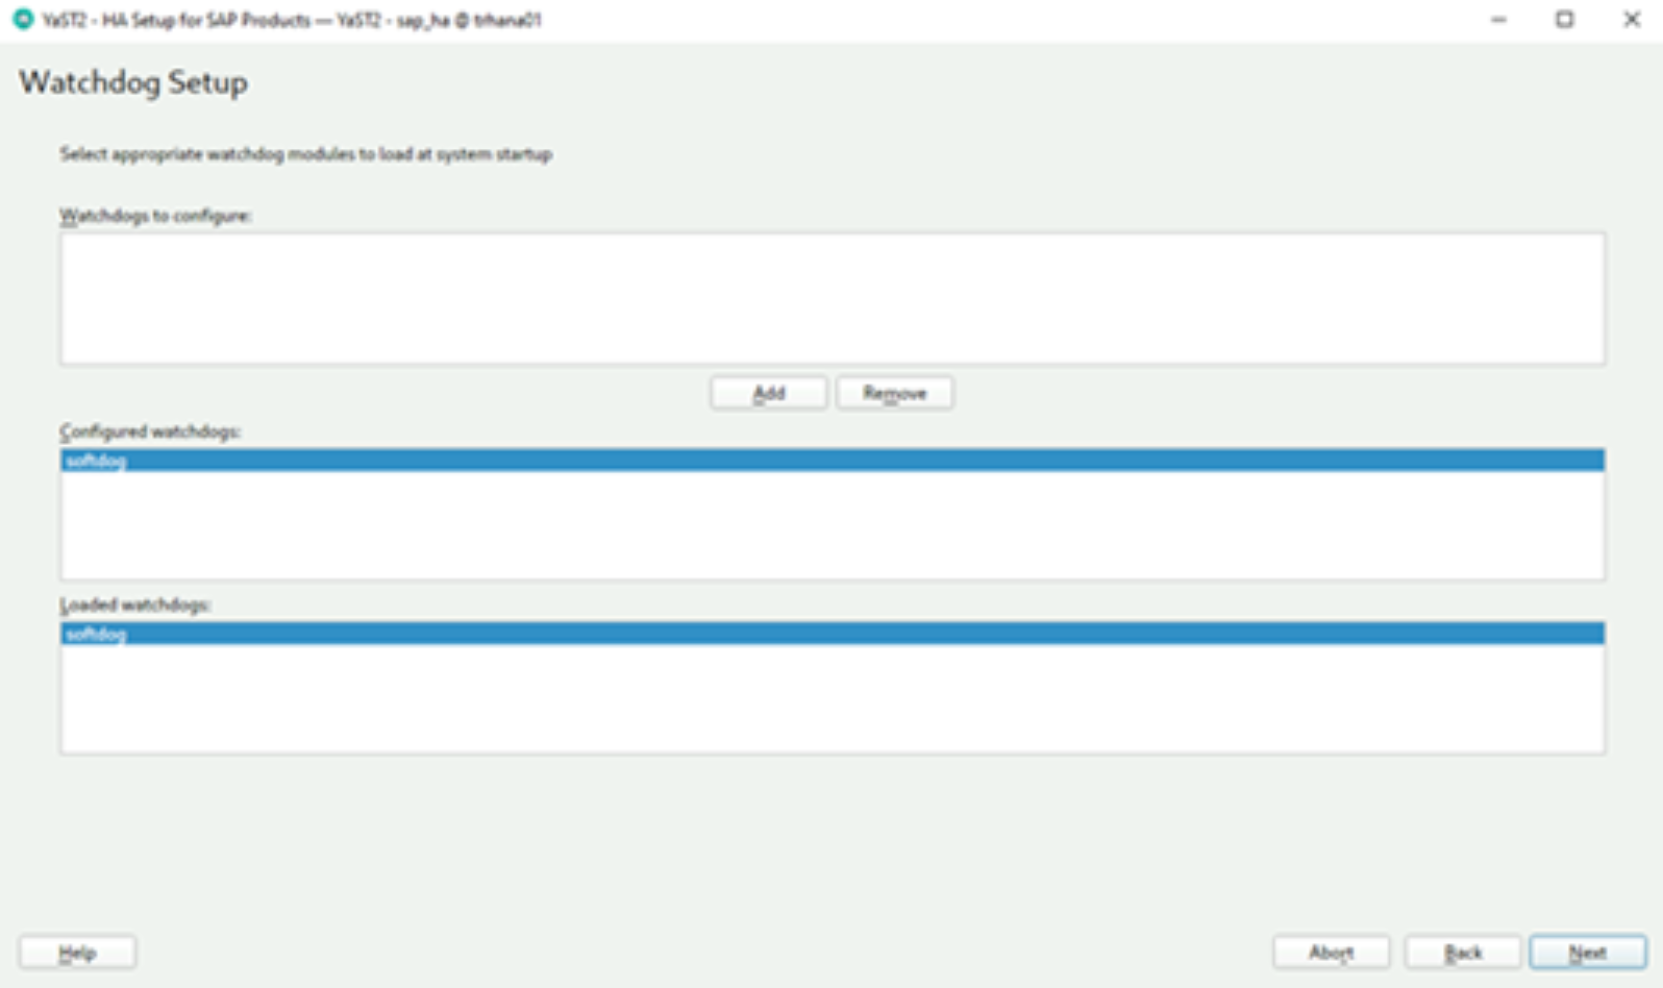
Figure 7. Setting the watchdog function
- Enter the settings that are required for your environment:
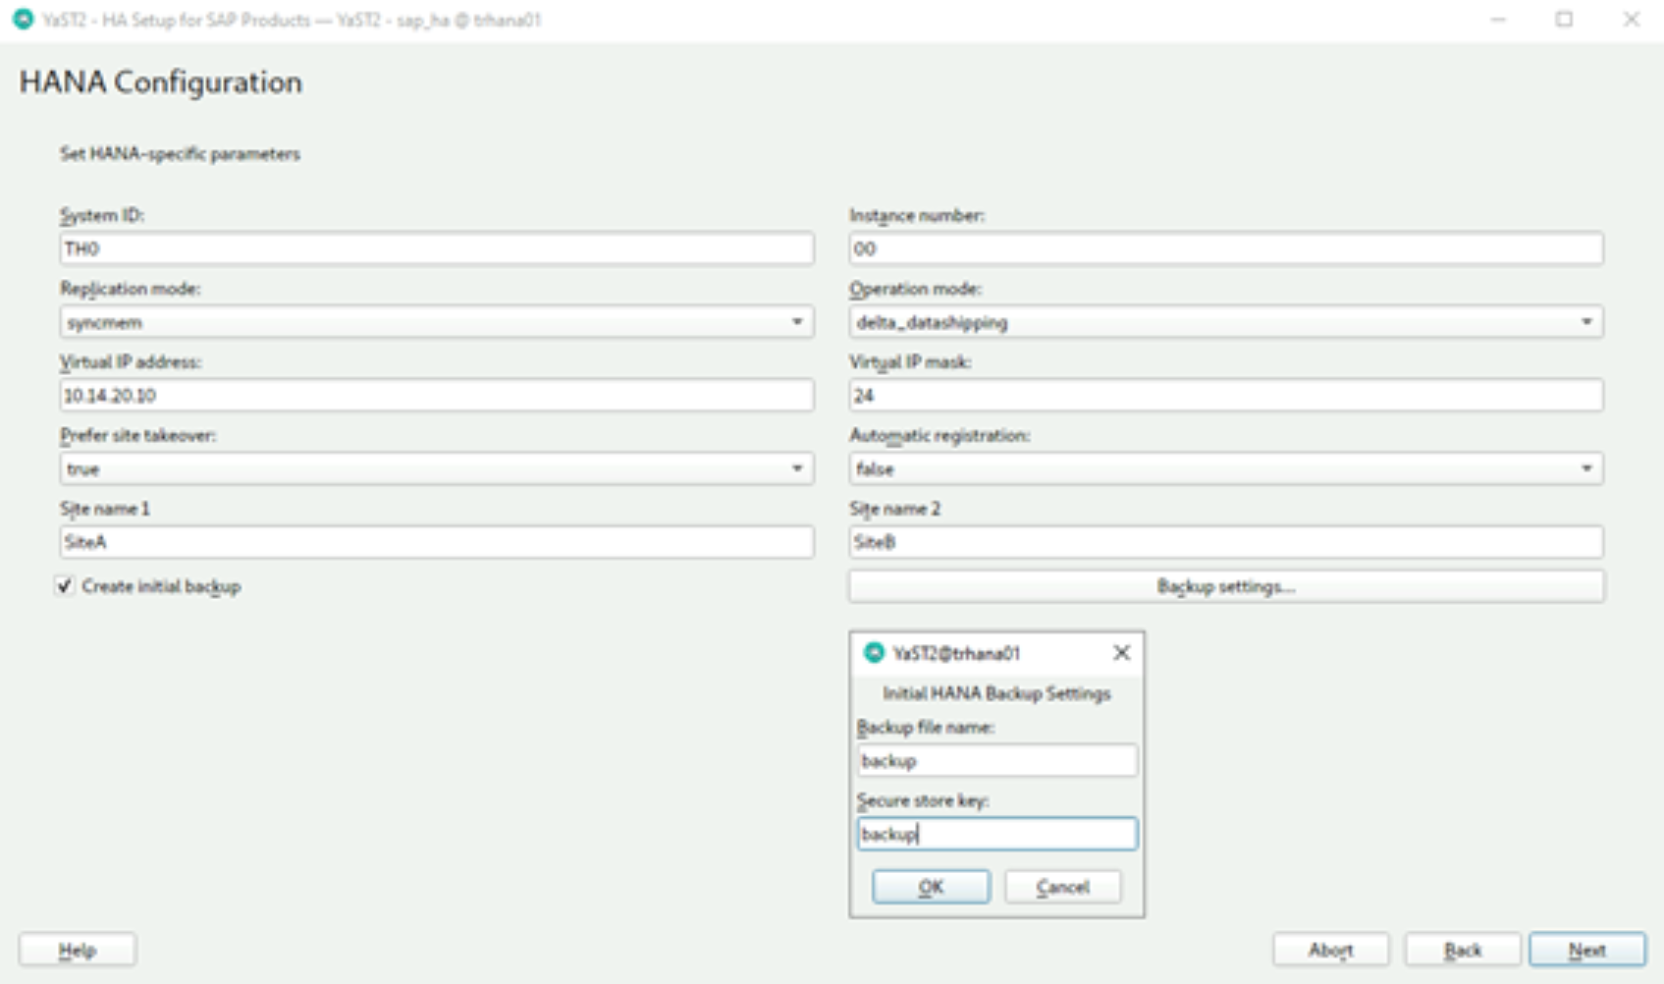
Figure 8. Configuring SAP HANA
- Enter your SID and cluster IP, and then select the Create initial backup flag.
- In the Backup Settings section, set your secure store username (this design guide uses “backup”). Most configurations accept the “syncmem” replication mode.
- Review the parameters and click Install to install the cluster.
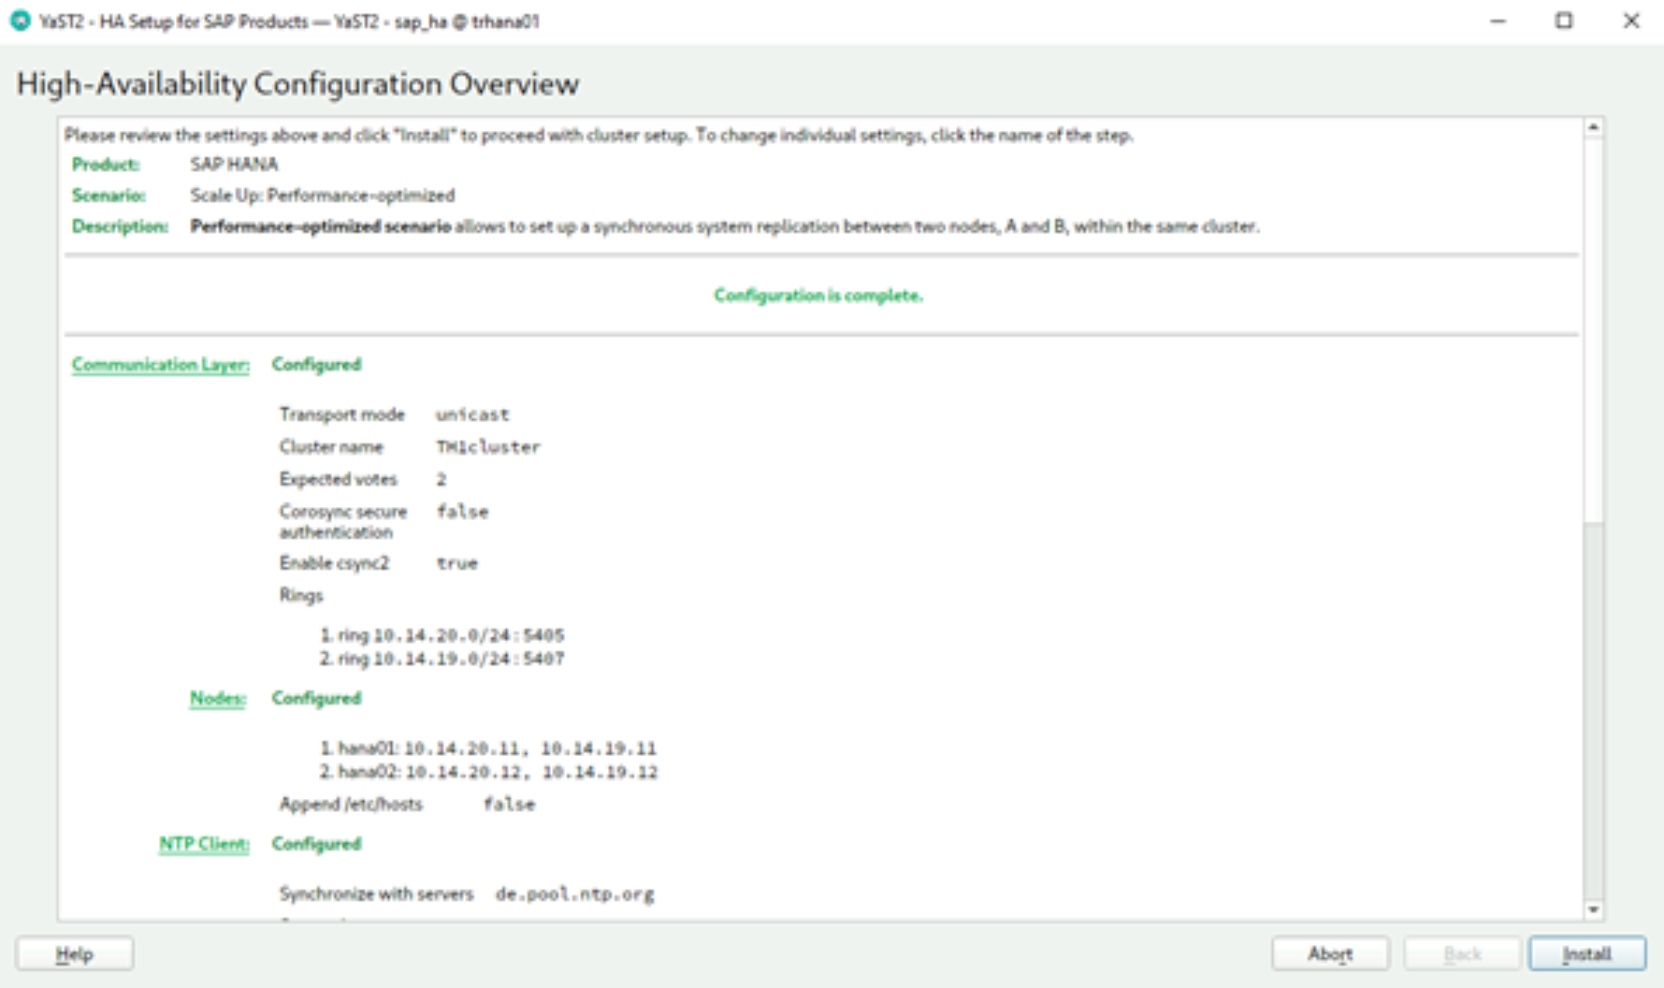
Figure 9. Installing the cluster
Verifying the installation
To verify that the cluster is installed on hana01, run:
trhana01:~ # crm_mon -r1
The following output is displayed:
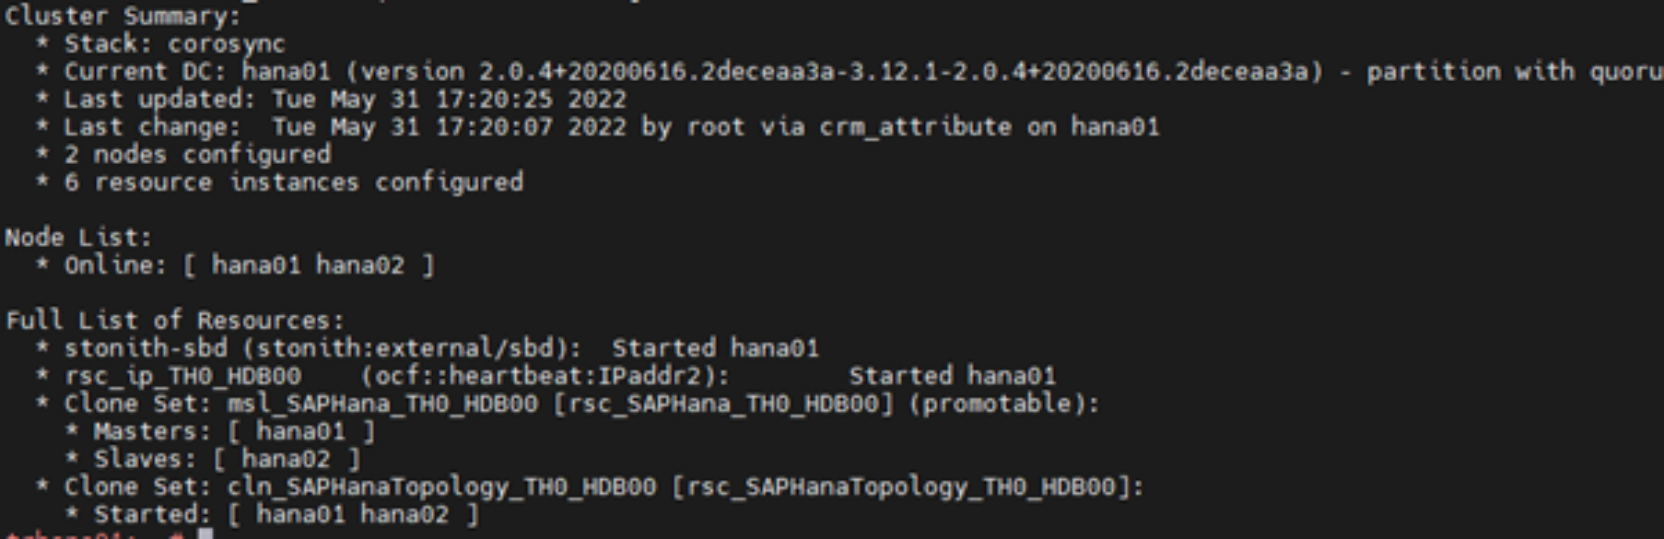
Figure 10. Cluster installation status check
You can also check the status of the replication by running:
trhana01:# su – th0adm
th0adm@hana01:# cdpy
th0adm@hana01:# python systemReplicationStatus.py

Figure 11. Replication status check
Configuring an ASCS/ERS cluster
The high-level steps for configuring a cluster are:
- Create an empty cluster between the nodes nwascs01 and nwascs02
- Define the cluster resources
Prerequisites
On nwascs01 and nwascs02:- Set up an NTP client and start the client.
- Install the ha_sles pattern by running:
# zypper in -t pattern ha_sles
Configure nwascs01 as the first cluster node
Use YaST or the command line tool to configure the basic cluster. This example uses the command line.
Run:
# modprobe softdog
# echo "softdog" > /etc/modules-load.d/softdog.conf
# systemctl enable sbd
# ha-cluster-init -y -i eth0 -i eth1 -u -s /dev/sdd -s /dev/sdeJoin the cluster with nwascs02
- Run:
# modprobe softdog
# echo "softdog" > /etc/modules-load.d/softdog.conf
# systemctl enable sbd
# rsync 10.14.20.21:/etc/sysconfig/sbd /etc/sysconfig- Use YaST or the command-line tool to join the cluster:
# ha-cluster-join -c 10.14.20.21 -i eth0 -i eth1
- To verify that the cluster has been configured correctly, run:
# crm_mon -r1
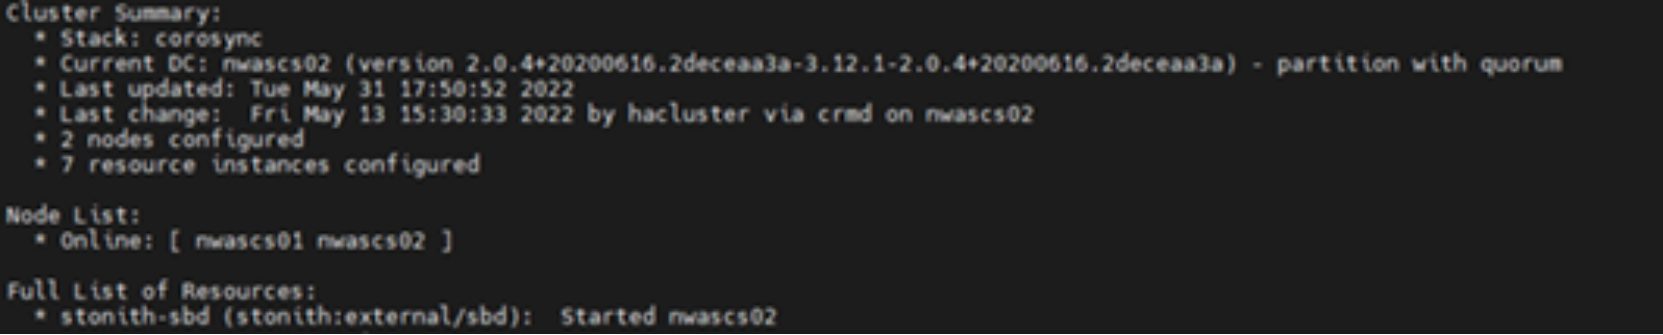
Figure 12. Cluster join command output
Define the cluster resources
After the configuration is complete on the server nwascs01, set the cluster to maintenance mode so that it does not trigger any actions:
# crm configure property maintenance-mode="true"
For easier handling, the resource configuration is written to the following files:
- crm_ascs.txt: Used for the ASCS resources
- crm_ers.txt: Used for the ERS resources
- crm_col.txt: Provides a rule for separating ASCS and ERS from one another as long two servers are available
crm_ascs.txt
group grp_TR1_ASCS00 \
rsc_ip_TR1_ASCS00 rsc_fs_TR1_ASCS00 rsc_sap_TR1_ASCS00 \
meta resource-stickiness=3000crm_ers.txt
primitive rsc_fs_TR1_ERS10 Filesystem \
params device="/dev/sdc" directory="/usr/sap/TR1/ERS10" fstype=xfs\
op start timeout=60s interval=0 \
op stop timeout=60s interval=0 \
op monitor interval=20s timeout=40s
primitive rsc_ip_TR1_ERS10 IPaddr2 \
params ip=10.14.20.19 \
op monitor interval=10s timeout=20s
primitive rsc_sap_TR1_ERS10 SAPInstance \
op monitor interval=11 timeout=60 on-fail=restart \
params InstanceName=TR1_ERS10_nwers-ha \
START_PROFILE="/sapmnt/TR1/profile/TR1_ERS10_nwers-ha" \
AUTOMATIC_RECOVER=false IS_ERS=true \
meta priority=1000
group grp_TR1_ERS10 \
rsc_ip_TR1_ERS10 rsc_fs_TR1_ERS10 rsc_sap_TR1_ERS10
crm_col.txt
colocation col_sap_TR1_no_both -5000: grp_TR1_ERS10 grp_TR1_ASCS00
location loc_sap_TR1_failover_to_ers rsc_sap_TR1_ASCS00 \
rule 2000: runs_ers_TR1 eq 1
order ord_sap_TR1_first_start_ascs Optional: rsc_sap_TR1_ASCS00:start \
rsc_sap_TR1_ERS10:stop symmetrical=false
See Appendix A for templates for these files to use at the time of installation, including simple commands to use for adjustment to your environment.
To load the files into the cluster stack, run:
# crm configure load update crm_ascs.txt
# crm configure load update crm_ers.txt
# crm configure load update crm_col.txt
After the three files are loaded, the resource configuration is complete. To end maintenance mode, run:
# crm configure property maintenance-mode="false"