
Installing SAP
Installing SAP
-
Prerequisites
When installing SAP, ensure that:
- Operating systems are already installed on the servers
- Hostnames and IP addresses are configured
For fault tolerance at the network level, Dell Technologies recommends using active/passive network bonding devices. For more information, see Chapter 14. Configuring network bonding Red Hat Enterprise Linux 8 | Red Hat Customer Portal.
Installation tasks overview
Install the SAP components in the following order:
- ASCS instance
- ERS instance
- Database instance and clustering
- Primary application server
- Additional application servers (at least one)
Prepare the file systems
Note: Dell Technologies strongly recommends using two Fiber Channel fabrics and multipathing for the shared disks.
Two fiber channel disks are assigned to each server, but the disks are mounted only on one server at a time. The mountpoints are managed through the cluster stack as resources.
- Create the file systems on the first server and mount only the required disk:
nwacsc01number mkfs.xfs /dev/sdb
nwacsc01# mkfs.xfs /dev/sdc
nwacsc01# mkdir -p /usr/sap/TR1/{ASCS00,ERS10}
nwacsc01# mount /dev/sdb /usr/sap/TR1/ASCS00nwacsc02# mkdir -p /usr/sap/TR1/{ASCS00,ERS10}
nwacsc02# mount /dev/sdc /usr/sap/TR1/ERS10- On all the servers, run the following commands:
# mkdir -p {/sapmnt,/sapinst,/usr/sap/TR1/SYS}
# mount <nfsServerIP>:/sapmnt /sapmnt
# mount <nfsServerIP>:/sapinst /sapinst
# mount <nfsServerIP>:/sapsys /usr/sap/TR1/SYSInstall the ASCS instance on nwascs01
Assign the cluster IP to the first node where the ASCS instance is running initially:
nwacsc01# ip addr add 10.14.20.19/24 dev bond0
nwacsc01# cd /sapinst/SWPM
nwacsc01# ./sapinst SAPINST_USE_HOSTNAME=nwascs-haUse the SWPM interface
Download the Software Provisioning Manager (SWPM). The option to choose depends on the following SAP NetWeaver version and architecture:
- ASCS instance
- ERS instance
- Database instance and clustering
- Primary application server
- Additional application servers (at least one)
Install SAP NetWeaver 7.5
- Under SID id TR1:
- Use instance number 00.
- Clear the Using FQDN option.
- For all passwords, use <yourSecurePwd>.
- During the parameter review, confirm that the nwascs-ha virtual name is used.
- Ensure that you use the user IDs that are specified in Table 11.
- If you receive a permissions error, change the ownership of the ASCS directory by running the following command:
chown -R tr1adm:sapsys /usr/sap/TR1/ASCS00
Install ERS on nwascs02
Manually add the cluster IP for the ASCS instance:
nwacsc02# ip addr add 10.14.20.20/24 dev bond0
nwacsc02# cd /sapinst/SWPM
nwacsc02# ./sapinst SAPINST_USE_HOSTNAME=nwers-haInstall SAP S/4 HANA Server 1809
In the SWPM interface:
- Select SAP HANA Database > Installation > Application Server ABAP > High-Availability System > ERS Instance.
- Use instance number 10.
- Clear the Using FQDN option.
- If you receive a permissions error during the installation, change the ownership of the ERS directory by running the following command:
chown -R tr1adm:sapsys /usr/sap/TR1/ERS10
Post-installation tasks for ASCS and ERS
Stop the ASCS and ERS Instances
On nwascs01, run the following commands:
# su - tr1adm
# sapcontrol -nr 00 -function Stop
# sapcontrol -nr 00 -function StopService
On nwascs02, run the following commands:
# su - tr1adm
# sapcontrol -nr 10 -function Stop
# sapcontrol -nr 10 -function StopService
Edit the SAP profiles
Run the following commands on any server on which /sapmnt is mounted:
# sed -i -e 's/Restart_Program_01/Start_Program_01/' /sapmnt/TR1/profile/TR1_ASCS00_nwascs-ha
# sed -i -e 's/Restart_Program_00/Start_Program_00/' /sapmnt/TR1/profile/TR1_ERS10_nwers-ha
Start ASCS and ERS
On nwascs01, run the following commands:
# su -tr1adm
# sapcontrol -nr 00 -function StartService TR1
# sapcontrol -nr 00 -function Start
On nwascs02, run the following commands:
# scale unit - tr1adm
# sapcontrol -nr 10 -function StartService TR1
# sapcontrol -nr 10 -function Start
Install SAP HANA on the hana01 and hana02 servers
Ensure that:
- The three required file systems for the SAP HANA database (/hana/data, /hana/log, and /hana/shared) are already configured on your system.
- Your system is fast enough to support the wanted workload.
Start by installing the empty database on both hosts so that you can use the latest SAP HANA patch release.
Note: While SWPM assumes that you are using the installation media, it is recommended that you install the latest SAP HANA patch packages instead of installing the base version first and then updating to the latest patch release.
- To add the SAP HANA cluster IP to the hana01 server, run the following command:
hana01# ip addr add 10.14.20.19/24 dev bond0
- On both servers (hana01 and hana02), run the following command:
# cd /sapinst/SAP_HANA_DATABASE/
# ./hdblcm –ignore=check_signature_file
Notes:
Use the ignore parameter only if you installed an SAP HANA database patch release and did not create a signature with SAPcar during the extraction.
Enter the values that are specified in Table 7 and Table 8.
Ensure that you enter the correct value for the sapsys group. Do not use the SAP HANA default value of 79.Import the SAP HANA database
On hana01, run the following command:
hana01 # cd /sapinst/SWPM
./sapinst SAPINST_USE_HOSTNAME=hana-ha
Install the primary application server on nwwrk01
In the SWPM interface:
- Run the following commands:
nwwrk01 # cd /sapinst/SWPM/
nwwrk01 # ./sapinst SAPINST_USE_HOSTNAME=nwwrk01
- Select Installing SAP NetWeaver 7.5 > SAP HANA Database > Installation > Application Server ABAP > High-Availability System > Primary Application Server Instance (PAS).
- Apply the following settings:
- Instance number 21.
- Clear the Using FQDN option.
- Other required parameters for your environment (such as SLD).
Install the additional application server on nwwrk02
- Run the following commands:
nwwrk02 # cd /sapinst/SWPM/
nwwrk02 # ./sapinst SAPINST_USE_HOSTNAME=nwwrk02
- In the SWPM interface, select Installing SAP NetWeaver 7.5 > SAP HANA Database > Installation > Application Server ABAP > High-Availability System > Primary Application Server Instance (PAS).
- Apply the following settings:
- Select instance number 22.
- Clear the Using FQDN option.
Cluster configuration
Configure the SAP HANA replication
Before you configure the SAP HANA replication, set up the hdbuser-store for a backup user. This design guide uses “backup” as the username.
On both hosts, run the following commands:
# su – th0adm
# hdbuserstore -i add backup localhost:30013@SYSTEMDB systemNote: For data protection reasons, create a backup user with the appropriate permissions on your databases. You can also use the SYSTEM permissions.
To configure replication:
- On the first node, which will become our primary database, create a backup and then enable system replication by running the following commands:
hana01:# su – th0adm
# hdbsql -i 00 -U backup -d SYSTEMDB "BACKUP DATA USING FILE ('/tmp/foo')"# hdbsql -i 00 -U backup -d SYSTEMDB "BACKUP DATA FOR TH0 USING FILE ('/tmp/foo2')"
Note: Ensure that the backup file destination has enough free available space and is writable for the th0adm user.
- After running the backups, prepare the primary node for system replication:
th0adm@hana01:# hdbnsutil -sr_enable --name=Node1
- Add the second database server to the replication:
hana02:# su – th0adm
th0adm@hana02:# HDB stop- Copy the security keys from the first server to the second server:
hana02:# scp root@hana01:/usr/sap/TH0/SYS/global/security/rsecssfs/key/SSFS_TH0.KEY/usr/sap/TH0/SYS/global/security/rsecssfs/key/SSFS_TH0.KEY
hana02:# scp root@hana01:/usr/sap/TH0/SYS/global/security/rsecssfs/data/SSFS_TH0.DAT /usr/sap/TH0/SYS/global/security/rsecssfs/data/SSFS_TH0.DAT
- Register the second node:
hana02:# su – th0adm
th0adm@hana02:# hdbnsutil -sr_register --remoteHost=hana01 --remoteInstance=00 --replicationMode=syncmem --name=Node2- Start the database on the second node:
hana02:# su – th0adm
th0adm@hana02:# HDB start- Optionally, verify the status of the replication by running the following commands on the first node:
hana01:# su – th0adm
th0adm@hana01:# cdpy
th0adm@hana01:# python systemReplicationStatus.py
The following code snippet shows the output of a successful replication command:

Figure 3. Replication status
Configure Pacemaker
- Install the required packages on all nodes:
# yum -y install pcs pacemaker resource-agents-sap-hana
# passwd hacluster
[enter a password for the user hacluster]
# systemctl enable pcsd.service; systemctl start pcsd.service
- Create the cluster with no cluster resources defined:
# pcs cluster auth hana01 hana02
# pcs cluster setup --name clhana hana01 hana02
# pcs cluster start --all
- For information about the scenarios in which fencing is required, see Using the Pacemaker cluster to automate startup on failure.
- For the configuration steps, see Configuring fencing in a Red Hat High Availability cluster Red Hat Enterprise Linux 8.
Red Hat supports two fencing mechanisms: power fence agents and I/O fence agents. For more information, see Fencing in a Red Hat High Availability Cluster - Red Hat Customer Portal. This example uses Intelligent Platform Management Interface (IPMI) as an industry-proven power fence agent mechanism.
- Enable IPMI in the iDRAC Settings page in the iDRAC web interface:
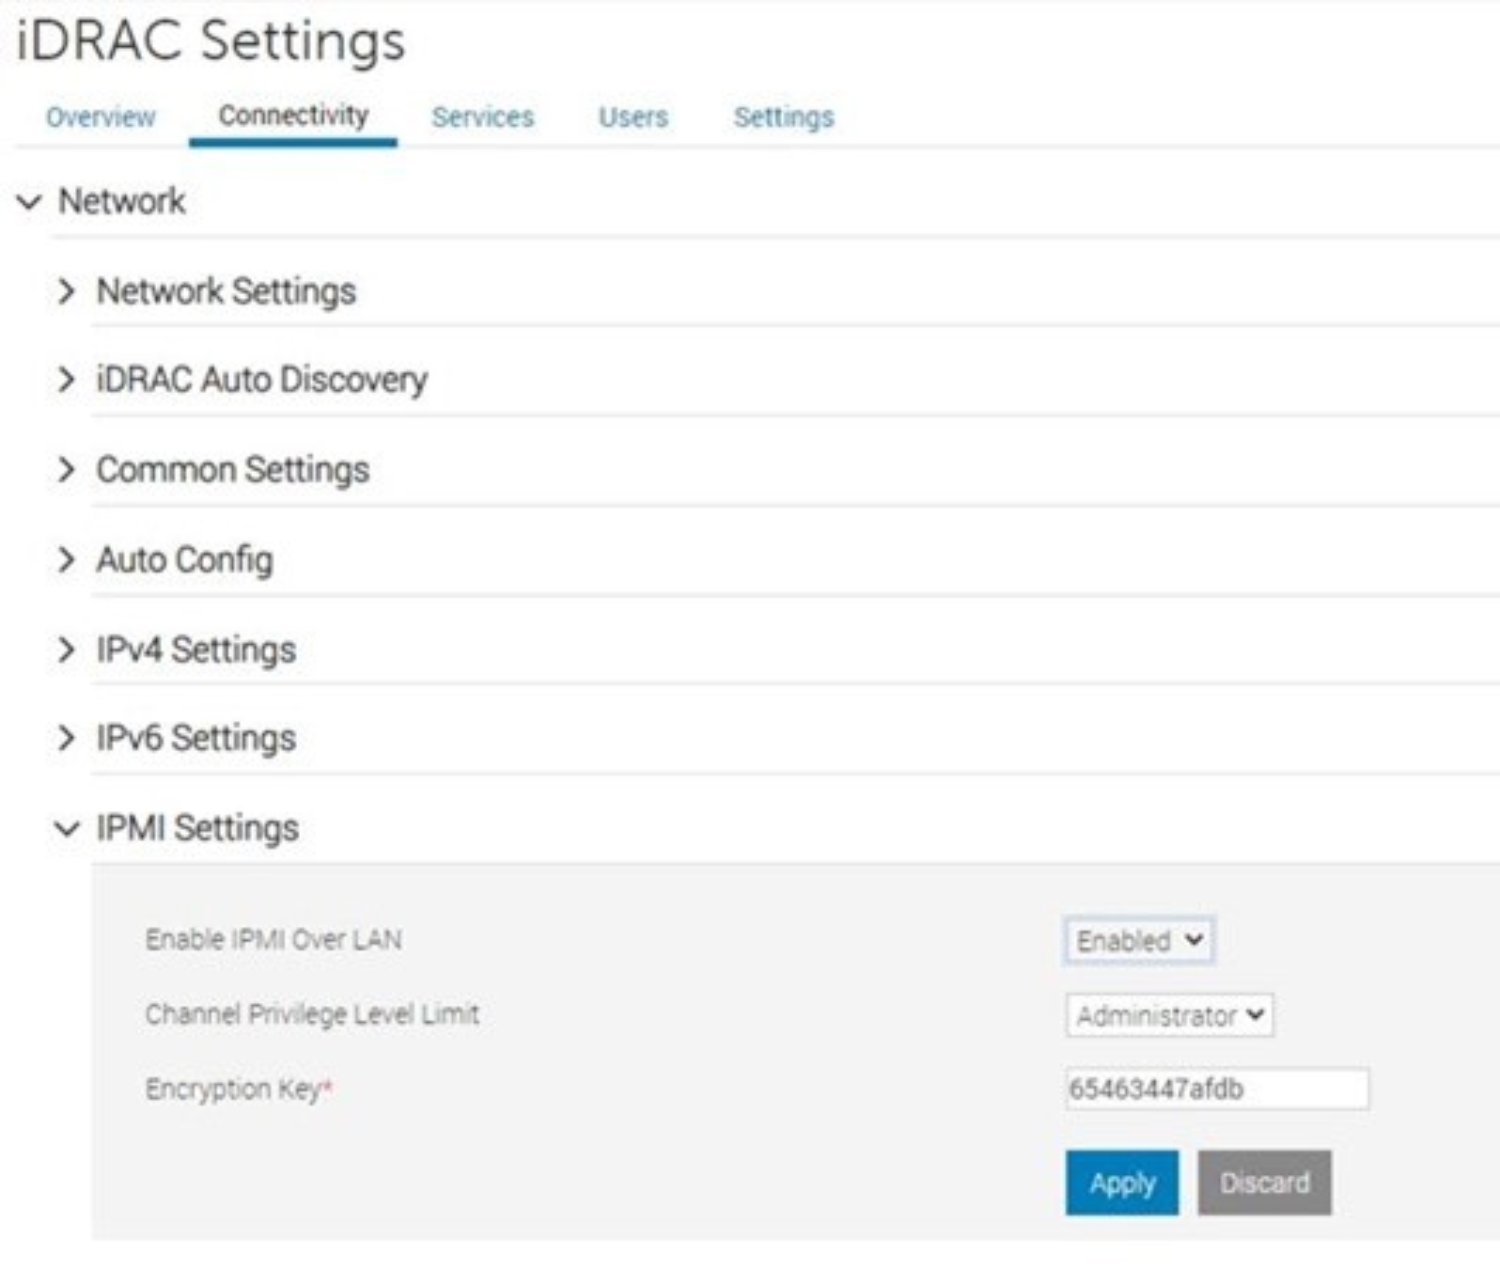
Figure 4. Configuring IPMI settings in iDRAC
- Configure the srConnectionChanged hooks on both cluster nodes:
- Stop the database instances:
hana01:# su – th0adm
th0adm@hana01:# HDB stophana02:# su – th0adm
th0adm@hana02:# HDB stop- Copy the files on both nodes:
[root]# mkdir -p /hana/shared/myHooks
[root]# cp /usr/share/SAPHanaSR/srHook/SAPHanaSR.py /hana/shared/myHooks
[root]# chown -R th0adm:sapsys /hana/shared/myHooks
- On both database nodes, modify the configuration file by editing the /hana/shared/TH0/global/hdb/custom/config/global.ini file:
[ha_dr_provider_SAPHanaSR]
provider = SAPHanaSR
path = /hana/shared/myHooks
execution_order = 1
[trace]
ha_dr_saphanasr = info
- Create the /etc/sudoers.d/20-saphana file with the following content.
Notes:
Adjust the values for th0 with your lowercase SAP SID of your database.
Adjust Node1and Node2 with the database names given during replication setup.Cmnd_Alias Node1_SOK = /usr/sbin/crm_attribute -n hana_th0_site_srHook_Node1 -v SOK -t crm_config -s SAPHanaSR
Cmnd_Alias Node1_SFAIL = /usr/sbin/crm_attribute -n hana_th0_site_srHook_Node1 -v SFAIL -t crm_config -s SAPHanaSR
Cmnd_Alias Node2_SOK = /usr/sbin/crm_attribute -n hana_th0_site_srHook_Node2 -v SOK -t crm_config -s SAPHanaSR
Cmnd_Alias Node_SFAIL = /usr/sbin/crm_attribute -n hana_th0_site_srHook_Node2 -v SFAIL -t crm_config -s SAPHanaSR
th0adm ALL=(ALL) NOPASSWD: Node1_SOK, Node1_SFAIL, Node2_SOK, Node2_SFAIL
Defaults!Node1_SOK, Node1_SFAIL, Node2_SOK, Node2_SFAIL !requiretty
- Start the databases again:
hana01:# su – th0adm
th0adm@hana01:# HDB starthana02:# su – th0adm
th0adm@hana02:# HDB start- Configure the cluster resources:
- To prevent the cluster from interfering with the database, set the maintenance mode as long we configure the cluster resources:
crm configure property maintenance-mode="true"
- Define global parameters for all cluster resources:
# pcs resource defaults update resource-stickiness=1000
# pcs resource defaults update migration-threshold=5000
- Add the configuration for the SAP host resource:
# pcs resource create SAPHanaTopology_TH0_00 SAPHanaTopology SID=TH0 InstanceNumber=00 \
op start timeout=600 \
op stop timeout=300 \
op monitor interval=10 timeout=600 \
clone clone-max=2 clone-node-max=1 interleave=true
- Add the resource configuration for the active-passive SAP HANA database:
# pcs resource create SAPHana_TH0_00 SAPHana SID=TH0 InstanceNumber=00 \
PREFER_SITE_TAKEOVER=true DUPLICATE_PRIMARY_TIMEOUT=7200 AUTOMATED_REGISTER=true \
op start timeout=3600 \
op stop timeout=3600 \
op monitor interval=61 role="Slave" timeout=700 \
op monitor interval=59 role="Master" timeout=700 \
op promote timeout=3600 \
op demote timeout=3600 \
promotable notify=true clone-max=2 clone-node-max=1 interleave=true
- Add the virtual IP as a cluster resource:
# pcs resource create vip_TH0_00 IPaddr2 ip="10.14.20.10"
- Add resource constraints so that the different cluster resources run on the nodes where they belong respectively, such as the virtual IP address on the node with the writable primary database.
# pcs constraint order SAPHanaTopology_TH0_00-clone then SAPHana_TH0_00-clone symmetrical=false
# pcs constraint colocation add vip_TH0_00 with master SAPHana_TH0_00-clone 2000
- Disable maintenance mode on the cluster because all resources are configured properly:
crm configure property maintenance-mode="false"
- Verify that the cluster is installed on hana01:
trhana01:~ # crm_mon -r1
The following output is displayed:
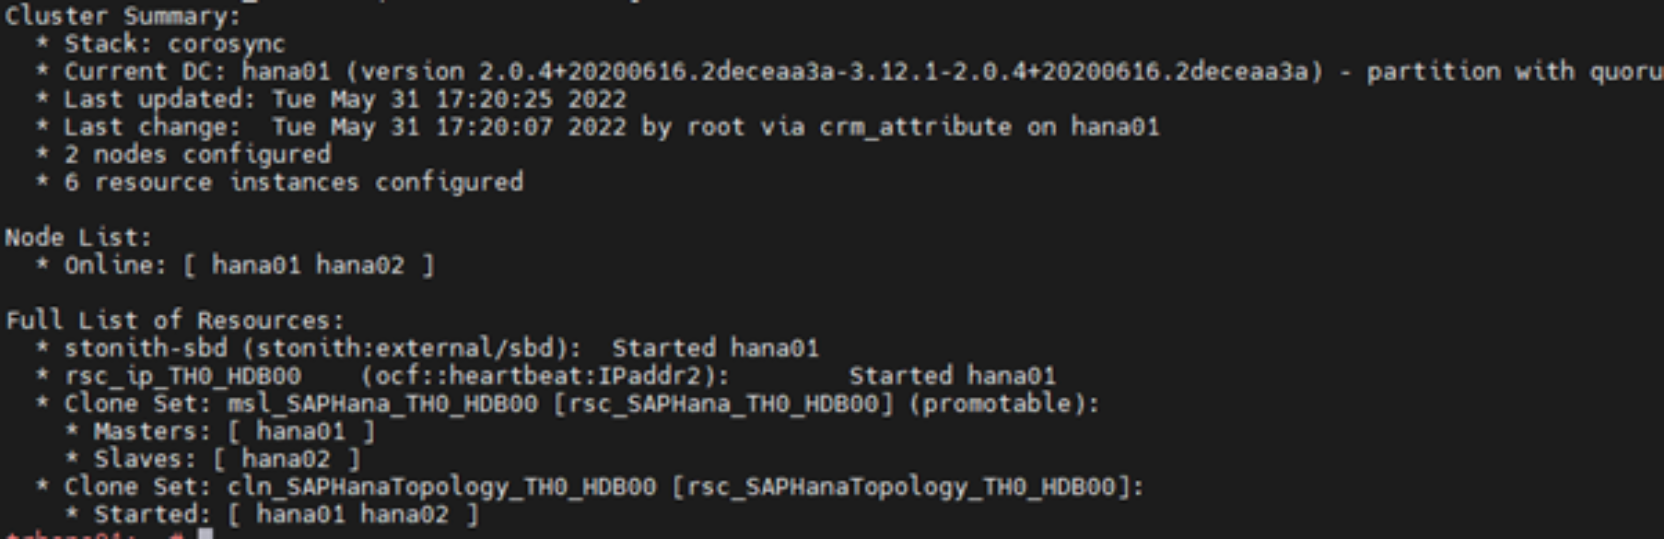
Figure 5. Checking the cluster installation status
- Verify the status of the replication by running the following commands:
trhana01:# su – th0adm
th0adm@hana01:# cdpy
th0adm@hana01:# python systemReplicationStatus.py
Figure 6. Checking the replication status
Configure an ASCS or ERS cluster
At a high level, configuring a cluster consists of the following steps:
- Create an empty cluster between the nwascs01 and nwascs02 nodes.
- Define the cluster resources.
Before you start
On the nwascs01 and nwascs02 nodes:
- Set up an NTP client and start the client.
- Install the software by running the following command:
# yum -y install pcs pacemaker resource-agents-sap
Create the cluster
Run the following command:
# pcs cluster auth nwascs01 nwascs02
# pcs cluster setup –name nwascs nwascs01 nwascs02
# pcs cluster start –all
Configure fencing on the cluster
Perform step 3 in Configure Pacemaker .
- To verify that the cluster has been configured correctly, run:
# crm_mon -r1

Figure 7. Cluster join command output
Define the cluster resources
After the configuration is complete on the nwascs01 server:
- Set the cluster to maintenance mode so that it does not trigger any actions:
# crm configure property maintenance-mode="true"
For easier handling, the resource configuration is written to the following files:
- crm_ascs.txt—Cluster resource configuration of the ASCS resources
- crm_ers.txt—Cluster resource configuration of the ERS resources
- crm_col.txt—Cluster resource configuration of colocation rules for separating ASCS and ERS from one another as long two servers are available
See Configuration resource files for the files.
- Load the resource configuration files into the cluster stack:
# crm configure load update crm_ascs.txt
# crm configure load update crm_ers.txt
# crm configure load update crm_col.txt
After the files are loaded, the resource configuration is complete.
- To end maintenance mode, run:
# crm configure property maintenance-mode="false"