
Connecting to the SQL Server instance
Connecting to the SQL Server instance
-
Use the sa account and the external IP address (and port number if not default) for the service to connect to the SQL Server container. Use the password that you configured as the Kubernetes secret or password configured in the deployment manifest.
You can use the following applications to connect to the SQL Server instance:
sqlcmd
To connect with sqlcmd, run the following command from the node or from any other machine which has sqlcmd installed and has network access to the pod.
sqlcmd -S <External IP Address> -U sa -P <SA Password>
For example:
sqlcmd -S 10.233.26.89 -U sa
Password:
1>
SQL Server Management Studio
SQL Server Management Studio (SSMS) is part of a suite of SQL tools that Microsoft offers free of charge for your development and management needs. SSMS is an integrated environment to access, configure, manage, administer, and develop all components of SQL Server. It can connect to SQL Server running on any platform on-premises, in Docker containers, and in the cloud.
To connect to SQL server running in a container, enter the following information:
Setting
Description
Server type
The default is database engine; do not change this value
Server name
External IP address assigned to service and the TCP port number
Authentication
For SQL Server on Linux, use SQL Server Authentication
Login
Name of a user with access to a database on the server, default is SA as configured in manifest
Password
Password or Secret configured in Pod manifest
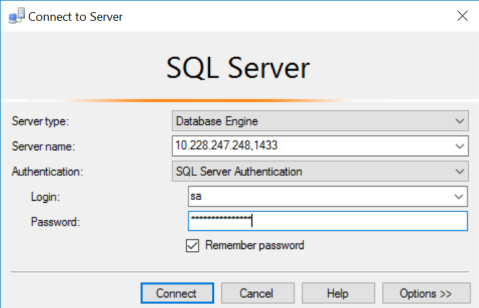
Figure 17. SQL Server Management Studio (SSMS)
Restore database
If the deployment was created with a backup volume mounted, the database can be restored from backup using sqlcmd or SSMS.
An example of a script used to restore a database is shown below.
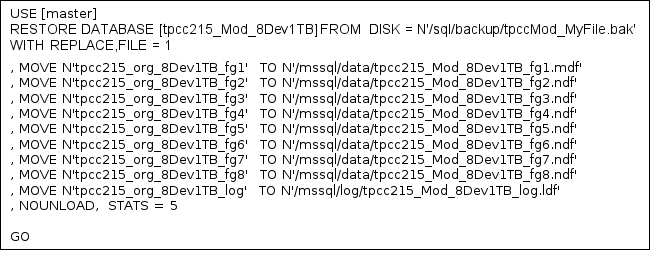
Figure 18. Sample SQL script to restore database
You can run the script SSMS or using by using sqlcmd:
sqlcmd -S <Server IP Address> -U sa -P <SA Password> -i <script file> -o <result file>
For example:
# sqlcmd -S 10.228.247.248 -U sa -P MySecretP@ssw0rd -i restoredb.sql -o restoreout.txt
Migrating existing SQL database to Kubernetes
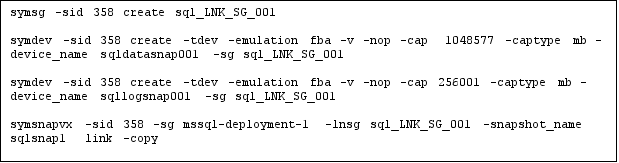
Migrating an existing SQL database which exists on a PowerMax device is fast and efficient. There is no need to go through the time-consuming process of database backup and restore. The most efficient method is to create a snapshot of the existing data and log volumes and then use those snapshots to create Kubernetes PVs to be used by a SQL Server container.
PowerMax array’s local replication data service Timefinder SnapVX creates very low-impact snapshots. SnapVX provides the ability to manage consistent point-in-time copies for storage groups with a single operation. This allows multiple persistent volumes used by a pod to be managed together.
A point-in-time snapshot can be accessed from Kubernetes nodes by linking it to a host-accessible volume referred to as a target. Target volumes are standard PowerMax devices. Up to 1,024 target volumes can be linked to the snapshot(s) of a single source volume. By default, targets are linked in a no-copy mode. This no-copy mode eliminates the need to perform a full volume copy of the source volume during the unlink operation in order to continue to use the target volume for host I/O.
Make a copy of existing data and log
To make a copy of the existing data and log, follow these steps:
- Identify the PowerMax volumes that contain the existing SQL server and put them in a Storage Group. If the volumes are already in a storage group, this step is not required.


- Create a snapshot of the storage group which will be then used to create Kubernetes persistent volumes.

- Create a new Storage Group with volumes that match in number and size with the original storage group, and link the snapshot to this new storage group. Make sure that device names do not contain “-“ in the name.
Create PV and PVC using existing volumes
To create a PV using a specific existing PowerMax volume, use a volume identifier to specify the volumeHandle for PV. The volume handle must be in the format <volumeIdentifier>-<SymmID-<device ID>.
For example, if volume is 00104 on PowerMax with SYMID 000197600358 and identifier is set to “sqldatasnap001”, volumeHandle would be “sqldatasnap001-000197600358-00104” as shown in the manifest for PV and PVC below. Create similar manifests for all the volumes required for the SQL server (Data and Log volumes). Field labels can be used to uniquely define a PV so that while creating a PVC, the selector parameter can be used to pick a specific PV. In this example, label matching is being used to pick a specific PV while creating PVC. Create PV for data and log volumes.
apiVersion: v1
kind: PersistentVolume
metadata:
name: sql-data-snap-001
labels:
device-name: sqldatasnap001
spec:
accessModes:
- ReadWriteOnce
capacity:
storage: 1024Gi
csi:
driver: csi-powermax.dellemc.com
volumeHandle: sqldatasnap001-000197600358-00104
persistentVolumeReclaimPolicy: Retain
storageClassName: powermax-358
volumeMode: Filesystem
---
apiVersion: v1
kind: PersistentVolumeClaim
metadata:
name: mssql-data-snap-1
spec:
accessModes:
- ReadWriteOnce
resources:
requests:
storage: 1024Gi
selector:
matchLabels:
device-name: sqldatasnap001
storageClassName: powermax-358
For the SQL server volume, create a dynamic PVC of required size.
apiVersion: v1
kind: PersistentVolumeClaim
metadata:
name: mssql-server-1
labels:
device-name: sql-server-1
spec:
accessModes:
- ReadWriteOnce
resources:
requests:
storage: 20Gi
storageClassName: powermax-358
Deploy SQL server and attach database
Deploy SQL Server using the PVC created in the previous step. The manifest will have one newly created volume for SQL Server, plus data and log volumes from existing PowerMax devices. Once the pod is operational, use SQL Server Management Studio to attach the database to SQL Server using the .mdf file for the database. In SSMS, after connecting to the SQL Server Database Engine through Object Explorer, expand the server, right-click on Databases, and select Attach.
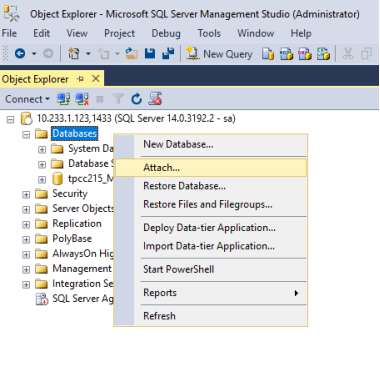
Figure 19. Attaching SQL Server database using SSMS
Create a script file with the restore commands as shown in the script example below. This script example has eight data files and one log file to be restored. Use SSMS or sqlcmd to execute the script. Run sqlcmd with all the required options. Option -I specifies the input file which was created in the previous step and -o option specifies the output file where output of the command will be stored. If -o option is not specified, output is written on a standard output device which is normally the terminal screen.
# sqlcmd -S 10.228.247.248 -U sa -P MySecretP@ssw0rd -i attachdb.sql -o attachout.txt
