
Blogs

Streamlining Unit Testing with GitHub Copilot: A Developer’s Guide – Spring Boot Java and Golang Application
Wed, 24 Apr 2024 15:51:17 -0000
|Read Time: 0 minutes
Unit testing is the backbone of robust software development. It ensures that the individual components of your codebase function correctly in isolation. However, writing comprehensive unit tests can be a labor-intensive task, especially when dealing with complex logic or large codebases. Enter GitHub Copilot – an AI-powered tool that promises to revolutionize the way developers write code.
The scenario
Imagine you’re building a Spring Boot or Golang based API. You’ve created a CustomerService class that contains methods to perform various business logic operations related to customers. Now, let’s see how GitHub Copilot can help generate unit tests and accelerate the process of writing unit tests for this class. GitHub Copilot aims to boost productivity by reducing boilerplate code and allowing developers to focus on business logic.
Spring Boot example
We’ll begin by creating the CustomerController class, which currently lacks any content. By effectively prompting Copilot, we can generate two essential operations: createCustomer and getCustomer.
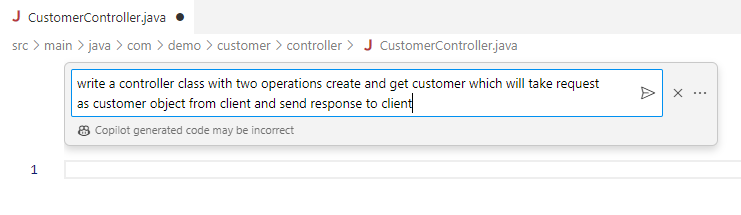
Figure 1. Copilot prompt for creating a controller class with two operations
Note: The input to the prompt should be effective with all the necessary details.
Based on the prompt inputs, GitHub Copilot generated a class CustomerController with two methods: createCustomer and getCustomer.
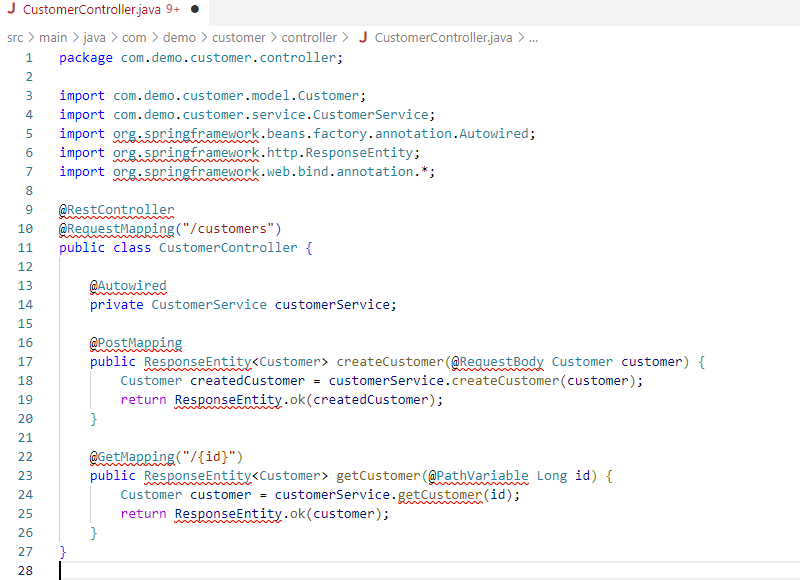
Figure 2. Copilot auto generated code for a controller and two operations
Now that the CustomerController class has the necessary functions, the next critical step is to create unit tests to validate their functionality. Initially, the CustomerControllerTest file is empty. We’ll use effective prompting techniques to assist GitHub Copilot in generating unit tests for both the createCustomer and getCustomer functions.
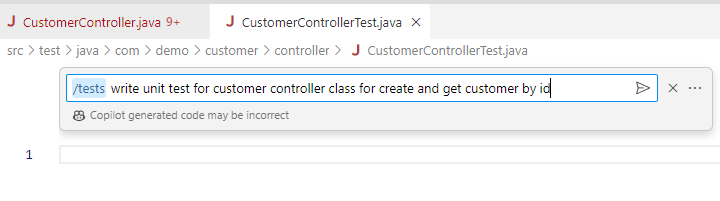
Figure 3. Copilot prompt for writing unit test for Controller class
Upon generating the test function CustomerControllerTest using the GitHub Copilot command, you are now presented with a decision to accept or discard the generated test functions. Your task involves a thorough review, allowing you to make an informed choice regarding their acceptance or rejection.
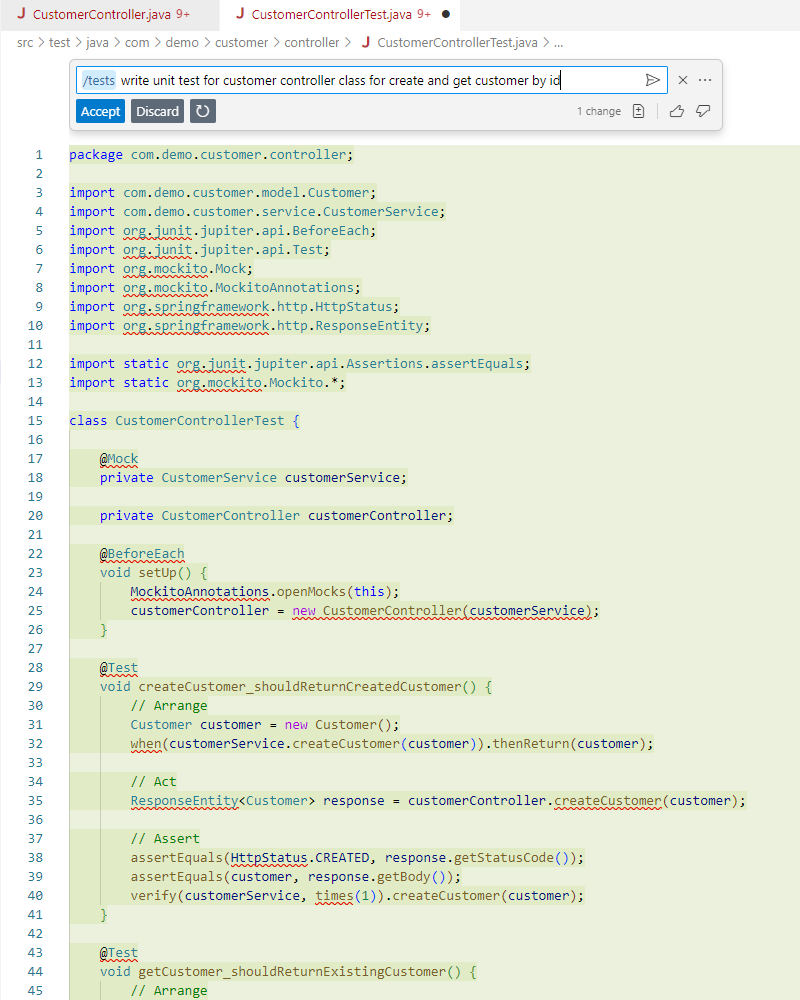
Figure 4. Copilot prompt for accepting the auto generated unit tests
Upon acceptance, all generated contents are added to CustomerControllerTest class.
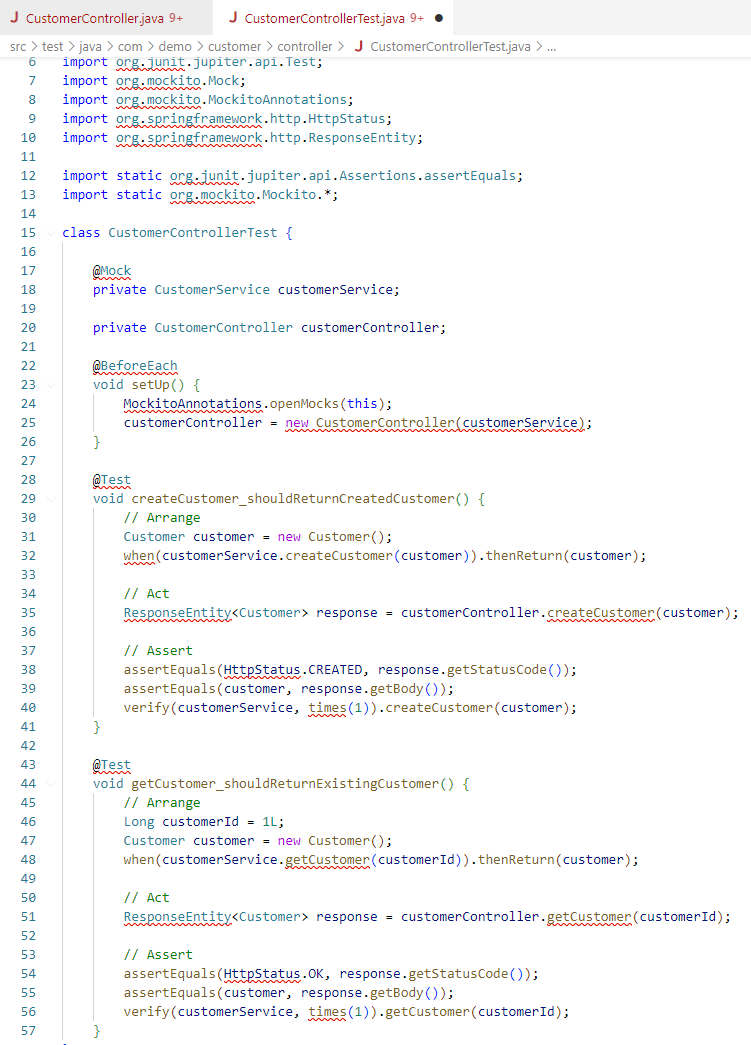
Figure 5. Copilot auto generated unit test cases
In the CustomerControllerTest function, errors such as import errors may arise. Utilize GitHub Copilot’s /fix feature to address and rectify these errors as they appear.
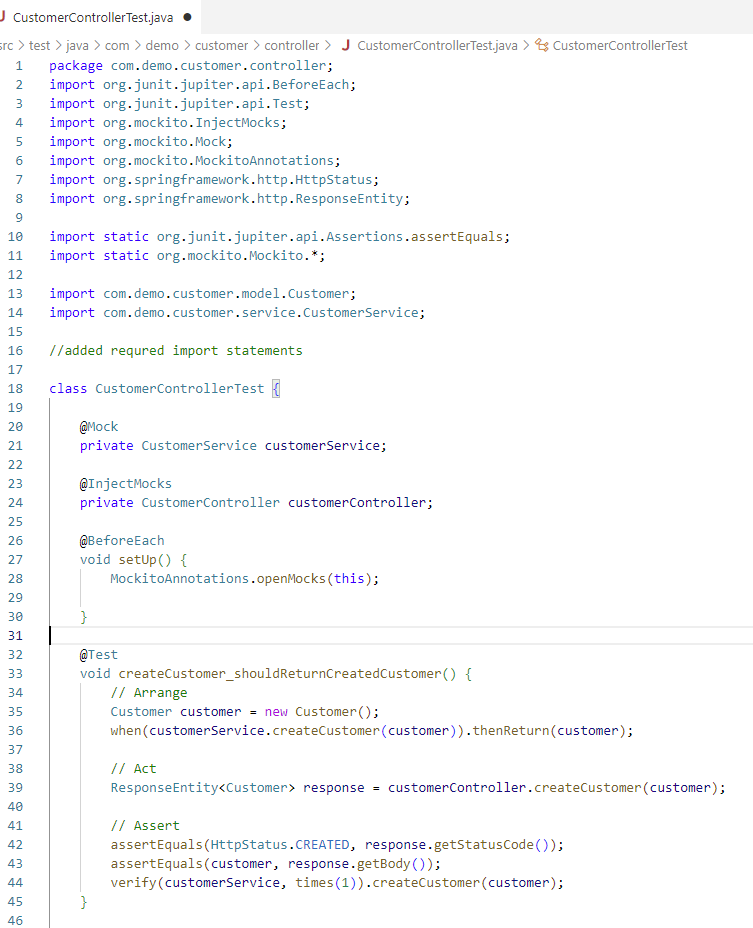
Figure 6. Copilot /fix prompt to fix errors in the code
Enhance your understanding of your code using the /explain feature. Simply select the code snippet you wish to understand better and employ the explain feature. This functionality provides developers with deeper insights into their codebase. Additionally, GitHub Copilot will provide suggestions such as ‘missing pom dependency’ to aid in code improvement, as seen in the following example.
Golang examples
Now, let’s explore how we can leverage similar features when developing a Go application.
Main.go currently stands as an empty file awaiting the creation of a router for two essential operations: creating and retrieving customers. Ensure all necessary details are included within the comments, following the format demonstrated in the following figure.
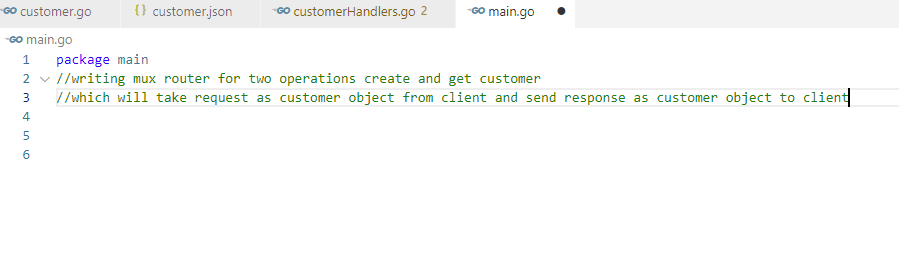
Figure 7. Copilot prompt for creating a router for Get and Create customer operations in GO
Note: The input to the prompt should be effective with all the necessary details.
Based on the prompt inputs, GitHub Copilot generated router code with two endpoints: createCustomer and getCustomers.
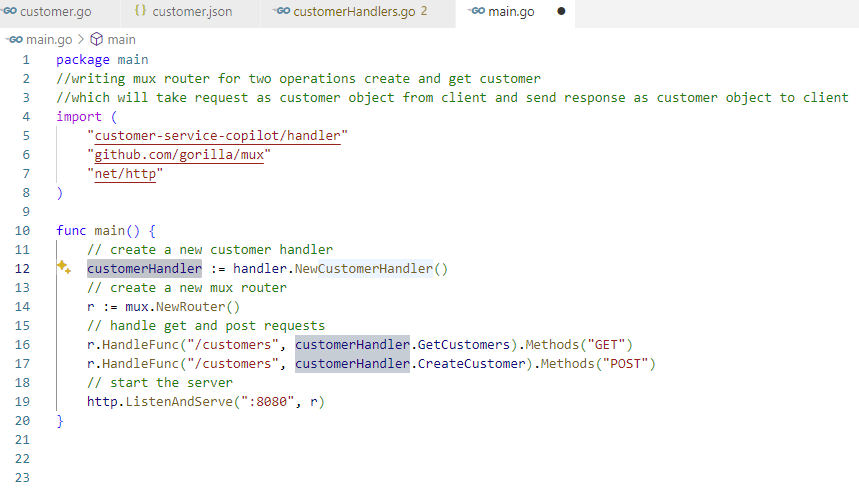
Figure 8. Copilot auto generated code for router and Get and Create customer endpoints
Next, we must develop handlers for both creating and retrieving customers. Currently, the CustomerHandler file remains void of any content. Let’s initiate a prompt to generate the necessary operations, as shown in the following figure.
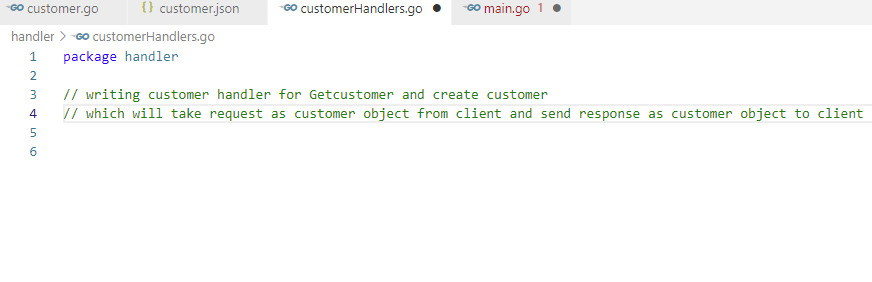
Figure 9. Copilot prompt for writing a customer handler for Get and Create customer operations
Note: Please ensure that the input provided to the prompt is comprehensive and includes all necessary details for effective results.
According to the provided prompt inputs, GitHub Copilot has generated a class named CustomerHandler containing two methods: createCustomer and getCustomers.
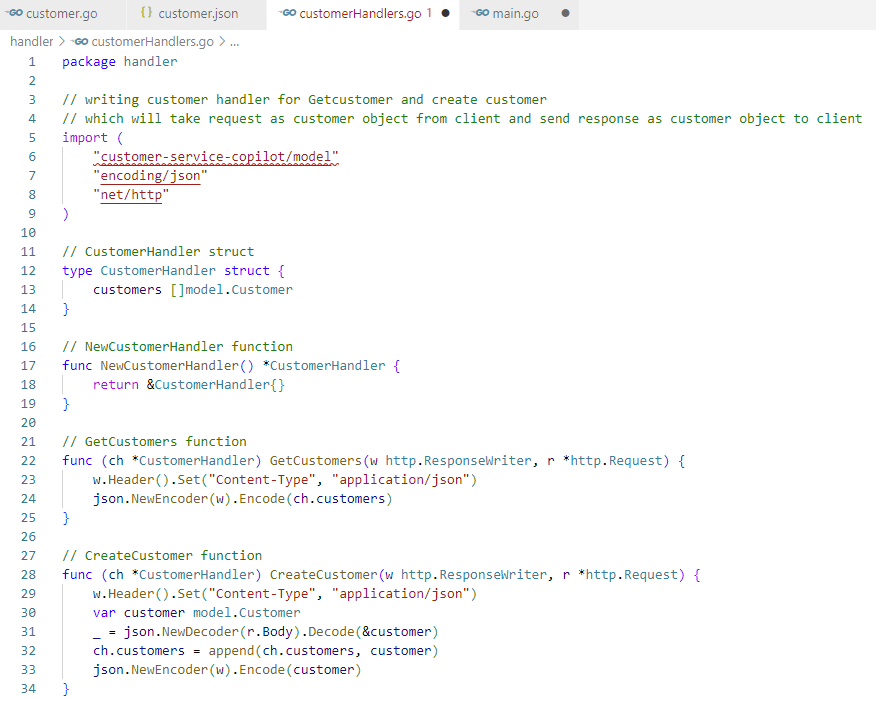
Figure 10. Copilot auto generated code for Get and Create customer operation
The next step involves creating unit tests. Currently, CustomerHandler_test remains empty. GitHub Copilot will generate the unit tests for both creating and retrieving customers using the prompt shown in the following figure.
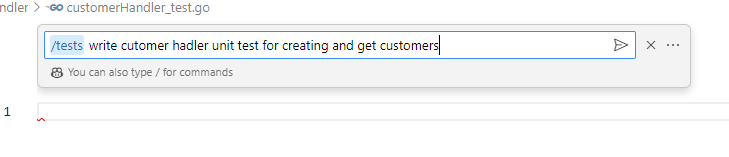
Figure 11. Copilot prompt for writing unit test
Now that the CustomerHandler_test class has been generated, as displayed in the following figure, GitHub Copilot provides you with the option to either accept or discard these tests. Take the time to review them thoroughly and make your decision accordingly.
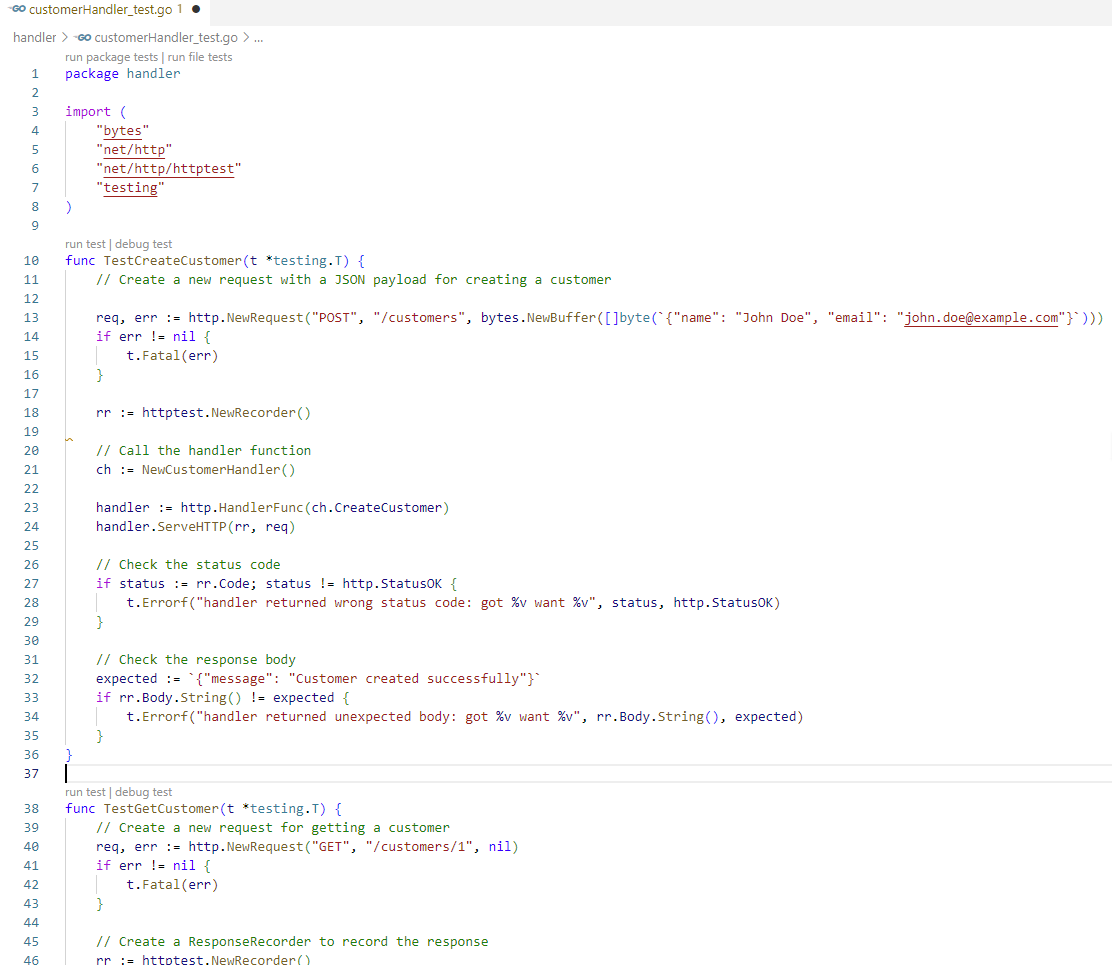
Figure 12. Copilot auto generated unit test cases
Conclusion
Writing a REST Controller
Without Copilot: Writing a Customer Controller from scratch might take a developer an hour, depending on their familiarity with Spring Boot and the complexity of the controller.
With Copilot: By providing suggestions and auto-completion for code snippets, Copilot has the potential to cut development time by around 20-40%.
For example, it typically takes 1 hour to write the Customer Controller without Copilot. With Copilot's assistance, it might take around 20-30 minutes, saving approximately 30-40 minutes.
Writing unit test cases
GitHub Copilot can significantly reduce the time required to write unit tests by providing suggestions and auto-completion for test cases based on the provided prompt.
With Copilot's assistance, the time required to write unit tests for CustomerControllerTest was reduce by around 20-40%, dependent on the complexity of the controller and the level of test coverage desired. For example, it typically takes 2 hours to write unit tests without Copilot's assistance. With Copilot's help, it might take around 40 min to 1 hour, saving approximately 1 to 1.2 hours.
In conclusion, GitHub Copilot is a valuable tool for developing a Customer Service basic CRUD operation and its unit tests for createcustomer and getcustomer. Copilot significantly reduces the time and effort required for coding tasks, resulting in enhanced productivity and efficiency. Moreover, the reduction in lines of code ensures cleaner, more maintainable codebases while accelerating sample customer service development.
Happy writing, DEVs!
Authors:
Manoj Kumar Manoj Kumar | LinkedIn
Ratnesh Yadav Ratnesh (रत्नेश) Yadav | LinkedIn

Requesting Dell Identity JSON web token
Mon, 12 Feb 2024 20:19:09 -0000
|Read Time: 0 minutes
This blog will cover how to get Dell Identity JSON web token for access APEX Job Management APIs and other APIs.
Before you begin
1. Retrieve your APEX API access key and secret at the “Creating & Managing Dell APEX API access key Id and secret” blog.
2. IDP details.
Request Dell Identity JSON Web token
1. Curl
Follow these steps:
a. Request and save the SAML token from your company IDP.
b. Using the following curl command to request Dell Identity JSON web token,
curl --location --request GET curl -X POST -H "Authorization: <Base64-encoded(<Apex_accesss_key_id>:<Apex_access_secret>)>" -H "Content-Type: application/x-www-form-urlencoded" --data-urlencode 'grant_type=urn:ietf:params:oauth:grant-type:token-exchange' --data-urlencode 'subject_token_type=urn:ietf:params:oauth:token-type:saml2' --data-urlencode "subject_token=<IDP_TOKEN>"
Please use the web token URL: https://www.dell.com/di/v3/fp/oauth/token.
2. Script
Follow these steps:
a. Download the script file from here. This script uses Okta as IDP.
b. Install dependencies
The Requirements.txt file contains a list of dependencies. Please run the following command to install the dependencies using the requirements.txt file.
pip install -r requirements.txt
c. Update config.json
Sample steps for retrieving SAMP and login endpoints”
i. Log into Okta.
ii. In the config.json file, update the login_endpoint value with SSL application URL.
iii. Execute following command.
curl -v -L https://{login_endpoint} 2>&1 > /dev/null | grep GET
For example:
curl -v -L https://foo.okta.com/home/foo_application1/0abc123/xyz789 2>&1 > /dev/null | grep GET
> GET /home/foo_application1/abc123/xyz789 HTTP/2
> GET /app/ foo_application1/f111aaa/sso/saml HTTP/2
iv. From the example above, copy the URL which has the “sso” key word, and construct a complete url using an Okta host name and update the saml_endpoint on config.json.
"okta": {
"login_endpoint": "https://foo.okta.com/home/foo_application1/0abc123/xyz789",
"saml_endpoint": " https://foo.okta.com/app/foo_application1/f111aaa/sso/saml”
}
v. Save the config.json file.
d. Execute the script.
i. Run the saml_get_token.py.
ii. Select the desired IDP.
iii. Enter the credentials for your IDP.
iv. Enter the APEX API access key & secret.
You will receive a Dell Identity token, with a TTL of 30 minutes.
This Dell Identity (DI) token can be used to make REST API calls to the APEX public APIs.
Author: Ratnesh Yadav

Creating & Managing Dell APEX API access key Id and secret
Tue, 06 Feb 2024 18:29:10 -0000
|Read Time: 0 minutes
Create API access key
The following steps will help you to create an API access key:
1. Log in to the Dell Premier Portal.
2. Navigate to Administration à Access Keys.
3. Click on “Create Access Key.”
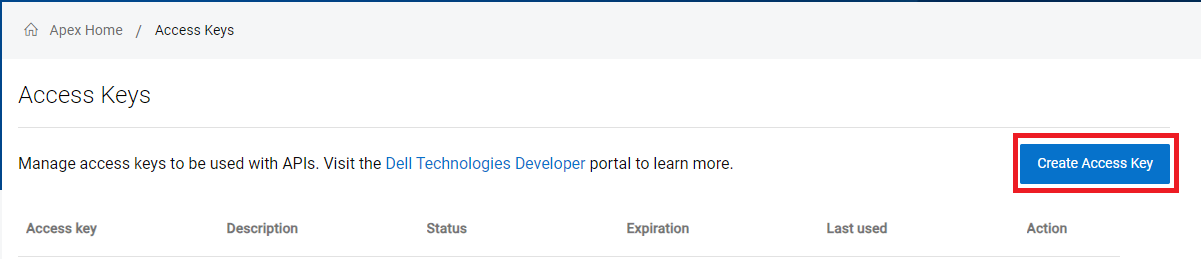
4. Provide the description (optional) and select the roles to be assigned.
5. The API access key creation and activation process can take some time.You will see the following notification notifying you of your wait time.

You can monitor the status of the “Access Keys” on the home page.

6. Once the key is created and ready, the status will change to “Ready”.
7. Now you can view the access key and secret. Make sure to record the secret somewhere or export to CSV, because it will only be shown to you once.
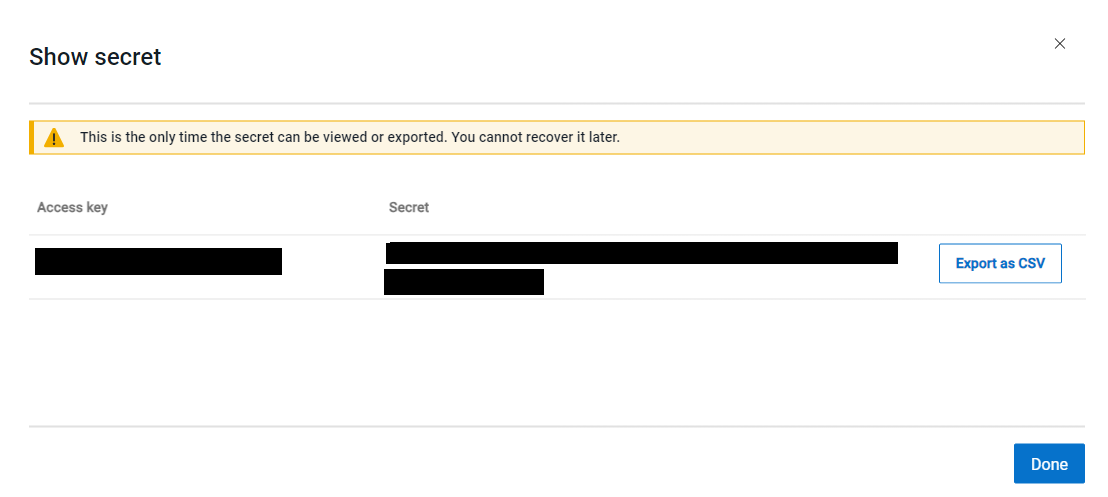
8. Once the secret has been displayed, the status changes to “Active.”
9. The Access key and secret is valid for one year.
Manage API access key on console
Once the API access key is in the “Active” status, you can perform following operations.
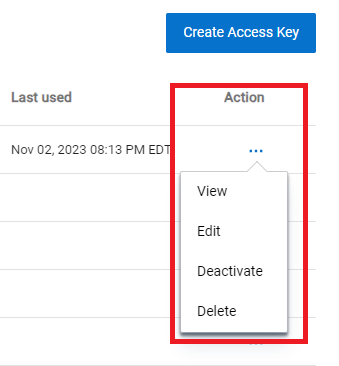
- View: This will show the following details about the access key:
a. Description
b. Status
c. Expiration date
d. Last used
e. Assigned roles
f. Created on - Edit: This option will allow you to update the following details:
a. Description
b. Assigned roles - Deactivate: It will deactivate the access key
- Delete: This will delete the access key
Manage API access key using APIs
Base URL à https://apex.apis.dell.com/apex
API | Details |
POST /rest/v1/api-access-keys/{accessKeyId}/generate-secret | To generate a secret for an existing access key |
DELETE /rest/v1/api-access-keys/{accessKeyId}?async=true | To delete an access key |
PATCH /rest/v1/api-access-keys/{accessKeyId}
| To update an access key (this includes activating, deactivating, modifying, or updating its description) |
GET /rest/v1/api-access-keys?all-org-users={all-org-users}&offset={offset}&limit={limit}
| To list all access keys for users in an organization |
GET /rest/v1/api-access-keys/{accessKeyId}
| To get the details of an individual access key |
Role
- Administrator: The Administrator role can view, edit, and delete access keys created by themselves and other users.
- Non-Administrator: The Non-Administrator role can view, edit, and delete only the access keys created by themselves.
Author: Ratnesh Yadav

APEX Job Management APIs – Pause and Resume Operations
Wed, 28 Feb 2024 19:18:53 -0000
|Read Time: 0 minutes
Welcome back to our APEX Job Management blog series! In our previous post, we explored the query APIs for the job - “APEX Job Management APIs – Get Job Instances”.
Today, we will delve into two crucial operations “Pause” and “Resume”. Let’s get started.
Prerequisites:
1. APEX API access key and secret has been generated and is available. You can check out the “Creating & Managing Dell APEX API access key Id and secret” blog addressing how to create an APEX API access key & secret.
2. You have a Dell Identity (DI) token. You can take a look at the “Requesting Dell Identity JSON web token” blog for steps on requesting a DI token.
Pause Operation
When you encounter a situation where you need to temporarily halt the execution of a job, the “Pause” operation comes to the rescue. Whether it’s to address an issue, perform maintenance, or simply pause a long-running task, this feature ensures that the job remains in a suspended state until you’re ready to resume.
How does Pausing Work?
1. Identify the Job: First, you’ll need to identify the specific job you want to pause. This could be a job that is currently RUNNING (actively executing).
2. Invoke the Pause Operation: Using the appropriate APEX APIs, invoke the “Pause” operation for the selected job. This action will temporarily suspend its execution.
3. The Job Remains Paused: Once paused, the job will remain in this state until the “Resume” operation is performed. During this time, no further progress occurs, and the job waits patiently for further instructions.
URL:
Endpoint:
/rest/v1/jobs/{id}/pause
Replace {id} with actual job ID.
Example:
curl --location "https://apex.apis.dell.com/apex/rest/v1/jobs/123456789/pause \
--header "Accept: application/json" \
--header "Authorization: Bearer {DI Token}" \
--header "Content-Type: application/json"
Replace {DI Token} with DI token.
The response will be something like this:
{
"id":"123456789",
"name":"My job",
"state":"PAUSING",
"create_time":"2024-01-30T23:38:52.475+00:00",
"start_time":"2024-01-30T23:38:52.475+00:00",
"end_time":"2024-01-30T23:41:45.087+00:00",
"progress":0,
.........
}
Documentation:
API details can be found here.
Resume Operation
When a job is in a PAUSED state, it means its execution has been temporarily halted. Perhaps you need to address an issue, perform maintenance, or simply pause a long-running task. Now, you’re ready to get things moving again. The “Resume” operation allows you to kickstart the job’s execution from where it left off.
How does Pausing Work?
1. Identify the Paused Job: First, you’ll need to identify the specific job that is currently in a PAUSED state. Retrieve its details, including the job ID.
2. Invoke the Resume Operation: Using the appropriate APEX APIs, invoke the “Resume” operation for the selected job. This action signals the job to continue its execution.
3. Job Progresses: Once resumed, the job will pick up where it left off.
URL:
Endpoint:
/rest/v1/jobs/{id}/resume
Replace {id} with actual job ID.
Example:
curl --location "https://apex.apis.dell.com/apex/rest/v1/jobs/123456789/resume \
--header "Accept: application/json" \
--header "Authorization: Bearer {DI Token}" \
--header "Content-Type: application/json"
Replace {DI Token} with DI token.
The response will be something like this:
{
"id":"123456789",
"name":"My job",
"state":"RESUMING",
"create_time":"2024-01-30T23:38:52.475+00:00",
"start_time":"2024-01-30T23:38:52.475+00:00",
"end_time":"2024-01-30T23:41:45.087+00:00",
"progress":0,
.........
}
Documentation:
API details can be found here.
Authors:
Ratnesh Yadav
Roopa Avula

APEX Job Management APIs – Get Job Instances
Wed, 14 Feb 2024 07:41:41 -0000
|Read Time: 0 minutes
In this blog we will cover two REST APIs from APEX Job Management System for querying jobs.
Before you begin:
1. APEX API access key and secret has been generated and is available. You can check “Creating & Managing Dell APEX API access key Id and secret” blog addressing how to create an APEX API access key & secret.
2. You have a Dell Identity (DI) token. You can check “Requesting Dell Identity JSON web token” blog for steps on requesting a DI token.
Collection query:
The section below describes how we can query APEX Jobs with multiple query parameters. The following are query parameters supported by the API,
Limit à Number of items to be returned.
Offset à Zero based index of the first item in the result page.
Oder à Ascending or Descending
Filter à Query API supports following filters,
Job name
Job Status
Service
Time (Created, Started and Finished)
Example of filter:
(state in (RUNNING,FAILED)) and (name like "provision") and (name eq "some service")
URL:
Endpoint:
/rest/v1/jobs
Example:
curl --location "https://apex.apis.dell.com/apex/rest/v1/jobs/?order=timeCreated.dsc&limit=5&offSet=0&filter=(state in (RUNNING,FAILED)) --header "Accept: application/json" --header "Authorization: Bearer {DI Token}" --header "Content-Type: application/json"
Replace {DI_Token} with DI token.
The response will be something like this:
{
"paging" : {
"total_instances" : 1161,
"first" : "/rest/v1/jobs?limit=5&order=timeCreated.dsc&offset=0",
"last" : "/rest/v1/jobs?limit=5&order=timeCreated.dsc&offset=232",
"next" : "/rest/v1/jobs?limit=5&order=timeCreated.dsc&offset=1",
"prev" : null
},
"results" : [
{
"id" : "123456789",
"name" : "My Job",
"state" : "SUCCEEDED",
"create_time" : "2024-01-30T23:38:52.475+00:00",
"start_time" : "2024-01-30T23:38:52.475+00:00",
"end_time" : "2024-01-30T23:41:45.087+00:00",
"progress" : 0,
.........
},
......
]
}
Instance query
The section below describes how we can query APEX Job details for a particular job.
URL:
Endpoint:
/rest/v1/jobs/{id}
Example:
curl --location "https://apex.apis.dell.com/apex/rest/v1/jobs/{Job_Id} --header "Accept: application/json" --header "Authorization: Bearer {DI_Token}" --header "Content-Type: application/json"
Replace {DI_Token} with a DI token, and {Job_Id} with a job id.
Response will be something like,
{
"id" : "123456789",
"name" : "My job",
"state" : "SUCCEEDED",
"create_time" : "2024-01-30T23:38:52.475+00:00",
"start_time" : "2024-01-30T23:38:52.475+00:00",
"end_time" : "2024-01-30T23:41:45.087+00:00",
"progress" : 0,
.........
}
Authors:
Ratnesh Yadav,
www.linkedin.com/in/ratneshyadavpublic
Roopa Avula
https://www.linkedin.com/in/roopa-avula