


Transform Your Data Consumption with Dell Enterprise SONiC and PowerFlex Appliance
Thu, 28 Sep 2023 18:16:45 -0000
|Read Time: 0 minutes
Different types of data generated by our everyday needs defines our digital world. To survive the constant evolution of this world, transformation should be the first order of business. One way to spark transformation is by developing the ability to intelligently leverage the data we produce.
Data centers are the convergence of software and hardware elements that provide predictable outcomes for mission-critical workloads. These workloads need to reside and evolve within a well-defined infrastructure.
This infrastructure is known as hyperconverged or converged infrastructure, where compute, networking, and storage components work together in a single appliance.
Dell Technologies’ product portfolio has several hyperconverged/converged (H/CI) platforms, one of which is VxRail, and PowerFlex, which facilitates this transformation.
This blog introduces PowerFlex, as well as Dell Enterprise SONiC, an open-source networking operating system. These appliances complement each other and serve as a holistic solution for your H/CI needs.
Dell PowerFlex: The basic pillars of digital transformation
The Dell PowerFlex family empowers organizations to leverage the benefits of fully integrated, high-power appliances to achieve predictable outcomes. It brings three key pillars: flexibility, high performance, and linear scalability. These pillars work together to simplify infrastructure management, increasing IT agility overall.
PowerFlex offers the flexibility to meet the diverse and rapidly evolving needs of the modern data center and IT Enterprise. For example, PowerFlex allows for mix and match storage, compute, and hyperconverged nodes for a dynamic deployment. This flexibility allows users to scale their storage and compute resources together or independently.
PowerFlex also supports a wide range of operating environments: bare metal operating systems, hypervisors, and container platforms. It offers a robust toolset for simplifying IT operations for the entire infrastructure with PowerFlex Manager, automating complex life cycle management activities.
The transformation pillars of flexibility, performance, and scalability need a foundation on which to build to deliver the predictable outcomes. The infrastructure or fabric is that foundation—and Dell Enterprise SONiC is the networking operating system that builds this fabric.
Dell Enterprise SONiC: Open-source networking made real
SONiC is an open-source, Linux-network operating system. It started in the cloud-scale data center for a hyperscale deployment model. Its modular or container-based architecture allows it to expand into increasingly applicable edge, cloud, and Enterprise deployments.
Dell Enterprise SONiC is Dell’s own version of the SONiC community version. Dell’s version contains Dell proprietary features that provide the foundational fabric for our edge, cloud, and Enterprise customers delivering H/CI environments such as PowerFlex solutions.
H/CI environments require some basic networking features such as jumbo frames, link aggregation, line-rate performance, Quality of Service (QoS), simple Spanning-Tree port types (portfast/edge), and VLANs.
In addition to these basic Layer 2 features, Dell Enterprise SONiC provides VxLAN EVPN, Data Center Interconnect (DCI), MC-LAG, PoE, PoE+, 802.1x, and additional features for the edge, cloud, and Enterprise environments.
With Dell Enterprise SONiC, our customers can:
- Leverage the entire open networking product portfolio to facilitate transitions between platforms
- Deploy alert framework and streaming
- Have access to a growing third-party application ecosystem
- Count on round-the-clock, single-source, world-class support
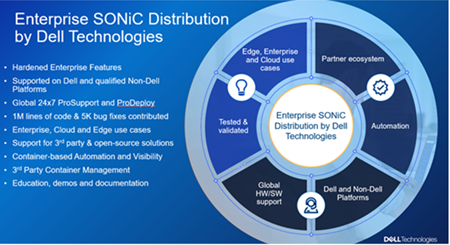 Dell Enterprise SONiC Distribution by Dell Technologies
The best of both of worlds
By combing PowerFlex and Dell Enterprise SONiC, you get the best of both worlds. When working alongside each other, these solutions deliver scalable databases, provide deep insight with next generation analytics, and consolidate IT systems to improve efficiency. Additionally, these solutions help integrate your cloud native applications, and bring together bleeding edge applications such as artificial intelligence and machine learning to create revenue streams.
 PowerFlex Appliance plus Dell Enterprise SONiC – a good match
Dell Enterprise SONiC brings open-source networking to the H/CI ecosystem by providing various competitive benefits. These include open architecture, community-driven development, vendor-neutrality, as well as enhanced scalability, performance, and security features. These benefits help to improve the efficiency, reliability, and security of an H/CI environment.
Together PowerFlex and Dell Enterprise SONiC deliver a unique solution based on innovative infrastructure open source for the next generation cloud, edge, and Enterprise IT providers for mission-critical workloads running on top of a hyperconverged or converged infrastructure.
For more information about these solutions, see the Dell Technologies Enterprise SONiC for PowerFlex Deployment Guide.
Related Blog Posts

Q1 2024 Update for Terraform Integrations with Dell Infrastructure

Tue, 02 Apr 2024 14:45:56 -0000
|Read Time: 0 minutes
This post covers all the new Terraform resources and data sources that have been released in the last two quarters: Q4’23 and Q1 ‘24. You can check out previous releases of Terraform providers here: Q1-2023, Q2-2023, and Q3-2023. I also covered the first release of PowerScale provider here.
Here is a summary of the Dell Terraform Provider versions released over the last two quarters:
- v1.1 and v1.2 of the provider for PowerScale
- v1.3 and v1.4 of the provider for PowerFlex
- v1.3 and v1.4 of the provider for PowerStore
- v1.2 of the Provider for OME
- v1.1 and v1.2 of the Provider for Redfish
PowerScale Provider v1.1 and v1.2
PowerScale received the most number of new Terraform capabilities in the last few months. New resources and corresponding data sources have been under the following workflow categories:
- Data Management
- User and Access Management
- Cluster Management
Data management
Following is the summary for the different resource-datasource pairs introduced to automate operations related to Data management on PowerScale:
Snapshots: CRUD operations for Snapshots
Here's an example of how to create a snapshot resource within a PowerScale storage environment using Terraform:
resource "powerscale_snapshot" "example_snapshot" {
  name        = "example-snapshot"
  filesystem  = powerscale_filesystem.example_fs.id
  description = "Example snapshot description"
  // Add any additional configurations as needed
}- name: Specifies the name of the snapshot to be created.
- filesystem: References the PowerScale filesystem for which the snapshot will be created.
- description: Provides a description for the snapshot.
Here's an example of how to retrieve information about existing snapshots within a PowerScale environment using Terraform:
data "powerscale_snapshot" "existing_snapshot" {
  name = "existing-snapshot"
}

output "snapshot_id" {
  value = data.powerscale_snapshot.existing_snapshot.id
}- name: Specifies the name of the existing snapshot to query.
Snapshot schedules: CRUD operations for Snapshot schedules
Following is an example of how to define a snapshot schedule resource:
resource "powerscale_snapshot_schedule" "example_schedule" {
  name                = "example-schedule"
  filesystem          = powerscale_filesystem.example_fs.id
  snapshot_type       = "weekly"
  retention_policy    = "4 weeks"
  snapshot_start_time = "23:00"
  // Add any additional configurations as needed
}- name: Specifies the name of the snapshot schedule.
- filesystem: References the PowerScale filesystem for which the snapshot schedule will be applied.
- snapshot_type: Specifies the type of snapshot schedule, such as "daily", "weekly", and so on.
- retention_policy: Defines the retention policy for the snapshots created by the schedule.
- snapshot_start_time: Specifies the time at which the snapshot creation process should begin.
Data Source Example:
The following example shows how to retrieve information about existing snapshot schedules within a PowerScale environment using Terraform. The powerscale_snapshot_schedule data source fetches information about the specified snapshot schedule. An output is defined to display the ID of the retrieved snapshot schedule:
data "powerscale_snapshot_schedule" "existing_schedule" {
  name = "existing-schedule"
}

output "schedule_id" {
  value = data.powerscale_snapshot_schedule.existing_schedule.id
}- name: Specifies the name of the existing snapshot schedule to query.
File Pool Policies: CRUD operations for File Pool Policies
File policies in PowerScale help establish policy-based workflows like file placement and tiering of files that match certain criteria. Following is an example of how the new file pool policy resource can be configured:
resource "powerscale_filepool_policy" "example_filepool_policy" {
  name = "filePoolPolicySample"
  is_default_policy = false

  file_matching_pattern = {
    or_criteria = [
      {
        and_criteria = [

          {
            operator = ">"
            type     = "size"
            units    = "B"
            value    = "1073741824"
          },
          {
            operator          = ">"
            type              = "birth_time"
             use_relative_time = true
            value             = "20"
          },
          {
            operator          = ">"
            type              = "metadata_changed_time"
             use_relative_time = false
            value             = "1704742200"
          },
          {
            operator          = "<"
            type              = "accessed_time"
             use_relative_time = true
            value             = "20"
          }
        ]
      },
      {
        and_criteria = [
          {
            operator          = "<"
            type              = "changed_time"
             use_relative_time = false
            value             = "1704820500"
          },
          {
             attribute_exists = false
            field            = "test"
            type             = "custom_attribute"
            value            = ""
          },
          {
            operator = "!="
            type     = "file_type"
            value    = "directory"
          },
          {
             begins_with    = false
            case_sensitive = true
            operator       = "!="
            type           = "path"
            value          = "test"
          },
          {
            case_sensitive = true
            operator       = "!="
            type           = "name"
            value          = "test"
          }
        ]
      }
    ]
  }
  # A list of actions to be taken for matching files. (Update Supported)
  actions = [

    {
       data_access_pattern_action = "concurrency"
      action_type                = "set_data_access_pattern"
    },
    {
       data_storage_policy_action = {
        ssd_strategy = "metadata"
        storagepool  = "anywhere"
      }
      action_type = "apply_data_storage_policy"
    },
    {
       snapshot_storage_policy_action = {
        ssd_strategy = "metadata"
        storagepool  = "anywhere"
      }
      action_type = "apply_snapshot_storage_policy"
    },
    {
       requested_protection_action = "default"
      action_type                 = "set_requested_protection"
    },
    {
       enable_coalescer_action = true
      action_type             = "enable_coalescer"
    },
    {
      enable_packing_action = true,
      action_type           = "enable_packing"
    },
    {
      action_type = "set_cloudpool_policy"
       cloudpool_policy_action = {
         archive_snapshot_files = true
        cache = {
          expiration = 86400
          read_ahead = "partial"
          type       = "cached"
        }
        compression                  = true
        data_retention               = 604800
        encryption                   = true
         full_backup_retention        = 145152000
         incremental_backup_retention = 145152000
        pool                         = "cloudPool_policy"
         writeback_frequency          = 32400
      }
    }
  ]

  description = "filePoolPolicySample description"

  apply_order = 1
}
You can import existing file pool policies using the file pool policy ID:
terraform import powerscale_filepool_policy.example_filepool_policy <policyID>
or by simply referencing the default policy:
terraform import powerscale_filepool_policy.example_filepool_policy is_default_policy=true
The data source can be used to get a handle to a particular file pool policy:
data "powerscale_filepool_policy" "example_filepool_policy" {
  filter {
    # Optional list of names to filter upon
    names = ["filePoolPolicySample", "Default policy"]
  }
}
or to get the complete list of policies including the default policy:
data "powerscale_filepool_policy" "all" {
}
You can then deference into the data structure as needed.
User and Access management
Following is a summary of the different resource-datasource pairs introduced to automate operations related to User and Access management on PowerScale:
LDAP Providers: CRUD operations
To create and manage LDAP providers, you can use the new resource as follows:
resource "powerscale_ldap_provider" "example_ldap_provider" {
  # Required params for creating and updating.
  name = "ldap_provider_test"
  # root of the tree in which to search identities.
  base_dn = "dc=tthe,dc=testLdap,dc=com"
  # Specifies the server URIs. Begin URIs with ldap:// or ldaps://
  server_uris = ["ldap://10.225.108.54"]
}
You can import existing LDAP providers using the provider name:
terraform import powerscale_ldap_provider.example_ldap_provider <ldapProviderName>
and also get a handle using the corresponding data source using a variety of criteria:
data "powerscale_ldap_provider" "example_ldap_provider" {
  filter {
    names = ["ldap_provider_name"]
    # If specified as "effective" or not specified, all fields are returned. If specified as "user", only fields with non-default values are shown. If specified as "default", the original values are returned.
    scope = "effective"
  }
}
ACL Settings: CRUD operations
PowerScale OneFS provides very powerful ACL capabilities, including a single namespace for multi-protocol access and its own internal ACL representation to perform access control. The internal ACL is presented as protocol-specific views of permissions so that NFS exports display POSIX mode bits for NFSv3 and shows ACL for NFSv4 and SMB. Now, we have a new resource to manage the global ACL settings for a given cluster:
resource "powerscale_aclsettings" "example_acl_settings" {
  # Optional fields both for creating and updating
  # Please check the acceptable inputs for each setting in the documentation
  #     access                  = "windows"
  #     calcmode                = "approx"
  #     calcmode_group          = "group_aces"
  #     calcmode_owner          = "owner_aces"
  #     calcmode_traverse       = "ignore"
  #     chmod                   = "merge"
  #     chmod_007               = "default"
  #     chmod_inheritable       = "no"
  #     chown                   = "owner_group_and_acl"
  #     create_over_smb         = "allow"
  #     dos_attr                = "deny_smb"
  #     group_owner_inheritance = "creator"
  #     rwx                     = "retain"
  #     synthetic_denies        = "remove"
  #     utimes                  = "only_owner"
}
Import is supported, and there is corresponding data source for the resource as well.
Smart Quotas: CRUD operations
Following is an example that shows how to define a quota resource:
resource "powerscale_quota" "example_quota" {
  name         = "example-quota"
  filesystem   = powerscale_filesystem.example_fs.id
  size         = "10GB"
  soft_limit   = "8GB"
  hard_limit   = "12GB"
  grace_period = "7d"
  // Add any additional configurations as needed
}- name: Specifies the name of the quota.
- filesystem: References the PowerScale filesystem to associate with the quota.
- size: Sets the size of the quota.
- soft_limit: Defines the soft limit for the quota.
- hard_limit: Defines the hard limit for the quota.
- grace_period: Specifies the grace period for the quota.
Data Source Example:
The following code snippet illustrates how to retrieve information about existing smart quotas within a PowerScale environment using Terraform. The powerscale_quota data source fetches information about the specified quota. An output is defined to display the ID of the retrieved quota:
data "powerscale_quota" "existing_quota" {
  name = "existing-quota"
}

output "quota_id" {
  value = data.powerscale_quota.existing_quota.id
}- name: Specifies the name of the existing smart quota to query.
Cluster management
Groupnet: CRUD operations
Following is an example that shows how to define a GroupNet resource:
resource "powerscale_groupnet" "example_groupnet" {
  name       = "example-groupnet"
  subnet     = powerscale_subnet.example_subnet.id
  gateway    = "192.168.1.1"
  netmask    = "255.255.255.0"
  vlan_id    = 100
  // Add any additional configurations as needed
}- name: Specifies the name of the GroupNet.
- subnet: References the PowerScale subnet to associate with the GroupNet.
- gateway: Specifies the gateway for the GroupNet.
- netmask: Defines the netmask for the GroupNet.
- vlan_id: Specifies the VLAN ID for the GroupNet.
Data Source Example:
The following code snippet illustrates how to retrieve information about existing GroupNets within a PowerScale environment using Terraform. The powerscale_groupnet data source fetches information about the specified GroupNet. An output is defined to display the ID of the retrieved GroupNet:
data "powerscale_groupnet" "existing_groupnet" {
  name = "existing-groupnet"
}

output "groupnet_id" {
  value = data.powerscale_groupnet.existing_groupnet.id
}- name: Specifies the name of the existing GroupNet to query.
Subnet: CRUD operations
Resource Example:
The following code snippet shows how to provision a new subnet:
resource "powerscale_subnet" "example_subnet" {
  name         = "example-subnet"
  ip_range     = "192.168.1.0/24"
  network_mask = 24
  gateway      = "192.168.1.1"
  dns_servers  = ["8.8.8.8", "8.8.4.4"]
  // Add any additional configurations as needed
}- name: Specifies the name of the subnet to be created.
- ip_range: Defines the IP range for the subnet.
- network_mask: Specifies the network mask for the subnet.
- gateway: Specifies the gateway for the subnet.
- dns_servers: Lists the DNS servers associated with the subnet.
Data Source Example:
The powerscale_subnet data source fetches information about the specified subnet. The following code snippet illustrates how to retrieve information about existing subnets within a PowerScale environment. An output block is defined to display the ID of the retrieved subnet:
data "powerscale_subnet" "existing_subnet" {
  name = "existing-subnet"
}

output "subnet_id" {
  value = data.powerscale_subnet.existing_subnet.id
}- name: Specifies the name of the existing subnet to query. The result is stored in the data object called existing_subnet.
Network pool
Following is an example demonstrating how to define a network pool resource:
resource "powerscale_networkpool" "example_network_pool" {
  name       = "example-network-pool"
  subnet     = powerscale_subnet.example_subnet.id
  gateway    = "192.168.1.1"
  netmask    = "255.255.255.0"
  start_addr = "192.168.1.100"
  end_addr   = "192.168.1.200"
  // Add any additional configurations as needed
}- name: Specifies the name of the network pool.
- subnet: References the PowerScale subnet to associate with the network pool.
- gateway: Specifies the gateway for the network pool.
- netmask: Defines the netmask for the network pool.
- start_addr and end_addr: Specify the starting and ending IP addresses for the network pool range.
Data Source Example:
The following code snippet illustrates how to retrieve information about existing network pools. The powerscale_networkpool data source fetches information about the specified network pool. An output is defined to display the ID of the retrieved network pool:
data "powerscale_networkpool" "existing_network_pool" {
  name = "existing-network-pool"
}

output "network_pool_id" {
  value = data.powerscale_networkpool.existing_network_pool.id
}- name: Specifies the name of the existing network pool to query.
SmartPool settings
Here's an example that shows how to configure SmartPool settings within a PowerScale storage environment using Terraform:
resource "powerscale_smartpool_settings" "example_smartpool_settings" {
  name                    = "example-smartpool-settings"
  default_policy          = "balanced"
  compression             = true
  deduplication           = true
  auto_tiering            = true
  auto_tiering_policy     = "performance"
   auto_tiering_frequency  = "weekly"
  // Add any additional configurations as needed
}- name: Specifies the name of the SmartPool settings.
- default_policy: Sets the default policy for SmartPool.
- compression: Enables or disables compression.
- deduplication: Enables or disables deduplication.
- auto_tiering: Enables or disables auto-tiering.
- auto_tiering_policy: Sets the policy for auto-tiering.
- auto_tiering_frequency: Sets the frequency for auto-tiering.
Data Source Example:
The following example shows how to retrieve information about existing SmartPool settings within a PowerScale environment using Terraform. The powerscale_smartpool_settings data source fetches information about the specified SmartPool settings. An output is defined to display the ID of the retrieved SmartPool settings:
data “powerscale_smartpool_settings” “existing_smartpool_settings” {
  name = “existing-smartpool-settings”
}

output “smartpool_settings_id” {
  value = data.powerscale_smartpool_settings.existing_smartpool_settings.id
}- name: Specifies the name of the existing SmartPool settings to query.
New resources
New resources and datasources are also available for the following entities:
- NTP Server
- NTP Settings
- Cluster Email Settings
In addition to the previously mentioned resource-datasource pairs for PowerScale Networking, an option to enable or disable “Source based networking” has been added to the Network settings resource. The corresponding datasources can retrieve this setting on a PowerScale cluster.
PowerFlex Provider v1.3 and v1.4
The following new resources and corresponding datasources have been added to PowerFlex:
Fault Sets: CRUD and Import operations
The following is an example that shows how to define a Fault Set resource within a PowerFlex storage environment using Terraform:
resource "powerflex_fault_set" "example_fault_set" {
  name           = "example-fault-set"
  protection_domain_id = powerflex_protection_domain.example_pd.id
  fault_set_type = "RAID-1"
  // Add any additional configurations as needed
}- name: Specifies the name of the Fault Set.
- protection_domain_id: References the PowerFlex Protection Domain to associate with the Fault Set.
- fault_set_type: Defines the type of Fault Set, such as "RAID-1".
If you would like to bring an existing fault set resource into Terraform state management, you can import it using the fault set id:
terraform import powerflex_fault_set.fs_import_by_id "<id>"
Data Source Example:
The following code snippet illustrates how to retrieve information about existing Fault Sets within a PowerFlex environment using Terraform. The powerflex_fault_set data source fetches information about the specified Fault Set. An output is defined to display the ID of the retrieved Fault Set:
Ldata "powerflex_fault_set" "existing_fault_set" {
  name = "existing-fault-set"
}

output "fault_set_id" {
  value = data.powerflex_fault_set.existing_fault_set.id
}- name: Specifies the name of the existing Fault Set to query.
Snapshot policies: CRUD operations
- Snapshot policy resource – create, update, and delete.
- Snapshot policy data source – to get information of an existing policy.
Two new data sources
- powerflex_node: to get complete information related to a PowerFlex node firmware, hardware, and node health details.
- powerflex_template: this is a massive object that has information categorized into multiple groups within this object.
OME Provider v1.2
Following are the new resources to support Firmware baselining and compliance that have been added to the Dell OME Provider:
- Firmware Catalog
- Firmware Baselines
Firmware Catalog
Here is an example of how the catalog resource can be used to create or update catalogs:
# Resource to manage a new firmware catalog
resource "ome_firmware_catalog" "firmware_catalog_example" {
  # Name of the catalog required
  name = "example_catalog_1"

  # Catalog Update Type required.
  # Sets to Manual or Automatic on schedule catalog updates of the catalog.
  # Defaults to manual.
  catalog_update_type = "Automatic"

  # Share type required.
  # Sets the different types of shares (DELL_ONLINE, NFS, CIFS, HTTP, HTTPS)
  # Defaults to DELL_ONLINE
  share_type = "HTTPS"

  # Catalog file path, required for share types (NFS, CIFS, HTTP, HTTPS)
  # Start directory path without leading '/' and use alphanumeric characters.
  catalog_file_path = "catalogs/example_catalog_1.xml"

  # Share Address required for share types (NFS, CIFS, HTTP, HTTPS)
  # Must be a valid ipv4 (x.x.x.x), ipv6(xxxx:xxxx:xxxx:xxxx:xxxx:xxxx:xxxx:xxxx), or fqdn(example.com)
  # And include the protocol prefix ie (https://)
  share_address = "https://1.2.2.1"

  # Catalog refresh schedule, Required for catalog_update_type Automatic.
  # Sets the frequency of the catalog refresh.
  # Will be ignored if catalog_update_type is set to manual.
  catalog_refresh_schedule = {
    # Sets to (Weekly or Daily)
    cadence = "Weekly"
    # Sets the day of the week (Monday, Tuesday, Wednesday, Thursday, Friday, Saturday, Sunday)
    day_of_the_week = "Wednesday"
    # Sets the hour of the day (1-12)
    time_of_day = "6"
    # Sets (AM or PM)
    am_pm = "PM"
  }

  # Domain optional value for the share (CIFS), for other share types this will be ignored
  domain = "example"

  # Share user required value for the share (CIFS), optional value for the share (HTTPS)
  share_user = "example-user"

  # Share password required value for the share (CIFS), optional value for the share (HTTPS)
  share_password = "example-pass"
}
Existing catalogs can be imported into the Terraform state with the import command:
# terraform import ome_firmware_catalog.cat_1 <id>
terraform import ome_firmware_catalog.cat_1 1
After running the import command, populate the name field in the config file to start managing this resource.
Firmware Baseline
Here is an example that shows how a baseline can be compared to an array of individual devices or device groups:
# Resource to manage a new firmware baseline
resource "ome_firmware_baseline" "firmware_baseline" {
  // Required Fields
  # Name of the catalog
  catalog_name = "tfacc_catalog_dell_online_1"
  # Name of the Baseline
  name = "baselinetest"

  // Only one of the following fields (device_names, group_names , device_service_tags) is required
  # List of the Device names to associate with the firmware baseline.
  device_names = ["10.2.2.1"]

  # List of the Group names to associate with the firmware baseline.
  # group_names = ["HCI Appliances","Hyper-V Servers"]

  # List of the Device service tags to associate with the firmware baseline.
  # device_service_tags = ["HRPB0M3"]

  // Optional Fields
  // This must always be set to true. The size of the DUP files used is 64 bits."
  #is_64_bit = true

  // Filters applicable updates where no reboot is required during create baseline for firmware updates. This field is set to false by default.
   #filter_no_reboot_required = true

  # Description of the firmware baseline
  description = "test baseline"
}
Although the resource supports terraform import, in most cases a new baseline can be created using a Firmware catalog entry.
Following is a list of new data sources and supported operations in Terraform Provider for Dell OME:
- Firmware Repository
- Firmware Baseline Compliance Report
- Firmware Catalog
- Device Compliance Report
RedFish Provider v1.1 and 1.2
Several new resources have been added to the Redfish provider to access and set different iDRAC attribute sets. Following are the details:
Certificate Resource
This is a resource for the import of the ssl certificate to iDRAC based on the input parameter Type. After importing the certificate, the iDRAC will automatically restart. By default, iDRAC comes with a self-signed certificate for its web server. If the user wants to replace with his/her own server certificate (signed by Trusted CA), two kinds of SSL certificates are supported: (1) Server certificate and (2) Custom certificate. Following are the steps to generate these certificates:
- Server Certificate:
- Generate the CSR from iDRAC.
- Create the certificate using CSR and sign with trusted CA.
- The certificate should be signed with hashing algorithm equivalent to sha256
- Custom Certificate:
- An externally created custom certificate which can be imported into the iDRAC.
- Convert the external custom certificate into PKCS#12 format, and it should be encoded via base64. The conversion requires passphrase which should be provided in 'passphrase' attribute.
Boot Order Resource
This Terraform resource is used to configure Boot Order and enable/disable Boot Options of the iDRAC Server. We can read the existing configurations or modify them using this resource.
Boot Source Override Resource
This Terraform resource is used to configure Boot sources of the iDRAC Server. If the state in boot_source_override_enabled is set once or continuous, the value is reset to disabled after the boot_source_override_target actions have completed successfully. Changes to these options do not alter the BIOS persistent boot order configuration.
Manager Reset
This resource is used to reset the manager.
Lifecycle Controller Attributes Resource
This Terraform resource is used to get and set the attributes of the iDRAC Lifecycle Controller.
System Attributes Resource
This Terraform resource is used to configure System Attributes of the iDRAC Server. We can read the existing configurations or modify them using this resource. Import is also supported for this resource to include existing System Attributes in Terraform state.
iDRAC Firmware Update Resource
This Terraform resource is used to update the firmware of the iDRAC Server based on a catalog entry.
Resources
Here are the link sets for key resources for each of the Dell Terraform providers:
- Provider for PowerScale
- Provider for PowerFlex
- Provider for PowerStore
- Provider for Redfish
Author: Parasar Kodati, Engineering Technologist, Dell ISG

Be more agile with EVPN Multihoming (MH)
Thu, 04 Jan 2024 16:51:10 -0000
|Read Time: 0 minutes
Let’s talk about enhancing your basic EVPN fabric. In your typical data center EVPN fabric, an end host uses dual homed connections onto the leaf or Top of Rack (ToR) switches.
The ToRs are usually a pair of switches configured with multi-chassis link aggregation (MC-LAG) to provide end-host link redundancy if one of the ToRs failed.
These links are Layer 2 with spanning-tree deployed on the fabric. Spanning tree typically blocks half of the links to avoid any network loops. As a result, the fabric bandwidth is cut in half. This only happens when the LAG consists of single links, as demonstrated in Figure 2.
However, if there was a way to attain link redundancy, flexibility, and full link bandwidth utilization things could be more interesting in the EVPN landscape.
Dell Enterprise SONiC 4.2 brings EVPN multihoming into the data center. It is a standards-based replacement for multi-chassis link aggregation (Multi-chassis Link Aggregation Group) and legacy stacking technology.
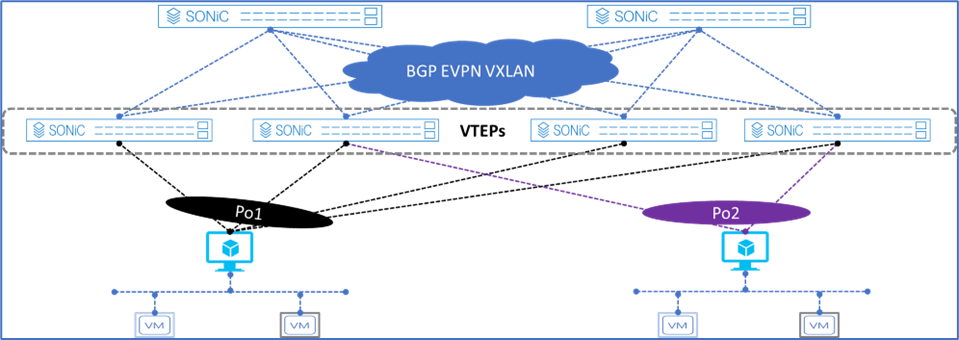
Figure 1. Dell Enterprise SONiC EVPN MH
Figure 1 shows the supported Dell Enterprise SONiC EVPN MH deployment. It shows the maximum number of VTEPs that can be connected to a single end host.
These connections are independent, meaning each link belonging to the link aggregation (LAG) can be connected to multiple independent upstream switches and these upstream switches do not have to be interconnected.
Deployment simplicity is the main benefit of EVPN MH, as all the connections only have to be connected from the end-host or server to the switches.
Achieve end host enhanced connectivity and link efficiency with EVPN MH
In an EVPN fabric, especially a data center fabric, the end hosts or servers are dual homed to a pair of Top of Rack (ToR) switches providing link redundancy. This deployment is common and it uses MC-LAG.
The other deployment option is known as stacking. This option involves several switches stacked together with a primary switch acting as the controller of the stack. All end-hosts or servers are connected to each of the switches part of the stack.
Note: A stack consisting of a single switch is also possible, but rarely deployed.
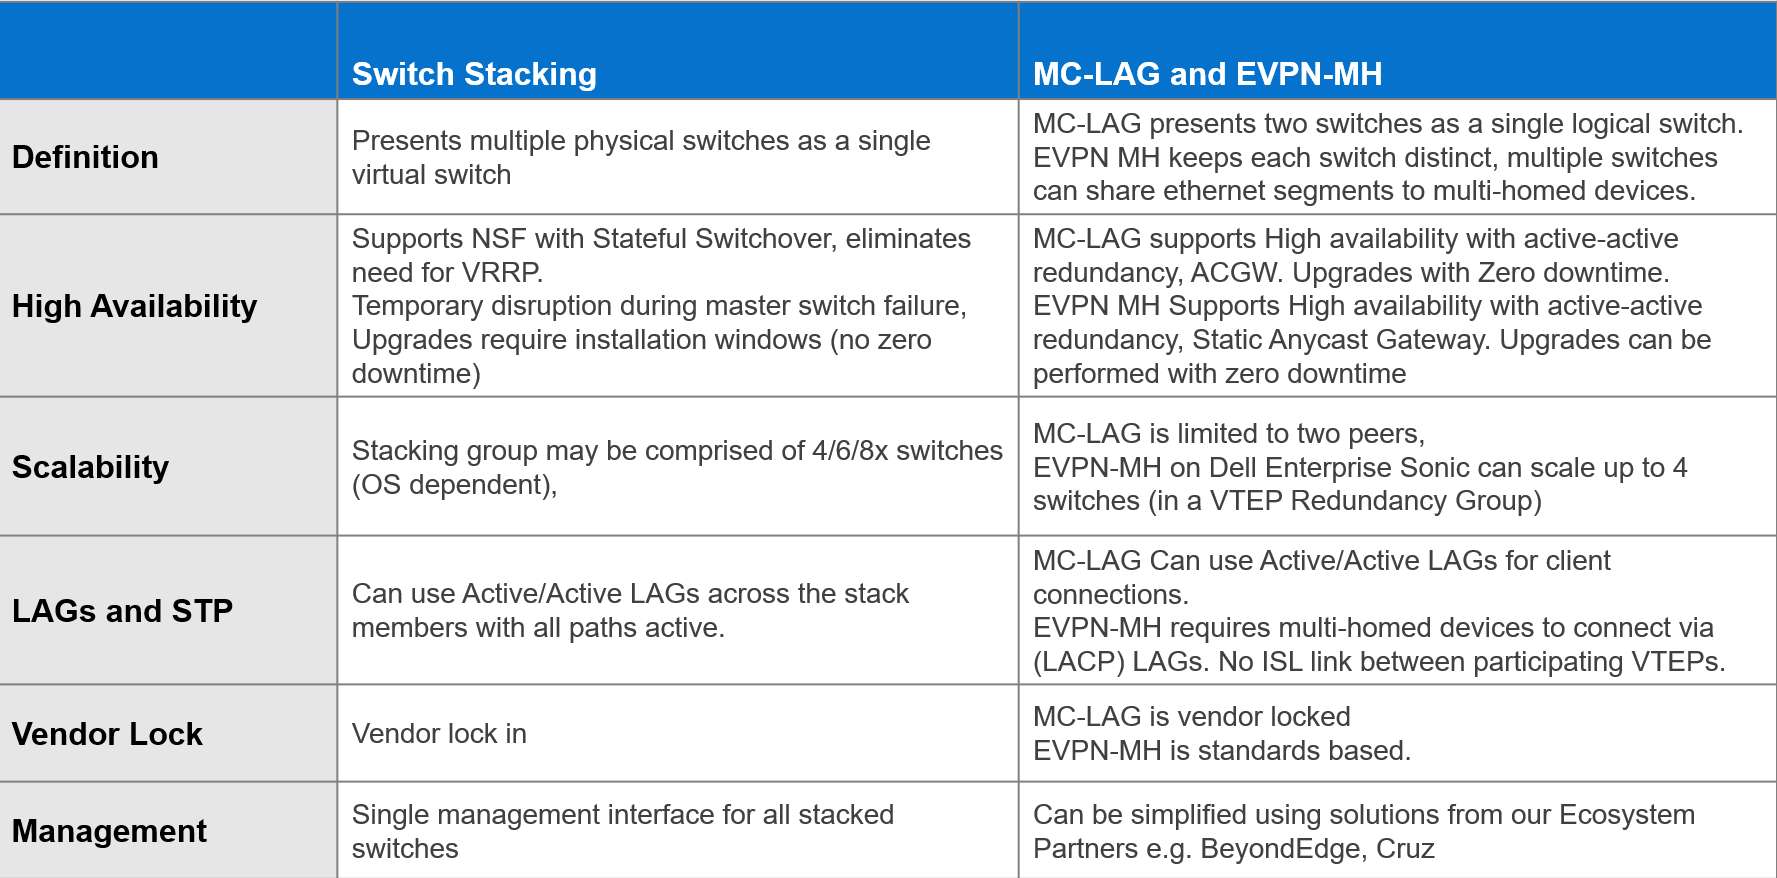
Both deployments offer link and device redundancy, but they have some limitations that EVPN MH can overcome. The benefits and limitations for each deployment option are described in the following lists.
MC-LAG deployment
- A minimum of two ToR/Leaf switches are required
- A single switch deployment is not supported
- An end host or server can connect only up to two ToRs/Leaf switches at any given time
- All connections from the end-host or server are Layer 2 based
Stacking deployment
- A maximum of eight switches are stacked with one primary or controller switch
- Specific types of stacking cables are required to form the stack
- A single switch deployment is not supported
- All end hosts or servers connect to each switch part of the stack to maintain link redundancy, resulting in a cable management situation
- All connections from the end-host or server are Layer 2 based
EVPN multihoming deployment
- A minimum of one ToR/Leaf switch is required
- An end-host or server can connect to four separate ToR/Leaf switches (VTEPs) at any given time
- All links from the end-host or server to the VTEPs are active
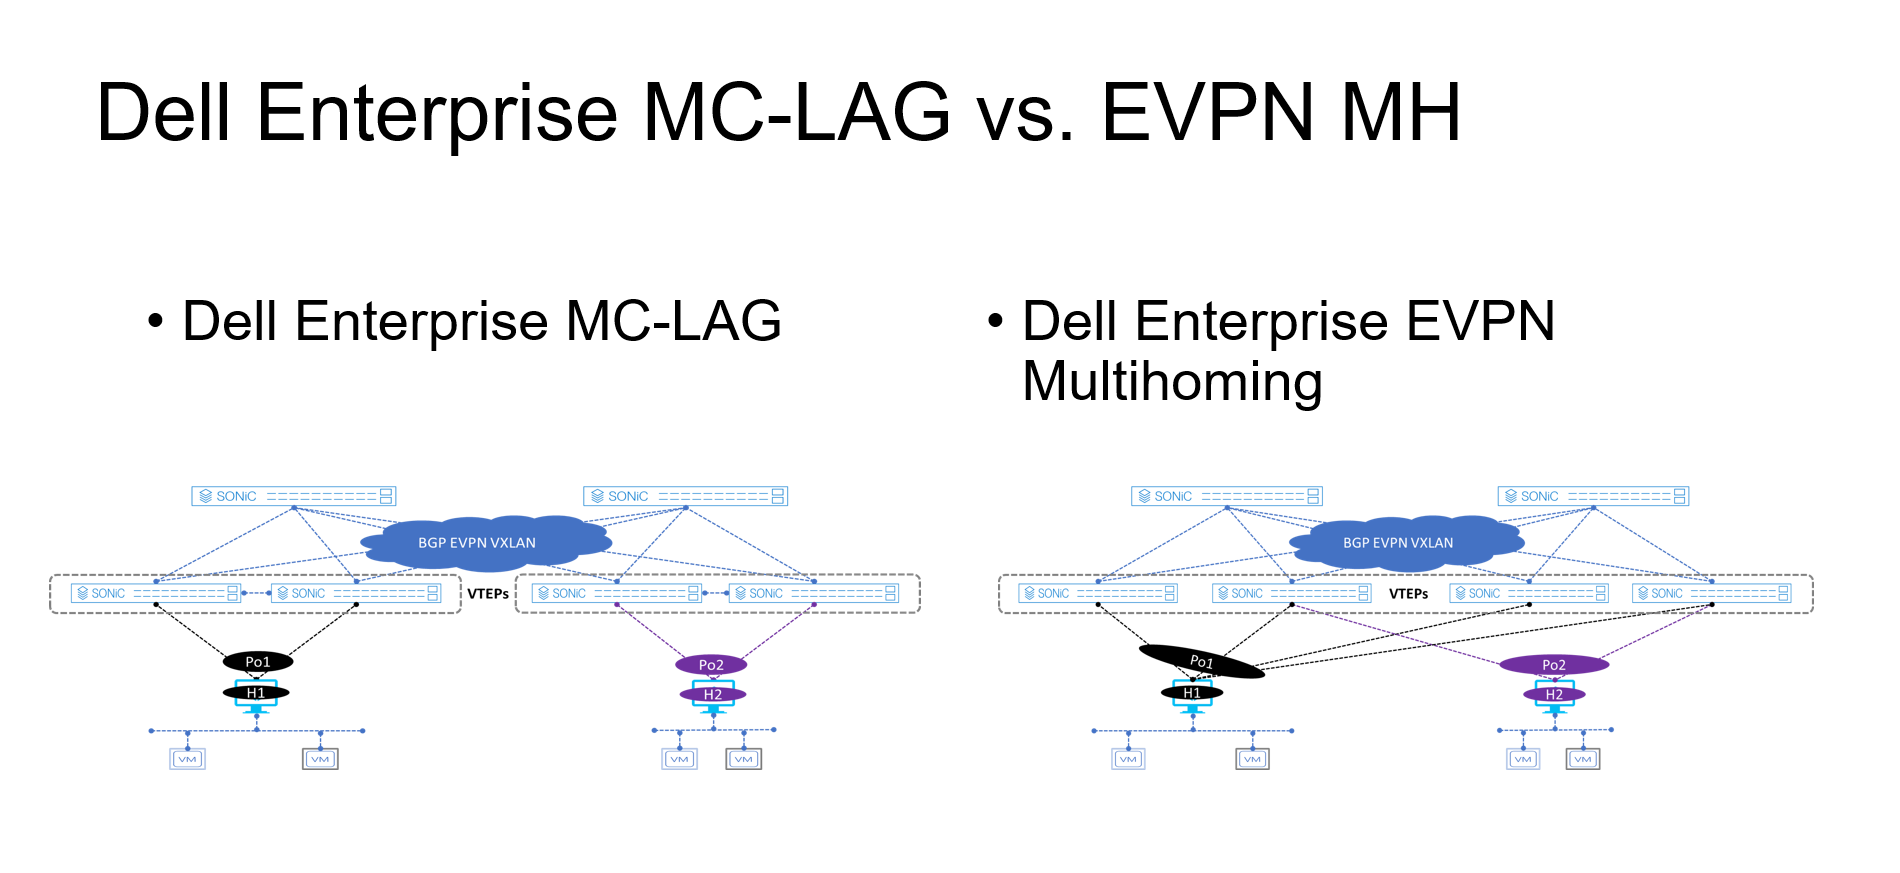
Figure 2. MC-LAG vs. EVPN multihoming deployment
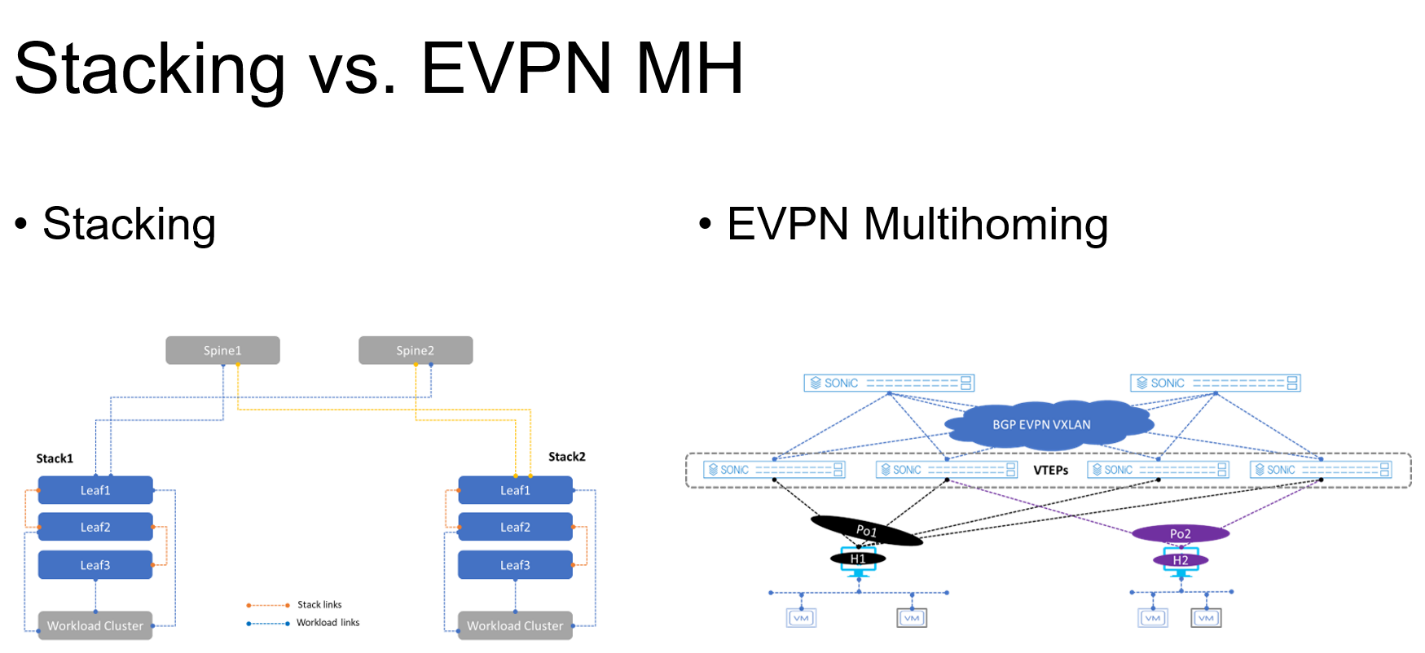
Figure 3. Stacking vs. EVPN multihoming deployment
The advantages offered by EVPN multihoming are clear when compared with the traditional stacking and MC-LAG. Table 1 summarizes these differences.
Table 1. Stacking compared to MC-LAG and EVPN-MH
EVPN offers an upgrade to the legacy Layer 2 VPN technology. EVPN should be considered each time a new fabric is deployed, especially when virtualization is one of the workloads.
Dell Enterprise SONiC 4.2 offers even more simplicity into the adoption of EVPN in the data center.
Additional resources
Dell Enterprise SONiC 4.2.0 User Guide (log in required)