

NVIDIA Metropolis and DeepStream SDK: The Fast Lane to Vision AI Solutions
Mon, 29 Apr 2024 19:31:34 -0000
|Read Time: 0 minutes
What does it take to create an AI vision pipeline using modern tools on a Dell platform?
This blog describes how to implement object detection from a webcam video stream. The steps include:
- Install DeepStream software with a Docker container
- Process webcam Real Time Streaming Protocol (RTSP) output
- Detect objects (person, car, sign, bicycle) in each frame in near real time
- Draw bounding boxes with identifiers around the objects
- Stream the output using RTSP
NVIDIA Metropolis is an application framework with a set of developer tools that reside in a partner ecosystem. It features GPU-accelerated SDKs and tools to build, deploy, and scale AI-enabled video analytics and Internet of Things (IoT) applications optimally.
This blog focusses on NVIDIA DeepStream, which is one of the SDKs of the NVIDIA Metropolis stack. NVIDIA DeepStream SDK is a complete streaming analytics toolkit for AI-based multi-sensor processing, video, audio, and image understanding. Developers can use DeepStream SDK to create stream processing pipelines that incorporate neural networks and other complex processing tasks such as tracking, video encoding and decoding, IOT message brokers, and video rendering. DeepStream includes an open source Gstreamer project.
Metropolis-based components and solutions enable AI solutions that apply to a broad range of industries like manufacturing, retail, healthcare, and smart cities in the edge ecosystem.
The following figure shows the NVIDIA Metropolis framework:
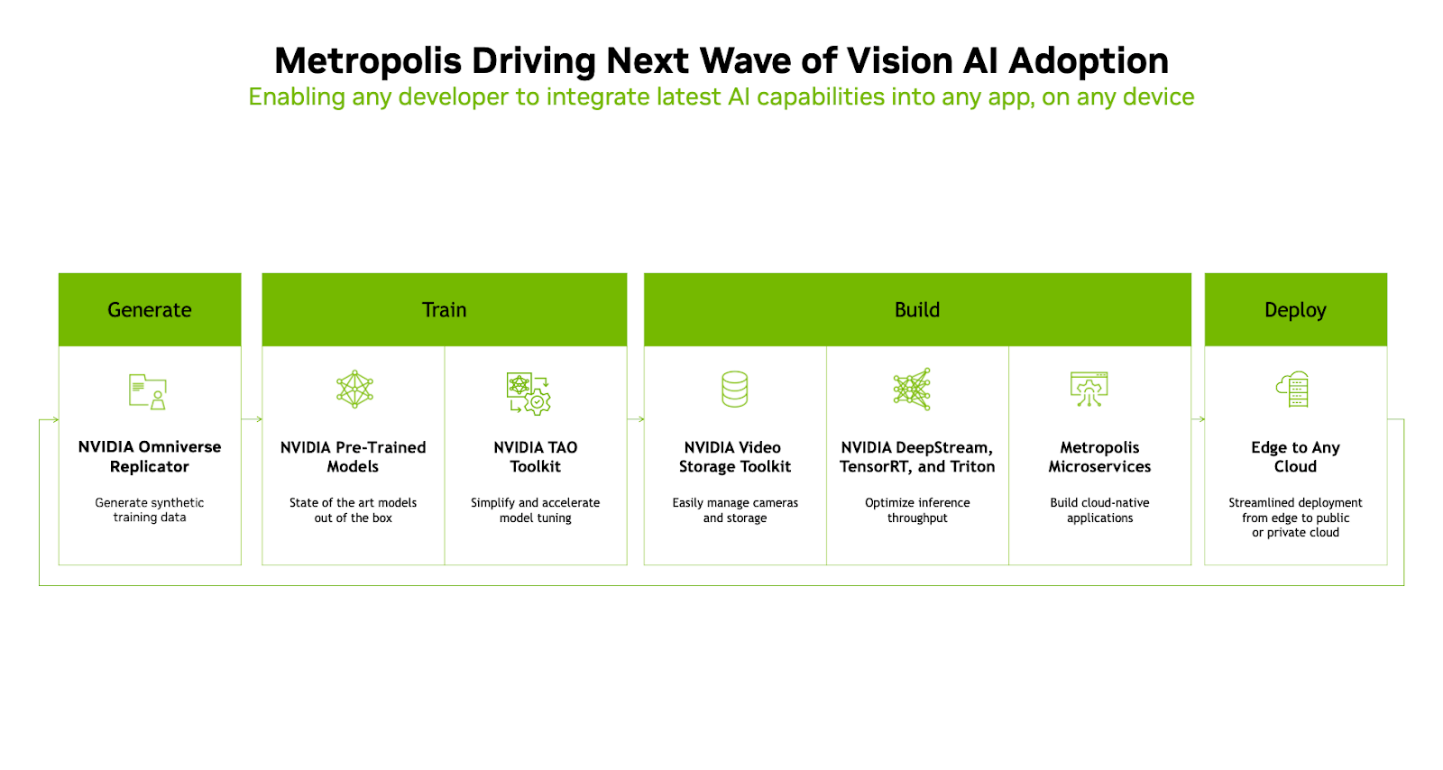
The NVIDIA Metropolis framework consists of the following stages:
Generate─The stage in which images, video streams, and data originate. The data can be real-time data or synthetic data generated by using Synthetic Data Generation (SDG) tools. NVIDIA tools like NVIDIA Omniverse Replicator fit into this stage of the pipeline.
Train─The stage that uses the data from the Generate stage to feed into pretrained models and enables accelerated model tuning. Models developed from standard AI frameworks like TensorFlow and PyTorch are used in this stage and integrate into the Metropolis framework workflow. The NVIDIA Train, Adapt, and Optimize (TAO) toolkit is a low-code AI model development SDK that helps tune the pretrained models.
Build─The stage of the pipeline in which the core functionality of the Vision AI pipeline is performed. The Build stage of the pipeline includes the NVIDIA video storage toolkit, DeepStream, TensorRT, Triton, and Metropolis Microservices. The libraries and functions in these SDK components provide capabilities such as video codec, streaming analytics, inference optimization, runtime libraries, and inference services.
Deploy─The stage that deploys containerized AI solutions into the production environment at the edge or cloud. The deployment of containerized AI solutions uses industry-standard container orchestration technologies such as Kubernetes and Docker.
Test setup
The test setup includes the following hardware:
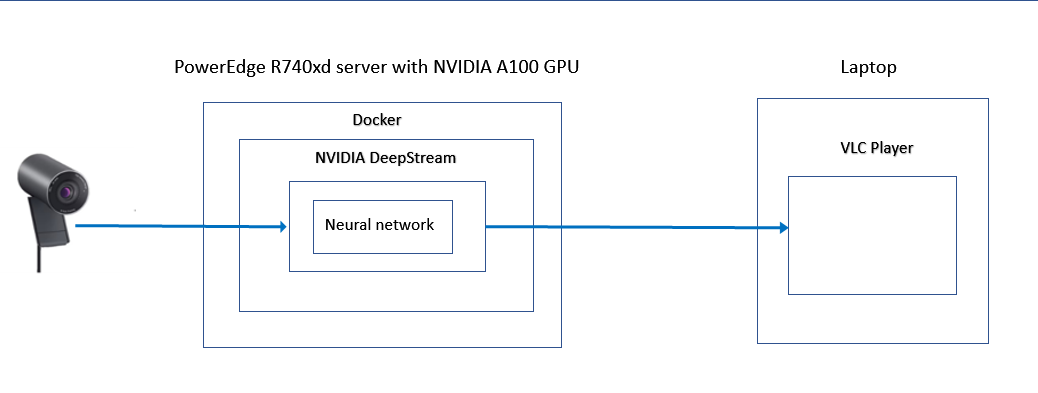
- Dell PowerEdge R740xd server with an NVIDIA A100 GPU
- Dell PowerEdge R750 server with an NVIDIA A16 GPU
- A 1080p webcam capable of streaming RTSP output and supporting H.264
- Client or laptop with VLC Media Player for viewing results
Note: Two servers are not required. We ran the demo on both servers to test different configurations. This hardware was available in the lab; we recommend the latest hardware for the best performance.
The test setup includes the following software:
- Ubuntu 20.04 server
- NVIDIA CUDA Toolkit and drivers
- Docker runtime
The following figure shows an example configuration:
Install NVIDIA CUDA
Enabling the CUDA toolkit on top of the base Ubuntu Linux operating system provides the necessary drivers and tools required to access the NVIDIA GPUs.
The requirements for the CUDA toolkit installation include:
- A CUDA-capable GPU on the platform running the base Linux operating system
- A supported version of the GCC compiler and toolchain on the Linux operating system
- The CUDA Toolkit
- Install the GCC compiler and other developer tool chains and libraries:
ssudo apt-get update
ssudo apt-get install build-essential
- Verify that the installation is successful:
gcc --version
- Install the NVIDIA GPU CUDA toolkit and NVIDIA Container Toolkit:
sudo sh NVIDIA-Linux-x86_64-515.76.run
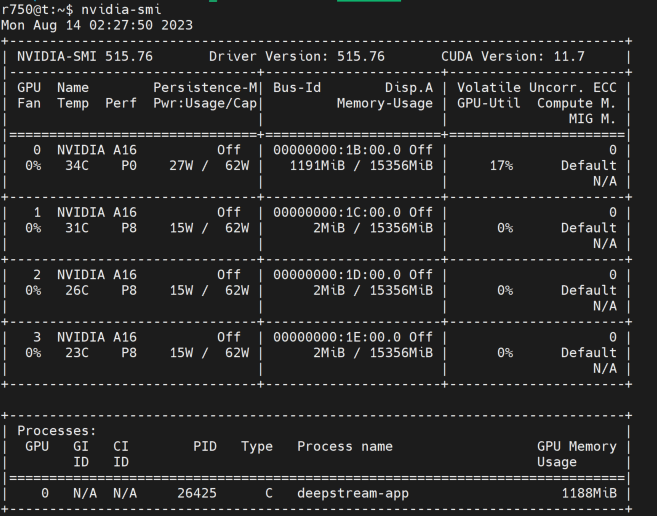
Note: For the PowerEdge system with an NVIDIA A16 GPU, the latest version of CUDA toolkit 12.2 did not function properly. After the installation, the nvidia-smi tool was unable to identify the GPU and activate the driver. Therefore, we chose an earlier version of the runfile (local installer) to install the CUDA toolkit package. We used CUDA Version 11.7 with driver version 515.76. The file used is NVIDIA-Linux-x86_64-515.76.run. - After installing the CUDA toolkit, see the nvidia-smi output for details about the GPU on the system:
nvidia-smi
Install Docker Runtime
The following steps describe how to enable a Docker container runtime on top of the base operating system and enabling access to the GPUs from the container environment. With the release of Docker 19.03 and later, nvidia-docker2 packages are no longer required to access the NVIDIA GPUs from the Docker container environment as they are natively supported in Docker runtime.
Perform these steps in Ubuntu 20.04:
- Update the apt package index and allow Advanced Packaging Tool (APT) to use a repository over HTTPS:
sudo apt-get update
ssudo apt-get install ca-certificates curl gnupg
- Add Docker's official GPG key:
sudo install -m 0755 -d /etc/apt/keyrings
curl -fsSL https://download.docker.com/linux/ubuntu/gpg | sudo gpg --dearmor -o /etc/apt/keyrings/docker.gpg
sudo chmod a+r /etc/apt/keyrings/docker.gpg
- Set up the repository:
sudo echo\
 "deb [arch="$(dpkg --print-architecture)" signed-by=/etc/apt/keyrings/docker.gpg] https://download.docker.com/linux/ubuntu \
 "$(. /etc/os-release && echo "$VERSION_CODENAME")" stable" | \
sudo tee /etc/apt/sources.list.d/docker.list > /dev/null
- Update the apt package index:
sudo apt-get update
- Install the latest version of the Docker engine:
sudo apt-get install docker-ce docker-ce-cli containerd.io docker-buildx-plugin docker-compose-plugin
- Verify that Docker is installed:
sudo docker run hello-world
After the Docker engine is installed, install the NVIDIA Container Toolkit and enable the NVIDIA runtime to Docker runtime. This step makes the GPUs detectable to the Docker containers.
- Set up the package repository and the GPG key:
distribution=$(. /etc/os-release;echo $ID$VERSION_ID) \
       && curl -fsSL https://nvidia.github.io/libnvidia-container/gpgkey | sudo gpg --dearmor -o /usr/share/keyrings/nvidia-container-toolkit-keyring.gpg \
       && curl -s -L https://nvidia.github.io/libnvidia-container/$distribution/libnvidia-container.list | \
            sed 's#deb https://#deb [signed-by=/usr/share/keyrings/nvidia-container-toolkit-keyring.gpg] https://#g' | \
            sudo tee /etc/apt/sources.list.d/nvidia-container-toolkit.list
After installing the repository sources, perform the following steps:
- Update the repository list:
sudo apt-get update
- Install the NVIDIA Container Toolkit:
sudo apt-get install -y nvidia-container-toolkit
- Configure the Docker daemon to recognize the NVIDIA Container Runtime:
sudo nvidia-ctk runtime configure --runtime=docker
- Set the default runtime and then restart the Docker daemon to complete the installation:
sudo systemctl restart docker
- Verify that the GPUs are visible from inside a container:
sudo docker run –rm –runtime=nvidia –gpus all nvidia/cuda:11.6.2-base-ubuntu20.04 nvidia-smi
The following figure shows the NVIDIA SMI output: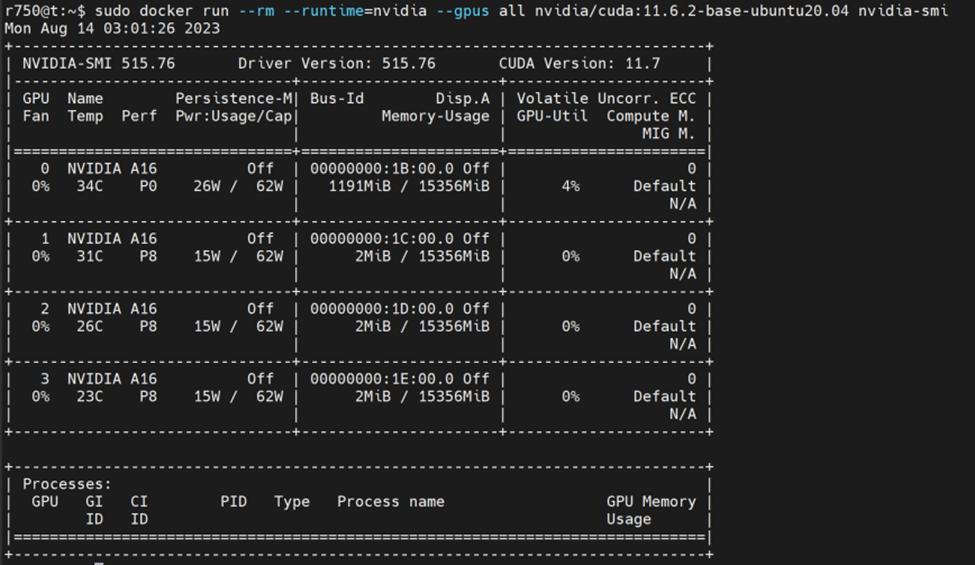
Run the DeepStream Docker Container
To run the DeepStream Docker Container, perform the following steps:
- Obtain the DeepStream docker container:
sudo docker pull nvcr.io/nvidia/deepstream:6.2-devel
At the time of this blog, the latest version is v6.2. Because the container is large, we recommend that you pull it down first before using it. It takes a few minutes to fully download all the container layers. - When the container is fully downloaded, run:
sudo docker run --gpus all -it --rm -p 8554:8554 nvcr.io/nvidia/deepstream:6.2-devel
This command instructs Docker to use any GPU it detects, run interactively, delete itself at termination, and open port 8554 for the RTSP output stream.
When the command runs, the following output indicates that the Docker container is accessible and in interactive mode:root@9cfa2cfeb11b:/opt/nvidia/deepstream/deepstream-6.2#
Configure DeepStream inside a Docker Container
In the Docker container, make configuration changes so that the demo runs properly.
- Install the required dependencies:
/opt/nvidia/deepstream/deepstream/user_additional_install.sh
The resulting output is long. The following example shows the beginning of the output of a successful installation:Get:1 file:/var/nv-tensorrt-local-repo-ubuntu2004-8.5.2-cuda-11.8 InRelease [1575 B] Get:1 file:/var/nv-tensorrt-local-repo-ubuntu2004-8.5.2-cuda-11.8 InRelease [1575 B] Hit:2 http://archive.ubuntu.com/ubuntu focal InRelease
The following example shows the end of the output of a successful installation:Setting up libavfilter7:amd64 (7:4.2.7-0ubuntu0.1) ... Setting up libavresample-dev:amd64 (7:4.2.7-0ubuntu0.1) ... Processing triggers for libc-bin (2.31-0ubuntu9.9) ...
When we did not perform this step and tried to run the demo, we received the following error message, which is a common error reported on message boards:(gst-plugin-scanner:12): GStreamer-WARNING **: 18:35:29.078: Failed to load plugin '/usr/lib/x86_64-linux-gnu/gstreamer-1.0/libgstchromaprint.so': libavcodec.so.58: cannot open shared object file: No such file or directory (gst-plugin-scanner:12): GStreamer-WARNING **: 18:35:29.110: Failed to load plugin '/usr/lib/x86_64-linux-gnu/gstreamer-1.0/libgstmpeg2dec.so': libmpeg2.so.0: cannot open shared object file: No such file or directory (gst-plugin-scanner:12): GStreamer-WARNING **: 18:35:29.111: Failed to load plugin '/usr/lib/x86_64-linux-gnu/gstreamer-1.0/libgstmpeg2enc.so': libmpeg2encpp-2.1.so.0: cannot open shared object file: No such file or directory (gst-plugin-scanner:12): GStreamer-WARNING **: 18:35:29.112: Failed to load plugin '/usr/lib/x86_64-linux-gnu/gstreamer-1.0/libgstmpg123.so': libmpg123.so.0: cannot open shared object file: No such file or directory (gst-plugin-scanner:12): GStreamer-WARNING **: 18:35:29.117: Failed to load plugin '/usr/lib/x86_64-linux-gnu/gstreamer-1.0/libgstopenmpt.so': libmpg123.so.0: cannot open shared object file: No such file or directory (gst-plugin-scanner:12): GStreamer-WARNING **: 18:35:31.675: Failed to load plugin '/usr/lib/x86_64-linux-gnu/gstreamer-1.0/deepstream/libnvdsgst_inferserver.so': libtritonserver.so: cannot open shared object file: No such file or directory (gst-plugin-scanner:12): GStreamer-WARNING **: 18:35:31.699: Failed to load plugin '/usr/lib/x86_64-linux-gnu/gstreamer-1.0/deepstream/libnvdsgst_udp.so': librivermax.so.0: cannot open shared object file: No such file or directory ** ERROR: <create_udpsink_bin:644>: Failed to create 'sink_sub_bin_encoder1' ** ERROR: <create_udpsink_bin:719>: create_udpsink_bin failed ** ERROR: <create_sink_bin:828>: create_sink_bin failed ** ERROR: <create_processing_instance:884>: create_processing_instance failed ** ERROR: <create_pipeline:1485>: create_pipeline failed ** ERROR: <main:697>: Failed to create pipeline Quitting App run failed
- Change directories and edit the configuration file:
cd samples

vim configs/deepstream-app/source30_1080p_dec_infer-resnet_tiled_display_int8.txt
- Find the following entries:
[tiled-display]
enable=1
- Change enable=1 to enable=0.
A nontiled display makes it easier to compare the before and after webcam video streams. - Find the following entries:
[source0]
enable=1
#Type - 1=CameraV4L2 2=URI 3=MultiURI 4=RTSP
type=3
uri=file://../../streams/sample_1080p_h264.mp4
- Change:
• type=3 to type=4
• uri to uri=rtsp://192.168.10.210:554/s0
Note: This URI is to the webcam that is streaming output. - Find the following entries:|
[source1]
enable=1
- Change enable=1 to enable=0.
- Find the following entries:
[sink0]
enable=1
- Change enable=1 to enable=0.
- Find the following entries:
[sink2] enable=0 #Type - 1=FakeSink 2=EglSink 3=File 4=RTSPStreaming type=4 #1=h264 2=h265 codec=1 #encoder type 0=Hardware 1=Software enc-type=0 - Change:
• enable=0 to enable=1
•enc-type=0 to enc-type=1
Note: The enc-type=1 entry changes the configuration to use software encoders instead of the hardware. We changed the entry because our demo system has an NVIDIA A100 GPU that has no hardware encoders. Ideally, keep this entry as enc-type=0 if hardware encoders are available. With the NVIDIA A16 GPU, we used enc-type=0 entry. The Video Encode and Decode GPU Support Matrix at https://developer.nvidia.com/video-encode-and-decode-gpu-support-matrix-new shows the GPU hardware and encoder support.
If you do not change the enc-type=1 entry (software encoder), the following error message might be displayed:ERROR from sink_sub_bin_encoder1: Could not get/set settings from/on resource. Debug info: gstv4l2object.c(3511): gst_v4l2_object_set_format_full (): /GstPipeline:pipeline/GstBin:processing_bin_0/GstBin:sink_bin/GstBin:sink_sub_bin1/nvv4l2h264enc:sink_sub_bin_encoder1: Device is in streaming mode - Save the file and exit the editor.
Running the Demo
To run the demo:
- In the container, start DeepStream to run with the new configuration. This command must be on one line.
deepstream-app -c configs/deepstream-app/source30_1080p_dec_infer-resnet_tiled_display_int8.txt
- Find the following text in the warning messages that are displayed:
*** DeepStream: Launched RTSP Streaming at rtsp://localhost:8554/ds-test ***
Even though the message indicates that DeepStream is bound to localhost, it is accessible remotely due to the Docker port command that was used earlier.
After more text and warning messages are displayed, the following output indicates that the software has started and is processing video input from the webcam:Runtime commands: h: Print this help q: Quit p: Pause r: Resume **PERF: FPS 0 (Avg) **PERF: 0.00 (0.00) ** INFO: <bus_callback:239>: Pipeline ready ** ERROR: <cb_newpad3:510>: Failed to link depay loader to rtsp src ** INFO: <bus_callback:225>: Pipeline running **PERF: 30.89 (30.89) **PERF: 30.00 (30.43) **PERF: 30.00 (30.28)
Viewing the Demo
To view the demo:
- On a laptop, start the media player. We use VLC media player.
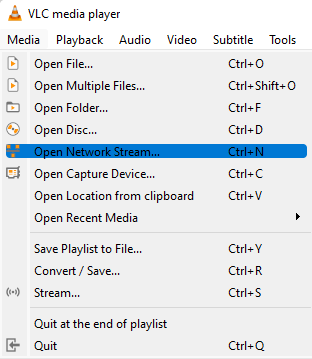
- Click Media, and then in the dropdown list, select Open Network Stream… , as shown in the following figure:
- Enter the IP address of the Linux system on which the container is running.
Note: The IP address in the following figure is an example. Use the appropriate IP address of your deployment. - Click Play.
In a few seconds, the webcam streams video that identifies objects with bounding boxes applied in near real time. This demo detects people, cars, signs, and bicycles.
The following figure is an example that shows the video output of recognized objects:
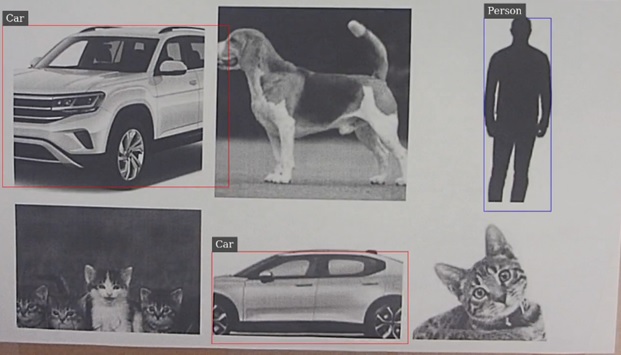
Note: The model is not trained to detect animals and correctly detects people and cars.
Summary
In this blog, we reviewed the Metropolis DeepStream hardware configuration test setup, the software installation steps, and how to use DeepStream to create a common vision AI pipeline with a Dell server. We included detailed instructions so that you can gain a deeper understanding of the configuration and ease of use.
We hope you enjoyed following our DeepStream journey.
Check back regularly for upcoming AI blogs. From Dell data center servers to rugged edge devices, Dell Technologies provides optimized solutions for running your AI workloads.


