
Deployment with FIPS enabled
Deployment with FIPS enabled
-
Introduction
Cluster deployment with Federal Information Processing Standard (FIPS) enabled is based on the IPI deployment approach. The services that are required to create an OpenShift cluster with FIPS enabled are set up in with the CSAH node.
Prepare the CSAH node
Note: To enable the cryptographic module self-checks that are mandated by FIPS 140, enable FIPS mode during the system installation.
To install Red Hat Enterprise Linux 8.6 on the CSAH node:
- Connect to the Integrated Dell Remote Access Controller (iDRAC) for installing Red Hat Enterprise Linux.
- Add the fips=1 option to the kernel command line during the system installation, as shown in the following figure:
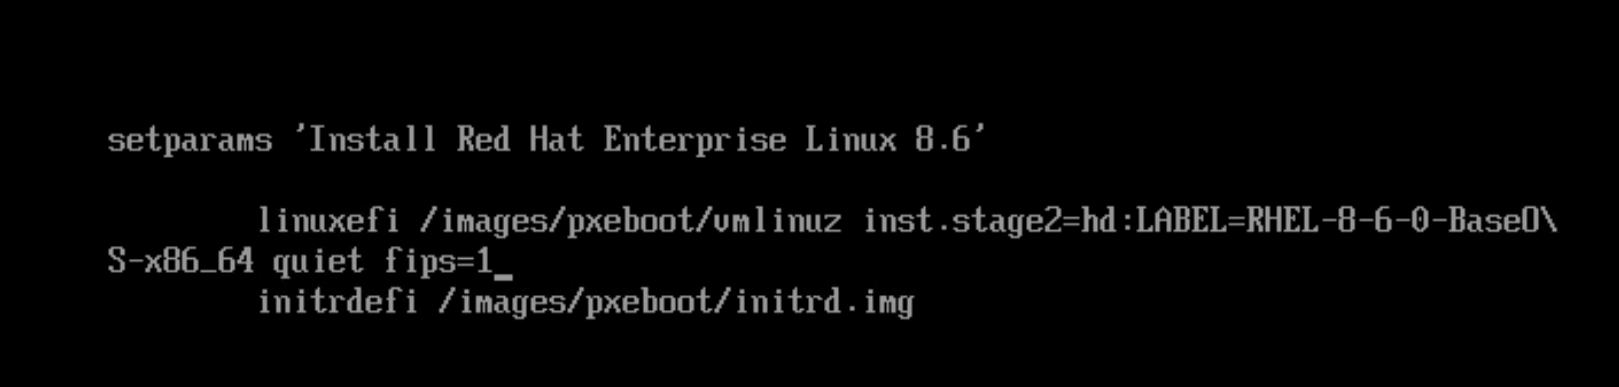
Figure 14. RHEL 8.6 installation with FIPS enabled
Note: Do not install any third-party software during the software selection stage.
3. Click Begin Installation.
After the installation, the system should start in FIPS mode automatically.
4. Verify that FIPS mode is enabled by running the following command:
[root@csah ~]$ fips-mode-setup --check
FIPS mode is enabled.
Deployment steps
Perform the following tasks in the console as user root:
- To set the hostname, run the following command:
[root@localhost~]# hostnamectl set-hostname <hostname FQDN>
2. Follow Step 1 in IPI deployment steps to create a bond and assign an IP to the CSAH node.
3. To enable the ansible-2.9-for-rhel-8-x86_64-rpms repository, run the following commands:
[root@csah ~]# subscription-manager register --username <subscription.user> --password <subscription.password> --force
[root@csah ~]# subscription-manager attach --pool=<pool id>
[root@csah ~]# subscription-manager repos --enable=ansible-2.9-for-rhel-8-x86_64-rpms
4. To install the Red Hat Package Manager (RPMs), run the following command:
[root@csah-amd ~]# yum install -y jq ansible python3-netaddr git
5. Create a user to run the playbooks.
Note: Do not use the username core. User core is part of the OpenShift cluster configuration and is a predefined user in CoreOS. In the (primary or secondary) CSAH node, user core is created using Ansible playbooks. The remainder of this guide assumes that user ansible runs the playbooks.
[root@csah ~]# useradd ansible
[root@csah ~]# passwd ansible
Changing password for user ansible.
New password:
Retype new password:
passwd: all authentication tokens updated successfully.
6. As user root, provide sudoers permissions to user ansible by running the following command:
[root@csah sudoers.d]# pwd
/etc/sudoers.d
[root@csah sudoers.d]# cat ansible
ansible ALL=(ALL) NOPASSWD: ALL
7. As user ansible, set up password-less access to the CSAH FQDN by running the following command:
[ansible@csah ~]$ ssh-keygen (press enter and go by defaults for the next set of questions)
[ansible@csah ~]$ ssh-copy-id <FQDN>
8. Download the Ansible playbooks from GitHub and check out branch ocp414_fips86 by running the following command:
[ansible@csah ~]$ git clone https://github.com/dell-esg/openshift-bare-metal.git
[ansible@csah ~]$ cd <git clone dir>/openshift-bare-metal
[ansible@csah openshift-bare-metal]$ git checkout origin/ocp414_fips86
9. Download the pull secret from the Red Hat Web console and save it as /home/ansible/files/pullsecret.
10. Prepare and run the Ansible playbooks as user ansible.
11. Update the YAML file that contains information about the bootstrap, control-plane, and compute nodes.
Note: Ensure that you only modify values in the YAML file. Keys must always remain the same.
12. Run the program.
Note: If the iDRAC user and password are the same across all control-plane and compute nodes, run the program with the --id_user and --id_pass arguments.
cd <git clone dir>/openshift-bare-metal/python
[ansible@csah python]$ python3 generate_inventory_file.py –-run --id_user <idrac user> --id_pass <idrac password> –-nodes nodes_ipi.yaml
13. Follow steps 6-12 in IPI-based deployment to continue.
In the infra components step, enter yes to enable FIPS:task choice for necessary inputs: 2
Do you want to install DNS on CSAH [yes/No]: yes
specify a DNS forwarder if necessary (yes/No): yes
enter the DNS forwarder IP: 10.8.8.8
specify cluster name
default [ocp]: ipi-fips
specify zone file
default [/var/named/ipi-fips.zones]:
adding zone_file: /var/named/ipi-fips.zones cluster: ipi-fips
Do you want to install cluster with FIPS enabled [yes/No]: yes
14. Review and generate the inventory file.
The program creates two files inside the <git clone dir>/openshift-bare-metal/python directory: generated_inventory and ansible.yaml. Copy both the files into the <git clone dir>/openshift-bare-metal/ansible directory.
15. As user ansible, run the playbooks:
[ansible@csah-amd ansible] $ pwd
/home/ansible/openshift-bare-metal/ansible
[ansible@csah-amd ansible] $ ansible-playbook -i generated_inventory ansible.yaml
16. Start the cluster deployment by running the command you generated in the /home/kni/ cluster_install_command file:
/usr/local/bin/openshift-baremetal-install --dir /home/kni/clusterconfigs --log-level debug create cluster
17. Check the installation status in the .openshift_install.log file:
tail -f /home/kni/clusterconfigs/.openshift_install.log
18. Validate the status of the control-plane nodes by running the following command:
oc get nodes
NAME STATUS ROLES AGE VERSION
ipi-amd-m1 Ready control-plane,master,worker 2d9h v1.27.10+28ed2d7
ipi-amd-m2 Ready control-plane,master,worker 2d9h v1.27.10+28ed2d7
ipi-amd-m3 Ready control-plane,master,worker 2d9h v1.27.10+28ed2d719. Run oc get co to view the cluster operator status.
20. Use the following query to verify that the cluster-config-v1 ConfigMap contains the "FIPS" option:
oc get cm cluster-config-v1 -n kube-system -o json | jq -r ‘.data’ | grep -I “fips”
Alternatively, run the following command to confirm that FIPS mode is enabled:
oc debug node/<nodename> -- chroot /host sh -c "fips-mode-setup --check"