


Managing your on-premises infrastructure with HashiCorp Terraform - Part 1

As I search the internet for “Terraform” I see plenty of examples for AWS, Azure, GCP and other public clouds. Developers use it a lot to provision virtual infrastructure and applications in public cloud, but what does it mean to you and me? What does it mean to system admins, and infrastructure engineers that work every day with physical infrastructure in our own data center? If you want to learn how to get started with Terraform to manage your physical servers, networks, and storage on-premises, this is introduction for you.
This is a series of blog posts that will cover: the basics, several examples of on-premises data center appliances, and finally how to use Ansible to provide better governance to Terraform.
- Terraform on-premises infrastructure
- Terraform Dell PowerStore
- Terraform resource dependencies
- Terraform variables
- Terraform Dell PowerMax
If you have been doing automation on-premises, there is a high chance you have been using Ansible. From my experience, Ansible is more common amongst system admins and infrastructure engineers operating a physical data center, but eventually you might be exposed to Terraform because developers already use it. I will not dig deep into details, but there are two approaches to Infrastructure-as-Code (or IaC for short). Terraform and Ansible are the leaders of these two approaches: provisioning vs config management, respectively. Depending on your goals it will be more advantageous to use one or the other but very often they are used together.

Providers and Resources
Part of Terraform’s success is the availability of an extensive list of “providers.” These are plugins that allow Terraform to understand and interact with the APIs of cloud platforms, SaaS providers, and other infrastructure tools. For example, the Terraform provider for AWS allows developers to provision VM instances. In the same way a storage admin can use the Terraform provider for Dell PowerStore to provision storage volumes and more. In Terraform speak, the VM instances and the PowerStore storage volumes are referred to as “resources.” Each “provider” typically exposes access to multiple resources or individual infrastructure elements.
Terraform configuration files
Unlike Ansible’s, which uses YAML files, Terraform uses HCL configuration files to define and manage infrastructure. HCL stands for Hashicorp Configuration Language, and it is a declarative language. This means that you “declare” the end-state of the infrastructure, as opposed to the procedure to get to that end-state.
There can be more than these, but these two are the most basic files in Terraform:
- “main.tf“. This is the entry point. It contains blocks of code of diverse types, including “providers,” “resources”, “data”, “modules”, “output” … “resource” blocks specify the resource type, properties, and desired state.
- “variables.tf“. This file serves as the central location for defining variables used in your infrastructure configuration. This makes Terraform code more flexible and enables us to manage critical information like credentials in a more secure way. It is important to note that using a variables file is a best practice, but it is not mandatory. You could also define variables in the “main.tf” file.
These two files are stored together in the same directory, and they are jointly referred to as a “Terraform module.”
The following is a basic example of a “main.tf” file that creates a volume in a Dell PowerStore storage array. Notice how the first block (terraform) is requesting a specific version of the PowerStore provider. The second block (provider) is initializing the provider. Notice how the provider uses the “var.” notation. This instructs Terraform to get the actual value from the “variables.tf” file.
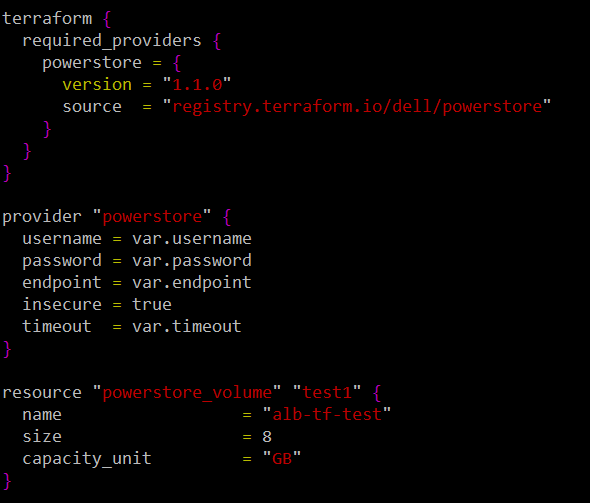
The final block (resource) provides the details of the volume to be created. In this example, all three attributes for this resource are hardcoded. We will see in the next blog post how to turn these into variables as well. The two strings before the curly bracket are the resource type (“powerstore_volume”) and the internal name (“test1”) of this resource while terraform is running. You will use this internal name for example, if you want to grab a piece of information from that resource once it is created to pass as an attribute for the creation of another resource.
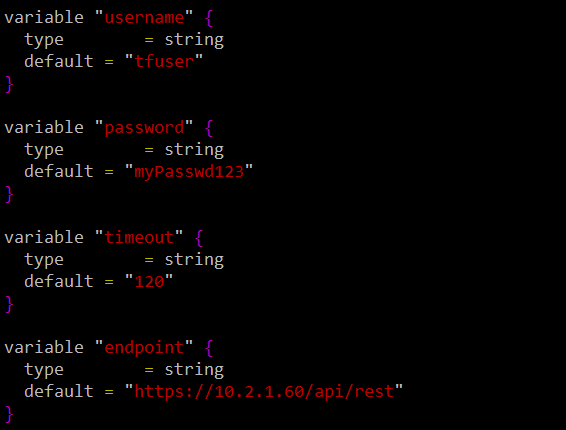
This is the corresponding “variables.tf” file that defines the values of the variables used in “main.tf.” Notice how the value of the variable is defined in the “default” property.
Terraform operations
Once you create these HCL files, Terraform allows you to perform four actions:
- “terraform init“: This is the first step. It creates the necessary folder structure and configuration files, and it downloads the plugins of any providers specified in your configuration files.
- “terraform plan“: As its name suggests, this is like a dry run. Terraform analyses your configuration files and compares them to the current state of your existing infrastructure. Based on this comparison, it generates an execution plan that shows the changes required and their impact.
- “terraform apply “: This command takes the plan generated with “terraform plan” and executes it. Based on the differences between your desired state and the current infrastructure, it creates added resources, modifies existing ones, or removes resources that are no longer needed. It uses the relevant provider plugins to talk to the target cloud or device to make changes. It stores the resulting state in a file called “terraform.tfstate.” By default, it stores the state file in the same directory where the configuration files are, but a customary practice is to store them in an S3 bucket. This enables multiple Terraform scripts (aka configurations) to operate the same infrastructure.
- “terraform destroy“: It terminates all the resources that have been created previously and deletes the state file.
The following screenshot shows the execution of “terraform init.” Notice how it downloads and installs the provider automatically.
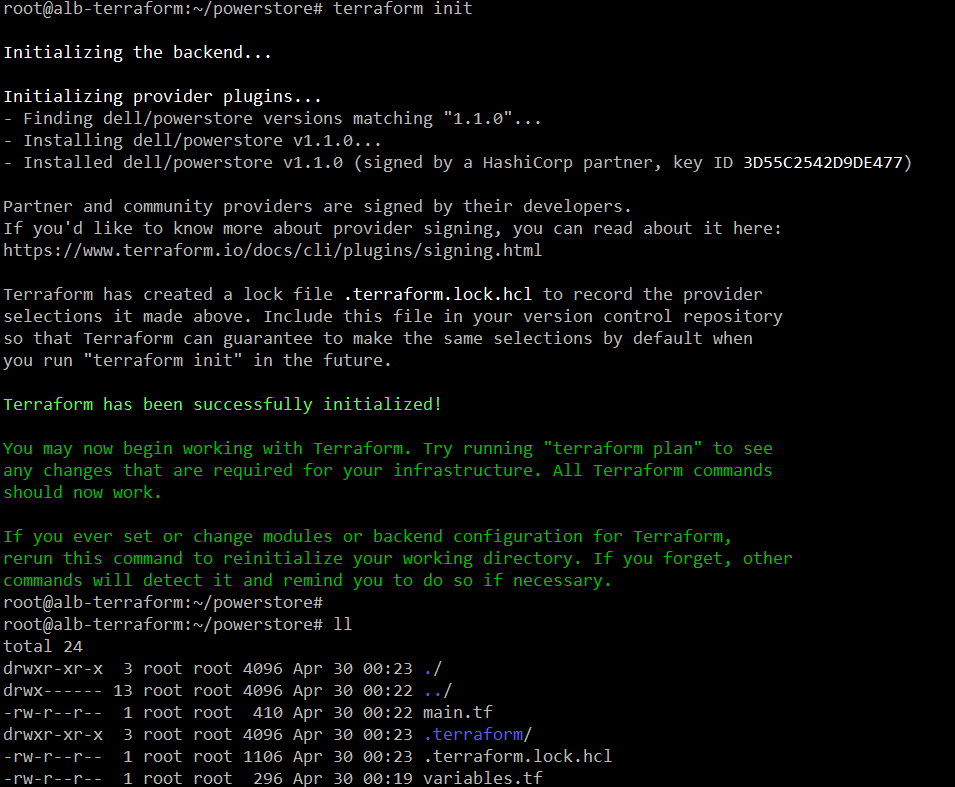
Notice how it has created the “terraform” folder and the “lock” file.
The following is a screenshot of the execution of “terraform plan.” We only specified three attributes to create the volume, but you can see here that this resource type has many more attributes or properties.
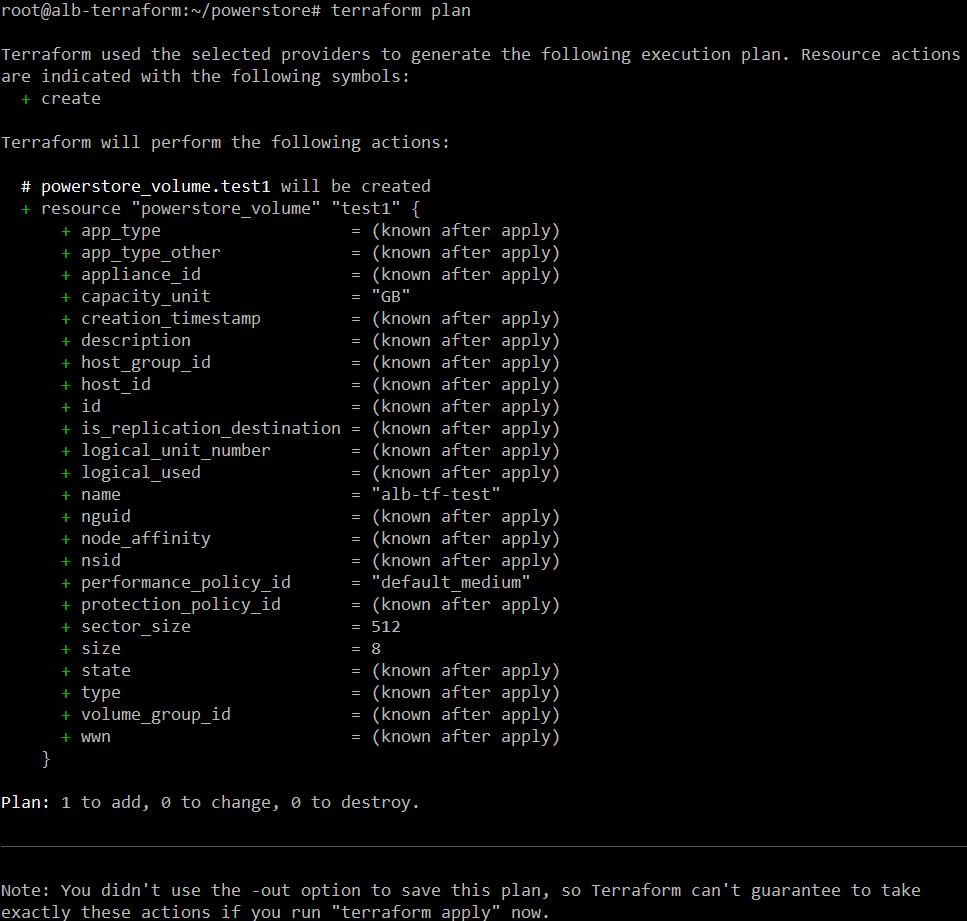
At the end it provides a summary of how many resources will be added, changed to destroyed once “terraform apply” runs.
That is a lot for a single post. In the next post we will see “apply” and “destroy” in action using PowerStore as an example.
Resources
- https://developer.dell.com
- https://github.com/dell
Author: Alberto Ramos, Principal Systems Engineer