


Get started building RAG pipelines in your enterprise with Dell Technologies and NVIDIA (Part 1)

In our previous blog, we showcased running Llama 2 on XE9680 using NVIDIA's LLM Playground (part of the NeMo framework). It is an innovative platform for experimenting with and deploying large language models (LLMs) for various enterprise applications.
The reality is that running straight inference with foundational models in an enterprise context simply does not happen and presents several challenges, such as a lack of domain-specific knowledge, the potential for outdated or incomplete information, and the risk of generating inaccurate or misleading responses.
Retrieval-Augmented Generation (RAG) represents a pivotal innovation within the generative AI space.
RAG combines generative AI foundational models with advanced information retrieval techniques to create interactive systems that are both responsive and deeply informative. Because of their flexibility, RAG can be designed in many different ways. In a blog recently published, David O'Dell showed how RAG can be built from scratch.
This blog also serves as a follow-on companion to the Technical White Paper NVIDIA RAG On Dell available here, which highlights the solution built on Dell Data Center Hardware, K8s, Dell CSI PowerScale for Kubernetes, and NVIDIA AI Enterprise suite. Check out the Technical White Paper to learn more about the solution architectural and logical approach employed.
In this blog, we will show how this new NVIDIA approach provides a more automated way of deploying RAG, which can be leveraged by customers looking at a more standardized approach.
We will take you through the step-by-step instructions for getting up and running with NVIDIA's LLM Playground software so you can experiment with your own RAG pipelines. In future blog posts (once we are familiar with the LLM playground basics), we will start to dig a bit deeper into RAG pipelines so you can achieve further customization and potential implementations of RAG pipelines using NVIDIA's software components.
But first, let's cover the basics.
Building Your Own RAG Pipeline (Getting Started)
A typical RAG pipeline consists of several phases. The process of document ingestion occurs offline, and when an online query comes in, the retrieval of relevant documents and the generation of a response occurs.
At a high level, the architecture of a RAG system can be distilled down to two pipelines:
- A recurring pipeline of document preprocessing, ingestion, and embedding generation
- An inference pipeline with a user query and response generation
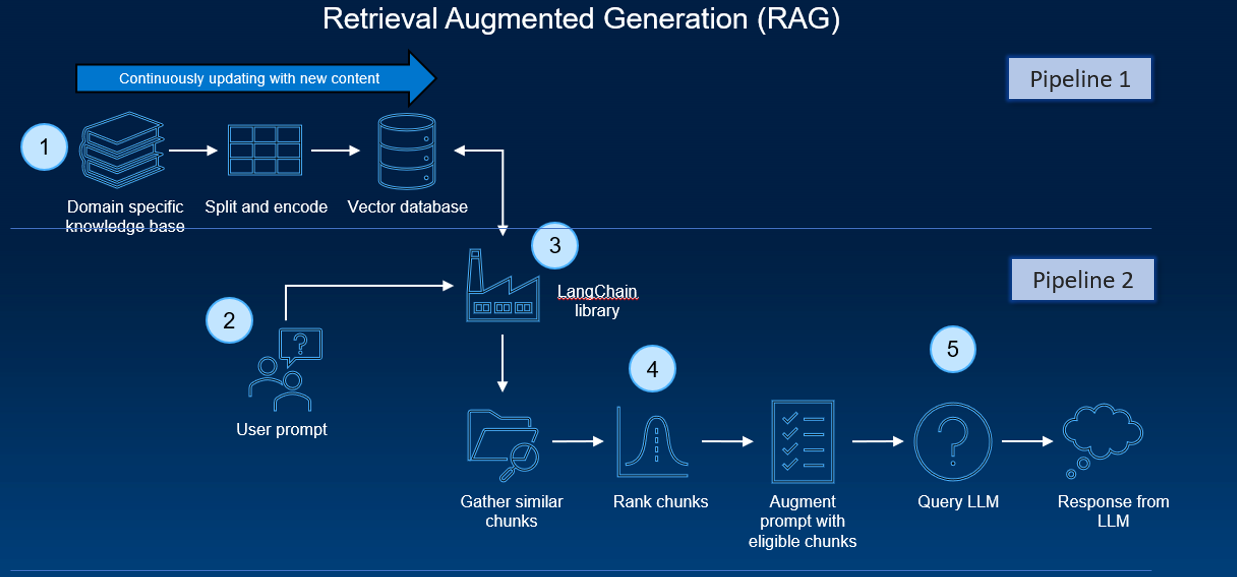
Several software components and tools are typically employed. These components work together to enable the efficient processing and handling of the data, and the actual execution of inferencing tasks.
These software components, in combination with the hardware setup (like GPUs and virtual machines/containers), create an infrastructure for running AI inferencing tasks within a typical RAG pipeline. These tools’ integration allows for processing custom datasets (like PDFs) and generating sophisticated, human-like responses by an AI model.
As previously stated, David O’Dell has provided an extremely useful guide to get a RAG pipeline up and running. One of the key components is the pipeline function.
The pipeline function in Hugging Face’s Transformers library is a high-level API designed to simplify the process of using pre-trained models for various NLP tasks, and it abstracts the complexities of model loading, data pre-processing (like tokenization), inference, and post-processing. The pipeline directly interfaces with the model to perform inference but is more focused on ease-of-use and accessibility rather than scaling and optimizing resource usage. It is as a high-level API that abstracts away much of the complexity involved in setting up and using various transformer-based models.
It’s ideal for quickly implementing NLP tasks, prototyping, and applications where ease of use and simplicity are key.
But is it easy to implement?
Setting up and maintaining RAG pipelines requires considerable technical expertise in AI, machine learning, and system administration. While some components (such as the ‘pipeline function’) have been designed for ease of use, typically, they are not designed to scale.
So, we need robust software that can scale and is easier to use.
NVIDIA's solutions are designed for high performance and scalability which is essential for handling large-scale AI workloads and real-time interactions.
NVIDIA provides extensive documentation, sample Jupyter notebooks, and a sample chatbot web application, which are invaluable for understanding and implementing the RAG pipeline.
The system is optimized for NVIDIA GPUs, ensuring efficient use of some of the most powerful available hardware.
NVIDA’s Approach to Simplify — Building a RAG System with NVIDIA’s Tools:
NVIDIA’s approach is to streamline the RAG pipeline and make it much easier to get up and running.
By offering a suite of optimized tools and pre-built components, NVIDIA has developed an AI workflow for retrieval-augmented generation that includes a sample chatbot and the elements users need to create their own applications with this new method. It simplifies the once daunting task of creating sophisticated AI chatbots, ensuring scalability and high performance.
Getting Started with NVIDIA’s LLM playground
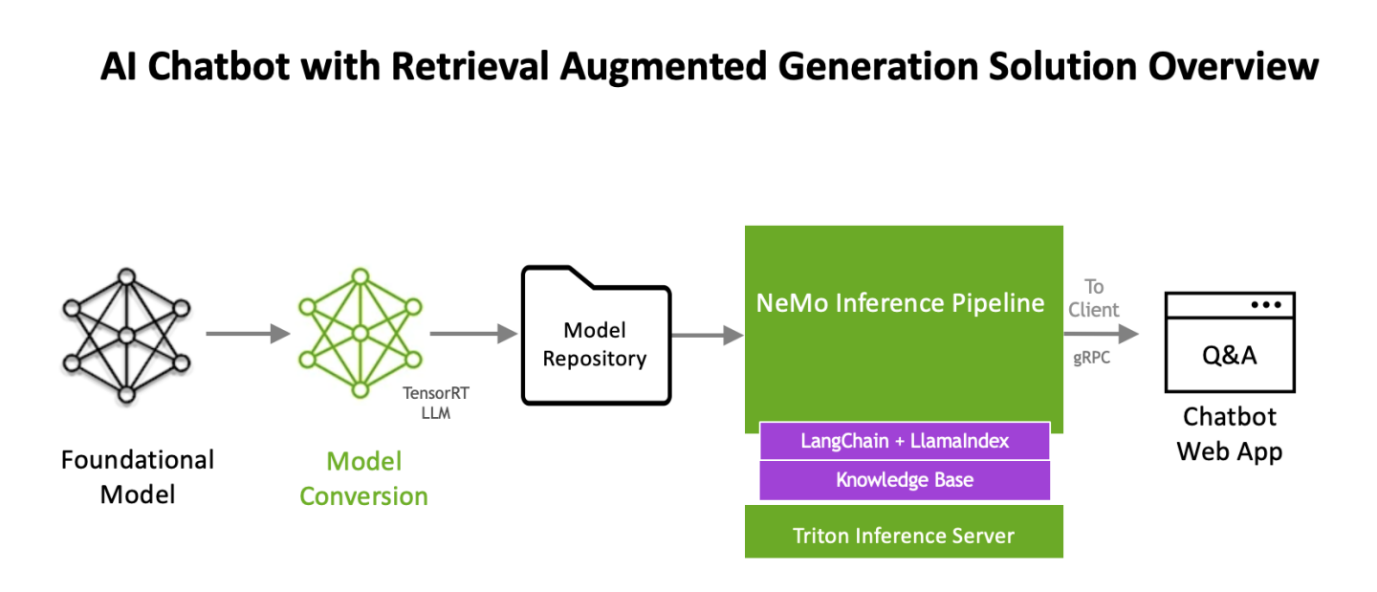
The workflow uses NVIDIA NeMo, a framework for developing and customizing generative AI models, as well as software like NVIDIA Triton Inference Server and NVIDIA TensorRT-LLM for running generative AI models in production.
The software components are all part of NVIDIA AI Enterprise, a software platform that accelerates the development and deployment of production-ready AI with the security, support, and stability businesses need.
Nvidia has published a retrieval augmented generation workflow as an app example at
https://resources.nvidia.com/en-us-generative-ai-chatbot-workflow/knowledge-base-chatbot-technical-brief
Also it maintains a git page with updated information on how to deploy it in Linux Docker, Kubernetes and windows at
https://github.com/NVIDIA/GenerativeAIExamples
Next, we will walk through (at a high level) the procedure to use the NVIDIA AI Enterprise Suite RAG pipeline implementation below.
This procedure is based on the documentation on link https://github.com/NVIDIA/GenerativeAIExamples/tree/v0.2.0/RetrievalAugmentedGeneration
Deployment
The NVIDIA developer guide provides detailed instructions for building a Retrieval Augmented Generation (RAG) chatbot using the Llama2 model on TRT-LLM. It includes prerequisites like NVIDIA GPU, Docker, NVIDIA Container Toolkit, an NGC Account, and Llama2 model weights. The guide covers components like Triton Model Server, Vector DB, API Server, and Jupyter notebooks for development.
Key steps involve setting up these components, uploading documents, and generating answers. The process is designed for enterprise chatbots, emphasizing customization and leveraging NVIDIA’s AI technologies. For complete details and instructions, please refer to the official guide.
Key Software components and Architectural workflow (for getting up and running with LLM playground)
1. Llama2: Llama2 offers advanced language processing capabilities, essential for sophisticated AI chatbot interactions. It will be converted into TensorRT-LLM format.
Remember, we cancannot take a model from HuggingFace and run it directly on TensorRT-LLM. Such a model will need to go through a conversion stage before it can leverage all the goodness of TensorRT-LLM. We recently published a detailed blog on how to do this manually here. However, (fear not) as part of the LLM playground docker compose process, all we need to do is point one of our environment variables to the llama model. It will automatically do the conversion process for us! (steps are outlined in the implementation section of the blog)
2. NVIDIA TensorRT-LLM: When it comes to optimizing large language models, TensorRT-LLM is the key. It ensures that models deliver high performance and maintain efficiency in various applications.
- The library includes optimized kernels, pre- and post-processing steps, and multi-GPU/multi-node communication primitives. These features are specifically designed to enhance performance on NVIDIA GPUs.
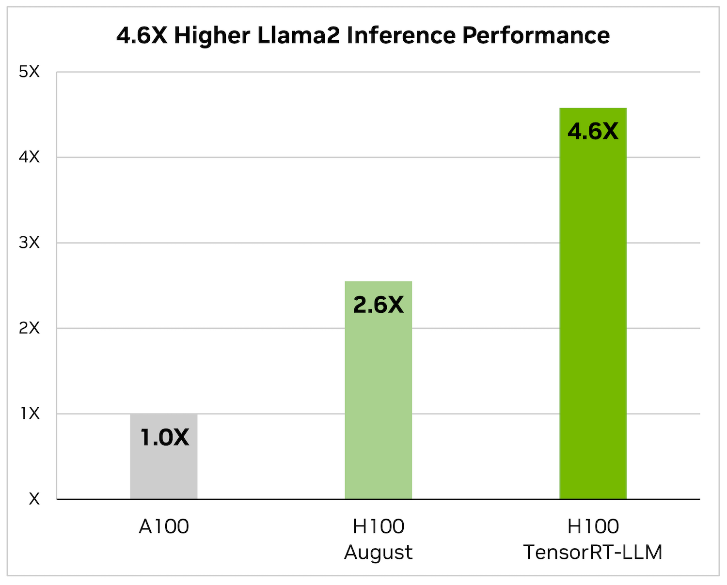 It utilizes tensor parallelism for efficient inference across multiple GPUs and servers, without the need for developer intervention or model changes.
We will be updating our Generative AI in the Enterprise – Inferencing – Design Guide to reflect the new sizing requirements based on TensorRT-LLM
3. LLM-inference-server: NVIDIA Triton Inference Server (container): Deployment of AI models is streamlined with the Triton Inference Server. It supports scalable and flexible model serving, which is essential for handling complex AI workloads. The Triton inference server is responsible for hosting the Llama2 TensorRT-LLM model
Now that we have our optimized foundational model, we need to build up the rest of the RAG workflow.
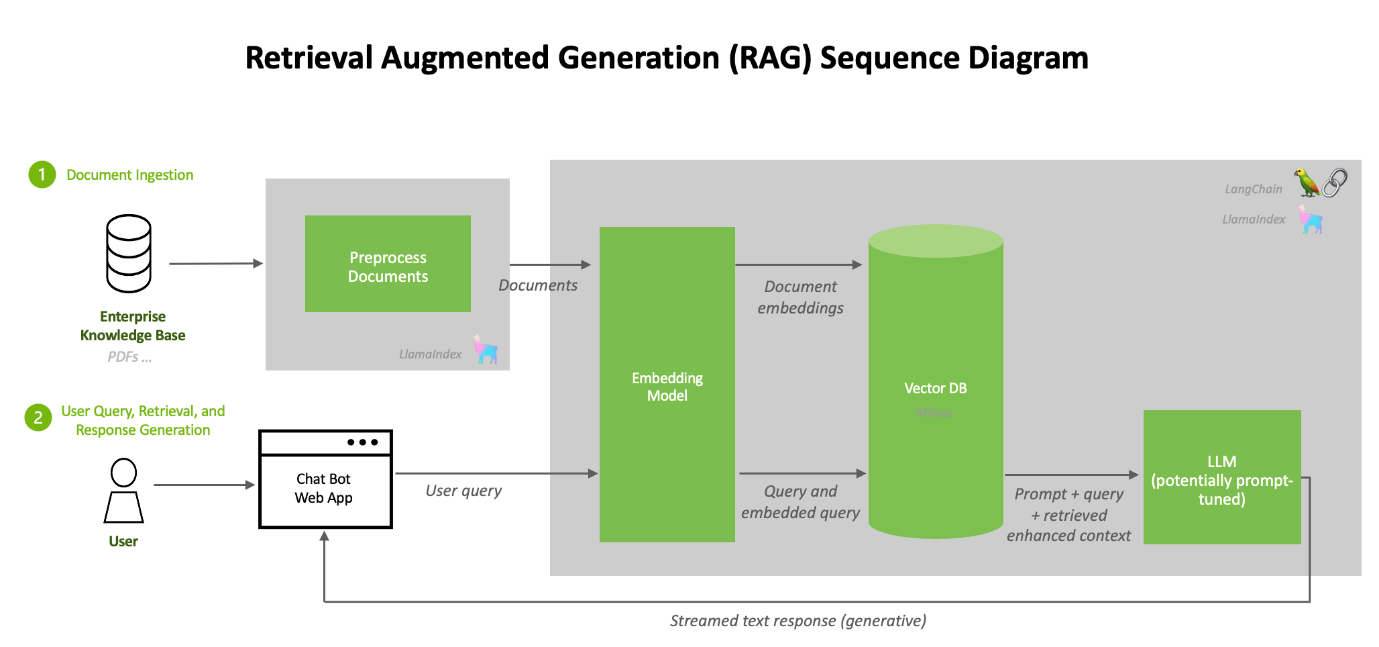
- Chain-server: langChain and LlamaIndex (container): Required for the RAG pipeline to function. A tool for chaining LLM components together. LangChain is used to connect the various elements like the PDF loader and vector database, facilitating embeddings, which are crucial for the RAG process.
4. Milvus (container): As an AI-focused vector database, Milvus stands out for managing the vast amounts of data required in AI applications. Milvus is an open-source vector database capable of NVIDIA GPU accelerated vector searches.
5. e5-large-v2 (container): Embeddings model designed for text embeddings. When content from the knowledge base is passed to the embedding model (e5-large-v2), it converts the content to vectors (referred to as “embeddings”). These embeddings are stored in the Milvus vector database.
The embedding model like “e5-large-v2” is used twice in a typical RAG (Retrieval-Augmented Generation) workflow, but for slightly different purposes at each step. Here is how it works:
Using the same embedding model for both documents and user queries ensures that the comparisons and similarity calculations are consistent and meaningful, leading to more relevant retrieval results.
We will talk about how “provide context to the language model for response generation” is created in the prompt workflow section, but first, let’s look at how the two embedding workflows work.
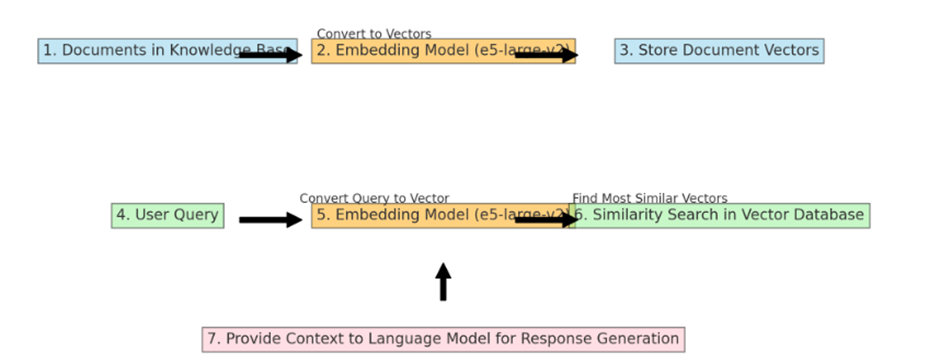
Converting and Storing Document Vectors: First, an embedding model processes the entire collection of documents in the knowledge base. Each document is converted into a vector. These vectors are essentially numerical representations of the documents, capturing their semantic content in a format that computers can efficiently process. Once these vectors are created, they are stored in the Milvus vector database. This is a one-time process, usually done when the knowledge base is initially set up or when it’s updated with new information.
Processing User Queries: The same embedding model is also used to process user queries. When a user submits a query, the embedding model converts this query into a vector, much like it did for the documents. The key is that the query and the documents are converted into vectors in the same vector space, allowing for meaningful comparisons.
Performing Similarity Search: Once the user’s query is converted into a vector, this query vector is used to perform a similarity search in the vector database (which contains the vectors of the documents). The system looks for document vectors most similar to the query vector. Similarity in this context usually means that the vectors are close to each other in the vector space, implying that the content of the documents is semantically related to the user’s query.
Providing Enhanced Context for Response Generation: The documents (or portions of them) corresponding to the most similar vectors are retrieved and provided to the language model as context. This context, along with the user’s original query, helps the language model generate a more informed and accurate response.
6. Container network nvidia-LLM: To allow for communication between containers.
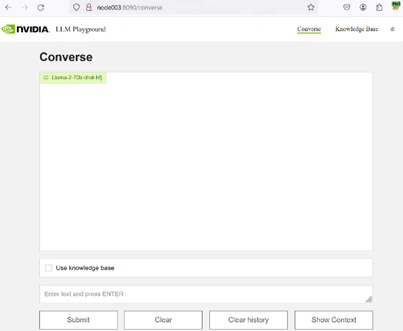
7. Web Front End (LLM-playground container) The web frontend provides a UI on top of the APIs. The LLM-playground container provides a sample chatbot web application. Requests to the chat system are wrapped in FastAPI calls to the Triton Inference Server
Prompt Workflow
Construction of an Augmented Prompt: The next step is constructing a prompt for the foundational Large Language Model (LLM). This prompt typically includes:
- The User’s Original Query: Clearly stating the query or problem.
- Retrieved Context: The relevant information retrieved from the knowledge base. This context is crucial as it provides the LLM with specific information that it might not have been trained on or that might be too recent or detailed for its training data.
- Formatting and Structuring: The prompt must be formatted and structured in a way that makes it clear to the LLM what information is from the query and what information is context from the retrieval. This can involve special tokens or separators.
Length and Complexity Considerations: The augmented prompt can become very large, especially if the retrieved context is extensive. There is a trade-off to be managed here:
Too Little Context: May not provide enough information for the LLM to generate a well-informed response.
Too Much Context: This can overwhelm the LLM or exceed its token limit, leading to truncated inputs or diluted attention across the prompt.
Feeding the Prompt to the LLM: Once the prompt is constructed, it is fed to the foundational LLM. The LLM then processes this prompt, considering both the user’s original query and the context provided.
Response Generation: The LLM generates a response based on the augmented prompt. This response is expected to be more accurate, informative, and contextually relevant than what the LLM could have produced based solely on the original query, thanks to the additional context provided by the retrieval process.
Post-Processing: In some systems, there might be an additional step of post-processing the response, such as refining, shortening, or formatting it to suit the user’s needs better.
Examples augmented prompt: This format helps the language model understand the specific question being asked and the context in which to answer it, leading to a more accurate and relevant response.
[Query]: "What are the latest developments in the treatment of Alzheimer's disease as of 2024?"
[Context - Memoriax Study]: "A groundbreaking study published in 2023 demonstrated the efficacy of a new drug, Memoriax, in slowing the progression of Alzheimer's disease. The drug targets amyloid plaques in the brain."
[Context - FDA Approval]: "The FDA approved a new Alzheimer's treatment in late 2023, involving medication and targeted brain stimulation therapy."
[Context - Lifestyle Research]: "A 2024 study emphasized the role of diet, exercise, and cognitive training in delaying Alzheimer's symptoms."
Please provide an overview of these developments and their implications for Alzheimer's treatment.
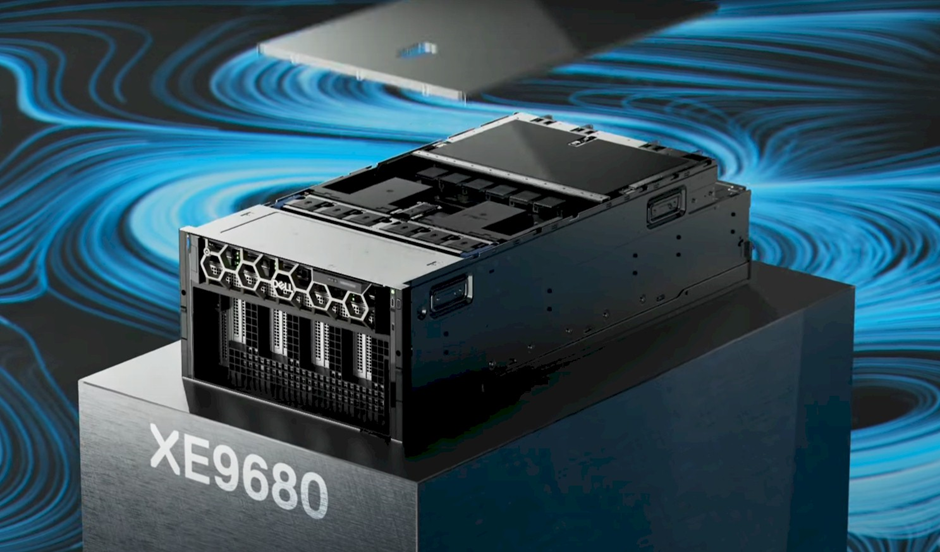
XE9680 Implementation
The following components will need to be installed.
- At least one NVIDIA GPU A100 with Llama 2 7B since it requires approximately 38GB of GPU memory, our implementation was developed using using 8x H100 for Llama2 70B on an XE9680
- Our XE9680 server is running Ubuntu 22.04
- NVIDIA driver version 535 or newer.
- Docker, Docker-Compose and Docker-Buildx
Step 1 – Logging in the NVIDIA GPU Cloud
For logging docker on NGC, you need to create a user and an access key. Please refer to the instructions and run the following command:
Docker login nvcr.io
Step 2 – Download Llama2 Chat Model Weights
Llama 2 Chat Model Weights need to be downloaded from Meta or HuggingFace. We downloaded the files on our deployment and stored them on our Dell PowerScale F600. Our servers can access this share with 100Gb Eth connections, allowing us to span multiple experiments simultaneously on different servers. The following is how the folder with Llama 70b model weights will look after download:
fbronzati@node003:~$ ll /aipsf600/project-helix/models/Llama-2-70b-chat-hf/ -h
total 295G
drwxrwxrwx 3 fbronzati ais 2.0K Jan 23 07:20 ./
drwxrwxrwx 9 nobody nogroup 221 Jan 23 07:20 ../
-rw-r—r—1 fbronzati ais 614 Dec 4 12:25 config.json
-rw-r—r—1 fbronzati ais 188 Dec 4 12:25 generation_config.json
drwxr-xr-x 9 fbronzati ais 288 Dec 4 14:04 .git/
-rw-r—r—1 fbronzati ais 1.6K Dec 4 12:25 .gitattributes
-rw-r—r—1 fbronzati ais 6.9K Dec 4 12:25 LICENSE.txt
-rw-r—r—1 fbronzati ais 9.2G Dec 4 12:40 model-00001-of-00015.safetensors
-rw-r—r—1 fbronzati ais 9.2G Dec 4 13:09 model-00002-of-00015.safetensors
-rw-r—r—1 fbronzati ais 9.3G Dec 4 12:30 model-00003-of-00015.safetensors
-rw-r—r—1 fbronzati ais 9.2G Dec 4 13:21 model-00004-of-00015.safetensors
-rw-r—r—1 fbronzati ais 9.2G Dec 4 13:14 model-00005-of-00015.safetensors
-rw-r—r—1 fbronzati ais 9.2G Dec 4 13:12 model-00006-of-00015.safetensors
-rw-r—r—1 fbronzati ais 9.3G Dec 4 12:55 model-00007-of-00015.safetensors
-rw-r—r—1 fbronzati ais 9.2G Dec 4 13:24 model-00008-of-00015.safetensors
-rw-r—r—1 fbronzati ais 9.2G Dec 4 13:00 model-00009-of-00015.safetensors
-rw-r—r—1 fbronzati ais 9.2G Dec 4 13:11 model-00010-of-00015.safetensors
-rw-r—r—1 fbronzati ais 9.3G Dec 4 12:22 model-00011-of-00015.safetensors
-rw-r—r—1 fbronzati ais 9.2G Dec 4 13:17 model-00012-of-00015.safetensors
-rw-r—r—1 fbronzati ais 9.2G Dec 4 13:02 model-00013-of-00015.safetensors
-rw-r—r—1 fbronzati ais 8.9G Dec 4 13:22 model-00014-of-00015.safetensors
-rw-r—r—1 fbronzati ais 501M Dec 4 13:17 model-00015-of-00015.safetensors
-rw-r—r—1 fbronzati ais 7.1K Dec 4 12:25 MODEL_CARD.md
-rw-r—r—1 fbronzati ais 66K Dec 4 12:25 model.safetensors.index.json
-rw-r—r—1 fbronzati ais 9.2G Dec 4 12:52 pytorch_model-00001-of-00015.bin
-rw-r—r—1 fbronzati ais 9.2G Dec 4 12:25 pytorch_model-00002-of-00015.bin
-rw-r—r—1 fbronzati ais 9.3G Dec 4 12:46 pytorch_model-00003-of-00015.bin
-rw-r—r—1 fbronzati ais 9.2G Dec 4 13:07 pytorch_model-00004-of-00015.bin
-rw-r—r—1 fbronzati ais 9.2G Dec 4 12:49 pytorch_model-00005-of-00015.bin
-rw-r—r—1 fbronzati ais 9.2G Dec 4 12:58 pytorch_model-00006-of-00015.bin
-rw-r—r—1 fbronzati ais 9.3G Dec 4 12:34 pytorch_model-00007-of-00015.bin
-rw-r—r—1 fbronzati ais 9.2G Dec 4 13:15 pytorch_model-00008-of-00015.bin
-rw-r—r—1 fbronzati ais 9.2G Dec 4 13:05 pytorch_model-00009-of-00015.bin
-rw-r—r—1 fbronzati ais 9.2G Dec 4 13:08 pytorch_model-00010-of-00015.bin
-rw-r—r—1 fbronzati ais 9.3G Dec 4 12:28 pytorch_model-00011-of-00015.bin
-rw-r—r—1 fbronzati ais 9.2G Dec 4 13:18 pytorch_model-00012-of-00015.bin
-rw-r—r—1 fbronzati ais 9.2G Dec 4 13:04 pytorch_model-00013-of-00015.bin
-rw-r—r—1 fbronzati ais 8.9G Dec 4 13:20 pytorch_model-00014-of-00015.bin
-rw-r—r—1 fbronzati ais 501M Dec 4 13:20 pytorch_model-00015-of-00015.bin
-rw-r—r—1 fbronzati ais 66K Dec 4 12:25 pytorch_model.bin.index.json
-rw-r—r—1 fbronzati ais 9.8K Dec 4 12:25 README.md
-rw-r—r—1 fbronzati ais 1.2M Dec 4 13:20 Responsible-Use-Guide.pdf
-rw-r—r—1 fbronzati ais 414 Dec 4 12:25 special_tokens_map.json
-rw-r—r—1 fbronzati ais 1.6K Dec 4 12:25 tokenizer_config.json
-rw-r—r—1 fbronzati ais 1.8M Dec 4 12:25 tokenizer.json
-rw-r—r—1 fbronzati ais 489K Dec 4 13:20 tokenizer.model
-rw-r--r-- 1 fbronzati ais 4.7K Dec 4 12:25 USE_POLICY.md
Step 3 – Clone GitHub content
We need to create a new working directory and clone the git repo using the following command:
fbronzati@node003:/aipsf600/project-helix/rag$ git clone https://github.com/NVIDIA/GenerativeAIExamples.git
fbronzati@node003:/aipsf600/project-helix/rag$ cd GenerativeAIExamples
fbronzati@node003:/aipsf600/project-helix/rag/GenerativeAIExamples$ git checkout tags/v0.2.0
Step 4 – Set Environment Variables
To deploy the workflow, we use Docker Compose, which allows you to define and manage multi-container applications in a single YAML file. This simplifies the complex task of orchestrating and coordinating various services, making it easier to manage and replicate your application environment.
To adapt the deployment, you need to edit the file compose.env with the information about your environment, information like the folder that you downloaded the model, the name of the model, which GPUs to use, so on, are all included on the file, you will need to use your preferred text editor, following we used vi with the command:
fbronzati@node003:/aipsf600/project-helix/rag/GenerativeAIExamples$ vi deploy/compose/compose.env
Dell XE9680 variables
Below, we provide the variable used to deploy the workflow on the Dell PowerEdge XE9680.
"export MODEL_DIRECTORY="/aipsf600/project-helix/models/Llama-2-70b-chat-hf/" This is where we point to the model we downloaded from hugging face – the model will be automatically converted into tensorR-TLLM format for us as the containers are deployed using helper scripts
fbronzati@node003:/aipsf600/project-helix/rag/GenerativeAIExamples$ cat deploy/compose/compose.env
# full path to the local copy of the model weights
# NOTE: This should be an absolute path and not relative path
export MODEL_DIRECTORY="/aipsf600/project-helix/models/Llama-2-70b-chat-hf/"
# Fill this out if you dont have a GPU. Leave this empty if you have a local GPU
#export AI_PLAYGROUND_API_KEY=""
# flag to enable activation aware quantization for the LLM
# export QUANTIZATION="int4_awq"
# the architecture of the model. eg: llama
export MODEL_ARCHITECTURE="llama"
# the name of the model being used - only for displaying on frontend
export MODEL_NAME="Llama-2-70b-chat-hf"
# [OPTIONAL] the maximum number of input tokens
export MODEL_MAX_INPUT_LENGTH=3000
# [OPTIONAL] the maximum number of output tokens
export MODEL_MAX_OUTPUT_LENGTH=512
# [OPTIONAL] the number of GPUs to make available to the inference server
export INFERENCE_GPU_COUNT="all"
# [OPTIONAL] the base directory inside which all persistent volumes will be created
# export DOCKER_VOLUME_DIRECTORY="."
# [OPTIONAL] the config file for chain server w.r.t. pwd
export APP_CONFIG_FILE=/dev/null
Step 5 – Build and start the containers
As the git repository has large files, we use the git lfs pull command to download the files from the repository:
fbronzati@node003:/aipsf600/project-helix/rag/GenerativeAIExamples$ source deploy/compose/compose.env; docker-compose -f deploy/compose/docker-compose.yaml build
Following, we run the following command to build docker container images:
fbronzati@node003:/aipsf600/project-helix/rag/GenerativeAIExamples$ source deploy/compose/compose.env; docker-compose -f deploy/compose/docker-compose.yaml build
And finally, with a similar command, we deploy the containers:
fbronzati@node003:/aipsf600/project-helix/rag/GenerativeAIExamples$ source deploy/compose/compose.env; docker-compose -f deploy/compose/docker-compose.yaml up -d
WARNING: The AI_PLAYGROUND_API_KEY variable is not set. Defaulting to a blank string.
Creating network "nvidia-LLM" with the default driver
Creating milvus-etcd ... done
Creating milvus-minio ... done
Creating LLM-inference-server ... done
Creating milvus-standalone ... done
Creating evaluation ... done
Creating notebook-server ... done
Creating chain-server ... done
Creating LLM-playground ... done
The deployment will take a few minutes to finish, especially depending on the size of the LLM you are using. In our case, it took about 9 minutes to launch since we used the 70B model:
fbronzati@node003:/aipsf600/project-helix/rag/GenerativeAIExamples$ docker ps -a
CONTAINER ID IMAGE COMMAND CREATED STATUS PORTS NAMES
ae34eac40476 LLM-playground:latest "python3 -m frontend…" 9 minutes ago Up 9 minutes 0.0.0.0:8090->8090/tcp, :::8090->8090/tcp LLM-playground
a9b4996e0113 chain-server:latest "uvicorn RetrievalAu…" 9 minutes ago Up 9 minutes 6006/tcp, 8888/tcp, 0.0.0.0:8082->8082/tcp, :::8082->8082/tcp chain-server
7b617f11d122 evalulation:latest "jupyter lab --allow…" 9 minutes ago Up 9 minutes 0.0.0.0:8889->8889/tcp, :::8889->8889/tcp evaluation
8f0e434b6193 notebook-server:latest "jupyter lab --allow…" 9 minutes ago Up 9 minutes 0.0.0.0:8888->8888/tcp, :::8888->8888/tcp notebook-server
23bddea51c61 milvusdb/milvus:v2.3.1-gpu "/tini -- milvus run…" 9 minutes ago Up 9 minutes (healthy) 0.0.0.0:9091->9091/tcp, :::9091->9091/tcp, 0.0.0.0:19530->19530/tcp, :::19530->19530/tcp milvus-standalone
f1b244f93246 LLM-inference-server:latest "/usr/bin/python3 -m…" 9 minutes ago Up 9 minutes (healthy) 0.0.0.0:8000-8002->8000-8002/tcp, :::8000-8002->8000-8002/tcp LLM-inference-server
89aaa3381cf8 minio/minio:RELEASE.2023-03-20T20-16-18Z "/usr/bin/docker-ent…" 9 minutes ago Up 9 minutes (healthy) 0.0.0.0:9000-9001->9000-9001/tcp, :::9000-9001->9000-9001/tcp milvus-minio
ecec9d808fdc quay.io/coreos/etcd:v3.5.5 "etcd -advertise-cli…" 9 minutes ago Up 9 minutes (healthy) 2379-2380/tcp
Access the LLM playground
The LLM-playground container provides A sample chatbot web application is provided in the workflow. Requests to the chat system are wrapped in FastAPI calls to the LLM-inference-server container running the Triton inference server with Llama 70B loaded.
Open the web application at http://host-ip:8090.
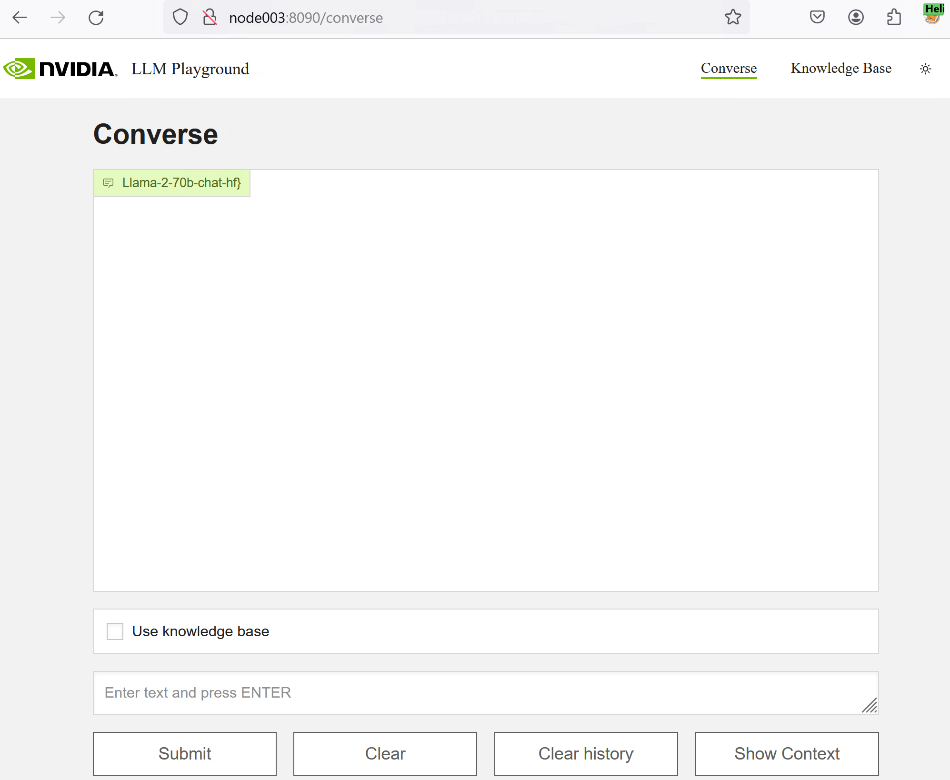
Let's try it out!
Again, we have taken the time to demo Llama2 running on NVIDIA LLM playground on an XE9680 with 8x H100 GPUs. LLM playground is backed by NVIDIA's Triton Inference server (which hosts the llama model).
We hope we have shown you that NVIDIA's LLM Playground, part of the NeMo framework, is an innovative platform for experimenting with and deploying large language models (LLMs) for various enterprise applications. While offering:
- Customization of Pre-Trained LLMs: It allows customization of pre-trained large language models using p-tuning techniques for domain-specific use cases or tasks.
- Experiments with a RAG pipeline