
Storage domains
Storage domains
-
Storage plays an essential role in the KVM implementation. The storage dictates the type of cluster: shared or local. Shared storage is the more common KVM cluster, enabling features such as HA and migration. During the oVirt Engine installation that is described in this guide, an initial shared storage domain was required and created on PowerMax. Dell Technologies recommends creating additional storage domains on PowerMax for objects such as virtual machines and ISO. These objects can be on FC, iSCSI, or NFS.
Storage types
When creating new shared storage domains in a KVM environment, the user is limited to these storage types, as shown in Figure 38:
- NFS
- POSIX-compliant FS (global file system)
- GlusterFS
- iSCSI
- Fibre Channel
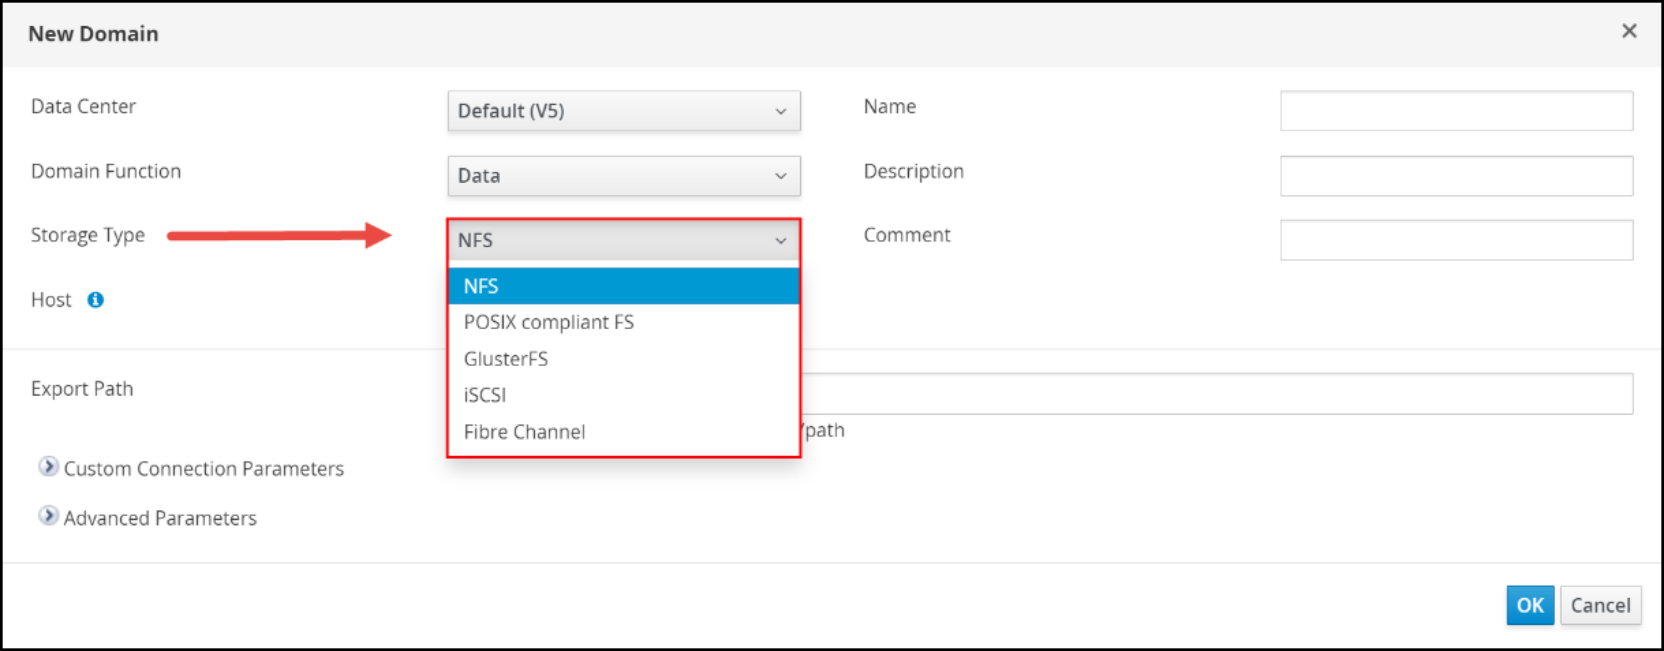
Figure 38. Storage type options for a storage domainPowerMax supports all these protocols: NFS, iSCSI, and FC. KVM has specific requirements for each storage type that is used in a storage domain.
NFS
NFS is a distributed file system protocol that allows one to access files over a network. NFS is a common choice for storage domains because it is simple to implement and manage. When using NFS storage with KVM, it is important to pick a platform that meets the performance and scalability requirements of user workloads. PowerMax supports both NFS 3 and 4.1 and delivers superior performance when matched with a low-latency network.
For NFS, the permissions and the ownership of the share must be altered so that the oVirt Engine can use it. The available ownership and permissions on the PowerMax NFS export are limited and do not meet the requirements of KVM. Therefore, it is necessary to manipulate the share either on an existing KVM node, or on a separate host altogether. In the following example, a Linux host was configured for the sole purpose of meeting the prerequisites of NFS storage. This example sets up the storage for the self-hosted oVirt Engine. It is the same process as is required for creating an NFS storage domain after the oVirt Engine deployment is completed.
Create the NFS file system
The following steps create the NFS system and make it available to the KVM node. It is assumed that a NAS server is configured and available on a network that the KVM hosts can reach.
- In Unisphere, go to Storage -> File -> File Systems and click Create to start the wizard, as shown in Figure 39:
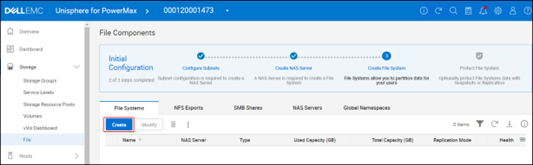 Figure 39. Create NFS file system in PowerMax – start the wizard
 - Because the hosts are physical hosts, keep the default setting of General in the Select Type dialog, as shown in Figure 40:
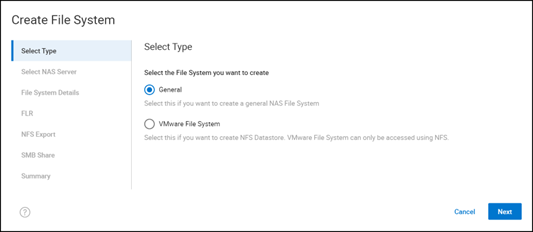 Figure 40. Create NFS file system in PowerMax – select type
 - Select a NAS Server and click Next as shown in Figure 41:
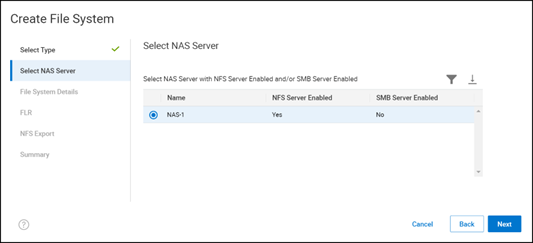 Figure 41. Create NFS file system in PowerMax – select the NAS server
 - In the File System Details dialog, enter a Name, an optional Description, a Size, as shown in Figure 42:
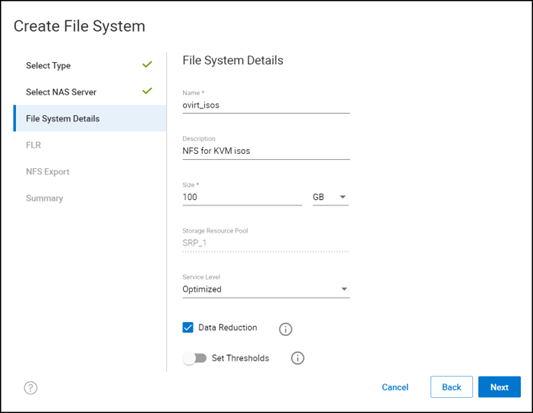 Figure 42. Create NFS file system in PowerMax – define system details
Generally, a PowerMax array only has a single Storage Resource Pool, therefore, no adjustment is needed. Optionally, modify the Service Level and Data Reduction default values, assign Thresholds for alerting and the click Next.
File Level Retention (FLR) is disabled by default. If the user enables either Enterprise or Compliance, additional details are displayed, as shown in Figure 43. Click Next when complete.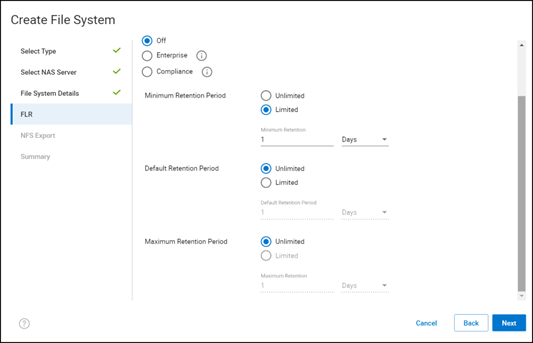 Figure 43. Create NFS file system in PowerMax – enable FLR
 - Swipe the Configure the Initial Export slider right and then optionally enter a Name and Description, as shown in Figure 44:
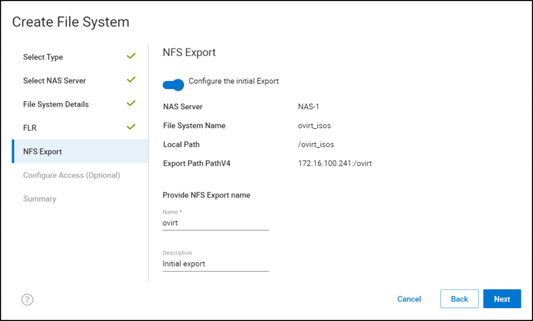 Figure 44. Create NFS file system in PowerMax – define NFS export
 - For KVM hosts to mount the NFS file system, grant the file system access, as shown in Figure 45:
- Set the Minimum Security to System.
The base security, which is the simplest security, is System. The advanced security is in the form of Kerberos. - Set the Default Access to Read/Write, allow Root and then click Next for the hosts to mount the file system. There is no need to add a specific host.
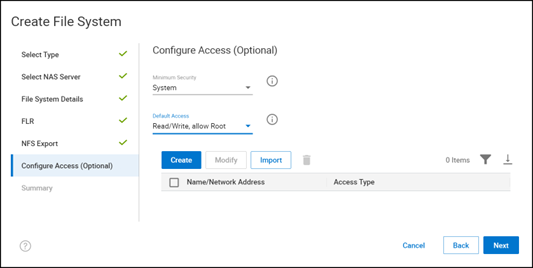 Figure 45. Create NFS file system in PowerMax – configure access
 - Set the Minimum Security to System.
- Go to the Summary page and click Run In The Background to complete the wizard, as shown in Figure 46:
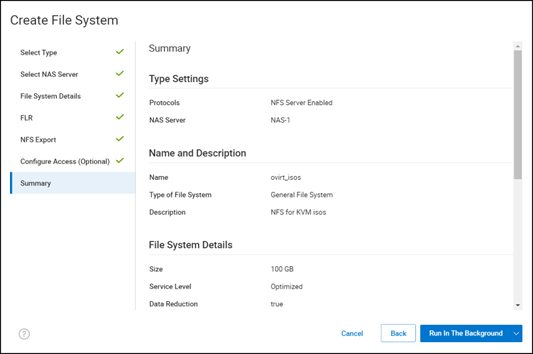 Figure 46. Create NFS file system in PowerMax – complete wizard
The resulting NFS file system is shown in Figure 47:
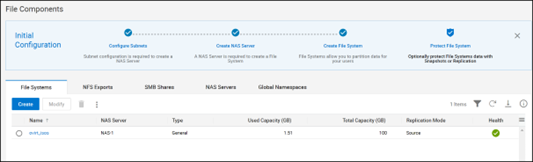 Figure 47. Create NFS file system in PowerMax – summary
Modify the NFS file system for the storage domain
To allow the storage domain to use the NFS file system, modify folder ownership. Create a folder in the NFS file system with the correct ownership (vdsm:kvm) and permissions (0755) for the storage domain.
Note: On most Linux implementations, the kvm group exists with ID 36. If another OS user on the host is already assigned the ID 36, use another host. If the user or group already exists on the host, skip the pertinent step below.
- Log in as the root user.
- Create the kvm group:
groupadd kvm -g 36 - Create the vdsm user in the group kvm group:
useradd vdsm -u 36 -g kvm - Create a mount point:
mkdir /ovirt - Mount the PowerMax NFS share created in section Create the NFS file system..
mount -t nfs 172.16.100.241:/ovirt /ovirt - Create a sub-directory under the NFS share. Modify the access rights to that subfolder, changing the permissions and ownership:
cd /ovirt
mkdir ovarit_isos
chmod 0755 ovirt_isos
chown 36:36 ovirt_isos (or chown vdsm:kvm ovirt_isos) - Unmount the share:
cd /ovirt
unmount /ovirt_install
Figure 48 shows the steps:
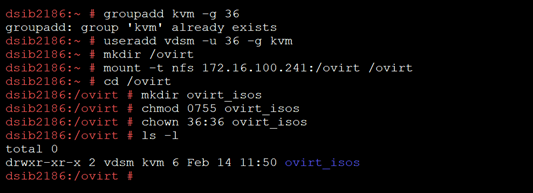 Figure 48. Prepare NFS mount for oVirt
NFS storage domain
If one wants to create an NFS storage domain after deploying the oVirt Engine, follow the steps in Modify the NFS file system for the storage domain.. Then, use the NFS storage domain wizard.
Note: In this example, the created mount is /ovirt/ovirt_isos.
- In the OVM, go to Storage -> Domains, as shown in Figure 49:
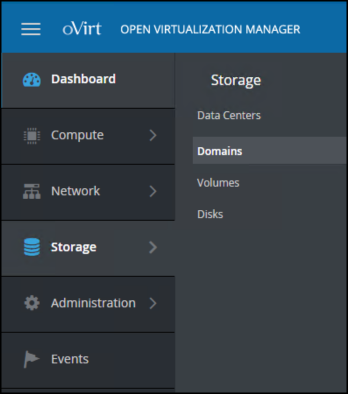 Figure 49. NFS storage domain – create an NFS storage domain
 - In the New Domain page, as shown in Figure 50:
- From the drop-down list next to Storage Type, select NFS.
- Select a KVM host.
- Optionally, enter a Name and Description.
- Enter the Export Path to the previously created mount.
- Keep all other default options (expanded here), unless the business requires a change.
- Click OK
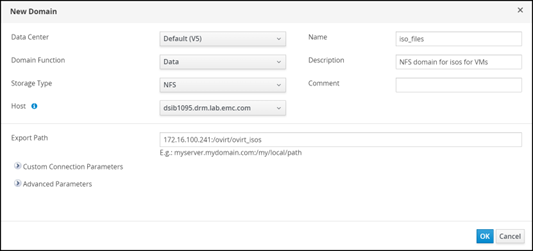 Figure 50. NFS storage domain - define the domain
If the connection to the NFS mount is successful, OVM immediately returns the following notification shown in Figure 51, which does not indicate success yet, only that OVM can mount the export. Figure 51. NFS storage domain - successful connection to the NFS mount
The storage domain remains locked until it is activated and is made available. When the domain is ready, the OVM provides the following notification, as shown in Figure 52: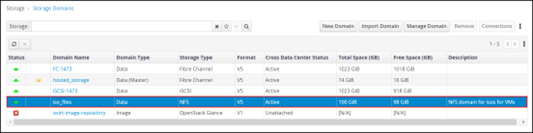 Figure 52. NFS storage domain - complete
Fibre channel
Solutions Enabler or Unisphere for PowerMax enable fibre channel presentation to the KVM environment. It is assumed that the prerequisites for FC are satisfied.
- Create an initiator group or host for each KVM host:
- Log in to Unisphere for PowerMax and go to Hosts -> Hosts and select Create.
- Enter the Host Name.
- Select the radio button Fibre (default) and use the arrows to move over the appropriate initiators.
- Click Run Now.
Figure 53 shows KVM host dsib1093 with two HBA initiators: Figure 53. Initiator group or host
- After the user creates all the hosts, create a single parent initiator group, or host group. This group contains all the individual hosts and ensures that all KVM hosts detect the same device in the shared domain, as shown in Figure 54:
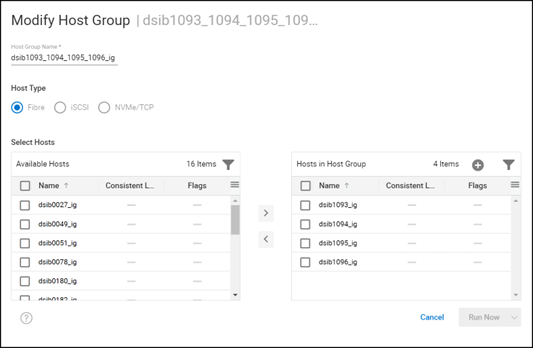 Figure 54. Parent initiator or host group
Provision volume
To provision a volume to the host group:
- Open the Unisphere for PowerMax UI and go to Hosts -> Hosts.
- Using the checkbox, select the KVM host group and click Provision Storage To Host, as shown in Figure 55:
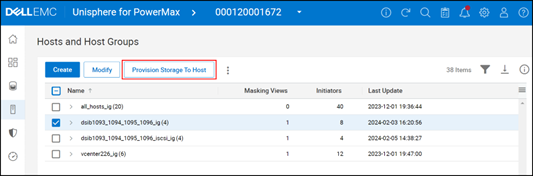 Figure 55. Provision storage to host
 - At a minimum, enter the following information and click Next, as shown in Figure 56:
- Storage Group Name
- Volumes
- Volume Capacity
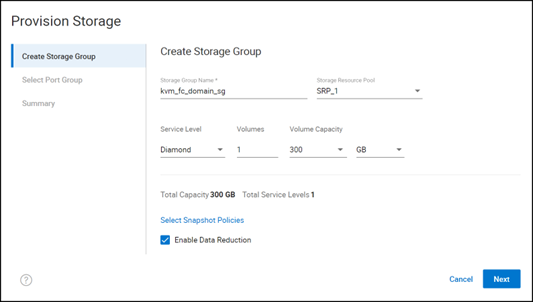 Figure 56. Provision storage to host – create storage group
 - Either create a new port group or select an existing group, and then click Next. Figure 57 shows an example of a new group that is added with two ports:
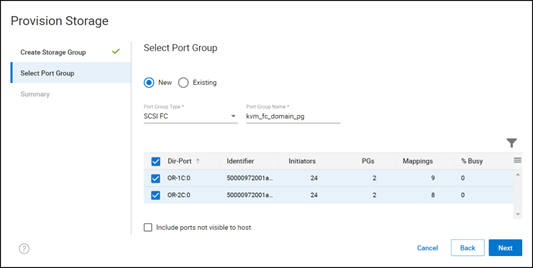 Figure 57. Provision storage to host – select port group
 - Review the summary and click Run Now, as shown in Figure 58:
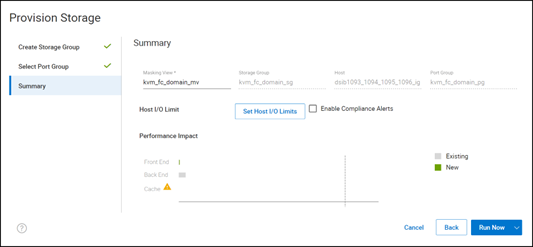 Figure 58. Provision storage to host - summary
This step creates the masking view, presenting the volume to all hosts in the KVM cluster.
FC storage domain
With the volume presented, create the FC storage domain:
- In OVM, go Storage -> Domains, as shown in Figure 59:
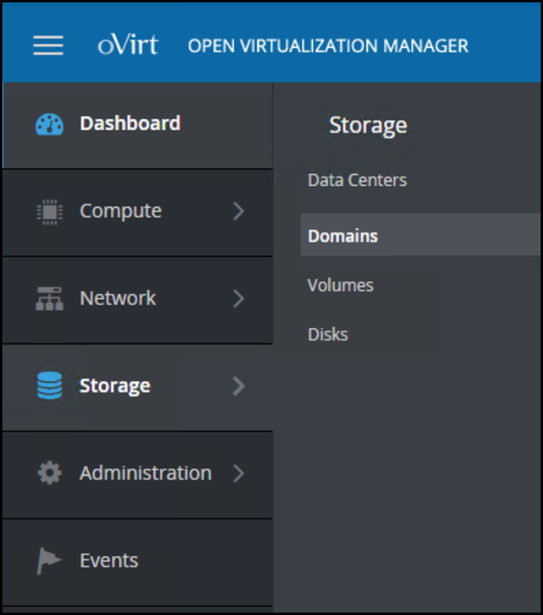 Figure 59. NFS storage domain
 - Select a Host from the drop-down list, as shown in Figure 60. The volume must be presented to all hosts in the cluster or storage domain creation fails.
- From the Storage Type drop-down list, select Fibre Channel.
OVM immediately initiates a scan of the host and returns the available volumes, as shown in the following figure. The PowerMax volumes are clearly identifiable. - As shown for this example, select the 300 GB device.
- Optionally, enter a Name and Description.
- Click Add next to the correct PowerMax volume.
- Keep all other default Advanced Parameters, unless the business requires a change.
- Click OK
- From the Storage Type drop-down list, select Fibre Channel.
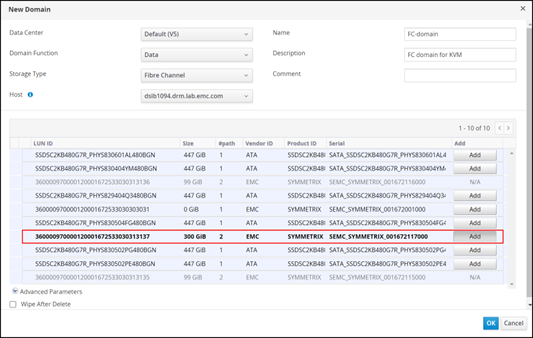
Figure 60. FC storage domainNote: Although it is possible, Dell Technologies does not recommend selecting multiple devices for use in a single storage domain. Rely on the PowerMax array for performance and present a single volume of the total size required.
OVM initiates the FC storage domain, locking it until completion. When completed, the storage domain displays as Active, as shown in Figure 61: Figure 61. Active FC storage domain
iSCSI
Solutions Enabler or Unisphere for PowerMax enable iSCSI presentation to the KVM environment. It is assumed that the prerequisites for iSCSI are satisfied.
Begin by creating an initiator group or host for each KVM host. The user can choose between two different ways depending on the level of automation wanted.
- First, record the initiator name on the KVM host. The initiatorname.iscsi file is located in the /etc/iscsi directory, as shown in Figure 62.
 Figure 62. iSCSI host initiator name
 - Choose either of the following options:
- Add the initiator manually, which is the simplest method for creating the host, as shown in Figure 63:
- Log in to Unisphere for PowerMax and go to Hosts -> Hosts and select Create.
- Enter the Host Name and select iSCSI as the Initiator Type.
- On the right, click the plus icon and enter the initiator.
- Click OK then Run Now
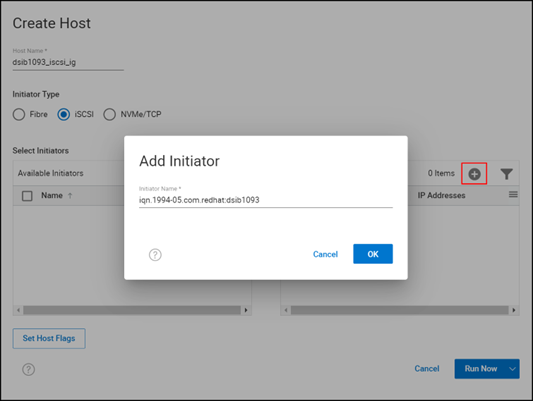 Figure 63. Adding an iSCSI initiator manually
- Inform Unisphere of the initiator before creating the host:
- Using iscsiadm on the KVM host, run a discovery of the iSCSI target on the PowerMax.
Although the command fails, the initiator is passed to Unisphere, as shown in the example in Figure 64: Figure 64. Running an iSCSI discovery
 - If necessary, after the discovery, refresh the PowerMax system in Unisphere. Log in to Unisphere for PowerMax and go to Hosts -> Hosts and select Create.
- Enter the Host Name and select iSCSI as the Initiator Type, as shown in Figure 65.
- Select the initiator name, which is populated on the left, and click the arrow to move it to the right side and then click Run Now.
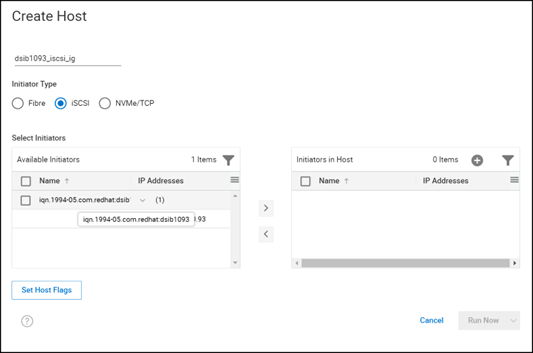 Figure 65. Adding an iSCSI initiator automatically
- Using iscsiadm on the KVM host, run a discovery of the iSCSI target on the PowerMax.
- Add the initiator manually, which is the simplest method for creating the host, as shown in Figure 63:
- After the user creates all the hosts, create a single parent initiator group, or host group. This group contains all individual hosts, which ensures that all KVM hosts see the same device in the shared domain, as shown in Figure 66:
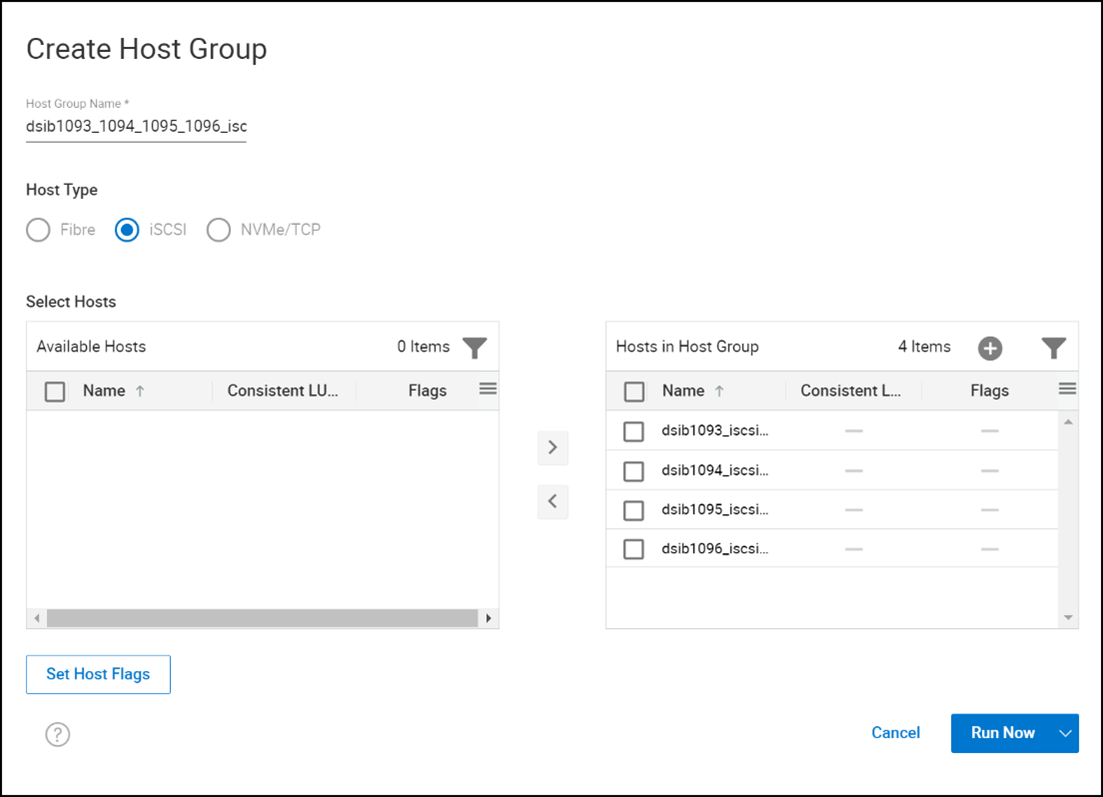 Figure 66. Parent initiator or host group
Provision a volume
To provision a volume to the host group:
- Open the Unisphere for PowerMax UI and go to Hosts -> Hosts. Using the checkbox, select the KVM host group and click Provision Storage To Host, as shown in Figure 67:
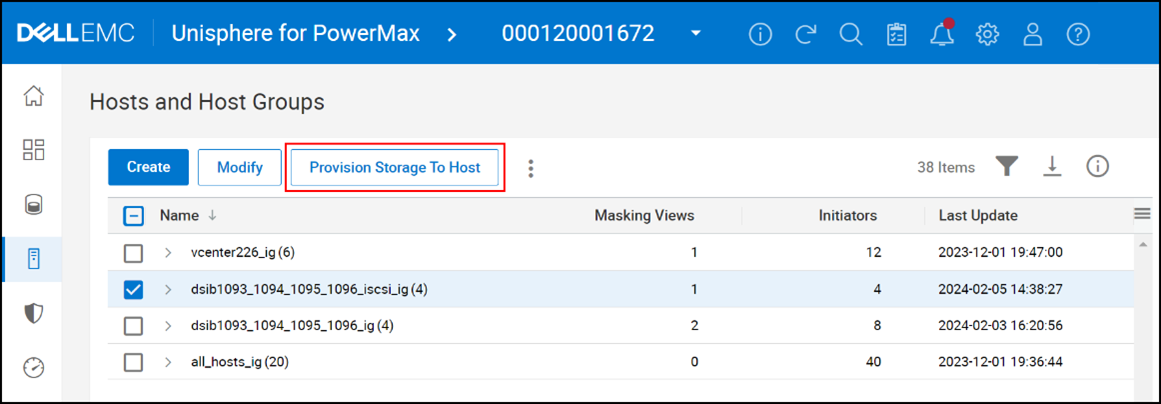 Figure 67: Provision storage to host
 - At a minimum, enter the following information and click Next, as shown in Figure 68:
- Storage Group Name
- Volumes
- Volume Capacity
 Figure 68. Provision storage to host – create storage group
 - Either create a new port group or select an existing group and the click Next, as shown in the example in Figure 69:
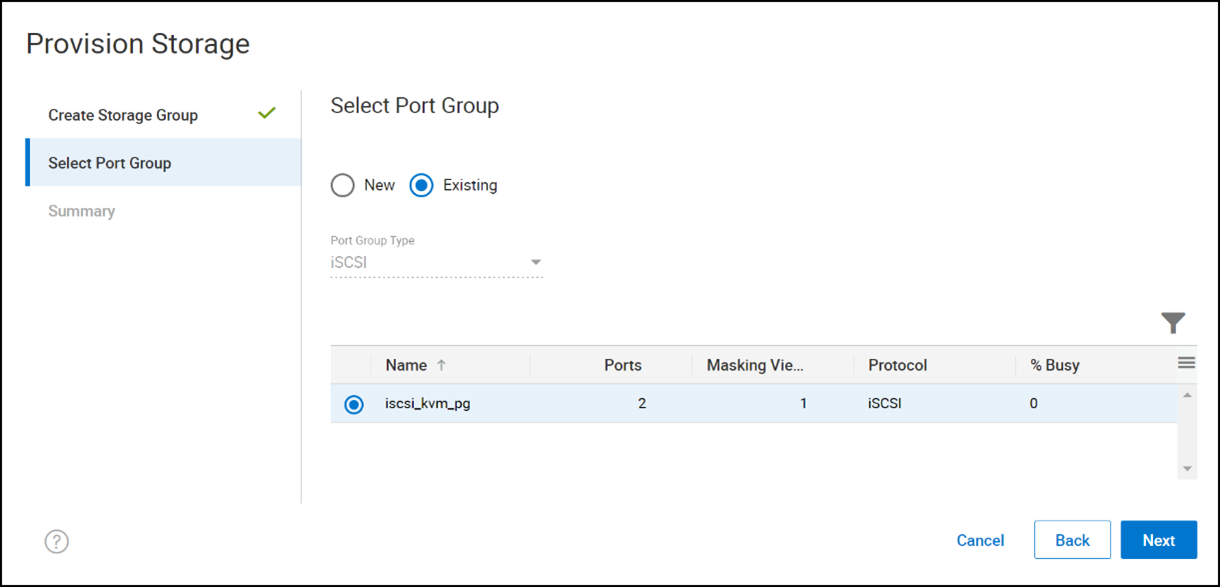 Figure 69. Provision storage to host – select port group
 - Review the summary and click Run Now, as shown in Figure 70:
 Figure 70. Provision storage to host – view summary
This step creates the masking view, presenting the volume to all hosts in the KVM cluster. - It might be necessary to discover the iSCSI targets (even if previously done) and then log in, as shown in the example in Figure 71:
 Figure 71. iSCSI target discovery and login
 - To confirm the host can now detect the volume, run the multipath -ll command, as shown in Figure 72:
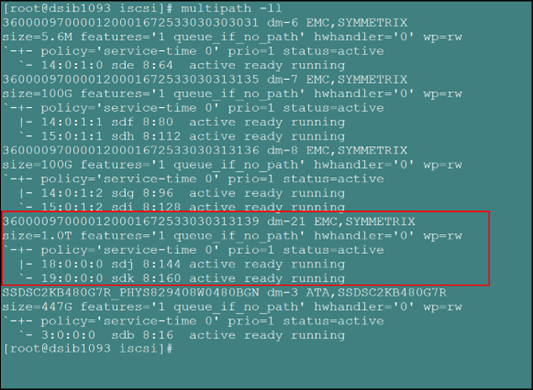 Figure 72. Multipath confirmation
iSCSI storage domain
With the volume presented, create the iSCSI storage domain:
- In OVM, go to Storage -> Domains, as shown in Figure 49.
- Select a Host from the drop-down list.
The volume must be presented to all hosts in the cluster or storage domain creation fails. - Use the Storage Type drop-down list to select iSCSI.
OVM immediately initiates a scan of the host and returns the available volumes. Initially, the screen returns Targets -> LUNs. - Change the screen to LUNs -> Targets to see the volumes, as shown in Figure 73.
In this example, there is only a single 1 TB device. - Optionally, enter a Name and Description
- Click Add next to the PowerMax volume
- Keep all other default Advanced Parameters, unless the business requires a change.
- Click OK.
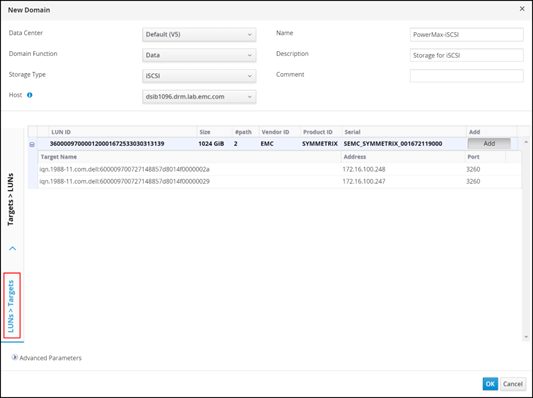 Figure 73. iSCSI storage domain
Note: Although it is possible, Dell Technologies does not recommend selecting multiple devices for use in a single storage domain. Rely on the PowerMax array for performance and present a single volume of the total size required.
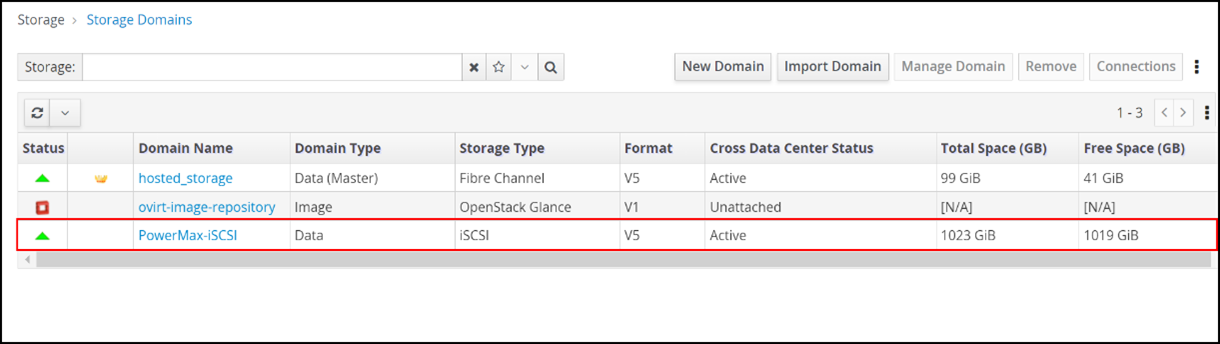
OVM initiates the iSCSI storage domain, locking it until completion. When done, the storage domain displays as active, as shown in Figure 74:
Storage domain OVF_STORE
Regardless of type, each storage domain contains two disks named OVF_STORE by default. These disks contain all the information about the storage domain (such as virtual machines and metadata), which allows KVM to recover the storage domain without needing the oVirt Engine (previous functionality). This information, however, is also shared with the oVirt Engine. The disks are not created at instantiation, rather oVirt generates them through a scheduled process.
The example in Figure 75 shows that the PowerMax-FC storage domain was created at 11:23:25 AM but the OVF_STORE disks were not generated until approximately 33 minutes later. After storage domain creation, OVF_STORE disk creation varies depending on when the oVirt job runs (auto), which might be up to an hour after initial creation of the domain.
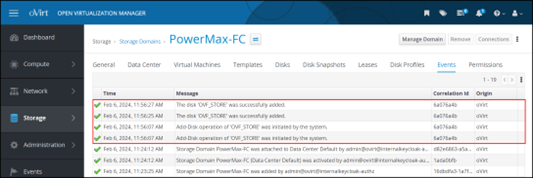
Figure 75. OVF_STORE disks
These disks remain for the life of the storage domain, neither increasing nor decreasing in number, no matter how many virtual disks or ISOs are created in the storage domain.