
Installation
Installation
-
The oVirt installation begins with selecting a node for the oVirt Engine.
There are three steps to the installation.
- Identify a physical host for the first KVM node of the cluster with sufficient memory, CPU, and PowerMax storage connectivity (iSCSI, FC, or NFS) to support the oVirt Engine.
- Install Enterprise Linux 8.x or use the oVirt Node ISO (CentOS).
- Run the hosted-engine script to deploy the oVirt Engine.
The following sections describe the installation of the oVirt Node and oVirt Engine.
oVirt Node installation
Install the oVirt Node:
- Download the latest available version 8 oVirt Node ISO file from the oVirt website. Figure 11 shows an example using the latest ISO file:

Figure 11. oVirt Node ISO file for Enterprise Linux 8Note: Version 9 is still under development.
- Mount the ISO file to the chosen physical server and boot. Select Install oVirt Node 4.5.4 (or the latest iso release), as shown in Figure 12:
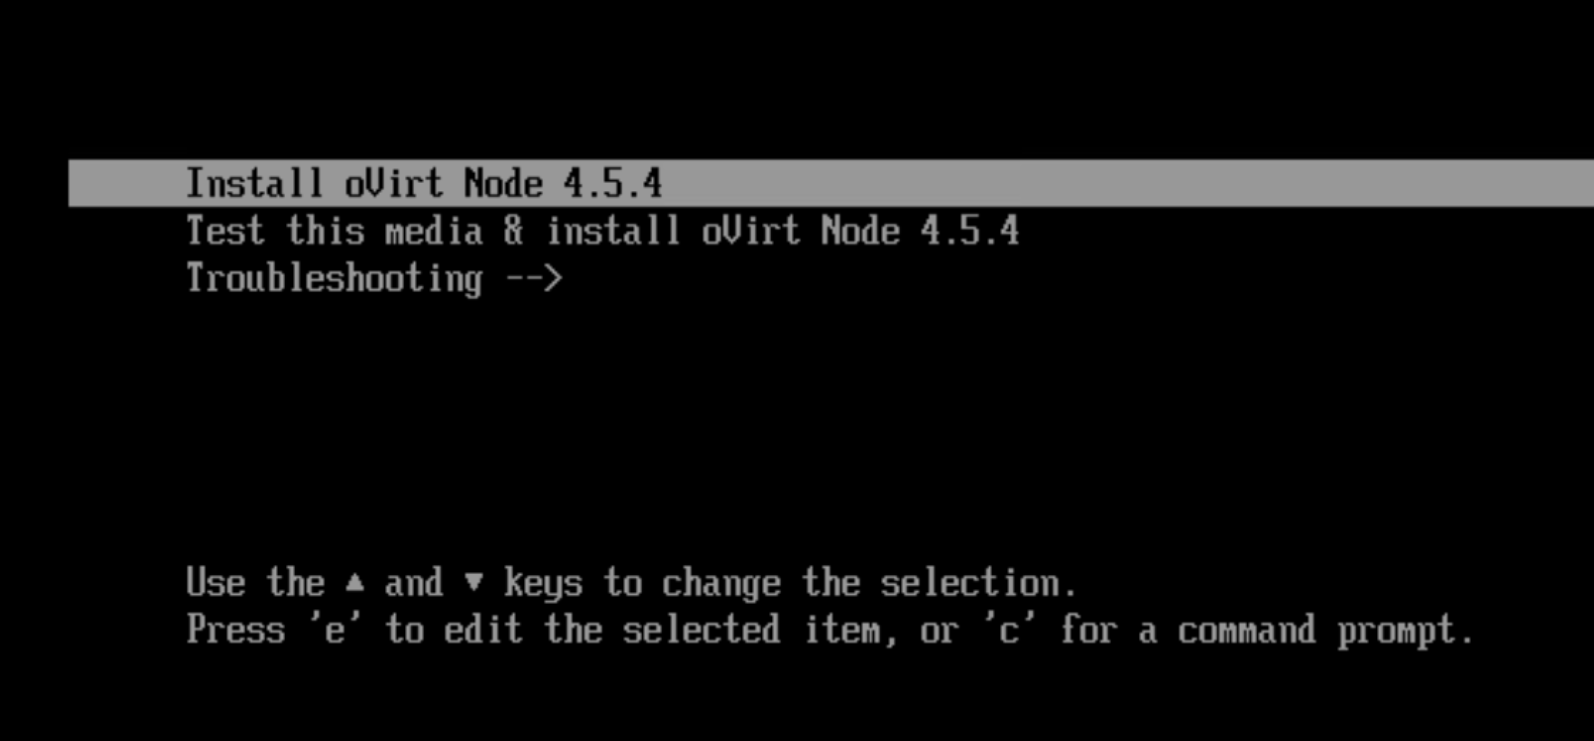
Figure 12. oVirt ISO installation: install oVIrt Node- Select the appropriate language, as shown in Figure 13:
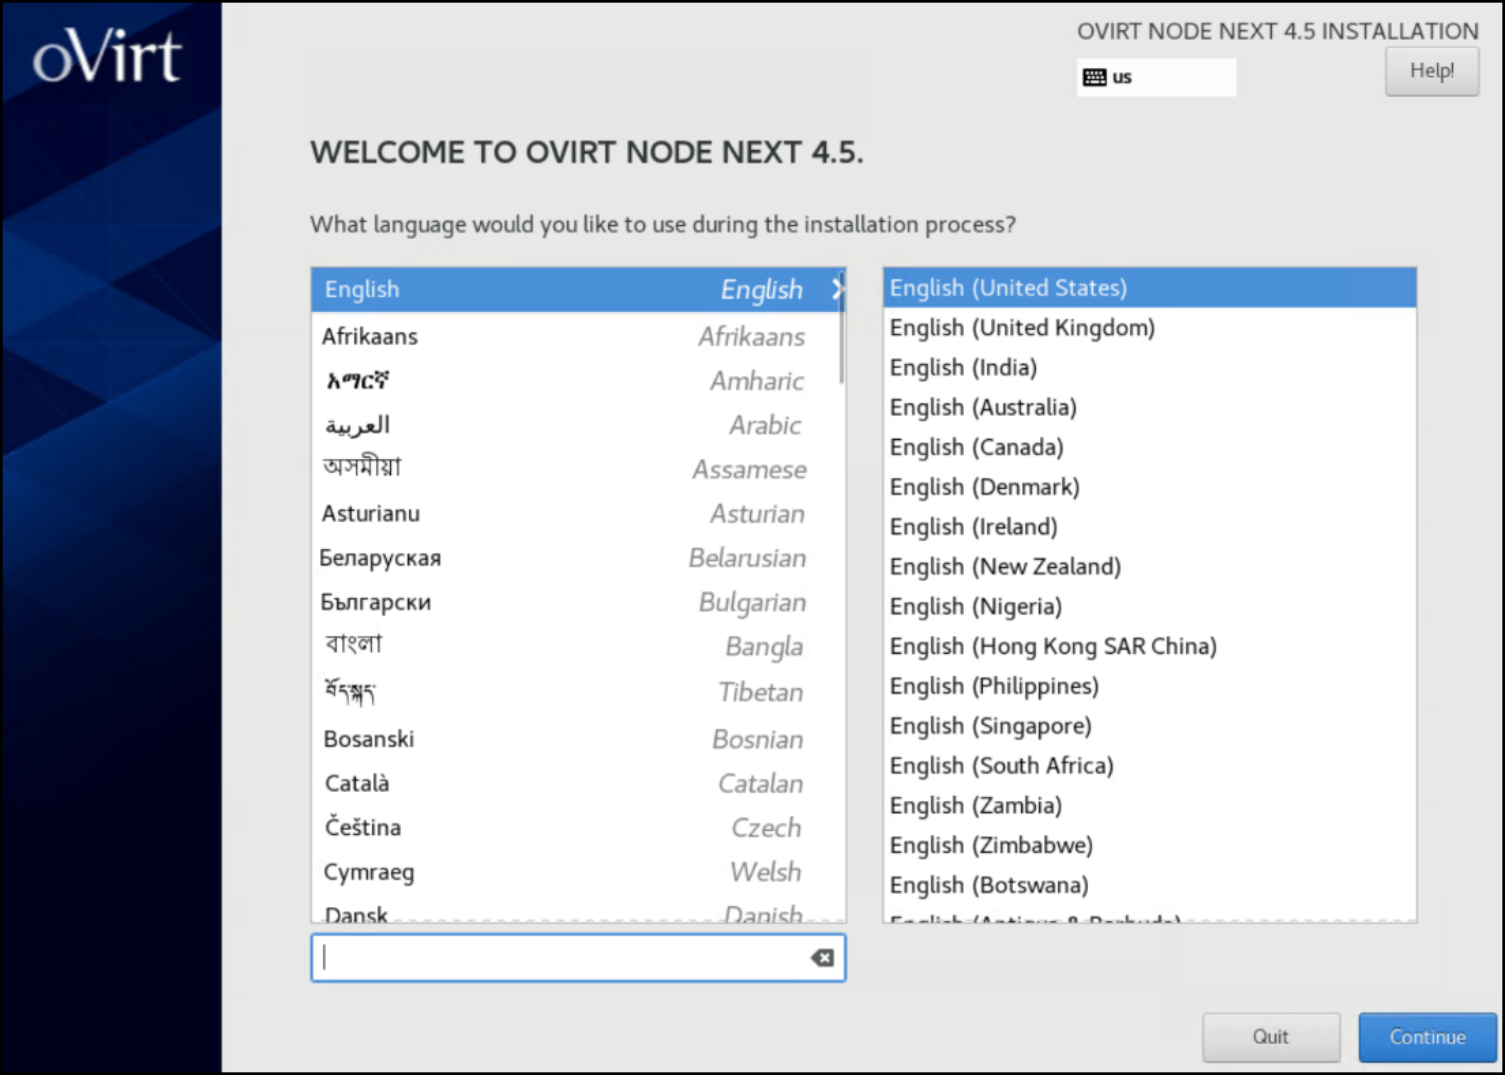
Figure 13. oVirt ISO installation: select language- Modify the following options and then click Begin Installation, as shown in Figure 14:
- Set the keyboard language.
- Set an installation destination with more than 75 GB of available space (this example uses100 GB). This size accommodates the oVirt Engine virtual machine, which is created on local storage before being moved to shared storage. If an insufficient size is selected, the installer does not continue with the installation.
- Set the network and hostname.
- Set the root password.
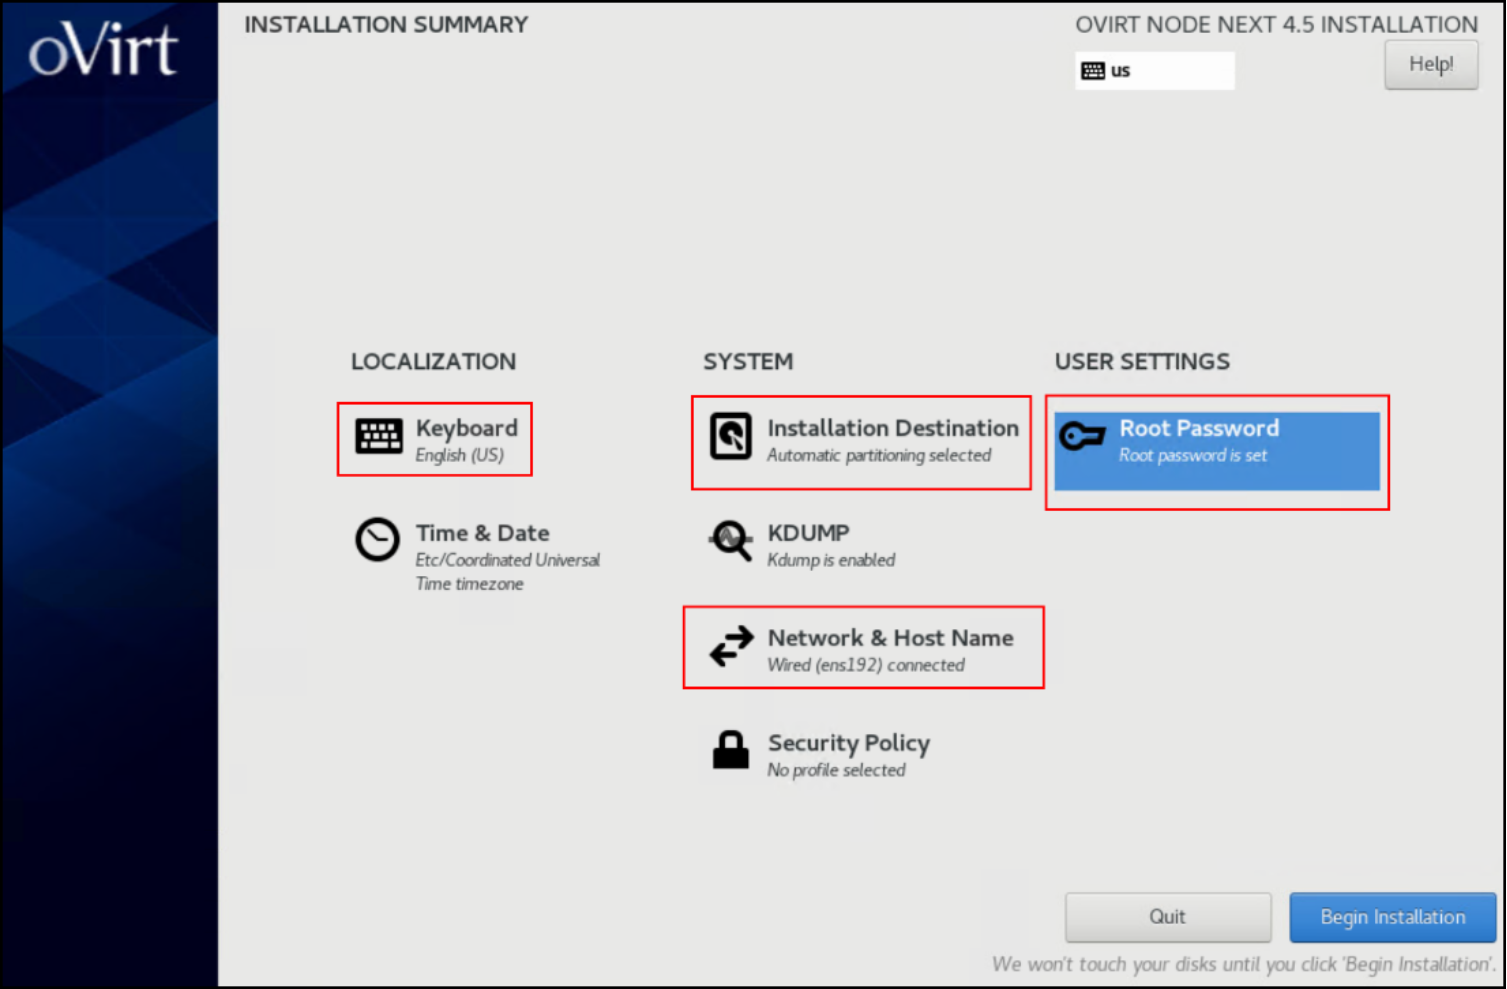
Figure 14. oVirt ISO installation: modify optionsNote: The ISO file is preconfigured with the necessary packages.
The installation progresses quickly due to the limited number of packages.
- Click Reboot System, as shown in Figure 15:
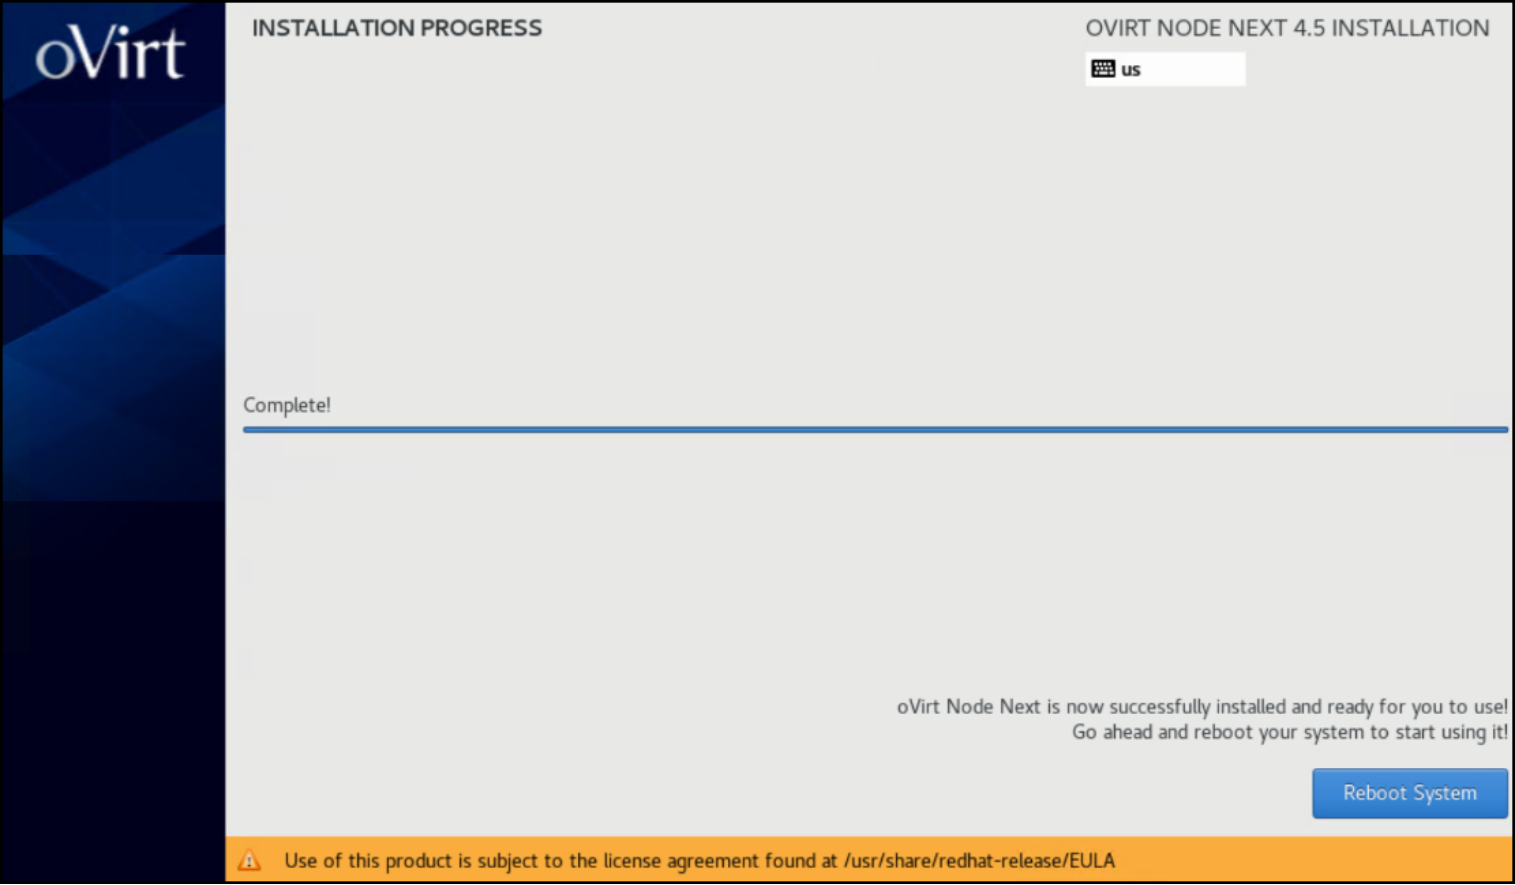
Figure 15. oVirt ISO installation: reboot the system- After the system reboots, use SSH to access the system and check that the node is healthy by running the nodectl check command, as shown in Figure 16:
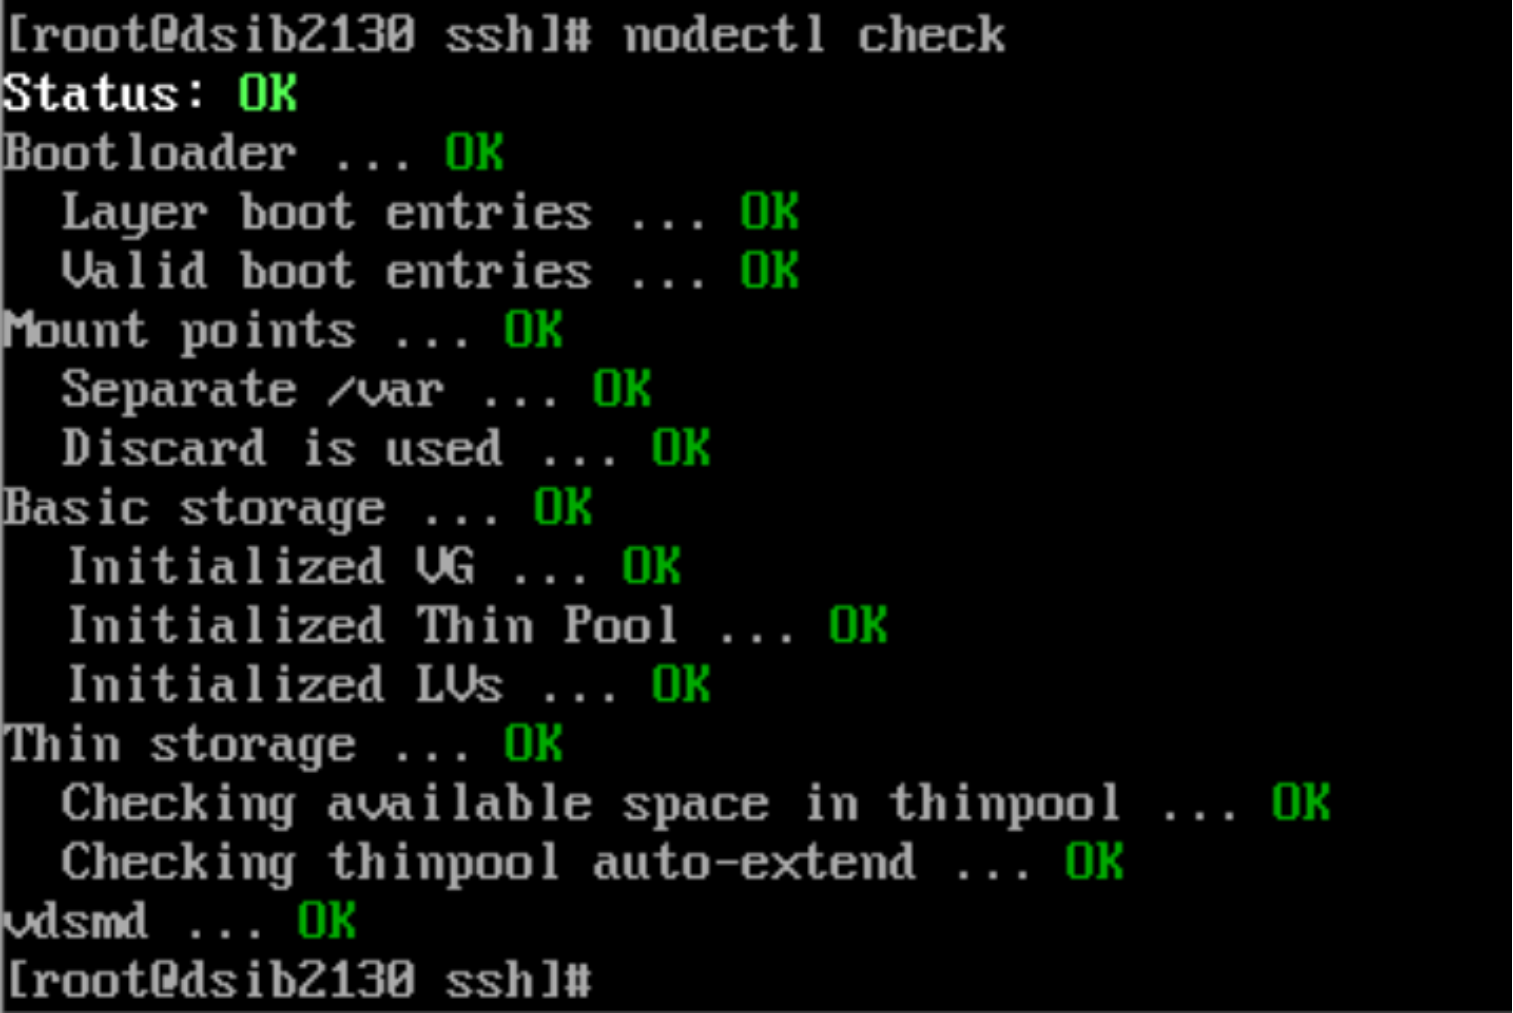
Figure 16. Node healthInstall the self-hosted oVirt Engine
The self-hosted oVirt Engine is a virtual machine created on the first node of a KVM cluster. Deploy it by running the hosted-engine –deploy command, which in turn runs Ansible scripts or playbooks to create the oVirt Engine. The script queries for the network, host names, IP addresses, and most importantly, storage. Initially, the virtual machine is deployed on the local mount (/) before being moved to the chosen shared storage. It is essential to use a disk large enough for deployment of the KVM node where the oVirt Engine will be built. By default, the script uses IPV6. If IPV4 is required, the --4 parameter must be passed.
Figure 17 shows the script output:
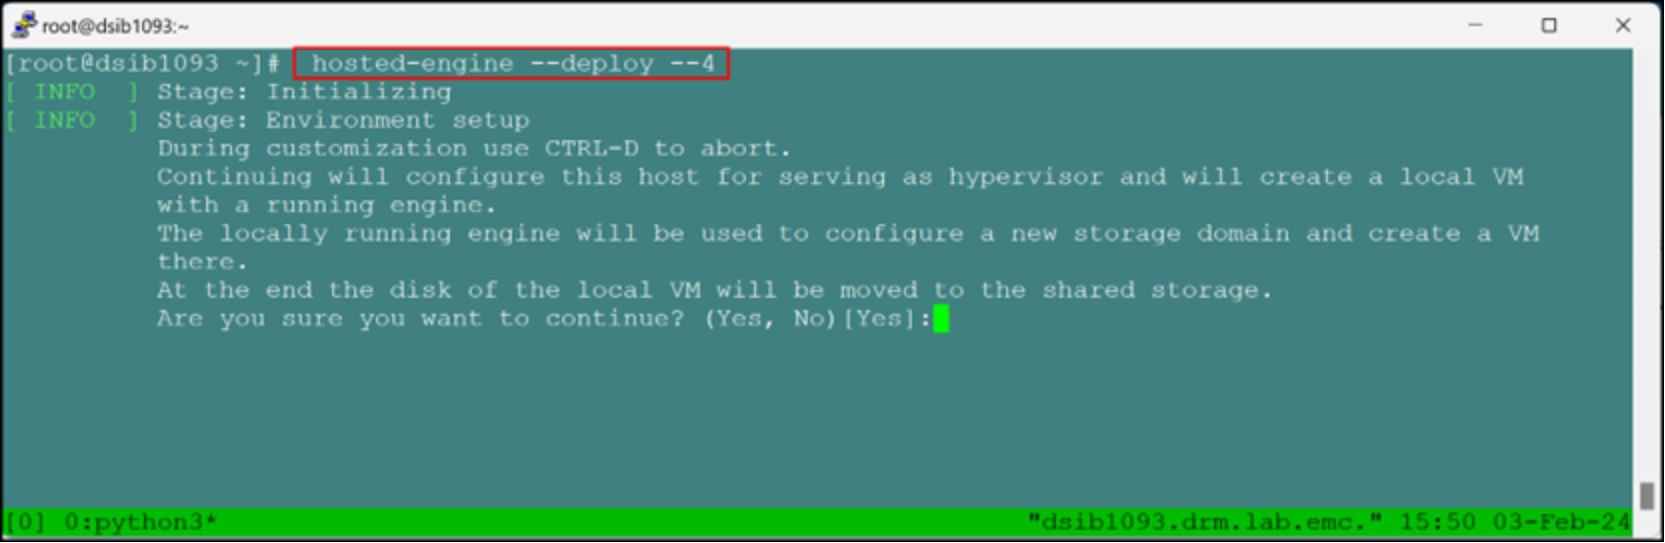
Figure 17. Hosted-engine script executionNote the reference to shared storage. The virtual machine is copied to a shared storage domain of the user’s choice that is created as part of the script. It cannot be a local storage domain. This limitation narrows the options to: GlusterFS, iSCSI, FC, or NFS. The storage must be presented to the node before running the deployment script for iSCSI and FC. To prepare for an FC storage domain, see Fibre Channel. To prepare for an iSCSI storage domain, see see iSCSI. The user can specify GlusterFS and NFS when prompted.
Note: When running the deployment script, use the tmux utility, which allows a script restart if the user is disconnected.
The script prompts the user for the management network (typically the public adapter of the host), the data center and cluster names, and the CPU, memory, and FQDN of the Engine. The Engine FQDN is not the running host, rather it is an available host/IP address for the virtual machine. The default values for CPU and memory are a percentage of the actual server amounts. They can be adjusted as shown in Figure 18:
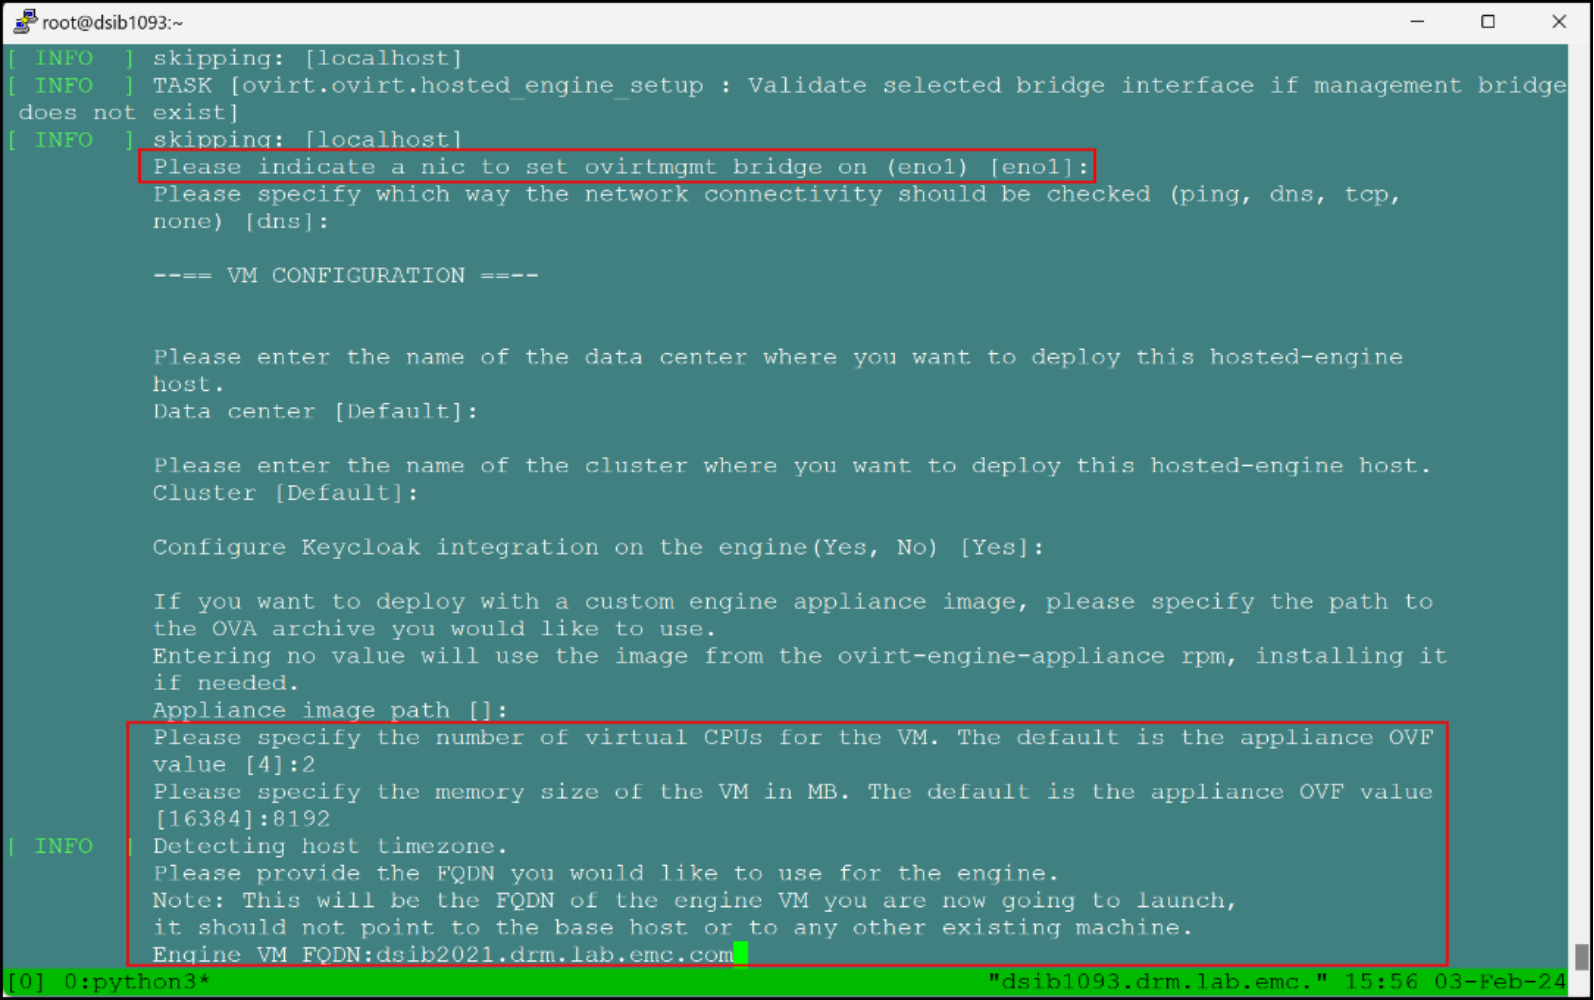
Figure 18. Engine virtual machine specificationsWhen the user enters the required information, the script deploys the appliance and creates the virtual machine on local storage. After this step is completed, the oVirt Engine is ready.
The final steps in the script move the virtual machine to shared storage. The user is prompted to select the type of storage. At the prompt, NFS is the default option. Figure 19 shows an example in which FC is selected:
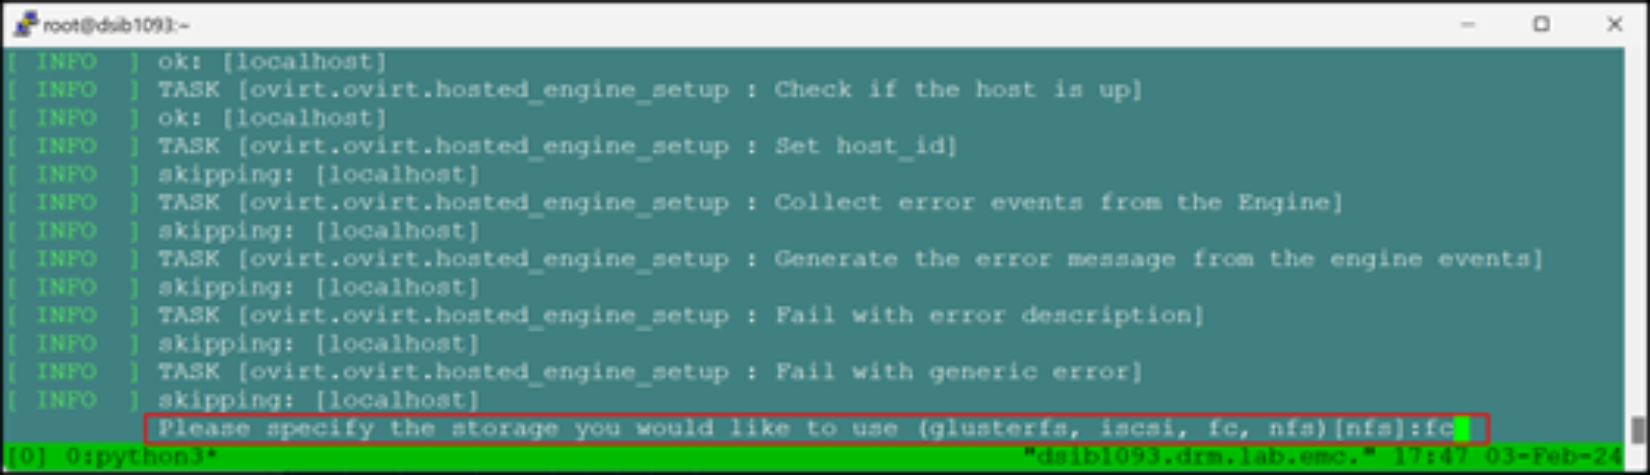
Figure 19. Shared storage promptWhen selecting either iSCSI or FC, the script initiates a storage scan and then presents a list of devices from which to choose. In Figure 20, option [2] is selected, which is a 99 GiB device. The default size of the virtual machine is 51 GB, therefore, the device must be larger than 51 GB.
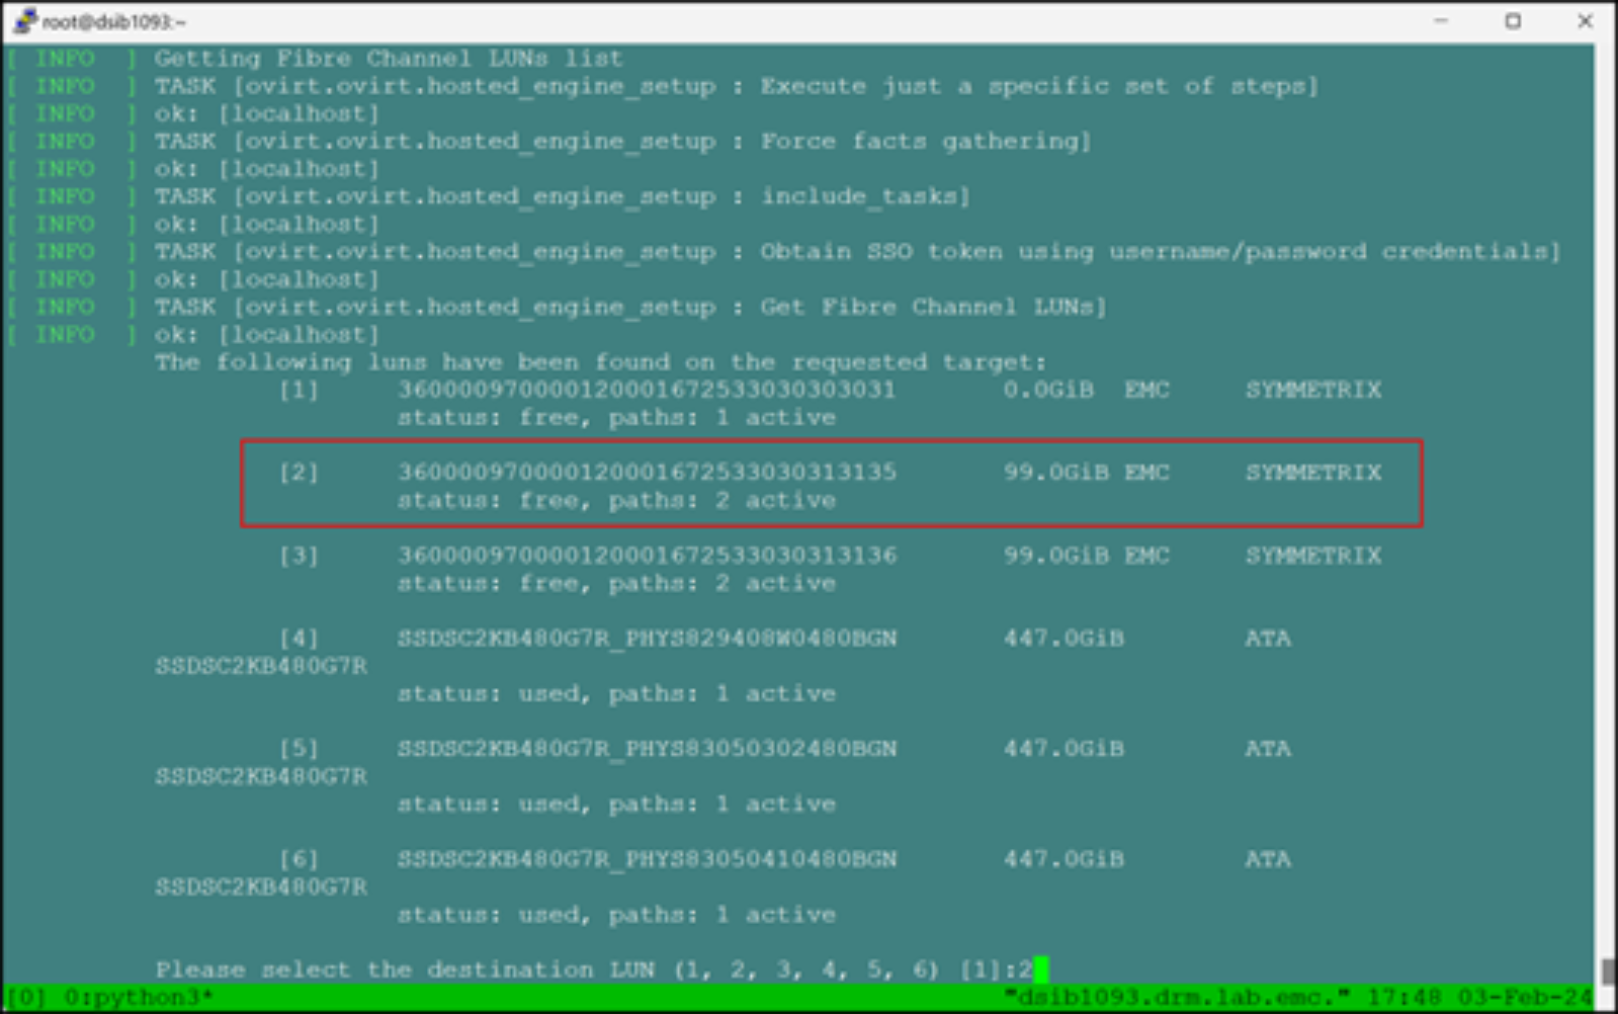
Figure 20. Selecting an FC volumeAfter the script creates the shared storage domain, it prompts the user for a virtual machine disk size before moving it to shared storage. Because KVM does not support moving live virtual machines across storage domains, there is the opportunity to change the disk size. Unless there is a specific reason to do so, accept the default value of 51 GB. Figure 21 shows these steps:
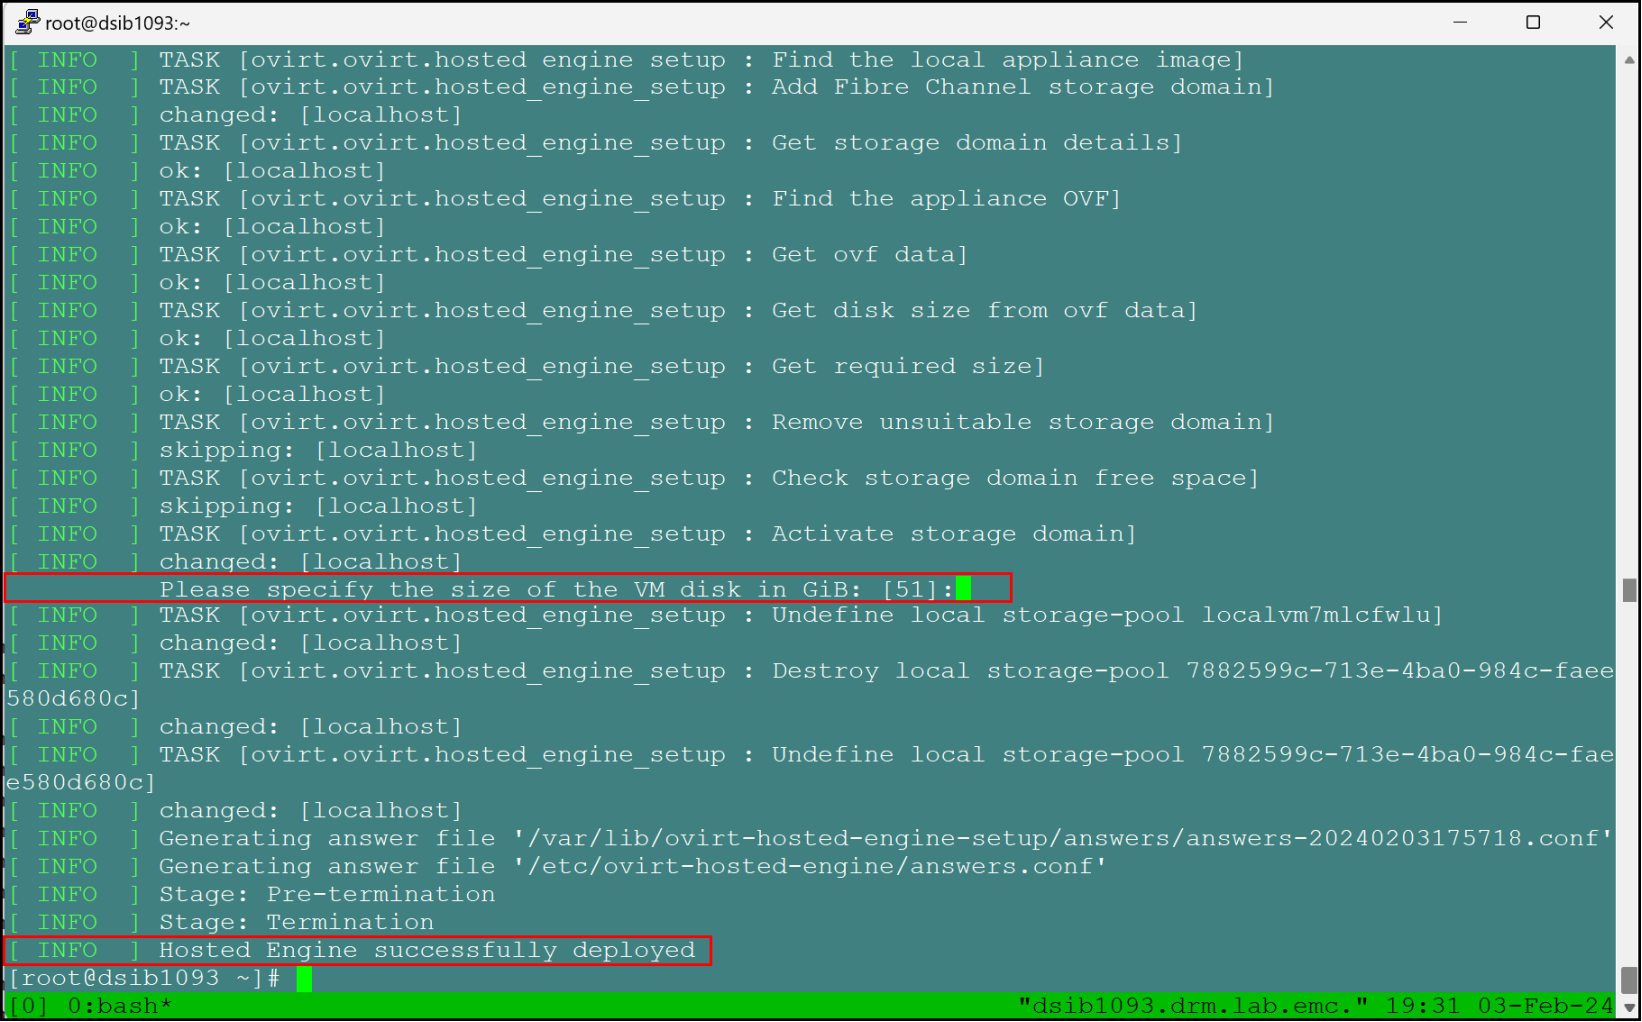
Figure 21. Deployment completionThe script in this example reports a successful completion, which means that the oVirt Engine is up and running on shared storage. If there are errors at any point, the user can address them and the script starts again. Sometimes, the state of the installation is unknown and requires a full reset. See Failed oVirt Engine script, which describes how to rollback a failed installation.
oVirt Manager
The oVirt Engine virtual machine contains the Open Virtualization Manager (OVM), which is the UI of the environment.
To access the OVM:
- Go to the FQDN provided during the deployment script in section Install the self-hosted oVirt Engine.
- Select Administration Portal and then log in as the admin@ovirt user, providing the password from the deployment script, as shown in Figure 22:
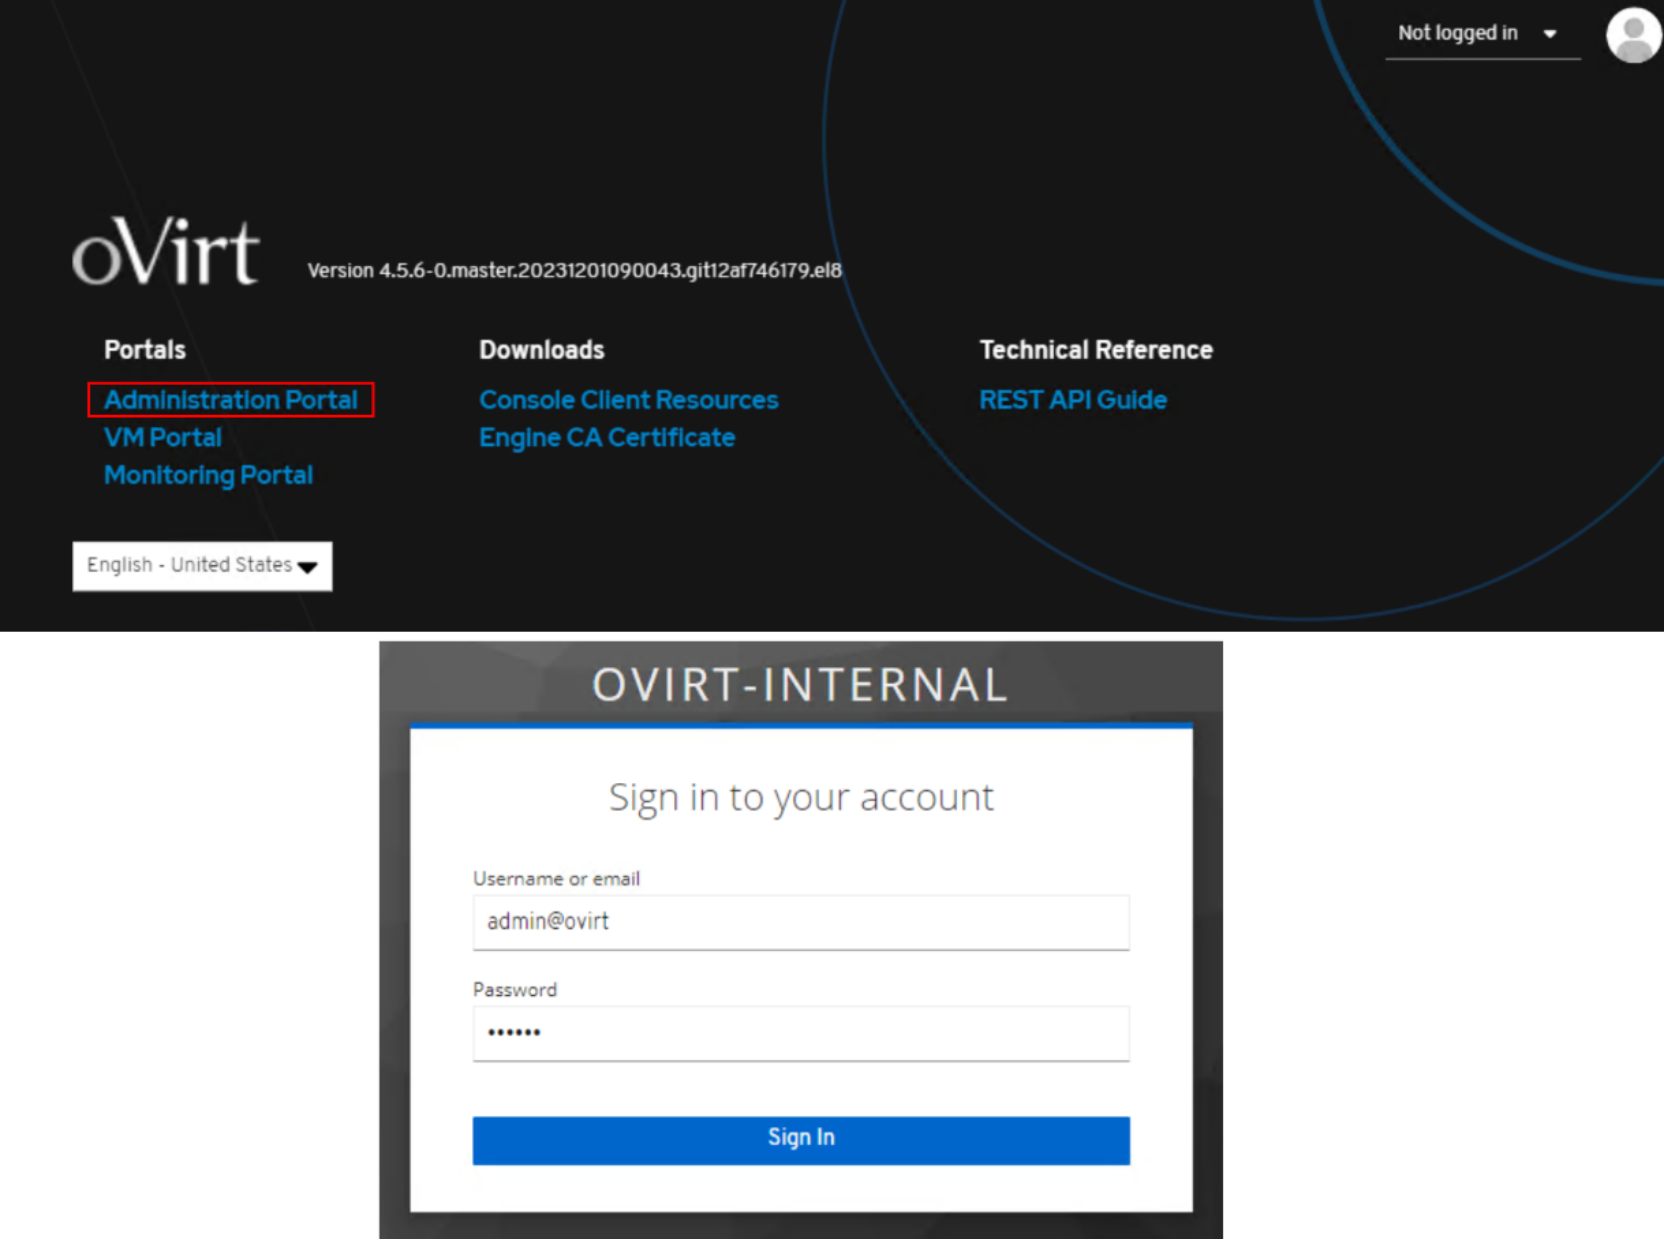
Figure 22. Open Virtualization Manager loginThe Dashboard is displayed, as shown in Figure 23:
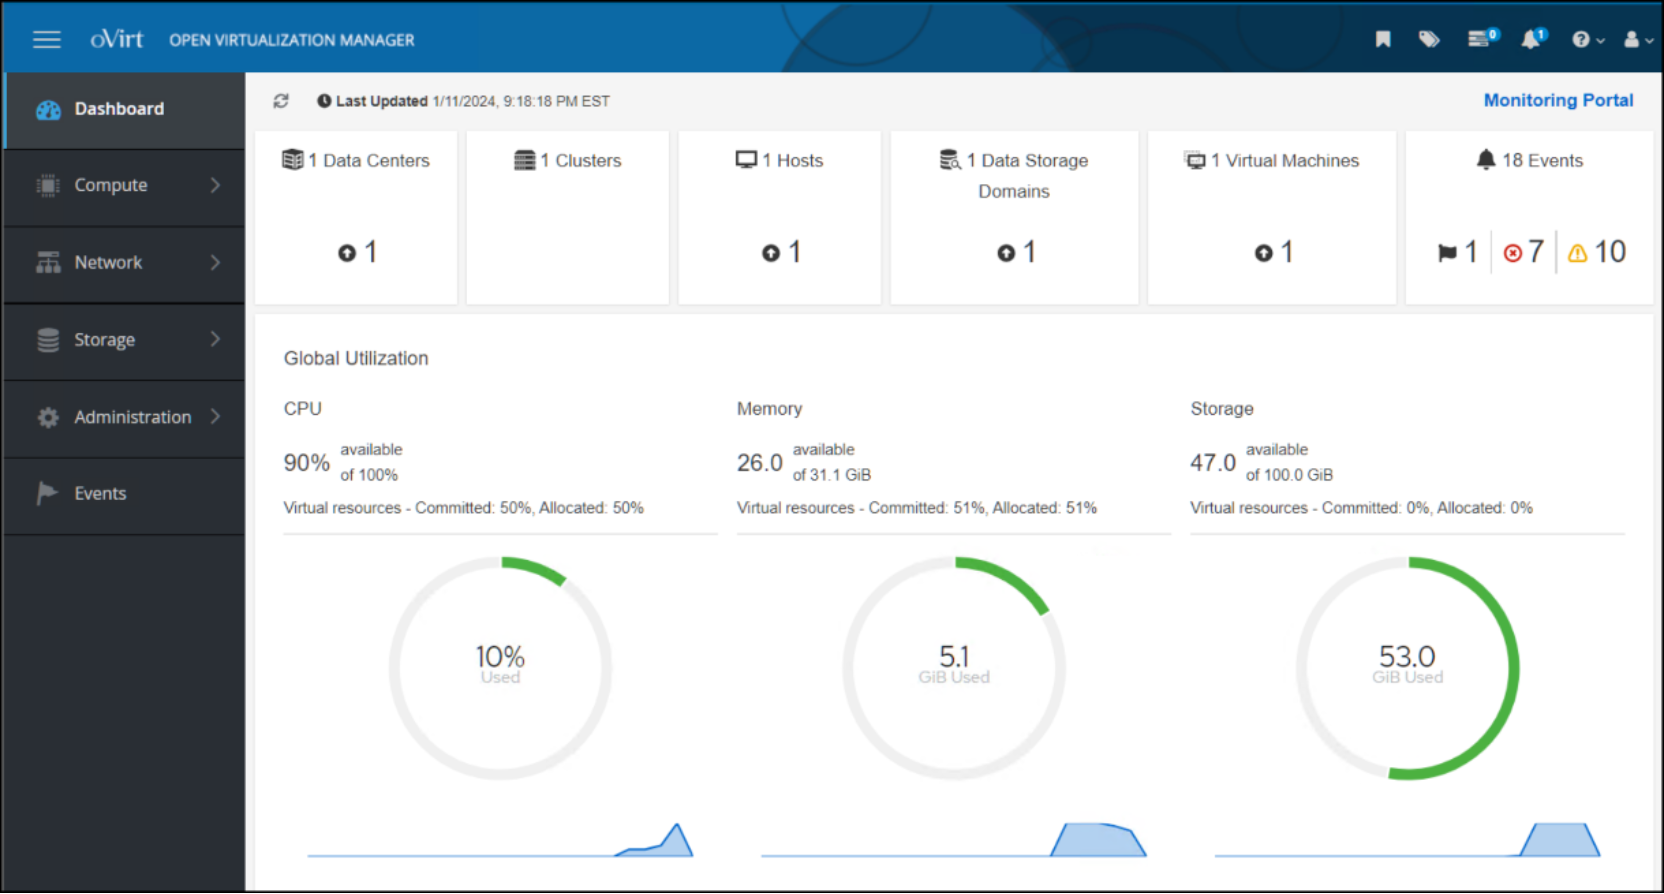
Figure 23. Open Virtualization Manager DashboardThe Dashboard enables one to access environment components, as well as a link to the Monitoring Portal. Each tile at the top of the dashboard is a hyperlink to the category header. For example, clicking the Hosts tile displays the oVirt node, as shown in Figure 24:
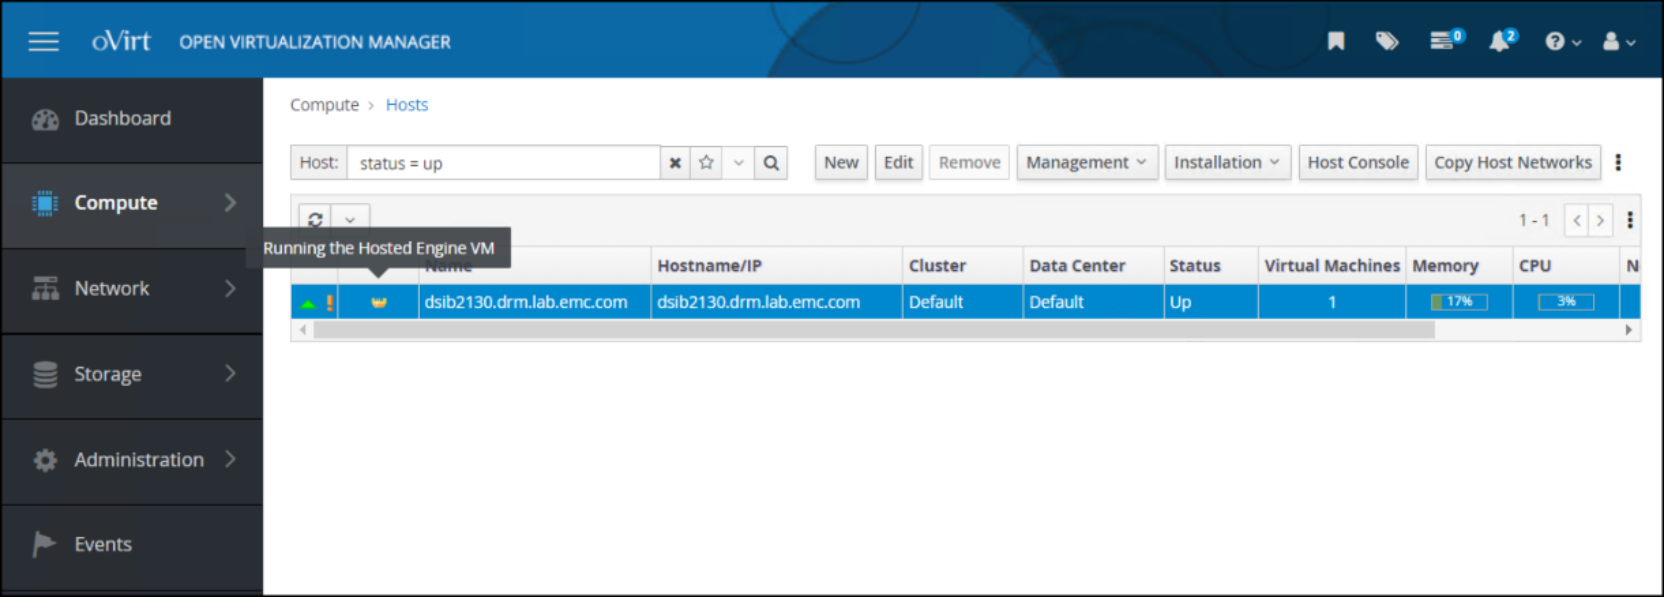
Figure 24. Hosts in Open Virtualization ManagerThe crown icon to the left of the hostname indicates that this host is running the Hosted Engine VM.
The exclamation point icon to the left of the crown icon indicates that power management is not active on the host. Power management allows the user to power on and power off the host from the OVM interface. It accomplishes this task through a fencing agent such as iDRAC. This node is the initial node in the configuration. One cannot enable power management on the initial node in the cluster until a second node is added. For information about enabling power management, see Adding a KVM host to a cluster.
With the completion of the script, the user can now add more hosts to the cluster and create more storage domains.
Cockpit
A user will likely see a reference to Cockpit when they log in to a KVM node. Cockpit is part of the build for the oVirt node and can be enabled on each KVM node for a standard server installation. It is a UI that can manage a Linux system, including virtual machines. The user might find it useful to manage the Linux host themselves, however, because the oVirt Engine provides the UI for the KVM environment as a whole, Cockpit is unnecessary for virtualization components. While the Virtualization option in the menu on the left offers the ability to install the oVirt Engine for the cluster, as shown in Figure 25, the UI deployment of the hosted engine is deprecated. Using the UI setup can lead to SSO authentication issues. Both Dell Technologies and the oVirt community recommend using the CLI procedure that is documented in this guide to ensure success.
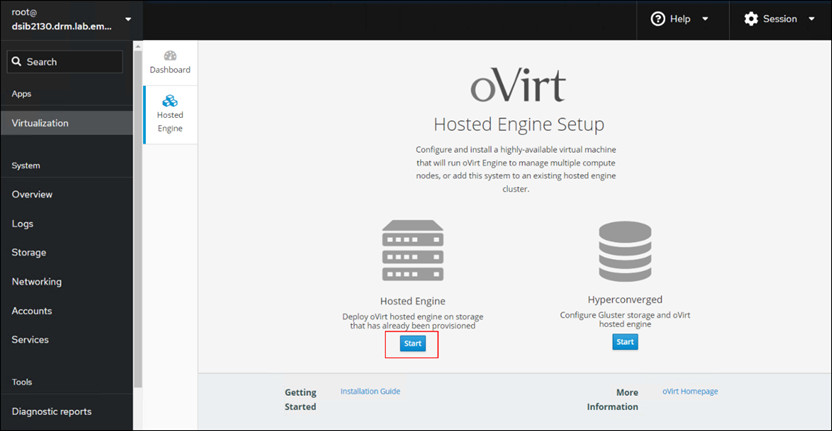 Figure 25. oVirt Engine UI setup
Adding a KVM host to a cluster
After deployment of the oVirt Engine, whether self-hosted or stand-alone, the user can add other Enterprise Linux or oVirt Nodes KVM nodes to the cluster. The oVirt documentation lists the minimal requirements for a KVM node before adding it to a cluster. The following procedure assumes that the user has met these prerequisites.
- From the OVM UI, go to Compute -> Hosts and click New to start the wizard, as shown in Figure 26:
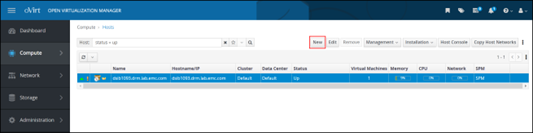 Figure 26. Add the KVM host - start the wizard
 - In the New Host dialog, select the Host Cluster, specify a Name, Hostname/IP, and a Password, as shown in Figure 27:
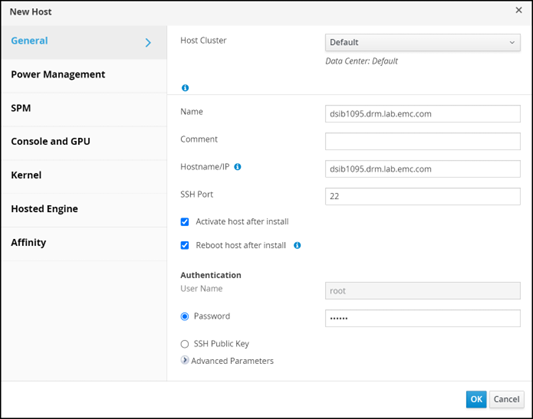 Figure 27. Add the KVM host – define the host cluster
No other changes are required. If using Power Management on the host (such as iDRAC), or enabling HA, continue to the next step. Otherwise, click OK to complete adding the host.
In the Power Management dialog, click the Enable Power Management checkbox and then click the plus sign to Add Fence Agent, as shown in Figure 28: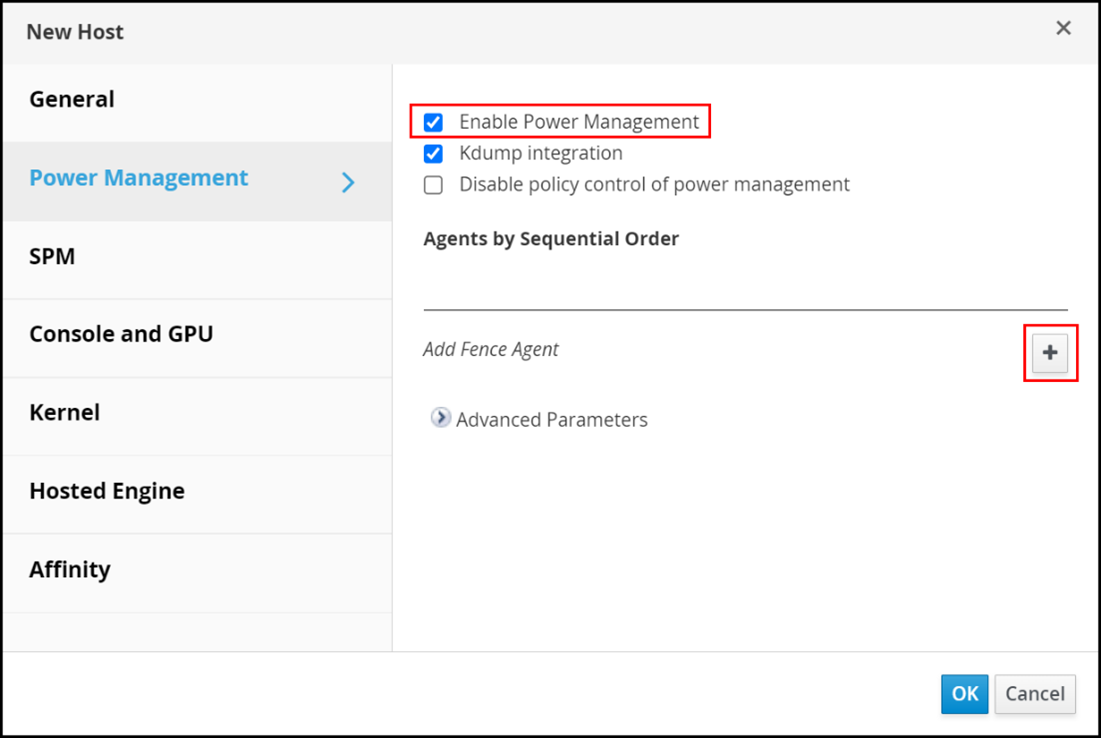 Figure 28. Add KVM host - enable Power Management
 - For the fence agent, as shown in Figure 29:
- Enter the Address, User Name, and Password.
- From the Type drop-down list, select the correct agent used on the host. As shown in the example in the following figure, drac7 is selected for iDRAC.
- Click Test to run the Test functionality in the red box.
- Click OK when ready.
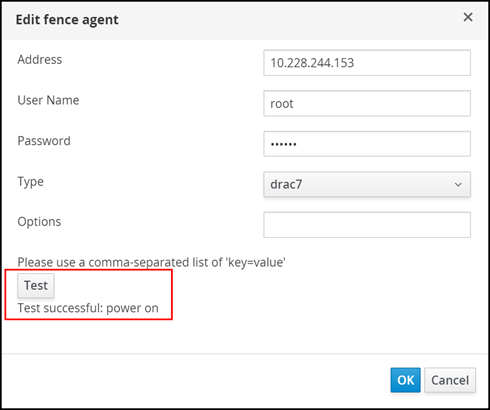 Figure 29. Add KVM host - edit the fence agent
The main Power Management screen is displayed. Figure 30 shows the new agent: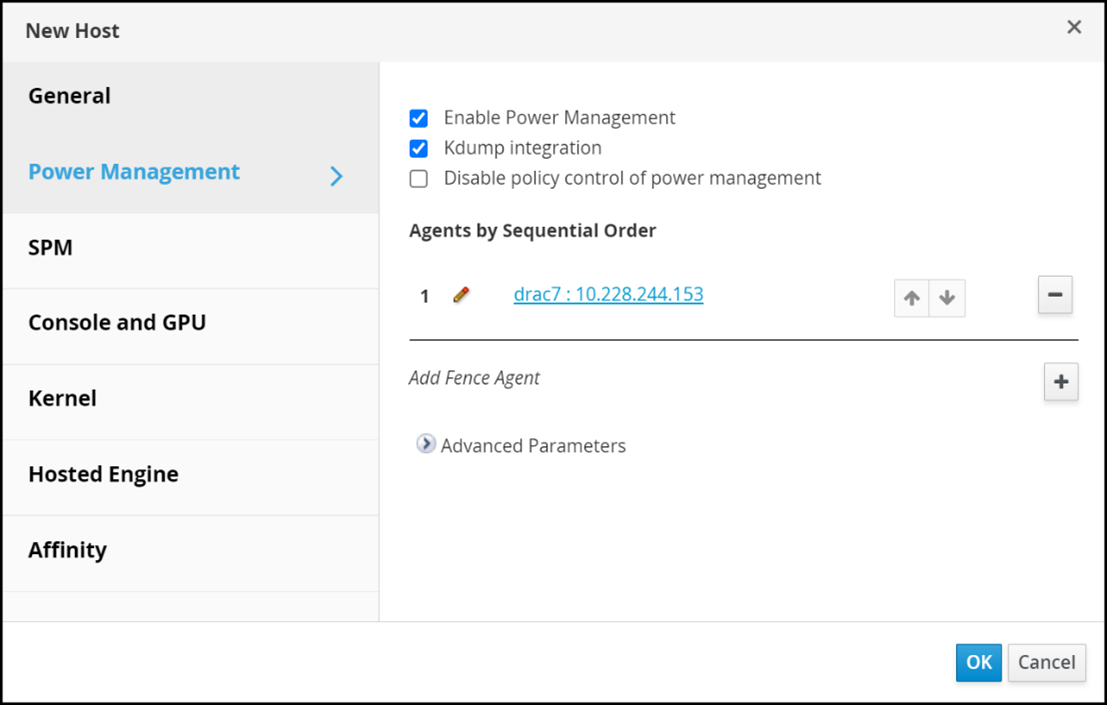 Figure 30. Add KVM host - edit the fence agent
 - If the KVM host will be configured to run the self-hosted engine (to enable HA), click Hosted Engine, select Deploy from the drop-down list, and then click OK to add the host, as shown in Figure 31:
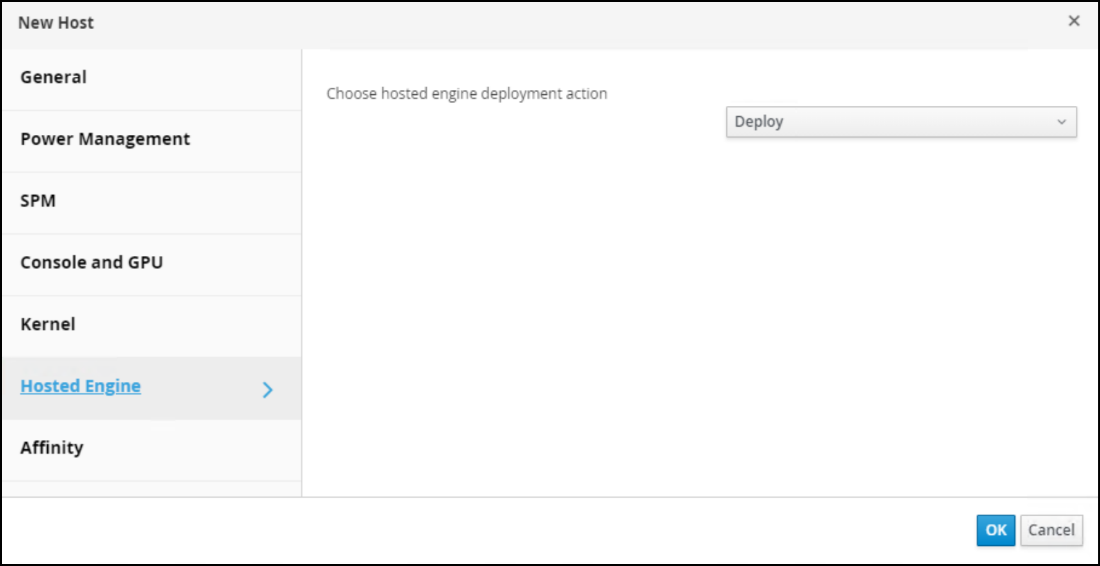
Figure 31. Add KVM host - add the hostAfter the steps are completed, OVM initiates the operations to add the host to the cluster, including installation of the packages. Figure 32 shows the status of the host as Installing; when the step is completed, the status of the host is Up.
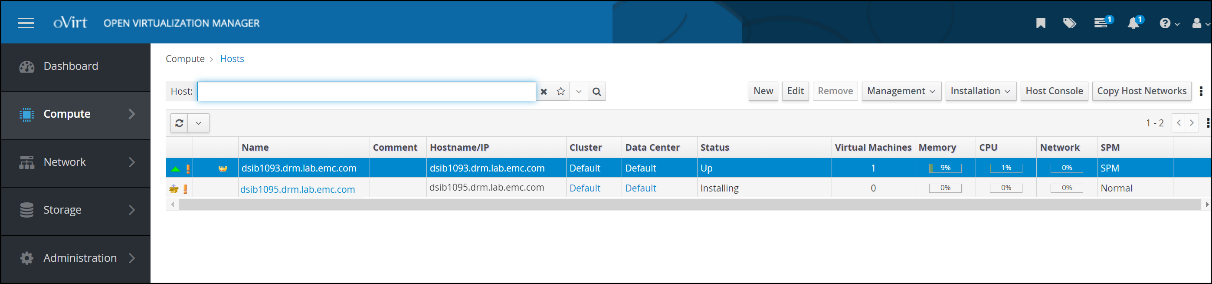 Figure 32. Add KVM host - view the host status
If a host is selected for the self-hosted engine, a gray crown icon to the left of the hostname indicates that the host is allowed to run the self-hosted engine, either because of an HA event or migration, as shown in Figure 33:
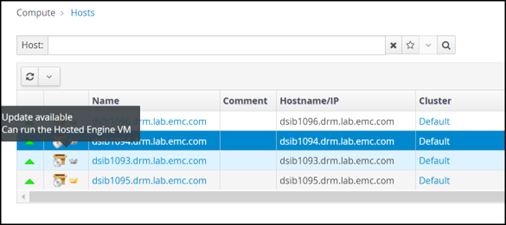 Figure 33. KVM host that can run the Hosted Engine
After the second host is part of the cluster, the user can edit the first host and assign power management. One cannot enable power management for the first host until there is a second host. Repeat the preceding steps to add power management to the first host.
Upgrades
If new oVirt software becomes available, OVM informs the user if any hosts in a cluster can be upgraded. If the user examines the hosts, each host indicates whether it can be upgraded. Figure 34 shows both views:
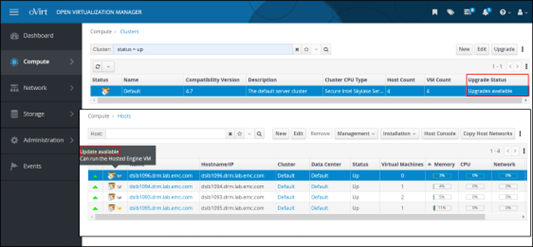
Figure 34. Upgrade statusIn the hosts view, the Installation menu also enables the user to check for updates because OVM only checks for updates periodically.
Host upgrade
To upgrade a host:
- Highlight the specific host and from the Installation drop-down list, select Upgrade, as shown in Figure 35:
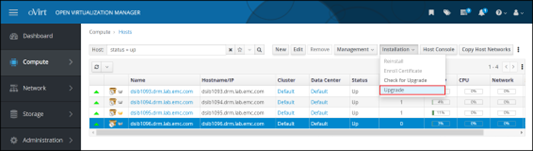
Figure 35. Upgrade the host
- In the Upgrade Host dialog, click OK. Note that the Reboot host after upgrade checkbox is enabled by default, as shown in Figure 36:
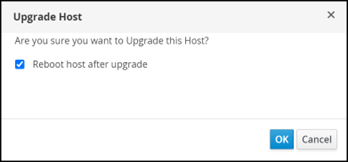 Figure 36. Upgrade host dialog
The status of the host proceeds through the following states:- Installing (host is placed in maintenance mode)
- Reboot
- Up
In Figure 37, the status of the host is shown as Maintenance before the installation and reboot. In the inset, the event log shows a successful upgrade:
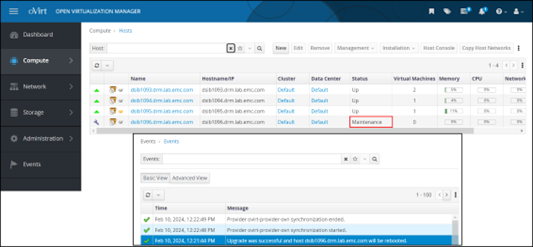
Figure 37. Host event log