
None
None
-
In this step we create an Oracle 19c database backup using the PowerFlex snapshot mechanism. We also use snapshot restore to verify data persistence in the newly created Oracle 19c database. The objective is to show that the 19c database in the newly created pod can be easily restored.
Follow the steps in this section to create the yaml files to create, snapshot, and restore a volume, and to deploy Oracle 19c. In this use case, to show persistence and snapshot restoration, we are using the yaml files that are shown in the following table:
Table 8. yaml files
yaml File
Description
1-initial-19c-deployment.yaml
Creates persistence volume and Oracle 19c deployment and service.
2-snap1-pvc19c.yaml
Creates a snapshot of the PVC that was created in Step 1.
3-restore1-19c-deployment.yaml
Creates a PVC from the snapshot that was created in Step 2, then creates Oracle 19c deployment and service.
4-snap2-pvc19c.yaml
Creates another snapshot of the PVC that was created in Step 1.
5-restore2-19c-deployment.yaml
Creates a PVC from the snapshot that is created in Step 4, then creates Oracle 19c deployment and service.
To verify persistence and snapshot restore, do the following:
# kubectl create -f 1-initial-19c-deployment.yaml
- In the Kubernetes dashboard, examine the newly created persistence volume in the PowerFlex GUI and Oracle 19c pod.
- Using Oracle SQL Developer, connect to this container database using the external IP address that was generated from the load balancer. (In this use case, the external IP is 10.20.87.183.)
- Using Oracle SQL Developer, add test data into the database.
- Log into the pod and check the mounted volume from PowerFlex to the Oracle 19c container.
# kubectl create -f 2-snap1-pvc19c.yaml
- Using the PowerFlex GUI, check the newly created snapshot.
- Using Oracle SQL Developer, add one more row to the initial Oracle 19c database.
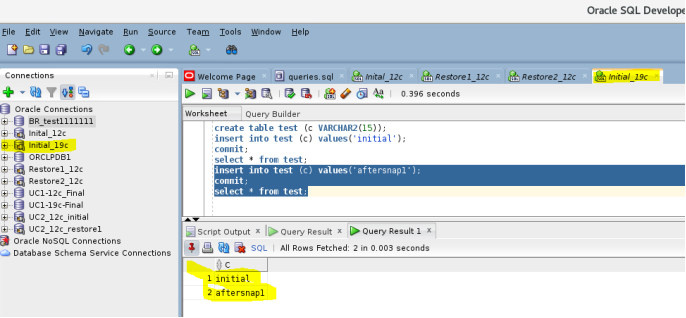
Figure 15. Add a row to the Oracle 19c database
- Use the snapshot to create an Oracle 19c pod. This step restores the PVC from the snapshot and deploying Oracle 19c database along with its services by mounting the restored volume.
- Use the 3-restore1-19c-deployment.yaml file to restore the Oracle 19c database.
# kubectl delete -f 3-restore1-19c-deployment.yaml
- Check for the pod and restored PVC.
# kubectl get pods -o wide
- Using Oracle SQL Developer, connect to the restored Oracle 19c pod, using the external IP that we got from the load balancer (10.230.87.184). Check for the initial row that we entered before taking snapshot.
# kubectl create -f 4-snap2-pvc19c.yaml
Using Oracle SQL Developer, add one more row to the initial Oracle 19c database. At this point, we have a second snapshot which includes the initial 19c database and all its existing rows plus one extra row.
- Use the second snapshot to create an Oracle 19c pod. This step restores the PVC from the second snapshot and deploys the Oracle 19c database along with the services by mounting the restored volume.
- Use the 5-restore2-19c-deployment.yaml file to restore the Oracle 19c database.
# kubectl delete -f 5-restore2-19c-deployment.yaml
- Check for the pod and restored PVC.
# kubectl get pods -o wide
- Using Oracle SQL Developer, connect to the second restored Oracle 19c pod, using the external IP that we got from the load balancer (10.230.87.185). Check for all the rows that we entered before taking the second snapshot.
- Show the persistence of the volume by deleting the pod created by the yaml file restore2-19c-deployment.yaml in the previous step.. Once we delete the initial pod, it automatically re-creates itself, and its exact data, using the existing PVC.
- Display the pod names.
# kubectl get pods -o wide
- Delete the initial pod.
# kubectl delete pod pod_name
- After the pod is deleted, verify that another pod that has the same PVC was created.
# kubectl get pods -o wide
- Using Oracle SQL Developer, compare the data between original and restored environments. In the original pod, the data was comprised of existing data plus one extra row. In the post-delete environment, the data in the Oracle 19c database created inside the new pod is the same as in the original environment pod.
Finally, use the Kubernetes dashboard to display all the pods, deployments, services, and PVCs.