
None
None
-
In the previous use case of database refresh, storage snapshots are used to create a consistent point-in-time image of the database in seconds. That image is then used to refresh a database environment such as test, development, or reporting. However, the data in the database is only as-of the time the snapshot was taken. This use case demonstrates a snapshot image that is valid for database recovery. In a database recovery, database transactions from the SQL Server transaction logs are used to progress the database data beyond the point of time of the snapshot. The more transactions are applied to the snapshot image of the database, the more up to date is the database.
A snapshot copy that is a valid backup image can be created using special Microsoft APIs called VSS and implemented by backup software applications such as Dell AppSync or Dell PowerProtect. These APIs shortly freezes the database operations while the snapshot is created. SQL Server 2022 can create valid snapshot backup images using a feature called T-SQL snapshot backup. This feature still uses a short freeze of database operations, but initiate it using SQL Server T-SQL commands and does not require a third-party backup application integration with VSS.
You can achieve complete database recovery, by doing a regular T-SQL storage snapshot in collaboration with PowerFlex storage snapshots. The following steps explain the complete database recovery in the lab. Lab setup details are described here.
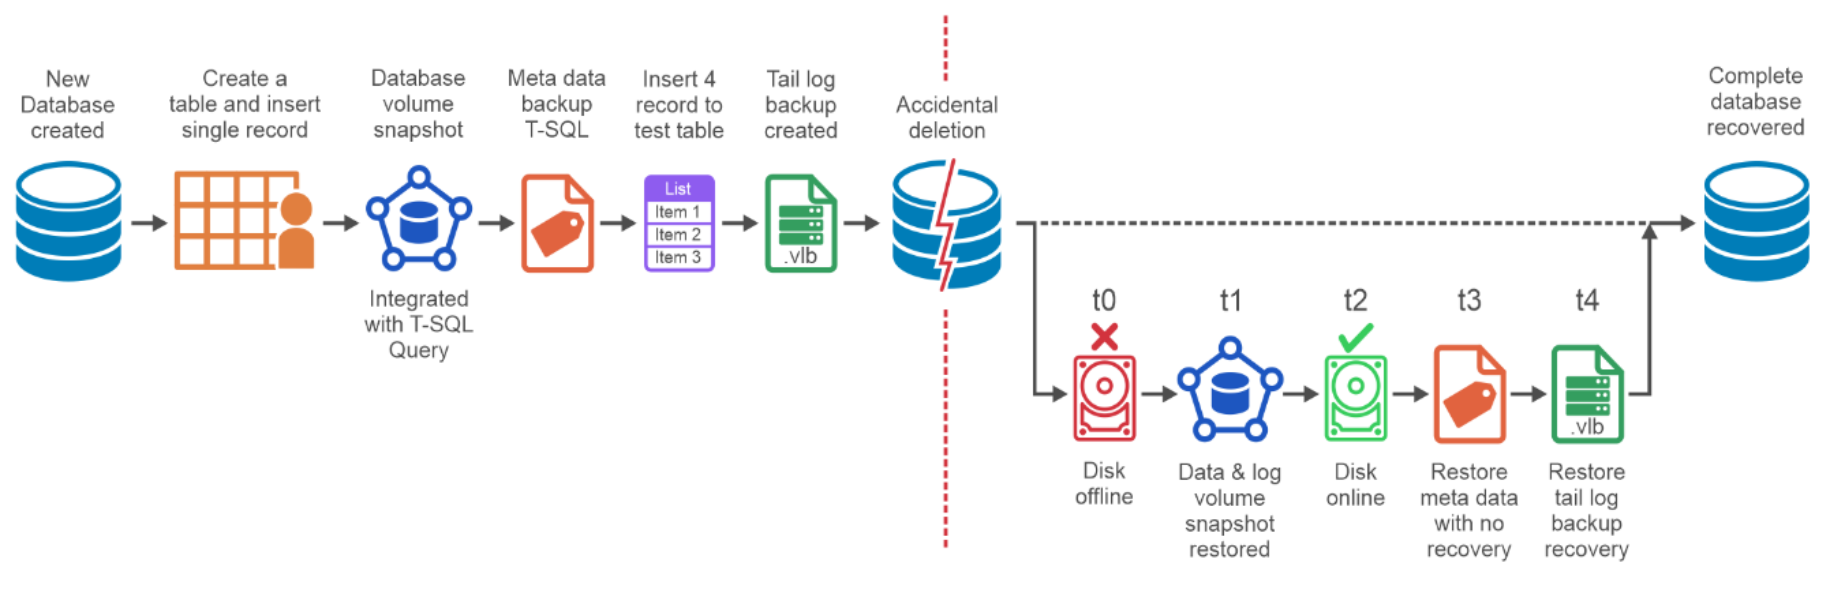
Figure 16. Database recovery time
Steps for complete database recovery:
- Create a table, insert a single record, and check the table values in the OLTP database.
create table returns (returnID int, returnName varchar (255));
insert into returns values (1,'sampleValue');
Table 2. Return table with single entry
returnID
returnName
1
sampleValue
- Quiesce the OLTP database with the following T-SQL query to freeze the database transactions.
ALTER DATABASE OLTP SET SUSPEND_FOR_SNAPSHOT_BACKUP = ON;
The Microsoft SQL Server now halts the operation and is ready for the storage snapshot.
- Create a snapshot of database and log volume using the PowerFlex GUI as shown in the following figure. The name of the database and log volume is CSV_data and CSV_log
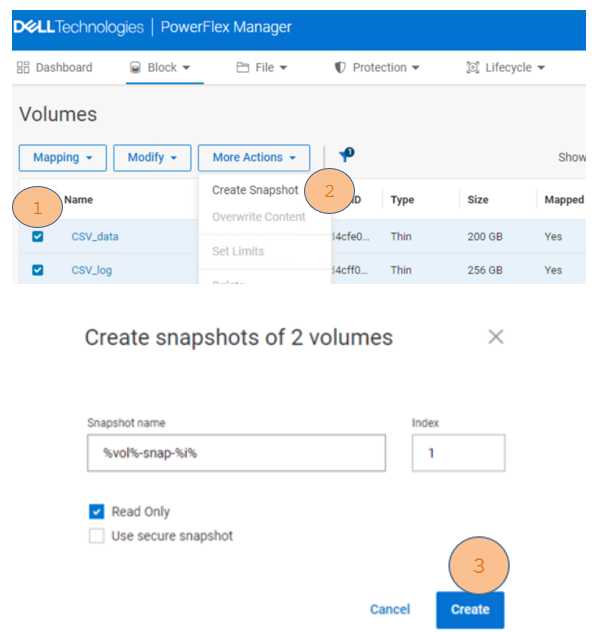
Figure 17. Storage Snapshot method
Alternatively, a snapshot can be taken using PowerFlex CLI.
scli --snapshot_volume --volume_name CSV_data, CSV_LOG --snapshot_name CSV_data-snap-1, CSV_LOG-snap-1
Sample output:
Snapshots on 2 volumes created successfully
Consistency group ID: b10f52c800000002
- Take T-SQL metadata backup of the database.
After the snapshot is created, use the following command to create the metadata backup file.
BACKUP DATABASE OLTP TO DISK = 'C:\mssql_metadata_backup\OLTP_metadata.bkm' WITH METADATA_ONLY, MEDIANAME='PowerFlex-MSSQL_DATA-Log-Snapshot-backup';
In this step, the metadata backup file of the OLTP database is stored in the specified path. This command also releases the database lock and allows the database operations to resume. Notice the name given for the media name to identify the storage system and the purpose of the snapshot operation.
- Insert four more records in the table.
insert into returns values (2, 'Item 1');
insert into returns values (3, 'Item 2');
insert into returns values (4, 'Item 3');
insert into returns values (5,'Item 4');
Table 3. Return table with four new records populated
returnID
returnName
1
sampleValue
2
Item 1
3
Item 2
4
Item 3
5
Item 4
- Take a transaction log backup.
The following command creates a transaction log backup which includes the latest inserted four records of the returns table. Transaction log backup is required for the database recovery.
BACKUP LOG OLTP TO DISK = 'C:\mssql_tail_log_backup\OLTP-tail-log-before-disaster.bkm’;
Note: It is a best practice to create periodic transaction log backups for the complete database recovery, as demonstrated above.
- Database corruption.
There could be different reasons for a database to require recovery, such as due to datafiles deletion, disks being formatted or overwritten, physical or logical block corruptions, and so on.
- Recovery
The high-level steps for recovery process require restoring the last PowerFlex snapshot with SQL Server metadata backup restored. Apply all the transaction log backups taken post storage snapshot to achieve point-in-time database recovery.
The following recovery steps apply to all the above-mentioned database corruption scenarios:
- Bring the database offline.
Before restoring the database, if it is still up (depends on the type of corruption), set the database offline by running the following command:
alter database OLTP set offline;
- Bring the database disks offline.
Before restoring the storage snapshot of the database disks, set the disks offline to avoid any leftover locks. You can use either disk management or PowerShell commands.
Set-Disk -Number 1 -isOffline $True
Set-Disk -Number 2 -isOffline $True
Note: Offline both data and log volume disk to restore both volume snapshot.
- Restore the database data volume snapshot.
Restore the PowerFlex database data volumes using the snapshot. This can be done from the PowerFlex UI, REST APIs, or PowerFlex CLI. Steps for restoring the PowerFlex snapshot is explained above.
The following is an example of restoring the snapshot using PowerFlex CLI:
scli --overwrite_volume_content --source_vol_name CSV_data-snap-1, CSV_LOG-snap-1--destination_vol_name ‘CSV_data’ ‘CSV_LOG’
Sample output
Overwrite volume content can remove data and should not be called during I/O operations or on mounted volumes. Press 'y' and then Enter to confirm:
Overwrite volume content was completed successfully.
- Bring the database disks online.
Bring the database volumes back online either using disk management or PowerShell commands.
Set-Disk -Number 1 -isOffline $False
Set-Disk -Number 2 -isOffline $False
- Bring the database online.
Bring the OLTP database back online by using following command:
alter database OLTP set online;
- Restore the snapshot backup metadata.
Use the metadata file captured during the snapshot backup to make the SQL Server aware of the restored snapshot.
Note: Before this can be done, SQL Server requires to perform a backup of active transaction log content. Do this first, followed by the database restore command.
Take a T-SQL backup of the active transaction log by running the following command:
BACKUP LOG OLTP TO DISK = 'C:\mssql_tail_log_backup\OLTP-tail_log_after_disaster.bkm' WITH NORECOVERY;
Restore the snapshot backup metadata by running the following command:
RESTORE DATABASE OLTP FROM DISK = 'C:\mssql_metadata_backup\OLTP_metadata.bkm' WITH METADATA_ONLY, NORECOVERY;
Note: Since the command specifies METADATA_ONLY, SQL Server knows that the database data was restored from a storage snapshot. If NORECOVERY is used, the database goes to a restoring state, and it is waiting to apply transaction log backups to make it consistent.
- Apply transaction log backups.
Restore all the transaction log backups to completely recover the database. We recovered the database till the last tail backup that has the last four records that are inserted into the table.
RESTORE LOG OLTP FROM DISK = C:\mssql_tail_log_backup\OLTP_tail_log_before_disaster.bkm' WITH RECOVERY.
Note: If there are multiple transaction logs to restore, use the WITH NORECOVERY option with all but not with the last one. The last RESTORE LOG command uses WITH RECOVERY, signifying that no more recovery is needed.
When this operation is complete, the database is operational and contains all the restored transactions (including the default OLTP database, newly created returns table along with its values) as shown in the following figure:

Figure 18. Complete database recovery from the corruption
The scenario mentioned in this use case is an example of RTO (Recovery time objective). Recovery time objective (RTO) is a maximum amount of time a system required to recover after a disaster or outage. In the above figure, t0-t4 is the total time that is required to recover the database post corruption. This time is the recovery time in this use case.
The time that is required in this example took only a few minutes to recover, but in real time database outages duration depends on the number of transaction logs that needs to be applied, which depends on the frequency of the storage snapshot and transaction log backup interval.