
PowrMaxOS iSCSI implementation core components
PowrMaxOS iSCSI implementation core components
-
The PowerMaxOS iSCSI model achieves the design objectives by using the core components:
- A 4 x 25 GbE port or 4 x 10 GbE port interface module (required hardware), or both
- The PowerMaxOS iSCSI Target Node
- The PowerMaxOS iSCSI IP Interface
- CHAP Authentication
- IP Routing
These new objects provide a significant amount of flexibility and allow users to define how to mix and match target nodes and IP interfaces over mapped physical ports. An example of using these components to create a multitenant environment sharing a single port is shown in the diagram below. Each of these components will be detailed in the sections that follow.
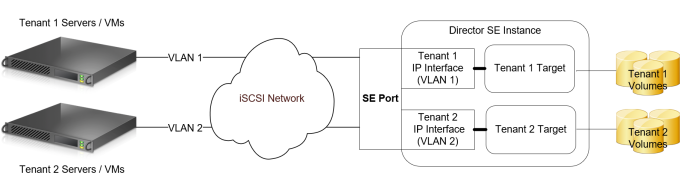
Figure 5. Typical PowerMaxOS iSCSI multitenant architecture
Supported PowerMax hardware: Quad-port 25 GbE interface module
The PowerMaxOS iSCSI target implementation uses a quad port 25 GbE hardware I/O module. This module has the following features:
- High-density quad-port 25 GbE interface (four SFP+ optical transceiver connectors)
- Support for up to four Modules/SE instance on PowerMax 2000, 3 Modules/SE instance on PowerMax 8000
- Auto Negotiation between 25 GbE to 10 GbE not supported
- Cannot use 25 GbE and 10 GbE on 25 GbE interface module. Separate 10 GbE module required for 10 GbE
- Can mix separate 25 GbE and 10 GbE interface modules on same director SE instance
- FRU and Hot Swappable
- Dimensions: 3” w x 1.25” h x 7.875”
Supported legacy PowerMax hardware: Quad-port 10 GbE interface module
The PowerMaxOS iSCSI target implementation uses a quad port 25 GbE hardware I/O module. This module has the following features:
- High-density quad-port 10 GbE interface (four SFP+ optical transceiver connectors)
- Support for up to four Modules/SE instance on PowerMax 2000, 3 Modules/SE instance on PowerMax 8000
- FRU and Hot Swappable
- Dimensions: 3” w x 1.25” h x 7.875”
PowerMaxOS iSCSI target node
The PowerMaxOS iSCSI target node is the backbone on how iSCSI is implemented on the PowerMax storage arrays. One can think of each PowerMaxOS iSCSI Target node as a virtual port as each physical port can have up to 64 targets. These target nodes are created and configured at the user’s discretion. An exception being the “bootstrapping target,” which can come preconfigured on a new all iSCSI PowerMax system. The bootstrapping target allows for initial target configuration on the system so that management hosts can discover and access the new storage array; however, with the introduction of Embedded Management, the user can remotely “http” to the embedded Unisphere on the storage array and create the initial iSCSI target, thus reducing the need for a factory preconfigured bootstrap target. The number of target nodes a user can configure is constrained to:
- Maximum of 64 targets per physical port
- Designed for maximum of 512 targets per director
An iSCSI Target can be in one of the two logical states: online or offline. Semantically these two states resemble the behavior of “port online” or “port offline,” where the online state indicates the Target Node is ready to accept and perform IO requests, and the latter one indicates it is not. Users will be able to control the target state through Unisphere and Solutions Enabler commands.
Most of the time (as is the case with port state) the Target Node will be in an online state. There are three common situations when the state will be offline:
- All newly created targets are in the offline state by default
- Configuration changes to the existing Target Node: All subsequent changes of Target attributes (for example, changing Target name) affect host connectivity in a detrimental way and require a specific Target to be in the offline state.
- For debugging, security, or other reasons, users may want to have a specific Target in the offline state and thus prevent any IO activity from hosts that are connected to this Target.
Another feature provided by the iSCSI target is device separation along target node lines. Devices that were previously provisioned on a per port basis are now allocated on a per Target basis. For example, if two Target Nodes are created for two different users (tenants) on the same SE instance, the new model allows for separation of devices assigned to each target. This practice cleanly isolates each user’s data from each other (true multitenancy). However, this is not a requirement, and users can technically still assign the same device to several iSCSI Targets on the same director (even though a use case for this would be hard to justify). A top-level limitation is that the same volume cannot be assigned to more than 32 different Targets on the same director.
To create an iSCSI target on PowerMax, a user must supply:
- The physical director that is configured with the SE emulation
- A user-defined IQN (Note: If a user does not supply an IQN, one will be autogenerated)
- A Network ID: A Network ID is PowerMaxOS construct that is used internally by the system to associate an array IP interface with an array iSCSI target. The PowerMaxOS Network ID is specific to a single director SE emulation and is not visible to other directors or external switches and hosts. The default Network ID value is 0, and the range is 0 to 511 per director. Note: Different directors can make use the same network ID number value (NetID 10 on Dir 1F and NetID 10 on Dir 2F); however, these network IDs are unique specific to the director they reside on.
- The user can optionally specify a TCP port for the target (default is port 3260 is used if none is specified).
In the PowerMaxOS iSCSI implementation, port flags that previously needed to be set on the physical port are now set on the iSCSI target. The iSCSI target port flags are:
- SOFT_RESET
- ENVIRON_SET
- DISABLE_Q_RESET_ON_UA
- AVOID_RESET_BROADCAST
- SCSI_3
- SPC2_PROTOCOL_VERSION
- SCSI_SUPPORT1
- VOLUME_SET_ADDRESSING
- OPENVMS
- ISID_PROTECTED
Note: The SCSI_3, SPC2_PROTOCOL_VERSION, and SCSI_SUPPORT1 flags are enabled by default when a target is created on PowerMax.
Creating a PowerMaxOS iSCSI target using Solutions Enabler
Below are Solutions Enabler commands that can be used to create an iSCSI target:
symconfigure -sid 0536 -cmd "create iscsi_tgt dir 1E, iqn=iqn.dellemc.0536.tenant1, network_id=80;" commit -noprompt
The following Solutions Enabler command creates an iSCSI target along with enabling the VOLUME_SET_ADDRESSING flag:
symconfigure -sid 0536 -cmd "create iscsi_tgt dir 1E, iqn=iqn.dellemc.0536.tenant1, network_id=80, VOLUME_SET_ADDRESSING=Enable;" commit -noprompt
Creating a PowerMaxOS iSCSI Target using Unisphere
To create an iSCSI target using Unisphere for VMAX, the user selects a POWERMAX or VMAX All Flash storage array; then goes to the iSCSI dashboard in “System;” and selects “Create iSCSI Target.” The create iSCSI target wizard is shown in the following screen.
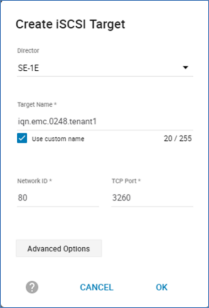
Figure 6. Creating an iSCSI target using Unisphere for PowerMax
After entering the required data, the user selects OK to create the target.
Note: By clicking “Advanced Options,” the user can set the port flags. The SCSI_3, SPC2_PROTOCOL_VERSION, and SCSI_SUPPORT1 flags are enabled by default when a target is created on PowerMax.
PowerMaxOS iSCSI IP interface
IP interfaces provide access to Target Nodes through one or more network paths. Similar to the iSCSI Target object, IP interfaces are managed by users, where they can create, modify, erase, and map them to an individual iSCSI Target. The number of IP interfaces a user can configure is constrained to:
- Maximum of 8 per target node
- Maximum of 64 per physical port
- Maximum of 1024 per engine (512 per director)
- A single IP Interface can be mapped to a single iSCSI target
To create an IP Interface on PowerMax, a user supplies:
- IP Address (either IPv4 or IPv6)
- Netmask for IP address provided as prefix length
- VLAN: VLAN tag information. If no VLAN is configured or not specified, the default value of zero (0) is used.
- Physical Director: Like the iSCSI target, an IP Interface can only be mapped to a single physical director using SE emulation.
- Physical Port number: The physical SE port number on the director the IP Interface is attached to.
- Network ID: A Network ID: A Network ID is PowerMaxOS construct that is used internally by the system to associate an array IP interface with an array iSCSI target. The PowerMaxOS Network ID is specific to a single director SE emulation and is not visible to other directors or external switches and hosts. The default Network ID value is 0, and the range is 0-511 per director. Note: Different directors can make use the same network ID number value (NetID 10 on Dir 1F and NetID 10 on Dir 2F); however, these network IDs are unique specific to the director they reside on.
- MTU size: This is an optional parameter that sets the maximum transmit size of Ethernet packet for the IP Interface. If not specified, the portal uses the default of 1500. To enable jumbo frames, set MTU to 9000 (maximum value allowed).
IP Interface configuration constraints:
- A single IP Interface can be mapped to only one iSCSI Target.
- Targets can make use of multiple IP interfaces (up to 8) on different SE ports on the same director; however, each IP interface must use the same Network ID as the target and must use a different subnet from the other IP interfaces.
- VLAN tag must be unique per physical SE port. VLAN tag zero implies there is no VLAN assigned.
Creating a PowerMaxOS IP interface using Solutions Enabler
Below is a Solutions Enabler command that will create an iSCSI IP Interface with an MTU size of 9000:
symconfigure -sid 0536 -cmd "create ip_interface dir 1E port 8, ip_address=192.168.82.30, ip_prefix=24,network_id=80, vlanid=80, mtu=9000;" commit -noprompt
Creating a PowerMaxOS IP interface using Unisphere
To create an iSCSI IP Interface using Unisphere, the user selects a storage array; then goes to the iSCSI dashboard in “System”; and selects “Create IP Interface.” The create iSCSI IP Interface wizard is shown in the screenshot below:
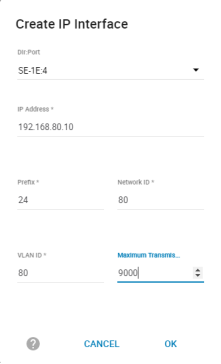
Figure 7. Creating a PowerMaxOS iSCSI IP Interface using Unisphere for VMAX
After entering the required information, the user selects OK to create the IP interface.
CHAP authentication
The PowerMaxOS iSCSI implementation supports the Challenge Handshake Authentication Protocol (CHAP) for initiators and targets. The implementation supports two types of CHAP authentication:
- One-way CHAP - In one-way CHAP authentication, also called unidirectional, the target authenticates the initiator, but the initiator does not authenticate the target.
- Two-way CHAP - In two-way CHAP authentication, also called bi-directional or mutual, an additional level of security enables the initiator to authenticate the target.
Setting one-way CHAP authentication
With CHAP one-way authentication, the storage array challenges the host initiator during the initial link negotiation process and expects to receive a valid credential and CHAP secret in response. When challenged, the host initiator transmits a CHAP credential and CHAP secret to the storage array. The storage array looks for this credential and CHAP secret, which is stored in the host initiator’s initiator group (IG) information in the ACLX database. Once a positive authentication occurs, the storage array sends an acceptance message to the host. However, if the storage array fails to find any record of the credential or secret pair, it sends a rejection message, and the link is closed.
CHAP Constraints:
- The CHAP protocol secret value is a user-defined string up to 32 ASCII characters, or 64 binary characters (binary values should be prefixed with the string “0x”) for UNIX users. Windows users need to specify a secret between 12 and 16 characters and a credential name string between 8 and 256 characters.
- Currently CHAP can only be set up using Solutions Enabler SYMCLI commands.
- The host initiator IQN must be in an initiator group prior to setting one-way CHAP as the initiator CHAP information is stored in the ACLX database for the initiator group. The initiator group does not need to be in a masking view (MV) at the time CHAP is enabled.
- Masking views are intended to provide storage isolation for specific initiators, while CHAP provides authentication.
- The use of Radius servers to store CHAP authentication data is not currently supported. This is under consideration for a future release.
- PowerMaxOS iSCSI currently does not support RADIUS for CHAP authentication. Radius support is under consideration for a future release but this support is dependent upon customer demand.
Setting iSCSI one-way CHAP authentication on PowerMax requires:
- The PowerMax storage array System ID (SID)
- The host initiator IQN
- The user-defined credential the host initiator will use to log in to the storage array with (often the host initiator IQN)
- A specific secret (password) the host needs to present to the storage array
The following SYMCLI command enables one-way CHAP for the iSCSI initiator (iqn.1991-05.com.microsoft.ENTTME0108) on the storage array:
symaccess -sid 0536 –iscsi iqn.1991-05.com.microsoft:ENTTME0108 set chap –cred iqn.1991-05.com.microsoft:ENTTME0108 –secret <TargetSecret>
In the above “symaccess set chap” command, the –cred and –secret flags specify the credential and target password the specific host initiator (specified by the –iscsi flag) will need to send to the storage array for authentication.
On a Windows host, the specific host credential and the target secret it passes to the storage array can be found and customized using the advanced settings frame of Windows iSCSI Initiator Tool (see screenshot below).
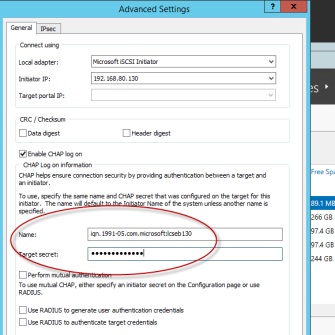
Figure 8. Customizing the host credential and target secret in the Windows iSCSI initiator tool
The values in the “Name” and “Target secret” text boxes on the advanced properties frame must match exactly the values entered in the –cred and –secret parameters used by the “symaccess set chap” command. Note that the values are case-sensitive. If there is a mismatch in either of these values, the host will not be able to authenticate on the storage array.
In the Windows iSCSI Tool, the host initiator IQN is always the default value used in the “Name” text box in the advanced settings frame. For easier management of Windows hosts on the storage array, use the Windows host IQN value for the –cred parameter in the “symaccess set chap” command. In most cases, Windows administrators will leave the default value (the host initiator IQN) in “Name” text box in advanced settings. If at some point the Windows administrator changes this value, then they must inform the storage administrator of this change as this will create a credential mismatch for the initiator on the PowerMax array. The host initiator will no longer be able to authenticate to the target and will lose access to its storage unless the “symaccess set chap” command is rerun for the initiator using the new credential value.
To examine the one-way CHAP credentials set up for the host initiator on the storage array, use the symaccess show <initiator group> command with the –detail flag using the name initiator group that the host initiator resides in:
symaccess -sid 0536 show ENTTME0108 -type initiator –detail
Symmetrix ID : 000197900536
Initiator Group Name : ENTTME0108
Last update time : 11:41:11 AM on Thu Aug 13,2015
Group last update time: 11:41:11 AM on Thu Aug 13,2015
Port Flag Overrides : No
Consistent Lun : No
iSCSI Name : iqn.1991-05.com.microsoft:ENTTME0108
...
Port Flag Overrides : No
CHAP Enabled : Yes
CHAP Credential : iqn.1991-05.com.microsoft:ENTTME0108
Type : iSCSI
In the above command, the host initiator IQN “iqn.1991-05.com.microsoft:ENTTME0108” has been previously placed into an initiator group named “ENTTME0108.” Again, this initiator group does not have to be in a masking view at the time one-way CHAP is enabled.
To disable CHAP authentications from an initiator, use the following command:
symaccess -sid 0536 –iscsi iqn.1991-05.com.microsoft:ENTTME0108 disable chap
Setting two-way CHAP authentication
Configuring two-way authentication between the host initiator and storage array iSCSI target requires the configuration of one-way authentication for the host initiator (as described in the previous section).
With two-way CHAP authentication, the host challenges and authenticates the storage array iSCSI targets also. This provides an extra layer of authentication and security in the iSCSI configuration as both the target and initiator act as authenticators and peers.
In two-way authentication, each target visible to the host must present an appropriate secret back to the host. In Windows, the initiator secret that the targets must present back to the host is set up in the Windows iSCSI Initiator tool Configuration tab as shown below:
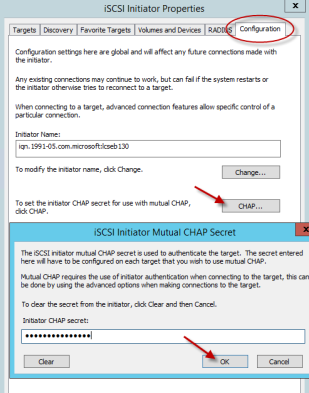
Figure 9. Setting the initiator secret using the Windows iSCSI Tool
This can also be accomplished by using the “set-IscsiChapSecret” PowerShell cmdlet on the host:
[LCSEB129] PS C:\ >Set-IscsiChapSecret -ChapSecret <InitiatorCHAPSecret>
On the PowerMax array, two-way CHAP authentication is set up on the target using the following command:
symaccess -sid 0536 -iqn iqn.dellemc.0536.1F.prod1 set chap -cred iqn.dellemc.0536.1F.prod1 -secret <InitiatorCHAPSecret>
In the above command, the IQN of the PowerMax iSCSI target that will be authenticated by the host initiator is the value used in the –iqn parameter. The IQN of the PowerMax iSCSI target is the value used in the –cred parameter (how the target presents itself to the host initiator in discovery). The secret that the target needs to present to the host initiator (as specified in the Windows iSCSI Tool Configuration tab) is the value used in the –secret parameter. If storage is to be presented to a host initiator through multiple PowerMax iSCSI targets, then the above command will need to be run for each target that will present itself to the host in order for successful two-way CHAP authentication.
Two-way CHAP authentication can also be set using the PowerMax iSCSI target’s associated director and virtual port combination as follows:
symaccess -sid 0536 –iscsi_dirport 1e:0 set chap -cred iqn.dellemc.0536.1F.prod1 -secret <InitiatorCHAPSecret>
In the above command, the –iqn parameter has been replaced with the –iscsi_dirport parameter. A storage array iSCSI target’s associated director and virtual port can found using the following “symcfg” command:
symcfg -sid 0536 list -se all -iscsi_tgt
Symmetrix ID: 000197900536 (Local)
Dir:P NetId Status IQN
------- ----- ------- ------------------------------
01E:000 80 Online iqn.dellemc.0536.1F.prod1
02E:000 81 Online iqn.dellemc.0536.2F.prod1To examine two-way CHAP authentication set up on the PowerMax array, run the following symaccess command:
symaccess -sid 0536 list chap
Symmetrix ID : 000197900536
Director Identification : SE-1F
Director Port : 000
iSCSI Target Name :
Protocol : CHAP
Identifier Type State Credential
------------------------ ----- -------- ------------------------
SE-1F:000 N/A ENABLED iqn.dellemc.0536.1F.prod1
To delete CHAP from a specific PowerMaxOS iSCSI target, use the following command:
symaccess -sid 0536 –iqn iqn.dellemc.0536.1F.prod1 delete chap
Routing instance
In many implementations, flat or single hop SAN networks are not possible, and the storage traffic will sometimes need to span across multiple subnets. For example, a host network might be on 10.240.180.xxx network while the storage might be on the 10.245.200.xxx network. In these cases, the PowerMaxOS iSCSI model must be able to properly route the iSCSI traffic across the different subnets being used in the environment. It does this by using an object called the routing instance. The routing instance object basically points the iSCSI traffic for a specific IP Interface IP Address (or group of IP addresses) used by a specific Network ID on a director to a specific gateway in which the iSCSI traffic is then forwarded on to other networks.
A PowerMaxOS routing instance is associated with a specific network ID on a single director. A user can create a maximum of 1024 routing instances per director. When creating a PowerMaxOS routing a user will need to specify:
- The director number
- IP address of default gateway
- Subnet Mask (prefix)
- Network ID number
- PowerMaxOS IP interface IP address
Creating a PowerMaxOS iSCSI IP route using Solutions Enabler
A user can specify an IP route for a specific IP address on a director by the following Solutions Enabler SYMCLI command:
symconfigure -sid 0536 -cmd "add ip_route dir 1F, ip_address=0.0.0.0, ip_prefix=0, gateway=192.168.82.1, network_id=10;" commit –nop
The above Solutions Enabler command will create a “catch all” routing instance that uses a default gateway of 192.168.82.1 for all IP interface IP address (0.0.0.0) and all subnets (0) using Network ID 10 on director 1F.
Note: Subnet mask 0.0.0.0/0 signifies all address visible on the network. In traditional networking best practices, the use of this subnet is discouraged because of the confusion in having a network and subnet with indistinguishable addresses. However, in networks with a few IP addresses, it can function as a useful “catch all” subnet to allow for broadcast to all visible IP address and subnets.
Creating a PowerMaxOS iSCSI IP route using Unisphere
A user can specify an IP route for a specific IP address on a director by the following Solutions Enabler SYMCLI command:
To create an iSCSI IP Interface using Unisphere, the user selects an array; then goes to the iSCSI dashboard in “System”; and selects “Add IP Route.” The Add iSCSI IP Route wizard is shown in the screen below.
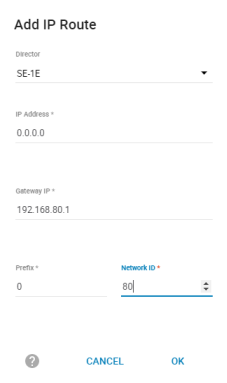
Figure 10. Creating a PowerMaxOS routing instance using Unisphere
After entering the required information, the user selects OK to create the IP route.