
Discover PowerMax iSCSI storage on the host
Discover PowerMax iSCSI storage on the host
-
Once iSCSI has been set up and a masking view has been created for the host on the PowerMax, the host can discover the iSCSI targets and acquire the storage devices presented to it through the masking view. Once this is done, the volumes can be formatted. This section will demonstrate how to do this for a using the Prod1 iSCSI components and masking view created in the previous sections. As said earlier, the example’s host is running Windows Server 2016 The techniques shown in this section will use PowerShell, the Windows iSCSI Initiator Tool, and the Windows Server Manager UI.
Note: All the techniques shown in this section are well documented at Microsoft TechNet.
For review, the iSCSI network configuration for this example’s Prod1 environment is shown in the diagram below:
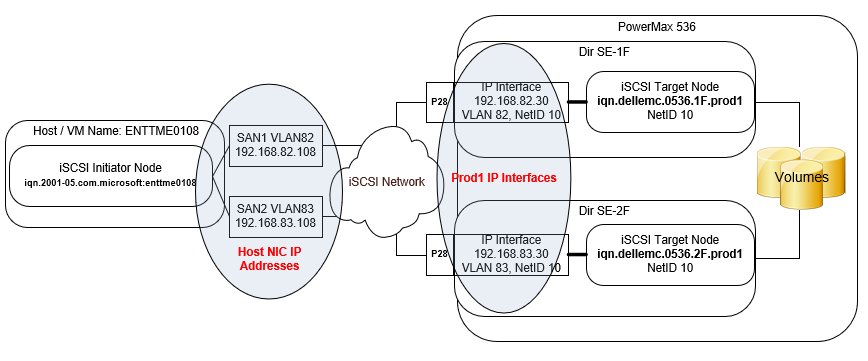
Figure 16. “Prod1” environment iSCSI network configuration
Note: This section assumes that the Windows host/virtual machine has been previously configured with the appropriate network information for use with the PowerMax iSCSI SAN (IP addresses, VLAN IDs). It is also assumed that the host/virtual machine has been properly configured to use the Microsoft iSCSI Software Initiator and that multipathing software (MPIO or PowerPath) has been installed. Details on how to set up a Windows host configuration for use with an iSCSI SAN is shown in the appendix section of this document.
Discover the PowerMax Prod1 IP Interfaces using PowerShell
In the example, there are two Prod1 IP interfaces on the PowerMax: 192.168.82.30 (for target iqn.dellemc.0536.1F.prod1) and 192.168.83.30 (for target iqn.dellemc.0536.2F.prod11). These interfaces are labeled SAN1 and SAN2 on the example’s Windows host. To discover the two storage array iSCSI target IP Interfaces from the Windows host, use the PowerShell “New-IscsiTargetPortal” cmdlet or use the Windows iSCSI Initiator Tool UI.
First (if needed), identify the host iSCSI NIC IP addresses (initiator interfaces). In the example, these are the NIC interfaces created for VLAN 82 and VLAN 83. The following PowerShell one liner identifies the IP addresses for the initiator interfaces on the example’s host:
[ENTTME0108] PS C:\>(Get-NetIPAddress -AddressFamily ipv4 | ? {$_.interfacealias -like "SAN*"}).IPAddress
192.168.83.108
192.168.82.108
Note: To get the hostname to appear in the command prompt use the following PowerShell command:
PS C:\>function prompt {"[$env:computername] PS $(get-location)>"}
[ENTTME0108] PS C:\>
Using PowerShell
Discover the storage array iSCSI target IP interfaces using the IP address for the host initiator interfaces with the “New-IscsiTargetPortal” command as follows without CHAP:
[ENTTME0108] PS C:\>New-IscsiTargetPortal -TargetPortalAddress 192.168.82.30 -InitiatorPortalAddress 192.168.82.108
InitiatorInstanceName : ROOT\ISCSIPRT\0000_0
InitiatorPortalAddress : 192.168.82.108
IsDataDigest : False
IsHeaderDigest : False
TargetPortalAddress : 192.168.82.30
TargetPortalPortNumber : 3260
PSComputerName :
[ENTTME0108] PS C:\>New-IscsiTargetPortal -TargetPortalAddress 192.168.83.30 -InitiatorPortalAddress 192.168.83.108
InitiatorInstanceName : ROOT\ISCSIPRT\0000_0
InitiatorPortalAddress : 192.168.83.108
IsDataDigest : False
IsHeaderDigest : False
TargetPortalAddress : 192.168.83.30
TargetPortalPortNumber : 3260
PSComputerName
In the above commands, a user specifies the network path between the host initiator and the storage array iSCSI target. The host initiator IP interface IP address is specified with “–InitiatorPortalAddress” flag and the associated target IP interface IP address is specified with the “–TargetPortalAddress” flag.
To discover the IP Interfaces if using CHAP:
[ENTTME0108] PS C:\>New-IscsiTargetPortal -TargetPortalAddress 192.168.82.30 -InitiatorPortalAddress 192.168.82.108 -AuthenticationType ONEWAYCHAP -ChapSecret FreeTomBrady
InitiatorInstanceName : ROOT\ISCSIPRT\0000_0
InitiatorPortalAddress : 192.168.82.108
IsDataDigest : False
IsHeaderDigest : False
TargetPortalAddress : 192.168.82.30
TargetPortalPortNumber : 3260
PSComputerName :
[ENTTME0108] PS C:\>New-IscsiTargetPortal -TargetPortalAddress 192.168.83.30 -InitiatorPortalAddress 192.168.83.100 -AuthenticationType ONEWAYCHAP -ChapSecret FreeTomBrady
InitiatorInstanceName : ROOT\ISCSIPRT\0000_0
InitiatorPortalAddress : 192.168.83.108
IsDataDigest : False
IsHeaderDigest : False
TargetPortalAddress : 192.168.83.30
TargetPortalPortNumber : 3260
PSComputerName :
If One-Way CHAP has been enabled, the host needs to specify the appropriate CHAP authentication type with the “-AuthenticationType” flag, along with the appropriate CHAP secret it must present to the PowerMax. This secret was specified when CHAP was set up on the initiator IQN on the PowerMax.
Note: The three valid options for authentication type in the above “New-IscsiTargetPortal” command are “NONE,” “ONEWAYCHAP,” and “MUTUALCHAP” – all in capital letters. There is an error in the PowerShell 4.0 documentation, which states that the valid options are “None,” “OneWayChap,” and “MutualChap.” This is incorrect and will be updated in a future release of PowerShell from Microsoft. This also applies to the upcoming “Connect-IscsiTarget” command.
Using the Windows iSCSI Initiator Tool UI
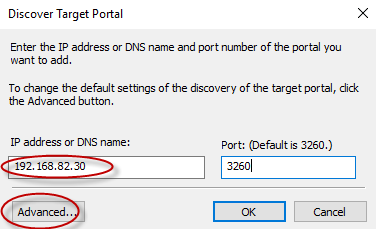
To discover the storage array iSCSI target IP interfaces using the Windows iSCSI Initiator Tool, open the tool through server manager tools iSCSI Initiator and go to the “Discovery” tab. In the Discovery tab, select “Discover Portal…”

Figure 17. Discover the IP Interfaces using the Windows iSCSI Initiator Tool
The “Discover Target Portal” window appears. Enter the IP address of the storage array iSCSI target IP interface and then select “Advanced…”
By clicking “Advanced…,” the “Advanced Setting” window opens. This where the storage array iSCSI target/IP interface discovery and connection information used by the host initiator is entered and stored. In the window, the user specifies the “Microsoft iSCSI Initiator” in the “Local adapter” drop down and the host initiator IP address used for connecting to the target on the POWERMAX in the “Initiator IP:” drop down.
If CHAP is enabled, the user enters the relevant CHAP information by selecting “Enable CHAP log on.” Here the initiator credential is shown in “Name” text box (the default is the IQN of the initiator) and the target CHAP secret is entered in the “Target secret” text box. As said earlier, the credential and target secret entered here are what is passed to the POWERMAX for authentication by the target. These values must match exactly the values what was entered in the “symaccess set chap” command –cred and –secret parameters.
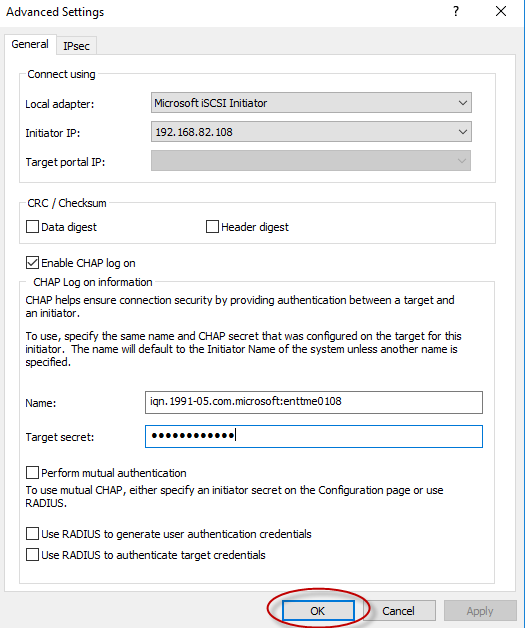
Click “OK” to save the connection information entered. This will close “Advanced Settings” and go back to the “Discover Target Portal” window. Click “OK” to discover the PowerMax IP Interface.

Repeat the previous steps using the Windows iSCSI Initiator tool to discover the second IP Interface (192.168.83.30).
Connect to the host to the PowerMax iSCSI Targets.
Once the target IP interfaces have been discovered, the host will be able to see the specific storage array iSCSI targets associated with the target IP interfaces. The next step in the process is to establish a connection from the host to the target. This can be done on a Windows host using either PowerShell or the Windows iSCSI Initiator Tool UI.
Using PowerShell
Once the IP interfaces have been discovered, examine the iSCSI targets that are associated with the portal IP addresses. This can be done using the “get-iscsitarget” cmdlet.
[ENTTME0108] PS C:\>Get-IscsiTarget | ft -AutoSize
IsConnected NodeAddress PSComputerName
----------- ----------- --------------
False iqn.dellemc.0536.1F.prod1
False iqn.dellemc.0536.2F.prod1
In the above output, the two targets are visible to the host; however, there are no connections created yet between the host initiators and targets. To connect host initiator though its first interface (192.168.82.108) to PowerMax iSCSI target (iqn.dellemc.0536.1F.prod1), use the “Connect-IscsiTarget” cmdlet if CHAP is not being used. Successful completion of this command will result in a newly created session between the host initiator and PowerMax iSCSI target (iqn.dellemc.0536.1F.prod1). The session details are shown in the command output.
[ENTTME0108] PS C:\>Connect-IscsiTarget -NodeAddress iqn.dellemc.0536.1F.prod1 -InitiatorPortalAddress 192.168.82.108 -IsMultipathEnabled $true -IsPersistent $true
AuthenticationType : NONE ß NO CHAP being used
InitiatorInstanceName : ROOT\ISCSIPRT\0000_0
InitiatorNodeAddress : iqn.1991-05.com.microsoft:enttme0108 ß Host IQN
InitiatorPortalAddress : 192.168.82.108 ß First Initiator IP
InitiatorSideIdentifier : 400001370000
IsConnected : True
IsDataDigest : False
IsDiscovered : True
IsHeaderDigest : False
IsPersistent : True
NumberOfConnections : 1
SessionIdentifier : ffffc00f984e6010-400001370000000a ß Session ID
TargetNodeAddress : iqn.dellemc.0536.1f.prod1 ß PowerMax Target
TargetSideIdentifier : 0100
PSComputerName :
[ENTTME0108] PS C:\>Connect-IscsiTarget -NodeAddress iqn.dellemc.0536.2F.prod1 -InitiatorPortalAddress 192.168.83.108 -IsMultipathEnabled $true -IsPersistent $trueget-disk
AuthenticationType : NONE ß No CHAP being used
InitiatorInstanceName : ROOT\ISCSIPRT\0000_0
InitiatorNodeAddress : iqn.1991-05.com.microsoft:enttme0108 ß Host IQN
InitiatorPortalAddress : 192.168.83.108 ß Second Initiator IP
InitiatorSideIdentifier : 400001370000
IsConnected : True
IsDataDigest : False
IsDiscovered : True
IsHeaderDigest : False
IsPersistent : False
NumberOfConnections : 1
SessionIdentifier : ffffc00f984e6010-400001370000000b ß Session ID
TargetNodeAddress : iqn.dellemc.0536.2f.prod1 ß PowerMax Target
TargetSideIdentifier : 0100
PSComputerName :
If using CHAP:
[ENTTME0108] PS C:\>Connect-IscsiTarget -NodeAddress iqn.dellemc.0536.1F.prod1 -InitiatorPortalAddress 192.168.82.108 -IsMultipathEnabled $true -IsPersistent $true -AuthenticationType ONEWAYCHAP -ChapSecret FreeTomBrady
AuthenticationType : ONEWAYCHAP ß One-way CHAP being used
InitiatorInstanceName : ROOT\ISCSIPRT\0000_0
InitiatorNodeAddress : iqn.1991-05.com.microsoft:enttme0108 ß Host IQN
InitiatorPortalAddress : 192.168.82.108 ß First Initiator IP
InitiatorSideIdentifier : 400001370000
IsConnected : True
IsDataDigest : False
IsDiscovered : True
IsHeaderDigest : False
IsPersistent : True
NumberOfConnections : 1
SessionIdentifier : ffffc00f984e6010-400001370000000a ß Session ID
TargetNodeAddress : iqn.dellemc.0536.1f.prod1 ß PowerMax Target
TargetSideIdentifier : 0100
PSComputerName :
When using “Connect-IscsiTarget,” the connecting initiator interface IP address is specified with the “InitiatorPortalAddress” flag. The target to connect to is specified with “NodeAddress” flag. Also in this command, the CHAP authentication type and the CHAP target secret must be included if CHAP has been enabled (See notes about CHAP specified previously with the New-IscsiTargetPortal cmdlet). The other parameters used in the cmdlet specify that host initiator has enabled Multipath IO and will use this when logging into the target and that the resulting session is persistent and to be automatically reconnected after each host reboot.
After running the “Connect-IscsiTarget cmdlet for both PowerMax iSCSI targets, reexamine iSCSI targets on host to verify that the connection state is "True".
[ENTTME0108] PS C:\>Get-IscsiTarget | ft -AutoSize
IsConnected NodeAddress PSComputerName
----------- ----------- --------------
True iqn.dellemc.0536.1F.prod1
True iqn.dellemc.0536.2F.prod1
Note: The discovering and connecting steps only needs to be performed one time whenever a new target is presented to the host or virtual machine. After the targets have been discovered and connected, a host simply has to do a storage rescan in order to acquire additional iSCSI storage presented through the connected targets.
Using the Windows iSCSI Initiator Tool UI
Connecting to a newly discovered target is straightforward using the Windows iSCSI Initiator Tool UI. To connect to a new target, go to the “Targets” tab, select a target, and then click “Connect.” The iSCSI tool will prompt to enable the connection for multipathing. Click “OK” connect to the target. Once the target is connected, the status will change to “Connected.” Repeat this step for additional targets.
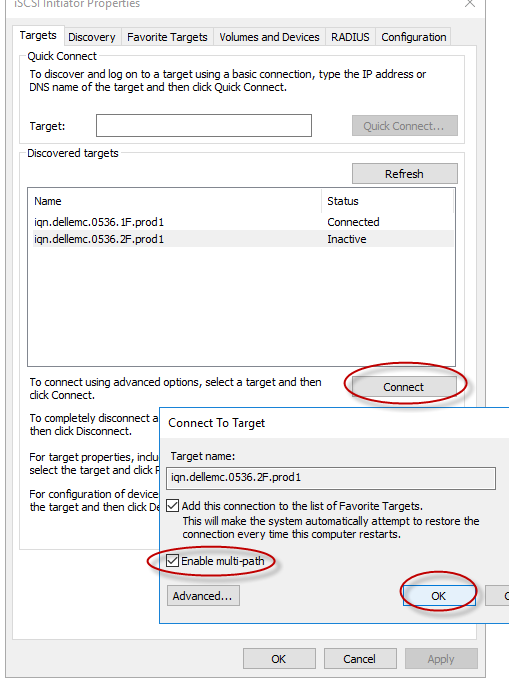
Note: The Windows iSCSI Initiator Tool will connect to the targets using the parameters entered previously in the “Advanced Settings” window (Initiator IP Interface, CHAP secret). Those parameters do not have to be reentered when connecting to the discovered targets.
Troubleshooting tip: Verify the host iSCSI session status on the PowerMax
This dialog displays iSCSI sessions for an initiator group on arrays running PowerMax OS 5978_Q219SR or above. iSCSI sessions on SE directors for an initiator group with iSCSI initiators are displayed along with the session state. The feature is intended to help users perform basic troubleshooting when iSCSI hosts lose connectivity to PowerMax arrays.
In order to see the session status in Unisphere for PowerMax, select the host (ENTTME0108-iSCSI), click three dots (more actions), and select “Check iSCSI Session State.”

The iSCSI session state for the host IQN will be show in the output. In the example, the session state is CONNECTED. Select close when done.

This information can also be seen in Solutions enabler with the following “symsan” command:
PS C:\>symsan -sid 0536 show -iscsi_sessions -ig ENTTME0108-iSCSI -se all
Symmetrix ID : 000197900536
Initiator Group : ENTTME0108-iSCSI
Host IQN : iqn.1991-05.com.microsoft:enttme0108
iSCSI Sessions
{
Director Identification : SE-01F
Director Port : 028
Host IP Address : 192.168.82.108
Target IQN : iqn.dellemc.0536.1F.prod1
Target IP Address : 192.168.82.30
Target IP Prefix Length : 24
Session State : CONNECTED
Director Identification : SE-02F
Director Port : 028
Host IP Address : 192.168.83.108
Target IQN : iqn.dellemc.0536.2F.prod1
Target IP Address : 192.168.83.30
Target IP Prefix Length : 24
Session State : CONNECTED
Rescan the storage on host
Although not always necessary, it is always a good idea to do a storage rescan anytime the host storage configuration changes or is updated.
Using PowerShell
The PowerShell “Update-HostStorageCache” cmdlet will refresh the storage configuration on the host or virtual machine.
[ENTTME0108] PS C:\> Update-HostStorageCache
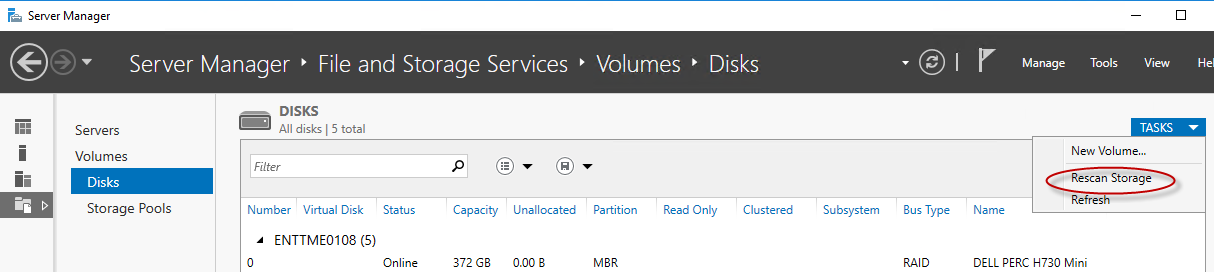
Using Windows Server Manager UI
To rescan the storage bus using Windows Server Manager, go to “Volumes” and select “Disks.” Select the “TASKS” drop down and then select “Rescan Storage.”
Verify the PowerMax volumes are visible to the host
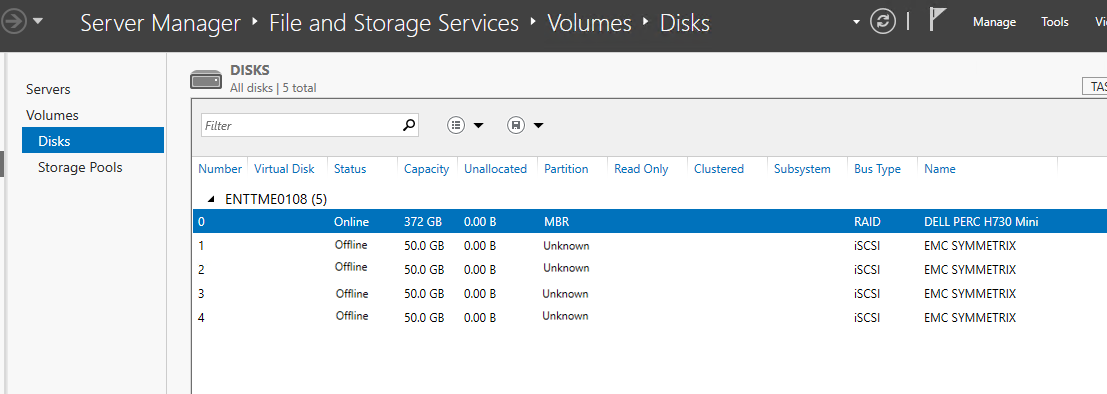
After the establishment of the iSCSI session to the storage array iSCSI targets and storage rescan, the new devices should be visible to the host but will be in an “Offline” status.
Using PowerShell
To examine the storage visible to the host or virtual machine, use the “get-disk” cmdlet. In the example below, the four new iSCSI devices will have a status of “Offline.” Also notice that the friendly name specifies "EMC Symmetrix."
[ENTTME0108] PS C:\>get-disk | ft -AutoSize
Number Friendly Name Serial Number HealthStatus OperationalStatus Total Size Partition Style
------ ------------- ------------- ------------ ----------------- ---------- ---------------
0 DELL PERC H730 Mini 00fe965c1c5ed1042300c85c82a06d86 Healthy Online 372 GB MBR
1 EMC SYMMETRIX 900536170000 Healthy Offline 50 GB
2 EMC SYMMETRIX 900536171000 Healthy Offline 50 GB
3 EMC SYMMETRIX 900536172000 Healthy Offline 50 GB
4 EMC SYMMETRIX 900536173000 Healthy Offline 50 GB
Using Windows Server Manager UI
After the “Rescan Storage” task completes, the new devices will appear in the “DISKS” window with a status of “Offline.”
Using PowerPath
The example’s host has PowerPath installed. To examine the presented devices in PowerPath use the “powermt display dev=all” command
[ENTTME0108] PS C:\>powermt display dev=all
Pseudo name=harddisk1
Symmetrix ID=000197900536
Logical device ID=00170
Device WWN=60000970000197900536533030313730
state=alive; policy=SymmOpt; queued-IOs=0
==============================================================================
--------------- Host --------------- - Stor - -- I/O Path -- -- Stats ---
### HW Path I/O Paths Interf. Mode State Q-IOs Errors
==============================================================================
3 port3\path0\tgt1\lun0 c3t1d0 SE 2f:28 active alive 0 0
3 port3\path0\tgt0\lun0 c3t0d0 SE 1f:28 active alive 0 0
Pseudo name=harddisk2
Symmetrix ID=000197900536
Logical device ID=00171
Device WWN=60000970000197900536533030313731
state=alive; policy=SymmOpt; queued-IOs=0
==============================================================================
--------------- Host --------------- - Stor - -- I/O Path -- -- Stats ---
### HW Path I/O Paths Interf. Mode State Q-IOs Errors
==============================================================================
3 port3\path0\tgt1\lun1 c3t1d1 SE 2f:28 active alive 0 0
3 port3\path0\tgt0\lun1 c3t0d1 SE 1f:28 active alive 0 0
Pseudo name=harddisk3
Symmetrix ID=000197900536
Logical device ID=00172
Device WWN=60000970000197900536533030313732
state=alive; policy=SymmOpt; queued-IOs=0
==============================================================================
--------------- Host --------------- - Stor - -- I/O Path -- -- Stats ---
### HW Path I/O Paths Interf. Mode State Q-IOs Errors
==============================================================================
3 port3\path0\tgt1\lun2 c3t1d2 SE 2f:28 active alive 0 0
3 port3\path0\tgt0\lun2 c3t0d2 SE 1f:28 active alive 0 0
Pseudo name=harddisk4
Symmetrix ID=000197900536
Logical device ID=00173
Device WWN=60000970000197900536533030313733
state=alive; policy=SymmOpt; queued-IOs=0
==============================================================================
--------------- Host --------------- - Stor - -- I/O Path -- -- Stats ---
### HW Path I/O Paths Interf. Mode State Q-IOs Errors
==============================================================================
3 port3\path0\tgt1\lun3 c3t1d3 SE 2f:28 active alive 0 0
3 port3\path0\tgt0\lun3 c3t0d3 SE 1f:28 active alive 0 0
Optional: Online, initialize, and create a new file system on the iSCSI volumes
Once the disks are visible to the operating system, they can be brought online, initialized, and formatted. This can be done using either PowerShell or Windows Server Manager.
Using PowerShell
The following is a sample PowerShell script that will online, initialize, and format all the EMC disks visible to the host OS that are in the “Offline” state. Scripts like this are beneficial as they can be used to work on multiple disks at a time.
Note: The following script should be used with discretion. There is no error checking included in the script and it might take a few moments to run. As each device is formatted, it will appear in the output.
####################################################################################
#PowerShell script to initialize, partition, and format new EMC offline disks
#####################################################################################Get disk numbers from all offline EMC disks visible to host OS
$disknumbers = (get-disk | ? {$_.FriendlyName -like "EMC*" -and $_.OperationalStatus -eq "Offline"}).number
#Starting foreach loop through disk numbers
$disknumbers | % {
#place disk number from input stream into variable
$disknum = $_
#create volume label to be used later
$newvollabel = "Disk"+$_
#inner foreach loop - initialize, online, format, and create new volume on disk
Initialize-Disk -number $disknum -PartitionStyle GPT -PassThru |
% {
$_ | set-disk -IsReadOnly 0
$_ | Set-disk -IsOffline 0
$_ | New-Partition -AssignDriveLetter -UseMaximumSize | Format-Volume -FileSystem NTFS -NewFileSystemLabel $newvollabel -Confirm:$false
}
}#End of Script
#####################################################################################
<output of script>
DriveLetter FileSystemLabel FileSystem DriveType HealthStatus OperationalStatus SizeRemaining Size
----------- --------------- ---------- --------- ------------ ----------------- ------------- ----
E Disk1 NTFS Fixed Healthy OK 49.78 GB 49.87 GB
F Disk2 NTFS Fixed Healthy OK 49.78 GB 49.87 GB
G Disk3 NTFS Fixed Healthy OK 49.78 GB 49.87 GB
H Disk4 NTFS Fixed Healthy OK 49.78 GB 49.87 GB
Using Windows Server Manager
With the release of Windows Server 2012, Microsoft introduced Windows Server Manager. Server Manager is Microsoft's preferred way for Windows administrators to manage their Windows Server environments. Prior to Windows 2012, “Disk Manager” was the primary utility to perform volume management operations. Disk manager is still available on Windows platforms, but Server Manager provides a more wizard-driven procedure (New Volume Wizard) to manage volumes on the Windows 2016 host.
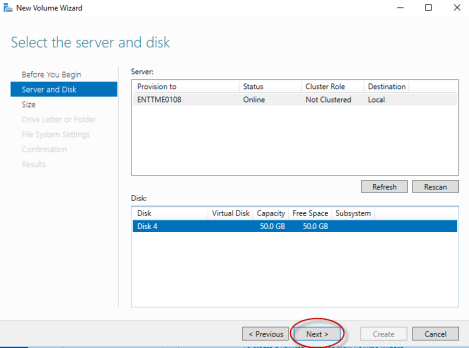
In Server Manager, go to disks, select the offline disk, and click Bring Online.

Once the disk is Online, select the disk and launch the New Volume wizard.

Select disk to create the new volume on, click Next.
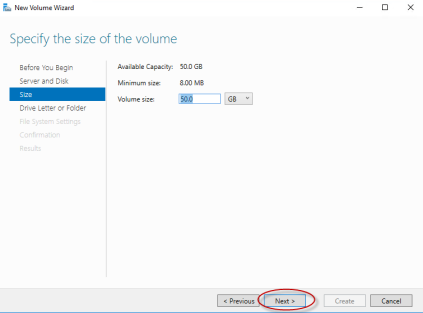
Enter volume size. Default is to use all available capacity. Click Next.
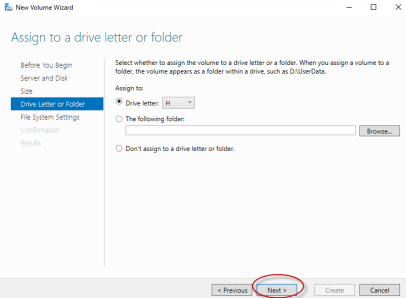
Assign drive letter for new volume. Next available drive letter is default selection. Click Next.
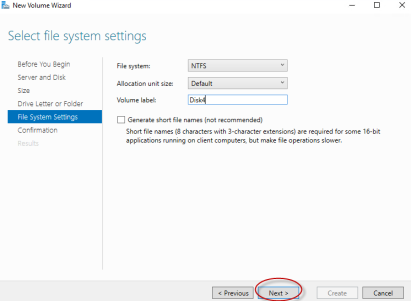
Select file system type (default is NTFS) and specify a volume label. Disk4 is entered as an example. Click Next.
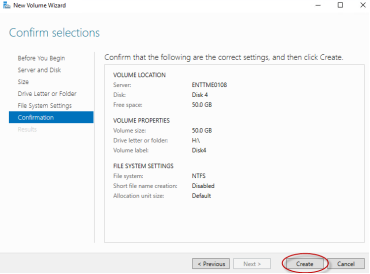
Confirm selections and then click Create.
Monitor volume creation progress. Click close when done.

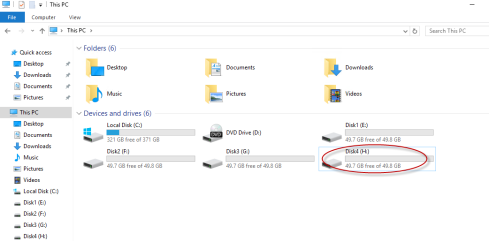
Verify new volume in Windows Explorer.
Optional: Send I/O from Prod1 host to PowerMax iSCSI storage
After the iSCSI volumes have been provisioned and acquired by the Prod1 host, it can then send IO to the array. The IO and its performance can be monitored from the array perspective using Unisphere for PowerMax and CloudIQ (if installed). Performance can be monitored from the host perspective using host-based IO tools such as Windows Resource Monitor or the PowerPath (if installed) “powermt display performance dev=all” command.
Unisphere for PowerMax allows users to create custom dashboards to monitor specific hosts or an application’s storage group’s performance profiles. Alerts can be set up and triggered when thresholds are crossed. A typical iSCSI-based host or application’s storage group performance dashboard could contain information around:
- Average response time (millisecond) for the host or application storage group
- Total host or application IOPS being sent to the array
- Throughput (MB/Sec) for the host or application storage group
- Associated SE Port % Busy
- Associated SE Port Throughput (MB/sec)
- Associated SE Port IP Interface Throughput (MB/Sec)
A sample dashboard that includes the above information is shown below:

In the above dashboard, the example’s Prod1 host ENTTME0108-iSCSI workload is sending ~ 10000 IOPS and a total ~320 MB/sec of throughput split between the two SE Ports SE-1F:28 and SE-2F:28. This workload is consuming about 10% of the resources (~ 10% Busy) on the SE ports. The associated throughput and for the SE Ports and associated SE Port IP Interfaces is also shown in the dashboard.
Section summary
This section demonstrated how to discover and connect a Windows Server 2016 host or virtual machine to PowerMax iSCSI storage. The PowerMax iSCSI storage provisioned through the targets was acquired and brought online, initialized, and formatted with NTFS file systems. Much of the techniques shown in this section are documented on Microsoft TechNet. See this site for more information about using the Windows iSCSI Initiator Tool or Windows Server Manager.
This document is not intended to be a tutorial on PowerShell. For more detailed information about PowerShell go to Microsoft TechNet or the following websites:
http://www.powershellpro.com/powershell-tutorial-introduction/
https://technet.microsoft.com/en-us/scriptcenter/dd901334.aspx
An excellent book on PowerShell is “Windows PowerShell Step by Step” by Ed Wilson.