
Create the Prod1 iSCSI configuration
Create the Prod1 iSCSI configuration
-
After identifying and selecting the online SE ports, the PowerMax iSCSI configuration can be built. In the example, the initial configuration is Prod1. Recall that the Prod1 configuration will use the following information:

This section demonstrates the following steps:
- Create the iSCSI Targets
- Create the IP Interfaces
- Attach the IP Interfaces to the iSCSI Targets
- Enable the Targets
These steps will be demonstrated using the iSCSI Configuration Wizard in Unisphere for PowerMax and through the various Solutions Enabler commands.
Option 1: Using the iSCSI Configuration Wizard
This section will show how to build the iSCSI configuration using the iSCSI Configuration Wizard in Unisphere for PowerMax.
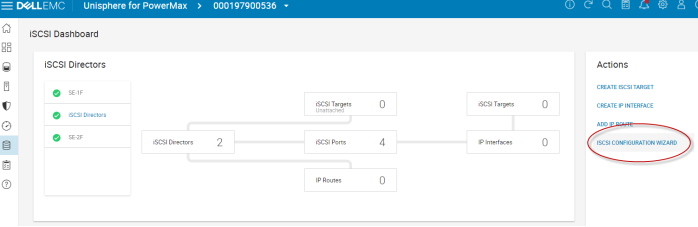
Step 1: Open the iSCSI Configuration Wizard
To access the wizard, select the PowerMax Array System iSCSI iSCSI Configuration Wizard.
Step 2: Enter the first target information
Enter iSCSI Target information (director number, custom name, network id, leave defaults for TCP port and advanced options). In the example, director 1F is selected, a custom name is entered, and a Network ID of 10 is used (value of 10 chosen because it is a nice round number and easy to remember). In the example, all other defaults for TCP Port and Advanced Options are selected. “Next” is then clicked.
Author’s comments about iSCSI target naming: In the wizard, a user has two naming options when creating a target. One option is to use a custom name as done in the example, which is iqn.dellemc.0536.1F.prod1, or let the system create a unique name, which is often in the form iqn.1992-04.com.emc:600009700bcbb8f83651012c00000006. Each custom target name must begin with “iqn.” While letting the system generate a target name is quick and easy, the system-generated name can be non-intuitive (IMHO), making it difficult to interpret when many targets are created on the system or present in the environment. Using a custom name allows for some naming standards to be implemented, which can be much more intuitive when troubleshooting the environment. The target naming standard used in this example is: iqn.dellemc.<SID###>.<director>.<environment name>

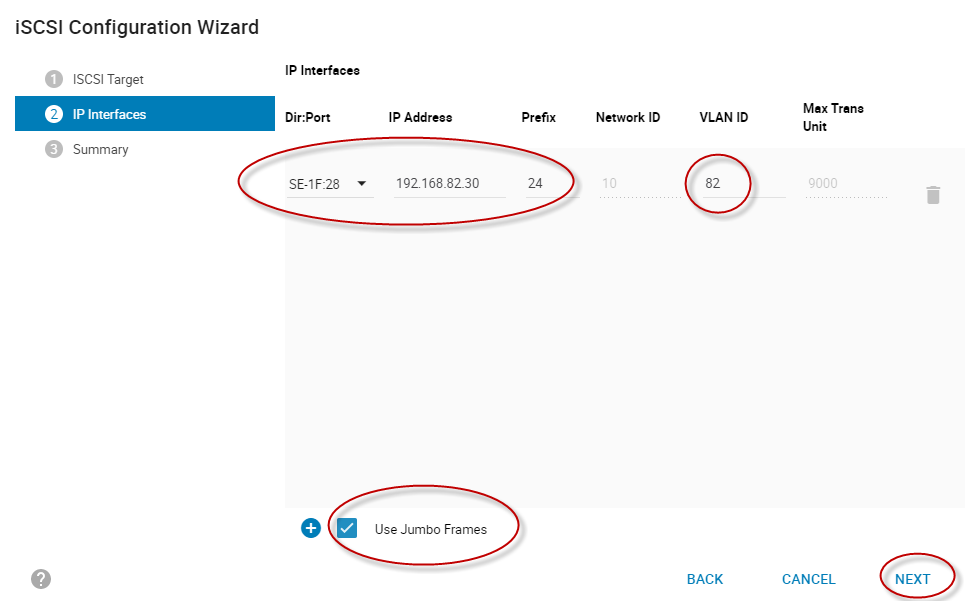
Step 3: Enter the first IP interface information
Once the target information is entered and “next” is selected, the wizard prompts for the entering of the associated IP Interface information such as the director port being used (1F:28), the IP address to be used (192.168.82.30), Subnet Prefix (24), and VLAN ID being used (82). Note that the wizard automatically selects the same Network ID (10) that was used when entering the target information. This is carried over from the previous screen as the target and its associated IP Interface must use the same Network ID.
One thing selected in the example that is not a default is “Use Jumbo Frames.” Although the use of Jumbo Frames is with iSCSI is considered a best practice, it needs to be implemented end to end from the host to the switch to the array. The use of Jumbo Frames in the environment requires coordination with the Network Team so in Unisphere “Use Jumbo Frames” is left as cleared as a default. A storage administrator can enable this when it is known that Jumbo Frames is enabled in the environment.
Once the IP Interface information is entered, select “Next.”
Step 4: Review the summary information and create the first target and IP interface
Once all the target and associated IP Interface information is entered, the wizard presents a summary screen of the configuration it will build. Review the information and select “Back” if any information needs to be updated or corrected. In the summary screen, there is a selectable option to “Enable iSCSI Target.” When iSCSI targets are created, the default option is for then to be disabled after the creation. This is done to allow the storage administrator the option to first create targets then enable later when the configuration and environment is ready. In the example, and in most customer implementations, the “Enable iSCSI Target” is selected. This saves the extra step of having to enable the target after its creation.
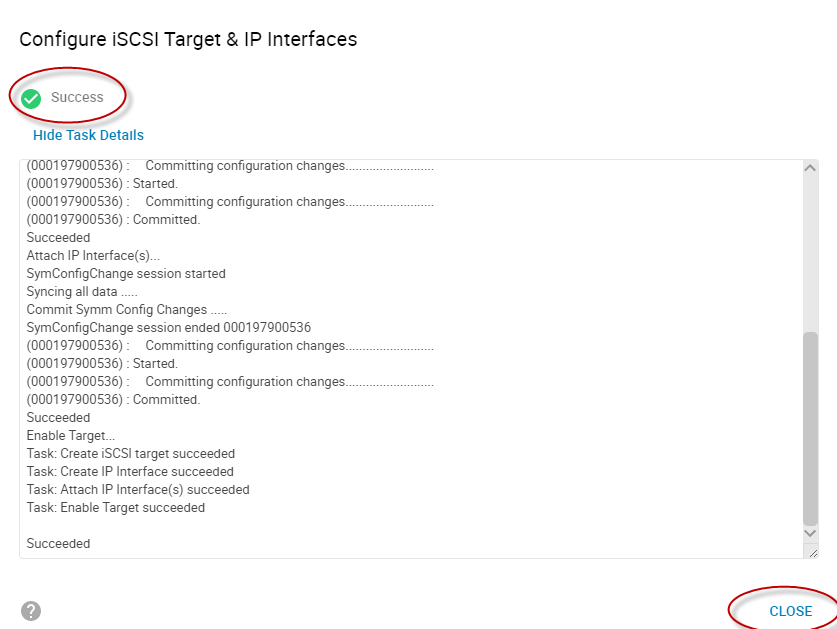
After reviewing the information and selecting “Enable iSCSI Target,” select “Run Now.” This will launch a batch operation will create the target.

As the batch operation proceeds, monitor the status and verify that it completes successfully. Press “Close” when done.
Step 5: Step 5: Optional: Examine the newly created iSCSI Target and IP Interface details
After the first iSCSI target and its IP Interface are created, go to the iSCSI dashboard (select the PowerMax Array System iSCSI) and double-click on “IP Interfaces.”
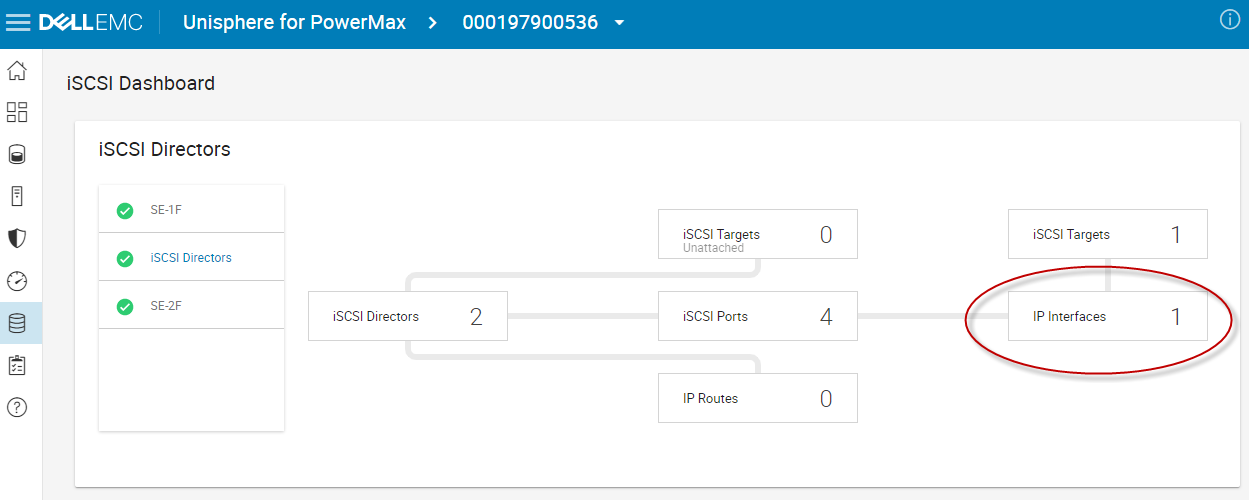
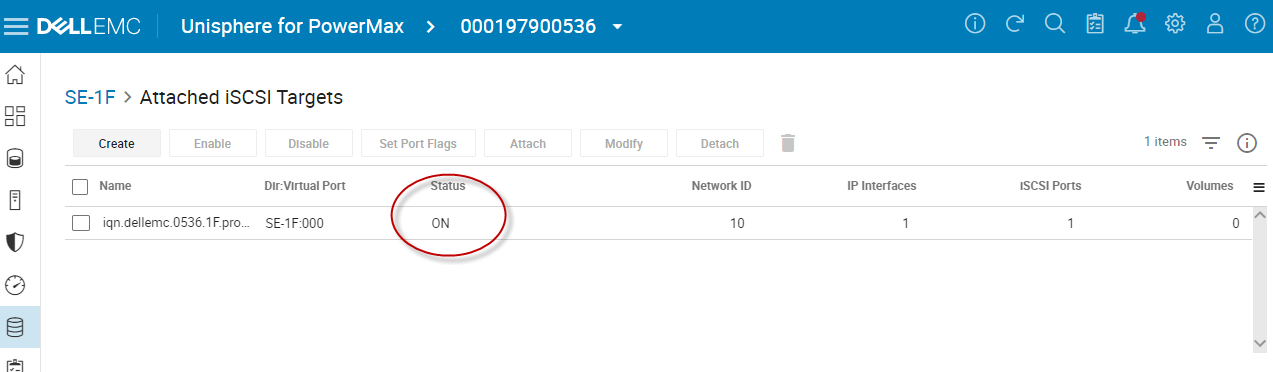
Examine the details of the newly created IP Interface and then double-click its associated iSCSI target.

Examine the details of the associated iSCSI target, and verify that i’s status is “On” (enabled).
Step 6: Repeat steps 1 to 5 to create the second iSCSI target and IP interface
Using the iSCSI Configuration Wizard, repeat the previous steps (1 – 5) to create the second iSCSI target and IP interface for the Prod1 environment. The following diagram illustrates the values to use for the second iSCSI target and IP interface.
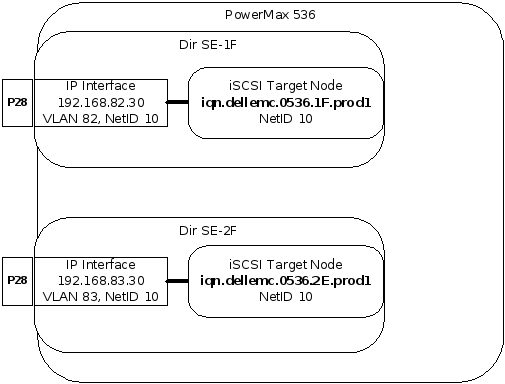
Once the values are entered in the wizard for the second iSCSI target and IP interface, review the summary information and then select “Run Now” to create the components. As before, confirm that the operation completes successfully.

Option 2: Using Solutions Enabler
This section will assume that the Prod1 environment (iSCSI Targets and IP Interfaces) have not been built using the Unisphere iSCSI Configuration Wizard discussed in the previous section. Some of the information presented in this section such as PowerMax iSCSI target naming will be a repeat from the previous section.
As stated previously, the example’s PowerMax Prod1 environment iSCSI components will use the following values:

Step 1: Create the IP Interfaces for the Prod1 Environment
To create this example with two IP Interfaces using the previously specified parameters, use the following SYMCLI symconfigure commands
PS C:\> symconfigure -sid 0536 -cmd "create ip_interface dir 1F port 28, ip_address=192.168.82.30, ip_prefix=24,network_id=10, vlanid=82, mtu=9000;" commit -noprompt
A Configuration Change operation is in progress. Please wait...
Establishing a configuration change session...............Established.
Processing symmetrix 000197900536
Performing Access checks..................................Allowed.
Checking Device Reservations..............................Allowed.
Committing configuration changes..........................Started.
Committing configuration changes..........................Committed.
Terminating the configuration change session..............Done.
The configuration change session has successfully completed.PS C:\> symconfigure -sid 0536 -cmd "create ip_interface dir 2F port 28, ip_address=192.168.83.30, ip_prefix=24,network_id=10, vlanid=83, mtu=9000;" commit -noprompt
A Configuration Change operation is in progress. Please wait...
Establishing a configuration change session...............Established.
Processing symmetrix 0001979000536
Performing Access checks..................................Allowed.
Checking Device Reservations..............................Allowed.
Committing configuration changes..........................Started.
Committing configuration changes..........................Committed.
Terminating the configuration change session..............Done.
The configuration change session has successfully completed.Step 2: (Optional) Verify that initial IP Interfaces have been created successfully
After the initial IP interfaces have been created, examine them to ensure that they have been created on the appropriate iSCSI SE director:port combination and are using the correct parameters (VLAN IDs, IP Address, MTU size) To examine the IP interfaces using Solutions Enabler, use the “symcfg list –ip” command.
PS C:\> symcfg -sid 0536 list –ip
Symmetrix ID: 000197900536 (Local)
iSCSI
Dir:P NetId Vlan IP Address Mtu Port
------ ----- ---- ------------------------------------------- ---- -----
01F:28 10 82 192.168.82.30/24 9000 -
02F:28 10 83 192.168.83.30/24 9000 -Note: The “-” for iSCSI port indicates that the specific IP interface is not attached to an iSCSI Target.
Step 3: Create the iSCSI Targets for the Prod1 environment
In this step, two iSCSI targets will be created - one created for each SE director used by the IP Interfaces created in the previous step. In the example, the SE directors are SE-1F and SE-2F. When creating the Targets, the IQN is user definable. When defining the IQN for the target, use a nomenclature that makes it easily identifiable on the host iSCSI environment. In the example, the nomenclature used follows “iqn.dellemc.<SID###>.<iSCSI director>.<environment name>”.
For the Prod1 example, recall that the targets will be called:
- iqn.dellemc.0536.1F.prod1
- iqn.dellemc.0536.2F.prod1
When creating the targets, it is important that the target and the eventual IP interface it is attached to share the same Network ID. In the example, the Prod1 IP Interfaces used network IDs of 10. These same network IDs will be used by the Prod1 targets.
The following “symconfigure create iscsi_tgt” commands will create the two “production” iSCSI targets used by this example. The associated iSCSI director on the PowerMax is specified by the “dir” parameter. The IQN assigned to the targets are specified by the “iqn” parameter. The network ID is specified by the “network_id” parameter.
PS C:\> symconfigure -sid 0536 -cmd "create iscsi_tgt dir 1F, iqn=iqn.dellemc.0536.1F.prod1, network_id=10;" commit -noprompt
A Configuration Change operation is in progress. Please wait...
...
created IQN : iqn.dellemc.0536.1F.prod1
Committing configuration changes..........................Committed.
Terminating the configuration change session..............Done.
The configuration change session has successfully completed.PS C:\> symconfigure -sid 0536 -cmd "create iscsi_tgt dir 2F, iqn=iqn.dellemc.0536.2F.prod1, network_id=10;" commit -noprompt
A Configuration Change operation is in progress. Please wait...
...
created IQN : iqn.dellemc.0536.2F.prod1
Committing configuration changes..........................Committed.
Terminating the configuration change session..............Done.
The configuration change session has successfully completed.Note: In the above commands, a specific TCP port number could have been specified by including the “tcp_port=####” parameter where #### is the user specified TCP port. When this parameter is omitted, the default iSCSI TCP port of 3260 is used. Also, specific port flags could have been specified in the commands as well.
Step 4: (Optional) Verify the iSCSI targets were created successfully
To examine the newly created targets using Solutions Enabler, use the following SYMCLI “symcfg list” command. Using the –se flag filters specifically for iSCSI SE directors and the –iscsi_tgt parameter will display the targets.
PS C:\> symcfg -sid 0536 list -se all -iscsi_tgt
Symmetrix ID: 000197900536 (Local)
Dir:P NetId Status IQN
------- ----- ------- --------------------------------------------
01F:000 10 Offline iqn.dellemc.0536.1F.prod1
02F:000 10 Offline iqn.dellemc.0536.2F.prod1In the above output, note the Dir:P column. The first part of the entry in the Dir:P column specifies the director and the second part designates the iSCSI virtual port the target has been assigned on the director. The initial target on any director will always be 000. Make a note of the iSCSI virtual port assigned to each director.
Step 5: Attach the Prod1 iSCSI targets to the Prod1 IP Interfaces
Once the targets have been created, they can then be attached to the IP Interfaces. Recall that each PowerMaxOS iSCSI target can be attached up to eight IP Interfaces. In this example, a single target will be attached to a single IP Interface. The target and any of the IP Interfaces it will be attached to need to use be associated with the same SE director and use the same network ID. The network IDs used in this example’s Prod1 environment are 10 on both directors 1F and 2F. The target iqn.dellemc.0536.1F.prod1. will be attached to IP Interface with the address of 192.168.82.30 as they are both associated with Dir 1F and Network ID 10. The target iqn.dellemc.0536.2F.prod1 will be attached to the IP interface with the address of 192.168.83.30 as they both are associated with director SE-2F and use the same Network ID of 10.
To attach an IP interface to an iSCSI target using Solutions Enabler, use the “symconfigure ‘attach ip_interface’” command by specifying the IP address of the IP interface using the ‘ip_address’ parameter and the IQN of the target using the ‘iscsi_tgt’ parameter. The commands below attach the example’s IP Interfaces with the appropriate iSCSI target.
PS C:\> symconfigure -sid 0536 -cmd "attach ip_interface ip_address=192.168.82.30 to iscsi_tgt iqn=iqn.dellemc.0536.1F.prod1;" commit -noprompt
A Configuration Change operation is in progress. Please wait...
Establishing a configuration change session...............Established...
The configuration change session has successfully completed.
PS C:\> symconfigure -sid 0536 -cmd "attach ip_interface ip_address=192.168.83.30 to iscsi_tgt iqn=iqn.dellemc.0536.2F.prod1;" commit -nopromptA Configuration Change operation is in progress. Please wait...
Establishing a configuration change session...............Established....
The configuration change session has successfully completed.Step 6: (Optional) Examine the attached “production” iSCSI target and IP interface combinations
Once the “production” targets have been attached to their IP interface, it is helpful to take a detailed look at the iSCSI configuration before moving to online the targets. In the detailed examination, look to ensure that the target has been attached to the desired interface; the status of the target; and re-examine the iSCSI flags.
To examine the iSCSI configuration in detail using Solutions Enabler, use the SYMCLI “symcfg list –se all –iscsi_tgt –detail” command.
PS C:\> symcfg -sid 0536 list -se all -iscsi_tgt -detail
Symmetrix ID: 000197900536 (Local)
Director Identification: SE-01F
iSCSI Name : iqn.dellemc.0536.1F.prod1
iSCSI Virtual Port : 01F:000
Status : Offline <----
Network ID : 10
IP Addresses
{
-------------------------------------------------------------
Tcp
IP Address Vlan Port Mtu
------------------------------------------------- ---- -----
192.168.82.30 82 3260 9000
}
iSCSI Flags
{
Soft_Reset(S) : Disabled
Environ_Set(E) : Disabled
Disable_Q_Reset_on_UA(D) : Disabled
Avoid_Reset_Broadcast(ARB) : Disabled
SCSI_3(SC3) : Enabled
SPC2_Protocol_Version(SPC2) : Enabled
SCSI_Support1(OS2007) : Enabled
Volume_Set_Addressing(V) : Disabled
}
Director Identification: SE-02F
iSCSI Name : iqn.dellemc.0536.2F.prod1
iSCSI Virtual Port : 02F:000
Status : Offline <----
Network ID : 10
IP Addresses
{
-------------------------------------------------------------
Tcp
IP Address Vlan Port Mtu
------------------------------------------------- ---- -----
192.168.83.30 83 3260 9000
...Step 7: Bring the Prod1 iSCSI targets online (enabling the target)
The final step in creating the “production” iSCSI configuration is to bring the iSCSI targets online. To bring the targets online, use the “symcfg -sid ### –se ## -iqn <name> online –nop” command where SE director value is used with the –SE parameter and target name is used with -iqn parameter.
PS C:\> symcfg -sid 0536 online -SE 1F -iqn iqn.dellemc.0536.1F.prod1 -noprompt
A port 'Online' operation execution is
in progress for Symmetrix unit '000197900536'. Please wait...
The port 'Online' operation successfully executed for
Symmetrix Unit '000197900536'.
PS C:\> symcfg -sid 0536 online -SE 2F -iqn iqn.dellemc.0536.2F.prod1 -noprompt
A port 'Online' operation execution is
in progress for Symmetrix unit '000197900536'. Please wait...
The port 'Online' operation successfully executed for
Symmetrix Unit '000197900536'.Step 8: (Optional) Examine the completed Prod1 iSCSI configuration using Solutions Enabler
Once the “production” iSCSI targets are online, the initial Prod1 iSCSI configuration is completed on the PowerMax. Before moving on to provision storage, a good practice is to reverify that the targets are online and re-examine the overall iSCSI configuration.
To verify that the initial targets are online, use the “symcfg list –se all –iscsi_tgt” command and examine that status column in the output. The targets should be in the “Online” state.
PS C:\> symcfg -sid 0536 list -se all -iscsi_tgt
Symmetrix ID: 000197900536 (Local)
Dir:P NetId Status IQN
------- ----- ------- ---------------------------------------------------------
01F:000 10 Online iqn.dellemc.0536.1F.prod1
02F:000 10 Online iqn.dellemc.0536.2F.prod1To examine the details of the configuration, the “–detail” parameter can be used with the “symcfg list –se all –iscsi_tgt” command.
PS C:\> symcfg -sid 0536 list -se all -iscsi_tgt -detail
Symmetrix ID: 000197900536 (Local)
Director Identification: SE-01F
iSCSI Name : iqn.dellemc.0536.1F.prod1
iSCSI Virtual Port : 01F:000
Status : Online <----
Network ID : 10
IP Addresses
{
-------------------------------------------------------------
Tcp
IP Address Vlan Port Mtu
------------------------------------------------- ---- -----
192.168.82.30 82 3260 9000
...
Director Identification: SE-02F
iSCSI Name : iqn.dellemc.0536.2F.prod1
iSCSI Virtual Port : 02F:000
Status : Online <----
Network ID : 10
IP Addresses
{
-------------------------------------------------------------
Tcp
IP Address Vlan Port Mtu
------------------------------------------------- ---- -----
192.168.83.30 83 3260 9000
...