
Preparing and running the Ansible playbooks
Preparing and running the Ansible playbooks
-
In the primary CSAH node, prepare and run the Ansible playbooks as user ansible.
Note: Ensure that the CSAH node can reach the iDRAC network IPs. If there is no connectivity, manually create the inventory file by following this sample file. Ignore step 1 if the inventory file is to be created manually.
Note: Ensure that you only modify values in the YAML file. Keys must always remain the same.
- For the bootstrap node, which is created as a kernel-based virtual machine (KVM), specify only the operating system IP address.
- For control-plane and compute nodes, specify both the operating system and the iDRAC IP address.
Note: Only RHCOS is supported for this release. Leave the value for the ‘os’ key in the nodes.yaml file as rhcos.
- Run the program.
Note: If the iDRAC user and password are the same across all control-plane and compute nodes, run the program with the --id_user and --id_pass arguments.
[ansible@csah-pri ]$ cd <git clone dir>/openshift-bare-metal/python
[ansible@csah-pri python]$ python3 generate_inventory_file.py
–-run --id_user <idrac user> --id_pass <idrac password> --release 4.10 –-nodes nodes.yaml
Note: In the argument that is passed, --release 4.10 specifies the OpenShift version and is the only value that the script accepts. The nodes.yaml file that is updated in the preceding step includes information about the bootstrap, control-plane, and compute nodes. In case of single node deployment, use the generate_inventory_file.py inside <git clone dir>/openshift-bare-metal/sno-ansible/python directory.
- Specify the FQDN of the secondary management node and press Enter. The following output is displayed:
Is there a backup management node [yes/No]: yes
Enter backup management node FQDN: csah-sec.dcws.lab Enter the IP address of VIP used for HAProxy: <IP>
- Enter the appropriate response as follows:
- If there is a secondary management node, enter Yes. The IP address that you specify is configured for Keepalived. Ensure that this IP address is not in use.
- If there is no backup management node, enter No.
A menu of numbered tasks is displayed, as shown in the following figure:
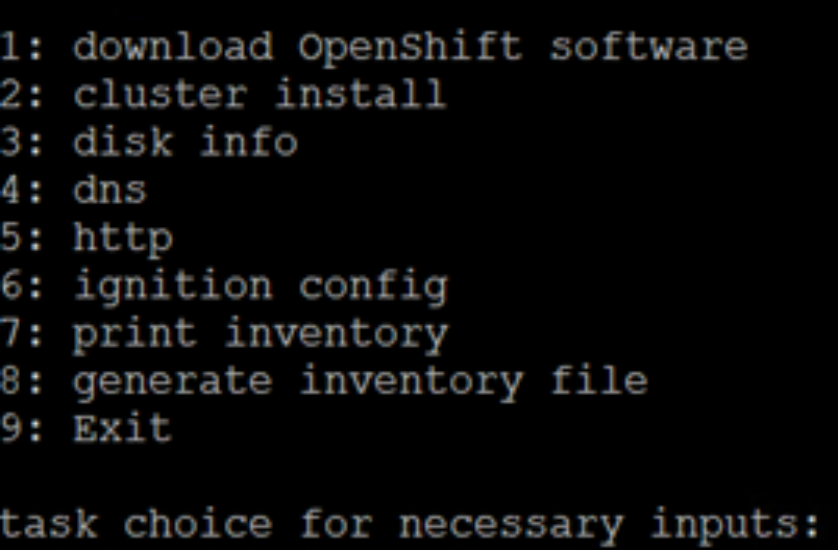
Figure 1. Inventory file generation inputs menu
- Select each task number in turn and provide the requested input. If you are unsure about what value to enter for an option, accept the default value.
Note: Run the program with all the tasks to ensure that all the necessary keys that are used in the Ansible playbooks are generated.
- For option 1, specify the directory to which to download the files:
provide complete path of directory to download OCP 4.10 software bits
default [/home/ansible/files]:
Option 1 downloads OpenShift Container Platform 4.10 software from Red Hat into a directory for which user ansible has permissions. This guide assumes that the directory is specified as /home/ansible/files.
- For option 2:
i Enter the cluster installation options by selecting 3 node or 5+ node:
task choice for necessary inputs: 2
supported cluster install options:
1. 3 node (converged control/compute nodes)
2. 5+ node (3 control and 2+ compute)
enter cluster install option: 2
OpenShift 4.10 supports the 3 node and 5+ node options. If you select the 3 node option, you are not prompted for information about compute nodes. The next step shows the steps to follow if you select a 5+ node cluster installation.
The following example assumes that three control-plane nodes are set up in the cluster. Select the interface to be used for DHCP and PXE and select two interfaces to be used for bonding. If only one interface is available, choose NO.
Note: In this document, the interface that DHCP and the active bond interface use are the same.
Do you want to perform bonding (y/NO): y
select network interfaces for node etcd-0
1 -> NIC.Integrated.1-1-1
2 -> NIC.Integrated.1-2-1
3 -> NIC.Slot.2-1-1
4 -> NIC.Slot.2-2-1
5 -> NIC.Slot.3-1-1
6 -> NIC.Slot.3-2-1
Select the interface used by DHCP: 3
selected interface is: NIC.Slot.2-1-1
device NIC.Slot.2-1-1 mac address is 3C:FD:FE:BF:7E:60
1 -> NIC.Integrated.1-1-1
2 -> NIC.Integrated.1-2-1
3 -> NIC.Slot.2-1-1
4 -> NIC.Slot.2-2-1
5 -> NIC.Slot.3-1-1
6 -> NIC.Slot.3-2-1
Select the interface used by etcd-0 active bond interface: 3
selected interface is: NIC.Slot.2-1-1
1 -> NIC.Integrated.1-1-1
2 -> NIC.Integrated.1-2-1
3 -> NIC.Slot.2-1-1
4 -> NIC.Slot.2-2-1
5 -> NIC.Slot.3-1-1
6 -> NIC.Slot.3-2-1
Select the interface used by etcd-0 backup bond interface: 5 selected interface is: NIC.Slot.2-2-1
- Repeat the preceding step for the remaining control-plane nodes.
- After you have entered the control-plane node information, provide the compute node information by entering the default number of compute nodes.
Note: This step is not necessary if you selected 3 node in sub step b.i. For this release, all compute nodes are installed with RHCOS 4.10.
Provide information relating to bonding and the interfaces that bonding uses for each compute node (for reference, see sub step b.ii).
- For option 3, provide details about the disks that are used in control-plane and compute nodes:
ensure disknames are available. Otherwise OpenShift install fails
specify the control plane device that will be installed
default [nvme0n1]: sda
specify the compute node device that will be installed
default [nvme0n1]: sda
Note: This guide assumes that the sda disk (RAID in the BOSS card) is used. If necessary, Perc H755N can be used to create RAID on NVMe drives.
- For option 4, provide the cluster name and the DNS zone file name:
specify a DNS forwarder if necessary (yes/No): yes
enter the DNS forwarder IP: <DNS Forwarder IP>
specify cluster name
default [ocp]:
specify zone file
default [/var/named/ocp.zones]:
Note: If DNS Forwarder is not required, enter No.
- For option 5, provide details for the HTTP web server setup and directory names that are created under /var/www/html:
enter http port
default [8080]:
specify dir where ignition files will be placed
directory will be created under /var/www/html
default [ignition]:
- For option 6, provide details about the default user that is used to install the OpenShift Container Platform cluster, the service network CIDR, pod network CIDR, and any other information to be added in the install-config.yaml file.
For information about the values to be specified for the pod network and the service network, see sample install-config.yaml file for bare metal. Red Hat specifies the values that are used for the Container Network Interface (CNI). Ensure that these values do not overlap with your existing network.
enter the directory where openshift installs
directory will be created under /home/core
default [openshift]:
enter the pod network cidr
default [10.128.0.0/14]:
pod network cidr: 10.128.0.0/14
specify cidr notation for number of ips in each node:
cidr number should be an integer and less than 32
default [23]:
specify the service network cidr
default [172.30.0.0/16]:
- Select option 7 to review the inventory that you have provided.
Note: To modify any values, run the related option again and correct the values.
- Select option 8 to perform a YAML dump of all the displayed contents into the generated_inventory file in the current directory (see this sample file in GitHub for guidance).
- Download the pullsecret file from your Red Hat account (Red Hat account credentials are required) and copy the file contents into the pullsecret file in the directory that contains the OpenShift Container Platform 4.10 software bits.
Note: This guide uses the /home/ansible/files directory for the software bits.
vars:
pull_secret_file: pullsecret
Note: Copy the generated_inventory file from the <git clone dir>/python/ directory to <git clone dir>/ansible directory. Ensure that the pull_secret_file is copied under /home/ansible/files.
- As user ansible, run the playbooks:
Note: If there is no secondary management, use the ocp.yaml playbook file under <git clone dir>/ansible (see this sample file for guidance). In case of single node deployment, use haocp.yaml or ocp.yaml inside <git clone dir>/sno-ansible.
[ansible@csah-pri ansible] $ pwd
/home/ansible/openshift-bare-metal/ansible
[ansible@csah-pri ansible] $ ansible-playbook -i generated_inventory haocp.yaml
The primary CSAH node is installed and configured with HTTP, HAProxy, DHCP, DNS, and PXE services.
Note: HTTP, HAProxy, and DNS services are configured for a secondary CSAH node. The Keepalived service is configured in both primary/secondary only when there is a secondary CSAH node.
In addition, the install-config.yaml file is generated, and the ignition config files are created and made available over HTTP.
- If any errors occur while the program is running, see the inventory.log file under the <git clone dir>/python directory to determine the cause of the error and how to resolve it.