
Installing a multinode cluster
Installing a multinode cluster
-
At a high level, creating a multinode OpenShift Container Platform cluster consists of the following steps:
- Create a bootstrap kernel-based virtual machine (KVM).
- Create the control-plane nodes.
- Create the compute nodes.
Creating a bootstrap KVM
Start the cluster installation by creating a bootstrap KVM. The bootstrap KVM creates the persistent control plane that the control-plane nodes manage. The bootstrap KVM is created as a VM using a QEMU emulator in the CSAH node.
- Ensure that DNS is updated for the bridge interface.
Note: This step is necessary because the Ansible playbooks configured a DNS setup in the CSAH node.
[root@csah-pri ~]# nmcli connection modify Bridge-mgmt ipv4.dns <IP address>
[root@csah-pri ~]# systemctl restart NetworkManager
[root@csah-pri ~]# cat /etc/resolv.conf
# Generated by NetworkManager
Search dcws.lab
nameserver <IP address>
The DNS IP is the keepalived IP that is specified in step 4 of Preparing and running the Ansible playbooks.
Note: If there is no secondary management node, specify the IP address that was configured for the primary CSAH node.
- Repeat the preceding steps for the secondary management node if needed.
To use virt-install to create KVM, the Ansible playbooks generate a command and place it in the bootstrap_command file under the /home/ansible/files directory.
Note: Configure the graphical display to ensure that the PXE menu is displayed. If no graphical menu is set, connect to the virtual console in iDRAC and run the command in step 4. Ensure that PXE is enabled through a bridge interface.
- Create the bootstrap VM by running:
[root@csah-pri ~] virt-install --name bootstrapkvm --ram 20480 --vcpu 8 --disk path=/home/bootstrapvm-disk.qcow2,format=qcow2,size=200 --os-variant generic --network=bridge=br0,model=virtio,mac=52:54:00:89:91:18 --pxe --boot uefi,hd,network &
Notes:
Do not change the MAC address. This address is autogenerated and added in the dhcpd.conf file by the Ansible playbooks. Adding the ampersand symbol (&) at the end ensures that the command is run in the background.
Ensure that the partition that is used to save the disk is of sufficient size. This example uses /home and allocates 200 G to the qcow2 image that is used by the bootstrap KVM. Size is a hard coded value. Reduce the size if there is not enough space.The bootstrap KVM menu is displayed.
- Select the bootstrap VM name and press Enter to start installing the bootstrap KVM.
- As user core in CSAH, run ssh bootstrap to ensure that the correct IP address is assigned to bond0.
When the installation process is complete, KVM reboots into the hard disk.
- As user core in CSAH, run ssh bootstrap to ensure that the correct IP address is assigned to bond0.
- From the CSAH node, as user core, SSH to the bootstrap node and verify that ports 6443 and 22623 are listening:
[core@csah-pri ~]$ ssh bootstrap sudo ss -tulpn | grep -E '6443|22623|2379'
tcp LISTEN 0 128 *:22623 *:* users:(("machine-config-",pid=6972,fd=8))
tcp LISTEN 0 128 *:6443 *:* users:(("kube-apiserver",pid=7998,fd=8))
tcp LISTEN 0 128 *:2379 *:* users:(("etcd",pid=6036,fd=5))
- Allow approximately 15 minutes for the ports to show up as “listening.” If the ports are not listening after 15 minutes, return to step 4 to reinstall the bootstrap.
Installing the control-plane nodes
To install the control-plane nodes:
- Connect to the iDRAC of a control-plane node and open the virtual console.
- Ensure that the NIC specified in step 5.b.ii of Preparing and running the Ansible playbooks is enabled with PXE.
- In the iDRAC UI, click Configuration and select BIOS Settings. Then:
- Expand Network Settings.
- Set PXE Device1 to Enabled.
- Expand PXE Device1 Settings.
- Set NIC in Slot 2 Port 1 Partition 1 as the interface.
- Scroll to the bottom of the Network Settings section and select Apply.
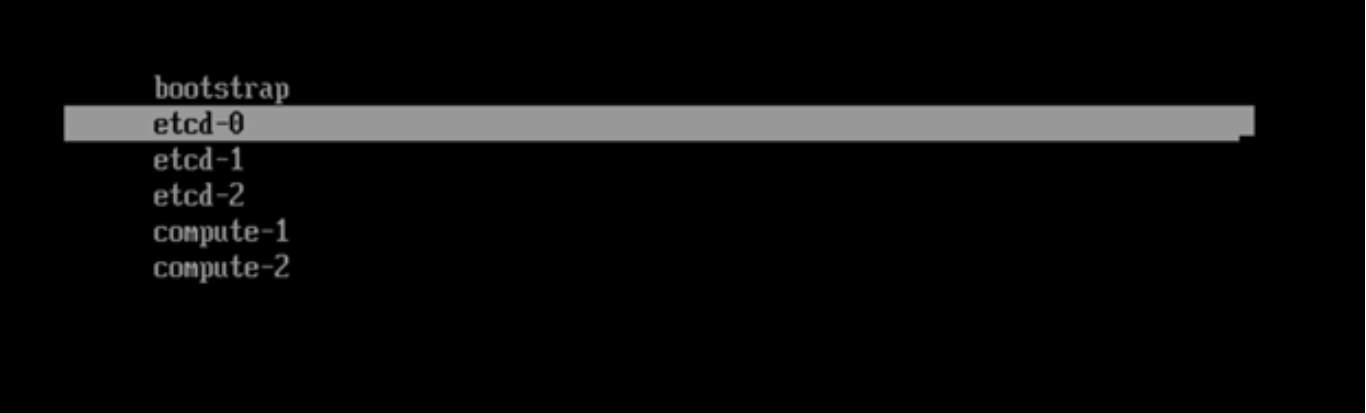
The system boots automatically into the PXE network and displays the PXE menu, as shown in the following figure:Figure 4. iDRAC console PXE menu
- Select the first control-plane node name. After the installation is complete and before the node reboots into the PXE, ensure that the hard disk is placed above the PXE interface in the boot order:
- Press F2 to enter System Setup.
- Select System BIOS > Boot Settings > UEFI Boot Settings > UEFI Boot Sequence.
- Select PXE Device 1 and click -.
- Repeat the preceding step until PXE Device 1 is at the bottom of the boot menu.
- Click OK, and then click Back.
- Click Finish and save the changes.
- Let the node boot into the hard drive where the operating system is installed.
- After the node comes up, ensure that the hostname is displayed as etcd-0 in the iDRAC console, as shown in the following figure:
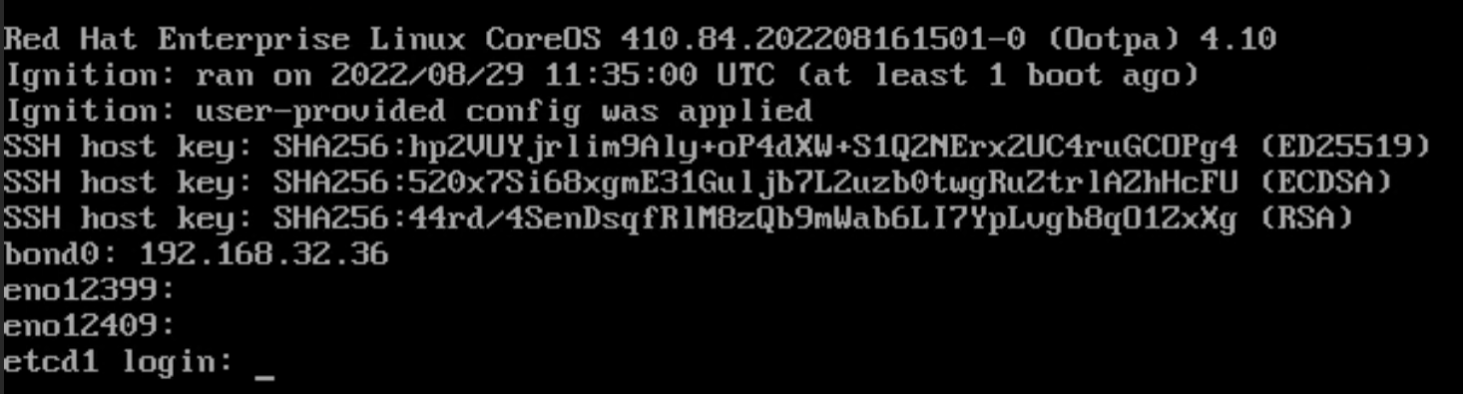
Figure 5. Control-plane node iDRAC console
- Repeat the preceding steps for the remaining two control-plane nodes, selecting etcd‑1 for the second control-plane node and etcd-2 for the third control-plane node.
- After three control-plane nodes are installed and running, from the CSAH node, log in to the bootstrap node as user core and check the status of the bootkube service:
[core@bootstrap ~]$ journalctl -b -f -u release-image.service -u bootkube.service
Aug 29 12:40:03 bootstrap.dcws.lab bootkube.sh[22133]: I0829 12:40:03.262988 1 waitforceo.go:67] waiting on condition EtcdRunningInCluster in etcd CR /cluster to be True.
Aug 29 12:42:19 bootstrap.dcws.lab bootkube.sh[22133]: I0829 12:42:19.058805 1 waitforceo.go:64] Cluster etcd operator bootstrapped successfully
Aug 29 12:42:19 bootstrap.dcws.lab bootkube.sh[22133]: I0829 12:42:19.058901 1 waitforceo.go:58] cluster-etcd-operator bootstrap etcd
Aug 29 12:42:19 bootstrap.dcws.lab bootkube.sh[22133]: bootkube.service complete
Aug 29 12:42:19 bootstrap.dcws.lab systemd[1]: bootkube.service: Succeeded.
- Ensure that the output of the bootkube.service is complete.
Completing the bootstrap setup
To complete the bootstrap process:
- As user core, run the following command in /home/core:
[core@csah-pri ~]$ ./openshift-install --dir=openshift wait-for bootstrap-complete --log-level debug
DEBUG OpenShift Installer 4.10.28
DEBUG Built from commit 6db5fb9d56c9284124cf9147afd8f3e79345e907
INFO Waiting up to 20m0s (until 9:04AM) for the Kubernetes API at https://api.ocp-amd.dcws.lab:6443...
INFO API v1.23.5+012e945 up
DEBUG Loading Install Config...
DEBUG Loading SSH Key...
DEBUG Loading Base Domain...
DEBUG Loading Platform...
DEBUG Loading Cluster Name...
DEBUG Loading Base Domain...
DEBUG Loading Platform...
DEBUG Loading Networking...
DEBUG Loading Platform...
DEBUG Loading Pull Secret...
DEBUG Loading Platform...
DEBUG Using Install Config loaded from state file
INFO Waiting up to 30m0s (until 9:14AM) for bootstrapping to complete...
DEBUG Bootstrap status: complete
INFO It is now safe to remove the bootstrap resources
INFO Time elapsed: 0s
- Validate the status of the control-plane nodes:
[core@csah-pri ~]$ oc get nodes
NAME STATUS ROLES AGE VERSION
etcd-0.dcws.lab Ready master 3h v1.23.5+012e945
etcd-1.dcws.lab Ready master 3h v1.23.5+012e945
etcd-2.dcws.lab Ready master 3h v1.23.5+012e945
Note: In a three-node cluster, each control plane node has an additional ROLE worker along with the master node.
- Run oc get co to view the cluster operator status.
Note: In a five+ node cluster, compute nodes must be in the Ready state before the cluster operator AVAILABLE state is displayed as True.
Installing compute nodes
Note: Skip these installation instructions for a three-node cluster.
To install the compute nodes:
- Connect to the iDRAC of a compute node and open the virtual console.
- In the iDRAC UI, click Configuration and select BIOS Settings.
- Expand Network Settings.
- Set PXE Device1 to Enabled.
- Expand PXE Device1 Settings.
- Select NIC in Slot 2 Port 1 Partition 1 as the interface.
- Scroll to the bottom of the Network Settings section and click Apply.
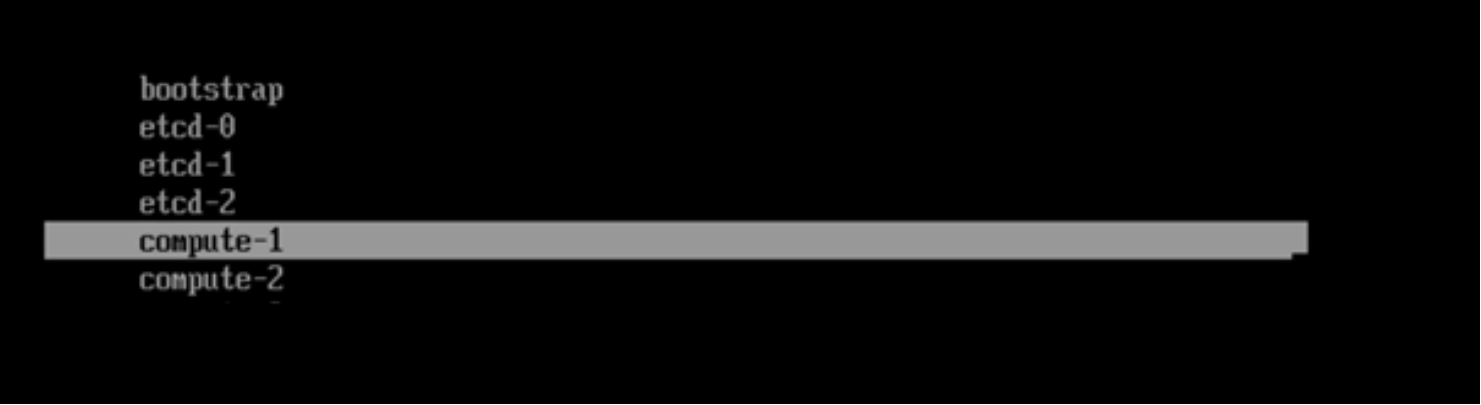
The system automatically boots into the PXE network and displays the PXE menu, as shown in the following figure:Figure 6. iDRAC console PXE menu
- Select the compute node name and let the system reboot after the installation. Before the node reboots into the PXE, ensure that the hard disk is placed above the PXE interface in the boot order:
- Press F2 to enter System Setup.
- Select System BIOS > Boot Settings > UEFI Boot Settings > UEFI Boot Sequence.
- Select PXE Device 1 and click -.
- Repeat the preceding step until PXE Device 1 is at the bottom of the boot menu.
- Click OK, and then click Back.
- Click Finish and save the changes.
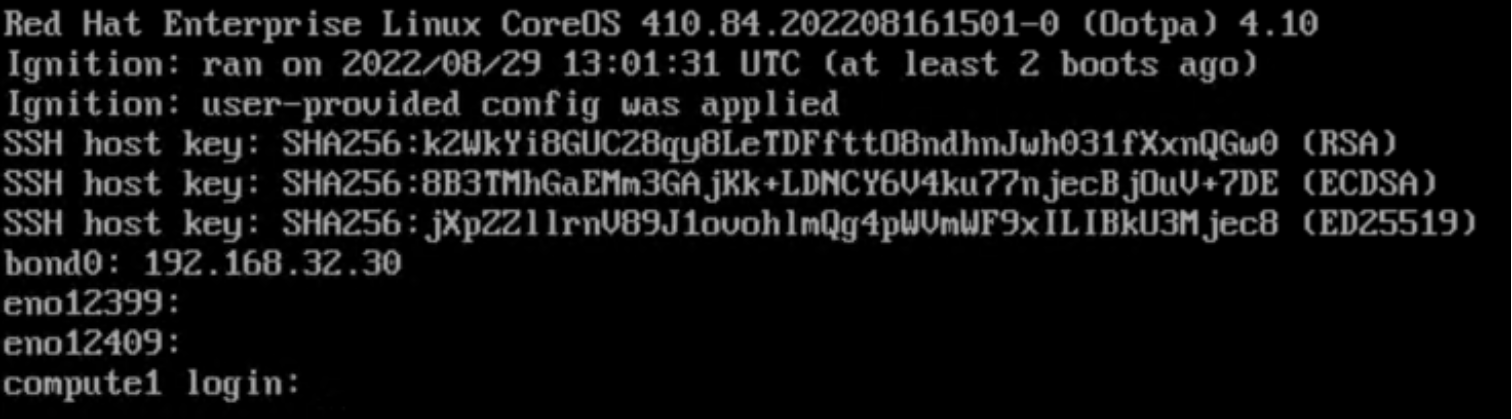
Let the node boot into the hard drive where the operating system is installed, as shown in the following figure:
Figure 7. iDRAC console: compute node
- Repeat the preceding steps for the remaining compute nodes.
- As user core in CSAH primary node, approve the CSR to ensure that RHCOS-based compute nodes are added in the cluster.
[core@csah-pri ~]$ oc get csr -o name | xargs oc adm certificate approve
- Verify that all compute nodes are listed and their status is READY:
[core@csah-pri ~]$ oc get nodes
NAME STATUS ROLES AGE VERSION
compute-1.dcws.lab Ready worker 1h v1.23.5+012e945
compute-2.dcws.lab Ready worker 1h v1.23.5+012e945
etcd-0.dcws.lab Ready master 3h v1.23.5+012e945
etcd-1.dcws.lab Ready master 3h v1.23.5+012e945
etcd-2.dcws.lab Ready master 3h v1.23.5+012e945
Completing the cluster setup
This section uses openshift for the install_dir variable. See the inventory file under <git clone dir>/python/generated_inventory for the value specified for the install_dir variable.
After the bootstrap, control-plane, and compute nodes are installed, complete the cluster setup:
- As user core, run the following command:
[core@csah-pri ~]$ oc get clusteroperators
- Ensure that all the operators are set to True in the AVAILABLE column. After the verification is complete, run:
[core@csah-pri ~]$ ./openshift-install --dir=openshift wait-for install-complete --log-level debug
DEBUG OpenShift Installer 4.10.28
DEBUG Built from commit 6db5fb9d56c9284124cf9147afd8f3e79345e907
DEBUG Loading Install Config...
DEBUG Loading SSH Key...
DEBUG Loading Base Domain...
DEBUG Loading Platform...
DEBUG Loading Cluster Name...
DEBUG Loading Base Domain...
DEBUG Loading Platform...
DEBUG Loading Networking...
DEBUG Loading Platform...
DEBUG Loading Pull Secret...
DEBUG Loading Platform...
DEBUG Using Install Config loaded from state file
INFO Waiting up to 40m0s (until 10:32AM) for the cluster at https://api.ocp-amd.dcws.lab:6443 to initialize...
DEBUG Cluster is initialized
INFO Waiting up to 10m0s (until 10:02AM) for the openshift-console route to be created...
DEBUG Route found in openshift-console namespace: console
DEBUG OpenShift console route is admitted
INFO Install complete!
INFO To access the cluster as the system:admin user when using 'oc', run 'export KUBECONFIG=/home/core/openshift/auth/kubeconfig'
INFO Access the OpenShift web-console here: https://console-openshift-console.apps.ocp-amd.dcws.lab
INFO Login to the console with user: "kubeadmin", and password: "xxxx-xxxx-xxxx-xxxx"
Removing the bootstrap node
A bootstrap node was created as part of the deployment procedure. Now that the OpenShift Container Platform cluster is running, you can remove this node.
- Remove the bootstrap node entries along with the names, IP addresses, and MAC addresses. For example, in the following sample entry for bootstrap_node in the inventory file, remove all entries along with the bootstrap_node: line:
bootstrap_node:
- name: bootstrap
ip: 192.168.46.26
mac: B8:59:9F:C0:35:86
- On the CSAH node, run the playbooks as user ansible:
[ansible@csah-pri ansible]$ ansible-playbook -i generated_inventory haocp.yaml
- If the bootstrap KVM is listed, delete it by running:
[ansible@csah-pri ansible]$ sudo virsh list
Id Name State
----------------------------------------------------
2 bootstrapkvm running
[ansible@csah-pri ansible]$ sudo virsh destroy bootstrapkvm
[ansible@csah-pri ansible]$ sudo virsh undefine --nvram bootstrapkvm
- Delete the qcow2 image manually if necessary:
[ansible@csah-pri ansible]$ sudo rm -rf /home/bootstrapvm-disk.qcow2
Note: Replace the location of the qcow2 image as appropriate.