
HAProxy configuration for single setup
HAProxy configuration for single setup
-
A configuration file is used to define how HAProxy should be configured to proxy requests to a pool of servers. The HAProxy configuration file haproxy.cfg located in /etc/haproxy directory is modified to define the following:
- Frontend – consists of a set of IP addresses and port used by clients to access HAProxy server, the mode (tcp or http), ACLs (optional), and backend rules based on ACL conditions.
- Backend – specifies options for load balancer algorithm to use, a list of ECS nodes and ports, the mode (tcp or http), and whether to perform health checks.
Frontend and backend definitions are explained in this section for http, https and NFS in addition to definitions to enable web monitoring. There are default global values defined in haproxy.cfg such as timeout for client and server, error files for different types of errors, stats timeout, mode, etc. These values are not modified in this example; however, some of the parameters such as mode and log are overridden in the frontend and backend definitions for NFS.
HTTP
The sample or default /etc/haproxy.cfg file contains some parameters for global and defaults. The “global” section contains definitions that applies to the entire HAProxy process such as logging, default ciphers, etc. For this example, no additional changes will be needed in this section. In the “defaults” section as shown in the following figure, the mode, timeouts, type of balance, options, etc. can be added or modified. In this example the defaults labeled HTTP, the default timeouts are modified and additional parameters are added such as balance, to specify the load balancer algorithm type to “leastconn” and option for forwardfor to set the X-Forwarded-For header with the source IP. Using “leastconn” as the load balancer algorithm forwards requests to ECS nodes that has the least amount of active connections.

Figure 8. Example of default definitions
Next append the frontend block shown in Figure 9 to /etc/haproxy/haproxy.cfg file. In defaults section, the mode is http so a mode is not specifically added in the frontend block shown in Figure 9. The first line in the frontend block “http-in” tells HAProxy to listen for requests on port 80 on all interfaces. It also defines ACLS named “host_s3”, “host_atmos”, and “host_swift” such that it extracts the HTTP header “host” and if the path of the user header request matches “os.ecstme.org, atmos.ecstme.org, or swift.ecstme.org” it will re-direct the request to appropriate protocol backend defined by the “use_backend” line. The “-i” flag ignores case during matching, and “-m dom” indicates domain matching such that the input string delimited with dots matches the specified pattern in this case os.ecstme.org, atmos.ecstme.org, and swift.ecstme.org.

Figure 9. Example of frontend definitions for object access
Further append the haproxy.cfg file with the backend definitions of “os.ecstme.org”, “swift.ecstme.org”, and “atmos.ecstme.org” specified in the frontend as shown in Figure 10. Each object protocol goes thru a certain port thus all S3 requests for http go thru port 9020, Atmos, thru port 9022, and Swift thru 9024. So, for each protocol backend, a list of ECS nodes IP addresses and ports are specified in “server” line. For the s3_backend and swift_backend, “check” is added at the end of the line to perform health checks on ECS services on each node using “S3 ping” or “Swift healthcheck” as specified in “option httpchk”. The “check” specified for atmos_backend will only check if the ECS node is down since this protocol does not yet have support for the “ping operation” to check the ECS services.
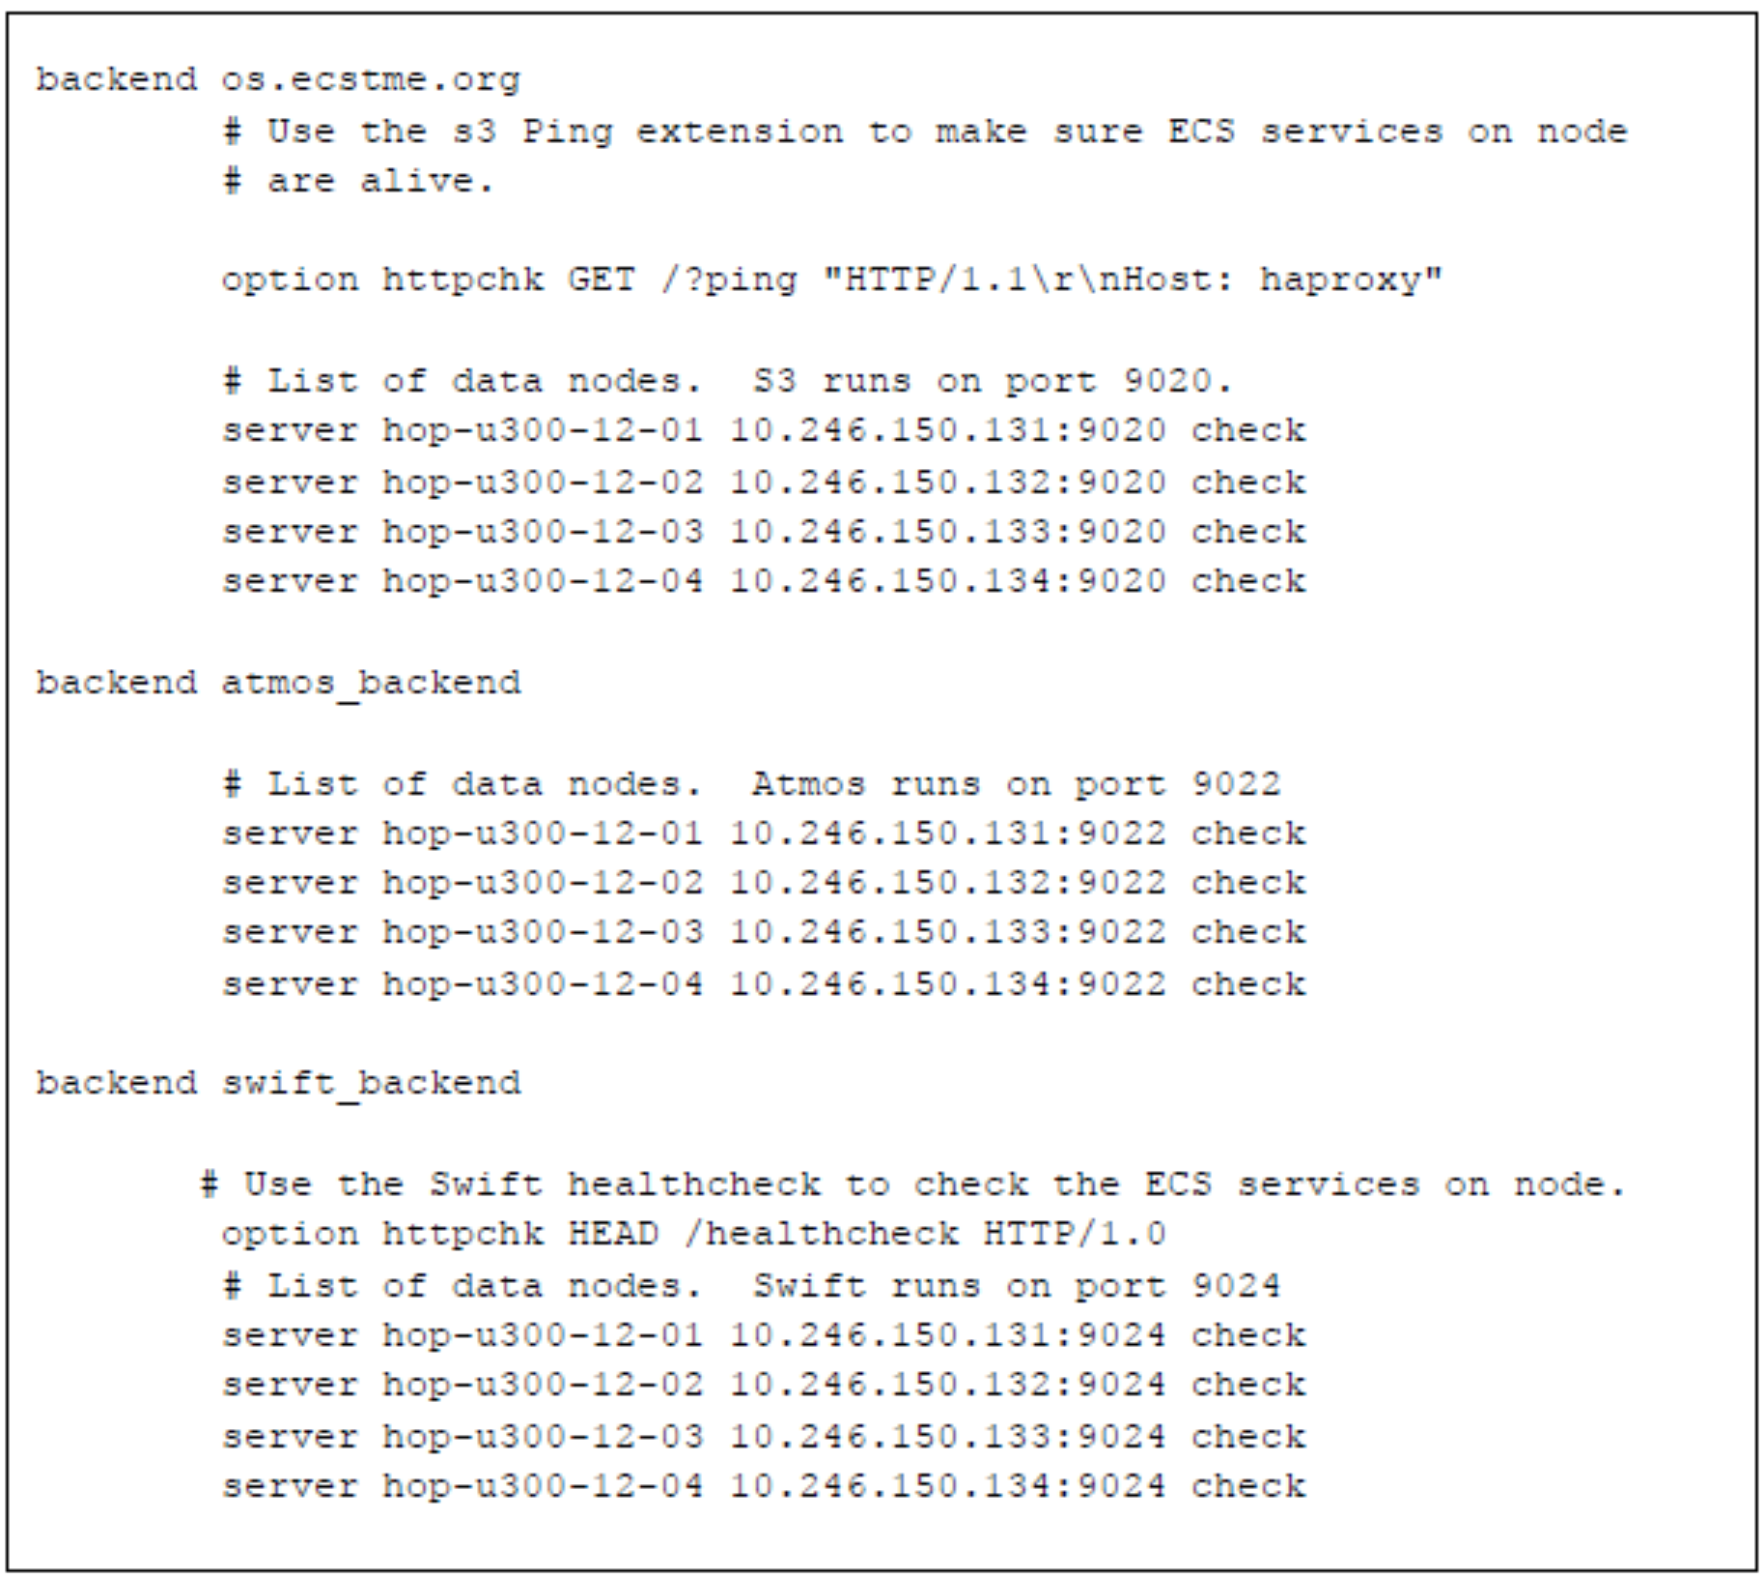
Figure 10. Backend definitions
For another example of how to implement the frontend and backend is of this example is described in Appendix A: Other configuration examples.
After the haproxy.cfg has been modified, check the validity of the configuration file. If configuration file is valid, then restart HAProxy to put in effect the load balancing directives in haproxy.cfg. The following figure shows how to check and restart HAProxy.

Figure 11. Example of command to restart HAProxy
To have HAProxy automatically start after a reboot, edit /etc/default/haproxy file and add ENABLED=1 as shown in the following figure.

Figure 12. Set ENABLED=1 in /etc/default/haproxy
To validate your HAProxy configuration, install S3 Browser or Cyberduck and set the IP or name of HAProxy. The following figure provides an example of the settings for S3 Browser. Since http is being tested, verify that the S3 Browser has the “Use secure transfer (SSL/TLS)” box unchecked.
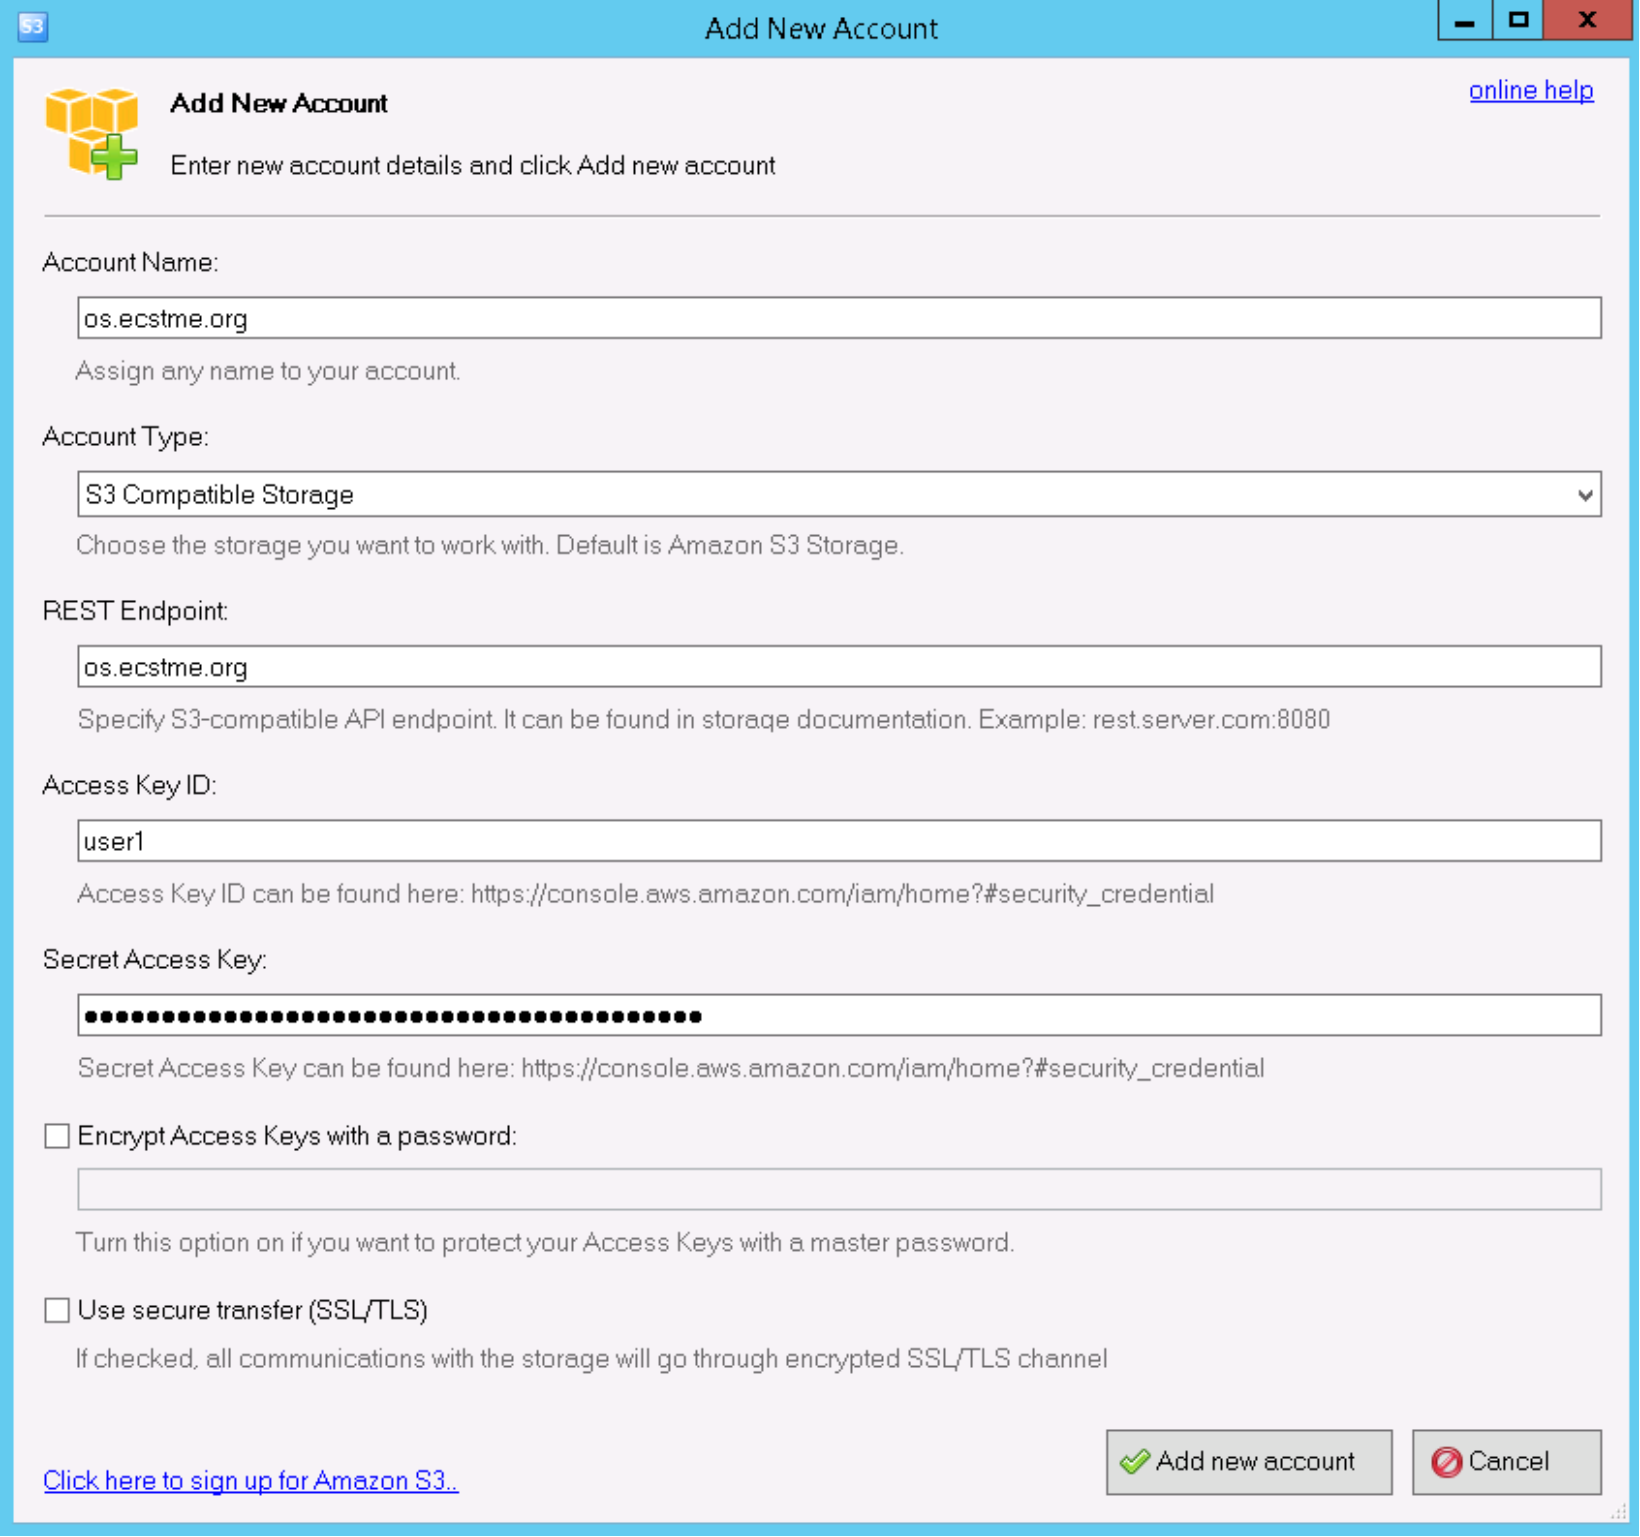
Figure 13. S3 browser settings example using HAProxy
Cyberduck can also be utilized to test both S3 and Swift. In this example, ECS Swift (HTTP) profile provided in the ECS community page https://community.emc.com/docs/DOC-27683 was used. From Cyberduck, open a new connection specifying “swift.ecstme.org” and port 80 for the server settings and providing the Swift credentials (e.g., namespace:user and password set for Swift user) as shown in the following figure.

Figure 14. Cyberduck with Swift settings example using HAProxy
To validate S3 virtually hosted style addressing scheme, a base URL (i.e., os.ecstme.org) would need to be specified in ECS via the ECS portal and S3curl utility can be used as a check. The following figure shows an example of how to install S3curl onto a Linux machine which requires retrieving the utility from github and unzipping the bundle. The unzip will create an s3curl directory which contains the files needed to use the utility.

Figure 15. Example of S3curl utility installation on Linux
Create an “.s3curl” configuration file in the home directory which contains the ECS user id, secret keys, and ECS endpoints. After editing the file as shown in the following figure, modify the permissions of the “.s3curl” configuration file to 600.

Figure 16. Example of s3curl configuration file
Execute the s3curl command located in s3curl directory with the virtual host style addressing as illustrated in the following figure. In this example, the bucket name is prepended to the base URL of os.ecstme.org.

Figure 17. S3curl command
A snippet output after running this command is pictured in the following figure and shows a bucket listing of a bucket named “testb”
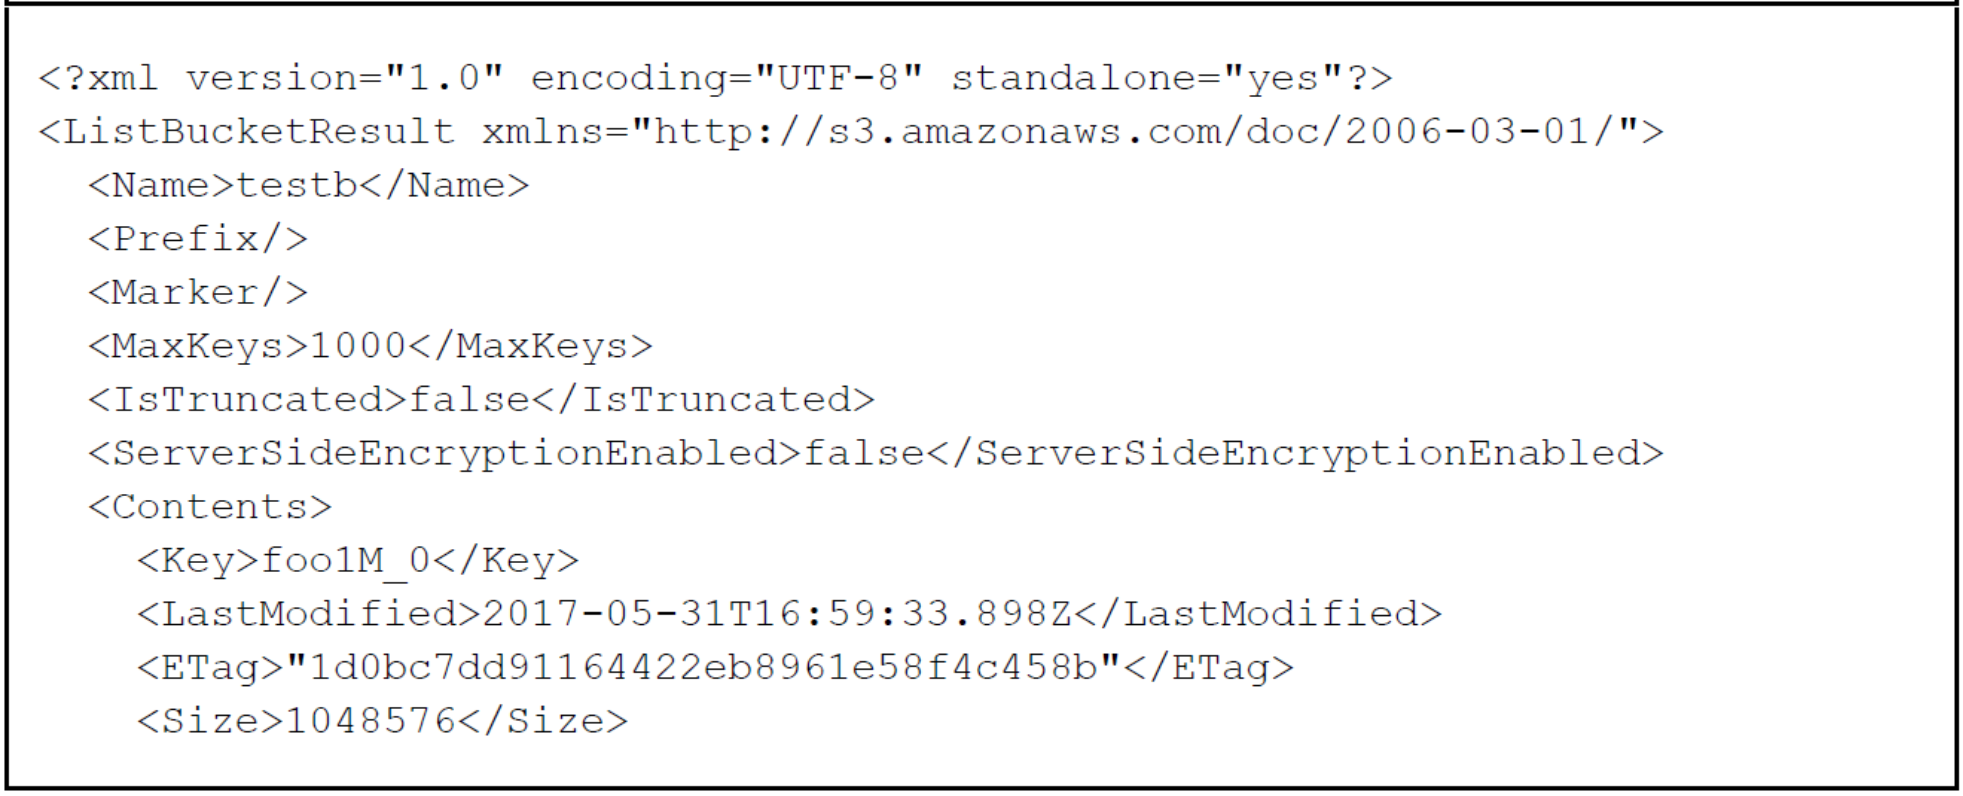
Figure 18. Snippet output of running s3curl.pl using bucket name “testb” in URL
HTTPS
Developing trust between two entities is established via Secure Socket Layer (SSL) and SSL certificates. The purpose of SSL and certificates is encryption and identification to ensure that communication exchange between two parties is secure and trustworthy. For identification of who to trust, a certificate would need to be generated and installed on HAProxy or ECS nodes. Certificates usually will contain information about the owner of the certificate (i.e., company, organization, city, state, email address of owner), duration of validity, resource location (i.e., Fully Qualified Domain Name or common name), public key, and hash. The certificate generated can be signed by either:
- Certificate Authority (CA) – trusted organizations that can verify the identity and validity of the entity requesting the certificate.
- Self-signed - authenticated by the system where the certificate resides.
As a best practice, using a Certificate Authority to sign certificate is preferred over issuing self-signed certificates. Almost all client systems come with a list of trusted root CA certificates that will automatically validate your CA-signed certificate. If you opt to use a self-signed certificate, that certificate will need to be installed on all client systems as a “trusted” certificate. If your organization has an internal Certificate Authority, you can use that CA to sign your certificates; just make sure that any client systems have your CA’s root certificate installed. Also, utilizing HAProxy to offload and terminate SSL is a best practice in order to not add extra load on ECS nodes to establish SSL sessions. Thus, the certificate generated in this example is to be installed on HAProxy load balancer. Some organizations have security policies that specify that the connection to ECS must be encrypted all the way to ECS. In those cases, you will need to terminate SSL on the ECS appliance itself. If SSL termination is required on ECS nodes, then use Layer 4 (tcp) load balancing mode to pass through the SSL traffic to ECS nodes for handling. In this scenario, the certificates would need to be installed on ECS. For information on how to generate certificates for ECS Nodes, refer to ECS System and Administration Guide.
Certificate generation for HAProxy load balancer example
OpenSSL is used in this example to generate the certificates. Note that you do not need to generate the certificates on ECS; any system with suitable tools like OpenSSL can generate certificates. By default, OpenSSL is installed on most Linux releases. General steps to create a certificate for HAProxy using OpenSSL include:
- Generate a private key.
- Modify configuration file to add Subject Alternative Names (SANs).
- Create a certificate request to submit to CA or generate a self-signed certificate.
- Combine the private key and certificate and place in HAProxy directory.
When generating certificates, the hostname of where the certificate will be used needs to be specified. For compatibility with the S3 protocol, the Common Name (CN) on the certificate should point to the wildcard DNS entry used by S3 since S3 is the only protocol that utilizes virtually hosted-style URL buckets where the bucket name is in the hostname. There can only be one wildcard entry on an SSL certificate and it must be under the CN. If specifying IP Addresses or other DNS entries for Atmos and Swift protocols, Subject Alternative Names (SANs) should be registered on the certificate. Some organizations do not allow the use of wildcard certificates. In this case, you will need to make sure that all of your S3 applications use “path-style” access so they can use the base hostname of S3 (e.g., os.ecstme.org) instead of the default method of adding the bucket to the hostname (e.g., bucket.os.ecstme.org).
Step 1: Generate a Private Key
A private key is required for self-signed and CA requests certificates. This key will be combined with the certificate generated. An example of how to generate the private key is shown in the following figure. Permissions are also changed on the key generated to safeguard from accidentally modification or deletion.
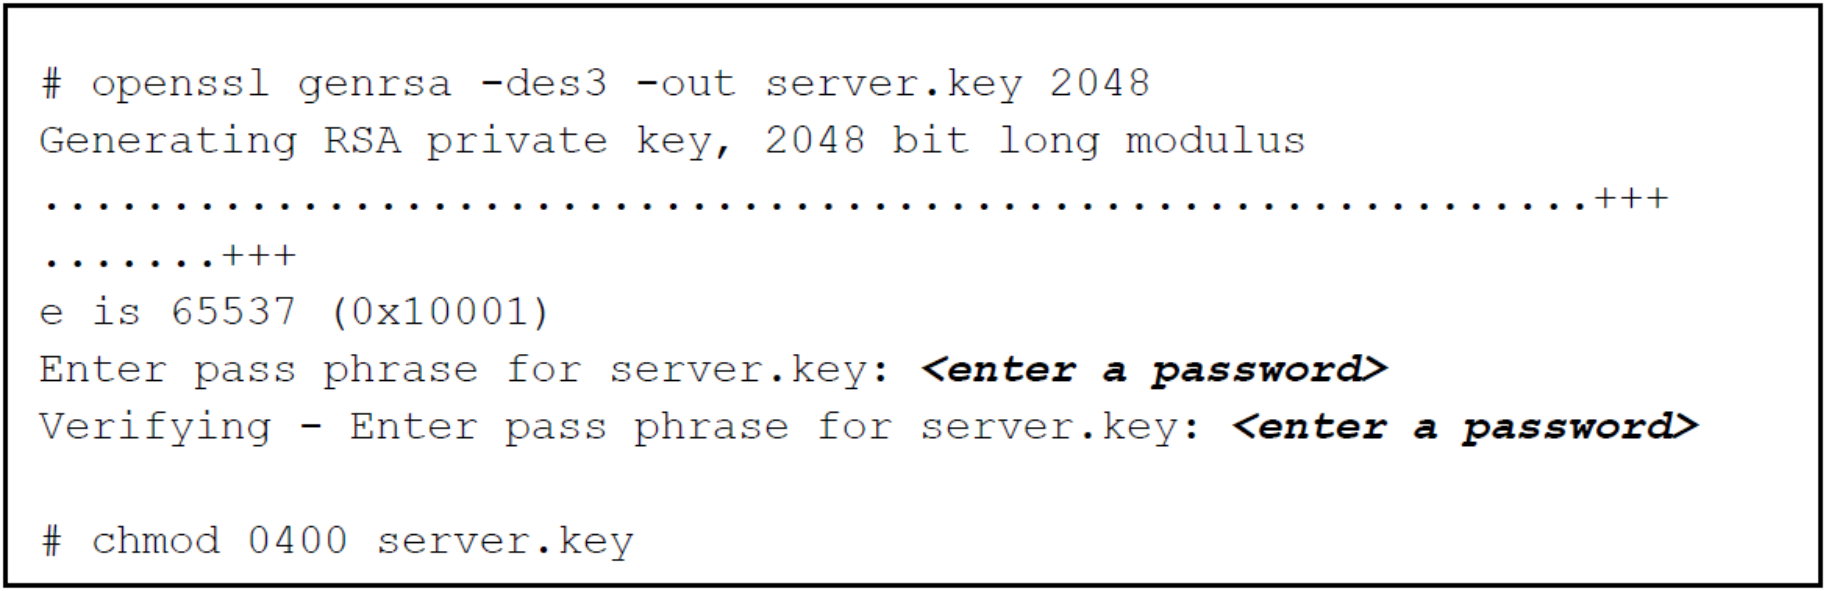
Figure 19. Example of command to create private key using OpenSSL
Step 2: Modify the Configuration File with SANs
OpenSSL does not allow passing of SANs through the command line so a configuration file is created to define them. A sample configuration file for openssl can be used as a reference and is located in /usr/lib/ssl/openssl.cnf. Copy the openssl.cnf file to a temporary directory where certificates will be generated and placed as pictured in the following figure.

Figure 20. Copying of openssl configuration file
Edit the request.conf file to include the SAN by adding the IP addresses or DNS entries mapping of the HAProxy server. The following figure is an example of the SAN setting for both DNS entries and IP addresses.

Figure 21. SANs setting in configuration file
In the [ req ] section, add the following lines if not present in the configuration file as shown in the following figure.

Figure 22. Indicate parameter(s) for extensions
In the [ v3_ca ] section, add the lines shown in the following figure. This indicates that there are alternate names provided.

Figure 23. Specify [ v3_ca ] parameters for SAN
Also, in [ v3_ca ] section, if creating a certificate signing request, comment out “authorityKeyIdentifier” as illustrated in the following figure. No need to comment out for self-signed certificates.

Figure 24. Comment out authorityKeyIdentifier paramteter in [ v3_ca ] section
Finally, in section [ CA_default ], uncomment or add the copy_extension line as pictured in

Figure 25. Parameter to add at [ CA_default ] section
Step 3a: Creation of a Certificate Signing Request for CA Submission
Figure 26 provides an example openssl command of how to create a certificate signing request. The command requires the private key, “server.key” created in Step 1, and the modified configuration file, request.conf containing the subject alternate names as described in Step 2. Several user inputs are expected such as location and organization information, email address and Common Name. As previously mentioned, the Common Name should be set to the wildcard DNS entry used by S3 which is “*.os.ecstme.org” in this example.
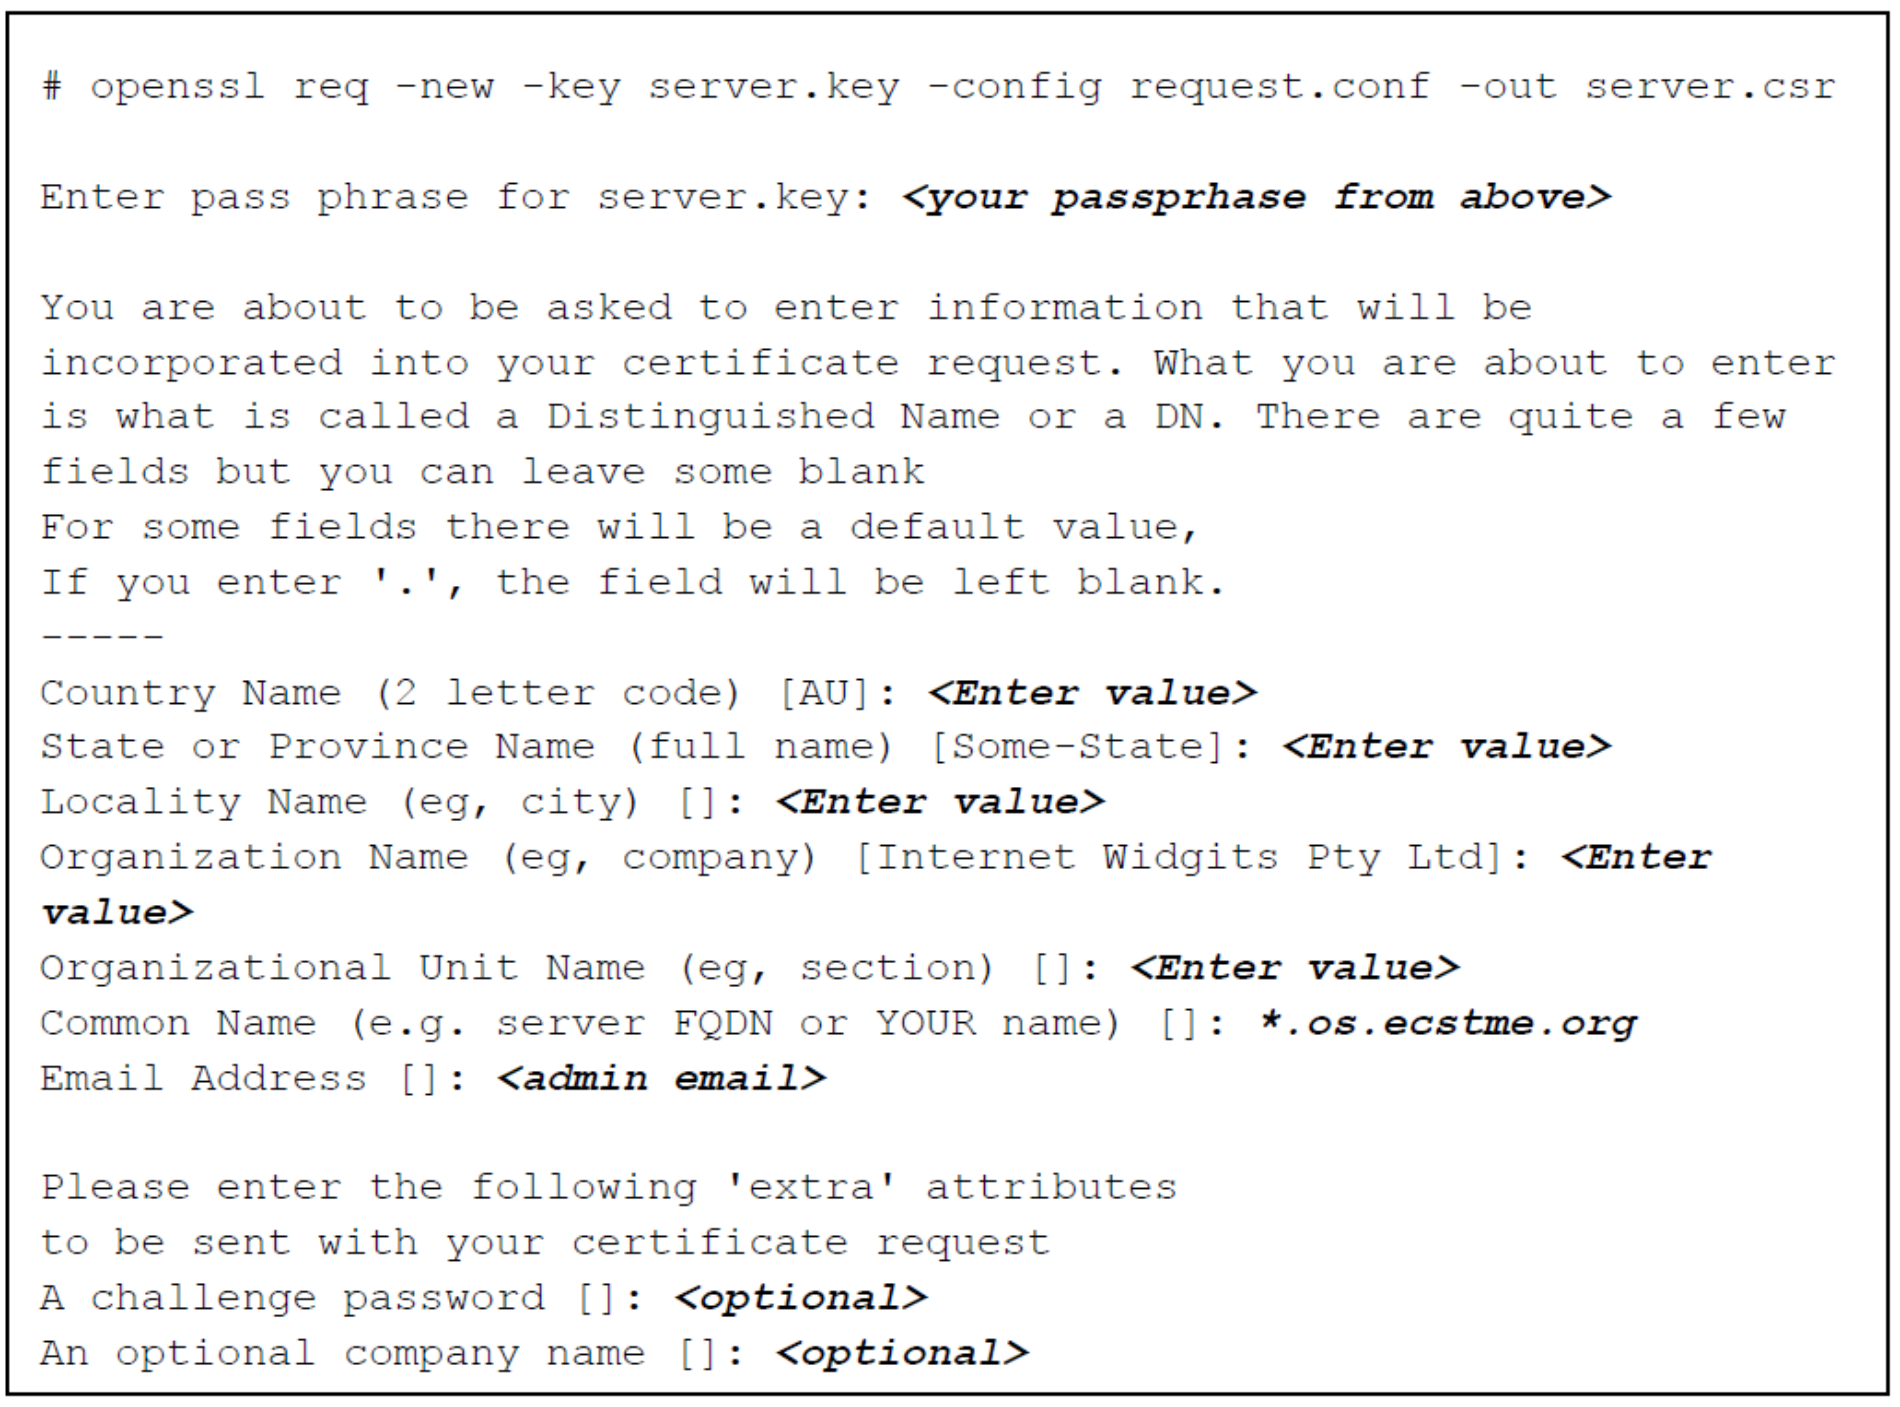
Figure 26. Example of command to generate a certificate signing request
Step 3b: Creation of a self-signed certificate
The command to create self-signed certificates is similar to certificate request except for “-x509” option added. The following figure provides an example command to generate the self-signed certificate. Also, the Common Name is set to “*.os.ecstme.org” for the S3 wildcard DNS entry. The validity of this certificate by default is one month, if more days are desired, specify command with “-days <# of days> (i.e.,” –days 366”).
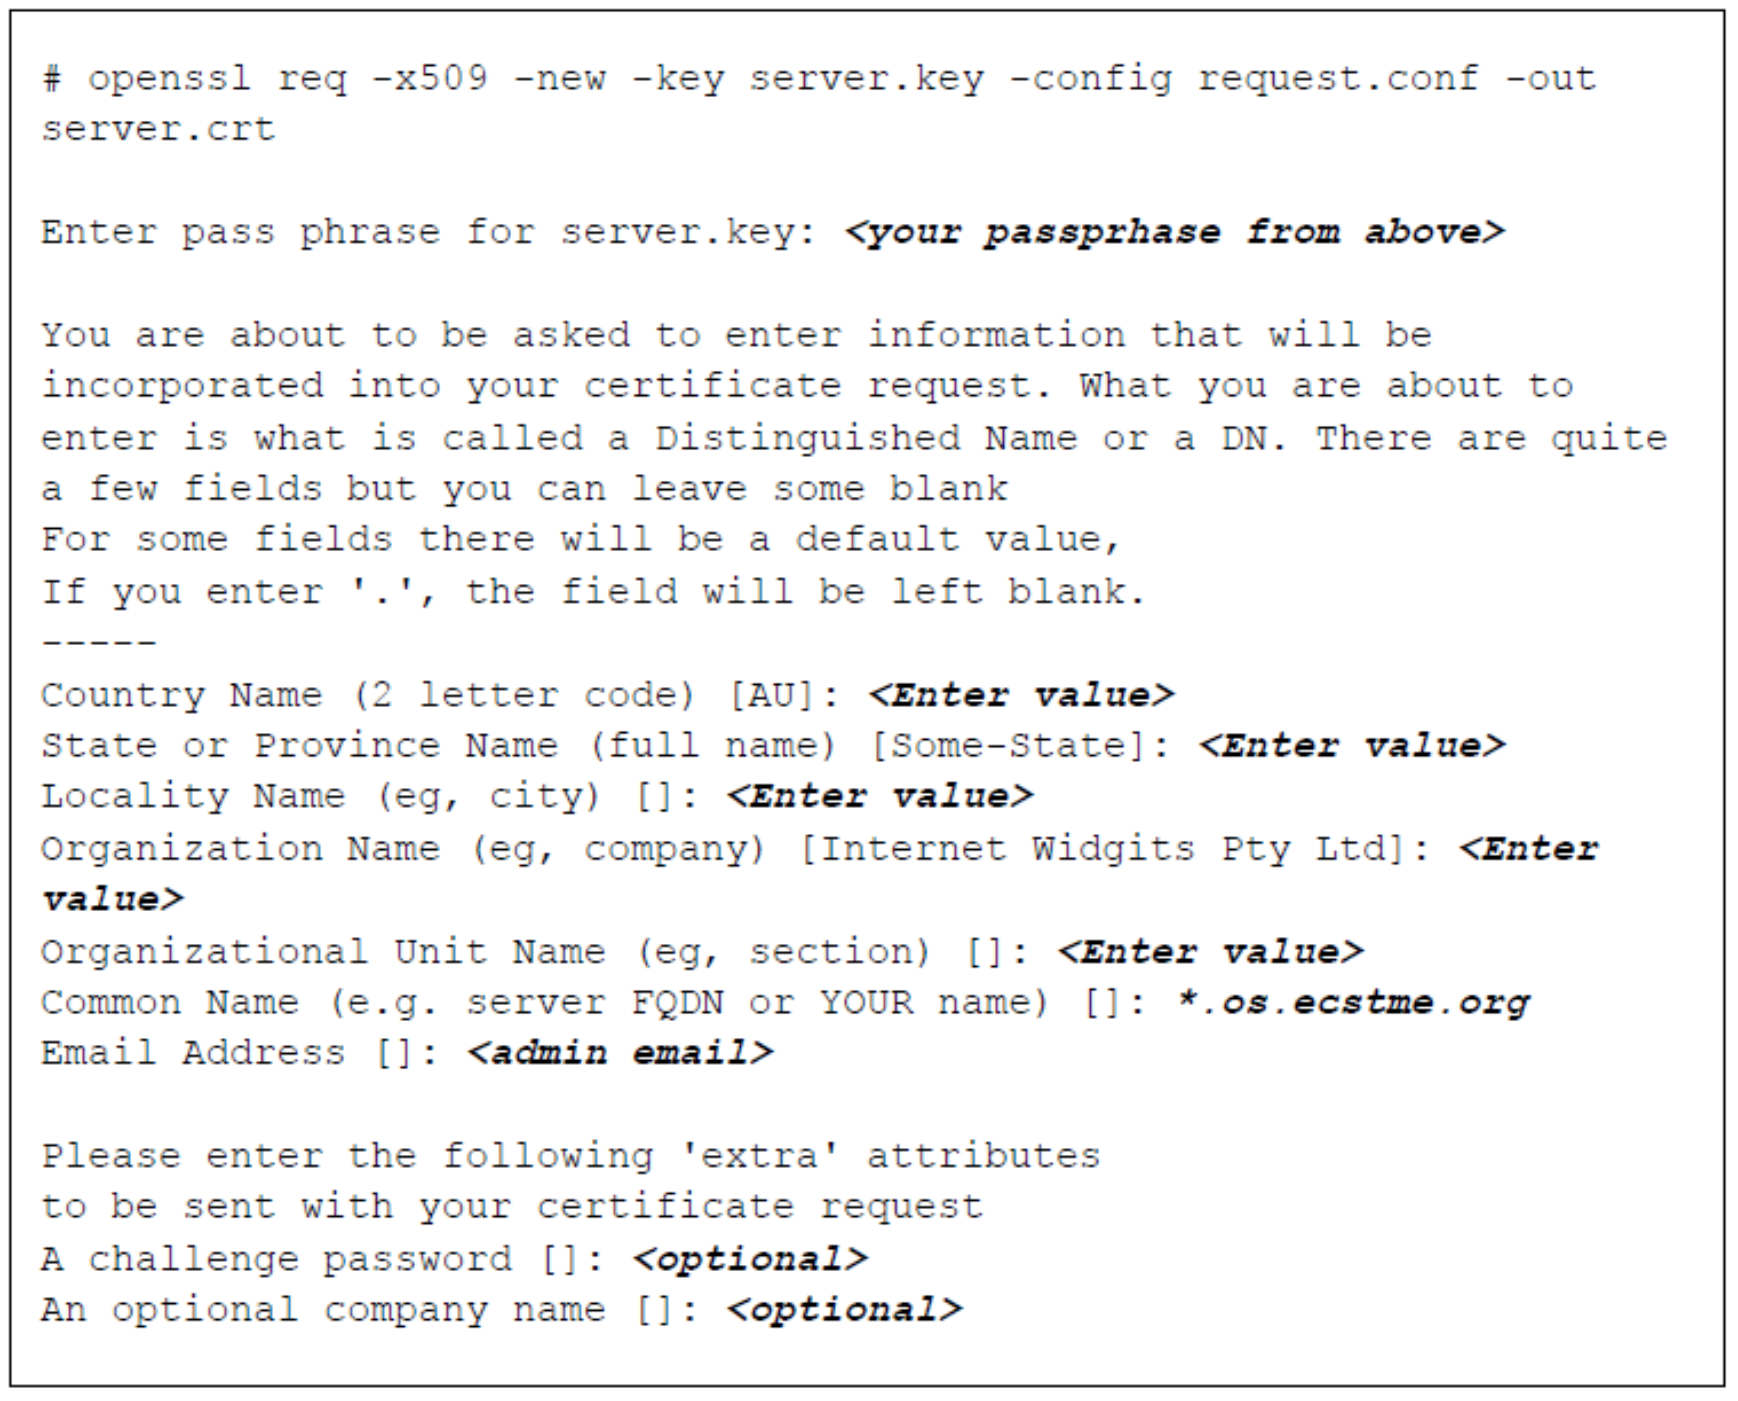
Figure 27. Example of command for creation of self-signed certificate
Step 3c: Validation of SANs in certificate request and self-signed certificate
In either certificate generation, user inputs and the Subject Alternate Names provided are included in the certificate. An openssl command to output certificate in text format is highlighted in the following two figures for each type of certificates.
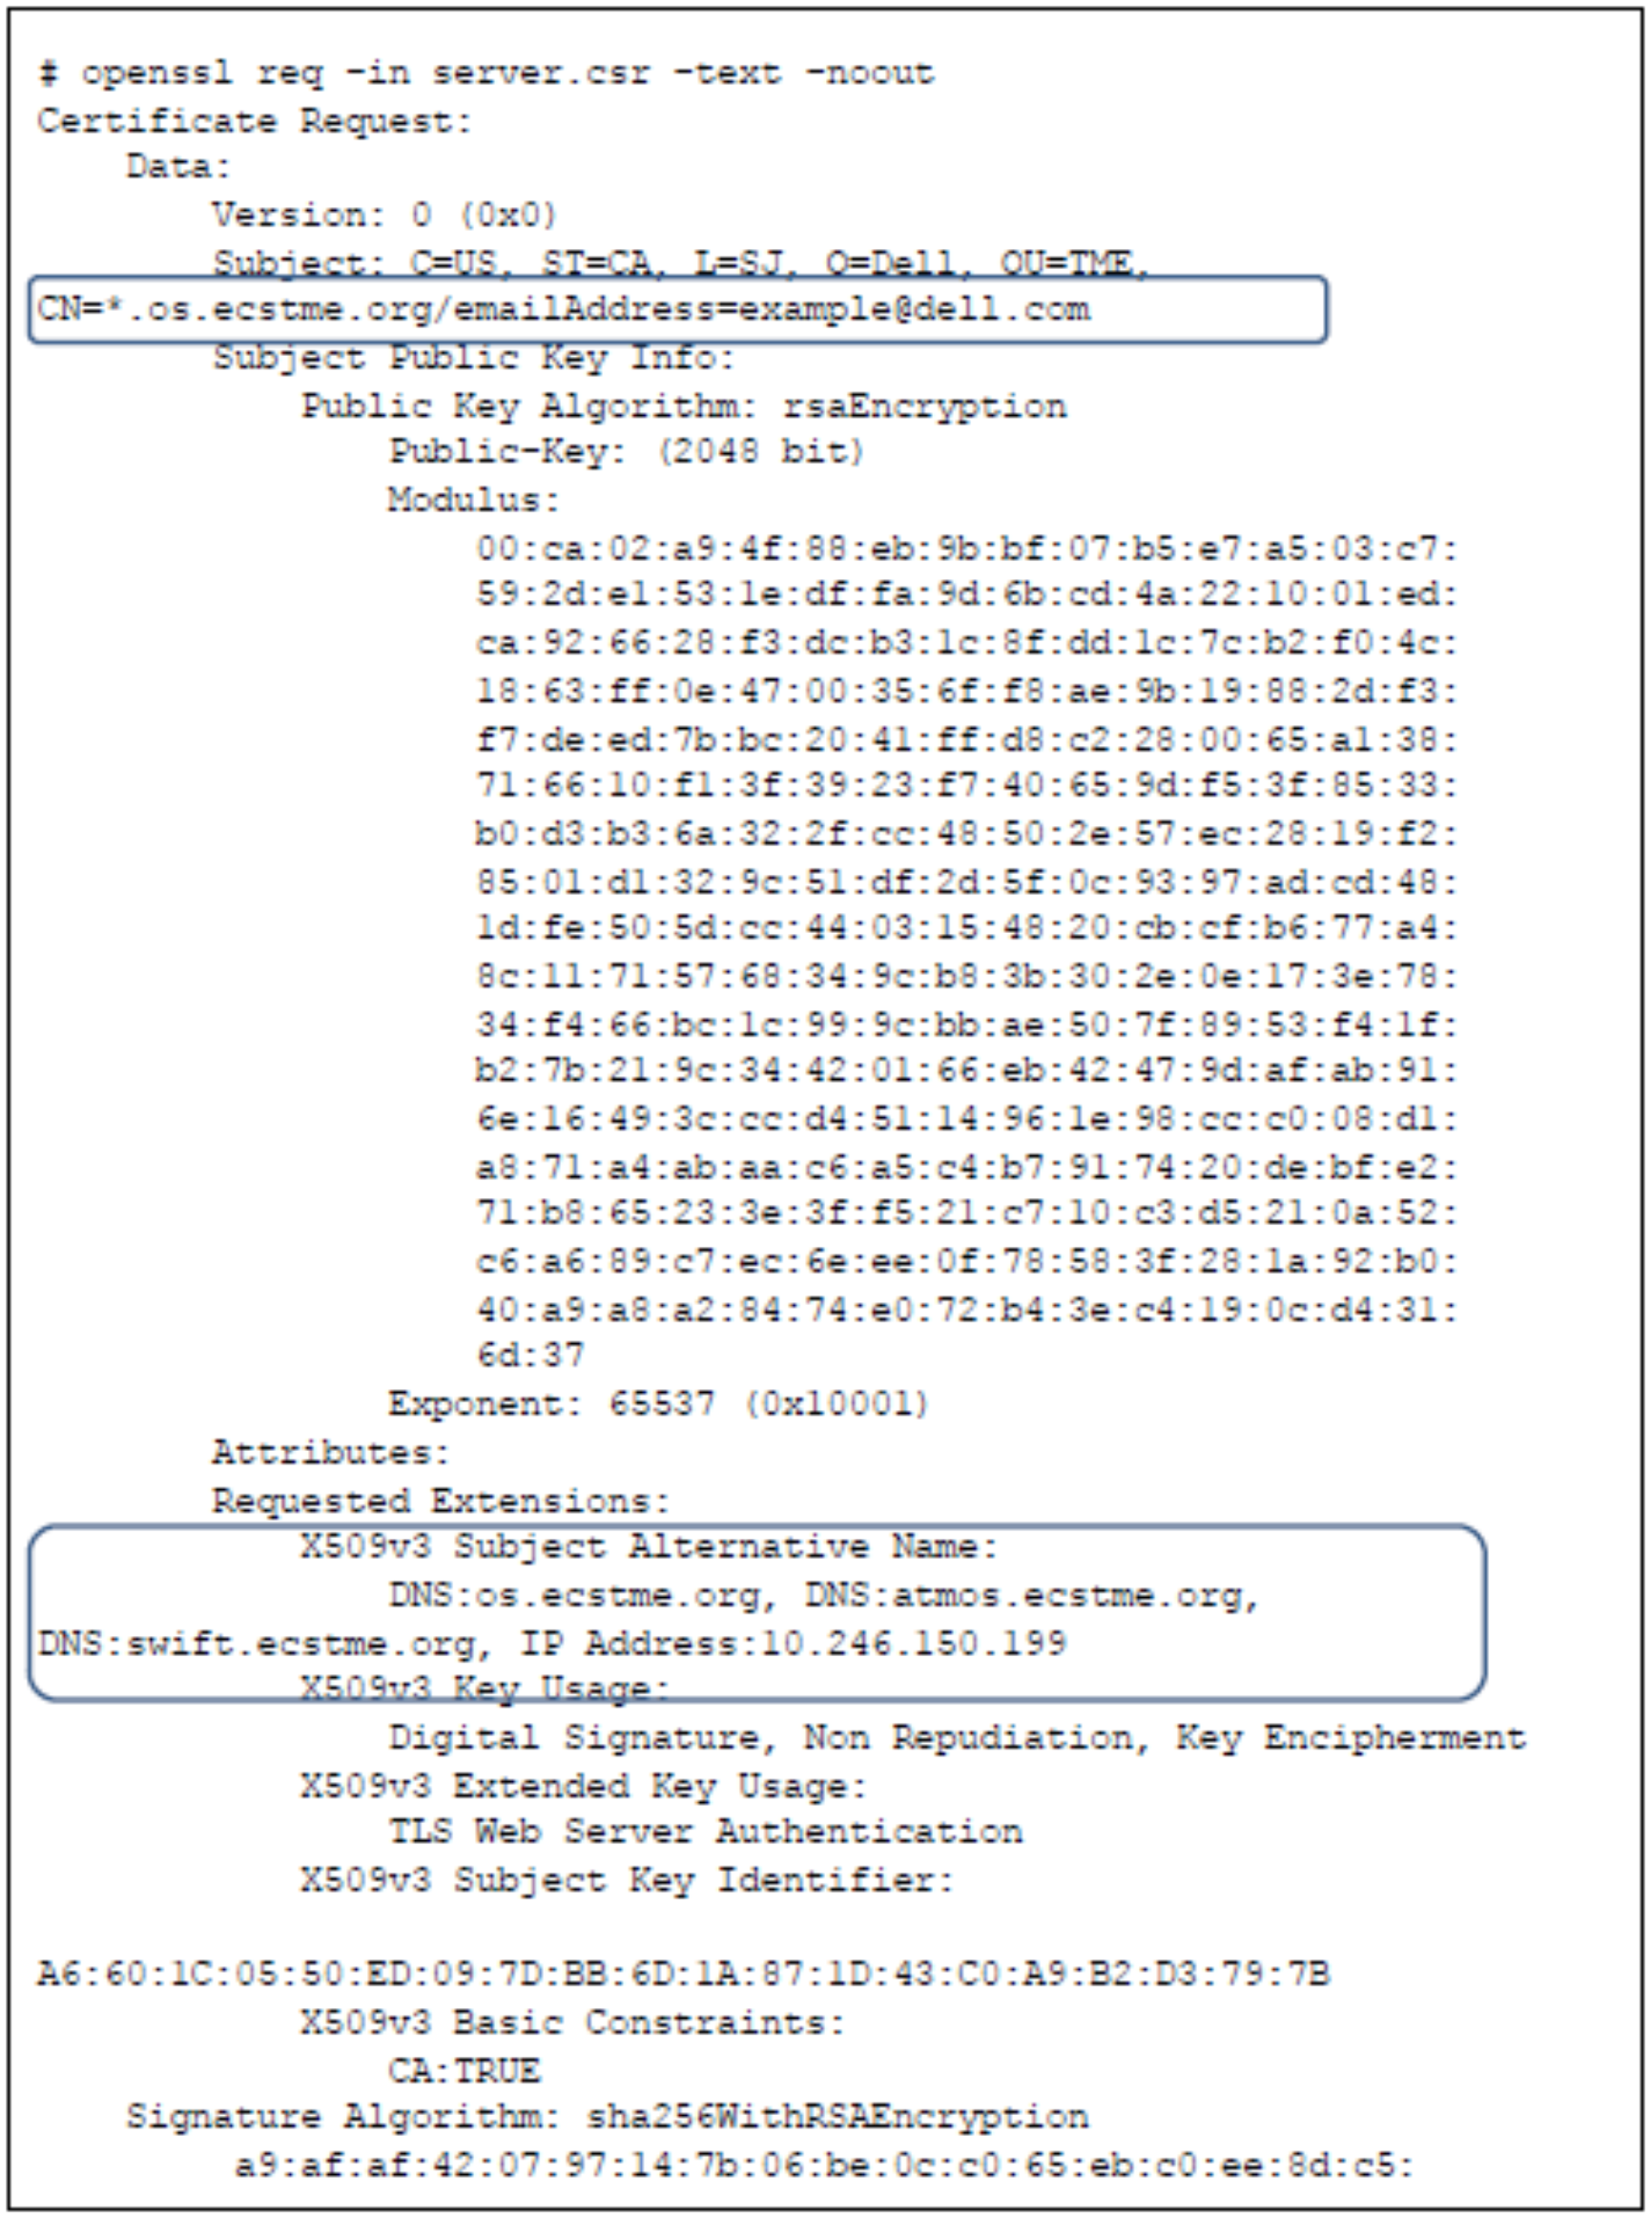
Figure 28. Example of text output
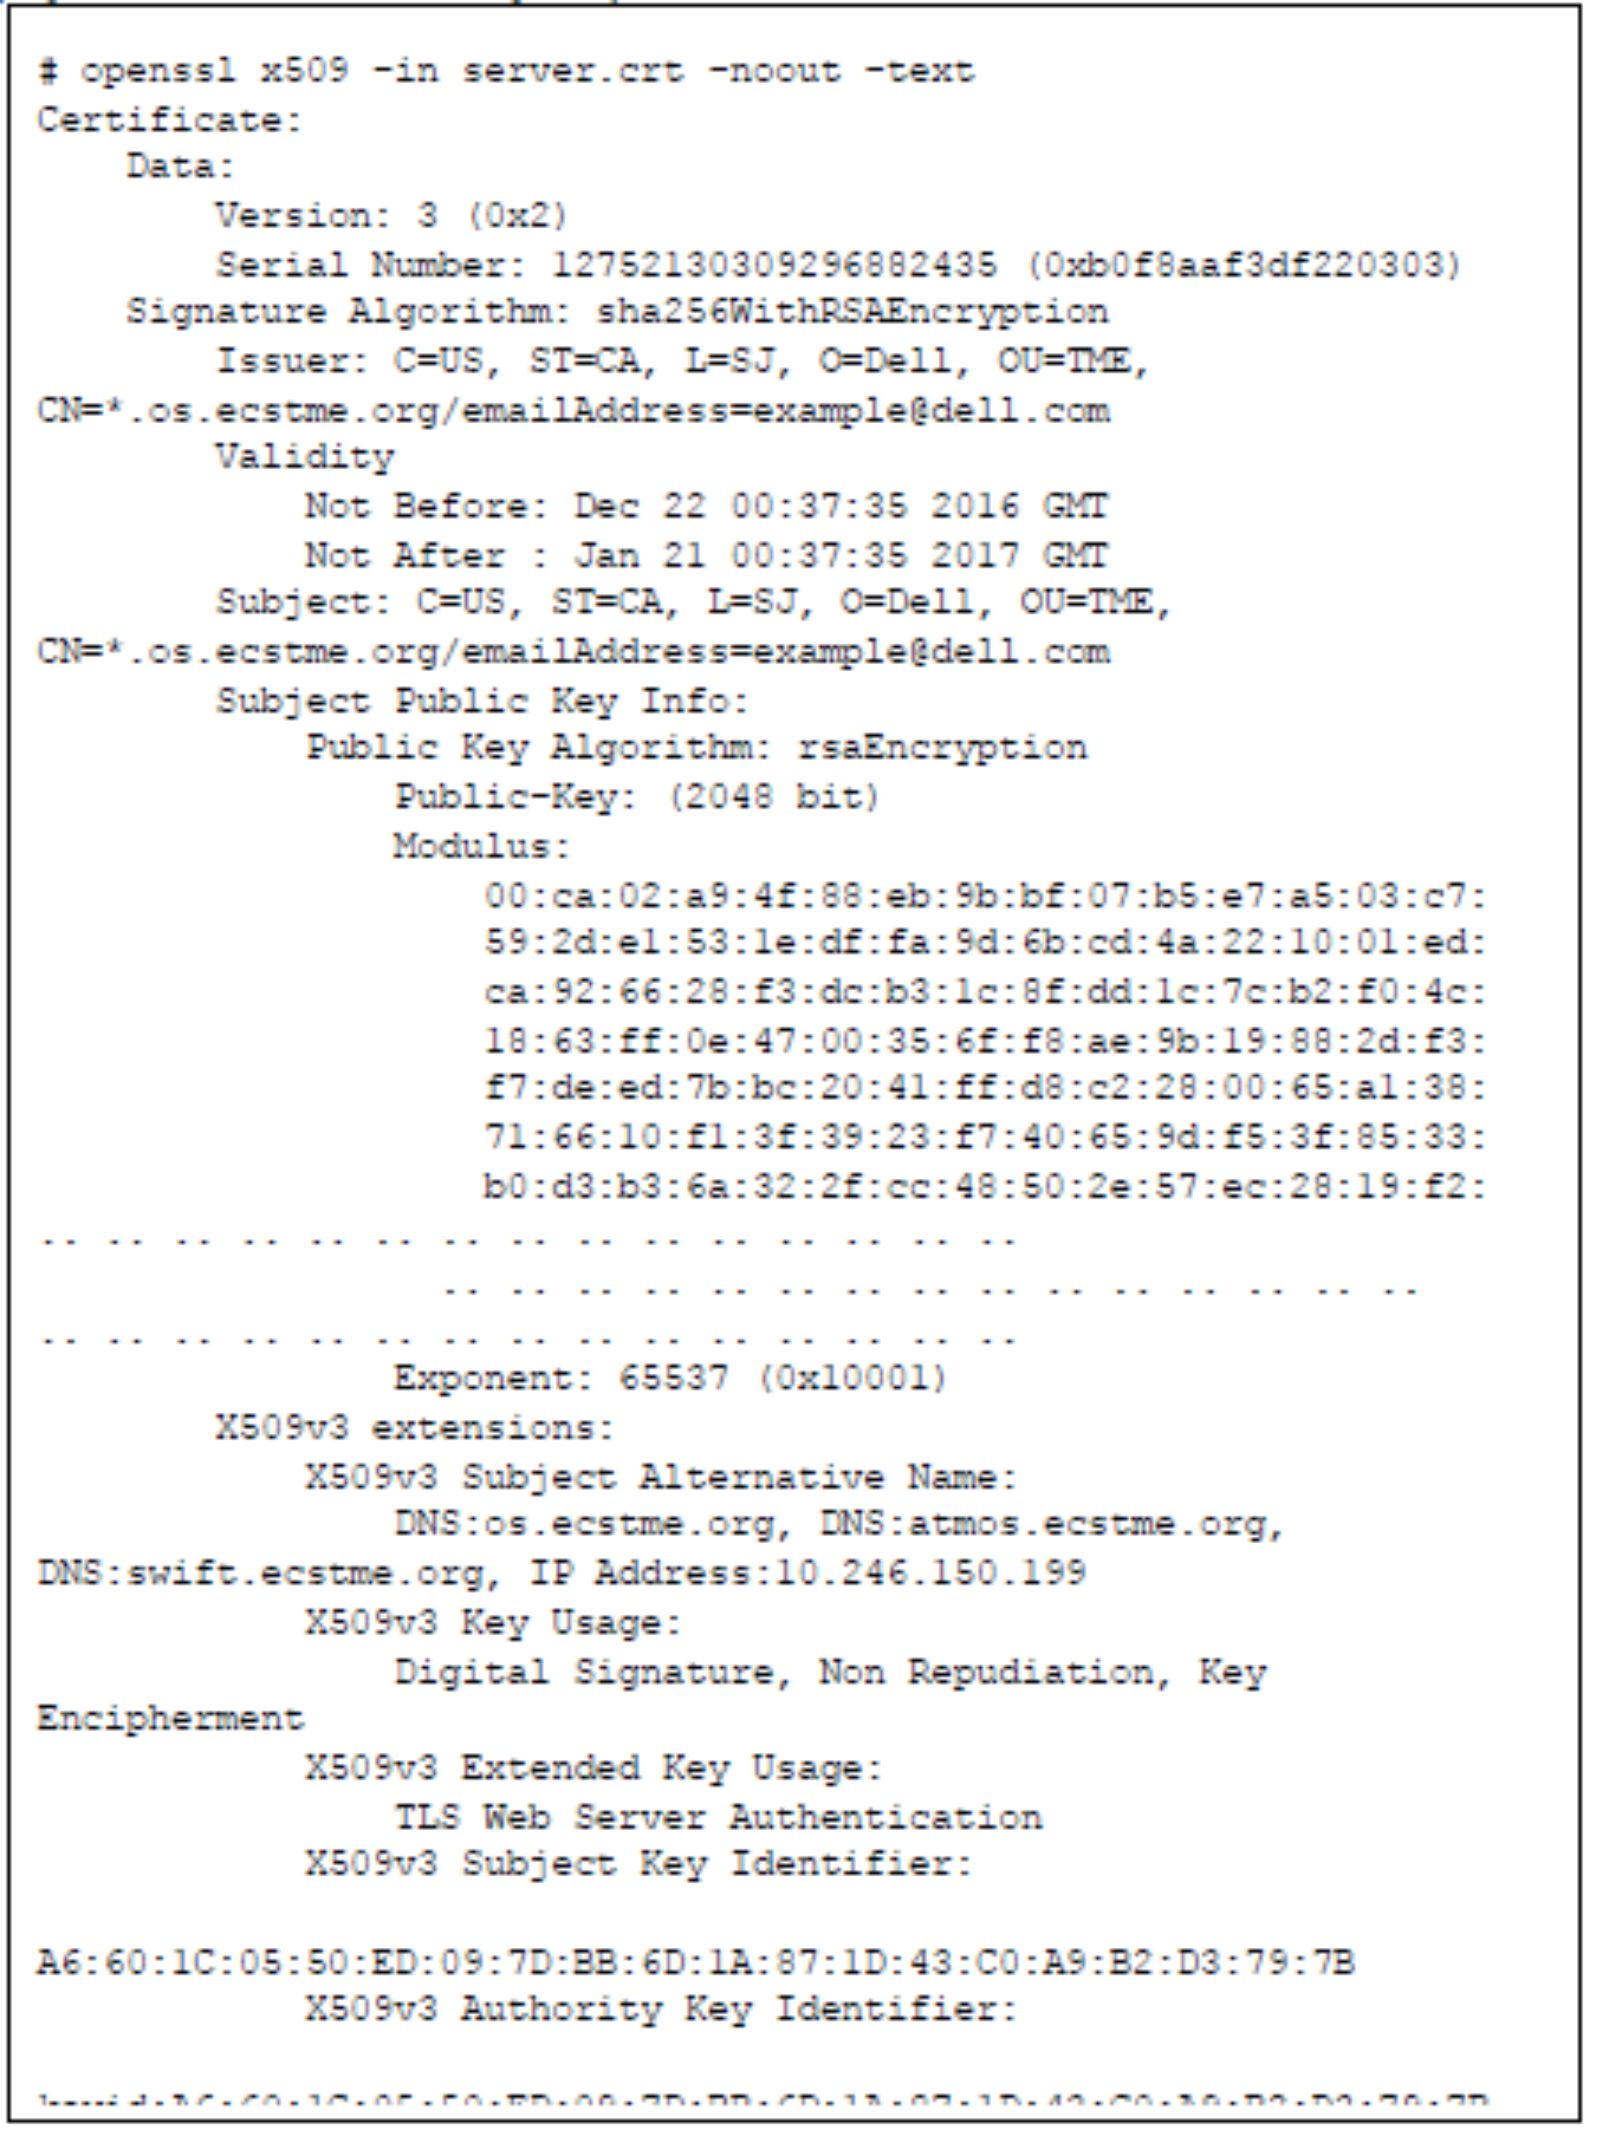
Figure 29. Example of text output of certificate request
Step 4: Combining the private key with certificate file
After the certificate files have been created, HAProxy requires the private key to be combined with the certificate file. If your certificate was signed by a CA, the intermediate CA files and certificate chain file would need to also be appended to the certificate signing request prior to combining with the private key. The following figure illustrates how to extract the private key by removing the password, concatenate it with a self-signed certificate file to generate a combined file and then placing the combined file in HAProxy directory.

Figure 30. Example of commands for combining the private key with certificate
Once the certificate generation has been completed, the frontend definition in HAProxy configuration file, “haproxy.cfg”, for https can be defined. Figure 31 provides an example of a frontend for handling https request. In this example the, SSL is terminated at the HAProxy load balancer and thus certificates will not need to be created for the ECS nodes and the same backend using the non-SSL ports of the ECS nodes will be used as previously defined in the http section. Check the validity of the configuration file and restart haproxy service to put in effect the load balancing directives defined for “https-in”.

Figure 31. Frontend definitions for HTTPS
S3 Browser can be used to validate that “https” traffic and SSL certificates are going thru HAProxy. For S3 Browser, edit the account and place a checkmark in “Use secure transfer (SSL/TLS) box as pictured in the following figure.
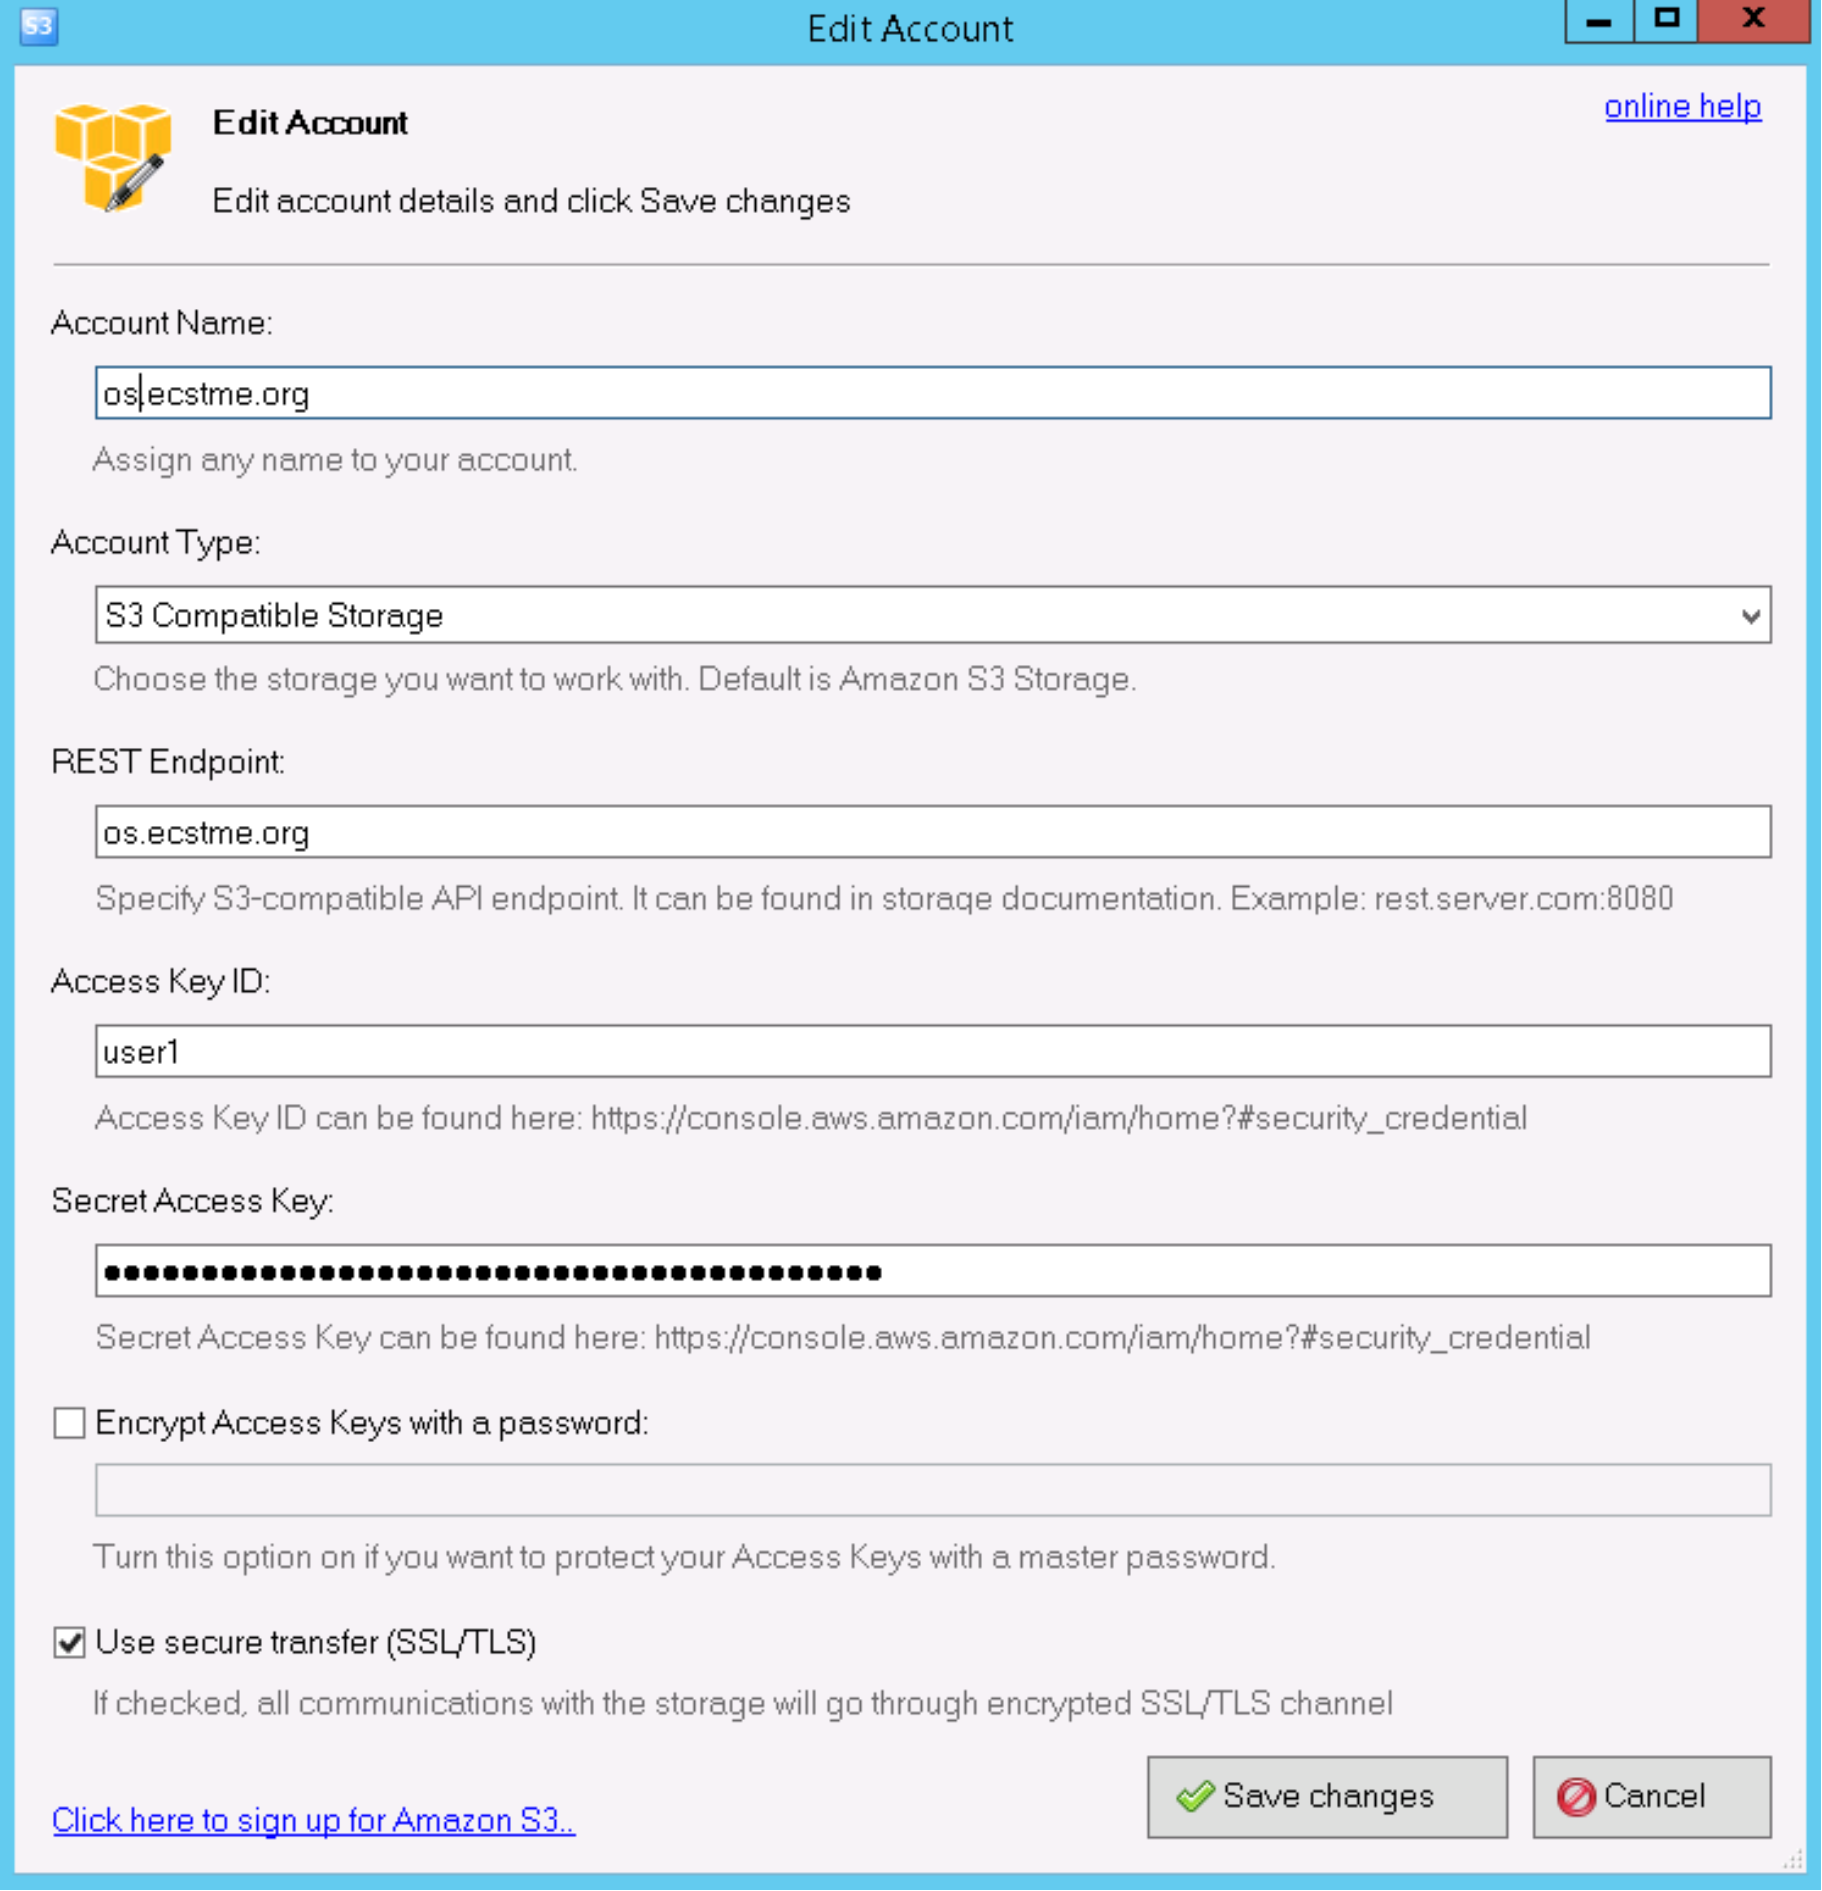
Figure 32. S3 Browser options to enable HTTPS
NFS
ECS NFS implementation utilizes server-side metadata caching and the cache exists locally on each node. Thus, it is important that NFS requests are handled by the same backend ECS node and a load balancer is used predominately for high availability purposes for NFS. If one of the ECS nodes currently serving NFS request fails, then HAProxy will redirect requests to another ECS node.
The Linux server that is hosting HAProxy should not be running “rpcbind” otherwise there will be a conflict when setting up HAProxy to forward NFS requests to ECS. If “rpcbind” is installed by default in the operating system, disable or remove.
Similar to the HTTP default definitions, there will be a set of defaults specifically for NFS requests as shown in Figure 33. The defaults will apply to all sections defined below the defaults NFS section. Thus, in the defaults section, the mode, timeouts and balance algorithm for NFS are defined. For NFS, tcp mode or Layer 4 is used such that traffic is directly passed thru to the ECS Nodes for handling. Also, the load balance algorithm “source” is used. With load balance of source, backend server is selected based on a hash of the source IP such as the user IP address to ensure request goes to the same server until something changes in the hash (i.e., one backend server goes down).

Figure 33. Defaults for NFS requests
HAProxy will listen for requests on ports 2049, 111, and 10000 where NFS service and daemons such as nfsd, mountd, nlockmgr and portmapper are listening to on the ECS nodes. As shown in the example directives in Figure 34, there is a frontend and backend handler defined for each port. The backend defines the list of ECS nodes with the appropriate port. It is assumed that ECS has been configured to support file and the exports and user and group mappings have been configured appropriately for NFS. The HAProxy IP or hostname should be added to the exports hosts in ECS. Each backend server definitions has a check to conduct availability checks on each backend server. If the server check fails, then requests will be forwarded to another backend server on the list.

Figure 34. Example frontend and backend definitions for NFS
The configuration file should be checked using the “haproxy –f haproxcy.cfg –c” command and the HAProxy service would need to be restarted using command “service haproxy restart” to pick up the changes to the haproxy.cfg. If using HAProxy version 1.7.10 or later, refer to Appendix A: Other configuration examples for another example that simplifies the frontend and backend definitions to handle NFS requests and provides an approach that improves this example by implementing stick tables.
As mentioned previously, ECS should have the File exports and user mappings configured prior to mount as pictured in Figure 35 and Figure 36 respectively. Then from an NFS client, another server different from HAProxy server, issue a mount command specifying the IP or name of HAProxy, port 2049 and NFS version 3. Figure 37 shows the example “mount” command and output of “df” command to illustrate the success of the mount. There should be an equivalent user in the Linux client with the same userid (506, in this example) specified as in ECS to access data as shown in Figure 38.
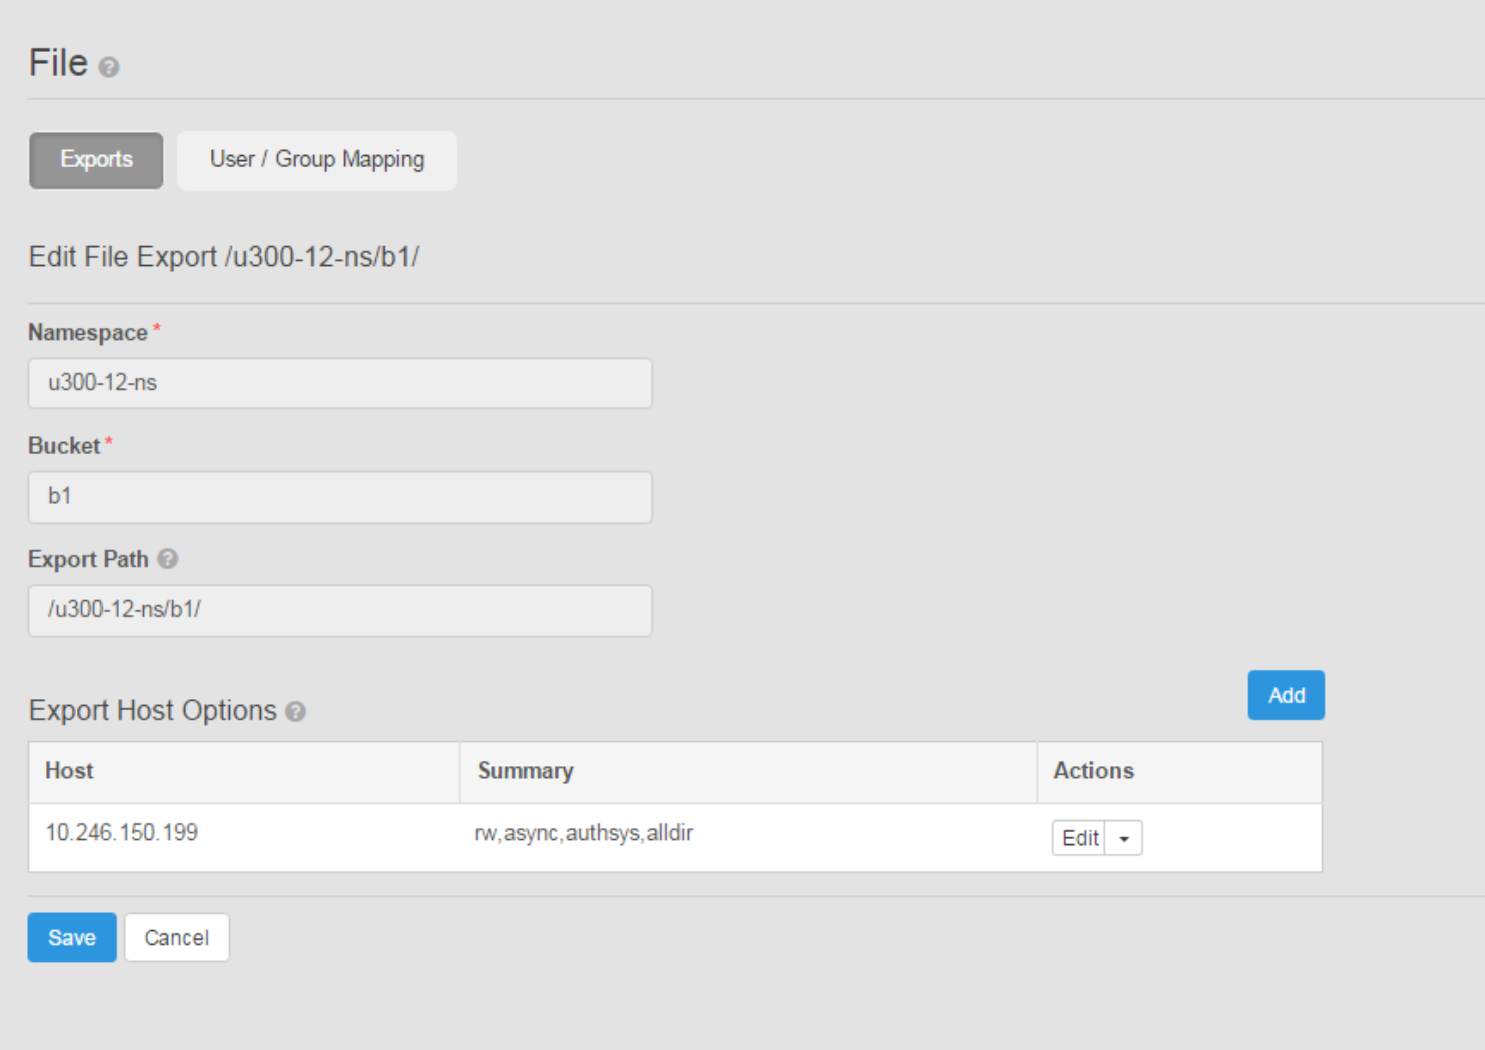
Figure 35. Example of file export settings in ECS
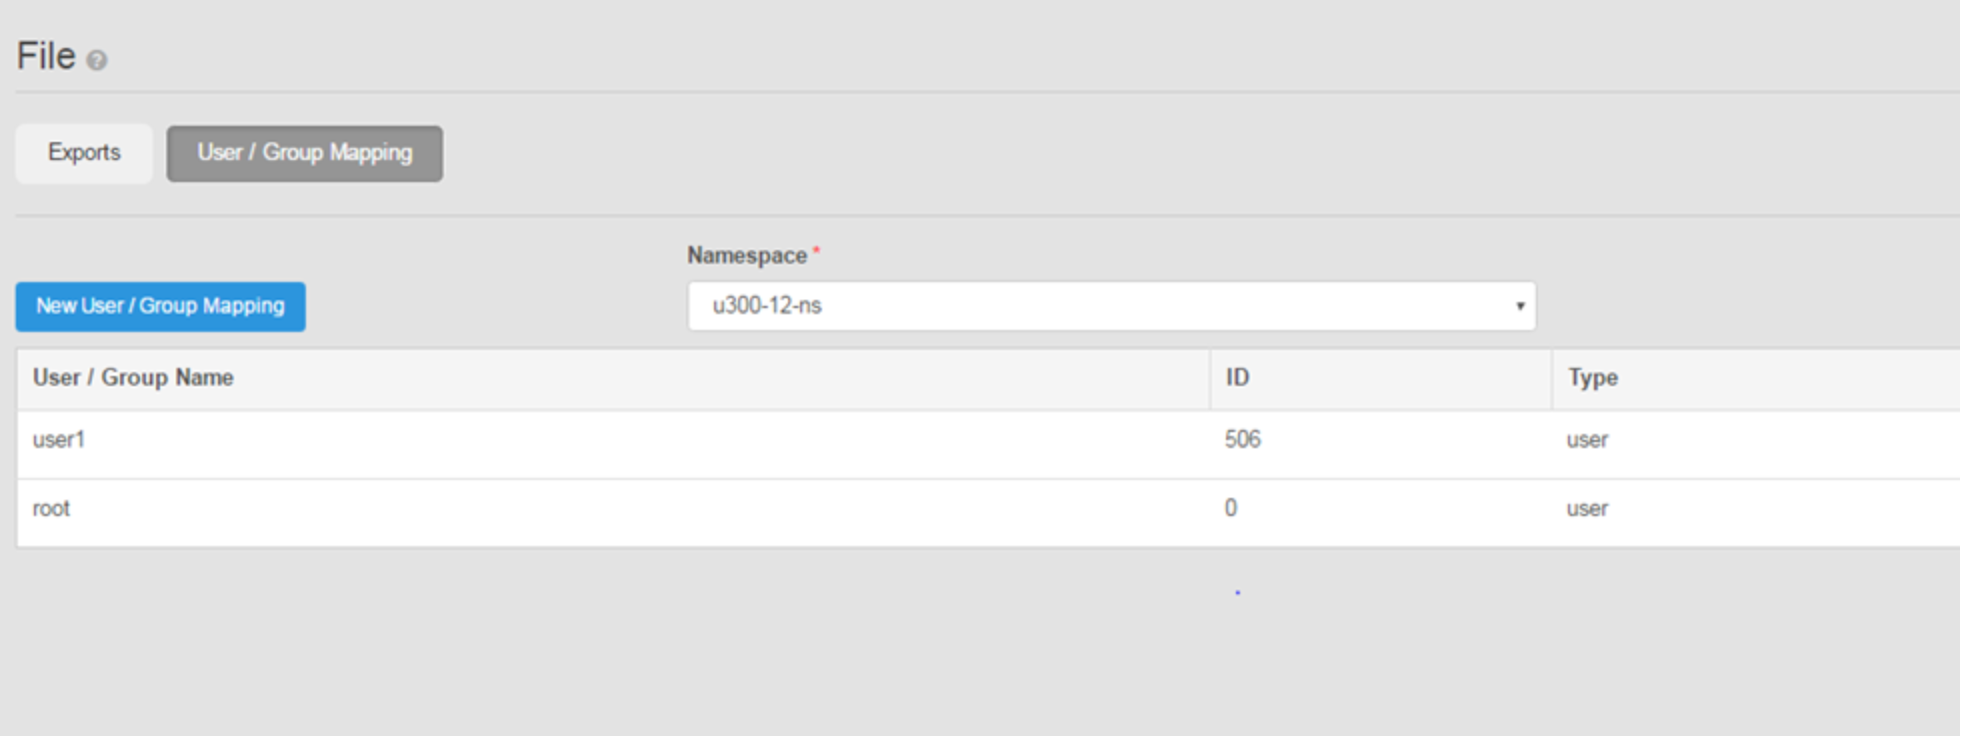
Figure 36. Example of user mapping settings in ECS
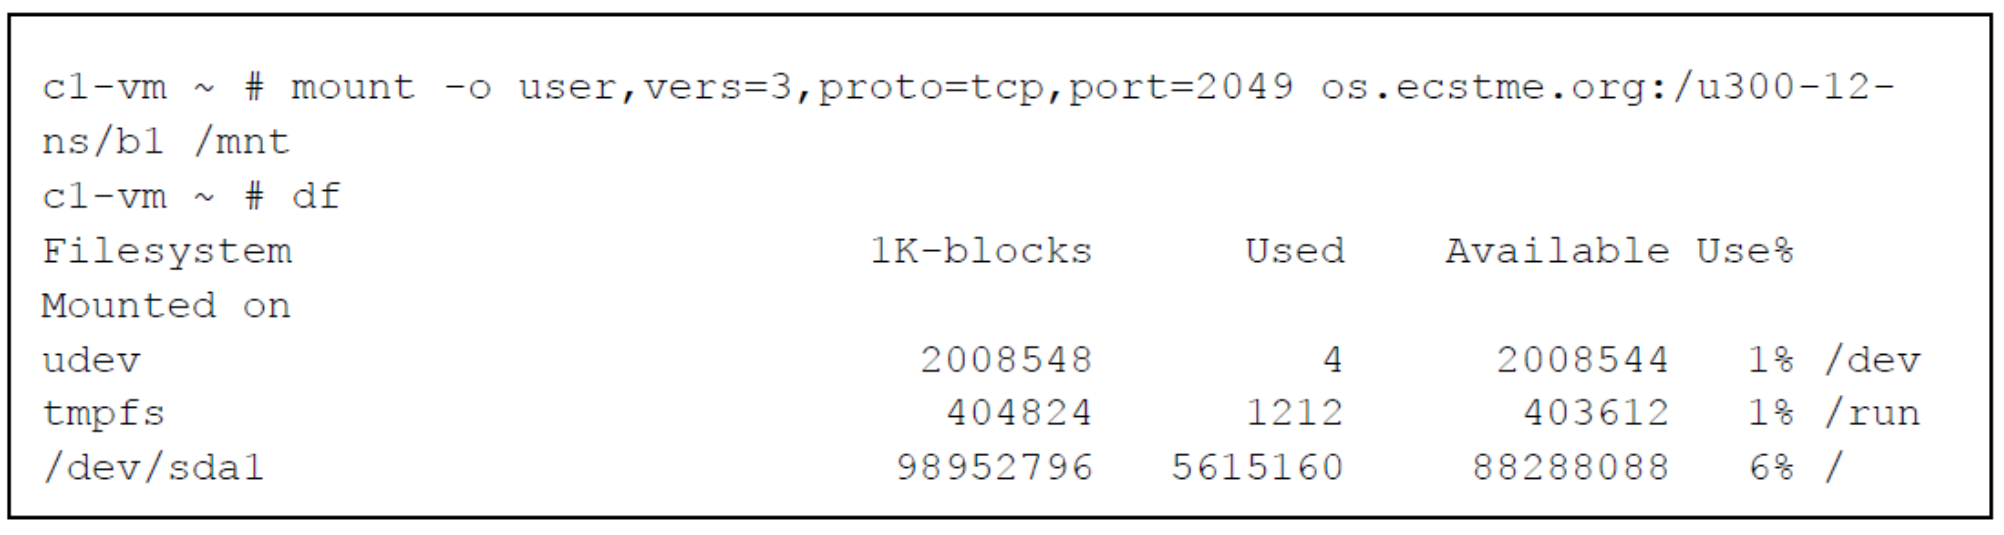
Figure 37. Example "mount" and "df" command
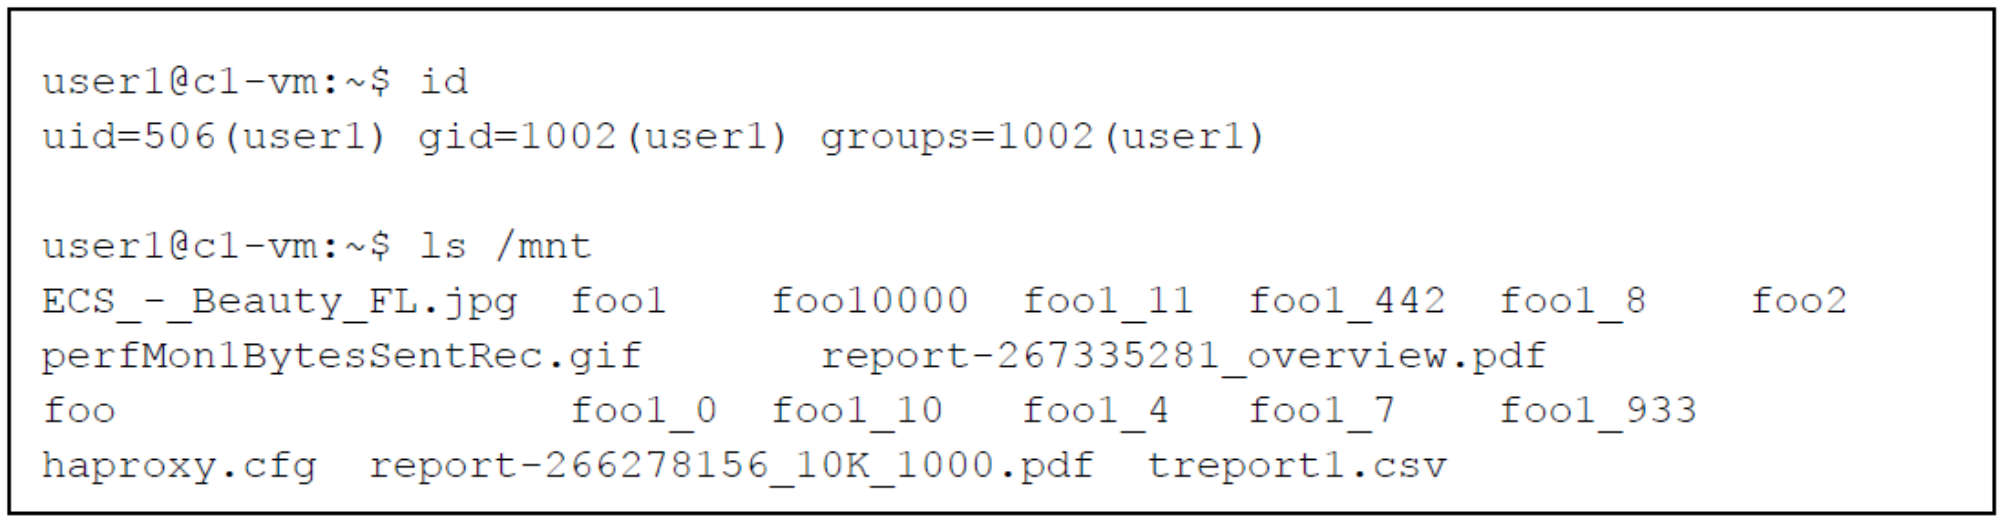
Figure 38. Example output of user ID on Linux client and "ls"
Monitoring
HAProxy provides a web monitoring capability that shows how much bandwidth is used, which backend ECS nodes are up or down, how many clients are connected, the number of bytes in and out, errors, warnings and much more. Monitoring information is also available to be exported in comma separated value (CSV) format. Tools can take advantage of this feature to provide a more enhanced experience such as adding graphs, charts and trending views. To set this up, the lines shown in the following figure would need to be added to end of the haproxy.cfg file.

Figure 39. Example of HAProxy definitions for web monitoring
An example of HAProxy web monitoring page is pictured in the following figure. When accessing the Web Monitoring page, the username and password is indicated by the “stats auth” line which in this example is “stats:password”.
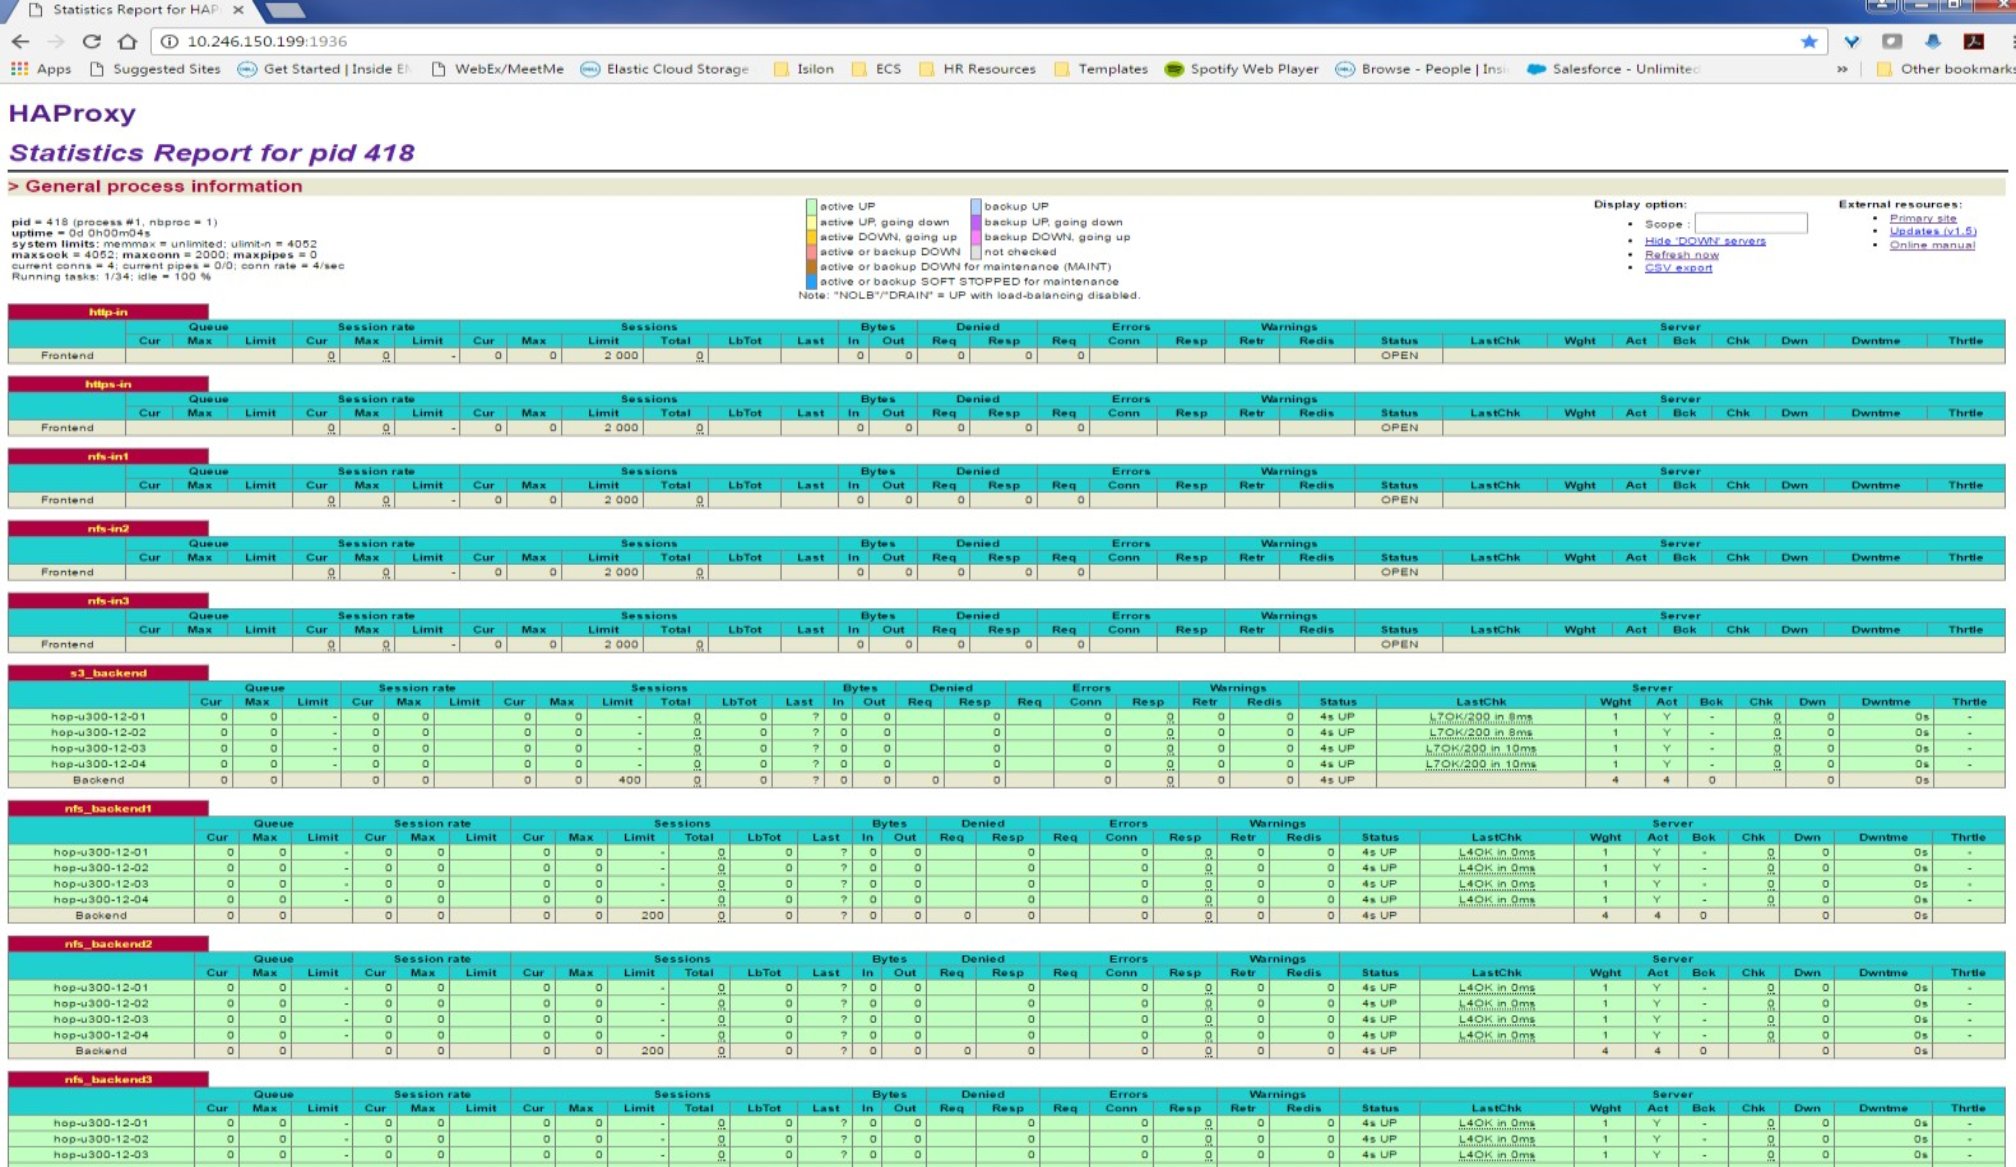
Figure 40. Example of HAProxy web monitoring page