
Dell Unity Service Scripts
Dell Unity Service Scripts
-
Dell Unity can run service commands from the Unity service account. Some service commands provide more ability to monitor and manage Unity. Some service commands provide the ability to:
- In unified configurations, determine the current setting of Unity’s rsize and wsize of the NFS buffer. Knowing the current setting of Unity’s rsize and wsize is useful when configuring and tuning Oracle dNFS.
- Check NFS network performance metrics.
Service commands are intended for the Storage Administrator, field services, and support personal. Since the scripts require a lower level of system control, use care when processing the scripts.
NOTE: Users should be familiar with Linux, Unity installed hardware, and the Unity operating system. Some service scripts must not be run without the approval from your authorized service representative or support personnel. Contact your service representative or support for guidance in using the service commands.
Service commands are run from Unity’s service account and require SSH to be enabled in Unity. The service account password is initially defined when Unity is deployed and configured. By default, the password is the same as the admin password but can be changed during deployment.
When connecting to Unity using SSH, the SSH client should use Unity’s Unisphere’s IP address.
Once connected to the service account, to see a list of available service commands, type svc_help.
The remainder of this section shows several use cases with several service commands:
- Enable/disabling/viewing nfs.transChecksum in Unity when using Oracle direct nfs (dNFS)
- Display/change Unity’s current nfs v3 buffer sizes
Unity’s nfs.transChecksum parameter
To use Oracle dNFS with Unity storage, use NFS protocol NFSv3, and enable Unity’s nfs.transChecksum parameter (set to 1). This parameter ensures that each transaction carries a unique ID and avoids the possibility of conflicting IDs that result from the reuse of relinquished ports.
Determine if nfs.transChecksum is enabled or disabled
To display the current value of nfs.transChecksum, perform the following service command in an ssh session to the IP address of Unisphere:
svc_nas <NAS Server name> -param -facility nfs -info transChecksumThis service command will return a number of parameters and their current value. If the value returned for parameter current_value is 0, then nfs.transChecksum is disabled. If its value is 1, then nfs.transChecksum is enabled.
Enable Unity’s nfs.transChecksum
To enable nfs.transChecksum, shutdown all Oracle resources that reside on the NAS Server where the nfs.transChecksum will be enabled. Then proceed with the following steps:
- Record the current nfs.transChecksum value (see Determine if nfs.transChecksum is enabled or disabled)
- Perform the following service command to change the value of nfs.transChecksum to 1 which will enable nfs.transChecksum.
svc_nas <NAS Server name> -param -facility nfs -modify transChecksum -value 1
- Perform the following service command to verify that the value of nfs.transChecksum was changed. The service command will return a number of parameters. If parameter current_value is 1, then nfs.transChecksum was changed correctly.
svc_nas <NAS Server name> -param -facility nfs -info transChecksum
- Perform the following service command to restart the NAS server that had its transChecksum value changed.
svc_nas <NAS Server name> -restart
Disable Unity’s nfs transChecksum
To disable nfs.transChecksum, shutdown all Oracle resources that reside on the NAS Server where the nfs.transChecksum will be enabled. Then, perform the following to disable nfs.transChecksum:
svc_nas ORA-ASM-NAS -param -facility nfs -info transChecksum
svc_nas <NAS Server name> -param -facility nfs -modify transChecksum -value 0
svc_nas ORA-ASM-NAS -param -facility nfs -info transChecksum
svc_nas <NAS Server name> -restart
svc_nas ORA-ASM-NAS -param -facility nfs -info transChecksum
Note: Only disable nfs.transChecksum if Oracle dNFS will no longer be used. nfs.transChecksum ensures that each database transaction carries a unique ID and avoids the possibility of conflicting IDs that result from the reuse of relinquished ports.
Unity’s nfs.v3xfersize parameter
It may be advantageous to change the size of Unity’s nfs buffer. When mounting a Unity NFS filesystem on a client, the filesystem should be mounted with wsize and rsize equal to the size of the Unity NFS buffer.
Display Unity’s current nfs v3 buffer sizes
To display the current size and range of Unity’s NFSv3 I/O transfer buffer size, process the following service command.
svc_nas <NAS server name> -param -facility nfs -info v3xfersize
The output from this command is helpful when configuring NFS, especially when using Oracle dNFS. When mounting the NFS filesystem serviced by the Unity NAS Server, set the rsize and wsize to the value of parameter current_value reported by the Unity service command:
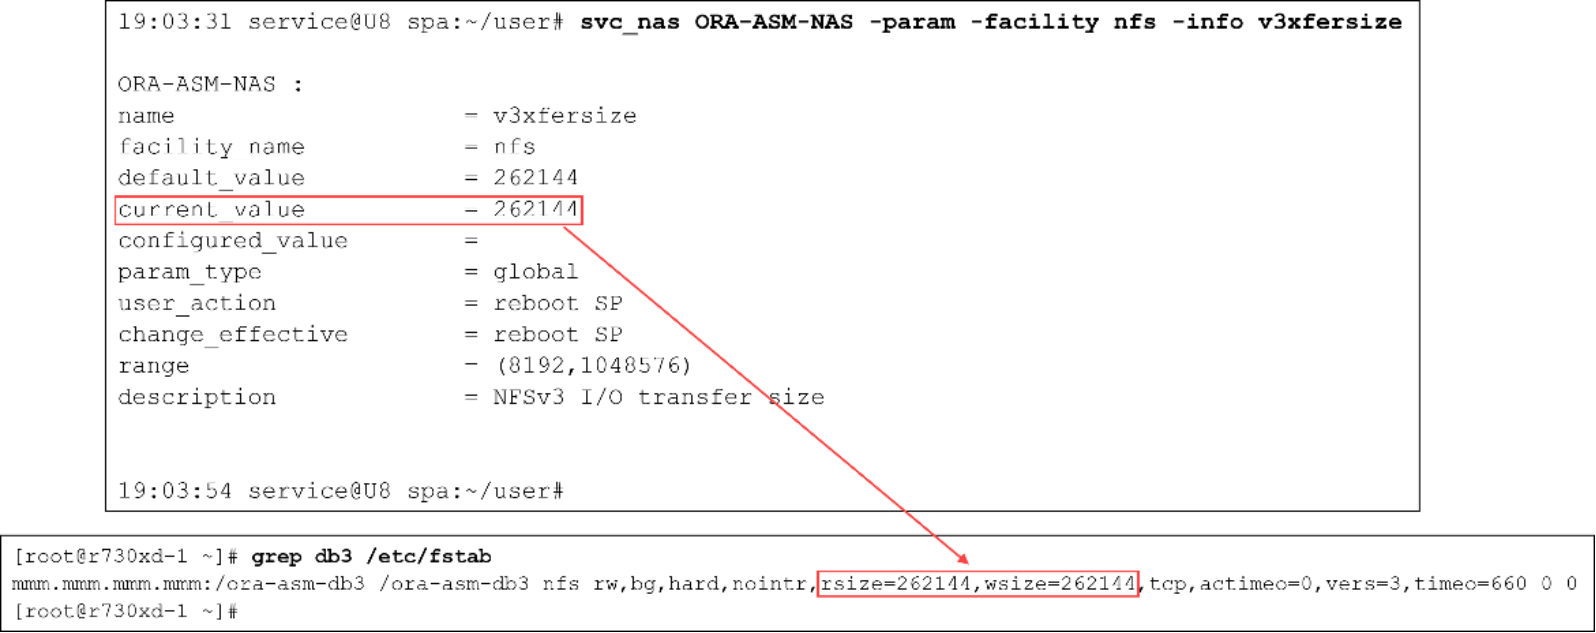
Figure 1. Mount the filesystem on the client and set w/rsize to Unity’s NFS buffer size.
It is recommended to test these changes in a nonproduction environment before changing them in production.
Changing Unity’s nfs v3 buffer sizes
To change the size of Unity’s NFSv3 I/O transfer buffer, perform the following steps.
Notes:
1) Contact your Dell Technologies service representative for guidance in this process.
2) The process will change the buffer sizes for all NAS servers on SP A and SP B, and will require a reboot of both the local and peer SPs.- Perform the following service command and record the value of nfs.v3xfersize’s parameter “configured_value”.
svc_nas <NAS name> -param -facility nfs -info v3xfersize
- Change the NFSv3 buffer size by performing the following service command. Set the value of v3xfersize’s parameter “configured_value” to <new-value>, the new wanted size.
svc_nas ALL -param -facility nfs -modify v3xfersize -value <new-value>
- Verify the change was recorded and configured correctly by performing the following service command. The returned value of parameter “configured_value” should be set to the new value.
svc_nas <NAS name> -param -facility nfs -info v3xfersize
- Reboot the local SP by performing the following service command.
svc_shutdown -r
- After the reboot, what was the peer SP will become the primary SP. Perform the following service command to verify that parameter “configured_value” on the new primary SP is the value set in step 2.
svc_nas <NAS name> -param -facility nfs -info v3xfersize
- Make the new value active by rebooting the new local SP. To reboot the SP, perform the following service command (SP A will again become the new local SP)
svc_shutdown -r
- Verify the nfs.v3xfersize buffer size, parameter current_value, is active on SP A, SP B, and on all NAS Servers. To verify, perform the following service command.
svc_nas ALL -param -facility nfs -info v3xfersize